Traffic lanes isolate specific service versions into independent runtime environments and route matching requests through an entire call chain -- without any application code changes. This enables end-to-end canary releases across multiple services simultaneously.
Why traffic lanes
Standard Kubernetes canary deployments couple traffic distribution with replica counts: sending 10% of traffic to a canary requires 1 canary replica alongside 9 stable replicas. This approach breaks down in two scenarios:
Multi-service call chains. A request flowing through services A, B, and C needs consistent version routing at every hop. Kubernetes provides no built-in mechanism for this.
Independent scaling. With lanes, traffic distribution and replica counts are fully decoupled. A single canary replica receives exactly the traffic percentage you specify, regardless of how many stable replicas are running.
ASM traffic lanes solve both problems by tagging requests at the ingress gateway and propagating the tag across the entire call chain.
How it works
Configuring lanes through the console generates three Istio resources automatically:
| Resource | Purpose |
|---|---|
| TrafficLabel | Assigns a label to each request based on the ASM_TRAFFIC_TAG pod label |
| DestinationRule | Maps lane names to service version subsets |
| VirtualService | Routes requests to the correct subset based on the x-asm-prefer-tag header and URI |
Routing flow:
A request arrives at the ingress gateway with the header
x-asm-prefer-tag: <lane-name>.The VirtualService matches the header and URI, then routes the request to the corresponding subset of the first service.
The TrafficLabel propagates the lane tag through subsequent service-to-service calls, keeping the request within the same lane for the entire call chain.
Scenario overview
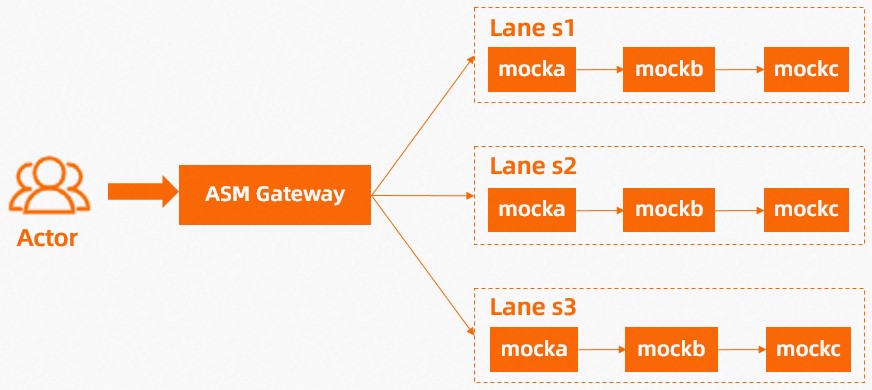
This tutorial deploys three lanes (s1, s2, s3), each containing three services (mocka, mockb, mockc) bound to different versions:
| Lane | Service tag | Services |
|---|---|---|
| s1 | v1 | mocka, mockb, mockc |
| s2 | v2 | mocka, mockb, mockc |
| s3 | v3 | mocka, mockb, mockc |
After setup, requests with x-asm-prefer-tag: s1 flow exclusively through v1 of all three services, requests with s2 through v2, and requests with s3 through v3.
Prerequisites
Before you begin, make sure that you have:
An ASM instance of Enterprise Edition or Ultimate Edition, version 1.17.2.22 or later. For more information, see Create an ASM instance or Update an ASM instance
A cluster added to the ASM instance. For more information, see Add a cluster to an ASM instance
An ASM gateway named
ingressgateway. For more information, see Create an ingress gateway serviceAn Istio gateway named
ingressgatewayin theistio-systemnamespace. For more information, see Manage Istio gateways
Step 1: Deploy sample services
Enable automatic sidecar proxy injection
Log on to the ASM console. In the left-side navigation pane, choose Service Mesh > Mesh Management.
On the Mesh Management page, click the name of the ASM instance. In the left-side navigation pane, choose ASM Instance > Global Namespace.
On the Global Namespace page, find the default namespace and click Enable Automatic Sidecar Injection in the Automatic Sidecar Injection column. In the Submit message, click OK.
For more information, see Enable automatic sidecar proxy injection.
Deploy the services
Deploy v1, v2, and v3 of the sample services in the ACK cluster:
kubectl apply -f https://alibabacloudservicemesh.oss-cn-beijing.aliyuncs.com/asm-labs/swimlane/v1/application-v1.yaml
kubectl apply -f https://alibabacloudservicemesh.oss-cn-beijing.aliyuncs.com/asm-labs/swimlane/v2/application-v2.yaml
kubectl apply -f https://alibabacloudservicemesh.oss-cn-beijing.aliyuncs.com/asm-labs/swimlane/v3/application-v3.yaml
Step 2: Create a lane group and lanes
Create a lane group
Log on to the ASM console. In the left-side navigation pane, choose Service Mesh > Mesh Management.
On the Mesh Management page, click the name of the ASM instance. In the left-side navigation pane, choose Traffic Management Center > Traffic Lane.
On the Traffic Lane page, click Create Swimlane Group. In the Create Swimlane Group panel, configure the following parameters and click OK.
| Parameter | Value |
|---|---|
| Name of swim lane group | test |
| Entrance gateway | ingressgateway |
| Swimlane Services | Select the ACK cluster from the Kubernetes Clusters drop-down list and select default from the Namespace drop-down list. Select mocka, mockb, and mockc in the service list, then click the |
After you create the lane group, ASM generates a TrafficLabel resource:
Create lanes
Create three lanes (s1, s2, s3) and bind each to the corresponding service version. The following steps show how to create the s1 lane. Repeat the same process for s2 (service tag: v2) and s3 (service tag: v3).
In the Traffic Rule Definition section of the Traffic Lane page, click Create swimlanes.
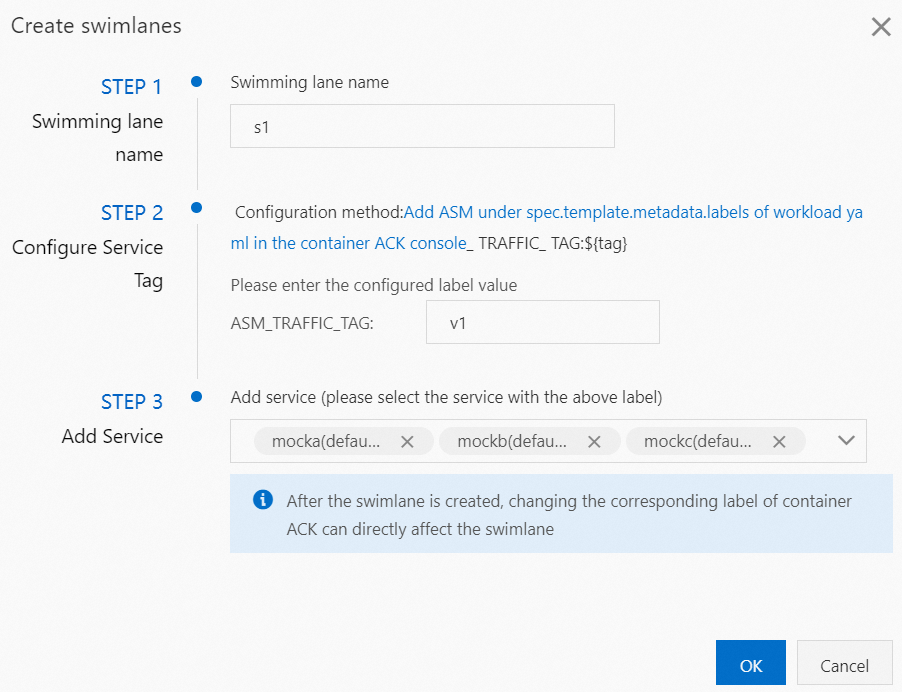
In the Create swimlanes dialog box, configure the following parameters and click OK.
| Parameter | Value |
|---|---|
| Swimlane Name | s1 |
| Configure Service Tag | v1 |
| Add Service | Select mocka(default), mockb(default), and mockc(default) |
Requests with the header x-asm-prefer-tag: s1 are routed to the v1 subset of each service.
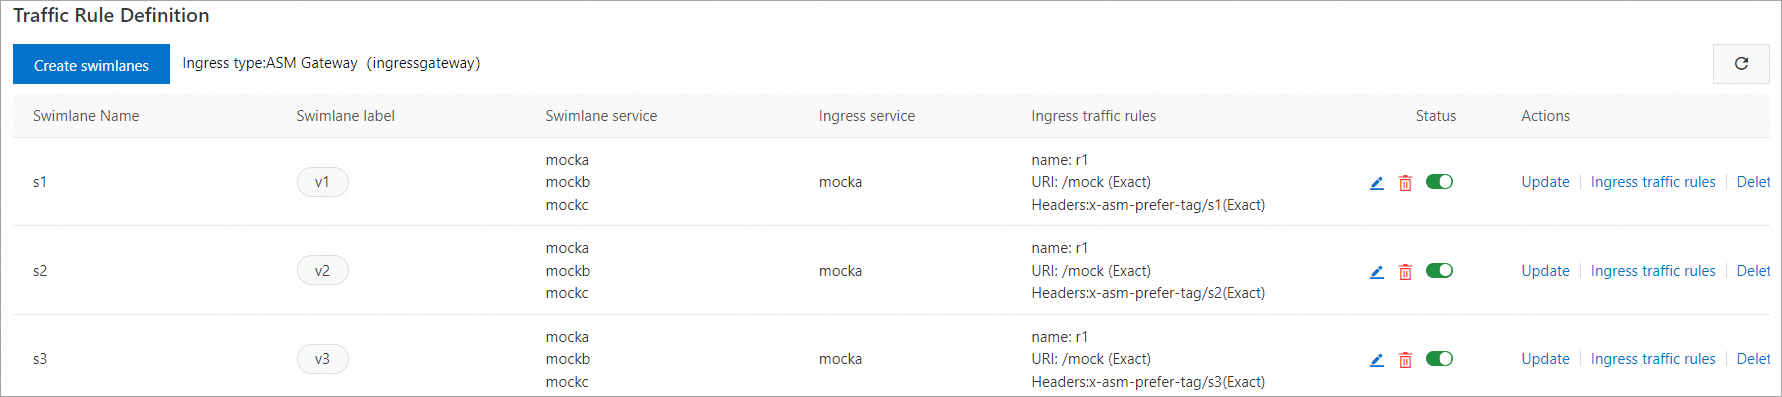
After you create all three lanes, the Traffic Rule Definition section displays them as follows:

Each lane creation generates a DestinationRule. The following example shows the DestinationRule for the s1 lane:
Create ingress traffic rules
Create a traffic routing rule for each lane. The following steps show how to create a rule for the s1 lane. Repeat the same process for s2 and s3.
This example assumes all lane services share the inbound request path /mock.
In the Traffic Rule Definition section of the Traffic Lane page, find the target lane and click Ingress traffic rules in the Actions column.
In the Add drainage rule dialog box, configure the following parameters and click OK.
| Parameter | Value |
|---|---|
| Ingress service | mocka.default.svc.cluster.local |
| Ingress traffic rules | Name: r1, realm name: * |
| Matching request URI | Method: Exact, Content: /mock |
After you create traffic routing rules for all three lanes, the Traffic Rule Definition section displays them as follows:
ASM generates a VirtualService that routes requests based on the x-asm-prefer-tag header:
Step 3: Verify the end-to-end canary release
Get the gateway IP address
Get the public IP address of the ASM ingress gateway. For details, see Step 2 in Integrate the cloud-native inference service KServe with ASM.
Set the IP address as an environment variable. Replace <gateway-ip-address> with the actual public IP address.
export ASM_GATEWAY_IP=<gateway-ip-address>Test each lane
Send 100 requests to each lane and verify that traffic stays within the expected service versions.
Lane s1 (expected: all v1):
for i in {1..100}; do curl -H 'x-asm-prefer-tag: s1' http://${ASM_GATEWAY_IP}/mock; echo ''; sleep 1; done;Expected output:
-> mocka(version: v1, ip: 172.17.0.54)-> mockb(version: v1, ip: 172.17.0.129)-> mockc(version: v1, ip: 172.17.0.130)All three services return v1, confirming that requests tagged with x-asm-prefer-tag: s1 route exclusively through the s1 lane.
Lane s2 (expected: all v2):
for i in {1..100}; do curl -H 'x-asm-prefer-tag: s2' http://${ASM_GATEWAY_IP}/mock; echo ''; sleep 1; done;Expected output:
-> mocka(version: v2, ip: 172.17.0.9)-> mockb(version: v2, ip: 172.17.0.126)-> mockc(version: v2, ip: 172.17.0.128)Lane s3 (expected: all v3):
for i in {1..100}; do curl -H 'x-asm-prefer-tag: s3' http://${ASM_GATEWAY_IP}/mock; echo ''; sleep 1; done;Expected output:
-> mocka(version: v3, ip: 172.17.0.132)-> mockb(version: v3, ip: 172.17.0.127)-> mockc(version: v3, ip: 172.17.0.69)Troubleshoot routing issues
If any request returns a mismatched version, check the following:
| Symptom | Possible cause | Resolution |
|---|---|---|
| Response shows wrong version | ASM_TRAFFIC_TAG pod labels do not match the service tag configured for the lane | Verify pod labels with kubectl get pods --show-labels and confirm they match the lane configuration |
| No response or 404 | VirtualService route does not match the x-asm-prefer-tag header value or URI | Check the VirtualService YAML to confirm header matching rules and URI path |
| Traffic leaks across lanes | DestinationRule subsets do not correctly map lane names to version labels | Inspect the DestinationRule YAML and verify each subset maps the correct ASM_TRAFFIC_TAG value |
| Intermittent routing failures | Sidecar proxy not injected on some pods | Run kubectl get pods -o jsonpath='{.items[*].spec.containers[*].name}' to confirm the istio-proxy container exists on all pods |
(Optional) Step 4: Check the mesh topology
If Mesh Topology is enabled in the ASM console, inspect the topology graph to visualize the request paths across lanes. For more information, see Enable Mesh Topology to observe an ASM instance in the ASM console.
What to do next
Label traffic -- Learn more about traffic labeling concepts and advanced configurations