When you need to customize access control policies based on your needs, such as authenticating requests based on domain names, paths, and methods in HTTP requests, you can implement custom authorization by using an ingress gateway to ensure that only authenticated users can access key services.
Prerequisites
Feature description
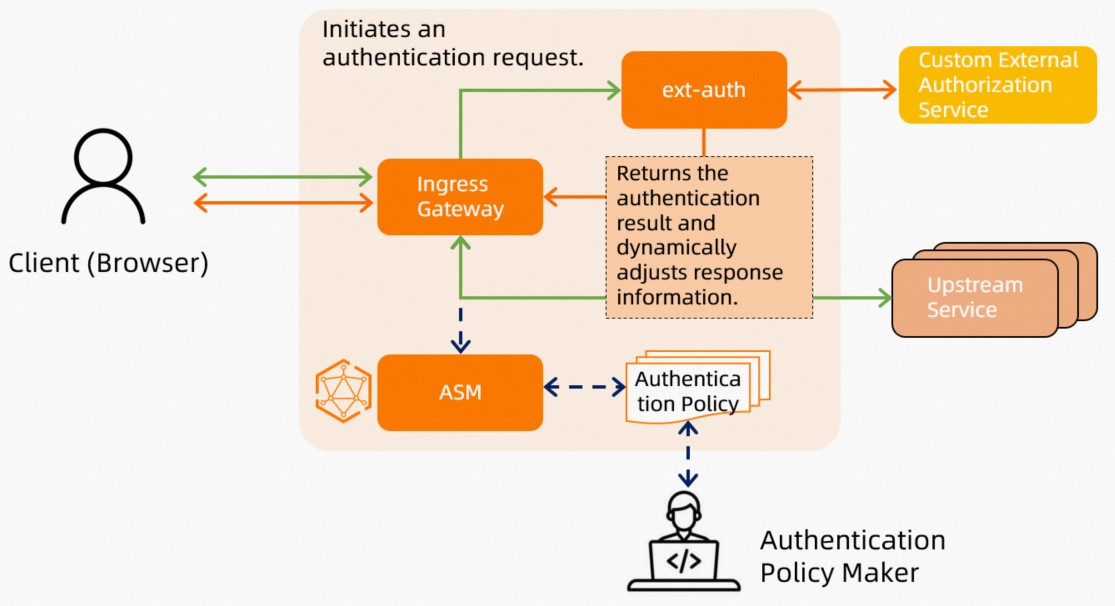
When a user initiates a service request, the backend needs to verify the validity of the user request. For example, the backend checks whether the user has permissions to access the requested resources. If the user passes the authentication, the message returned contains some additional information. For example, the service version number and user ID are added in the response header. Service Mesh (ASM) allows you to define custom authorization services. You can add an authentication process to an ingress gateway to ensure that only authorized users can access key services.
You can customize authorization services based on your business needs. In this example, a custom authorization service is deployed for an ingress gateway to authenticate requests that are routed to the ingress gateway. The requests are allowed or denied based on the authentication results. You need to specify the following configurations:
The information that is required for the ingress gateway to connect with the custom authorization service
The requests that need to be authenticated by using the custom authorization service
Custom authorization is an advanced security feature of Service Mesh. You can use this feature if you have special security requirements. If your security requirements are common, you can configure authorization policies by referring to Configure a blacklist or whitelist for an ingress gateway or the Authorization policies section in the Overview of zero trust security topic.
How to implement custom authorization
ASM encapsulates the custom authorization feature of Istio. For more information about how the custom authorization feature of Istio is implemented, see the native Istio resources that are generated after you configure the custom authorization service. The following example shows how to implement custom authorization in ASM:
Define a custom authorization service and associate this service with the desired ingress gateway in ASM. This way, ASM can use the custom authorization service to perform authentication. For more information about how to define a custom authorization service, see Step 1.
Create an authorization policy in ASM, configure an application that requires custom authorization, and then perform authentication by using the custom authorization service that you configured in Step 2.
Step 1: Deploy a custom authorization service
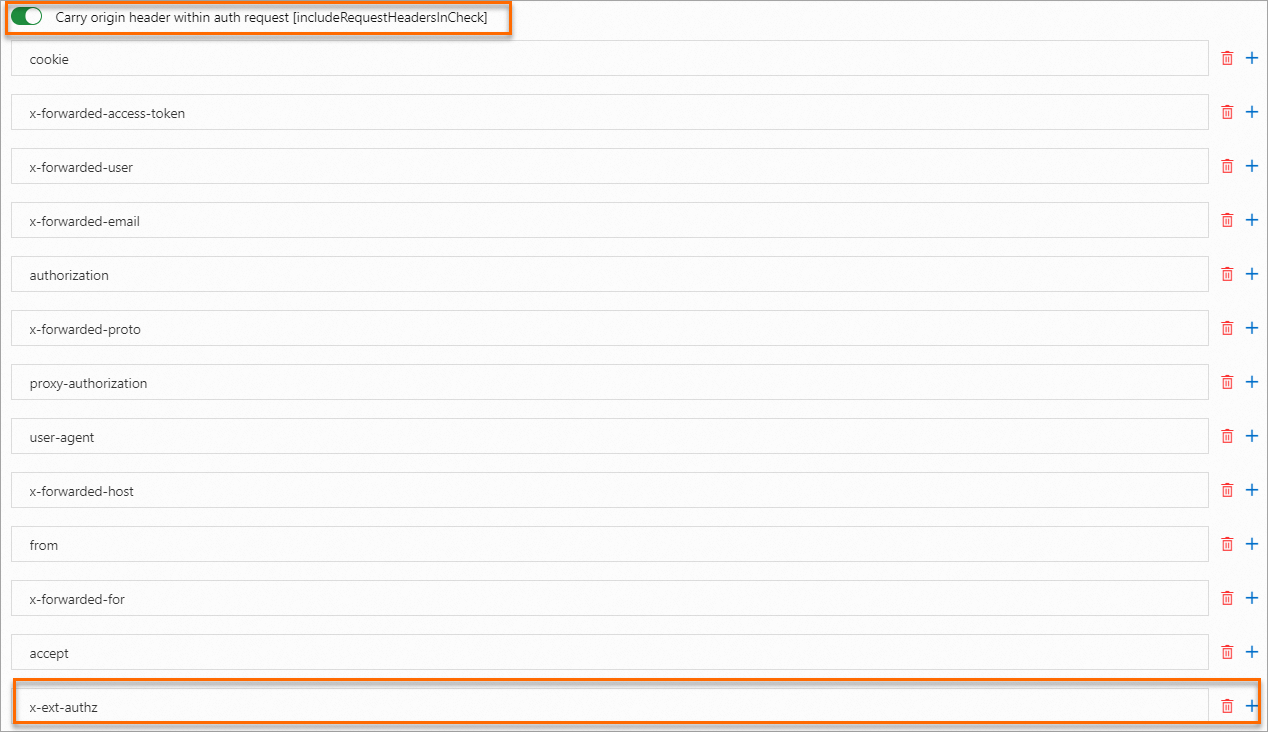
Deploy a custom authorization service in a Container Service for Kubernetes (ACK) cluster. This service must comply with the API specifications of Istio for custom authentication services and support HTTP and gRPC protocols. The sample authorization service provided in this topic specifies that only requests with the x-ext-authz: allow header can pass the authentication.
You can create a custom authorization service based on the sample code in this topic. For more information, see extauthz.
Create an ext-authz.yaml file that contains the following content:
Run the following command to deploy the authorization service in the desired ACK cluster:
For more information about how to use kubectl to manage clusters and applications, see Obtain the kubeconfig file of a cluster and use kubectl to connect to the cluster.
kubectl apply -f ext-authz.yamlRun the following command to query the status of the pod:
kubectl get podExpected output:
NAME                              READY   STATUS    RESTARTS       AGE
ext-authz-6d458d5f8f-bh2m9        2/2     Running   0              1m
Run the following command to check whether the ext-authz service works as expected:
kubectl logs "$(kubectl get pod -l app=ext-authz -n default -o jsonpath={.items..metadata.name})" -n default -c ext-authzExpected output:
2023/12/12 10:01:31 Starting HTTP server at [::]:8000
2023/12/12 10:01:31 Starting gRPC server at [::]:9000
If the preceding result is returned, the ext-authz service works properly. The desired custom authorization service is deployed successfully.
Obtain the gRPC and HTTP ports of the ext-authz service.
Log on to the ACK console. In the left-side navigation pane, click Clusters.
On the Clusters page, click the name of the cluster that you want to manage and choose in the left-side navigation pane.
On the Services page, click ext-authz.
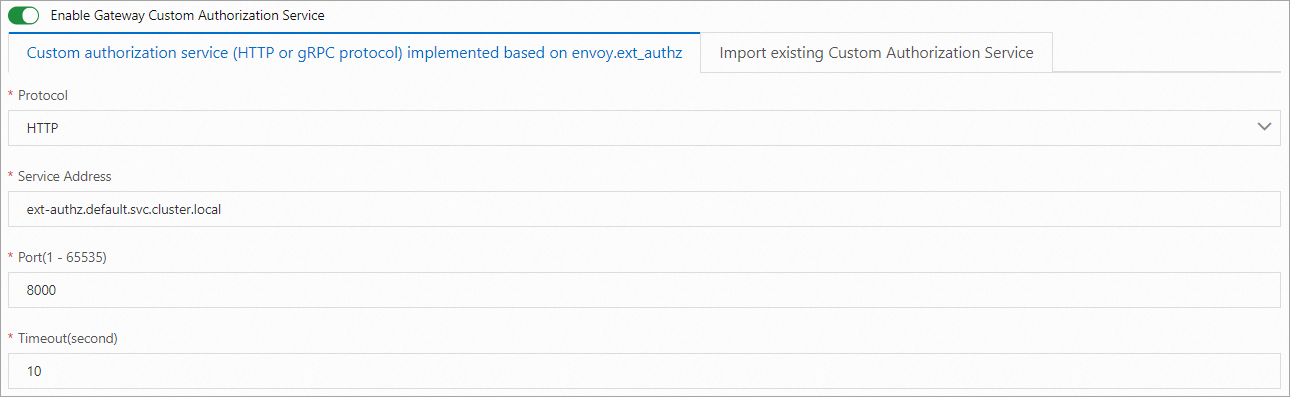
In the Endpoint section, you can see that the port of the gRPC protocol is 9000 and the port of the HTTP protocol is 8000. Therefore, the gRPC address used to access the service is ext-authz.default.svc.cluster.local:9000 and the HTTP address is ext-authz.default.svc.cluster.local:8000.
Step 2: Configure a custom authorization service that uses the HTTP protocol for the desired ingress gateway
Ingress gateways integrate the custom authorization capability. You can configure a custom authorization service in the ASM console.
Log on to the ASM console. In the left-side navigation pane, choose .
On the Mesh Management page, click the name of the ASM instance. In the left-side navigation pane, choose .
On the Ingress Gateway page, click the ingress gateway for which you want to configure a custom authorization service.
In the left-side navigation pane, choose .
In the Custom Authorization Service Configuration step of the configuration wizard, turn on Enable Gateway Custom Authorization Service, use one of the following methods to configure a custom authorization service, and then click Next.
Method 1: Create a custom authorization service
On the Custom authorization service (HTTP or gRPC protocol) implemented based on envoy.ext_authz tab, configure the parameters. For more information about the parameters, see Implement custom authorization by using the HTTP protocol.
Method 2: Import an existing custom authorization service
On the Import existing Custom Authorization Service tab, select an existing custom authorization service.
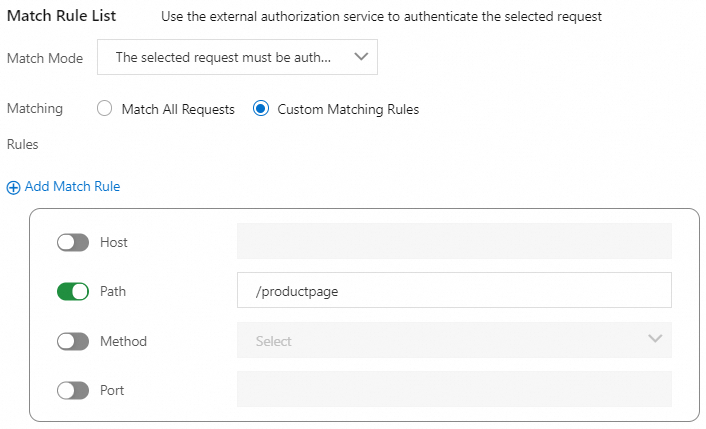
In the Match Rules step of the configuration wizard, configure the parameters and click Submit.
Requests that match this rule will be authenticated by using the authorization service.
After the configuration is complete, the Gateway Custom Authorization Service Created successfully message appears.
Step 3: Verify that custom authorization can be implemented by using the ingress gateway
Run the following command to access the resources in the
/api/v1/productspath on the ingress gateway:For more information about how to obtain the IP address of the ingress gateway, see Substep 1 in Step 3 in Use Istio resources to route traffic to different versions of a service.
curl -I http://{IP address of the ingress gateway}/api/v1/productsExpected output:
HTTP/1.1 200 OK
server: istio-envoy
date: Wed, 13 Dec 2023 02:41:20 GMT
content-type: application/json
content-length: 395
x-envoy-upstream-service-time: 1
The preceding result indicates that custom authorization is not triggered. The reason is that the path is
/api/v1/productsinstead of/productpageconfigured in the preceding step.Run the following command to use a request with the
x-ext-authz: denyheader to access resources in the/productpagepath:curl -I -H "x-ext-authz: deny" http://{IP address of the ingress gateway}/productpageExpected output:
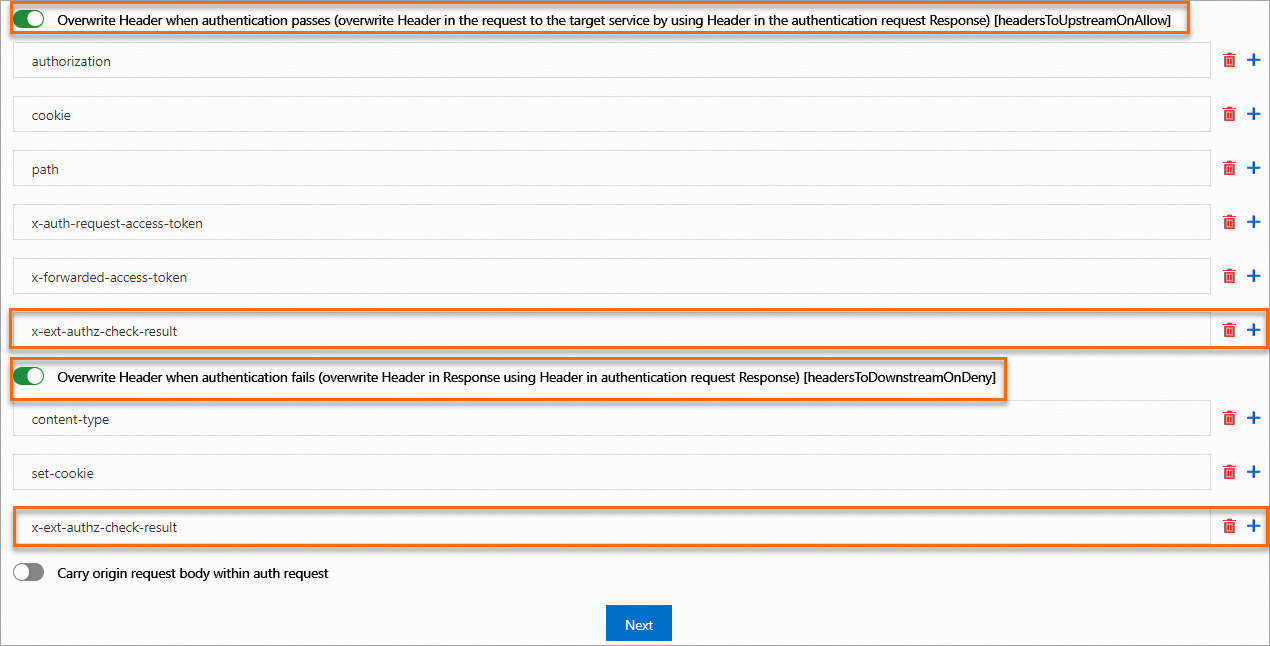
HTTP/1.1 403 Forbidden
x-ext-authz-check-result: denied
date: Wed, 13 Dec 2023 02:42:59 GMT
server: istio-envoy
transfer-encoding: chunked
The preceding result indicates that custom authorization is triggered but the authentication fails. The returned result contains the newly added response header
x-ext-authz-check-result: denied. The reason why custom authorization is triggered is that the path is/productpagedefined in the authorization policy.Run the following command to use a request with the
x-ext-authz: allowheader to access resources in the/productpagepath:curl -I -H "x-ext-authz: allow" http://{IP address of the ingress gateway}/productpageExpected output:
HTTP/1.1 200 OK
server: istio-envoy
date: Wed, 13 Dec 2023 02:50:38 GMT
content-type: text/html; charset=utf-8
content-length: 5290
x-envoy-upstream-service-time: 47
The preceding result indicates that custom authorization is triggered and the authentication is successful. The returned result contains the newly added response header x-ext-authz-check-result: allowed. After the authentication is successful, the request forwarded by the ingress gateway to the application carries the x-ext-authz-check-result: allowed header, which meets expectations.
References
ASM allows you to configure a blacklist or whitelist for an ingress gateway to reject or allow requests based on specific IP addresses, domain names in HTTP requests, ports, or remote IP addresses. This ensures the security of applications in your mesh. For more information, see Configure a blacklist or whitelist for an ingress gateway.
You can use identity information provided by Alibaba Cloud IDentity as a Service (IDaaS) or other identity providers ((IdPs) that comply with the OpenID Connect (OIDC) protocol to log on with a single ID to multiple related systems without the need to modify your applications. For more information, see Configure OIDC-based SSO on an ingress gateway.