When you release a new version of a microservice, you need to control how much traffic reaches each version before fully rolling out. Service Mesh (ASM) uses three Istio resources -- Gateway, VirtualService, and DestinationRule -- to split traffic by percentage across service versions. This supports canary releases and A/B testing.
This topic uses a complete example with the Bookinfo application. You expose Bookinfo through an Istio gateway, then configure weighted routing to send 10%, 40%, and 50% of traffic to three versions of the reviews service.
How it works
Traffic routing in ASM relies on three Istio resources that work together in a chain:
| Resource | Role |
|---|---|
| Gateway | A load balancer at the mesh edge that accepts inbound HTTP or TCP connections. Bind it to an ingress gateway to control how external traffic enters the mesh. |
| VirtualService | Routing rules that match incoming requests by URI, headers, or other criteria, then forward them to specific services. A VirtualService can split traffic across multiple destinations by weight. |
| DestinationRule | Groups service instances into named subsets based on labels (typically version labels). VirtualService rules reference these subsets to direct traffic to specific versions. |
The traffic flow:
External traffic --> Gateway --> VirtualService --> DestinationRule (subsets) --> Service podsIn this tutorial, you first create a Gateway and VirtualService to expose the Bookinfo application. Then you add a DestinationRule and a second VirtualService to split reviews traffic across v1, v2, and v3.
Prerequisites
Before you begin, make sure that you have:
The Bookinfo application deployed in the ASM instance. For details, see Deploy an application in an ACK cluster added to an ASM instance
Step 1: Create an Istio gateway
Create an Istio gateway and bind it to the ingress gateway so that external traffic can reach services in the mesh.
Option A: Apply YAML (recommended)
Save the following manifest and apply it with kubectl apply -f <filename>.yaml:
apiVersion: networking.istio.io/v1beta1
kind: Gateway
metadata:
  name: bookinfo-gateway
  namespace: default
spec:
  selector:
    istio: ingressgateway
  servers:
    - port:
        number: 80
        name: http
        protocol: HTTP
      hosts:
        - '*'
This gateway selects the ingress gateway pod (label istio: ingressgateway) and listens on port 80 for HTTP traffic from all hosts.
Option B: Use the ASM console
Log on to the ASM console. In the left-side navigation pane, choose Service Mesh > Mesh Management.
On the Mesh Management page, click the name of the ASM instance. In the left-side navigation pane, choose ASM Gateways > Gateway. Click Create.
Configure the following parameters, and then click Create.
Parameter Value Namespace defaultName bookinfo-gatewayGateway Pod Selector -- Key istioGateway Pod Selector -- Value ingressgatewayExposed Service -- Name httpExposed Service -- Port 80Exposed Service -- Protocol HTTP Exposed Service -- Service *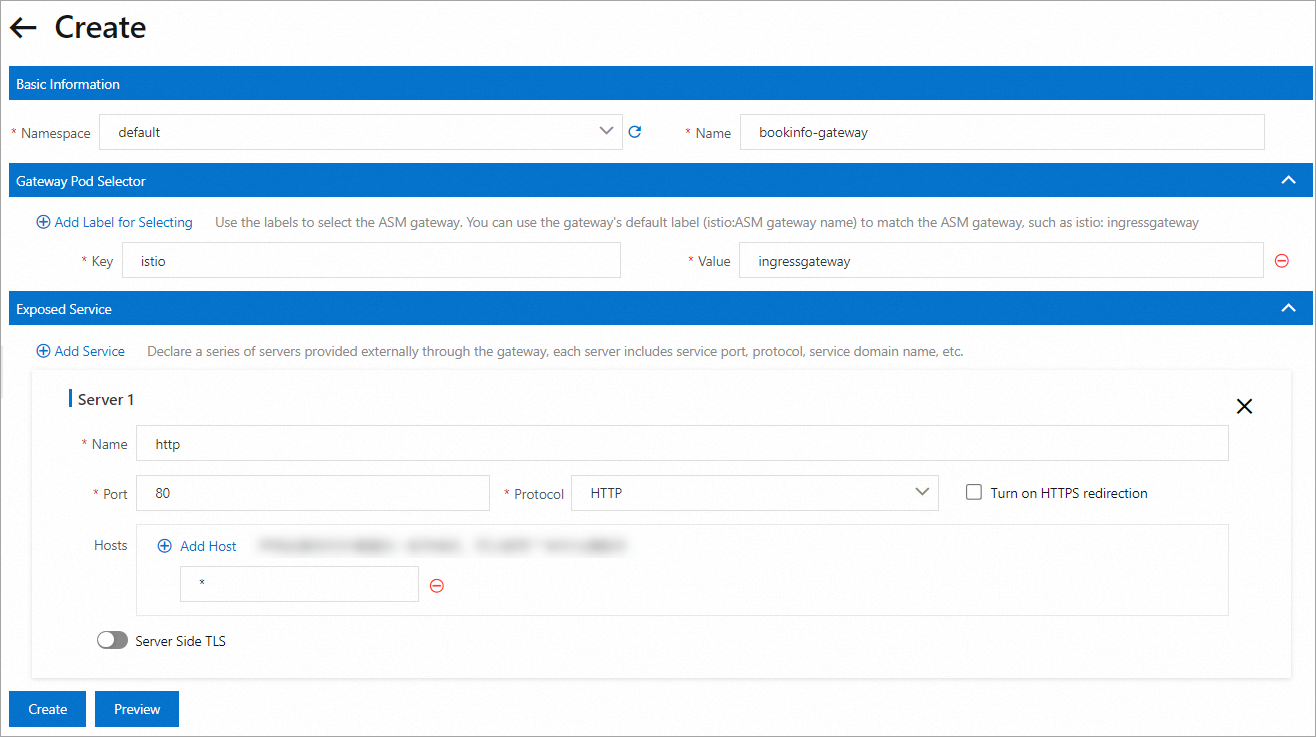
For a full description of each parameter, see Gateway.
Step 2: Create a VirtualService for ingress routing
Create a VirtualService that routes incoming requests through the gateway to the productpage service. After this step, the Bookinfo application is accessible at /productpage, /static, /login, /logout, and /api/v1/products.
Option A: Apply YAML (recommended)
apiVersion: networking.istio.io/v1beta1
kind: VirtualService
metadata:
  name: vs-demo
  namespace: default
spec:
  hosts:
    - '*'
  gateways:
    - bookinfo-gateway
  http:
    - name: gw-to-productage
      match:
        - uri:
            exact: /productpage
        - uri:
            prefix: /static
        - uri:
            exact: /login
        - uri:
            exact: /logout
        - uri:
            prefix: /api/v1/products
      route:
        - destination:
            host: productpage
            port:
              number: 9080
This VirtualService binds to bookinfo-gateway and forwards matched requests to the productpage service on port 9080.
Option B: Use the ASM console
Log on to the ASM console. In the left-side navigation pane, choose Service Mesh > Mesh Management.
On the Mesh Management page, click the name of the ASM instance. In the left-side navigation pane, choose Traffic Management Center > VirtualService. Click Create.
Configure the following settings, and then click Create.
Section Parameter Value Basic Information Namespace defaultName Specify a name for the VirtualService Gateways Apply To specific Gateways Turn on. Select bookinfo-gateway Apply To All Sidecars Turn off Hosts Select *HTTP Route Name Specify a route name Request matching rules Add five rules: Matching request URI = Exact: /productpageMatching request URI = Prefix: /staticMatching request URI = Exact: /loginMatching request URI = Exact: /logoutMatching request URI = Prefix: /api/v1/productsRoute destination Host: productpage, Port:9080
For a full description of each parameter, see Virtual Service.
Step 3: Verify that Bookinfo is accessible
Get the IP address of the ingress gateway.
From the ASM console
Log on to the ASM console. Choose Service Mesh > Mesh Management.
Click the ASM instance name. Choose ASM Gateways > Ingress Gateway.
On the Ingress Gateway page, find the value of Service address.
From the ACK console
Log on to the ACK console. In the left-side navigation pane, click Clusters.
Click the cluster name. In the left-side navigation pane, choose Network > Services.
On the Services page, select istio-system from the Namespace drop-down list. Find the External IP for port 80 of istio-ingressgateway.
Open
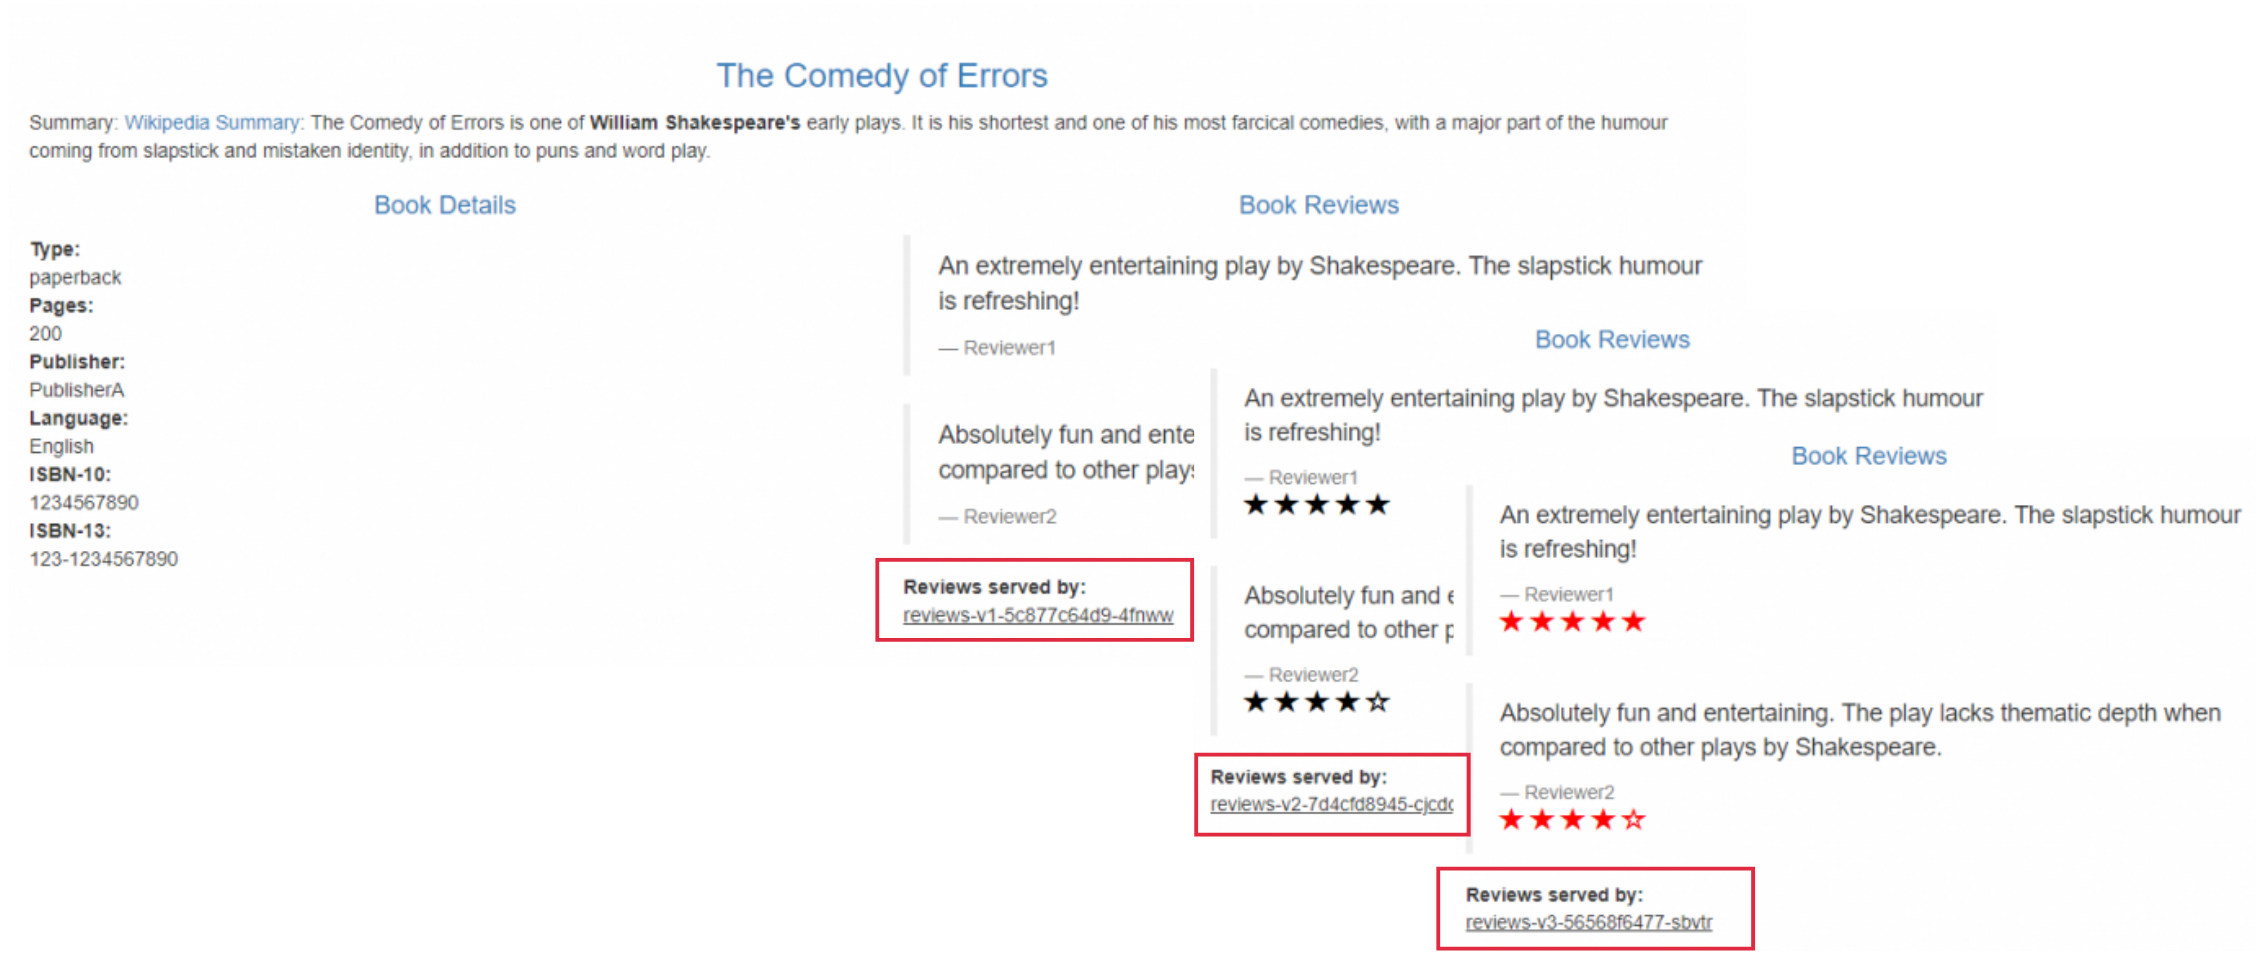
http://<ingress-gateway-ip>/productpagein a browser and refresh the page about 10 times. Without routing rules, Istio distributes requests to v1, v2, and v3 of thereviewsservice roughly equally (1:1:1). Each version renders star ratings differently, so the page appearance changes with each refresh:v1 -- No star ratings
v2 -- Black star ratings
v3 -- Red star ratings
Step 4: Configure weighted traffic routing
Create a DestinationRule to define version-based subsets, and a VirtualService to split traffic across those subsets at a 10:40:50 ratio.
4a. Create a DestinationRule
Define three subsets (v1, v2, v3) for the reviews service based on the version label.
Option A: Apply YAML (recommended)
apiVersion: networking.istio.io/v1beta1
kind: DestinationRule
metadata:
  name: reviews
  namespace: default
spec:
  host: reviews
  subsets:
    - name: v1
      labels:
        version: v1
    - name: v2
      labels:
        version: v2
    - name: v3
      labels:
        version: v3
Each subset matches pods with the corresponding version label, grouping reviews instances by version.
Option B: Use the ASM console
Log on to the ASM console. Choose Service Mesh > Mesh Management.
Click the ASM instance name. Choose Traffic Management Center > DestinationRule. Click Create.
Configure the following settings, and then click Create.
Section Parameter Value Basic Information Namespace defaultName Specify a name Host reviewsService Version (subset) Subset 1 Name: v1, Label:version=v1Subset 2 Name: v2, Label:version=v2Subset 3 Name: v3, Label:version=v3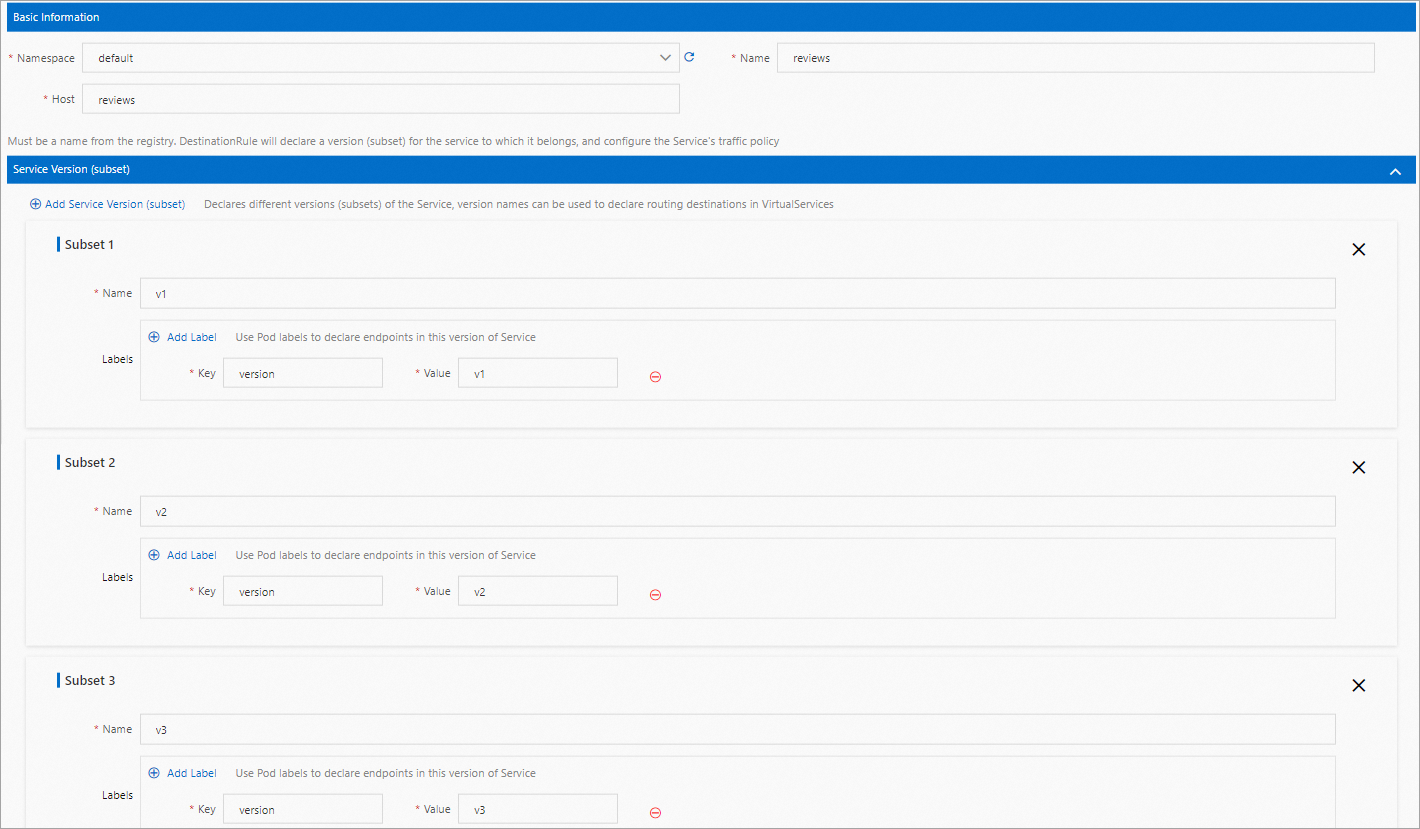
For a full description of each parameter, see Destination Rule.
4b. Create a VirtualService for weighted routing
Route 10% of traffic to v1, 40% to v2, and 50% to v3 of the reviews service.
Option A: Apply YAML (recommended)
apiVersion: networking.istio.io/v1beta1
kind: VirtualService
metadata:
  name: reviews
  namespace: default
spec:
  hosts:
    - reviews.default.svc.cluster.local
  http:
    - name: route
      route:
        - destination:
            host: reviews
            subset: v1
          weight: 10
        - destination:
            host: reviews
            subset: v2
          weight: 40
        - destination:
            host: reviews
            subset: v3
          weight: 50
The weight values must add up to 100. Adjust these percentages to match your rollout strategy. For example, start with a 90/10 split for a conservative canary release, then gradually shift more traffic as confidence grows.
Option B: Use the ASM console
Log on to the ASM console. Choose Service Mesh > Mesh Management.
Click the ASM instance name. Choose Traffic Management Center > VirtualService. Click Create.
Configure the following settings, and then click Create.
Section Parameter Value Basic Information Namespace defaultName Specify a name Gateways Apply To All Sidecars Turn on Hosts Select reviews in the default namespace HTTP Route Name Specify a route name Route destination 1 Host: reviews, Subset:v1, Weight:10Route destination 2 Host: reviews, Subset:v2, Weight:40Route destination 3 Host: reviews, Subset:v3, Weight:50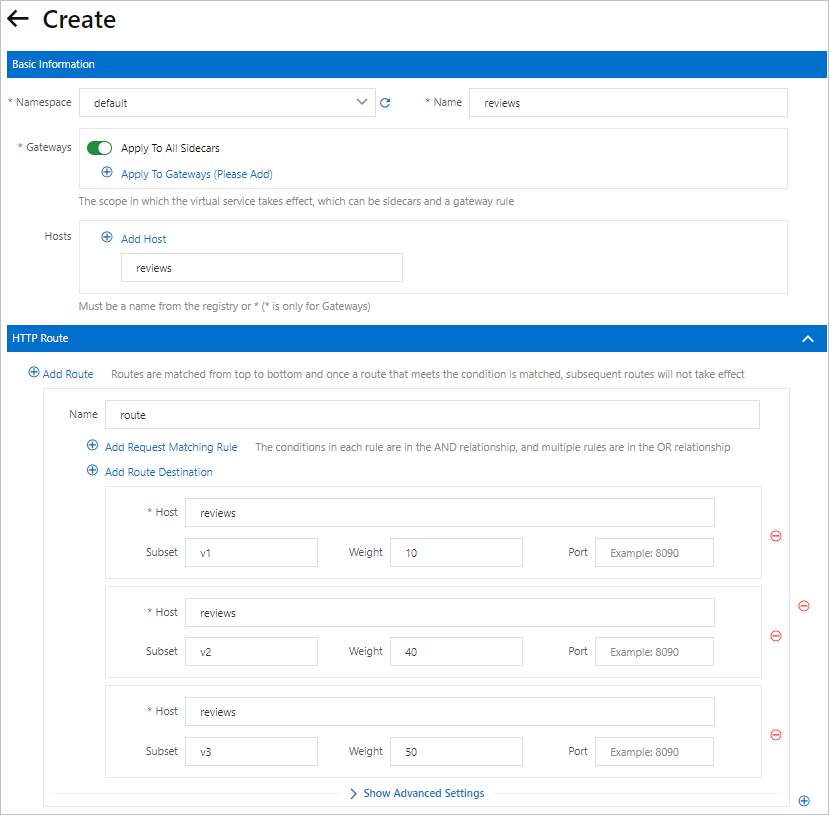
Step 5: Verify the traffic split
Open http://<ingress-gateway-ip>/productpage in a browser and refresh the page about 10 times.
Each version of the reviews service renders star ratings differently:
| Version | Star ratings | Expected frequency (out of 10 refreshes) |
|---|---|---|
| v1 | No stars | ~1 time |
| v2 | Black stars | ~4 times |
| v3 | Red stars | ~5 times |
If the distribution roughly matches 1:4:5, the weighted routing is working correctly. The distribution is probabilistic, so small deviations are normal.
What's next
Adjust the traffic weights to shift more traffic to a specific version as part of a canary release
Add header-based routing rules to route specific users to a particular version for A/B testing
Configure retry policies and timeouts alongside traffic routing for improved resilience