Zero trust is a security model that eliminates implicit trust inside and outside the network perimeter. Alibaba Cloud Service Mesh (ASM) is a key framework for implementing a cloud-native zero trust architecture. It integrates authentication and authorization into the service mesh, moving them out of the application code. This provides an out-of-the-box, dynamically configurable solution where security policies can be updated easily and take effect immediately. This topic describes why and how to use ASM to implement a zero trust system.
Background
Microservices offer many benefits, including scalability, agility, independent scaling, business logic isolation, independent lifecycle management, and simplified distributed development. However, this distributed architecture also introduces security challenges, as each microservice becomes a potential attack target. Kubernetes provides an excellent platform to host and orchestrate microservices. By default, however, all communication between microservices is insecure. They communicate over plaintext HTTP, which is insufficient for modern security requirements. Relying solely on a network perimeter for security is not enough. If an internal service is compromised, an attacker can move laterally to attack other services within the network. Therefore, internal traffic must also be secured. This is the value of zero trust security. A zero trust model requires explicit verification for every request and applies the principle of least privilege to restrict access to resources.
A key benefit of Service Mesh technology is its ability to secure production environments without reducing developer productivity. The Service Mesh provides the foundation for adopting a zero trust security approach for microservices. This approach helps you achieve security goals such as strong identity authentication, context-aware authorization, and comprehensive logging and monitoring for all access. By using these mesh features, you can apply security controls to all applications within the mesh. For example, you can ensure that all traffic is encrypted and that all incoming traffic to applications is verified by a policy enforcement point (PEP).
In addition to Kubernetes network policies for Layer 3 security, ASM provides peer authentication, request authentication, Istio authorization policies, and fine-grained OPA policies. These zero trust security capabilities in ASM help you achieve your security objectives.
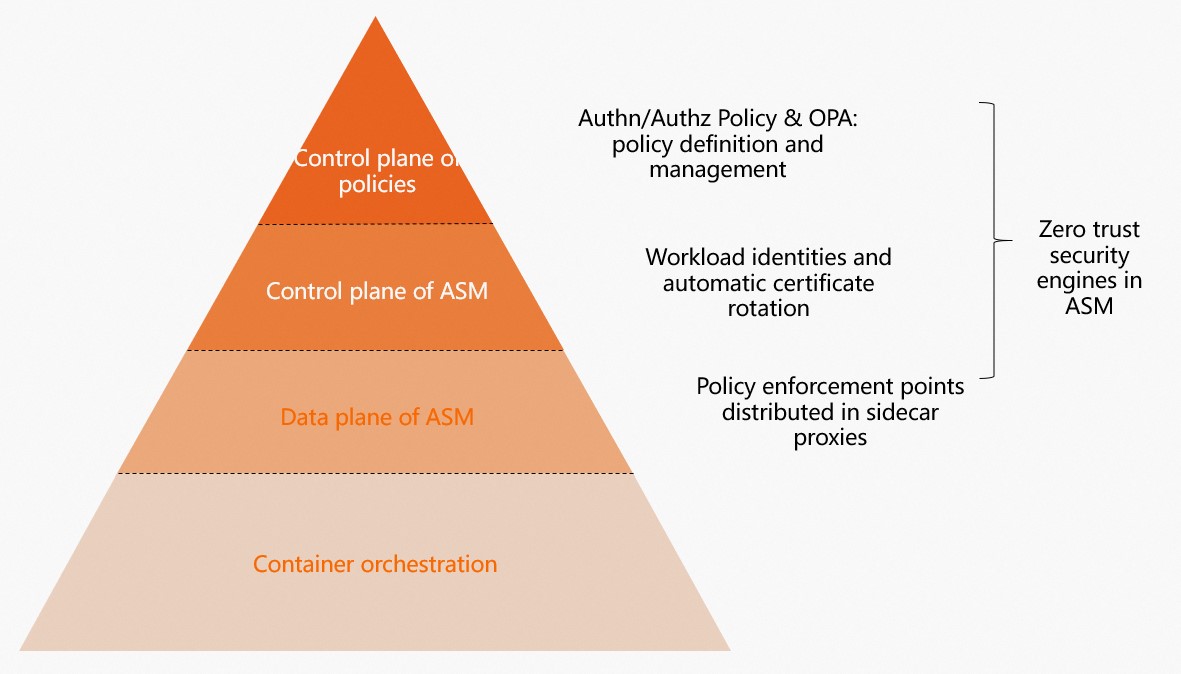
The theoretical framework for ASM's capabilities includes the following aspects:
-
Workload identity: As the foundation of zero trust, ASM provides a unified identity for each cloud-native Service Mesh. It offers a simple way to define identities for every workload in the service mesh and provides customization mechanisms to extend the identity system for specific scenarios. These identities are compatible with the community SPIFFE standard.
-
Security certificates: Certificates are a core component of zero trust. ASM provides certificate issuance, lifecycle management, and rotation. Each proxy uses an X.509 TLS certificate to establish its identity. ASM also manages the rotation of certificates and private keys.
-
Policy enforcement: A policy-based trust engine is at the core of zero trust. In addition to supporting Istio role-based access control (RBAC) policies, ASM also provides more granular authorization policies based on OPA.
-
Visualization and analysis: To provide insight into the zero trust system, ASM offers observability mechanisms to monitor logs and metrics from policy execution, allowing you to assess the performance of each policy.
Why use ASM to implement zero trust
The ASM architecture offers several security benefits over the traditional approach of building security mechanisms directly into application code:
-
The sidecar proxy lifecycle is independent of the application, making the proxies easier to manage.
-
ASM allows for dynamic configuration. You can update policies easily, and the changes take effect immediately without requiring you to redeploy your applications.
-
The centralized control architecture of ASM allows enterprise security teams to build, manage, and deploy security policies across the entire organization. This ensures that business applications are secure by default, and developers can benefit from these security policies without any extra work.
-
ASM can authenticate end-user credentials attached to a request, such as a JSON Web Token (JWT).
-
With the ASM architecture, you can deploy authentication and authorization systems as services within the mesh. Like other services in the mesh, these security systems also benefit from the security guarantees provided by the mesh, including transport encryption, strong identities, policy enforcement points, and authentication and authorization of end-user credentials.
With ASM, you can use a single control plane to implement strong identity and access management, transparent TLS encryption, authentication, authorization, and audit logging. Its simple installation and management enable developers, system administrators, and security teams to protect their microservice applications.
Using ASM's zero trust system
ASM reduces the attack surface in cloud-native environments and provides the foundational framework for a zero trust application network. By managing service-to-service security, ASM ensures end-to-end encryption, service-level authentication, and fine-grained authorization policies.
The ASM framework supports the following:
-
Enforce mutual TLS (mTLS) authentication or server-side TLS authentication between services, with support for automatic certificate lifecycle management, including rotation. All communication within the mesh is authenticated and encrypted.
-
Enable fine-grained, identity-based authorization, as well as authorization based on other parameters. Building on role-based access control (RBAC), ASM supports a "least privilege" posture, where only authorized services can communicate with each other based on ALLOW or DENY rules.
ASM provides fundamental zero trust security capabilities, including workload identity, peer authentication, request authentication, authorization policies, and OPA policies.
Workload identity
When an application runs in an ASM environment, ASM provides a unique identity for each service. This service identity can be used for mutual authentication to verify access between services and in authorization policies.
When you use ASM to manage workloads running on Kubernetes, ASM provides a service identity for each workload. This identity is based on the workload's service account token.
Service identities in ASM are compliant with the SPIFFE standard and use the following format: spiffe://<trust-domain>/ns/<namespace>/sa/<service-account>.
You can log on to the ASM console to view services that are connected from a Kubernetes cluster.
-
Log on to the ASM console. In the left-side navigation pane, choose .
-
On the Mesh Management page, click the name of the ASM instance. In the left-side navigation pane, choose .
-
On the Workload Identity page, set Data Plane to the cluster ID and select a Namespaces to view the workload identities for services from the Kubernetes cluster that are added to the service mesh.
Peer authentication
ASM provides two types of authentication: peer authentication and request authentication. Peer authentication uses mutual TLS to authenticate peers when two microservices interact.
-
If both the client and server have a sidecar proxy injected, mTLS communication is enabled by default in ASM.
-
If only the client has a sidecar proxy injected, the client decides whether to use mTLS communication based on the server's configuration.
-
If only the server has a sidecar proxy injected, the default mTLS mode is PERMISSIVE, which accepts both plaintext and encrypted traffic. If you configure a PeerAuthentication policy for the server and set the mTLS mode to STRICT, requests will fail.
Request authentication
Request authentication allows end users and systems to interact with microservices. This is typically done using a JSON Web Token (JWT).
When a microservice is requested, you can create a request authentication policy to perform JWT validation on incoming requests. The policy validates requests that contain a JWT. Only requests with a valid JWT can successfully access the service. Requests without a JWT are not validated and can access the service without restriction.
To ensure that only requests with a valid JWT can access a service, combine request authentication with an authorization policy. This configuration denies requests that have an invalid JWT or no JWT.
-
Deploy the bookinfo application that will receive requests. For more information, see Deploy an application in a cluster associated with an ASM instance.
-
Deploy the sleep application that will send requests.
-
In the KubeConfig environment for your ACK cluster, create a sleep.yaml file.
-
Run the following command to deploy the sleep application.
kubectl apply -f sleep.yaml -n default
-
-
Create a request authentication policy to enforce JWT authentication for inbound requests to the
detailsservice.-
Log on to the ASM console. In the left-side navigation pane, choose .
-
On the Mesh Management page, click the name of the ASM instance. In the left-side navigation pane, choose . On the page that appears, click Create.
-
On the creation page, set the following parameters and then click Create to define a JWT rule for the
detailsworkload.Select the default namespace, set the name to test, and add a label selector with the name app and the value details.
The following describes some of the parameters:
-
issuer: The issuer of the JWT. For this example, set it to testing@secure.istio.io.
-
audiences: A list of audiences for the JWT. This specifies which services can use the JWT to access the target service. For this example, leave it empty, meaning access is not restricted to any specific service.
-
jwks: The JSON Web Key Set (JWKS) for the JWT. For this example, use the following JWKS. For more information, see jwks.json.
{ "keys":[ {"e":"AQAB","kid":"DHFbpoIUqrY8t2zpA2qXfCmr5VO5ZEr4RzHU_-envvQ","kty":"RSA","n":"xAE7eB6qugXyCAG3yhh7pkDkT65pHymX-P7KfIupjf59vsdo91bSP9C8H07pSAGQO1MV_xFj9VswgsCg4R6otmg5PV2He95lZdHtOcU5DXIg_pbhLdKXbi66GlVeK6ABZOUW3WYtnNHD-91gVuoeJT_DwtGGcp4ignkgXfkiEm4sw-4sfb4qdt5oLbyVpmW6x9cfa7vs2WTfURiCrBoUqgBo_-4WTiULmmHSGZHOjzwa8WtrtOQGsAFjIbno85jp6MnGGGZPYZbDAa_b3y5u-YpW7ypZrvD8BgtKVjgtQgZhLAGezMt0ua3DRrWnKqTZ0BJ_EyxOGuHJrLsn00fnMQ"}]}
-
-
-
To generate the token used in the next step, you can use a JWT tool. The token must be created using a private key that corresponds to the public key in the JWKS and include the issuer testing@secure.istio.io.
{ "keys":[ {"e":"AQAB","kid":"DHFbpoIUqrY8t2zpA2qXfCmr5VO5ZEr4RzHU_-envvQ","kty":"RSA","n":"xAE7eB6qugXyCAG3yhh7pkDkT65pHymX-P7KfIupjf59vsdo91bSP9C8H07pSAGQO1MV_xFj9VswgsCg4R6otmg5PV2He95lZdHtOcU5DXIg_pbhLdKXbi66GlVeK6ABZOUW3WYtnNHD-91gVuoeJT_DwtGGcp4ignkgXfkiEm4sw-4sfb4qdt5oLbyVpmW6x9cfa7vs2WTfURiCrBoUqgBo_-4WTiULmmHSGZHOjzwa8WtrtOQGsAFjIbno85jp6MnGGGZPYZbDAa_b3y5u-YpW7ypZrvD8BgtKVjgtQgZhLAGezMt0ua3DRrWnKqTZ0BJ_EyxOGuHJrLsn00fnMQ"}]}The expected token is:
eyJhbGciOiJSUzI1NiIsImtpZCI6IkRIRmJwb0lVcXJZOHQyenBBMnFYZkNtcjVWTzVaRXI0UnpIVV8tZW52dlEiLCJ0eXAiOiJKV1QifQ.eyJleHAiOjQ2ODU5ODk3MDAsImZvbyI6ImJhciIsImlhdCI6MTUzMjM4OTcwMCwiaXNzIjoidGVzdGluZ0BzZWN1cmUuaXN0aW8uaW8iLCJzdWIiOiJ0ZXN0aW5nQHNlY3VyZS5pc3Rpby5pbyJ9.CfNnxWP2tcnR9q0vxyxweaF3ovQYHYZl82hAUsn21bwQd9zP7c-LS9qd_vpdLG4Tn1A15NxfCjp5f7QNBUo-KC9PJqYpgGbaXhaGx7bEdFWjcwv3nZzvc7M__ZpaCERdwU7igUmJqYGBYQ51vr2njU9ZimyKkfDe3axcyiBZde7G6dabliUosJvvKOPcKIWPccCgefSj_GNfwIip3-SsFdlR7BtbVUcqR-yv-XOxJ3UcMI0tz3uMiiZcyPV7sNCU4KRnemRIMHVOfuvHsU60_GhGbiSFzgPTAa9WTltbnarTbxudb_YEOx12JiwYToeX0DCPb43W1tzIBxgm8NxUg -
Verify that the request authentication policy is in effect.
-
Run the following command to access the details service by using the encoded JWT.
export TOKEN=eyJhbGciOiJSUzI1NiIsImtpZCI6IkRIRmJwb0lVcXJZOHQyenBBMnFYZkNtcjVWTzVaRXI0UnpIVV8tZW52dlEiLCJ0eXAiOiJKV1QifQ.eyJleHAiOjQ2ODU5ODk3MDAsImZvbyI6ImJhciIsImlhdCI6MTUzMjM4OTcwMCwiaXNzIjoidGVzdGluZ0BzZWN1cmUuaXN0aW8uaW8iLCJzdWIiOiJ0ZXN0aW5nQHNlY3VyZS5pc3Rpby5pbyJ9.CfNnxWP2tcnR9q0vxyxweaF3ovQYHYZl82hAUsn21bwQd9zP7c-LS9qd_vpdLG4Tn1A15NxfCjp5f7QNBUo-KC9PJqYpgGbaXhaGx7bEdFWjcwv3nZzvc7M__ZpaCERdwU7igUmJqYGBYQ51vr2njU9ZimyKkfDe3axcyiBZde7G6dabliUosJvvKOPcKIWPccCgefSj_GNfwIip3-SsFdlR7BtbVUcqR-yv-XOxJ3UcMI0tz3uMiiZcyPV7sNCU4KRnemRIMHVOfuvHsU60_GhGbiSFzgPTAa9WTltbnarTbxudb_YEOx12JiwYToeX0DCPb43W1tzIBxgm8NxUg
kubectl exec $(kubectl get pod -l app=sleep -o jsonpath={.items..metadata.name}) -c sleep -- curl http://details:9080/details/1 -o /dev/null --header "Authorization: Bearer $TOKEN" -s -w '%{http_code}\n'
A 200 status code is returned, indicating successful access.
-
Run the following command to access the details service by using an invalid JWT.
kubectl exec $(kubectl get pod -l app=sleep -o jsonpath={.items..metadata.name}) -c sleep -- curl http://details:9080/details/1 -o /dev/null --header "Authorization: Bearer badtoken" -s -w '%{http_code}\n'A 403 status code is returned, indicating that access failed.
-
Run the following command to access the details service without a JWT.
kubectl exec $(kubectl get pod -l app=sleep -o jsonpath={.items..metadata.name}) -c sleep -- curl http://details:9080/details/1 -o /dev/null -s -w '%{http_code}\n'A 200 status code is returned, indicating successful access.
These results show that requests with a valid JWT succeed, requests with an invalid JWT fail, and requests without a JWT succeed. This confirms that the request authentication policy is working as expected.
-
Authorization policy
When a microservice is requested, you can use an authorization policy to restrict access based on the request's port, IP address, source, and more. Only requests that meet the requirements can access the service. The following authorization policy restricts access based on the request source by requiring that the request contains a JWT from a specific issuer.
-
Deploy the bookinfo application that will receive requests. For more information, see Deploy an application in a cluster associated with an ASM instance.
-
Deploy the sleep application that will send requests.
-
Create a sleep.yaml file with the following content.
-
In the KubeConfig environment for your ACK cluster, run the following command to deploy the sleep application.
kubectl apply -f sleep.yaml -n default
-
-
Create an authorization policy.
-
Log on to the ASM console. In the left-side navigation pane, choose .
-
On the Mesh Management page, click the name of the ASM instance. In the left-side navigation pane, choose . On the page that appears, click Create from YAML.
-
-
On the Create page, select the default namespace, enter the following YAML, and then click Create.
For more information about the fields, see Authorization Policy.
apiVersion: security.istio.io/v1beta1 kind: AuthorizationPolicy metadata: name: require-jwt namespace: default spec: action: ALLOW rules: - from: - source: requestPrincipals: - testing@secure.istio.io/testing@secure.istio.io selector: matchLabels: app: details -
Run the following command to send a request without a JWT to access the service.
kubectl exec $(kubectl get pod -l app=sleep -o jsonpath={.items..metadata.name}) -c sleep -- curl http://details:9080/details/1 -o /dev/null -s -w '%{http_code}\n'Expected output:
403The request to the
detailsservice without a JWT fails, which confirms that the authorization policy is in effect. The policy requires that all requests must contain a JWT issued bytesting@secure.istio.ioto access the service successfully.
OPA policy
OPA is a policy engine that enables fine-grained access control for your applications. As a general-purpose policy engine, OPA can be deployed as a standalone service alongside your microservices. To protect an application, each request to a microservice must be authorized before being processed. The microservice queries the OPA API to determine if the request should be allowed. For more information, see OPA.
ASM integrates an OPA plug-in, which allows you to define access control policies using OPA to achieve fine-grained access control for your applications. These OPA policies can also be dynamically updated. For more information, see Dynamically update OPA policies in ASM.
Summary and use cases
In summary, ASM provides the following security-enhancing components:
-
A managed certificate infrastructure with full certificate lifecycle management that simplifies certificate issuance and CA rotation.
-
Managed control plane APIs for distributing authentication policies, authorization policies, and secure naming information to Envoy proxies.
-
Sidecar proxies that act as a policy enforcement point (PEP) to help secure the mesh.
-
Envoy proxy extensions that enable telemetry collection and auditing.
Each workload uses an X.509 TLS certificate to establish its identity. This certificate is then used by the workload's sidecar proxy. ASM provides and periodically rotates these certificates and private keys. If a private key is compromised, ASM can quickly replace it with a new one, significantly reducing the attack surface.
Use cases
-
Use an authorization policy on an ingress gateway to implement IP-based access control or access control based on a custom external authorizer.
-
An internet finance customer needed to manage access permissions for multi-language applications across clusters. They used ASM authorization policies to isolate external-facing zones from internal application zones. In combination with an egress gateway for auditing mesh traffic, they also used authorization policies to control application access to third-party services.