Available authorization method
You can create a Resource Access Management (RAM) user, authorize the RAM user, and then record the AccessKey ID and AccessKey secret of the RAM user for subsequent operations.
Procedure
Step 1: Activate RAM
Log on to the Alibaba Cloud Management Console. Enter RAM in the search box, and click Resource Access Management in the Consoles section to go to the RAM console.
Step 2: Install and configure the MaxCompute client
For more information about the MaxCompute client, see the MaxCompute client (odpscmd).
1. Download and decompress the installation package of the MaxCompute client. The decompressed package contains the bin, conf, lib, and plugins folders.

2. Open the conf folder and modify the odps_config.ini file.
(1) Specify the following fields:
project_name: the name of the project that you want to access. You can query the value of this field in the MaxCompute console.
access_id: the AccessKey ID of your Alibaba Cloud account or the RAM user.
access_key: the AccessKey secret that corresponds to the AccessKey ID.
(2) Retain default settings for other fields. For more information, see the documentation of the MaxCompute client.
3. Open the bin folder and check whether the MaxCompute client runs as expected.
(1) Start the MaxCompute client.
(2) Run the show tables; command on the command line to check whether the results meet your expectations. A semicolon (;) must be added to the end of the command.
4. Exit the MaxCompute client.
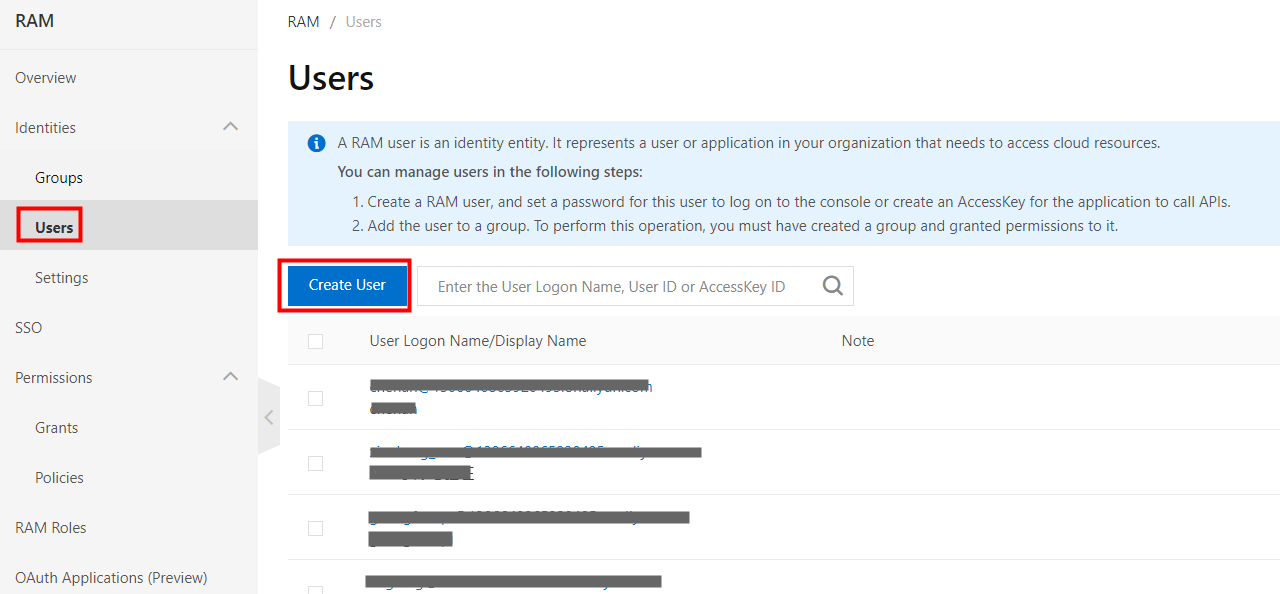
Step 3: Create a RAM user
This step is performed to create a RAM user that you want to authorize. We recommend that you use the RAM user to access only Alibaba Cloud Artificial Intelligence Recommendation (AIRec) and grant the RAM user only the permissions specified in this topic.
For more information about the concepts of roles and users, see the RAM documentation.
1. Log on to the RAM console. In the left-side navigation pane, choose Identities > Users. On the Users page, click Create User.
2. On the Create User page, set the parameters based on your business requirements.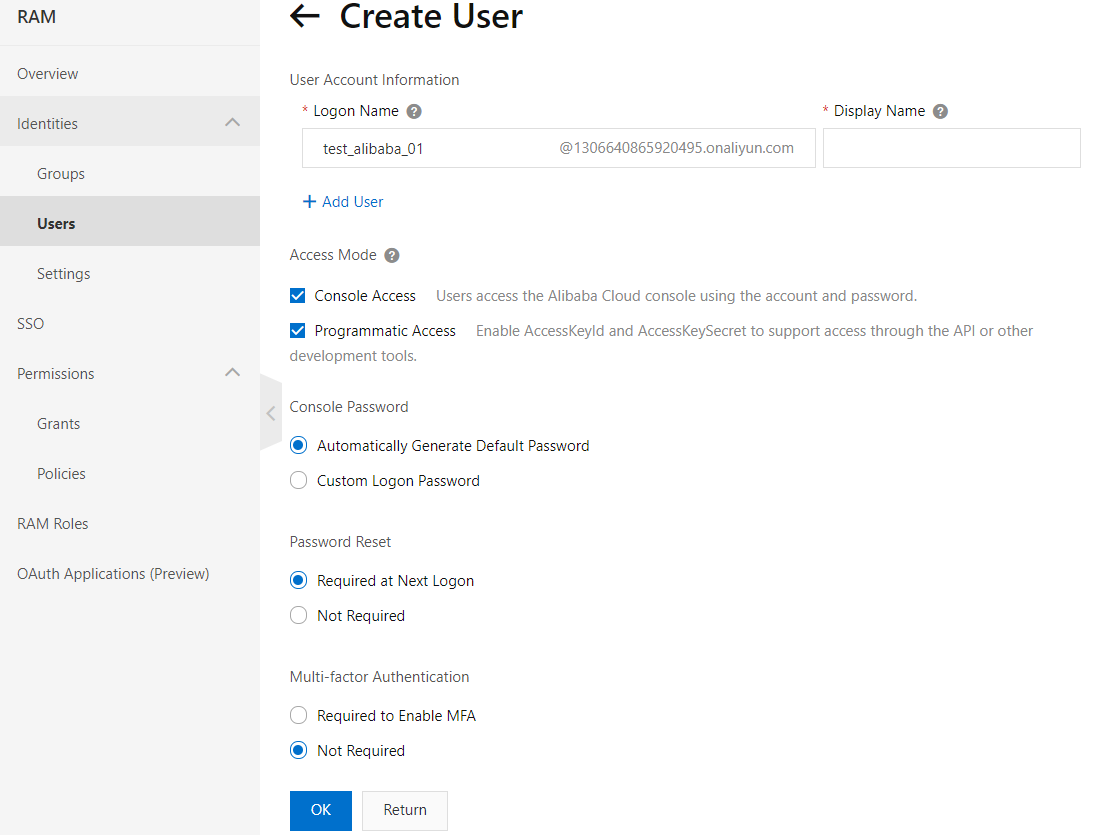
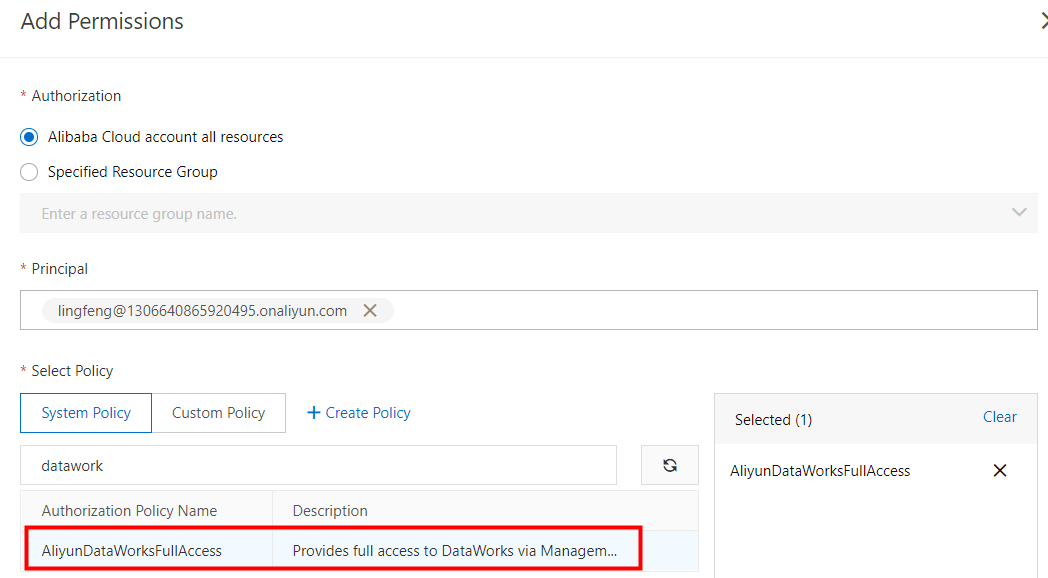
Step 4: Grant the permissions on DataWorks to the RAM user
1. On the Users page, find the RAM user that you created, and then click Add Permissions in the Actions column.

2. In the Add Permissions panel, enter DataWorks in the search box in the Select Policy section to grant the RAM user the permissions on DataWorks.
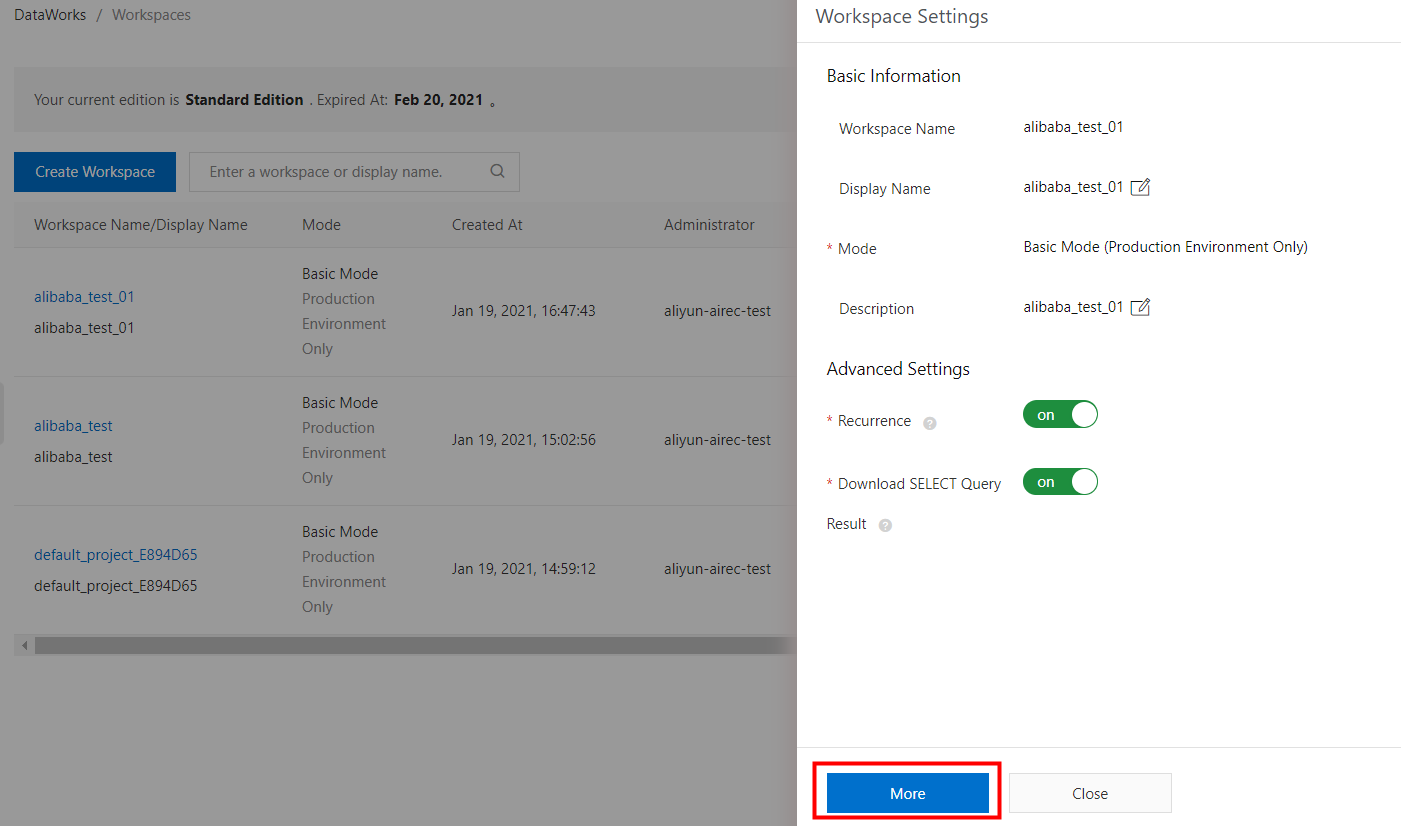
Step 5: Add the RAM user to a DataWorks workspace
You can add the RAM user to a DataWorks workspace in the DataWorks console or by running the add user command. We recommend that you add the RAM user in the DataWorks console.
Add the RAM user in the DataWorks console:
1. Log on to the DataWorks console. In the left-side navigation pane, click Workspaces. On the Workspaces page, find the workspace to which you want to add the RAM user and click Workspace Settings in the Actions column. In the Workspace Settings panel, click More.

2. On the page that appears, click User Management in the left-side navigation pane. On the Member Management page, click Add Member. Then, you can add the RAM user to the workspace.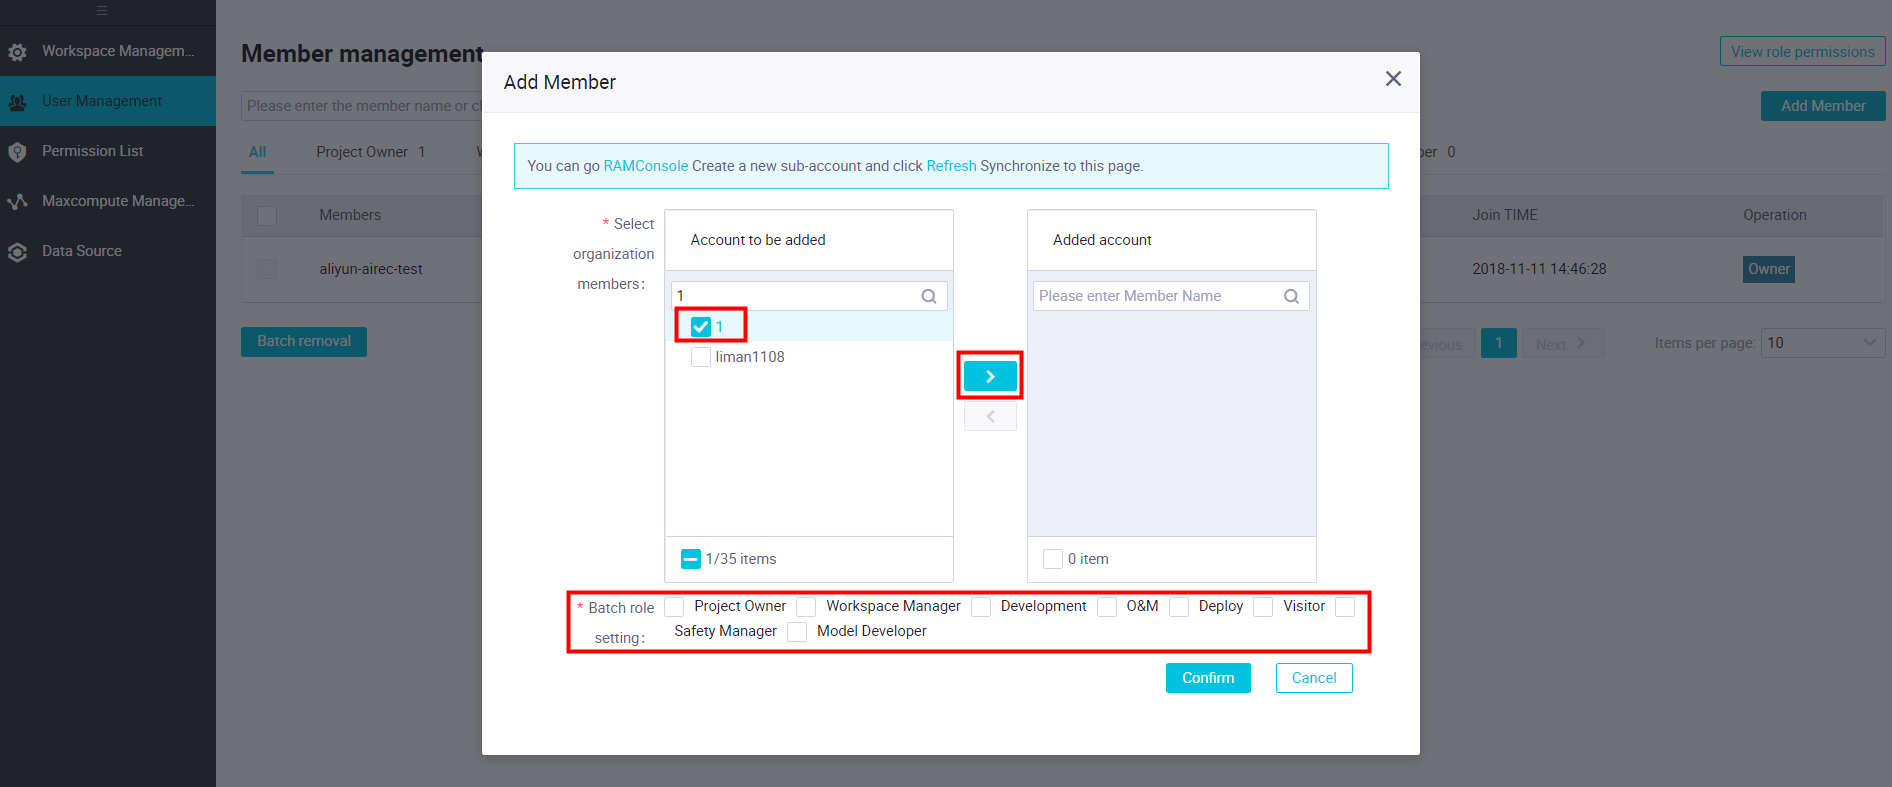
3. Run the add user command on the MaxCompute client to check whether the RAM user is added to the workspace. The RAM user is named in the RAM\$username format.
Add the RAM user by running the add user command on the MaxCompute client
Run the add user command on the MaxCompute client.
Step 6: Create a role for the RAM user
You can create a role for the RAM user in the DataWorks console or on the MaxCompute client. We recommend that you perform this operation on the MaxCompute client. If you create a role in the DataWorks console, the naming format of the role does not apply when the role is assigned to the RAM user on the MaxCompute client. For example, the name of the role contains a hyphen (-), but the hyphen is not identified when the role is assigned to the RAM user.
Create a role for the RAM user in the DataWorks console
For more information, see the RAM documentation.
Create a role for the RAM user by running the create role; command on the MaxCompute client
Run the create role; command on the MaxCompute client. A semicolon (;) must be added to the end of the command.

Step 7: Attach a policy to the role
This operation must be performed on the MaxCompute client.
1. Compile a policy file. The following example shows how to grant read permissions on MaxCompute projects. You can change the value of odps to grant the desired permissions to the role based on your business requirements.
{
        "Version": "1",
        "Statement": [{
                "Effect": "Allow",
                "Action": [
                        "odps:List",
                        "odps:Read"
                ],
                "Resource": [
                        "acs:odps:*:projects/openrec_gray"
                ]
        },
      {
                "Effect": "Allow",
                "Action": [
                        "odps:Read",
                        "odps:Describe",
                        "odps:Select"
                ],
                "Resource": [
                        "acs:odps:*:projects/openrec_gray/tables/*"
                ]
        }]
}
2. If you want to customize the policy, we recommend that you use the preceding policy structure.
3. Run the put policy on role; command to attach the policy to the role. A semicolon (;) must be added to the end of the command. No prefix is required for the role name.
4. Run the get policy on role command to check whether the policy is attached to the role.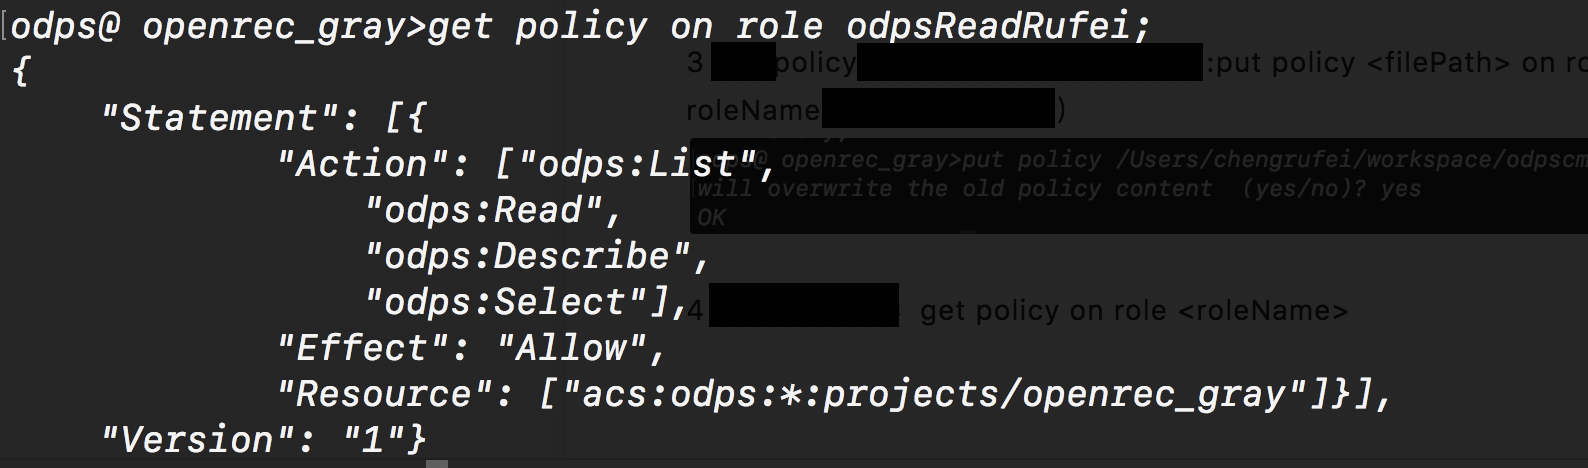
Step 8: Assign the role to the RAM user
This operation can be performed only on the MaxCompute client.
grant to RAM\$;

Step 9: Complete the authorization
Record the following information for subsequent operations:
AccessKey ID of the RAM user
AccessKey secret of the RAM user
Names of the three tables in MaxCompute