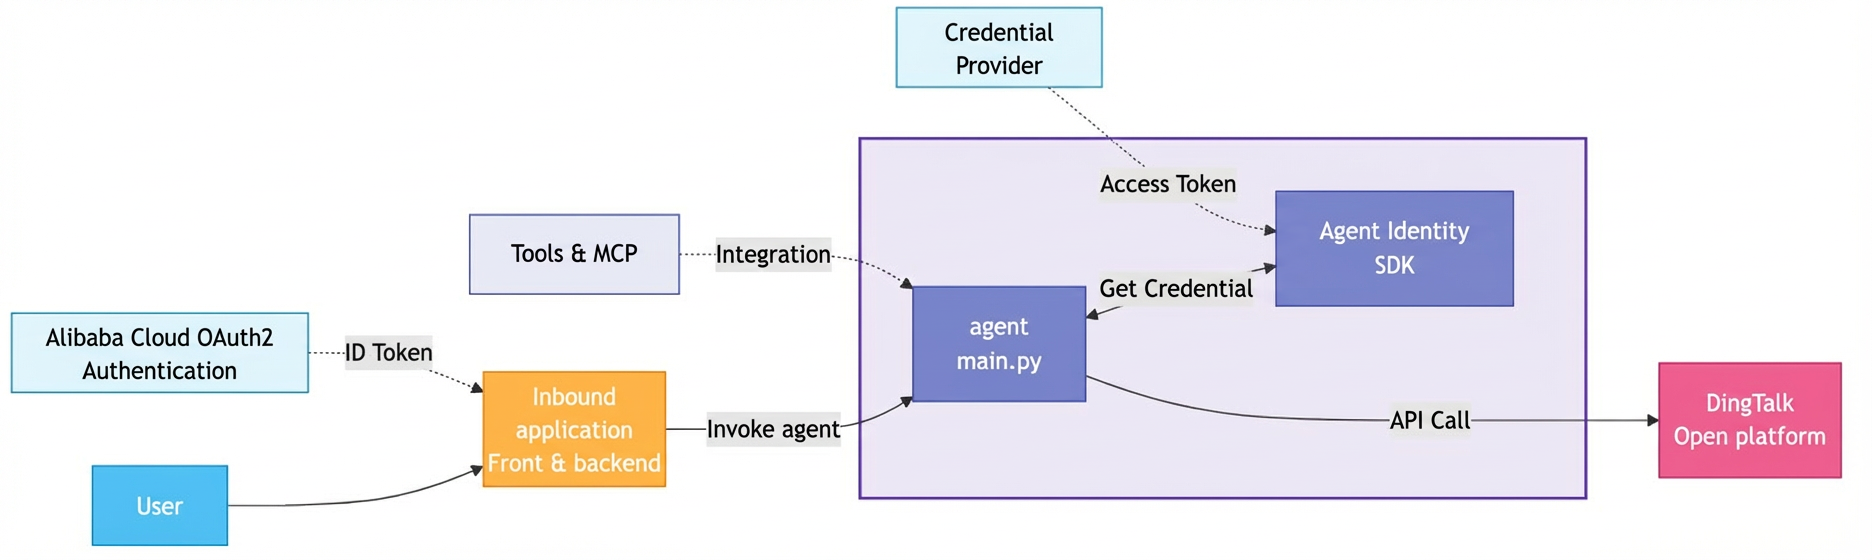
Use Agent Identity to enable an agent to call the DingTalk Open Platform and securely write data to DingTalk Docs.
Architecture
Prerequisites
Environment requirements
Your local test environment must have Python (version 3.10 or later) and the pip package manager installed.
User and permission requirements
-
User requirements:
-
A DingTalk Open Platform administrator: To manage applications on the DingTalk Open Platform.
-
A script execution user (RAM user): To run the setup script and test the application locally.
-
-
RAM permission requirements:
The script execution user must have the following permissions:
{
  "Version": "1",
  "Statement": [
    {
      "Effect": "Allow",
      "Action": "agentidentity:*",
      "Resource": "*"
    },
    {
      "Effect": "Allow",
      "Action": "agentidentitydata:*",
      "Resource": "*"
    },
    {
      "Effect": "Allow",
      "Action": "ram:CreateServiceLinkedRole",
      "Resource": "*",
      "Condition": {
        "StringEquals": {
          "ram:ServiceName": ["agentidentity.aliyuncs.com"]
        }
      }
    },
    {
      "Effect": "Allow",
      "Action": [
        "ram:CreateApplication",
        "ram:CreateRole",
        "ram:CreatePolicy",
        "ram:AttachPolicyToRole",
        "ram:CreateAppSecret",
        "ram:DeleteApplication"
      ],
      "Resource": "*"
    }
  ]
}
DashScope API key
Obtain a DashScope API key with permission to call Model Studio models. If you have not created one, see Create an API Key.
Step 1: Create and configure a DingTalk application
Create a DingTalk application
Follow the DingTalk OAuth credential provider setup tutorial to create a DingTalk application and configure it as an OAuth2 credential provider for Agent Identity.
Configure DingTalk application permissions
-
Log on to the DingTalk Open Platform. Find the DingTalk application that you created and go to its details page.
-
In the left-side navigation pane of the application details page, click Permission Management. In the permission search box, enter
Document.Document.Write, and click Enable in the Actions column. This permission lets the DingTalk application overwrite the user's DingTalk documents on their behalf.
Step 2: Install and test the application locally
Get and prepare the sample code
-
Clone the code repository. Open a local terminal and run the following command to clone the sample code.
git clone https://github.com/aliyun/agent-identity-dev-kit.git cd agent-identity-dev-kit/agent_identity_python_samples/end-to-end_sample -
Install dependencies. Create and activate a Python virtual environment, and then install the required dependencies.
pip install -r requirements.txt -
Configure environment variables.
export AGENT_IDENTITY_REGION_ID=cn-beijing # Agent Identity is currently available only in the China (Beijing) region
export DASHSCOPE_API_KEY=<your-api-key> # Your DashScope API key
Prepare RAM user credentials
Configure credentials locally for the script execution user mentioned in the User and permission requirements section.
Alibaba Cloud CLI
-
Install the Alibaba Cloud CLI (skip if already installed). For details, see Quick start with CLI.
-
Log on to the Alibaba Cloud CLI. For details, see Configure OAuth authentication for Alibaba Cloud CLI.
-
Check the credential configuration. Run the command
aliyun configure listto verify the credential configuration. The output should be similar to the following:Profile | Credential | Valid | Region | Language --------- | ------------------ | ------- | ---------------- | -------- OAuthProfile * | OAuth:xQcliVOdYA@CN | Valid | cn-hangzhou | zh
Access key (not recommended)
Create an access key for the script execution user and configure it in your local environment variables.
export ALIBABA_CLOUD_ACCESS_KEY_ID=<your-access-key-id>
export ALIBABA_CLOUD_ACCESS_KEY_SECRET=<your-access-key-secret>
Run the setup script
In the root directory of your local project, run the setup script prepare.py to automatically create the required cloud resources:
python -m prepareThis script performs the following actions:
-
Creates an identity provider.
-
Creates an Alibaba Cloud OAuth 2.1 inbound application.
-
Creates an OAuth 2.1 native application required for Alibaba Cloud MCP services (not used in this tutorial).
-
Creates a workload identity and a role.
-
Configures the credential provider.
The script outputs information about the created resources to the .config.json file in the root directory.
If the script fails due to an exception, such as a network issue or an exceeded resource quota, clean up the created resources before running the script again:
python -m clearTo avoid affecting other RAM resources in your account, the cleanup logic does not delete the role or any custom policies. You must delete them manually.
Configure the DingTalk credential provider in the code
-
On the Agent Identity Credential Providers page, find the DingTalk credential provider that you created in Step 1 and copy its Credential Provider Name.
-
In the
deploy_starter/tools/ding_talk_tool.pyfile of your project, find the following code:@requires_access_token( credential_provider_name="test-provider-for-dingtalk", scopes=["openid", "corpid"], auth_flow="USER_FEDERATION", on_auth_url= on_auth, # force_authentication=True, callback_url= f"{get_config_with_default('APP_REDIRECT_URI', 'http://localhost:8090')}/callback", inject_param_name="access_token", )Replace the existing code with the following, and update the
credential_provider_namevalue to the name of your DingTalk credential provider.@requires_access_token( credential_provider_name="your-dingtalk-credential-provider-name", scopes=["openid", "corpid"], auth_flow="USER_FEDERATION", on_auth_url= on_auth, # force_authentication=True, callback_url= f"{get_config_with_default('APP_REDIRECT_URI', 'http://localhost:8090')}/callback", inject_param_name="access_token", custom_parameters={"prompt": "consent"}, )
Step 3: Test and verify
-
Start the agent proxy service. In the root directory, run the following command:
python -m deploy_starter.main -
Start the front-end and back-end applications. In the root directory, run the following command:
python -m application.backend.app -
Access the application and interact with the agent:
-
After the agent and the front-end/back-end applications start, open a browser and navigate to
http://localhost:8090. -
Complete the Alibaba Cloud logon and user authorization process. In the application's chat window, interact with the model. For example, enter: "Write the following content to my DingTalk Doc: {DingTalk Doc link} {content to write}".
After you send the prompt, the agent invokes the DingTalk tool and displays an authorization prompt: "Please click the link to authorize writing to DingTalk Docs", along with an OAuth2 authorization link (
agentidentitydata.cn-beijing.aliyuncs.com/oauth2/authorize?request_uri=urn:ietf:params:oauth:request_uri:xxx). Click this link to authorize writing to the DingTalk Doc.NoteYou must obtain the link to an existing DingTalk Doc beforehand. This sample application cannot create new DingTalk Docs.
-
Click the OAuth authorization URL in the response and complete the logon and authorization process using the account of the DingTalk Doc owner.
-
After authorization is complete, the agent confirms that the document has been written successfully.
-
Verify that the content has been written to the DingTalk Doc.
-
You can combine the DingTalk writing feature with other MCP services. For example, follow the Use Agent Identity in Model Studio pro-code mode tutorial to write data retrieved from Alibaba Cloud MCP to a DingTalk Doc.
Important notes
-
To run the preparation script prepare.py again, first run the cleanup script in the project root directory:
python -m clear -
Do not change the constant configurations in the
prepare.pyscript. Otherwise, the application may not work as expected. -
To deploy the front-end and back-end applications to Alibaba Cloud (for example, on an ECS instance), associate an instance RAM role (such as an ECS instance role or a Function Compute instance role) with the back-end application's runtime environment. You must also grant the
AliyunAgentIdentityDataCompleteAuthAccesssystem policy to the role. Otherwise, the agent cannot obtain an OAuth access token.