The Model Studio (Bailian) high-code platform enables rapid development and deployment of customized AI agents. Integrating Agent Identity with this platform provides secure, controlled access to both agents and cloud resources, requiring real-time user authorization before agents perform sensitive operations.
Architecture
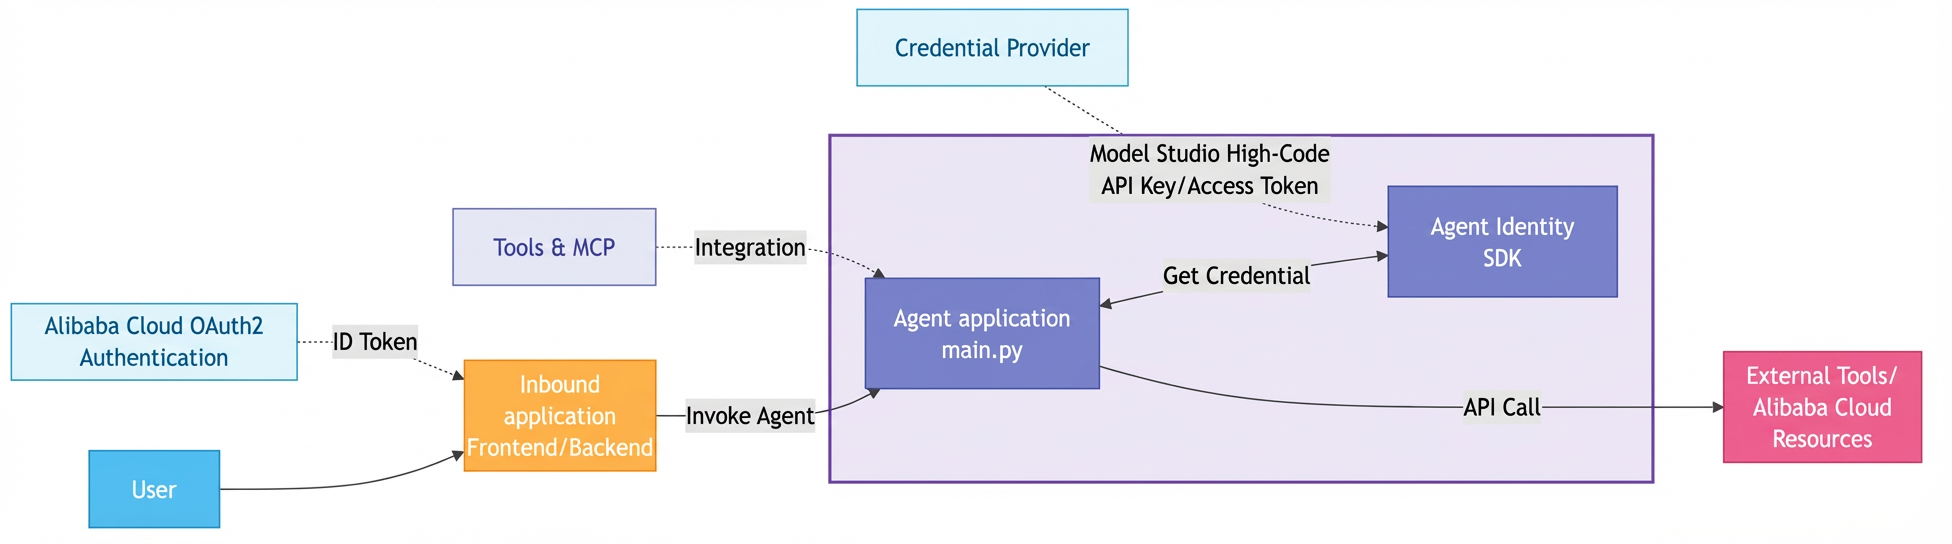
Prerequisites
Environment requirements
Your local test environment requires Python (version 3.10 or later) and the pip package manager.
RAM user and permission requirements
-
RAM user requirements:
You need two RAM users for different purposes.
-
Administrator: This user logs in to the Model Studio (Bailian), Function Compute (FC), Agent Identity, and RAM consoles to manage applications and configure permissions.
-
Script execution user: This user runs preparation scripts, tests the application locally, and deploys the application to the Model Studio (Bailian) high-code platform.
-
-
RAM permission requirements:
The administrator requires at least the following permissions:
{
  "Version": "1",
  "Statement": [
    {
      "Effect": "Allow",
      "Action": "fc:*",
      "Resource": "*"
    },
    {
      "Effect": "Allow",
      "Action": "ram:PassRole",
      "Resource": "*",
      "Condition": {
        "StringEquals": {
          "acs:Service": [
            "fc.aliyuncs.com"
          ]
        }
      }
    },
    {
      "Effect": "Allow",
      "Action": "bailiancontrol:*",
      "Resource": "*"
    },
    {
      "Effect": "Allow",
      "Action": [
        "ram:ListUserBasicInfos",
        "ram:*Application*"
      ],
      "Resource": "*"
    },
    {
      "Effect": "Allow",
      "Action": [
        "ram:CreateRole",
        "ram:GetRole",
        "ram:ListRoles",
        "ram:AttachPolicyToRole",
        "ram:ListPolicyAttachments",
        "ram:ListPolicies",
        "ram:GetPolicy",
        "ram:ListUsers"
      ],
      "Resource": "*"
    },
    {
      "Effect": "Allow",
      "Action": "openapiexplorer:*Mcp*",
      "Resource": "*"
    },
    {
      "Effect": "Allow",
      "Action": "agentidentity:*",
      "Resource": "*"
    },
    {
      "Effect": "Allow",
      "Action": [
        "log:Get*",
        "log:List*"
      ],
      "Resource": "*"
    },
    {
      "Effect": "Allow",
      "Action": [
        "log:Query*",
        "log:CallAiTools"
      ],
      "Resource": "*"
    }
  ]
}
The script execution user requires the following permissions:
{ "Version": "1", "Statement": [ { "Effect": "Allow", "Action": [ "bailiandata:*", "sfm:*" ], "Resource": "*" }, { "Effect": "Allow", "Action": "agentidentity:*", "Resource": "*" }, { "Effect": "Allow", "Action": "agentidentitydata:*", "Resource": "*" }, { "Effect": "Allow", "Action": "ram:CreateServiceLinkedRole", "Resource": "*", "Condition": { "StringEquals": { "ram:ServiceName": ["agentidentity.aliyuncs.com"] } } }, { "Effect": "Allow", "Action": [ "ram:CreateApplication", "ram:CreateRole", "ram:CreatePolicy", "ram:AttachPolicyToRole", "ram:CreateAppSecret", "ram:DeleteApplication", "ram:ListUserBasicInfos", "ram:ListRoles" ], "Resource": "*" } ] } -
Model Studio (Bailian) workspace permission requirements:
Grant the Component Management_Agent_Operation permission to the script execution user for the target workspace on the Model Studio (Bailian) Account Management page.
In the Edit Permissions dialog box, go to the Page Permissions step, select the Application tab, and then select the target permission.
Service activation and authorization
-
Ensure that the following services are activated for your Alibaba Cloud account:
-
Model Studio (Bailian)
-
Function Compute (FC)
-
-
Authorize cloud services on the Model Studio (Bailian) console. Go to Alibaba Cloud Model Studio (Bailian) - App Management, click the high-code type, and grant one-click authorization for the related cloud services.
Ensure that Function Compute (FC), Object Storage Service (OSS), and API Gateway are in the Authorized state.
DashScope API key
Obtain a DashScope API key with permission to call Model Studio (Bailian) models. If you do not have one, see Get API Key to create one.
Step 1: Local installation and testing
Get and prepare the sample code
-
Clone the code repository. Open a terminal on your local machine and run the following commands.
git clone https://github.com/aliyun/agent-identity-dev-kit.git cd agent-identity-dev-kit/agent_identity_python_samples/end-to-end_sample -
Install dependencies. We recommend creating and activating a Python virtual environment before installing the dependencies.
pip install -r requirements.txt -
Configure environment variables.
export AGENT_IDENTITY_REGION_ID=cn-beijing # Agent Identity is currently available only in the China (Beijing) region.
export DASHSCOPE_API_KEY=<your-api-key> # DashScope API
export MODELSTUDIO_WORKSPACE_ID=<your-workspace-id> # Optional. Replace with the Model Studio (Bailian) workspace ID where the high-code application will be deployed. If not set, the default workspace is used.
Prepare RAM user credentials
Configure local credentials by using the script execution user defined in RAM user and permission requirements.
Use Alibaba Cloud CLI
-
Install the Alibaba Cloud CLI (skip if already installed). For more information, see Quick start with CLI.
-
Log in to the Alibaba Cloud CLI. For more information, see Configure OAuth authentication for Alibaba Cloud CLI.
-
Check the credential configuration. Run the
aliyun configure listcommand to verify that the credential configuration exists and is valid. The output should be similar to the following:Profile | Credential | Valid | Region | Language --------- | ------------------ | ------- | ---------------- | -------- OAuthProfile * | OAuth:xQcliVOdYA@CN | Valid | cn-hangzhou | zh
Use an access key (not recommended)
Create an access key for the script execution user and configure it as local environment variables.
export ALIBABA_CLOUD_ACCESS_KEY_ID=<your-access-key-id>
export ALIBABA_CLOUD_ACCESS_KEY_SECRET=<your-access-key-secret>
Run the preparation script
In the project root directory, run the prepare.py script to create the required cloud resources:
python -m prepareThis script performs the following actions:
-
Creates an identity provider
-
Creates an Alibaba Cloud OAuth 2.1 inbound application
-
Creates an OAuth 2.1 native application required by the Alibaba Cloud MCP service
-
Creates a workload identity and role
-
Configures a credential provider
The script saves created resource details to the .config.json file in the root directory, including the mcp_app_name needed in a later step.
If the script fails due to a network issue or exceeded resource quota, clear the created resources before retrying:
python -m clearTo avoid impacting other RAM resources in your account, the cleanup logic does not delete roles or custom policies. You must delete them manually.
Configure the OpenAPI MCP service
-
Navigate to the Alibaba Cloud OpenAPI Custom MCP Service page and log in.
-
In the search box, enter "resourcecenter" and click the "resourcecenter" system service in the search results.
-
In the OAuth Configuration area, click Modify.
-
In the Modify OAuth Configuration dialog box, select Custom OAuth. From the dropdown menu, select the MCP application name created by the preparation script. The application name must match the value of the
mcp_app_namefield in the.config.jsonfile in the project's root directory. Click Confirm Change. -
In the Configuration Information area, copy the
Streamable HTTP Endpointaddress and update theMCP_SERVERfield in thedeploy_starter/config.ymlfile.
Test the application
-
Start the agent proxy service. Run the following command in the root directory:
python -m deploy_starter.main -
Start the frontend and backend applications. Run the following command in the root directory:
python -m application.backend.app -
Access the application and interact with the agent:
-
After the agent proxy and applications have started, open
http://localhost:8090in your browser. -
Complete the Alibaba Cloud login and user authorization. You can then interact with the model in the application's chat window. For example, enter: "Query my VPC configuration information in my Alibaba Cloud account."
-
Click the OAuth authorization URL in the response and complete the authorization.
The system returns a message indicating that the first conversation requires authorization to obtain the MCP tool list and provides an OAuth authorization link for the Alibaba Cloud MCP Service.
-
After authorization, the query returns a list of six Virtual Private Cloud (VPC) instances across three regions. For example, in the China (Hangzhou) (
cn-hangzhou) region, each VPC entry includes fields such as VPC Name, Resource ID, Resource Group ID, and Creation Time. Some entries also include tag information.
NoteFor more examples of interacting with the agent, see the README document in the code repository.
-
Step 2: Package and deploy the agent to Model Studio (Bailian) high-code
Package the local code
-
Install dependencies for packaging and deployment. Run the following commands in the project's root directory:
pip install rich pip install alibabacloud-bailian20231229 -
Package the agent. Run the following command in the project's root directory:
python setup.py bdist_wheelAfter successful packaging, a
.whlfile is generated in the project'sdistdirectory.
Deploy the agent to Model Studio (Bailian)
-
Run the following command in the project's root directory to deploy the packaged .whl file to Model Studio (Bailian):
runtime-fc-deploy --deploy-name agent-identity-sample --whl-path <PATH_TO_YOUR_NEW_WHL_FILE> --telemetry enableThe output should be similar to the following:
(.venv) xxx agentscope-sample % runtime-fc-deploy --deploy-name agent-identity-sample --whl-path ./dist/agentdev_starter_5ca90297-0.1.0-py3-none-any.whl --telemetry enable Built wheel at /Users/xxx agentscope-sample/dist/agentdev_starter_5ca90297-0.1.0-py3-none-any.whl Resource Name agent-identity-sample Deploy Result Console URL: https://modelstudio.console.alibabacloud.com/?tab=app#/app-center Deploy ID: bf96fd3202e24e64989442f7aaae57b1NoteIf you encounter permission-related errors during deployment, verify that the script execution user has the required RAM permissions and Model Studio (Bailian) workspace permissions as described in RAM user and permission requirements.
-
After a successful deployment, wait a few moments. The deployed agent application appears with a Published status in Alibaba Cloud Model Studio (Bailian) - App Management.
On the App Management page, select the high-code category tab. An application named
agent-identity-sampleappears with a green dot indicating the Published status.
Step 3: Configure the Model Studio (Bailian) high-code application
Configure environment variables in Model Studio (Bailian)
-
In Alibaba Cloud Model Studio (Bailian) - App Management, find and click the deployed agent application to open its details page.
-
On the high-code application details page, click the edit button to the right of the Environment Variables area.
-
Add the following two environment variables and click OK.
-
AGENT_IDENTITY_WORKLOAD_IDENTITY_NAME: Set this to the value of theworkload_identity_namefield from the .config.json file in the project's root directory. -
DASHSCOPE_API_KEY: Set this to the DashScope API key from the current workspace in Model Studio (Bailian).
-
-
In the Save Environment Variables confirmation dialog box, click Confirm.
Configure the instance RAM role in Function Compute
-
Log in to the RAM console and create a RAM role to associate with the Function Compute instance. For the cloud service principal, select Function Compute. For detailed steps, see Create a RAM role for a trusted Alibaba Cloud service.
-
On the RAM console, grant the
AliyunAgentIdentityDataFullAccesssystem policy to the newly created RAM role. -
In Alibaba Cloud Model Studio (Bailian) - App Management, find and click the deployed agent application. On the high-code application details page, click View Details to the right of the Basic Configurations area to view the details of the Function Compute instance that hosts the application.
-
On the Function Compute details page, click the Configuration tab. On the Configuration tab, click Edit on the right side of the Advanced Configurations section.
-
On the advanced configuration edit page, click Permissions. In the function role input box, search for and select the RAM role you just created.
-
Click Deploy.
Configure the public endpoint and authentication token in local code
-
In Alibaba Cloud Model Studio (Bailian) - App Management, find and click the deployed agent application. On the high-code application details page, copy the public endpoint and authentication token from the Triggers area.
-
Update the
deploy_starter/config.ymlfile with the public endpoint and authentication token:AGENT_BEARER_TOKEN: "<authentication-token>" AGENT_ENDPOINT: "<public-endpoint>/process"
Step 4: Test and verify
Test the application by following the instructions in Test the application.
Query logs (optional)
View request logs on the Function Compute instance to review call history and agent output.
On the function details page, select the Logs tab. The Invocation Requests list shows request ID, invocation status (for example, 200 for success), memory usage, and execution time. Log entries include MCP tool registration records such as Registered 5 tool functions from ResourceCenter-20221201-SearchResources, and tool_use call details showing agent resource queries through the ResourceCenter API.
Important notes
-
If you need to run the prepare.py script again, first run the cleanup script in the project's root directory to clear the resources:
python -m clear -
Do not change the constant configurations in the
prepare.pyscript, as this may cause the application to fail. -
If you deploy the frontend and backend to Alibaba Cloud (for example, on an ECS instance), you must associate an instance RAM role, such as an ECS instance role or a Function Compute instance role, with the backend's hosting environment. You must also grant this role the
AliyunAgentIdentityDataCompleteAuthAccesssystem policy. Without this role, the agent cannot obtain an OAuth access token.