To push or pull images to a Container Registry Enterprise Edition instance from a different region or a data center, the source network and the instance's VPC must be connected. This topic covers how to obtain IP addresses and configure routes for cross-region or off-site image access.
Use cases
|
Scenario |
Description |
Actions |
|
Access an Enterprise Edition instance from a data center |
Use VPN Gateway, Express Connect, or Smart Access Gateway to connect your data center to the VPC that hosts the Enterprise Edition instance. |
|
|
Access an Enterprise Edition instance across regions |
Use Cloud Enterprise Network (CEN) to connect your source VPC to the instance's VPC for cross-region access. Note
To pull images from multiple regions, create an Enterprise Edition instance in each region and use global synchronization. Synchronize instances within the same account. |
|
Example
This example accesses an Enterprise Edition instance in China (Hangzhou) from China (Shanghai) under the same Alibaba Cloud account. Environment details:
-
VPC1
-
Region: China (Hangzhou)
-
IPv4 CIDR block: 10.0.0.0/16
-
vSwitch 1, located in Zone J, with CIDR block 10.0.0.0/24
-
vSwitch 2, located in Zone K, with CIDR block 10.0.1.0/24 (multi-zone deployment for disaster recovery)
-
ECS1 IP address: 10.0.0.1 (used to verify connectivity)
-
-
VPC2
-
Region: China (Shanghai)
-
IPv4 CIDR block: 172.16.0.0/16
-
vSwitch 1, located in Zone M, with CIDR block 172.16.0.0/24
-
vSwitch 2, located in Zone N, with CIDR block 172.16.1.0/24
-
ECS2 IP address: 172.16.0.1
-
Workflow:
-
Establish a cross-region connection: Connect VPC1 and VPC2 through CEN. Connect VPCs across regions.
-
In China (Hangzhou), get the information for these three domains:
NoteECS instances in the same region as the Enterprise Edition instance must access it over the internal network. Configure access control for a VPC.
-
The Enterprise Edition instance domain, used for API access to push and pull images.
-
The authentication service domain, used for identity verification.
-
The associated OSS bucket domain, used for image storage and access.
-
-
Configure route tables: Add the obtained IP addresses or CIDR blocks to the source network's route tables for cross-region access through CEN.
-
From China (Shanghai), verify access to the Enterprise Edition instance in China (Hangzhou).
Step 1: Establish a cross-region connection
Use CEN to connect VPC1 in China (Hangzhou) and VPC2 in China (Shanghai). Connect VPCs across regions.
Step 2: Get domain information
Verify that the IP addresses for the following three domains do not conflict with existing services on your source network.
-
Log on to ECS1 in China (Hangzhou) and obtain the VPC IP addresses for the Enterprise Edition instance, the authentication service, and the OSS bucket.
-
Get the VPC access IP address of the Enterprise Edition instance.
Log on to the Container Registry console.
In the top navigation bar, select a region.
In the left-side navigation pane, click Instances.
On the Instances page, click the Enterprise Edition instance that you want to manage.
-
In the navigation pane on the left of the instance management page, choose .
-
On the VPC tab, copy the VPC access domain name of the Enterprise Edition instance. Then, run
pingon the domain name from the ECS instance to obtain its IP address.
-
Get the VPC IP address of the authentication service.
NoteYou can skip this step by enabling the instance to take over the authentication domain.
-
Run the following command to get the VPC domain name of the authentication service. Replace
InstanceNamewith your Enterprise Edition instance name andRegionIdwith its region ID.curl -vv https://${InstanceName}-registry-vpc.${RegionId}.cr.aliyuncs.com/v2/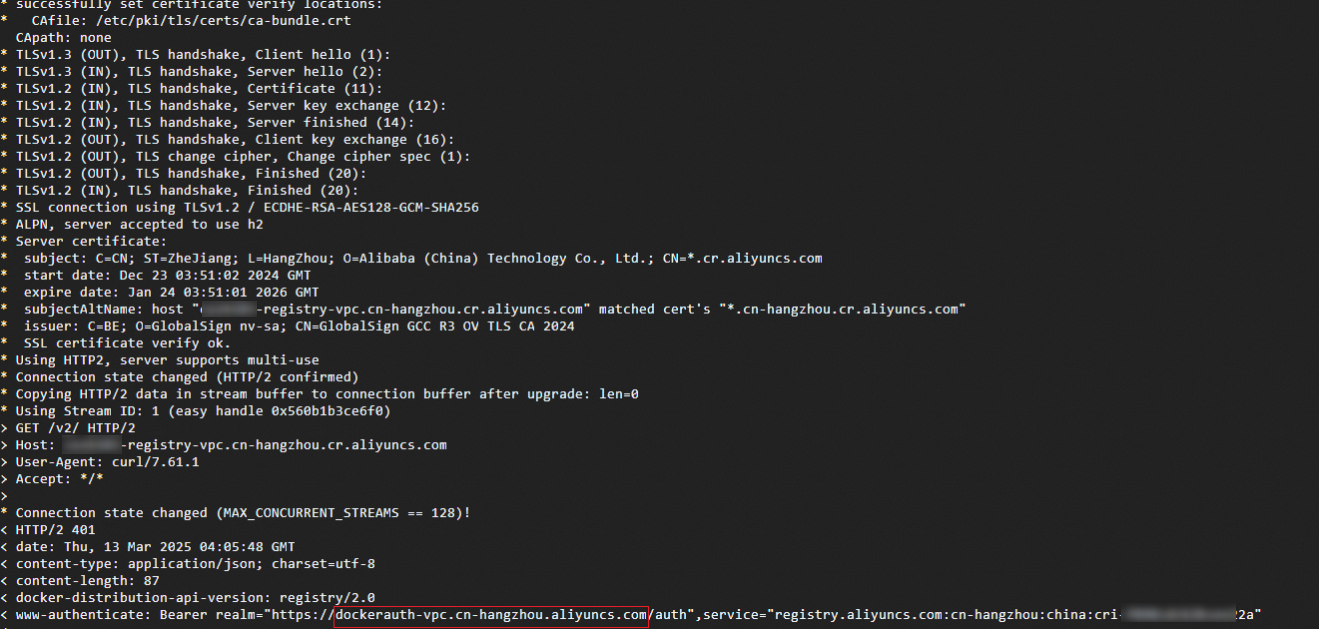
-
Run
pingto get the corresponding IP address.ping dockerauth-vpc.cn-hangzhou.aliyuncs.com
-
-
Get the VPC IP address of the OSS bucket.
NoteSkip this step if you access OSS resources over a private network by using PrivateLink and point the OSS domain name to the PrivateLink endpoint with a CNAME record.
Run
pingto get the corresponding IP address.-
Get the VPC domain name for the OSS bucket in China (Hangzhou). Access OSS by using an endpoint and a bucket domain name.
-
Run the ping command to get the IP address.
ping oss-cn-hangzhou-internal.aliyuncs.com
NoteIf you use a custom OSS bucket, the domain name is
${OSSBucketName}.oss-${RegionId}-internal.aliyuncs.com. -
Sample IP addresses for the Enterprise Edition instance domains in China (Hangzhou):
Service
Domain name
IP address
Enterprise Edition instance
xxxxxx-registry-vpc.cn-hangzhou.cr.aliyuncs.com
10.94.205.198
Authentication service
dockerauth-vpc.cn-hangzhou.aliyuncs.com
100.103.7.181/32
OSS bucket
oss-cn-hangzhou-internal.aliyuncs.com
100.118.28.43/32
-
Step 3: Configure route tables
-
In VPC2 in China (Shanghai), add the authentication service and OSS bucket IP addresses to the route table.
Log on to the VPC console.
In the left-side navigation pane, click Route Tables.
-
On the Route Tables page, find the target custom route table and click its ID.
-
On the details page of the custom route table, choose , and then click Add Route Entry.
-
In the Add Route Entry panel, configure the route entry as follows, and then click Confirm.
Parameter
Description
Screenshot
Destination CIDR Block
Enter the destination CIDR block for forwarding.
For IPv4 CIDR, enter 100.103.7.181/32 and 100.118.28.43/32. Add each IP address as a separate entry.
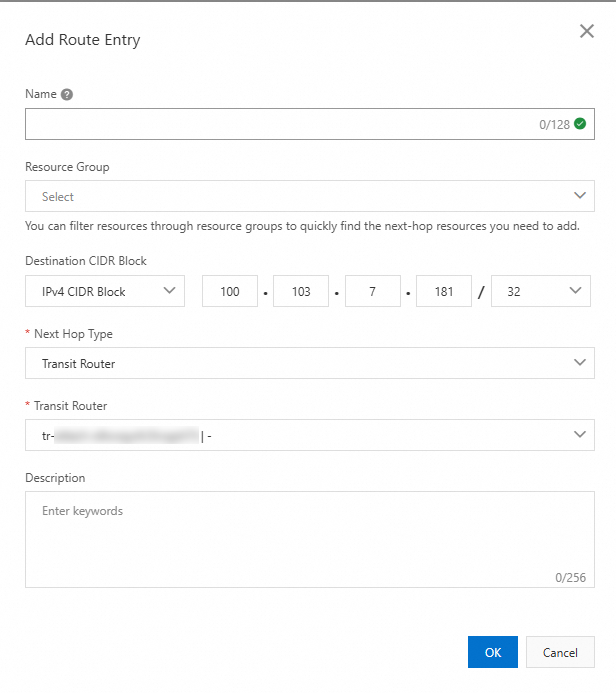
Next Hop Type
Select the next hop type.
Select Transit Router. Traffic to the destination CIDR block routes through the selected transit router.
Then, select the Transit Router created in Step 1: Establish a cross-region connection.
-
Add a route entry for 100.0.0.0/8 (covering the authentication service and OSS bucket IPs) to the transit router route table in China (Shanghai).
Log on to the CEN console.
On the CEN Instance page, click the ID of the CEN instance that you want to manage.
-
On the tab, find the transit router instance in China (Shanghai) and click its ID.
On the details page of the transit router, click the Route Table tab.
-
In the section on the left, click the target route table ID. On the details page of the route table, click the Route tab, and then click Create Route Entry.
-
In the Add Route Entry dialog box, configure the route entry, and then click Confirm.
Parameter
Description
Screenshot
Destination CIDR
Enter the destination CIDR block.
For IPV4, enter 100.0.0.0/8 (covers authentication service and OSS IPs).
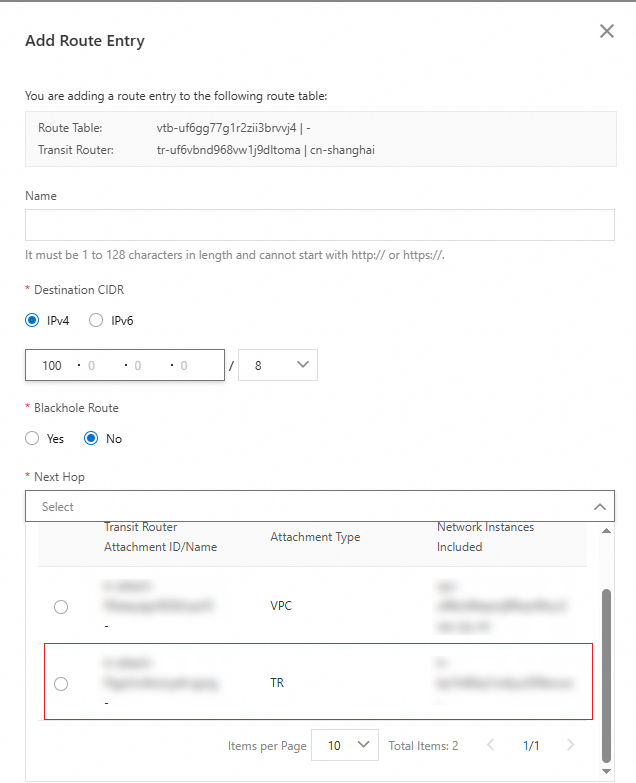
Blackhole Route
Blackhole Route:
No
Next Hop
Next Hop:
Set the attachment type to TR and select the CEN instance from Step 1: Establish a cross-region connection.
-
Add a route entry for 100.0.0.0/8 (covering the authentication service and OSS bucket IPs) to the transit router route table in China (Hangzhou).
-
On the tab, find the transit router instance in China (Hangzhou) and click its ID.
On the details page of the transit router, click the Route Table tab.
-
In the section on the left, click the target route table ID. On the details page of the route table, click the Route tab, and then click Create Route Entry.
-
In the Add Route Entry dialog box, configure the route entry, and then click Confirm.
Parameter
Description
Screenshot
Destination CIDR
Enter the destination CIDR block.
For IPV4, enter 100.0.0.0/8 (covers authentication service and OSS IPs).
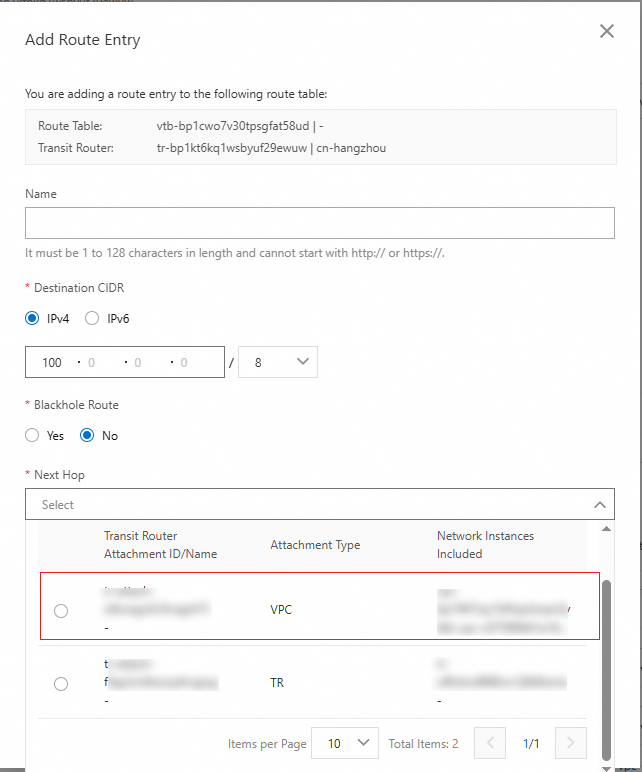
Blackhole Route
Blackhole Route:
No
Next Hop
Next Hop:
Set the attachment type to VPC and select the VPC instance ID for China (Hangzhou).
-
Step 4: Verify access
-
Log on to ECS2 in China (Shanghai). Run
pingto test connectivity to the three IP addresses from Step 2, then configure local DNS resolution.vim /etc/hosts 10.94.205.198 xxxxxx-registry-vpc.cn-hangzhou.cr.aliyuncs.com 100.103.7.181 dockerauth-vpc.cn-hangzhou.aliyuncs.com 100.118.28.43 ${OSSBucketName}.oss-cn-hangzhou-internal.aliyuncs.com -
Run
docker loginto log on to the container image repository, then rundocker pullto pull an image.
Resolving 100.0.0.0/8 IP conflicts
The authentication and OSS domain IPs resolve to the 100.0.0.0/8 CIDR block. If your internal network uses this range, IP conflicts will occur.
Authentication domain IP conflict
Resolve this conflict by enabling the instance to take over the authentication domain. This lets you access the service using only the instance domain name.
Log on to the Container Registry console.
In the top navigation bar, select a region.
On the Instances page, click the Enterprise Edition instance that you want to manage.
-
In the navigation pane on the left of the instance management page, choose . On the Domain page, turn on the Instance Taking over Authentication Domain Name switch.
ImportantTo enable authentication domain takeover, you must submit a ticket to add your Enterprise Edition instance to the allowlist.
-
In the Confirm to Enable Instance Taking over Authentication Domain Name dialog box, click Confirm.
OSS domain IP conflict
To resolve this conflict, access OSS resources over a private network by using PrivateLink, then point the OSS domain name to the PrivateLink domain name with a CNAME record.