This topic describes how to dynamically provision and mount Alibaba Cloud disk volumes for stateful applications in ACK Serverless and how to verify their persistent storage characteristics.
Use cases
Disk volumes suit workloads that need dedicated, high-performance block storage:
-
Stateful applications with high disk I/O requirements (for example, MySQL and Redis) without cross-pod data sharing
-
High-throughput log writing
-
Data persistence independent of the pod lifecycle
How dynamic provisioning works
When a PVC references a StorageClass, Kubernetes automatically creates and binds a persistent volume (PV) backed by an Alibaba Cloud disk, eliminating manual disk creation.
ACK Serverless clusters do not include a default StorageClass. Create one before provisioning storage.
Kubernetes supports a default StorageClass. If a PVC omits the StorageClass, Kubernetes uses the default to provision a PV. See Storage basics.
Prerequisites
Ensure the following:
-
An ACK Serverless cluster is created.
-
kubectl is connected to the cluster.
-
The CSI plug-in is installed.
Provision a disk volume
Complete these steps in order:
-
Create a StorageClass to define the disk type and provisioning behavior.
-
Create a PVC to claim storage from the StorageClass.
-
Deploy an application and mount the PVC.
ACK console
Step 1: Create a StorageClass
-
Log on to the ACK console and click Clusters in the left-side navigation pane.
-
On the Clusters page, click the cluster name, then choose Volumes > StorageClasses.
-
On the StorageClasses page, click Create.
-
In the Create dialog box, set the parameters.
Specific ECS instance types do not support ESSDs or elastic ephemeral disks. See FAQ about Elastic Block Storage.
Parameter Required Description Name Yes The StorageClass name. PV Type Yes Select Cloud Disk. Parameter Yes The disk category. Default: cloud_essd. Valid values:cloud_essd(Enterprise SSD),cloud_regional_disk_auto(Regional ESSDs),elastic_ephemeral_disk_premium(premium elastic ephemeral disk),elastic_ephemeral_disk_standard(standard elastic ephemeral disk),cloud_ssd(standard SSD),cloud_efficiency(ultra disk). Set multiple values for fallback, e.g.type: cloud_ssd,cloud_essd. The system tries each in order. AddzoneIdto pin to specific zones, e.g.cn-beijing-aorcn-beijing-a, cn-beijing-b.Reclaim Policy Yes PV and disk behavior on PVC deletion. Default: Delete (both removed). Set to Retain to keep both — recommended when data loss would be costly. Binding Mode No Default: Immediate (disk is created before the pod is scheduled). -
Click Create. The StorageClass appears on the StorageClasses page.
Step 2: Create a PVC
-
In the left-side navigation pane, choose Volumes > Persistent Volume Claims.
-
On the Persistent Volume Claims page, click Create.
-
In the Create PVC dialog box, set the parameters.
Parameter Required Description PVC Type Yes Select Cloud Disk. Name Yes The PVC name. Must be unique within the namespace. Allocation Mode Yes Select Use StorageClass. Existing Storage Class Yes Click Select, find the StorageClass from Step 1, and click Select in the Actions column. Capacity Yes The storage capacity to claim. Minimum: 20 GiB. Access Mode No Default: ReadWriteOnce (single-node read/write). -
Click Create. The PVC appears on the Persistent Volume Claims page with a bound PV.
Step 3: Deploy an application
-
In the left-side navigation pane, choose Workloads > StatefulSets.
-
On the StatefulSets page, click Create from Image.
-
Configure the application. Select Cloud Storage and mount the PVC created in Step 2. In this example, the disk mounts to
/tmp, persisting data written to/tmp. See Use a StatefulSet to create a stateful application.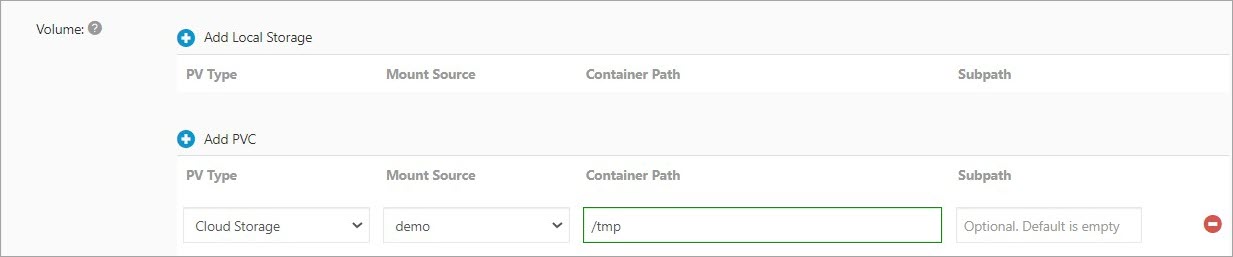
-
Click Create. The application is deployed with persistent disk storage.
kubectl
Step 1: Create a StorageClass
In multi-zone clusters, the StorageClass determines the disk type before pod scheduling.
-
Create a file named
storage-class-csi.yaml:Parameter Required Description provisionerYes Set to diskplugin.csi.alibabacloud.com.typeYes The disk category. Valid values: cloud_auto(ESSD AutoPL disk),cloud_essd(ESSD, default),cloud_essd_entry(ESSD Entry disk),cloud_ssd(standard SSD),cloud_efficiency(ultra disk),elastic_ephemeral_disk_standard(standard elastic ephemeral disk),elastic_ephemeral_disk_premium(premium elastic ephemeral disk),cloud_regional_disk_auto(Regional ESSDs). Specify multiple values as a comma-separated fallback list. See EBS pricing, Block storage performance, and Overview of instance families.encryptedNo Whether to encrypt the disk. Default: false.reclaimPolicyYes PV and disk behavior on PVC deletion. Delete: both removed.Retain: both kept — useRetainwhen data loss would be costly. Default:Delete.allowVolumeExpansionNo Set to trueto allow online disk expansion.volumeBindingModeNo Default: Immediate(disk is provisioned before the pod is scheduled).apiVersion: storage.k8s.io/v1 kind: StorageClass metadata: name: alicloud-disk-ssd-b # Use diskplugin.csi.alibabacloud.com as the provisioner for Alibaba Cloud disks. provisioner: diskplugin.csi.alibabacloud.com parameters: # Disk category fallback order: ESSD → standard SSD → ultra disk. # The system tries each value in sequence and stops when a disk is created. type: cloud_essd,cloud_ssd,cloud_efficiency # Optional. Set to "true" to encrypt the disk at rest. encrypted: "false" # Retain: keeps the PV and disk when the PVC is deleted (manual cleanup required). # Delete: removes the PV and disk automatically when the PVC is deleted. reclaimPolicy: Retain # Allows online disk expansion without downtime. allowVolumeExpansion: true # Immediate: provisions the disk before scheduling the pod. volumeBindingMode: Immediate -
Apply the StorageClass:
kubectl apply -f storage-class-csi.yaml -
Verify in the ACK console: log on, click Clusters, click the cluster name, then choose Volumes > StorageClasses.
Step 2: Create a PVC
-
Create a file named
pvc-ssd.yaml:Parameter Required Description nameYes The PVC name. accessModesYes The PV access mode. volumeModeNo Disk mount format. Filesystemis supported.storageClassNameYes The StorageClass for provisioning. storageYes The storage capacity to claim. Minimum: 20 GiB. apiVersion: v1 kind: PersistentVolumeClaim metadata: name: disk-pvc spec: accessModes: - ReadWriteOnce volumeMode: Filesystem resources: requests: storage: 25Gi storageClassName: alicloud-disk-ssd-b -
Create the PVC:
kubectl create -f pvc-ssd.yaml -
Verify in the ACK console: choose Volumes > Persistent Volume Claims.
Step 3: Deploy an application
-
Create a file named
pvc-dynamic.yaml:Parameter Description mountPathContainer path for the disk mount. claimNamePVC name. Must match the PVC from Step 2. apiVersion: apps/v1 kind: StatefulSet metadata: name: nginx-dynamic spec: selector: matchLabels: app: nginx template: metadata: labels: app: nginx spec: containers: - name: nginx image: nginx ports: - containerPort: 80 name: web volumeMounts: - name: pvc-disk mountPath: /data # Path inside the container where the disk is mounted. volumes: - name: pvc-disk persistentVolumeClaim: claimName: disk-pvc # Must match the PVC name created in Step 2. -
Deploy the application:
kubectl create -f pvc-dynamic.yaml -
Verify in the ACK console: choose Workloads > StatefulSets.
Next steps
-
Troubleshoot errors with FAQ about disk volumes.
-
Expand disk volumes running low on capacity.
-
Monitor disk usage with container storage monitoring.