You can install the cloud-native AI suite on ACK Pro clusters, ACK Serverless clusters (Pro version), and ACK Edge clusters (Pro version). The cluster version must be 1.18 or later. This topic describes how to install the cloud-native AI suite and how to install and configure the cloud-native AI operations and development consoles.
Prerequisites
An ACK Pro cluster, ACK Serverless cluster (Pro version), or ACK Edge cluster (Pro version) is created. The cluster version must be 1.18 or later. For more information, see Create an ACK Pro cluster, Create an ACK Serverless Pro cluster, and Create an ACK Edge Pro cluster.
To install and configure the cloud-native AI operations console, you must select Container Monitoring and Log Service on the Component Configurations page when you create a cluster, or install the ack-arms-prometheus and loongcollector components on the Add-ons page of an existing cluster. For more information, see Use Alibaba Cloud Prometheus for Monitoring and Collect Container Logs from an ACK Cluster.
Deploy the cloud-native AI suite
Log on to the ACK console. In the left navigation pane, click Clusters.
On the Clusters page, find the cluster you want and click its name. In the left-side pane, choose .
On the Cloud-native AI Suite page, click Deploy. On the deployment page, select the required components.
The following table describes the console configurations, components, and component support for different cluster types.
Configuration in the console
Component configuration
Supported cluster
Configuration item
Description
Component name and description
Namespace
ACK managed Pro cluster
ACK Serverless Pro cluster
ACK Edge Pro cluster
Elasticity
Specify whether to enable the elastic feature. For more information, see Run model training jobs on Kubernetes and Containerized elastic inference services.
ack-alibaba-cloud-metrics-adapter, an auto scaling component.
kube-system


Acceleration
Specify whether to enable the Fluid Data Acceleration feature. For more information, see Elastic datasets.
ack-fluid, a data caching and acceleration component.
fluid-system
Scheduling
Specify whether to enable the Scheduling Component (Batch Task Scheduling, GPU Sharing, Topology-aware GPU scheduling, and NPU scheduling) feature. You can click Advanced to configure custom parameters.
ack-ai-installer, a scheduling component.
kube-system
Specify whether to enable the Kube Queue feature. For more information, see Use ack-kube-queue to manage AI and machine learning workloads.
ack-kube-queue, a scheduling component that manages workloads in Kubernetes.
kube-queue
Interaction Mode
Arena: Select this option if you want to use the Arena CLI. To use the Arena CLI, you also need to install and configure the Arena client. After you install the Arena client, you can use the Arena CLI to integrate Kubeflow training operators. You can click Advanced to configure custom parameters.
If you select Kube Queue, Console, and Kubeflow Pipelines at the same time, the Arena option is required. For more information, see Configure the Arena client.
ack-arena (ecosystem tool), a machine learning CLI.
kube-system
Console: Deploy a lightweight Platform for AI. You can click Advanced to configure custom parameters.
ack-pai, a lightweight Platform for AI. Recommended.
You can integrate algorithms and engines that are deeply optimized by PAI based on years of experience into containerized applications. Services such as Data Science Workshop (DSW), Deep Learning Containers (DLC), and Elastic Algorithm Service (EAS) improve the elasticity and efficiency of AI model development, training, and inference, enhancing effectiveness of training and inference while reducing the barriers to AI development.
pai-system
Console: AI Console.
NoteThe AI Console (including AI Dashboard and AI Developer Console) provided by Alibaba Cloud was gradually rolled out through a whitelist mechanism starting January 22, 2025.
Existing deployments: If you have already deployed AI Dashboard or AI Developer Console before this date, your current usage remains unaffected.
New installations: Users not whitelisted can install and configure the AI Console through the open-source community. For detailed open-source configuration instructions, see Open-source AI Console.
ack-ai-dashboard (ecosystem tool), a visualized O&M console.
kube-ai
ack-ai-dev-console (ecosystem tool), a deep learning development console.
kube-ai
Console Data Storage
After you set Interaction Mode to Console, set Console Data Storage to Pre-installed MySQL or ApsaraDB RDS. For more information, see Install and configure the cloud-native AI console.
ack-mysql, a MySQL database component.
kube-ai
Workflow
After you select Kubeflow Pipelines, you can set Workflow Data Storage to Pre-installed MinIO or OSS. For more information, see Install and configure a workflow.
ack-ai-pipeline (ecosystem tool), a platform for building end-to-end machine learning workflows.
kube-ai
Monitoring
Specify whether to install the Monitoring Component. For more information, see Work with cloud-native AI dashboards.
ack-arena-exporter, a cluster monitoring component.
kube-ai
Click Deploy Cloud-native AI Suite at the bottom of the page. An environment and dependency check starts, and the selected components are automatically deployed after the check is passed.
After the components are installed, you can view the following information on the component list page:
You can view information, such as the names and versions of the components that are installed in the current cluster, and perform Deploy and Uninstall operations.
If a new version of an installed component is available, you can also perform an Upgrade operation.
After installing the cloud-native AI operations console (ack-ai-dashboard) and cloud-native AI development console (ack-ai-dev-console) components, you can access them in the Cloud-native AI Suite page. In the upper-left corner of the page, click AI Dashboard or AI Developer Console to go to the corresponding console.

After the installation is complete, you can find the AI Dashboard and AI Developer Console buttons in the upper-left corner of the Cloud-native AI Suite page. Click either button to go to the corresponding console.
Install and configure the cloud-native AI console
The AI console provided by Alibaba Cloud, which includes the development console and operations console, will be available only to whitelisted users starting January 22, 2025. If you deployed the development console or operations console before this date, your usage will not be affected. Users who are not on the whitelist can install and configure the AI suite console from the open source community. For more information about open source configuration, see Open Source AI Console.
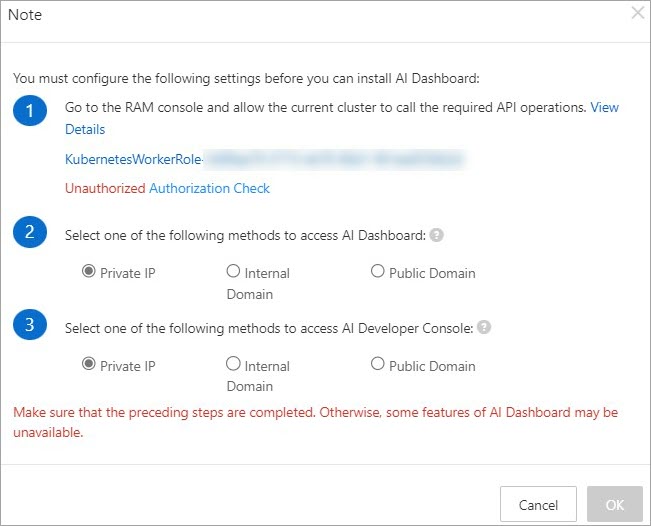
In the Ecosystem Tools section of the Deploy Cloud-native AI Suite page, select Console. The Note dialog box appears.
Create custom policies and grant permissions to a RAM role.
Create a custom policy.
Log on to the RAM console, and in the left navigation pane, select .
Click Create Policy.
On the JSON tab, add the following policy information and click OK. Then, in the name text box, enter a name for the custom policy in the
k8sWorkerRolePolicy-{ClusterID}format and click OK.{ "Version": "1", "Statement": [ { "Effect": "Allow", "Action": [ "cs:*", "log:GetProject", "log:GetLogStore", "log:GetConfig", "log:GetMachineGroup", "log:GetAppliedMachineGroups", "log:GetAppliedConfigs", "log:GetIndex", "log:GetSavedSearch", "log:GetDashboard", "log:GetJob", "ecs:DescribeInstances", "ecs:DescribeSpotPriceHistory", "ecs:DescribePrice", "eci:DescribeContainerGroups", "eci:DescribeContainerGroupPrice", "log:GetLogStoreLogs", "ims:CreateApplication", "ims:UpdateApplication", "ims:GetApplication", "ims:ListApplications", "ims:DeleteApplication", "ims:CreateAppSecret", "ims:GetAppSecret", "ims:ListAppSecretIds", "ims:ListUsers" ], "Resource": "*" } ] }
Grant permissions to the RAM role of the target ACK cluster.
Log on to the Resource Access Management (RAM) console. In the navigation pane on the left, choose .
In the search box, enter the target role name in the
KubernetesWorkerRole-{ClusterID}format. Find the role and click Grant Permission in the Actions column.In the Grant Permission panel, enter the name of the custom policy that you created in the search box. The policy name must be in the
k8sWorkerRolePolicy-{ClusterID}format.Select the policy and click Grant permissions.
Return to the Note dialog box in the ACK console and click Authorization Check. If the authorization is successful, the status changes to Authorized and the OK button becomes available. You can then proceed to step 3.
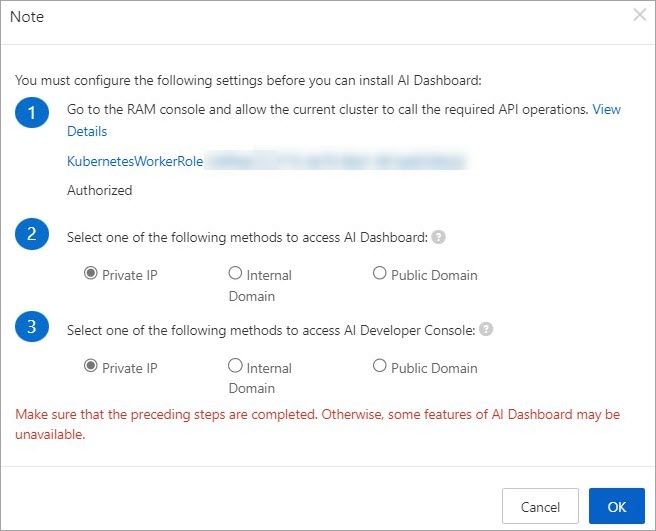
Select the way to access AI Dashboard and AI Developer Console, and then click OK.
You can use a Private IP, a Internal Domain, or a Public Domain to access the service.
In a production environment, use a private IP address or a private domain name.
Using a public domain name is recommended for testing purposes only. If you want to use a public domain name, you must add a mapping between the public domain name and the public IP address of the NGINX Ingress SLB instance for the cluster to your local hosts file.
NoteIf you want to access the console over a private network, select Private IP in the Note dialog box.
For more information about how to access the console using a private domain name or private IP address, see Access the AI operations console.
Select the Console Data Storage method.
After you select Sample Console, the Console Data Storage option appears in the Interaction Method section of the deployment page. You can then select a data storage method.
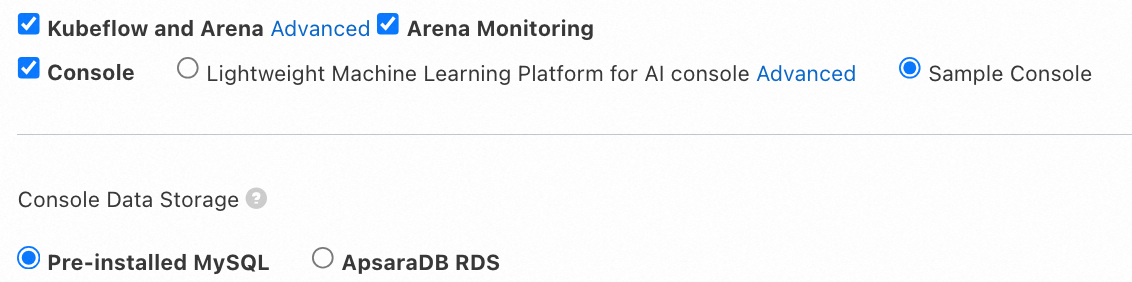
Cluster Built-in MySQL
If you do not select Alibaba Cloud RDS for data storage, the built-in MySQL database in the cluster is used by default. Due to stability and Service-Level Agreement (SLA) concerns, this method is recommended for testing purposes only and is not suitable for production environments. This method creates a new billable disk each time the component is installed. You must manage and release these disk resources.
ImportantIf the cluster fails or storage is lost, data may be lost.
The cloud-native AI suite uses the disk's StorageClass to create a PersistentVolumeClaim (PVC) with a disk backend as the persistent storage for the MySQL database. The ACK cluster creates and attaches a new 120 GB disk. This disk is billable. The lifecycle of this disk is not managed by ACK. You must manage your disk resources and delete them if they are no longer needed. For more information about how to release a disk, see Release a disk.
Alibaba Cloud RDS
NoteIf a connection error occurs when you use RDS, see Troubleshoot instance connection failures.
If you want to change the data storage method, you must uninstall and then reinstall the cloud-native AI suite. If a Secret named
kubeai-rdsexists in the cluster, use kubectl to delete it.
Purchase an RDS instance and create a database and an account. For more information, see Quick Start for ApsaraDB RDS. For more information about RDS billing, see Billing overview.
Click Deploy Cloud-native AI Suite at the bottom of the page.
Click the name of the target cluster. In the navigation pane, select Configurations > Secrets.
From the Namespace drop-down list at the top of the page, select
kube-ai.In the upper-left corner of the page, click Create from YAML.
Enter the following YAML template to create a Secret named
kubeai-rds.apiVersion: v1 kind: Secret metadata: name: kubeai-rds namespace: kube-ai type: Opaque stringData: MYSQL_HOST: "Your RDS URL" MYSQL_DB_NAME: "Database name" MYSQL_USER: "Database username" MYSQL_PASSWORD: "Database password"Parameter
Description
name
The name of the secret.
namespace
The name of the cluster namespace.
MYSQL_HOST
MYSQL_DB_NAME
MYSQL_USER
MYSQL_PASSWORD
The parameters for ApsaraDB RDS for MySQL. For more information, see (Deprecated, redirected to "Step 1") Quickly create an ApsaraDB RDS for MySQL instance and (Deprecated, redirected to "Step 1") Create a database and an account.
Install and configure a workflow
If you select Kubeflow Pipelines as the workflow engine, you must also select a Workflow Data Storage method.
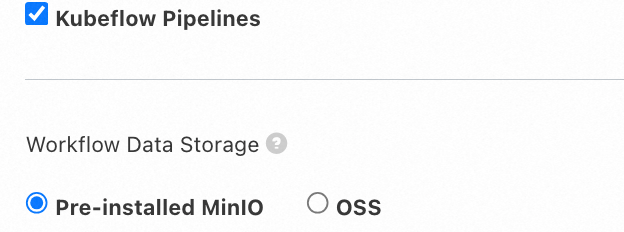
Pre-installed MinIO
If you do not select Alibaba Cloud OSS for data storage, the built-in MinIO in the cluster is used by default. Due to stability and SLA concerns, this method is recommended for testing purposes only and is not suitable for production environments. This method creates a new billable disk each time the component is installed. You must manage and release these disk resources.
If the cluster fails or storage is lost, data may be lost.
The cloud-native AI suite uses the disk's StorageClass to create a PVC with a disk backend as the persistent storage for MinIO. The ACK cluster creates and attaches a new 20 GB disk. This disk is billable. The lifecycle of this disk is not managed by ACK. You must manage your disk resources and delete them if they are no longer needed. For more information about how to release a disk, see Release a disk.
OSS
If the kube-ai namespace does not exist in the cluster, create it.
kubectl create ns kube-aiBefore you install Kubeflow Pipelines from the cloud-native AI suite, go to the Container Service console, click the name of the target cluster, and then in the navigation pane on the left, select .
From the Namespace drop-down list at the top of the page, select kube-ai.
In the upper-right corner of the page, click Create from YAML.
Enter the following YAML template and click Create. The cluster automatically deploys the YAML file to generate a Secret named
kubeai-oss.apiVersion: v1 kind: Secret metadata: name: kubeai-oss namespace: kube-ai type: Opaque stringData: ENDPOINT: "https://oss-cn-beijing.aliyuncs.com" ACCESS_KEY_ID: "****" ACCESS_KEY_SECRET: "****"Parameter
Description
name
The name of the secret.
namespace
The name of the cluster namespace.
Notenamespace: kube-ai is automatically created when you deploy the cloud-native AI suite. You do not need to create it separately.
ENDPOINT
The endpoint of OSS. The example uses the endpoint of the China (Beijing) region. For more information about endpoints, see OSS regions and endpoints.
ACCESS_KEY_ID
ACCESS_KEY_SECRET
The AccessKey pair of your account. To obtain an AccessKey pair, see Create an AccessKey.
ImportantTo ensure data security, we recommend that you use the AccessKey (AK) of a Resource Access Management (RAM) user. Before logging on as a RAM user, you must grant the
AliyunOSSFullAccesspermission to the RAM user.After you create the Secret, wait for a bucket named
mlpipeline-<clusterid>to be automatically created in the OSS console. The creation of the bucket indicates that you have successfully configured Alibaba Cloud OSS as the workflow data storage method. For more information about OSS billing, see Billing overview.Finally, install the Kubeflow Pipelines component from the cloud-native AI suite.