The native Ray Dashboard is available only while a cluster is running. Once the cluster is terminated, all historical logs and monitoring data are gone. HistoryServer solves this by collecting node logs in real time during cluster operation and storing them persistently in Object Storage Service (OSS), so you can query historical records even after the cluster is recycled.
HistoryServer requires six configuration steps. Complete them in order, as each step depends on the previous one.
| Step | What you do |
|---|---|
| 1. Enable RRSA | Enable the RAM Roles for Service Accounts (RRSA) OpenID Connect (OIDC) feature on your cluster |
| 2. Create an RRSA role | Create a RAM role with ARMS read and OSS full-access permissions |
| 3. Create an OAuth application | Register an OAuth app and create a Kubernetes Secret with its credentials |
| 4. Configure KubeRay | Install KubeRay and set the HistoryServer parameters in the Operator |
| 5. Create a RayCluster | Submit a RayCluster with the ray.alibabacloud.com/enable-historyserver: "true" annotation |
| 6. Access HistoryServer | Connect via port-forward or configure public internet access |
Prerequisites
Before you begin, ensure that you have:
-
KubeRay version later than
1.2.1.5installed. For more information, see Install KubeRay in ACK. -
(If you use a custom
postStarthook) When HistoryServer is enabled, it overwrites thepostStarthook of pods created by RayCluster. To keep your hook behavior, append the following script, which writes the Raynodeidto/tmp/ray/init.logfor the HistoryServer Collector sidecar to read.GetNodeId(){ while true; do nodeid=$(ps -ef | grep raylet | grep node_id | grep -v grep | grep -oP '(?<=--node_id=)[^ ]*' | tr -d '\n') if [ -n "$nodeid" ]; then echo "$(date) raylet started: \"$(ps -ef | grep raylet | grep node_id | grep -v grep | grep -oP '(?<=--node_id=)[^ ]*')\" => ${nodeid}" >> /tmp/ray/init.log echo $nodeid > /tmp/ray/alibabacloud_raylet_node_id break else echo "$(date) raylet not start >> /tmp/ray/init.log" sleep 1 fi done } GetNodeId -
(If you use a custom ServiceAccount) When HistoryServer is enabled, it replaces the ServiceAccount of pods created by RayCluster. The new ServiceAccount follows the naming convention
ServiceAccountPrefix-RayClusterName. Make sure your custom ServiceAccount configuration matches this naming rule.
Step 1: Enable RRSA
-
Log in to the ACK console. In the left-side navigation pane, click Clusters.
-
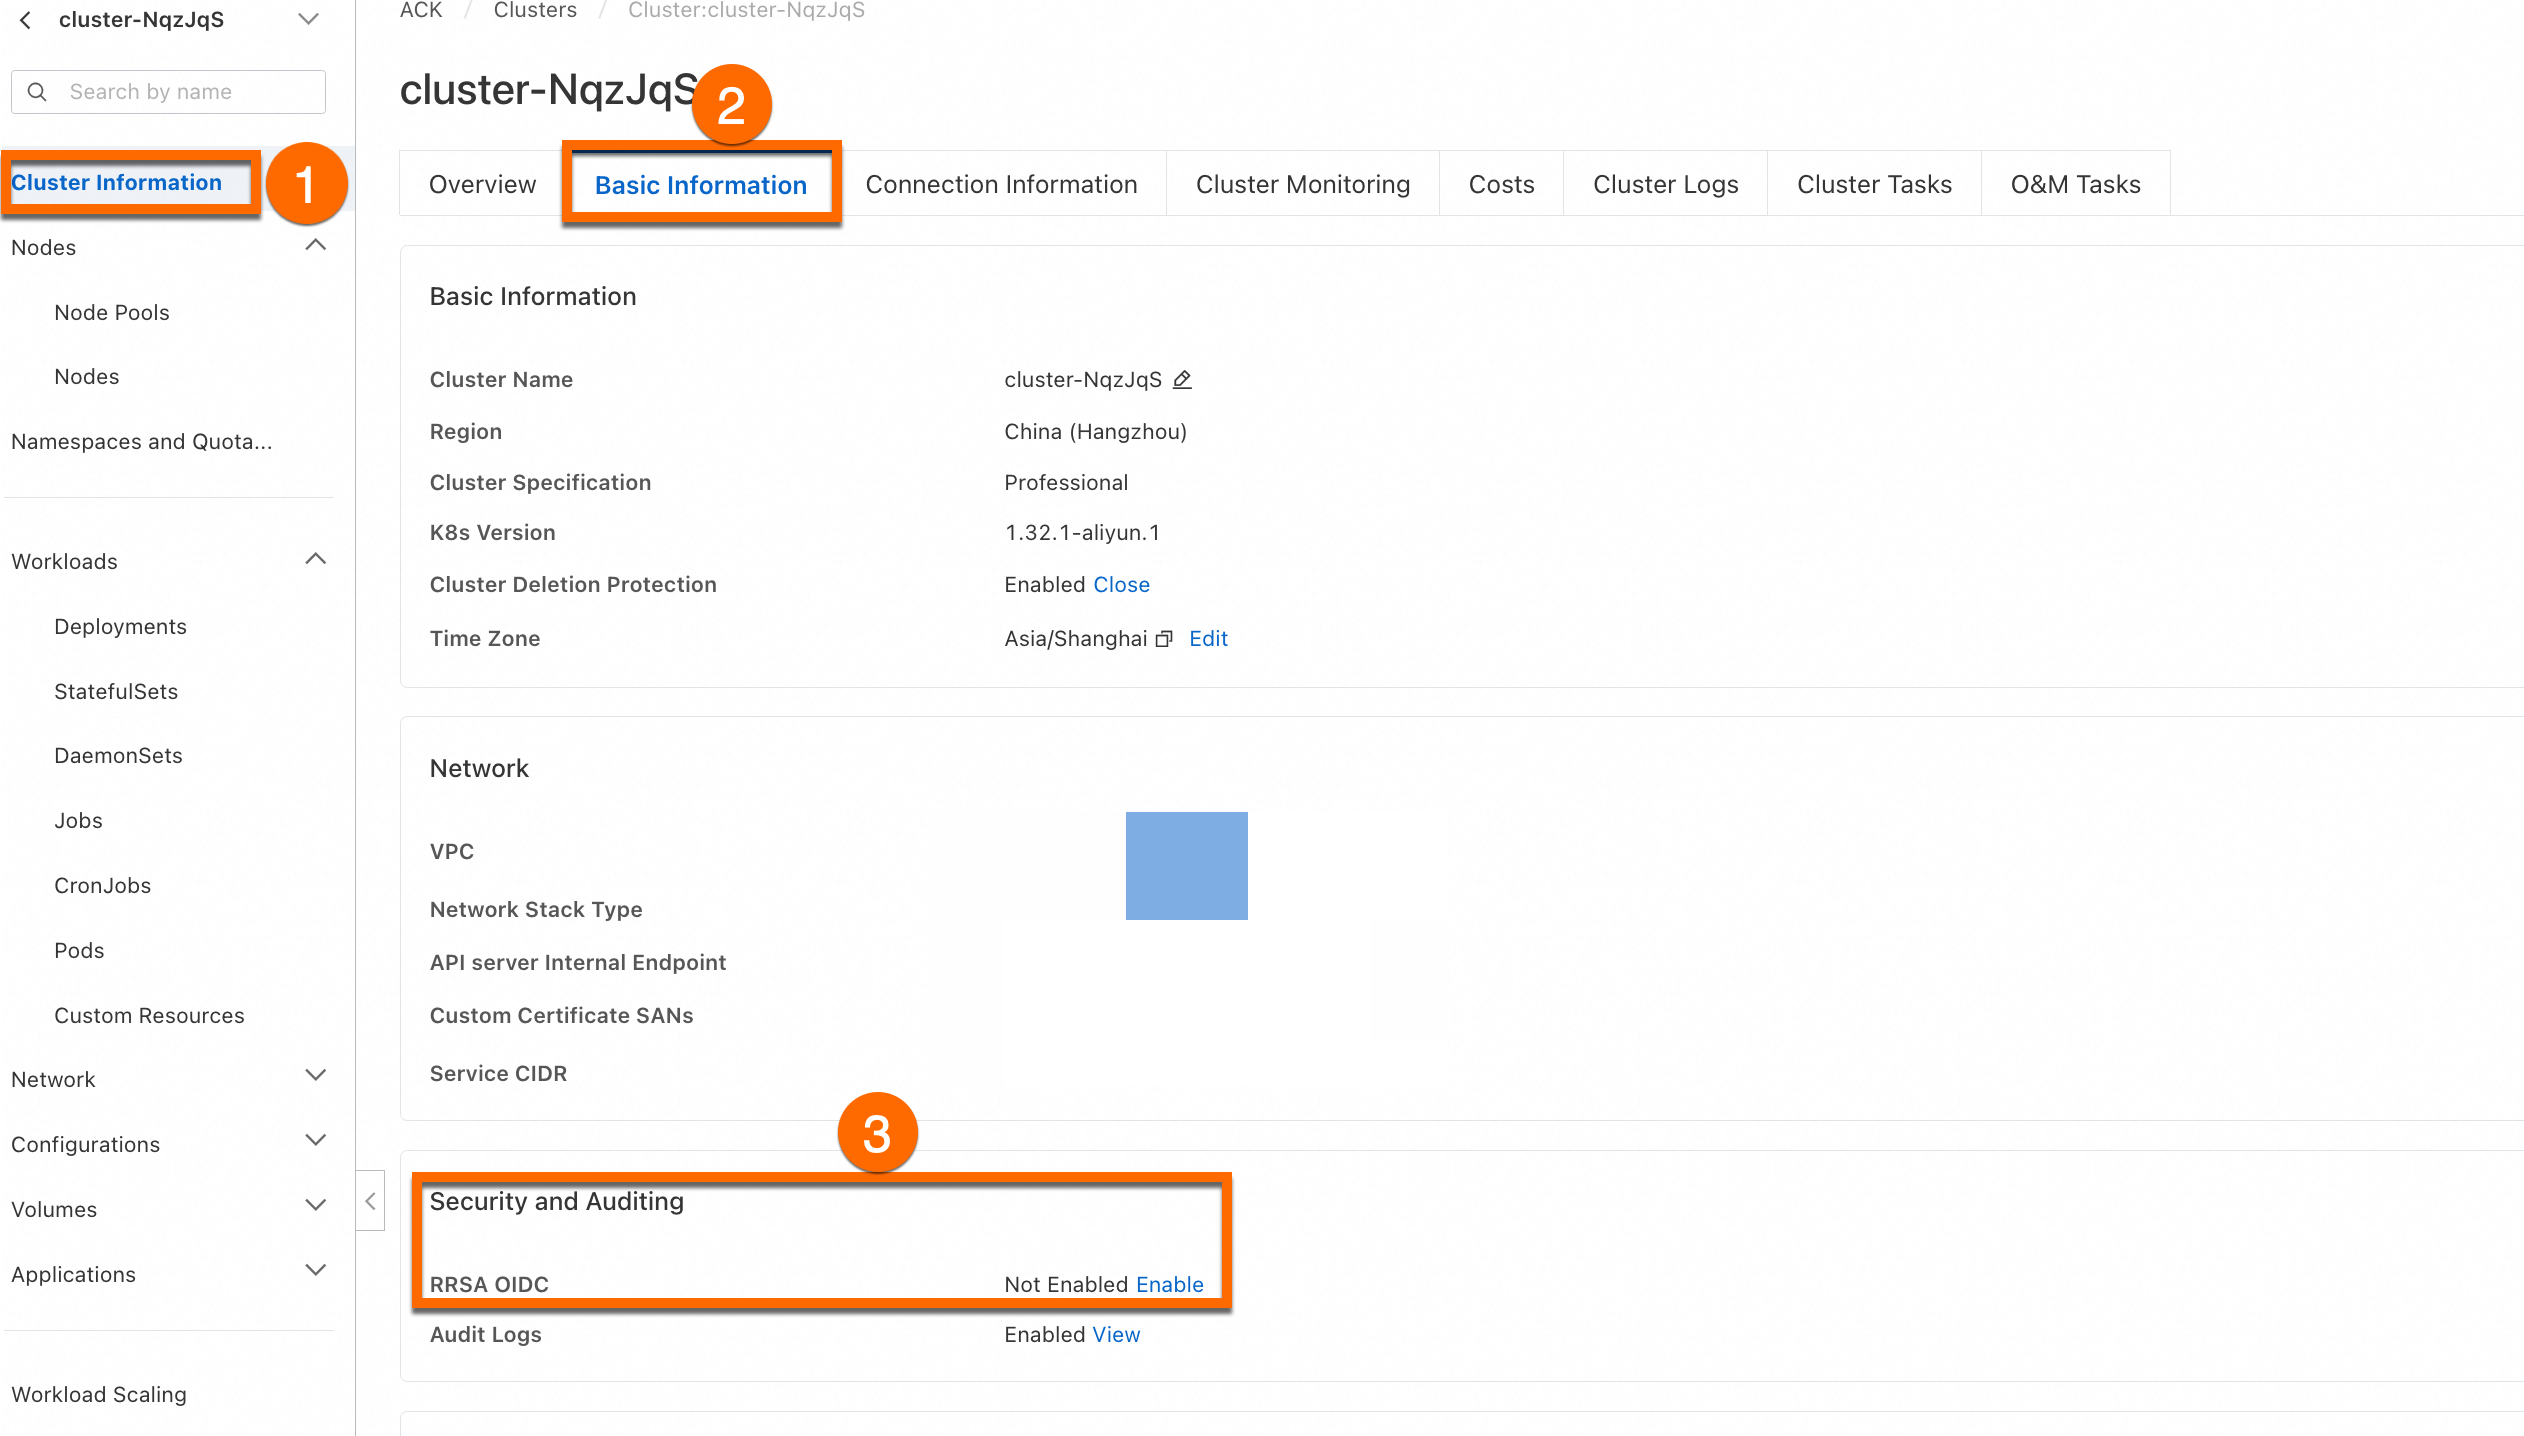
On the Clusters page, click the name of the cluster you want to manage. In the left-side pane, click Cluster Information.
-
On the cluster details page, go to Basic Information > Security and Auditing, and click Enable next to RRSA OIDC. For more information, see Enable during cluster creation.
Step 2: Create an RRSA role
Create the role
-
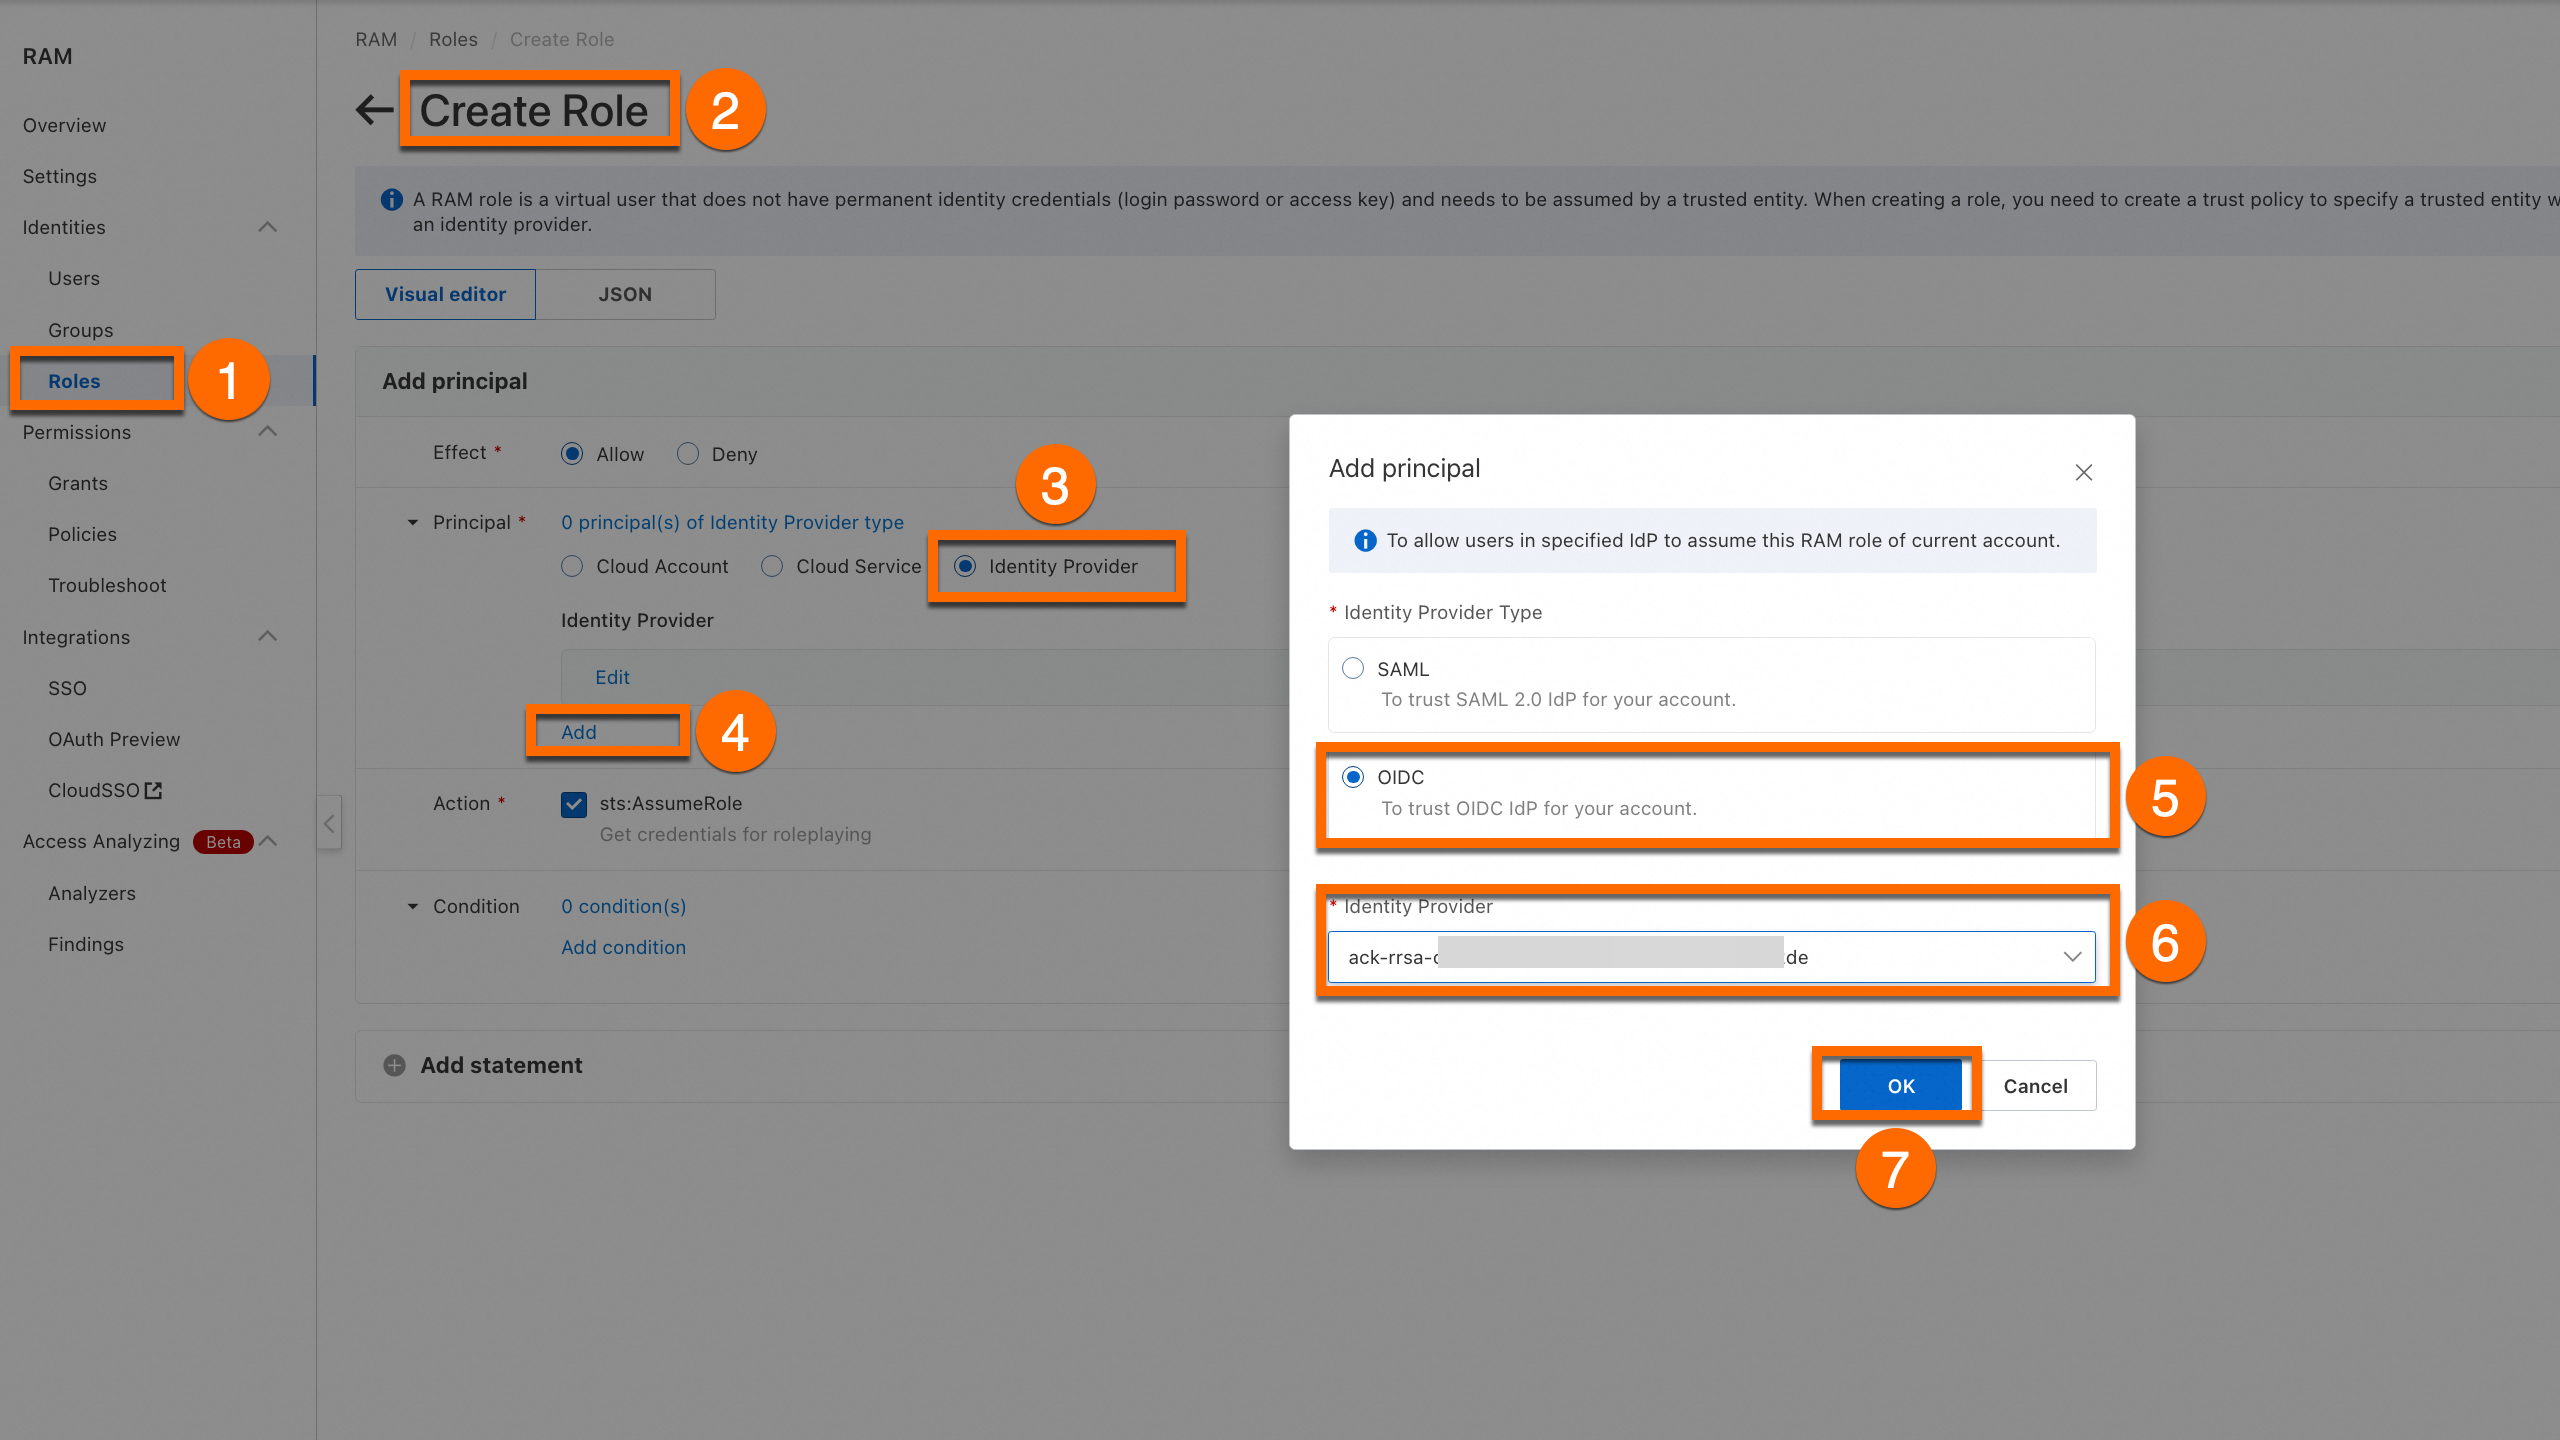
Log in to the RAM console as a RAM administrator. In the left-side navigation pane, choose Identities > Roles.
-
On the Roles page, click Create Role and select Identity Provider as the trusted principal type.
-
Add a principal: select the cluster for which you enabled RRSA OIDC.
-
Add a condition to associate a specific ServiceAccount with this role. If you use a custom ServiceAccount, click Add statement to add two principals to the same RRSA role, one for each of the following conditions: *Principal 1 — Identity Provider* *Principal 2 — Identity Provider* The two service accounts are
system:serviceaccount:kuberay:ray-historyserverandsystem:serviceaccount:*:rhs*, whererhsis a customizable part.The asterisk (
*) is a wildcard.ray-historyservermust match theServiceAccountPrefixyou specify when installing HistoryServer.Field Value Key oidc:subOperator StringLikeValue system:serviceaccount:*:ray-historyserver*Field Value Key oidc:subOperator StringEqualsValue system:serviceaccount:kuberay:ray-historyserverField Value Key oidc:subOperator StringLikeValue system:serviceaccount:*:rhs*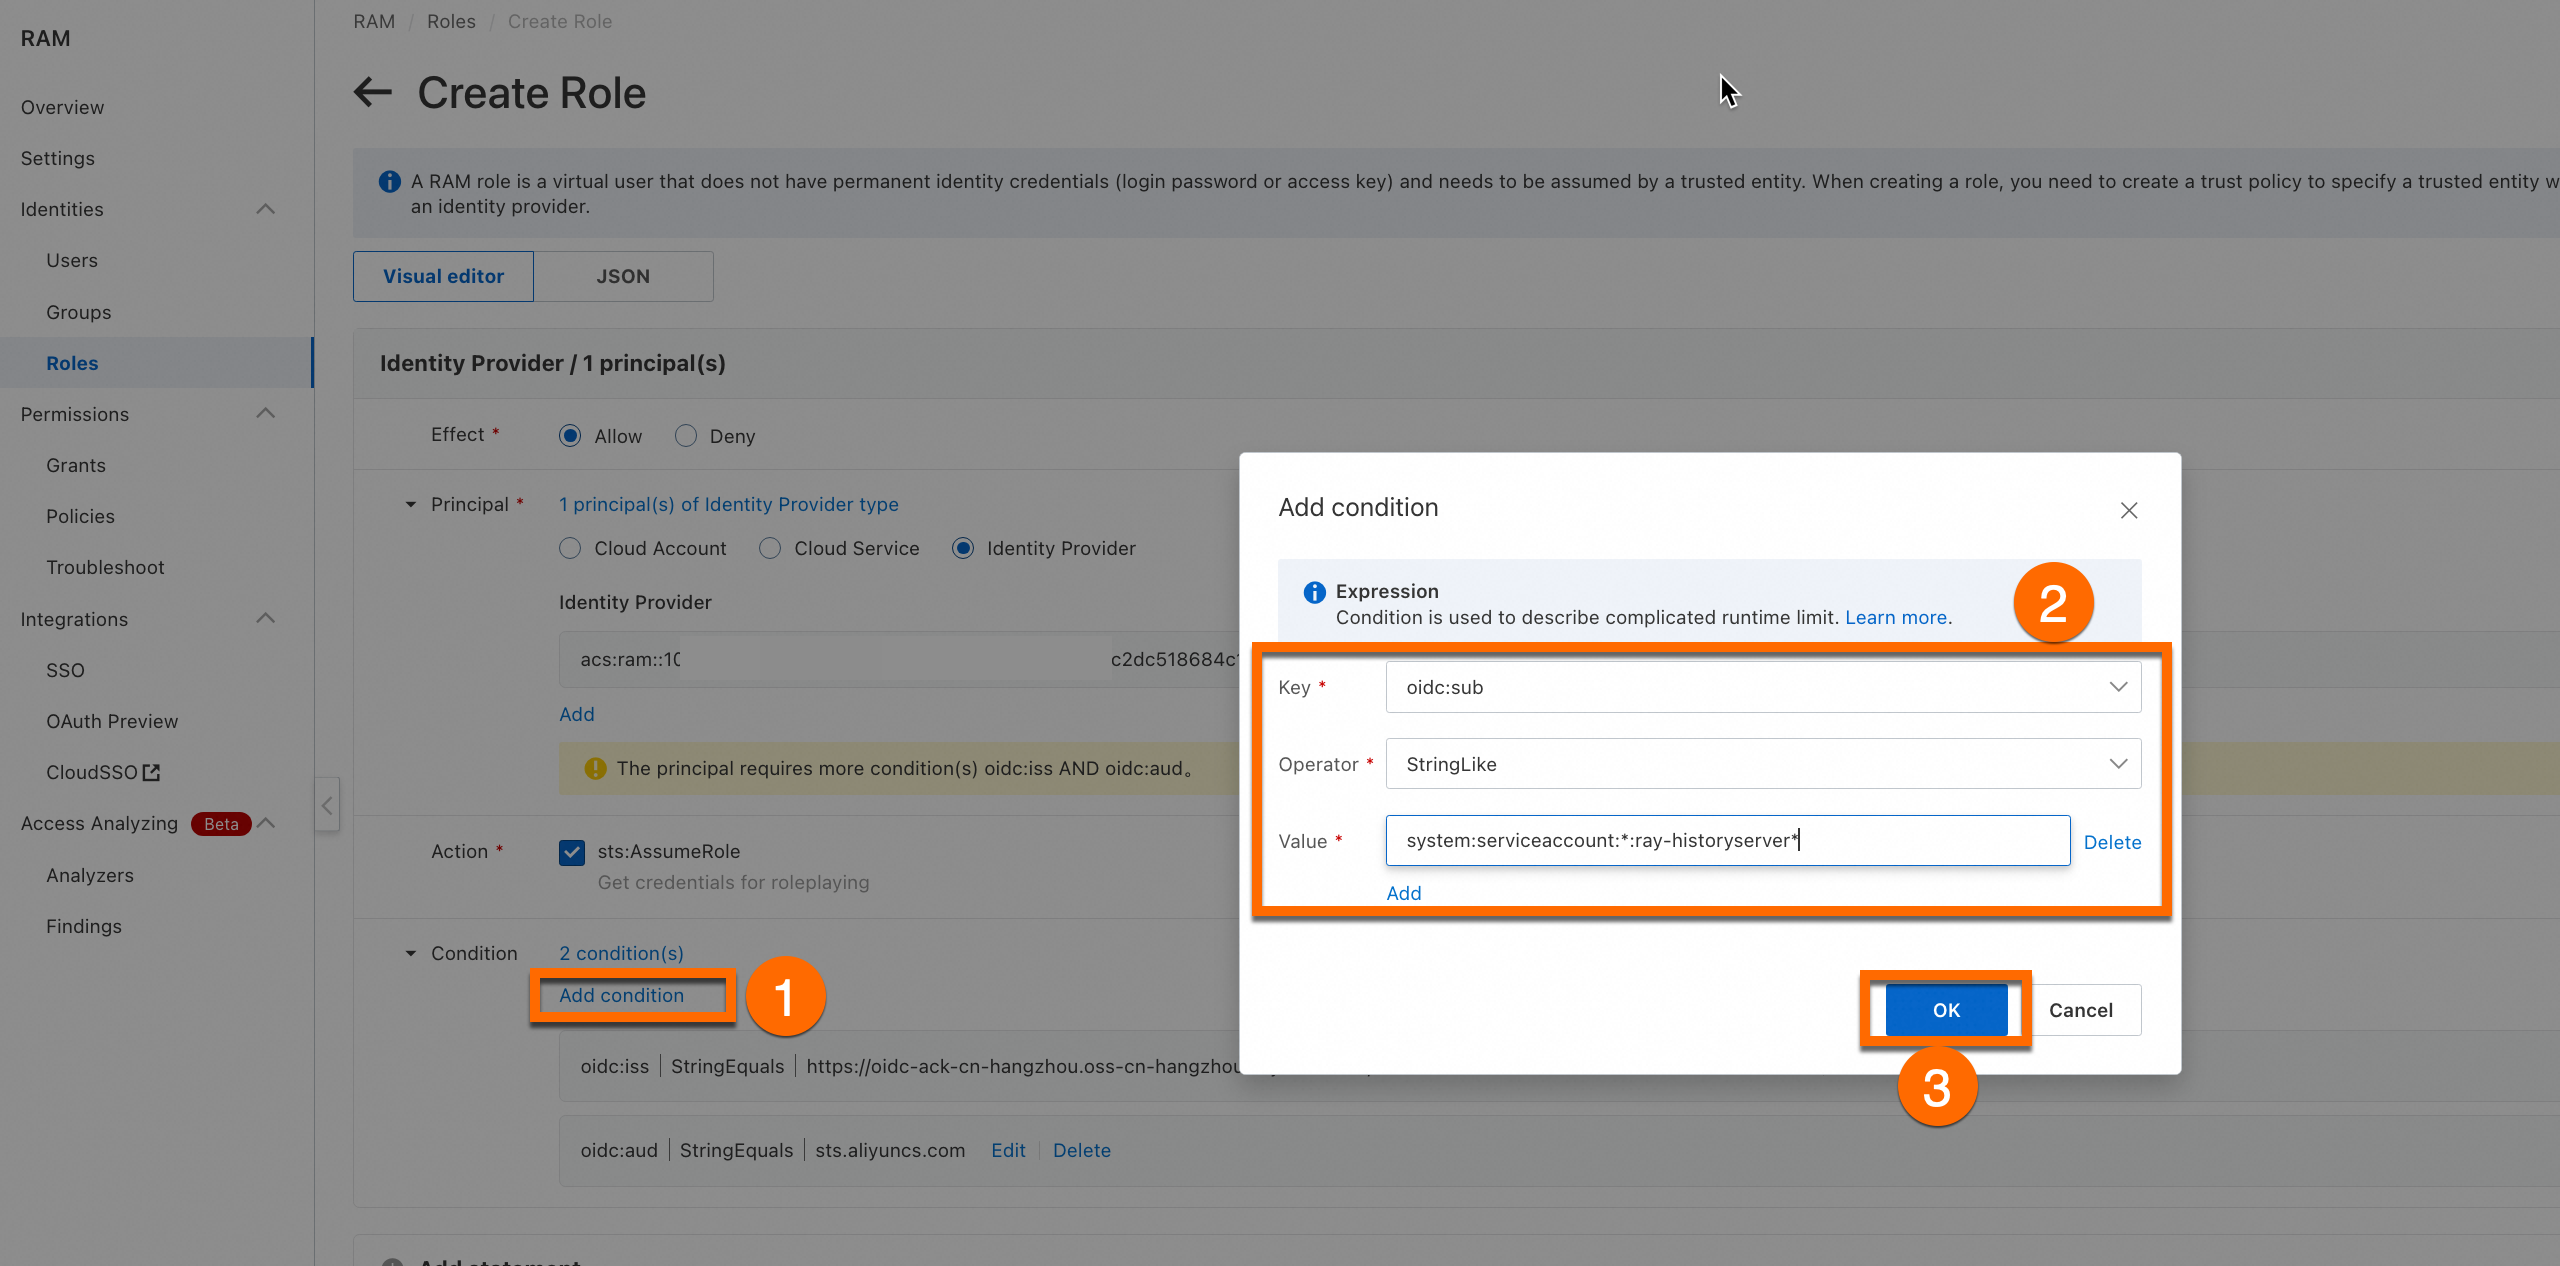
Add permissions
Add the following permissions to the role:
-
Add
AliyunARMSReadOnlyAccessfor read-only access to Application Real-Time Monitoring Service (ARMS).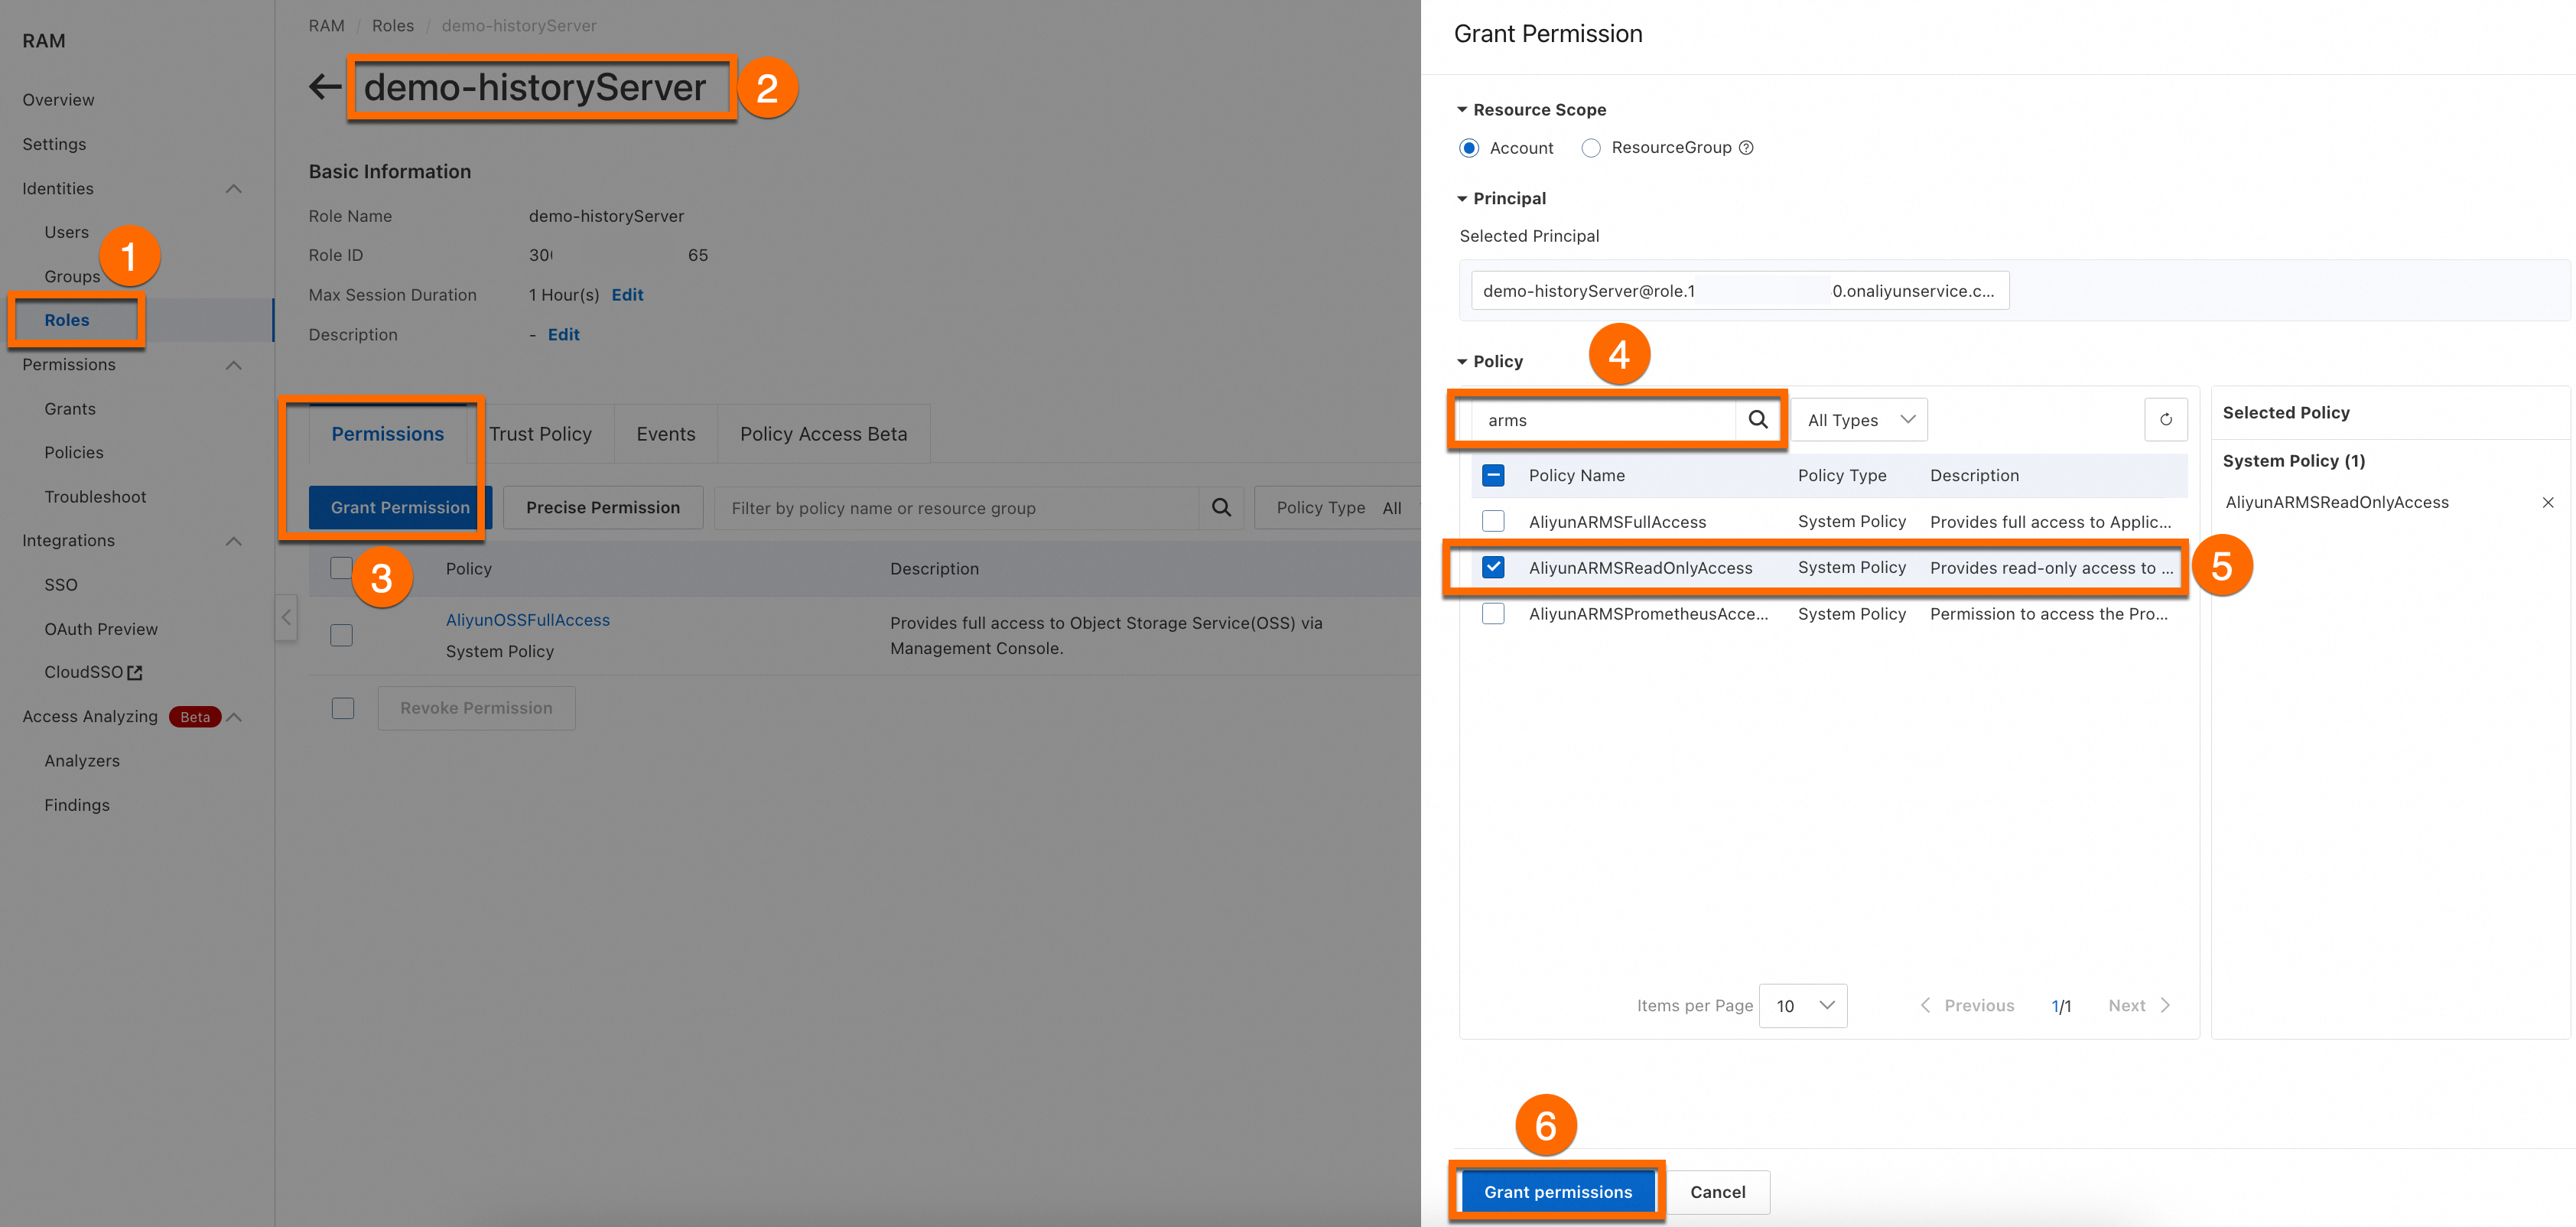
-
Add
AliyunOSSFullAccessfor managing OSS. The steps are the same as above.ImportantThis guide grants the role full OSS permissions. In production, use precise authorization to limit the permission scope.
Step 3: Create an OAuth application
Create and configure the OAuth application
To connect to HistoryServer over the internet, see Configure internet access.
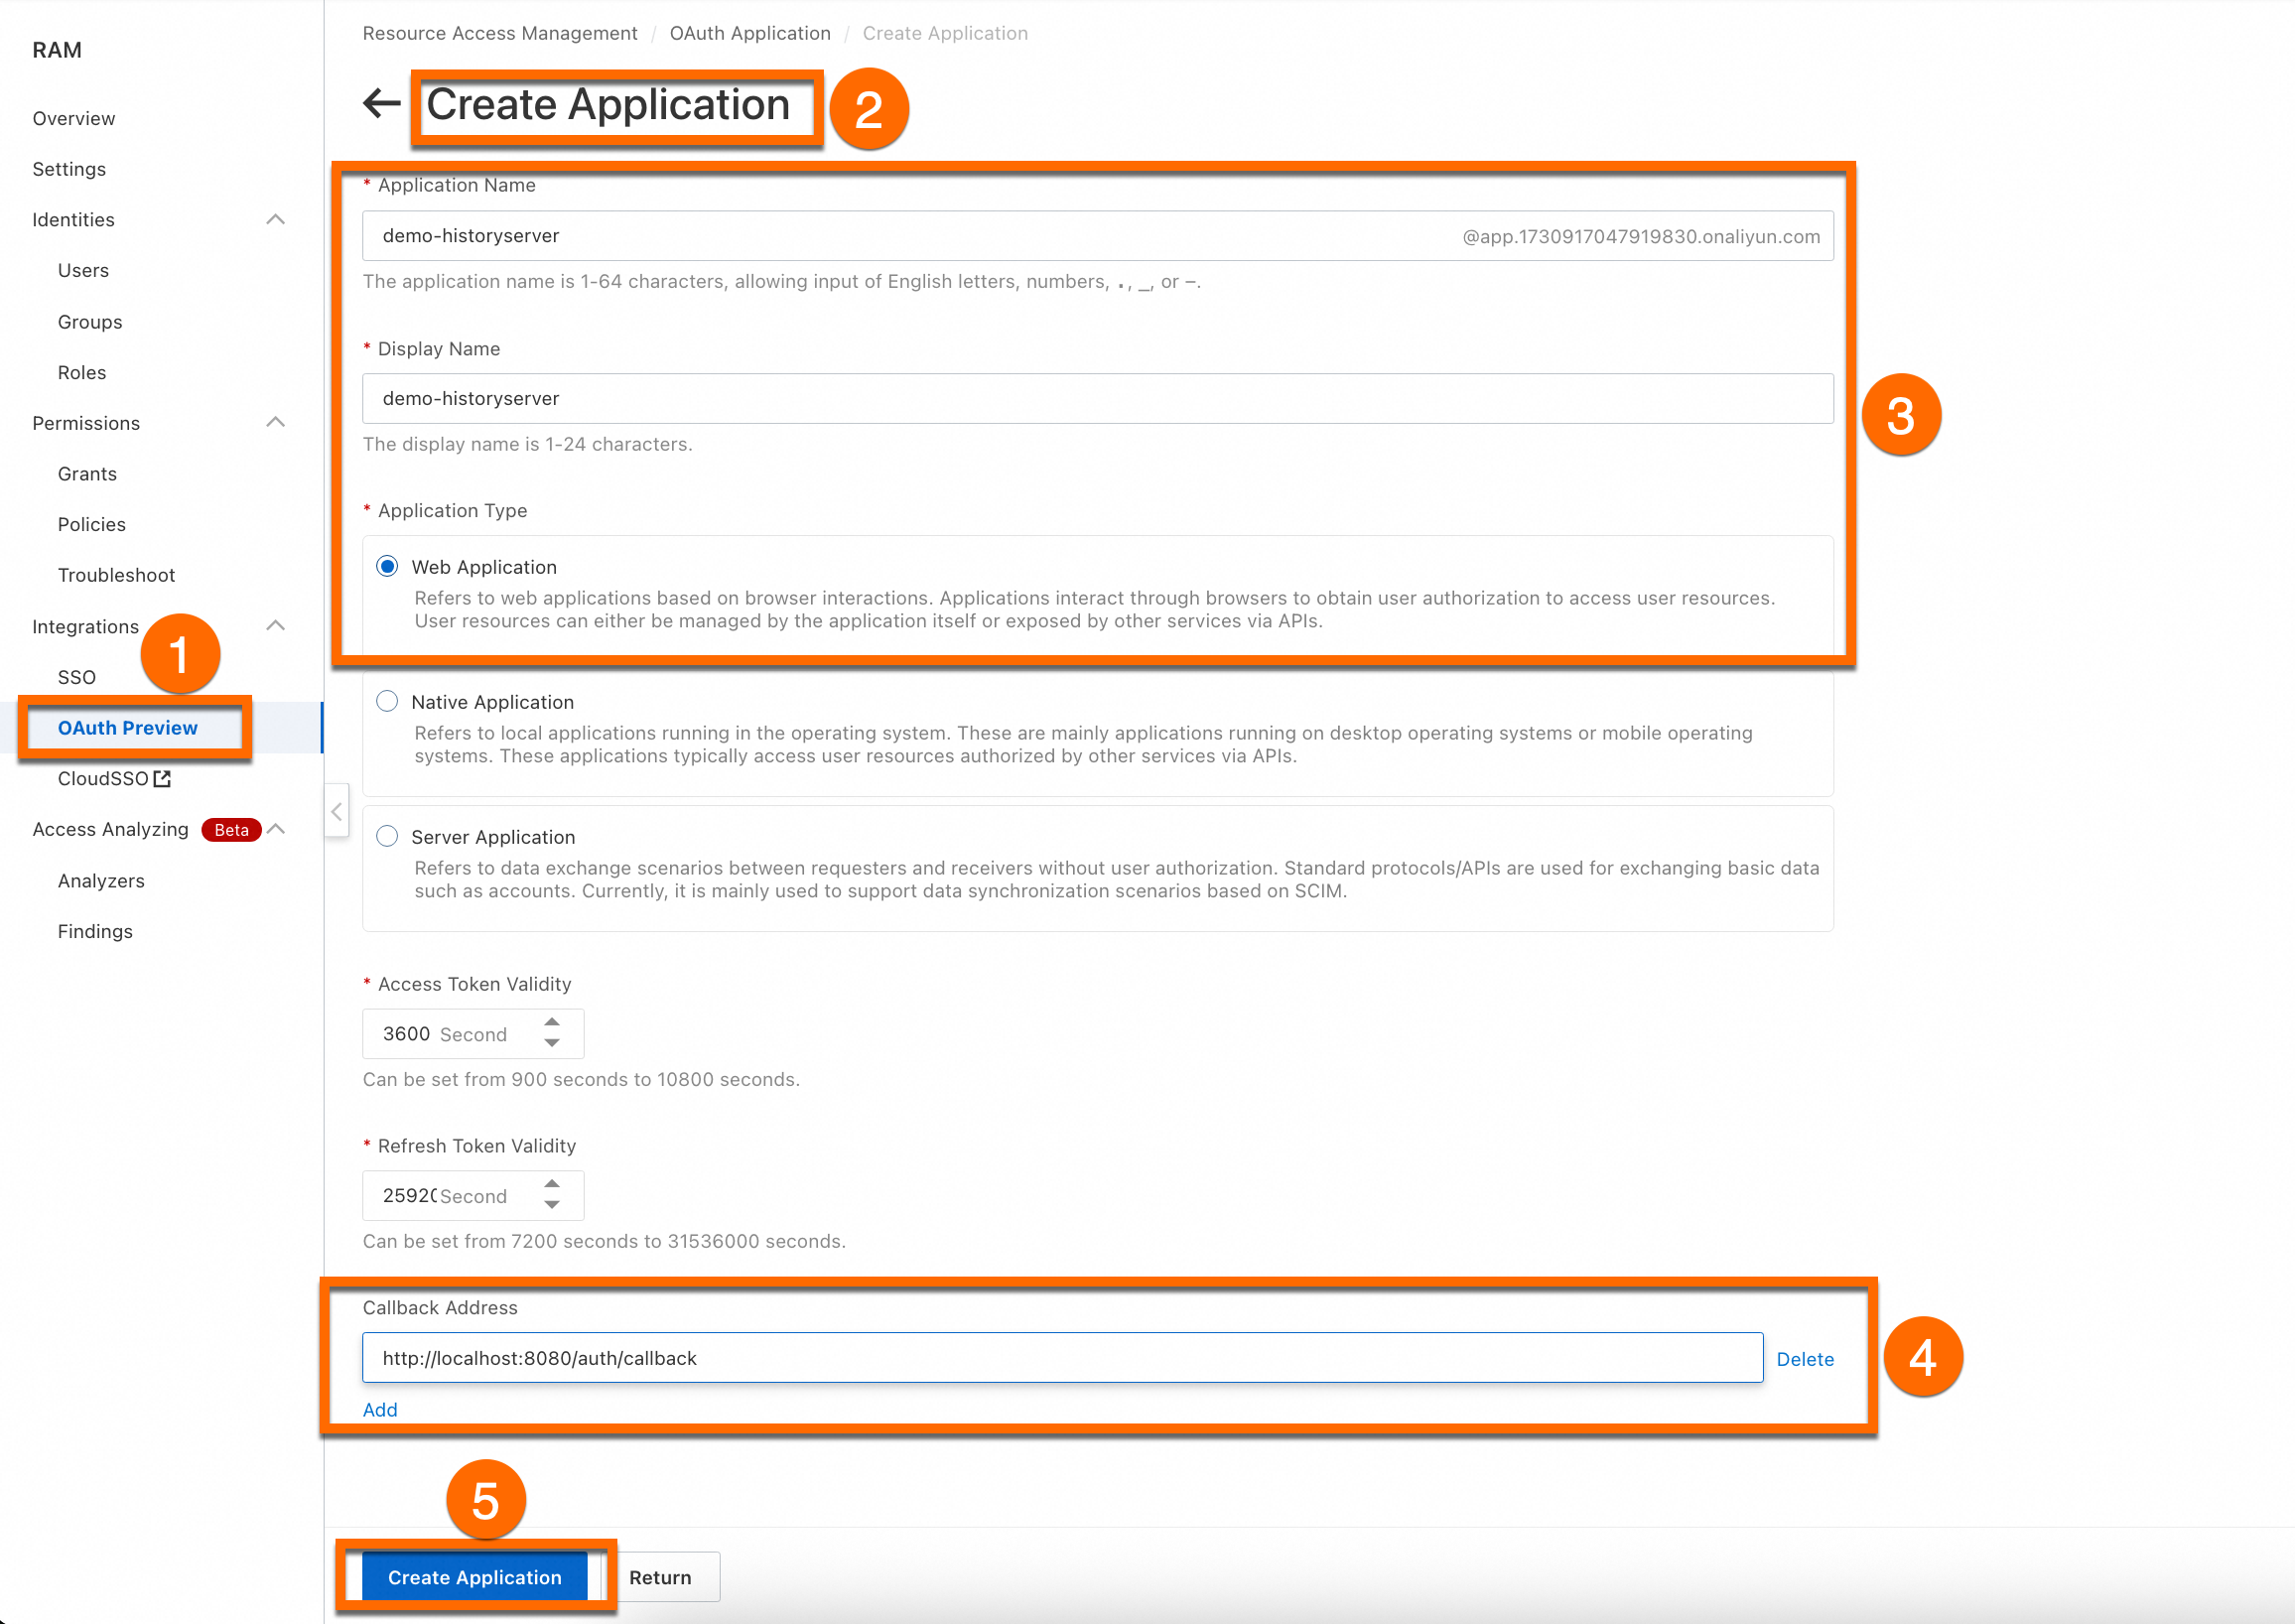
-
Create an OAuth enterprise application. Set the callback address to
http://localhost:8080/auth/callback, where:-
localhost:8080is the HistoryServer domain, which corresponds toCallbackServiceNamein the KubeRay configuration. -
/auth/callbackis a fixed path suffix.
-
-
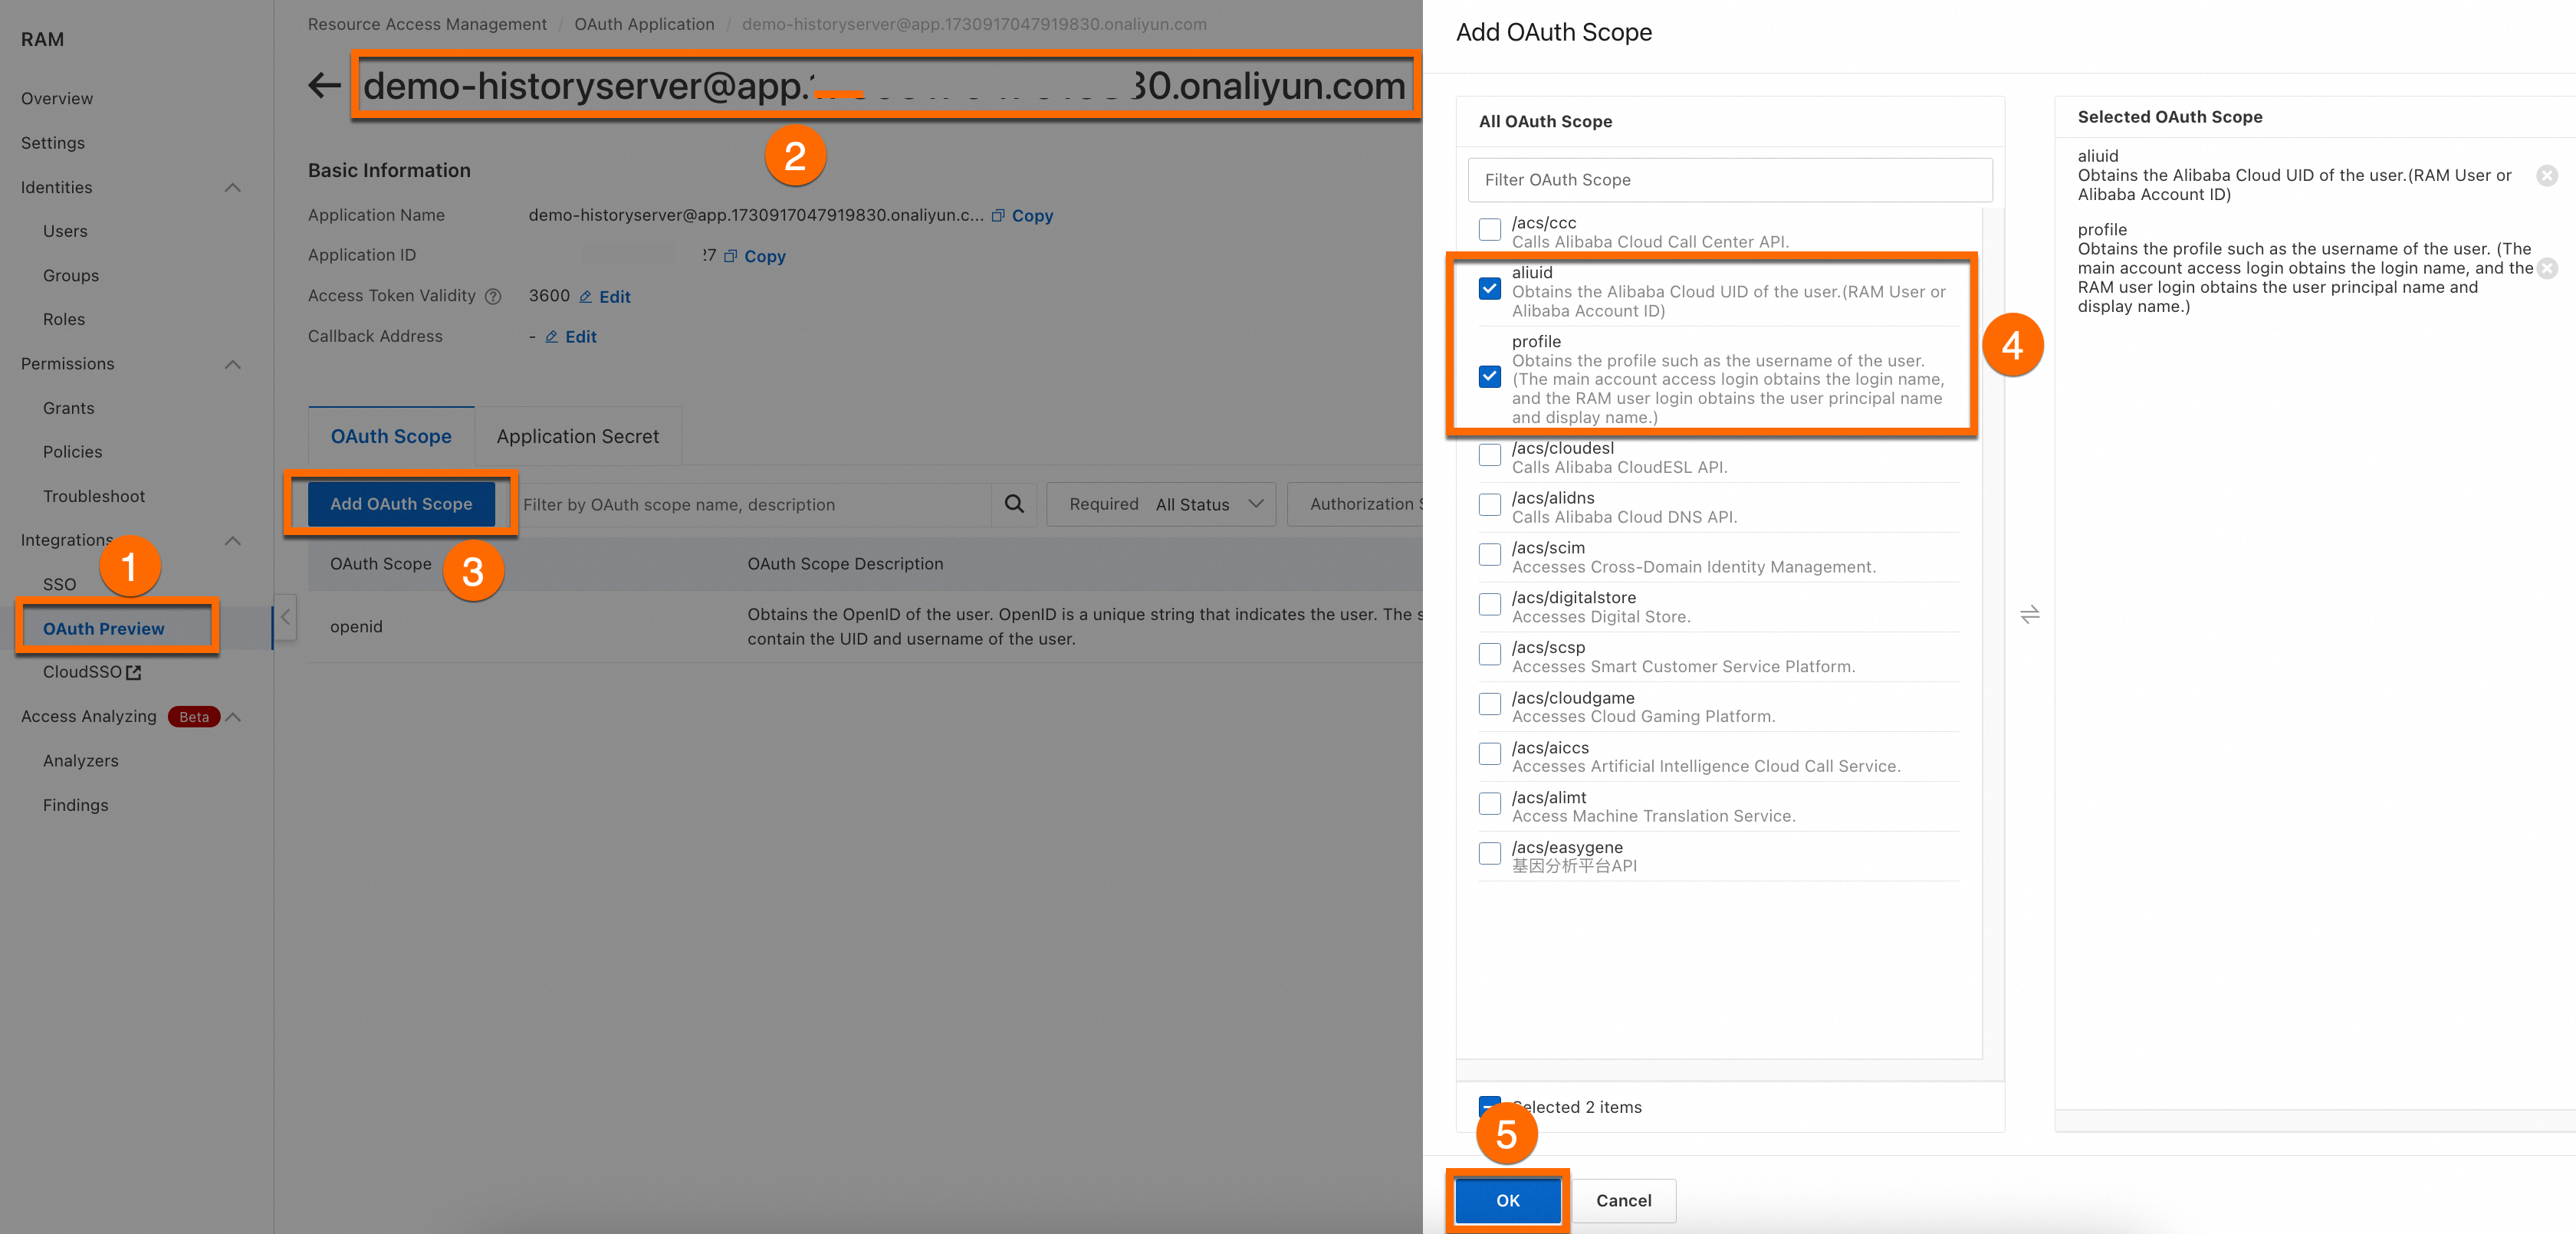
Add the following OAuth scopes:
-
aliuid— retrieves the Alibaba Cloud UID (RAM user or Alibaba Cloud account ID). -
profile— retrieves the username. For main accounts, this is the login name. For RAM users, this is the user principal name and display name.
-
-
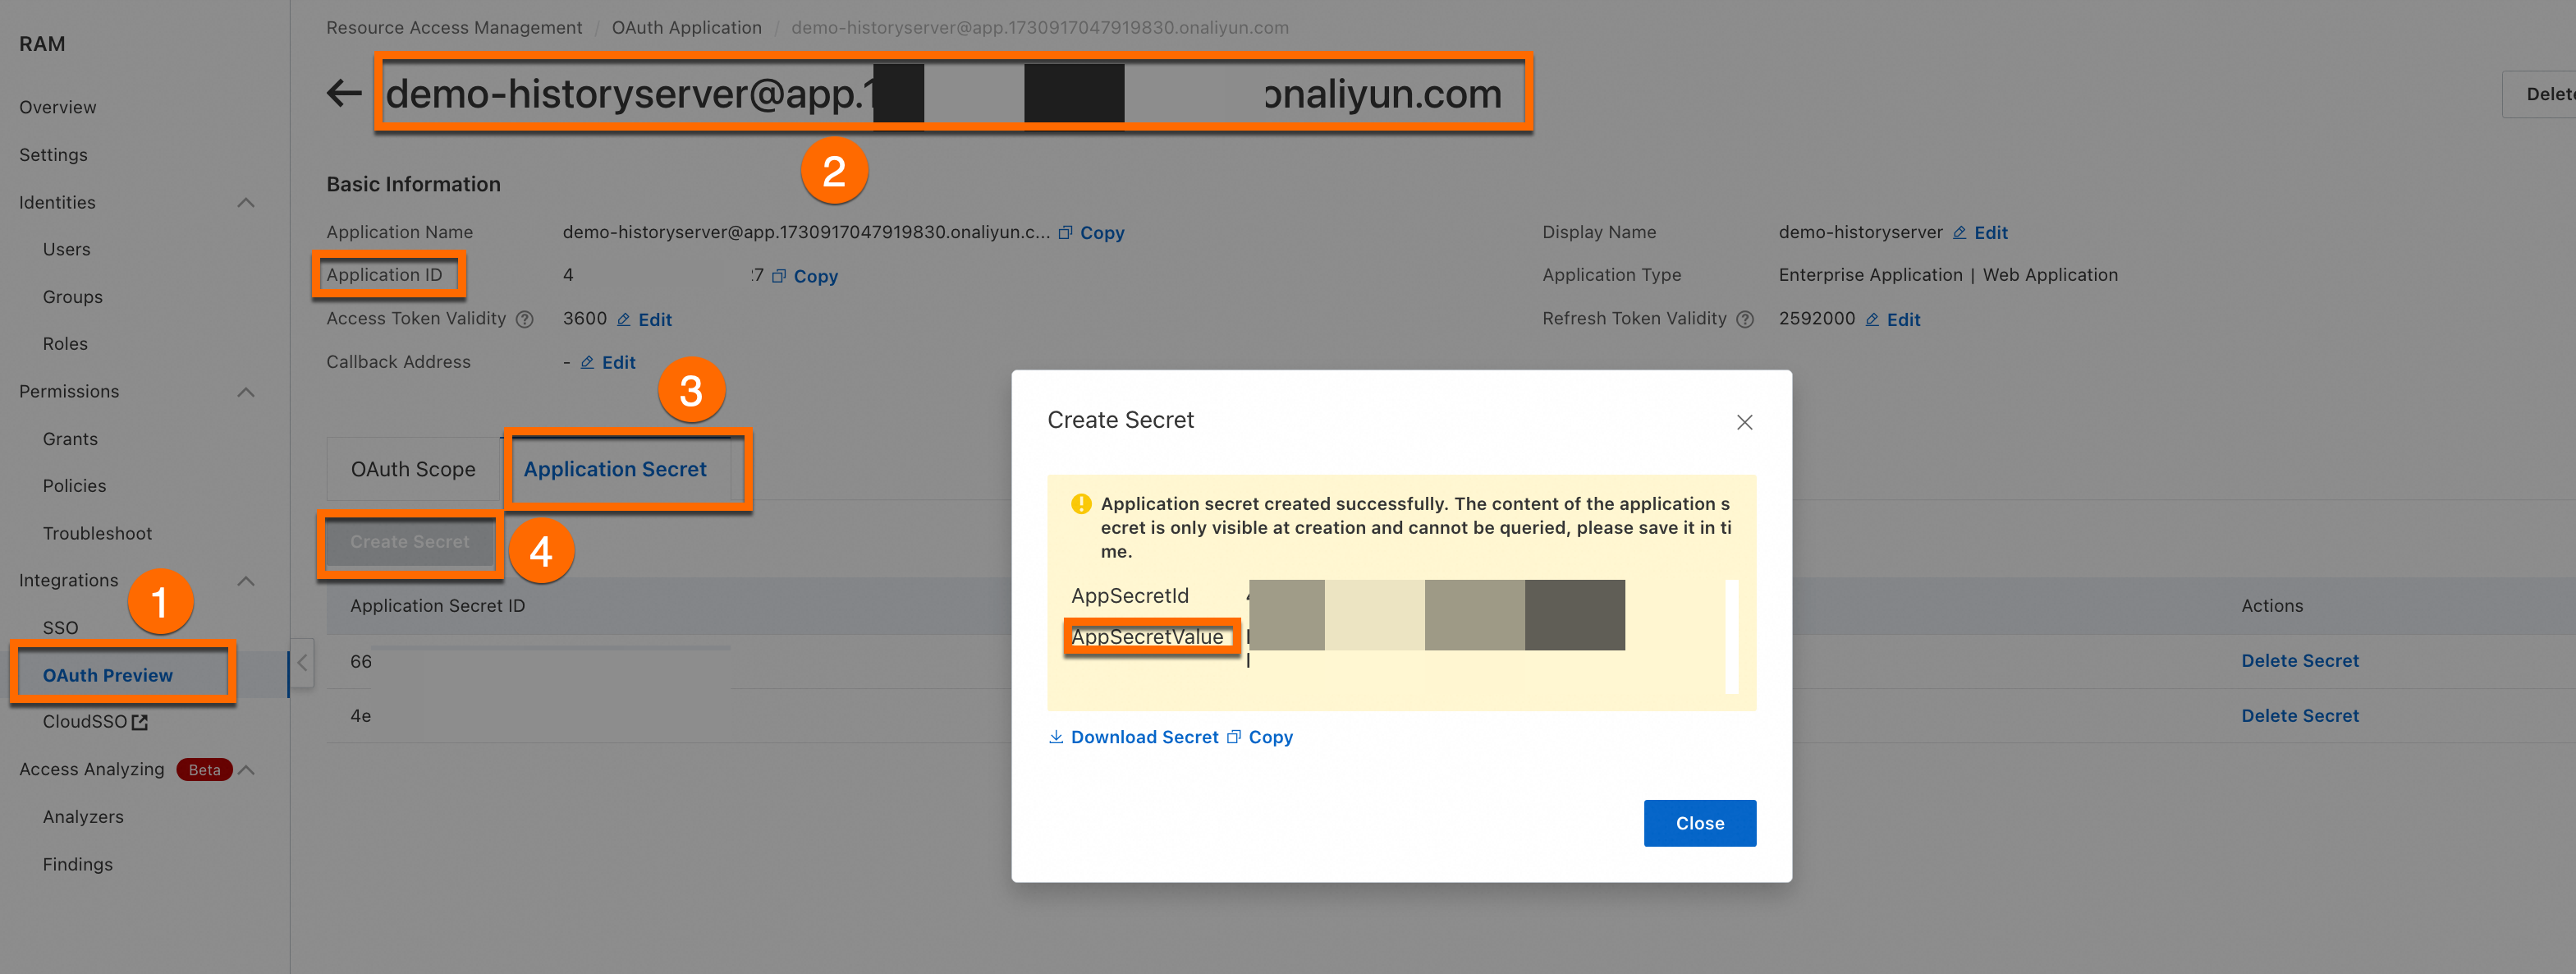
Create and save the OAuth application Secret.
ImportantRecord the Application ID and AppSecretValue. You need them in the next step.
Create a Kubernetes Secret
Connect to your ACK cluster (see Connect to a cluster) and run the following commands:
kubectl create ns kuberay
kubectl create secret -n kuberay generic webapp-secret --from-literal=webapp-id="yours-AppID" --from-literal=webapp-secret=yours-AppSecretValue
Replace the placeholders:
| Placeholder | Description |
|---|---|
yours-AppID |
The OAuth application ID |
yours-AppSecretValue |
The AppSecretValue of the OAuth key |
webapp-secret is the Secret name and is customizable.Step 4: Configure KubeRay parameters
-
Install the KubeRay component. For more information, see Install KubeRay.
-
Configure the following parameters in the KubeRay Operator:
Parameter Description Enable HistoryServer Select to enable HistoryServer CallbackServiceName The callback domain for HistoryServer OAuth authentication. Must match the domain in the OAuth application callback address. For example, if the callback address is http://xx.com/auth/callback, set this toxx.com.CloudRoleName The name of the RRSA role associated with HistoryServer OSSBucket The OSS bucket name used by HistoryServer OSSEndPoint The endpoint of the OSS bucket OSSHistoryServerRootDir The OSS directory where HistoryServer stores logs and metadata OSSRegion The OSS region, such as cn-hangzhouorap-southeast-1
Step 5: Create a RayCluster
Add the ray.alibabacloud.com/enable-historyserver: "true" annotation to your RayCluster manifest to enable HistoryServer. The following is a complete YAML example.
Step 6: Access HistoryServer
Access via localhost
By default, use kubectl port-forward to access HistoryServer. Run the following command in a terminal window:
kubectl -n kuberay port-forward svc/ray-history-server --address 0.0.0.0 8080:80After running this command, open http://localhost:8080 in your browser. At this point, you cannot view monitoring data in HistoryServer. To view monitoring data, run the following additional port-forward command in a separate terminal window:
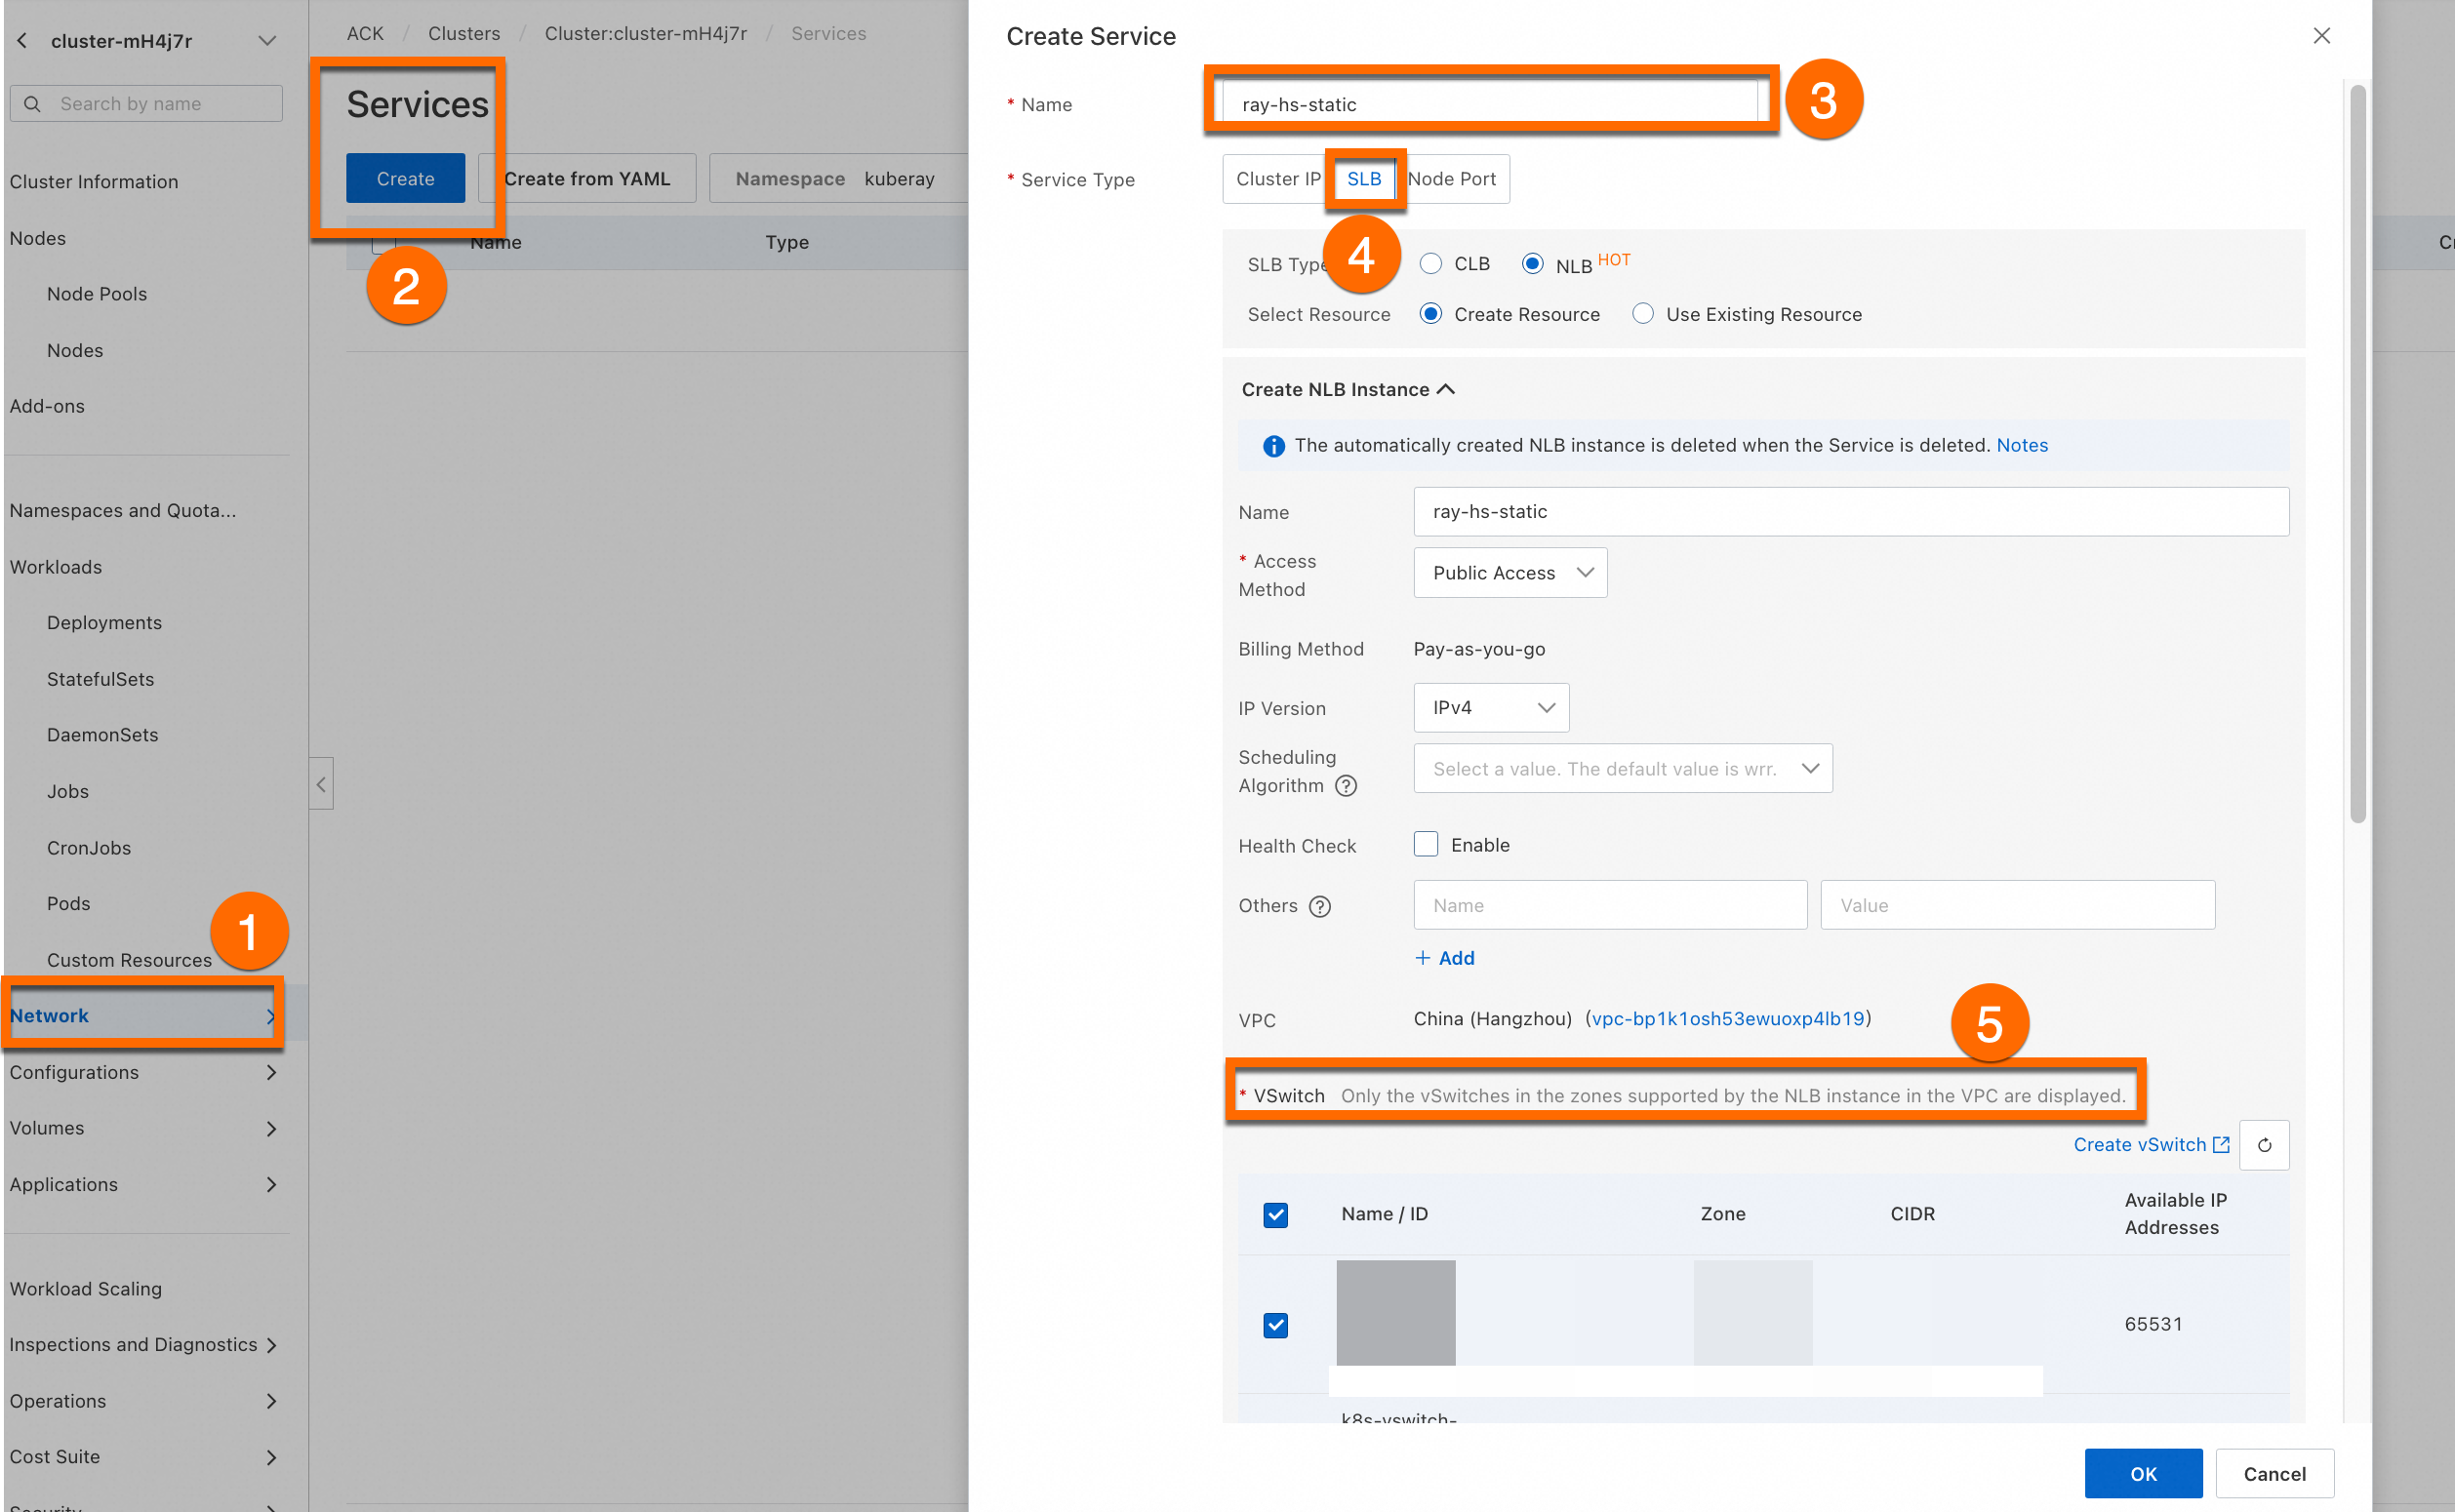
kubectl -n kuberay port-forward svc/ray-history-server --address 0.0.0.0 3000:3000Configure internet access
This example is for demonstration purposes. Enable the Access Control feature in production environments to protect your application data.
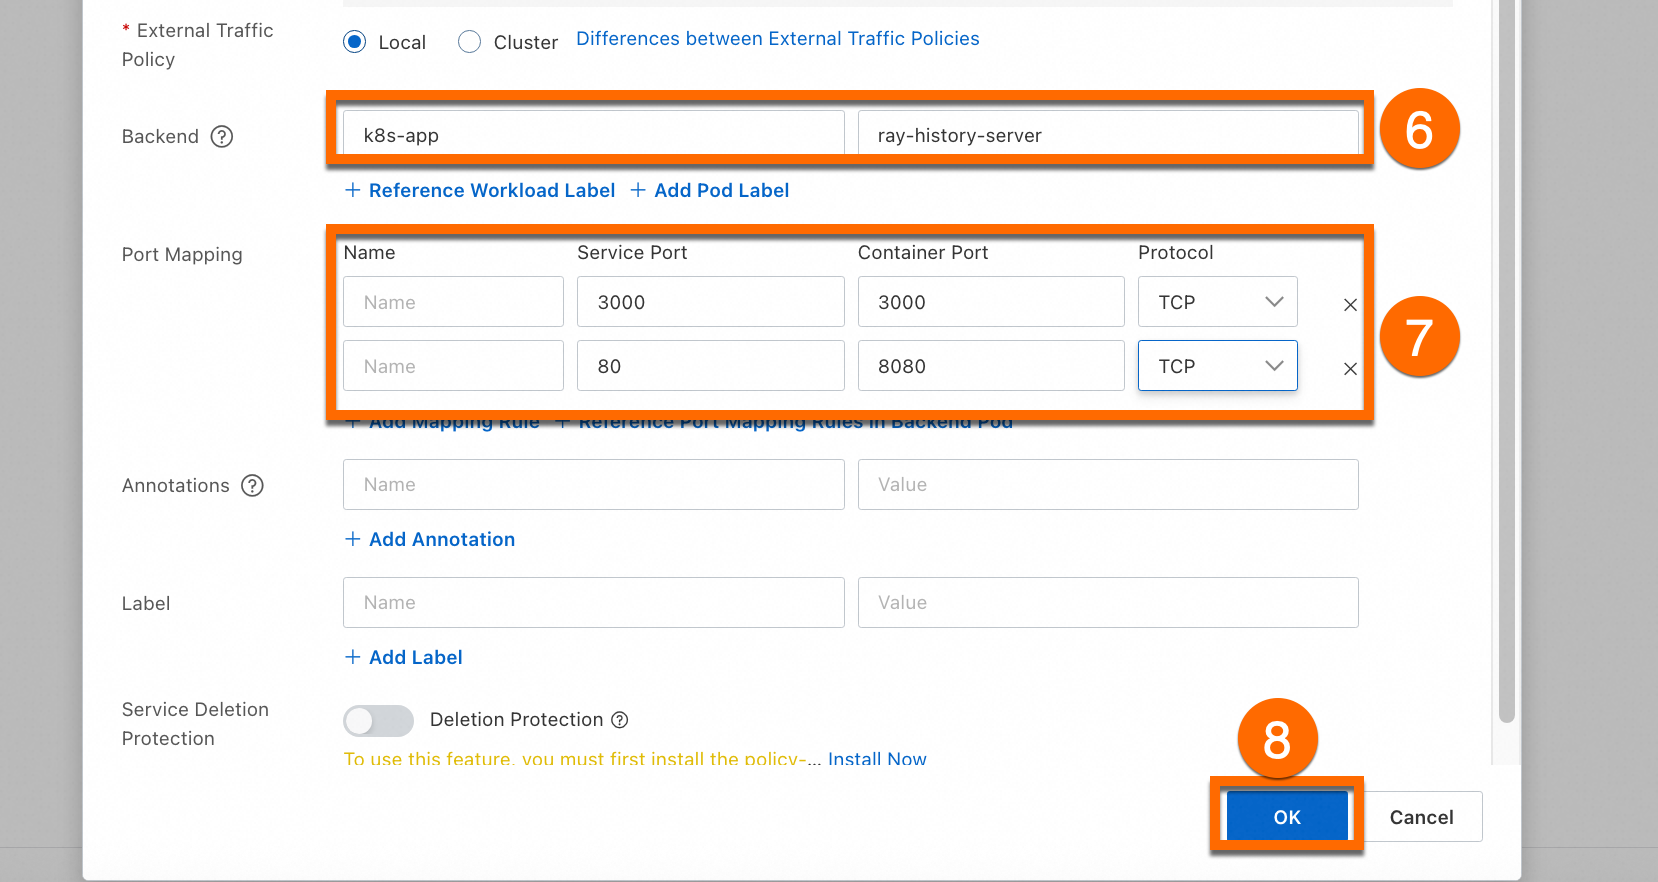
Log in to the ACK console and navigate to the cluster details page. Configure the internet service as shown in the following figures, then set the OAuth application callback address to http://${externalIP}/auth/callback. For the OAuth application settings, see Step 3: Create an OAuth application.