All Products
Search
Document Center

Container Service for Kubernetes:Colocated scheduling for Slurm HPC and Kubernetes

Last Updated:Jul 03, 2026

Dynamically share cluster nodes between Slurm HPC and Kubernetes to eliminate idle-resource waste.

With static allocation, each Slurm Pod permanently reserves resources — even when idle — causing fragmentation. The ack-slurm-operator colocated scheduling solution addresses this by letting Slurm jobs and Kubernetes Pods share the same physical nodes dynamically. SlurmCopilot, running in the Kubernetes cluster, coordinates resource allocation with Slurm in real time so both schedulers use the same capacity without conflicts.

How it works

The following figure shows how colocated scheduling works.
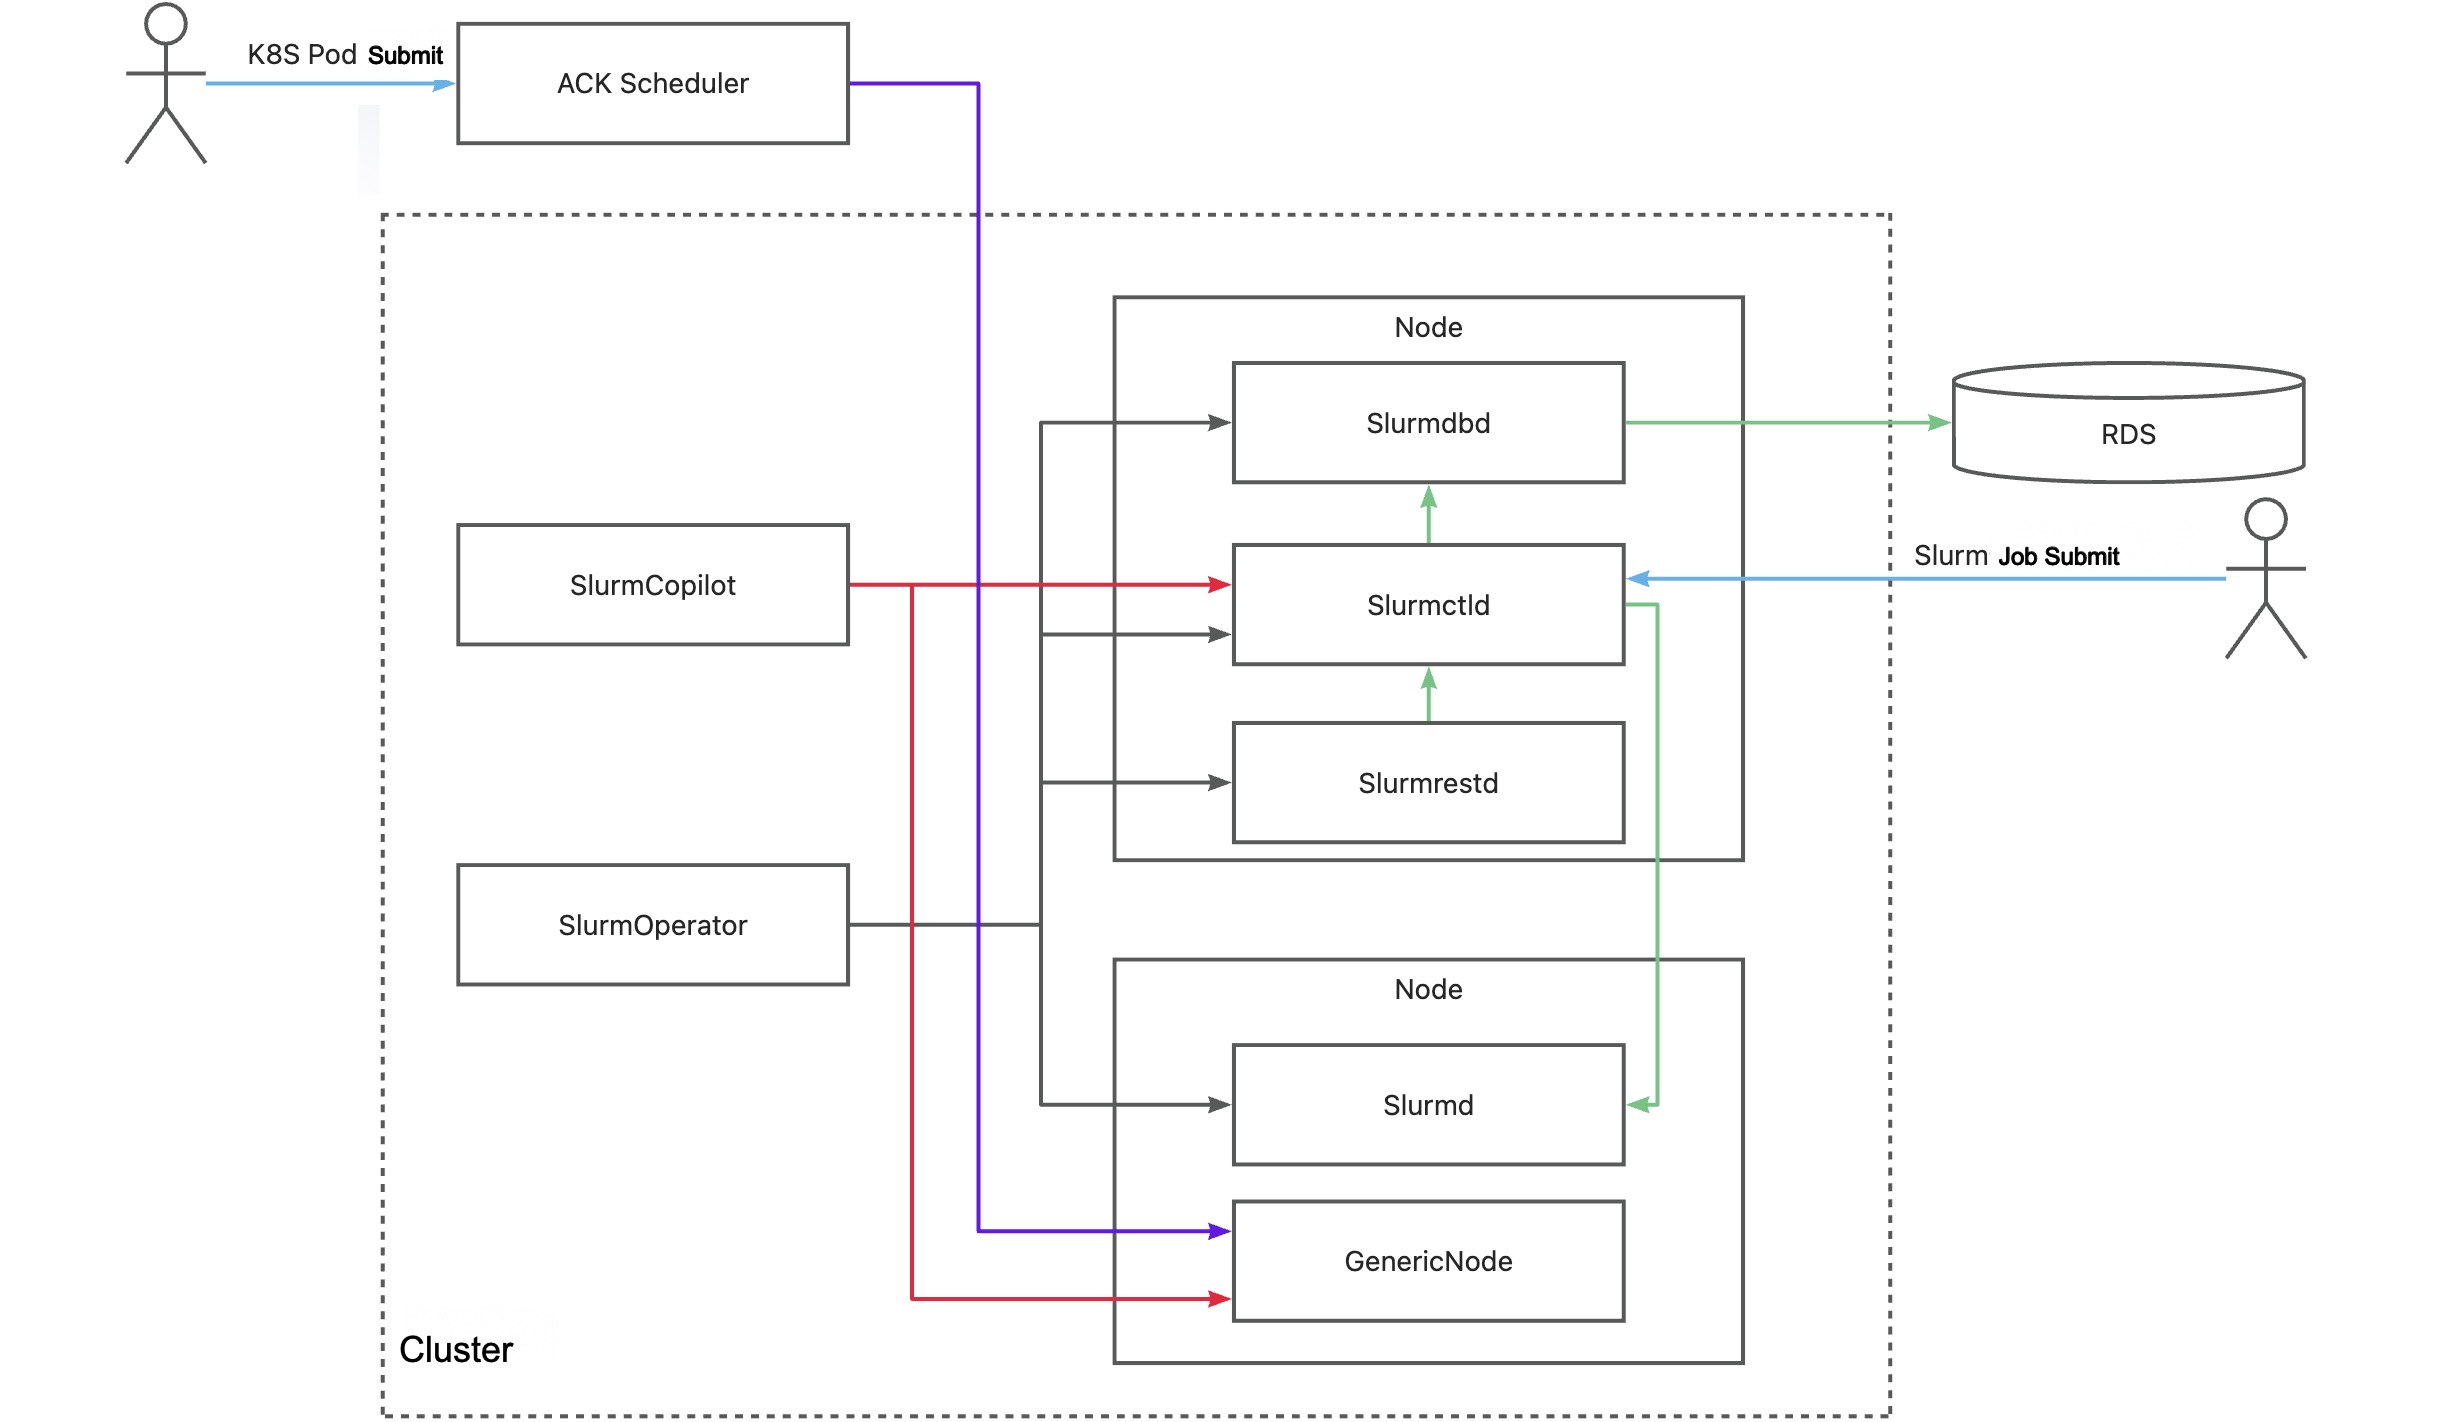
Architecture diagram

Key components

Component

Description

SlurmOperator

Launches a containerized Slurm cluster. Worker Pods run exclusively on dedicated cluster nodes; other Slurm system components are scheduled on random nodes.

SlurmCopilot

Coordinates resources with Slurmctld via a cluster token. When an AdmissionCheck is added to a GenericNode, updates available resources in Slurmctld, writes status back to the GenericNode, and notifies the ACK scheduler.

Slurmctld

Central Slurm manager daemon. Monitors resources and jobs, schedules jobs, and allocates resources. Supports a backup for high availability.

GenericNode

Custom resource acting as a resource ledger between Kubernetes and Slurm. Before placing a Pod, the ACK scheduler adds an AdmissionCheck to the GenericNode to confirm resources with Slurm.

Slurmd

Slurm node daemon. Runs on each compute node, executes jobs, and reports status to Slurmctld.

Slurmdbd

Slurm database daemon for job accounting. Optional — accounting data can be stored in files instead.

Slurmrestd

Slurm REST API daemon. Optional — you can use CLI tools instead.

By default, Slurmctld auto-generates a JWT token on startup and writes it to a Kubernetes Secret via kubectl. To override, use a custom startup script or revoke the Secret update permission, then update the token in the ack-slurm-jwt-token Secret in the ack-slurm-operator namespace. In the Data field, use the cluster name as the key and the Base64-encoded token (base64 --wrap=0) as the value.

Static allocation vs. colocated scheduling

The following table compares the two approaches.

Static allocation

Colocated scheduling

Static allocation diagram

Colocated scheduling diagram

SlurmCopilot uses the OpenAPI to communicate with Slurm, so colocated scheduling also works with non-containerized clusters. See Extend colocated scheduling to non-containerized clusters.

Prerequisites

Before you begin:

Install ack-slurm-operator

  1. Log on to the ACK console and click your cluster name.

  2. Install ack-slurm-operator. Leave Application Name and Namespace blank, then click Next. In the Confirm dialog box, click Yes to use the default name (ack-slurm-operator) and namespace (ack-slurm-operator).
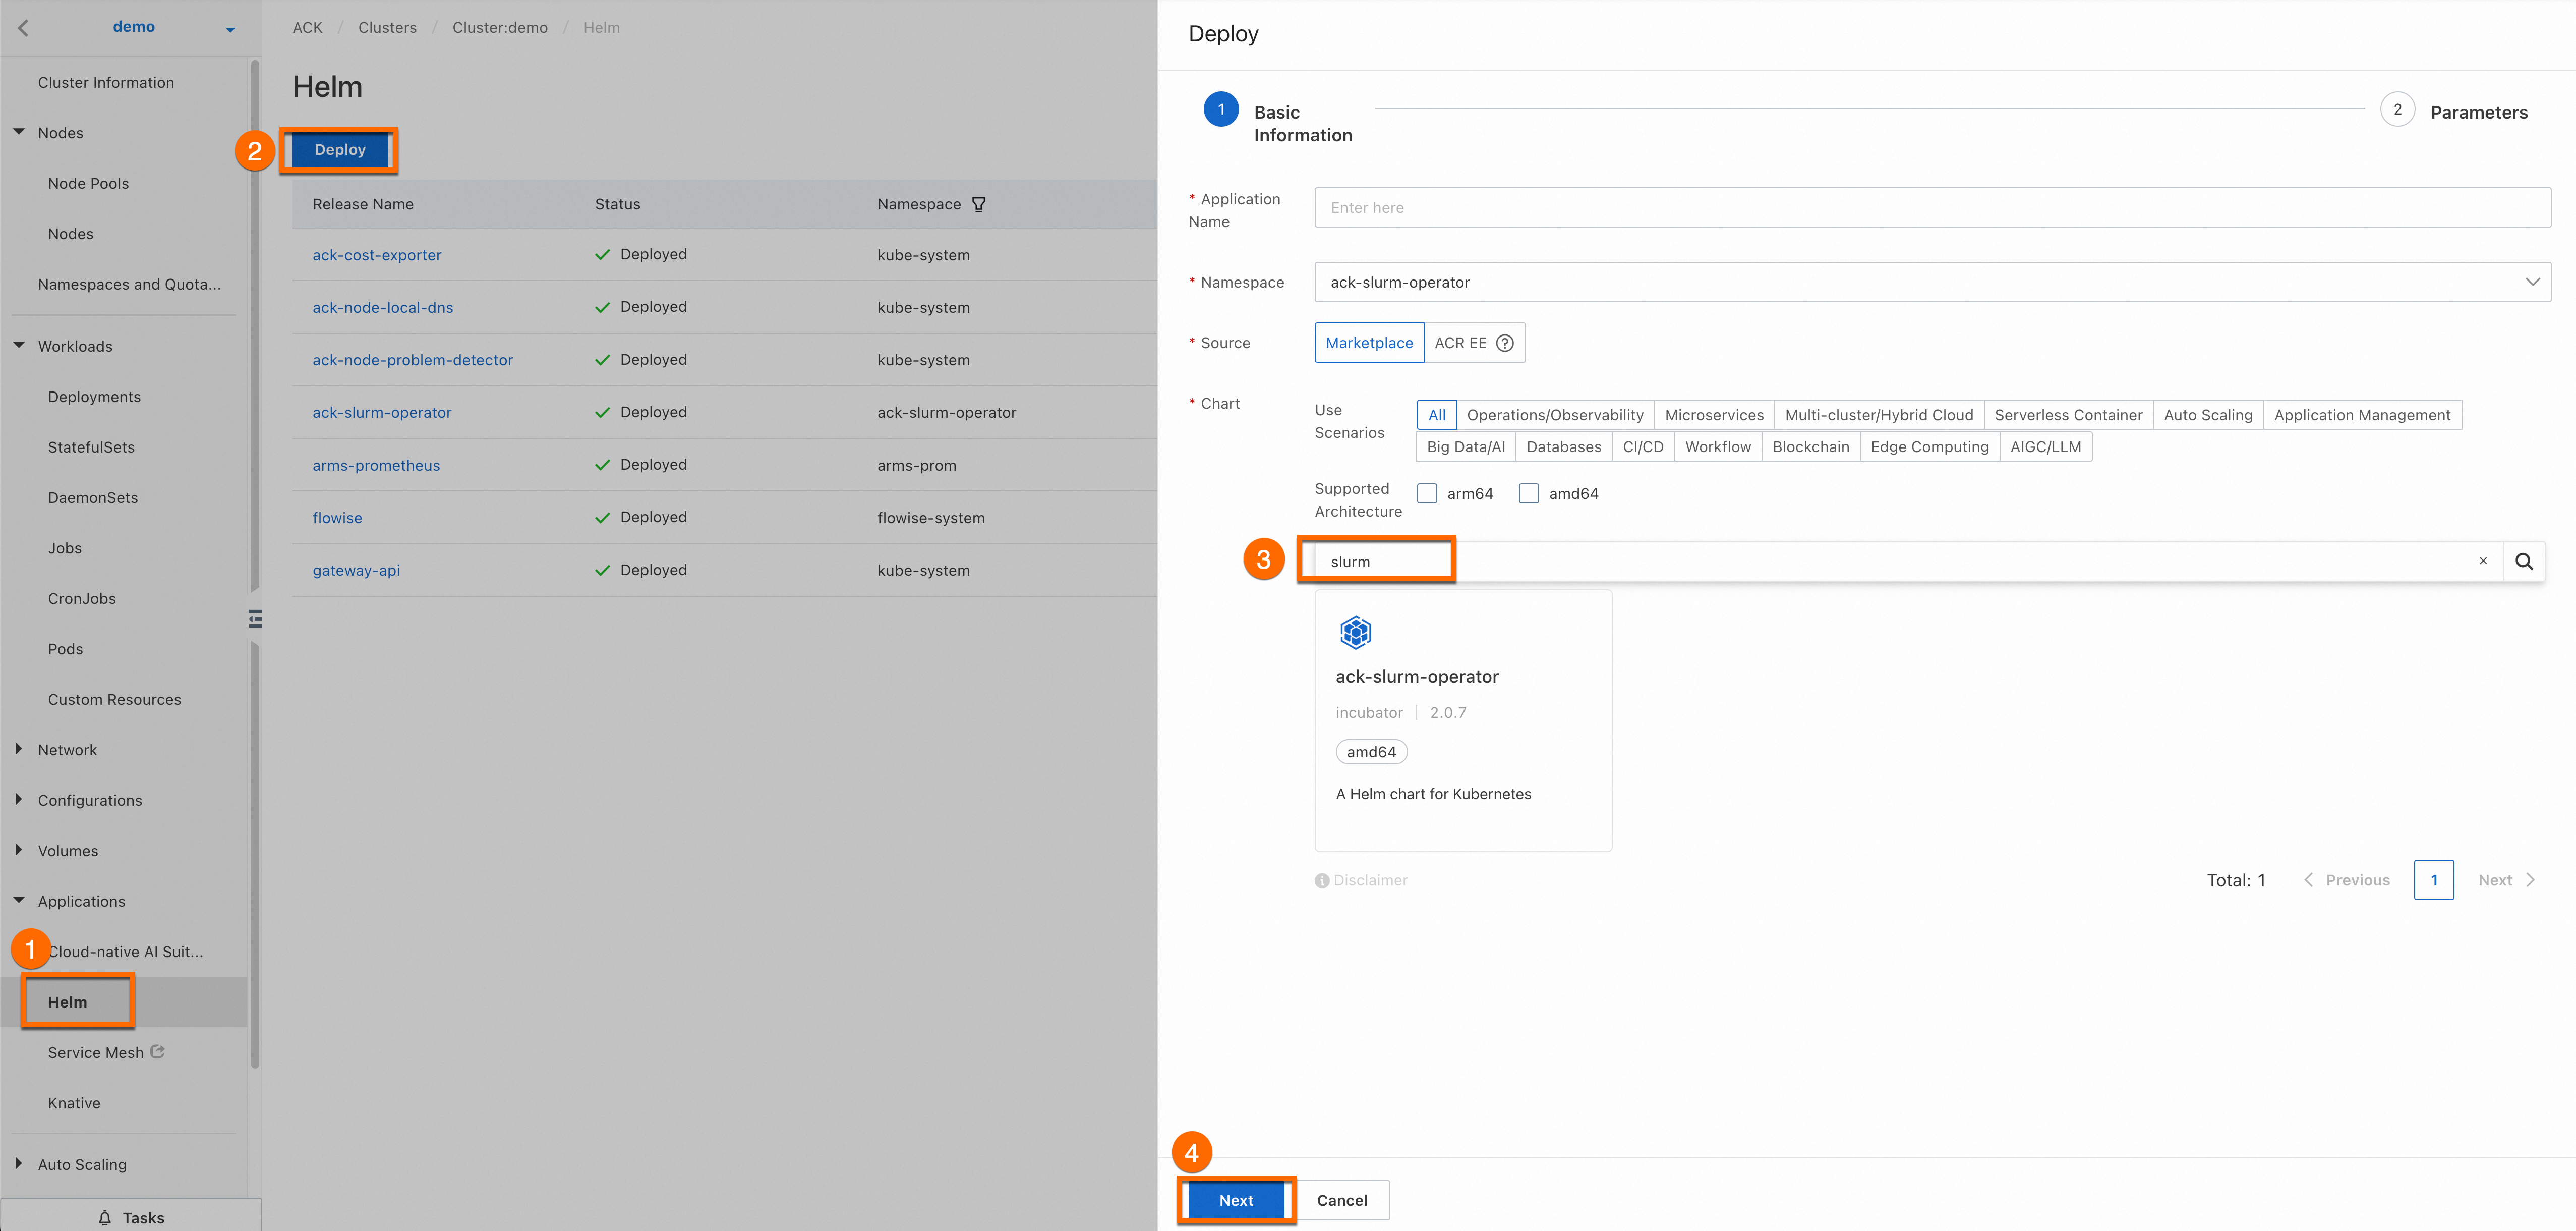
    ack-slurm-operator installation step

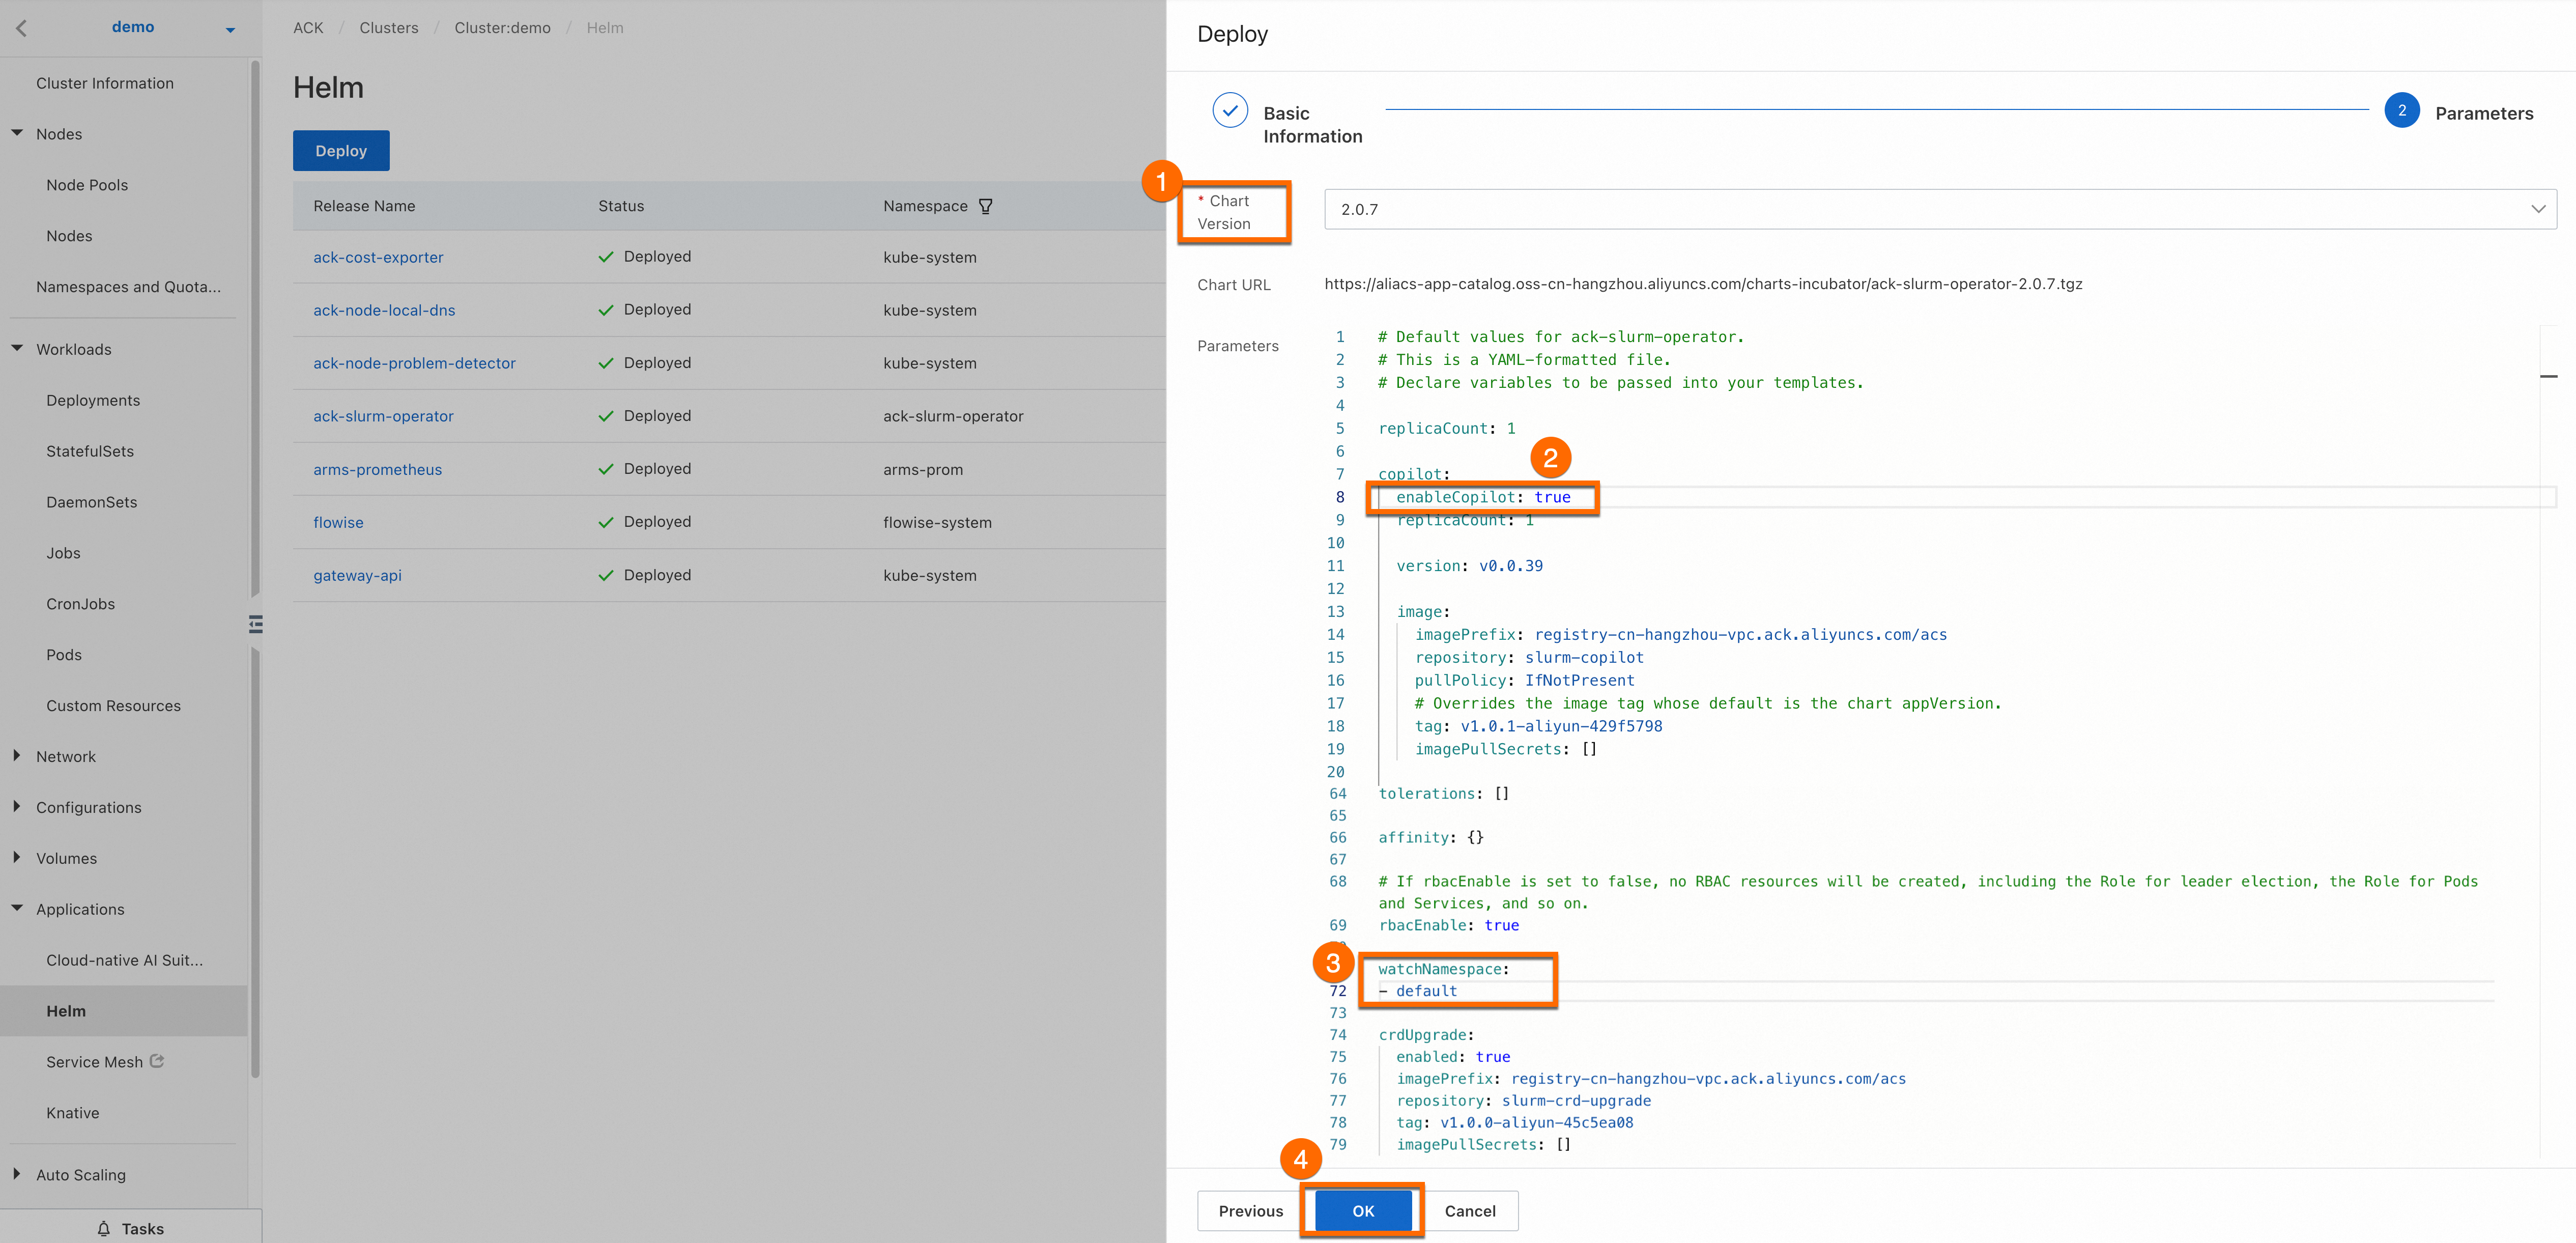
  3. Set Chart Version to the latest version, enableCopilot to true, and watchNamespace to default (or a custom namespace). Click OK.

    ack-slurm-operator configuration

  4. (Optional) To update ack-slurm-operator: on the Cluster Information page, click the Applications > Helm tab, find ack-slurm-operator, and click Update.
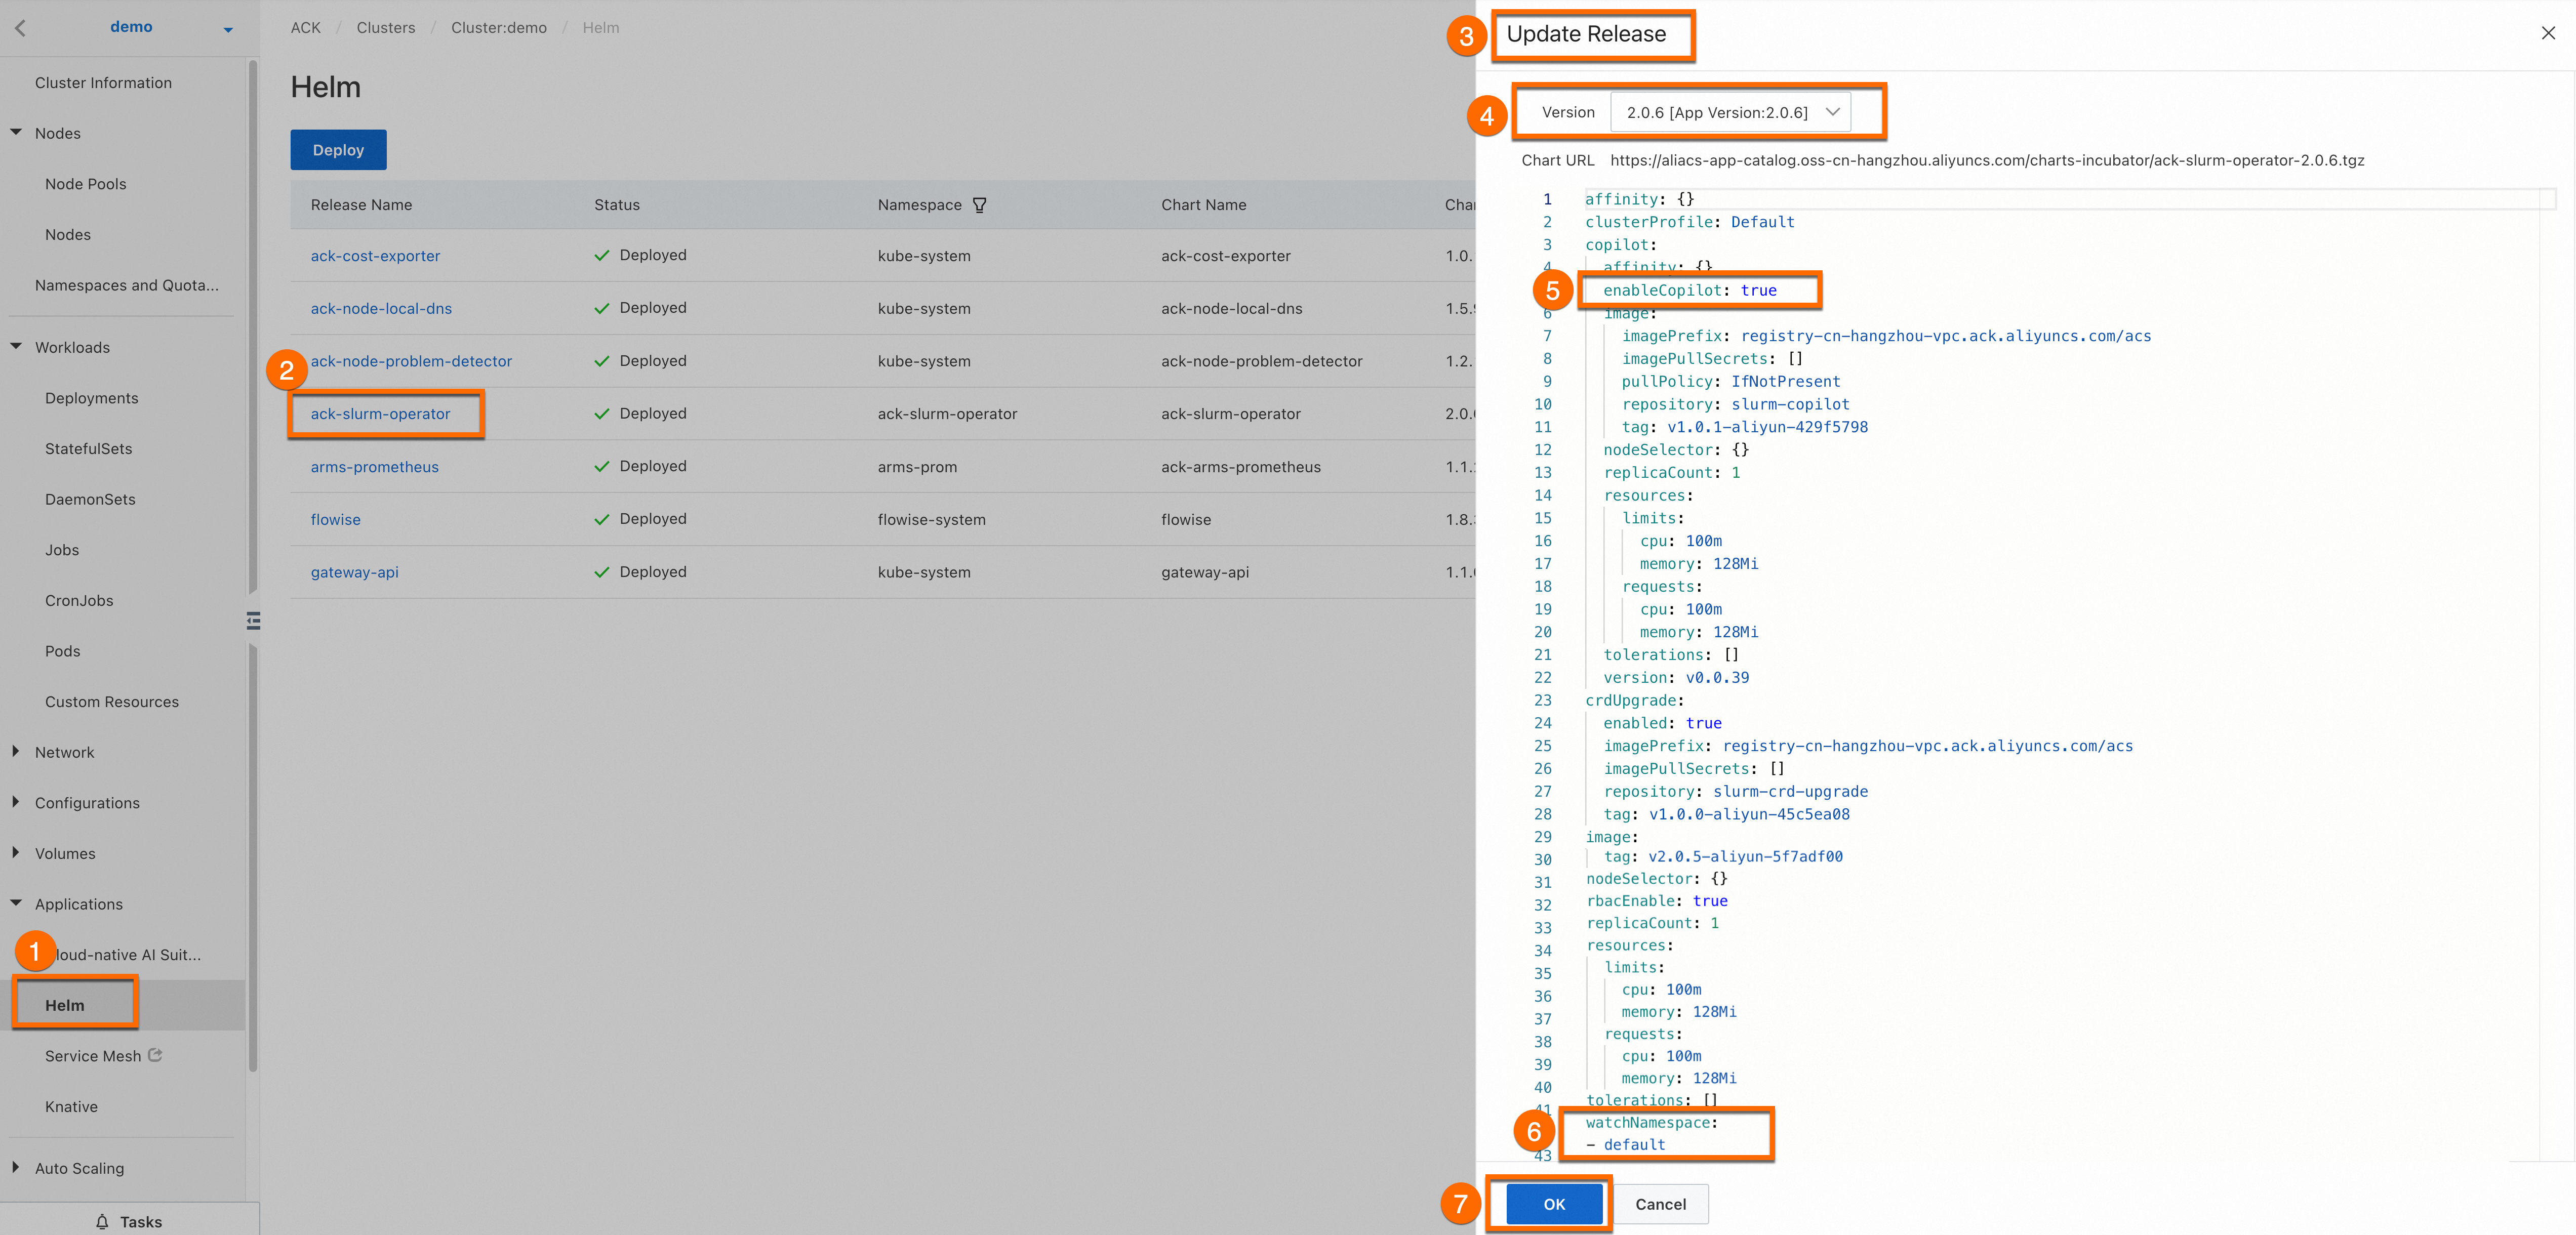
    ack-slurm-operator update

Install and configure ack-slurm-cluster

Deploy the SlurmCluster Helm chart. It creates all required resources — RBAC, ConfigMaps, Secrets, and the SlurmCluster resource — from a single values.yaml file.

Resources and parameters

The chart creates the following resources.

Resource type

Resource name

Purpose

ConfigMap

{{ .Values.slurmConfigs.configMapName }}

Stores user-defined Slurm configuration files. Created when createConfigsByConfigMap=true. Mounted to .Values.slurmConfigs.slurmConfigPathInPod and copied to /etc/slurm/ on Pod startup.

ServiceAccount

{{ .Release.Namespace }}/{{ .Values.clusterName }}

Allows Slurmctld to modify the SlurmCluster resource for auto scaling with CloudNode.

Role

{{ .Release.Namespace }}/{{ .Values.clusterName }}

Same purpose as the ServiceAccount above.

RoleBinding

{{ .Release.Namespace }}/{{ .Values.clusterName }}

Same purpose as the ServiceAccount above.

Role

{{ .Values.slurmOperatorNamespace }}/{{ .Values.clusterName }}

Allows Slurmctld to modify Secrets in the slurm-operator namespace for token updates during hybrid deployment.

RoleBinding

{{ .Values.slurmOperatorNamespace }}/{{ .Values.clusterName }}

Same purpose as the role above.

Secret

{{ .Values.mungeConfigs.secretName }}

Used for authentication between Slurm components. Created when createConfigsBySecret=true, with content "munge.key"={{ .Values.mungeConfigs.content }}.

SlurmCluster

Custom

The rendered SlurmCluster resource.

Key parameters:

Parameter

Example value

Description

clusterName

The cluster name, used to generate resources such as Secrets and Roles. Must match ClusterName in the Slurm configuration files.

headNodeConfig

Required. Configurations for the Slurmctld Pod.

workerNodesConfig

Configurations for the Slurmd Pod.

workerNodesConfig.deleteSelfBeforeSuspend

true

When true, adds a preStop hook that drains the node and marks it offline before Pod termination.

slurmdbdConfigs

Configurations for the Slurmdbd Pod. If not specified, no Slurmdbd Pod is created.

slurmrestdConfigs

Configurations for the Slurmrestd Pod. If not specified, no Slurmrestd Pod is created.

headNodeConfig.hostNetwork slurmdbdConfigs.hostNetwork slurmrestdConfigs.hostNetwork workerNodesConfig.workerGroups[].hostNetwork

false

Specifies hostNetwork for the respective Pod.

headNodeConfig.setHostnameAsFQDN slurmdbdConfigs.setHostnameAsFQDN slurmrestdConfigs.setHostnameAsFQDN workerNodesConfig.workerGroups[].setHostnameAsFQDN

false

Specifies setHostnameAsFQDN for the respective Pod.

headNodeConfig.nodeSelector slurmdbdConfigs.nodeSelector slurmrestdConfigs.nodeSelector workerNodesConfig.workerGroups[].nodeSelector

nodeSelector:
  example: example

Specifies nodeSelector for the respective Pod.

headNodeConfig.tolerations slurmdbdConfigs.tolerations slurmrestdConfigs.tolerations workerNodesConfig.workerGroups[].tolerations

tolerations:
- key:
  value:
  operator:

Specifies tolerations for the respective Pod.

headNodeConfig.affinity slurmdbdConfigs.affinity slurmrestdConfigs.affinity workerNodesConfig.workerGroups[].affinity

affinity:
  nodeAffinity:
    requiredDuringSchedulingIgnoredDuringExecution:
      nodeSelectorTerms:
      - matchExpressions:
        - key: topology.kubernetes.io/zone
          operator: In
          values:
          - zone-a
    preferredDuringSchedulingIgnoredDuringExecution:
    - weight: 1
      preference:
        matchExpressions:
        - key: another-node-label-key
          operator: In
          values:
          - another-node-label-value

Specifies affinity for the respective Pod.

headNodeConfig.resources slurmdbdConfigs.resources slurmrestdConfigs.resources workerNodesConfig.workerGroups[].resources

resources:
  requests:
    cpu: 1
  limits:
    cpu: 1

Specifies resource requests and limits for the primary container. Worker Pod resource limits define the Slurm node resource upper limits.

headNodeConfig.image slurmdbdConfigs.image slurmrestdConfigs.image workerNodesConfig.workerGroups[].image

registry-cn-hangzhou.ack.aliyuncs.com/acs/slurm:23.06-1.6-aliyun-49259f59

The container image. To build a custom image, see the Alibaba Cloud open source repository.

headNodeConfig.imagePullSecrets slurmdbdConfigs.imagePullSecrets slurmrestdConfigs.imagePullSecrets workerNodesConfig.workerGroups[].imagePullSecrets

imagePullSecrets:
- name: example

The image pull secret for the respective Pod.

headNodeConfig.podSecurityContext slurmdbdConfigs.podSecurityContext slurmrestdConfigs.podSecurityContext workerNodesConfig.workerGroups[].podSecurityContext

podSecurityContext:
  runAsUser: 1000
  runAsGroup: 3000
  fsGroup: 2000
  supplementalGroups: [4000]

Specifies podSecurityContext for the respective Pod.

headNodeConfig.securityContext slurmdbdConfigs.securityContext slurmrestdConfigs.securityContext workerNodesConfig.workerGroups[].securityContext

securityContext:
  allowPrivilegeEscalation: false

Specifies securityContext for the primary container.

headNodeConfig.volumeMounts slurmdbdConfigs.volumeMounts slurmrestdConfigs.volumeMounts workerNodesConfig.workerGroups[].volumeMounts

Volume mounts for the primary container.

headNodeConfig.volumes slurmdbdConfigs.volumes slurmrestdConfigs.volumes workerNodesConfig.workerGroups[].volumes

Volumes for the respective Pod.

slurmConfigs.slurmConfigPathInPod

Mount path for Slurm configuration files. When mounting via a volume, declare the slurm.conf location here. On startup, the Pod copies files to /etc/slurm/ and sets permissions.

slurmConfigs.createConfigsByConfigMap

true

When true, auto-creates a ConfigMap for Slurm configuration files.

slurmConfigs.configMapName

The name of the ConfigMap that stores Slurm configuration files.

slurmConfigs.filesInConfigMap

Configuration file content when auto-creating a ConfigMap. See the Slurm System Configuration Tool.

mungeConfigs.mungeConfigPathInPod

Mount path for MUNGE configuration files. Declare the munge.key location here when mounting via a volume. On startup, the Pod copies files to /etc/munge/ and sets permissions.

mungeConfigs.createConfigsBySecret

When true, auto-creates a Secret for MUNGE configuration files.

mungeConfigs.secretName

The name of the Secret for MUNGE configuration files.

mungeConfigs.content

The content of the MUNGE configuration file when auto-creating a Secret.

Important

Changes to slurmConfigs.filesInConfigMap after a Pod starts require recreating the Pod. Confirm file content before starting.

Step 1: Pull the Helm chart

  1. Add the Alibaba Cloud Helm repository.

    helm repo add aliyun https://aliacs-app-catalog.oss-cn-hangzhou.aliyuncs.com/charts-incubator/
  2. Pull and unpack the chart. This creates an ack-slurm-cluster directory with all chart files and templates.

    helm pull aliyun/ack-slurm-cluster --untar=true
  3. Open values.yaml to configure the chart.

    cd ack-slurm-cluster
    vi values.yaml

Step 2: Generate and import a JWT key

SlurmCopilot and Slurmrestd use JSON Web Token (JWT) authentication. Generate a JSON Web Key (JWK) and import it into the cluster before installing the chart.

The JWT authentication plug-in uses JWKs (RFC7517) to sign and verify tokens. The private key signs tokens; the public key verifies them.

Generate a JWK using an online tool such as mkjwk.org. Example:

{
  "kty": "RSA",
  "e": "AQAB",
  "kid": "O9fpdhrViq2zaaaBEWZITz",
  "use": "sig",
  "alg": "RS256",
  "n": "qSVxcknOm0uCq5vGsOmaorPDzHUubBmZZ4UXj-9do7w9X1uKFXAnqfto4TepSNuYU2bA_-tzSLAGBsR-BqvT6w9SjxakeiyQpVmexxnDw5WZwpWenUAcYrfSPEoNU-0hAQwFYgqZwJQMN8ptxkd0170PFauwACOx4Hfr-9FPGy8NCoIO4MfLXzJ3mJ7xqgIZp3NIOGXz-GIAbCf13ii7kSStpYqN3L_zzpvXUAos1FJ9IPXRV84tIZpFVh2lmRh0h8ImK-vI42dwlD_hOIzayL1Xno2R0T-d5AwTSdnep7g-Fwu8-sj4cCRWq3bd61Zs2QOJ8iustH0vSRMYdP5oYQ"
}
Convert to YAML if needed. Only configure the public key in the plug-in. Store the private key securely.

Supported signing algorithms:

Signing algorithm

Supported alg values

RSASSA-PKCS1-V1_5 with SHA-2

RS256, RS384, RS512

Elliptic Curve (ECDSA) with SHA-2

ES256, ES384, ES512

HMAC using SHA-2

HS256, HS384, HS512

Important

For HS256, HS384, or HS512, the key must be Base64 URL-encoded. If you get an Invalid Signature error, verify the key encoding matches the token format.

Import the JWK into the cluster.

kubectl create configmap jwt --from-literal=jwt_hs256.key='<Your-JWK>'

Step 3: Configure Slurm

Edit slurmConfigs.filesInConfigMap in values.yaml to configure GRES, database, and authentication settings.

slurmConfigs:
  ...
  filesInConfigMap:
    gres.conf: |
      # Used by SlurmCopilot to sync Kubernetes allocated resources to Slurm.
      Name=k8scpu Flags=CountOnly
      Name=k8smemory Flags=CountOnly
    slurmdbd.conf: |
      # Log path. Must match the path used for verification.
      LogFile=/var/log/slurmdbd.log
      # JWT authentication is required when using Slurmrestd.
      AuthAltTypes=auth/jwt
      # Slurmdbd uses this key to authenticate tokens. Mount the key into the Pod as shown below.
      AuthAltParameters=jwt_key=/var/jwt/jwt_hs256.key
      AuthType=auth/munge
      SlurmUser=slurm
      # Set MySQL database account information.
      StoragePass=
      StorageHost=
      StorageType=accounting_storage/mysql
      StorageUser=root
      StoragePort=3306
    slurm.conf: |
      # Sets k8scpu and k8smemory extended resource properties when a node joins the cluster,
      # preventing the node from being set to DOWN state.
      NodeFeaturesPlugins=node_features/k8s_resources
      # Automatically adds k8scpu and k8smemory extended resources when submitting Slurm jobs.
      JobSubmitPlugins=k8s_resource_completion
      AccountingStorageHost=slurm-test-slurmdbd
      # JWT authentication is required when using Slurmrestd.
      AuthAltTypes=auth/jwt
      # Slurmctld uses this key to generate tokens. Mount the key into the Pod as shown below.
      AuthAltParameters=jwt_key=/var/jwt/jwt_hs256.key
      # Used by SlurmCopilot to sync Kubernetes allocated resources to Slurm.
      GresTypes=k8scpu,k8smemory
      # Enter ${slurmClusterName}-slurmdbd.
      AccountingStorageHost=
      AccountingStoragePort=6819
      AccountingStorageType=accounting_storage/slurmdbd
      # MySQL database settings for the JobComp plug-in.
      JobCompHost=
      JobCompLoc=/var/log/slurm/slurm_jobcomp.log
      JobCompPass=
      JobCompPort=3306
      JobCompType=jobcomp/mysql
      JobCompUser=root
      # High availability configuration.
      SlurmctldHost=

Mount the JWT key in the Slurmctld, Slurmdbd, and Slurmrestd Pods.

...
headNodeConfig:
  image: "registry-cn-hangzhou.ack.aliyuncs.com/acs/slurm:23.06-1.6-aliyun-49259f59"
  # Mount the JWT key into Slurm. The mount path must match the path in the configuration above.
  volumes:
  - configMap:
      defaultMode: 444
      name: jwt
    name: config-jwt
  volumeMounts:
  - mountPath: /var/jwt
    name: config-jwt
slurmdbdConfigs:
  nodeSelector: {}
  tolerations: []
  affinity: {}
  resources: {}
  image: "registry-cn-hangzhou.ack.aliyuncs.com/acs/slurm:23.06-1.6-aliyun-49259f59"
  imagePullSecrets: []
  # if .slurmConfigs.createConfigsByConfigMap is true, slurmConfPath, volume, and volumeMounts
  # are automatically set. This also applies to mungeConfigs.createConfigsBySecret.
  volumes:
  - configMap:
      defaultMode: 444
      name: jwt
    name: config-jwt
  volumeMounts:
  - mountPath: /var/jwt
    name: config-jwt

slurmrestdConfigs:
  nodeSelector: {}
  tolerations: []
  affinity: {}
  resources: {}
  image: "registry-cn-hangzhou.ack.aliyuncs.com/acs/slurm:23.06-1.6-aliyun-49259f59"
  imagePullSecrets: []
  volumes:
  - configMap:
      defaultMode: 444
      name: jwt
    name: config-jwt
  volumeMounts:
  - mountPath: /var/jwt
    name: config-jwt

Step 4: Install the chart

Install the chart. If already installed, run helm upgrade instead and delete existing Pods and the Slurmctld StatefulSet to apply changes.

cd ..
helm install my-slurm-cluster ack-slurm-cluster

Verify installation

  1. Confirm the chart is deployed.

    helm list

    Expected output:

    NAME                    NAMESPACE       REVISION        UPDATED                                 STATUS          CHART                   APP VERSION
    ack-slurm-cluster       default         1               2024-07-19 14:47:58.126357 +0800 CST    deployed        ack-slurm-cluster-2.0.0 2.0.0
  2. Confirm all Pods are running.

    kubectl get pod

    Expected output: one worker and three control plane Pods running.

    NAME                          READY   STATUS    RESTARTS   AGE
    slurm-test-slurmctld-dlncz    1/1     Running   0          3h49m
    slurm-test-slurmdbd-8f75r     1/1     Running   0          3h49m
    slurm-test-slurmrestd-mjdzt   1/1     Running   0          3h49m
    slurm-test-worker-cpu-0       1/1     Running   0          166m
  3. Confirm Slurmdbd started correctly.

    kubectl exec slurm-test-slurmdbd-8f75r cat /var/log/slurmdbd.log | head

    Expected output:

    kubectl exec [POD] [COMMAND] is DEPRECATED and will be removed in a future version. Use kubectl exec [POD] -- [COMMAND] instead.
    [2024-07-22T19:52:55.727] accounting_storage/as_mysql: _check_mysql_concat_is_sane: MySQL server version is: 8.0.34
    [2024-07-22T19:52:55.737] error: Database settings not recommended values: innodb_lock_wait_timeout
    [2024-07-22T19:52:56.089] slurmdbd version 23.02.7 started

Build a generic Slurm image

Build a custom image if you need additional Slurm dependencies. The registry-cn-beijing.ack.aliyuncs.com/acs/slurm:23.06-1.6-aliyun-49259f59 image includes all packages required by the examples in this document.

Include the following plug-ins:

  • kubectl and node_features/k8s_resources (required)

  • job_submit/k8s_resource_completion (optional, required for auto-filling GRES resources)

About the `k8s_resources` plug-in

By default, Slurmctld checks GRES resource usage when Slurmd sends a _slurm_rpc_node_registration request. Any GRES change marks the node as INVAL, blocking new tasks and requiring rejoin. The k8s_resources plug-in prevents this: when ActivateFeature is updated, it sets k8s cpu and k8s memory to 0 and node_feature to true, bypassing the GRES check.

Source code is available in the Alibaba Cloud open source repository.

Example Dockerfile

FROM nvidia/cuda:11.4.3-cudnn8-devel-ubuntu20.04 as exporterBuilder
ENV TZ=Asia/Shanghai
ENV DEBIAN_FRONTEND=noninteractive
RUN ln -snf /usr/share/zoneinfo/$TZ /etc/localtime && echo $TZ > /etc/timezone
RUN apt-get update && apt install -y golang git munge libhttp-parser-dev libjson-c-dev libyaml-dev libjwt-dev libgtk2.0-dev libreadline-dev libpmix-dev libmysqlclient-dev libhwloc-dev openmpi-bin openmpi-common libopenmpi-dev rpm libmunge-dev libmunge2 libpam-dev perl python3 systemd lua5.3 libnvidia-ml-dev libhdf5-dev
# Download the source code before building the image
COPY ./slurm-23.02.7.tar.bz2 ./slurm-23.02.7.tar.bz2
RUN tar -xaf slurm-23.02.7.tar.bz2
COPY ../node_features/k8s_resources ./slurm-23.02.7/src/plugins/node_features/k8s_resources
RUN sed -i '/"src\/plugins\/node_features\/Makefile") CONFIG_FILES="\$CONFIG_FILES src\/plugins\/node_features\/Makefile" ;;/ a "    src/plugins/node_features/k8s_resources/Makefile") CONFIG_FILES="\$CONFIG_FILES src/plugins/node_features/k8s_resources/Makefile" ;;' ./slurm-23.02.7/configure
RUN awk '/^ac_config_files="\$ac_config_files/ && !found { print; print "ac_config_files=\"$ac_config_files src/plugins/node_features/k8s_resources/Makefile\""; found=1; next } { print }' ./slurm-23.02.7/configure > ./slurm-23.02.7/configure.new && mv ./slurm-23.02.7/configure.new ./slurm-23.02.7/configure && chmod +x ./slurm-23.02.7/configure
RUN cat ./slurm-23.02.7/configure
RUN sed -i '/^SUBDIRS =/ s/$/ k8s_resources/' ./slurm-23.02.7/src/plugins/node_features/Makefile & \
sed -i '/^SUBDIRS =/ s/$/ k8s_resources/' ./slurm-23.02.7/src/plugins/node_features/Makefile.in & \
sed -i '/^SUBDIRS =/ s/$/ k8s_resources/' ./slurm-23.02.7/src/plugins/node_features/Makefile.am
RUN cd slurm-23.02.7 && ./configure --prefix=/usr/ --sysconfdir=/etc/slurm && make

FROM nvidia/cuda:11.4.3-cudnn8-runtime-ubuntu20.04
ENV TZ=Asia/Shanghai
ENV DEBIAN_FRONTEND=noninteractive
RUN ln -snf /usr/share/zoneinfo/$TZ /etc/localtime && echo $TZ > /etc/timezone

RUN apt update
RUN apt install -y munge libhttp-parser-dev libjson-c-dev libyaml-dev libjwt-dev libgtk2.0-dev libreadline-dev libpmix-dev libmysqlclient-dev libhwloc-dev openmpi-bin openmpi-common libopenmpi-dev rpm libmunge-dev libmunge2 libpam-dev perl python3 systemd lua5.3 inotify-tools openssh-server pip libnvidia-ml-dev libhdf5-dev
COPY --from=0 /slurm-23.02.7 /slurm-23.02.7
RUN cd slurm-23.02.7 && make install && cd ../ && rm -rf /slurm-23.02.7
RUN apt remove libnvidia-ml-dev libnvidia-compute-545 -y; apt autoremove -y ; ln -s /usr/lib/x86_64-linux-gnu/libnvidia-ml.so.1 /usr/lib/x86_64-linux-gnu/libnvidia-ml.so
COPY ./sh ./
RUN mkdir /etc/slurm
RUN chmod +x create-users.sh munge-inisitalization.sh slurm-initialization.sh slurm-suspend.sh slurm-resume.sh slurmd slurmctld slurmdbd slurmrestd
RUN touch /var/log/slurm-resume.log /var/log/slurm-suspend.log ; chmod 777 /var/log/slurm-resume.log /var/log/slurm-suspend.log
RUN mv slurmd /etc/init.d/slurmd && mv slurmdbd /etc/init.d/slurmdbd && mv slurmctld /etc/init.d/slurmctld
RUN ./create-users.sh && ./munge-inisitalization.sh && ./slurm-initialization.sh
RUN rm ./create-users.sh ./munge-inisitalization.sh ./slurm-initialization.sh
ENV NVIDIA_VISIBLE_DEVICES=
RUN apt-get update && apt-get upgrade -y && rm -rf /var/cache/apt/

Verify colocated scheduling

  1. Check the GenericNode to view resource allocation across Slurm and Kubernetes.

    kubectl get genericnode

    Expected output:

    NAME                    CLUSTERNAME   ALIAS                     TYPE    ALLOCATEDRESOURCES
    cn-hongkong.10.1.0.19                 slurm-test-worker-cpu-0   Slurm   [{"allocated":{"cpu":"0","memory":"0"},"type":"Slurm"},{"allocated":{"cpu":"1735m","memory":"2393Mi"},"type":"Kubernetes"}]
  2. Submit a Slurm job and scale a Kubernetes Deployment to see updated GenericNode allocations.

    [root@iZj6c1wf3c25dbynbna3qgZ ~]# kubectl exec slurm-test-slurmctld-dlncz -- nohup srun --cpus-per-task=3 --mem=4000 --gres=k8scpu:3,k8smemory:4000 sleep inf &
    [1] 4132674
    
    [root@iZj6c1wf3c25dbynbna3qgZ ~]# kubectl scale deployment nginx-deployment-basic --replicas 2
    deployment.apps/nginx-deployment-basic scaled
    
    [root@iZj6c1wf3c25dbynbna3qgZ ~]# kubectl get genericnode
    NAME                    CLUSTERNAME   ALIAS                     TYPE    ALLOCATEDRESOURCES
    cn-hongkong.10.1.0.19                 slurm-test-worker-cpu-0   Slurm   [{"allocated":{"cpu":"3","memory":"4000Mi"},"type":"Slurm"},{"allocated":{"cpu":"2735m","memory":"3417Mi"},"type":"Kubernetes"}]
  3. Submit a second Slurm job. With all resources allocated, it enters Pending (PD) state.

    [root@iZj6c1wf3c25dbynbna3qgZ ~]# kubectl exec slurm-test-slurmctld-dlncz -- nohup srun --cpus-per-task=3 --mem=4000 sleep inf &
    [2] 4133454
    
    [root@iZj6c1wf3c25dbynbna3qgZ ~]# srun: job 2 queued and waiting for resources
    
    [root@iZj6c1wf3c25dbynbna3qgZ ~]# kubectl exec slurm-test-slurmctld-dlncz -- squeue
     JOBID PARTITION     NAME     USER ST       TIME  NODES NODELIST(REASON)
         2     debug    sleep     root PD       0:00      1 (Resources)
         1     debug    sleep     root  R       2:34      1 slurm-test-worker-cpu-0
The srun command in step 3 omits --gres because the job_resource_completion plug-in auto-fills GRES from CPU and memory requests. Without this plug-in, add --gres=k8scpu:3,k8smemory:4000 manually.

Slurm job script examples

Without the auto-fill plug-in, calculate GRES manually.

`srun` and `sbatch` parameters

Parameter

Description

--tres-per-task

Trackable Resource (TRE) per task.

--gres

Generic Resources (GRES) for the job.

--nodes / -N

Number of nodes to allocate.

--ntasks-per-node / --tasks-per-node

Number of tasks per node.

--cpus-per-task

Number of vCPUs per task.

--time / -t

Maximum run time.

--job-name / -J

Job name.

Slurm resource calculation example

Calculating GRES resources

For a single node:

  • Total vCPUs per node = (Tasks per node) x (CPUs per task)

  • Total memory per node = (Tasks per node) x (Memory per task)

Example: With 2 nodes, 4 tasks per node, and 2 CPUs per task: 4 x 2 = 8 vCPUs per node.

Using the auto-fill plug-in

The job_submit/k8s_resource_completion plug-in auto-populates --gres from CPU and memory requests. When using this plug-in:

  • Specify task count using -n or --ntasks (required)

  • Request GPU resources using --gpus-per-task, not --gpus or --gpus-per-socket

Compile the plug-in using this code sample.

Example job script

#!/bin/bash
#SBATCH --job-name=test_job                   # Job name
#SBATCH --nodes=2                             # Number of nodes required
#SBATCH --ntasks-per-node=4                   # Number of tasks per node
#SBATCH --cpus-per-task=2                     # Number of vCPUs per task
#SBATCH --time=01:00:00                       # Maximum run time
#SBATCH --output=job_output_%j.txt            # Standard output file
#SBATCH --error=job_error_%j.txt              # Standard error file

srun my_program

Alternatively, pass parameters on the command line:

sbatch --nodes=2 --ntasks-per-node=4 --cpus-per-task=2 --time=01:00:00 --job-name=test_job my_job_script.sh

Extend colocated scheduling to non-containerized clusters

SlurmCopilot communicates with Slurm via the OpenAPI, so it also supports non-containerized Slurm clusters.

In a non-containerized setup, create these Kubernetes resources manually, in addition to the JWT token.

  1. Create a Service for each Slurm cluster. SlurmCopilot sends OpenAPI requests to ${.metadata.name}.${.metadata.namespace}.svc.cluster.local:${.spec.ports[0].port}. The Service name must be ${slurmCluster}-slurmrestd, where ${slurmCluster} matches the value specified in the GenericNode.

    apiVersion: v1
    kind: Service
    metadata:
      name: slurm-slurmrestd
      namespace: default
    spec:
      ports:
      - name: slurmrestd
        port: 8080
        protocol: TCP
        targetPort: 8080
  2. Create a DNS record that resolves ${.metadata.name}.${.metadata.namespace}.svc.cluster.local:${.spec.ports[0].port} to the Slurmrestd address.

  3. Create GenericNode resources for Slurm nodes. GenericNode maps a Kubernetes node to a Slurm node via an alias. The name must match the Kubernetes node name, .spec.alias must match the Slurm node name, and the labels kai.alibabacloud.com/cluster-name and kai.alibabacloud.com/cluster-namespace must match the Service.

    apiVersion: kai.alibabacloud.com/v1alpha1
    kind: GenericNode
    metadata:
      labels:
        kai.alibabacloud.com/cluster-name: slurm-test
        kai.alibabacloud.com/cluster-namespace: default
      name: cn-hongkong.10.1.0.19
    spec:
      alias: slurm-test-worker-cpu-0
      type: Slurm

Summary

With colocated scheduling, Slurm schedules HPC jobs and Kubernetes orchestrates containerized workloads on the same cluster. This lets you leverage the Kubernetes ecosystem, including Helm charts, CI/CD pipelines, and monitoring tools, while consolidating workloads into a single cluster for more efficient resource utilization.