Deploy Flowise on ACK to build and embed LLM-powered chatbots with a visual drag-and-drop workflow.
Overview

The solution embeds a blue floating chat button on the webpage. When users visit the website, they can click the button to interact with the chatbot.
Configure a general-purpose chatbot in three steps:
-
Install the Flowise component: Create an ACK cluster using Alibaba Cloud Container Service for Kubernetes (ACK) and install the Flowise component.
-
Build a general-purpose chatbot workflow: Create a chatbot in the Flowise service.
-
Orchestrate a personalized conversation flow: Set up a Q&A model and a prompt template, then connect them with a chain model.

1. Install the Flowise component
Flowise is an open-source low-code framework for building large language model (LLM) applications. Its drag-and-drop UI simplifies LangChain-based workflow creation from prototyping to production.
1.1 Prerequisites
-
An ACK Pro cluster of version 1.22 or later is created. See Create an ACK managed cluster and Upgrade a cluster.
-
kubectl is connected to the cluster. See Obtain the kubeconfig file of a cluster and use kubectl to connect to the cluster.
1.2 Deploy the component
-
Install and deploy the Flowise component.
-
Log on to the ACK console. In the left navigation pane, click Clusters.
-
Click the target cluster and follow the numbered steps in the figure to install the Flowise component.
You do not need to configure Application Name or Namespace for the component. After you click Next, an Confirm dialog box appears. Click Yes to use the default application name (flowise) and namespace (flowise-system).
Operation path: ① In the left-side navigation pane, choose Applications > Helm. ② Click Create. ③ Select the AI & LLM application scenario tag. ④ Search for and select the flowise application card. In the YAML edit area on the parameter configuration page, modify
username(default value:flowiseuser) andpassword(default value:flowisepassword) in the config section as needed, and click OK to complete the deployment.
-
Set Chart Version to the latest version and click OK.
On the Parameters tab, set a custom username and password.
-
-
Verify that the Flowise component is running properly.
Check that the pods in the
flowise-systemnamespace are in the Running state:kubectl get pod -n flowise-systemExpected output:
NAME                       READY   STATUS    RESTARTS   AGE
flowise-596fb8bf88-7zdlr   1/1     Running   0          3h
flowise-postgresql-0       1/1     Running   0          3h
2. Create a workflow orchestration template
2.1 Access the Flowise service
-
Enable Internet access for the Flowise component.
In production, enable Access Control to secure your data.

-
After configuration, find the External IP of the Flowise component. Enter this IP in your browser to access the Flowise service.
On the Service list page, confirm that the flowise service is of the LoadBalancer type and the port mapping is
3000:30864/TCP.
-
Access the Flowise service.
Open the External IP address and enter your Username and Password.

If no custom username or password was set during installation, use the defaults:
Username=flowiseuserandPassword=flowisepassword.
2.2 Create Chatflows
Flowise can turn flows into tools. A main flow coordinates task-specific tool flows, each designed for a specific task.
Each child flow runs independently with its own memory. A final agent summarizes all outputs for higher-quality results.
To create a Chatflow:
-
Log on to the Flowise service.
-
Create a new Chatflow.
Click .

3. Orchestrate a personalized conversation flow
3.1 Configure Chat Models
Flowise orchestrates LLM applications by connecting nodes. These nodes, abstracted from frameworks such as LangChain and LlamaIndex, include types such as Agents, Chains, and Chat Models.
-
In the Chat Models Panel, drag a ChatOpenAI Custom node. Click Connect Credential > Create New and enter the API key for Tongyi Qianwen.

-
In Connect Credential, select Tongyi Qianwen. Set Model Name to qwen-turbo, set Temperature to 0.9, and on the Additional Parameters page, set BasePath to
https://dashscope.aliyuncs.com/compatible-mode/v1.
3.2 Set up a prompt template
In the Prompts panel, drag a Prompt Template node and configure the Template as follows.
Question: {question}
Answer: Let's think step by step.
3.3 Set up an LLM Chain
-
In the Chains panel, drag an LLM Chain node.
The created LLM Chain node contains the following input fields: Language Model (required), Prompt (required), Output Parser, Input Moderation, and Chain Name (used to name the chain). The output field is LLM Chain.

-
Connect the nodes to complete the chatbot orchestration.
The orchestrated workflow contains a ChatOpenAI Custom node (with the model set to
qwen-turboand Connect Credential configured), a Prompt Template node, and an LLM Chain node. The three nodes are connected in sequence.
3.4 Verify the result
After orchestrating the Chatflow, click Save in the upper-right corner. Use the Message button to debug the chatbot.
In the canvas, the ChatOpenAI Custom node (Connect Credential: Tongyi Qianwen, Model Name: qwen-turbo, Temperature: 0.9), the Prompt Template node (template: Question: {question} Answer: Let's think step by step.), and the LLM Chain node are connected in sequence. In the chat panel on the right, send a message such as "Please introduce yourself". The model returns a self-introduction about its capabilities as an AI assistant, which verifies that the conversation feature works as expected.

Summary
Apply to a production environment
Two ways to deploy the chatbot to production:
-
Use the conversation flow as an API in your frontend application.
Flowise provides BaaS-style APIs for all applications, enabling LLM access in frontend applications. See Develop with APIs.
-
Embed the chatbot on your website.
Copy the embed code into your HTML file.
Use Flowise to create a chatbot and embed it into your website. See Embed in websites.
Example: Embed an AI application into a website
Follow these steps to embed an LLM application into your website.
This example is for demonstration only. Enable Access Control in production to secure your data.
-
Enable Internet access for the Flowise component and open the external IP in your browser. See Access the Flowise service.
-
Build a simple web application in an ACK cluster to debug the chatbot.
Deploy a web application in the ACK cluster to host the Flowise LLM application.
-
Obtain the Flowise service code.
Select an embed method and copy the code into your website.

-
In the ACK cluster, create a deployment and a service to run and expose the web application.
The following YAML deploys an Nginx server with static HTML.
-
Log on to the ACK console. On the Configurations > ConfigMaps page, select the default namespace and click Create from YAML. Paste the YAML below and replace
window.difyChatbotConfig,scr, andidwith your Flowise service code.See the example below.
-
Successful deployment:
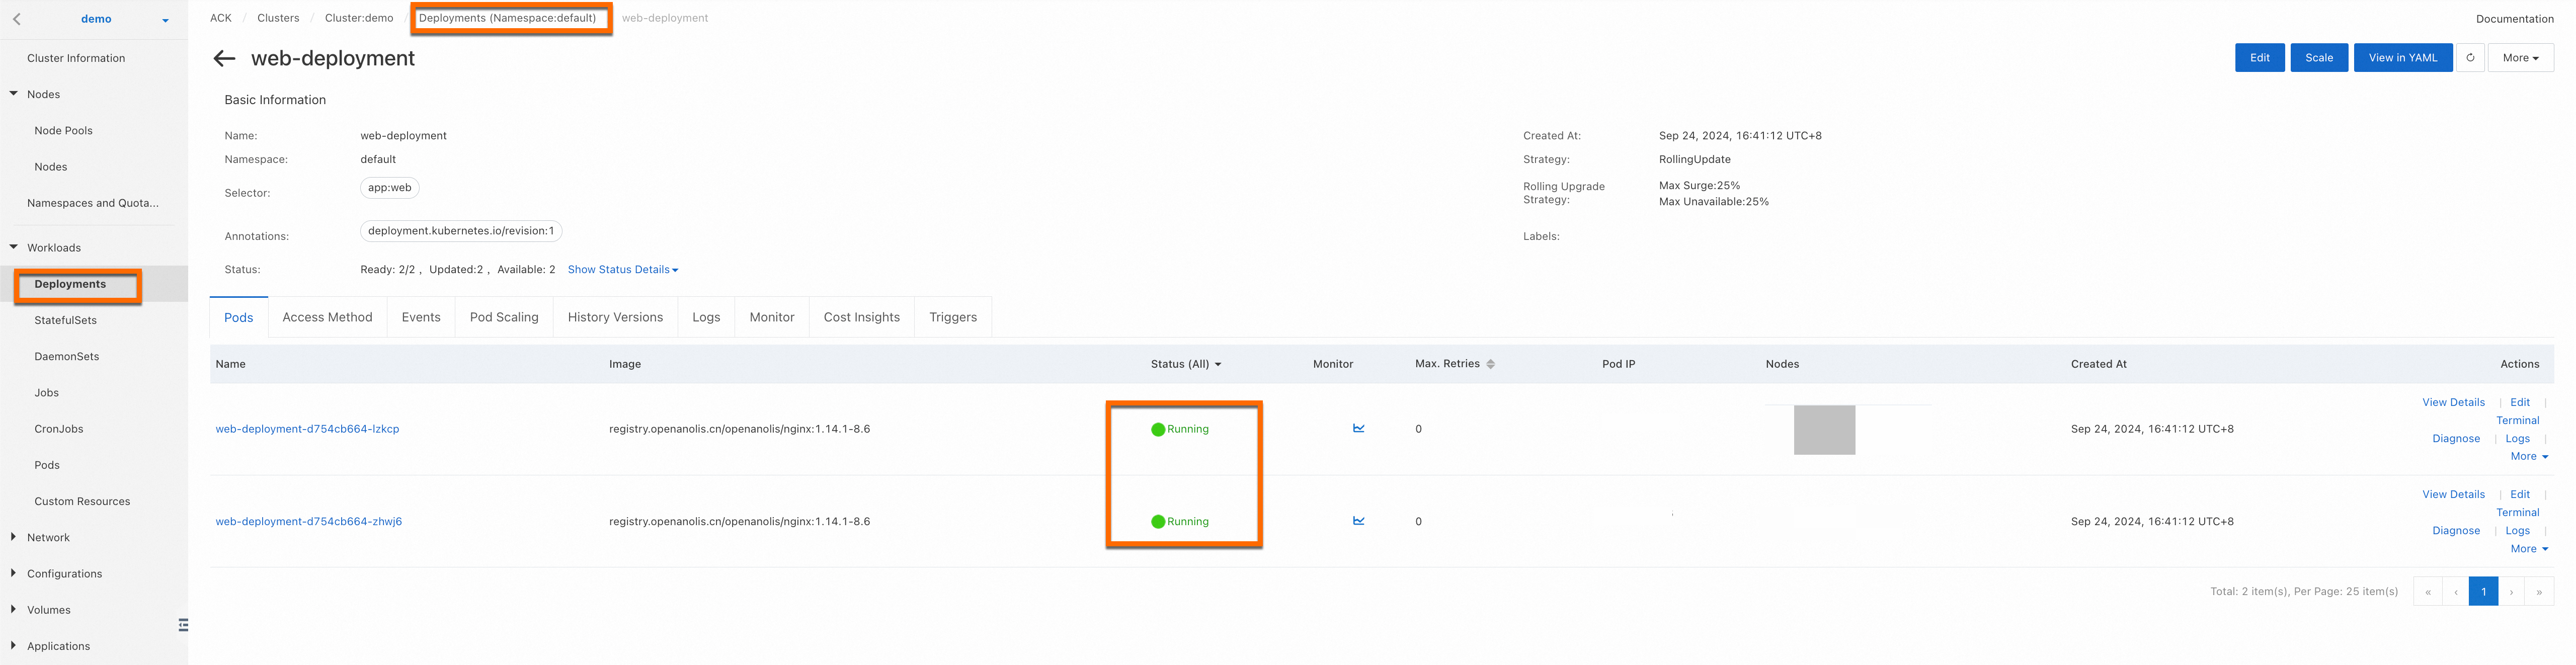
In the left-side navigation pane of the ACK console, choose Stateless and view the details of the web-deployment workload. The namespace is default, the images of the two pods are
registry.openanolis.cn/openanolis/nginx:1.14.1-8.6, both pods are in the Running state, and the ready count is 2/2. This indicates that the deployment is successful. -
Enable Internet access for the deployed service.
In production, enable Access Control to secure your data.
In the left-side navigation pane, choose Network > Services. Find web-service and click Update in the Actions column. In the Update Service dialog box, select the LoadBalancer tab, set the load balancer type to Classic Load Balancer (CLB), set Select Resources to Create New, set Access Method to Internet Access, and set Billing Method to Pay-as-you-go. Then, click OK.
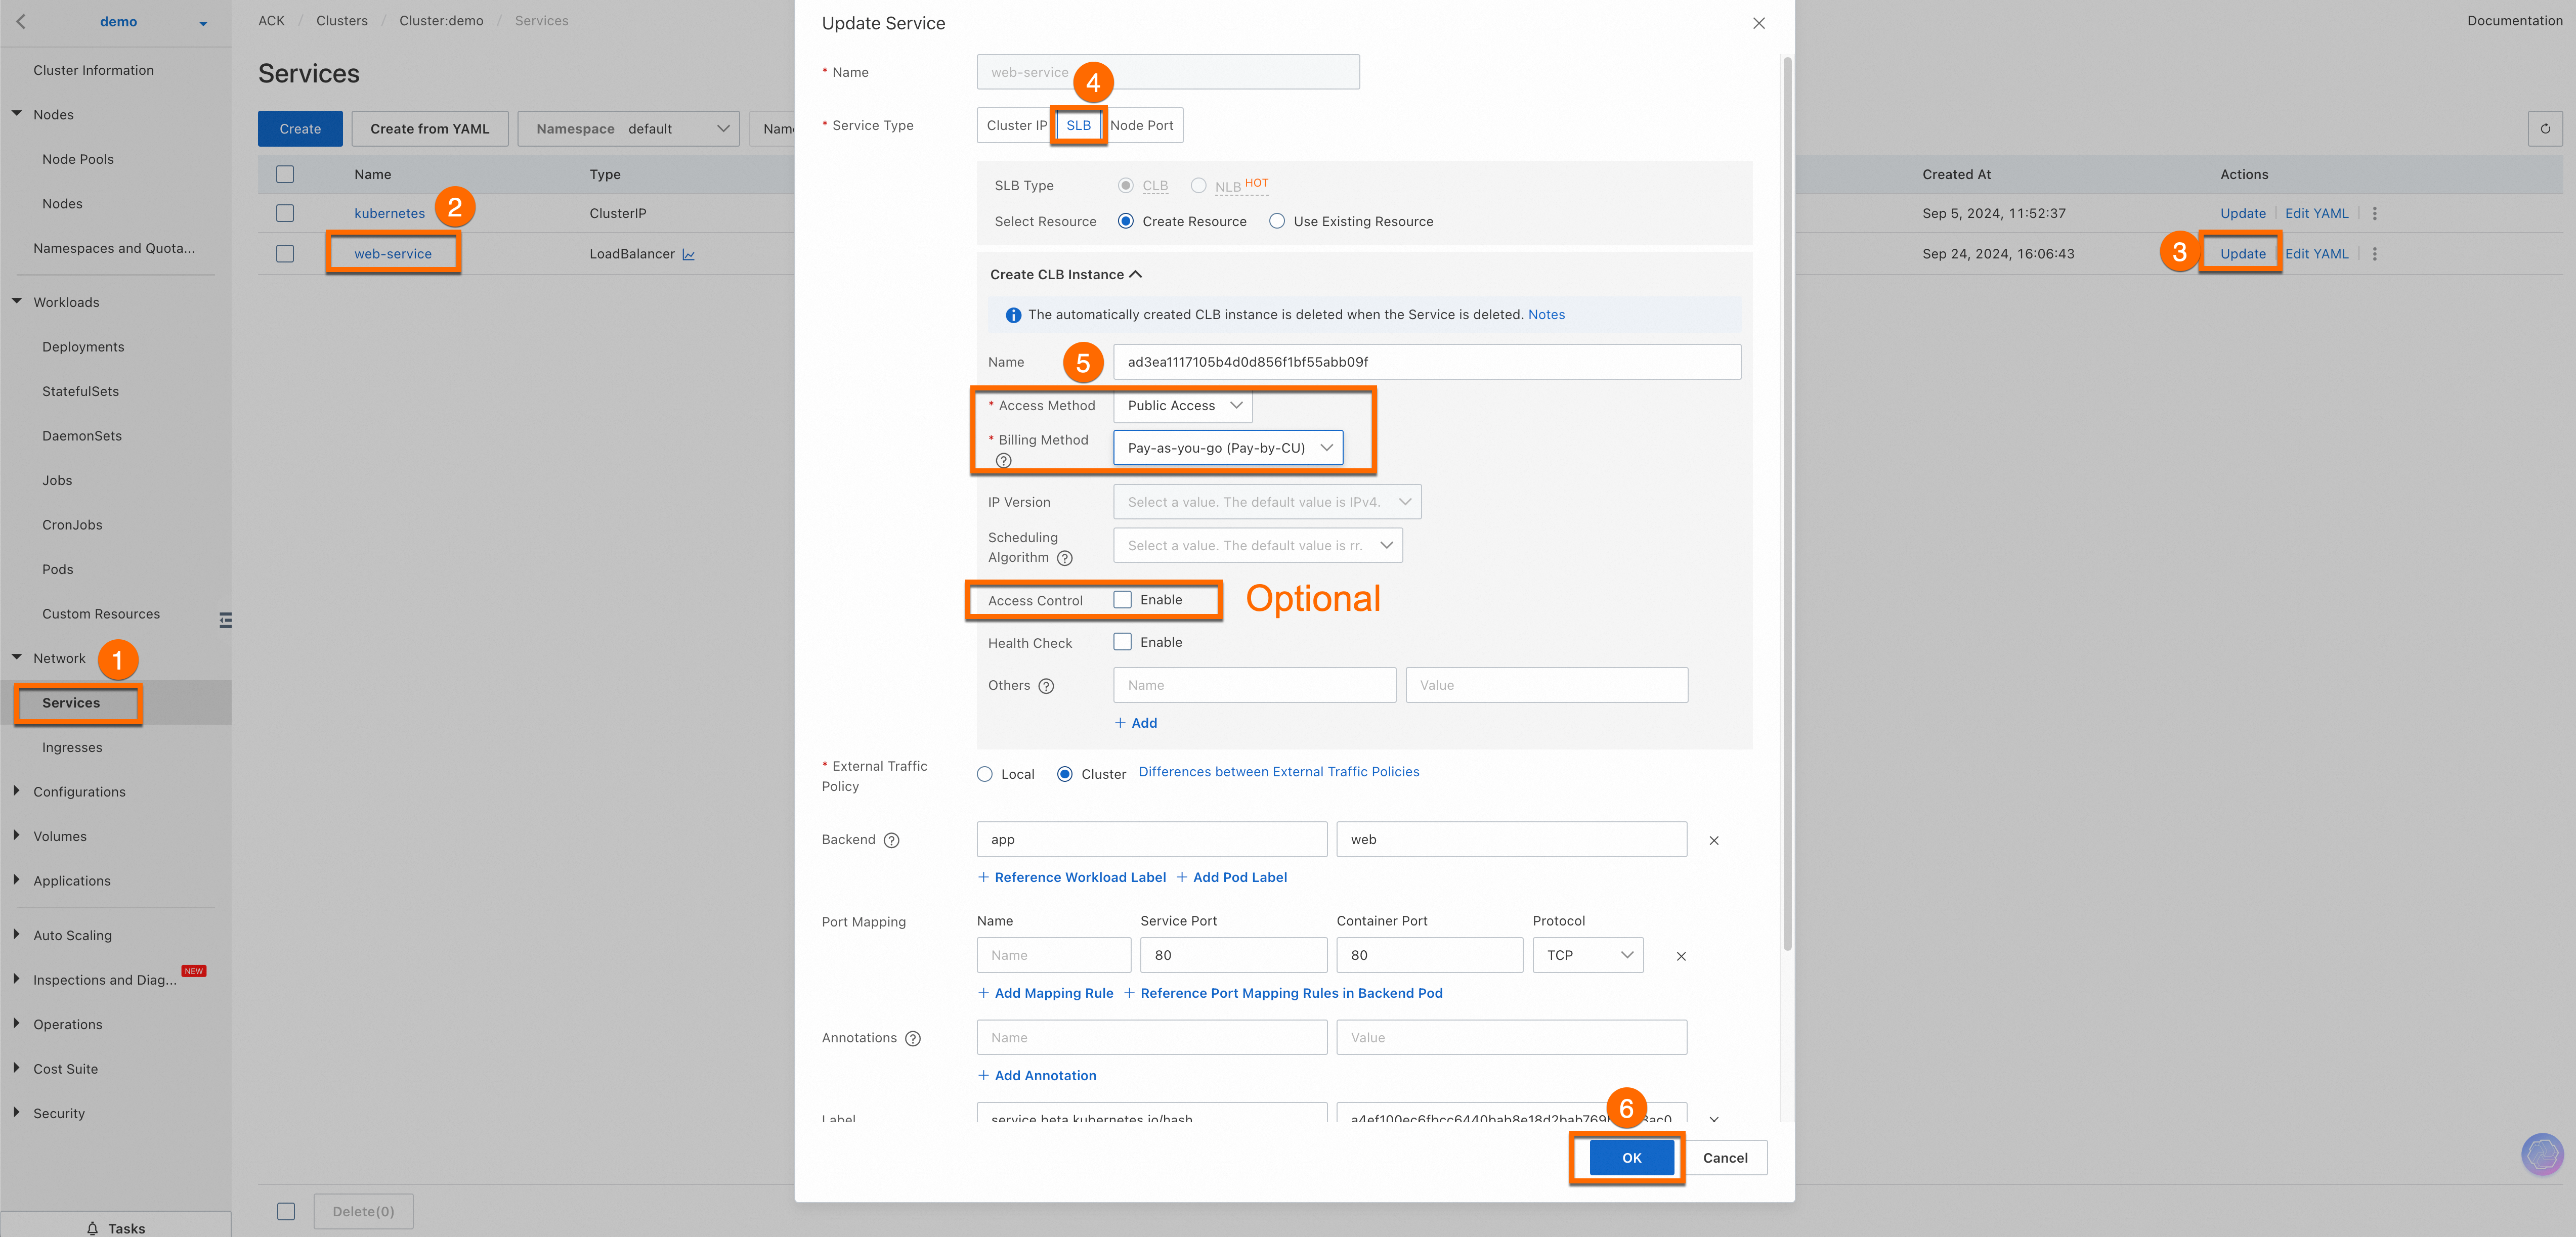
After configuration, find the External IP of web-service. Enter this IP in your browser to access the web service.
 Important
-
For external access, ensure the cluster's security group allows traffic on port 80. See Add a security group rule.
-
Ensure your code is secure against cross-site scripting (XSS) and code injection. This is a basic example; extend and modify as needed.
-
-
View the result.
-
-
Continuous improvement
See Build a customized AI Q&A assistant for a website using Dify.
With Dify, integrate knowledge bases into LLM applications to build customized AI Q&A solutions for your business.
Billing
This feature charges management fees for ACK Pro clusters and fees for the Alibaba Cloud resources that are used. The Alibaba Cloud products involved in this feature include Elastic Compute Service (ECS), Server Load Balancer (SLB), elastic IP addresses (EIPs), and Apsara File Storage NAS. You are charged for the resources that you use based on the billing rules of each product. For more information about cluster management fees and resource fees, see Billing overview.