Use volume snapshots created from disks
Volume snapshots let you back up StatefulSet data before a risky operation—such as an upgrade or schema change—and restore it to a new volume if something goes wrong. This topic explains how to create a volume snapshot from a disk volume and how to restore data from it.
Prerequisites
Before you begin, ensure that you have:
-
An ACK managed cluster running Kubernetes 1.18 or later
-
The Elastic Compute Service (ECS) Snapshot service activated (activation is free; charges apply only for snapshots you create). For more information, see Activate ECS Snapshot
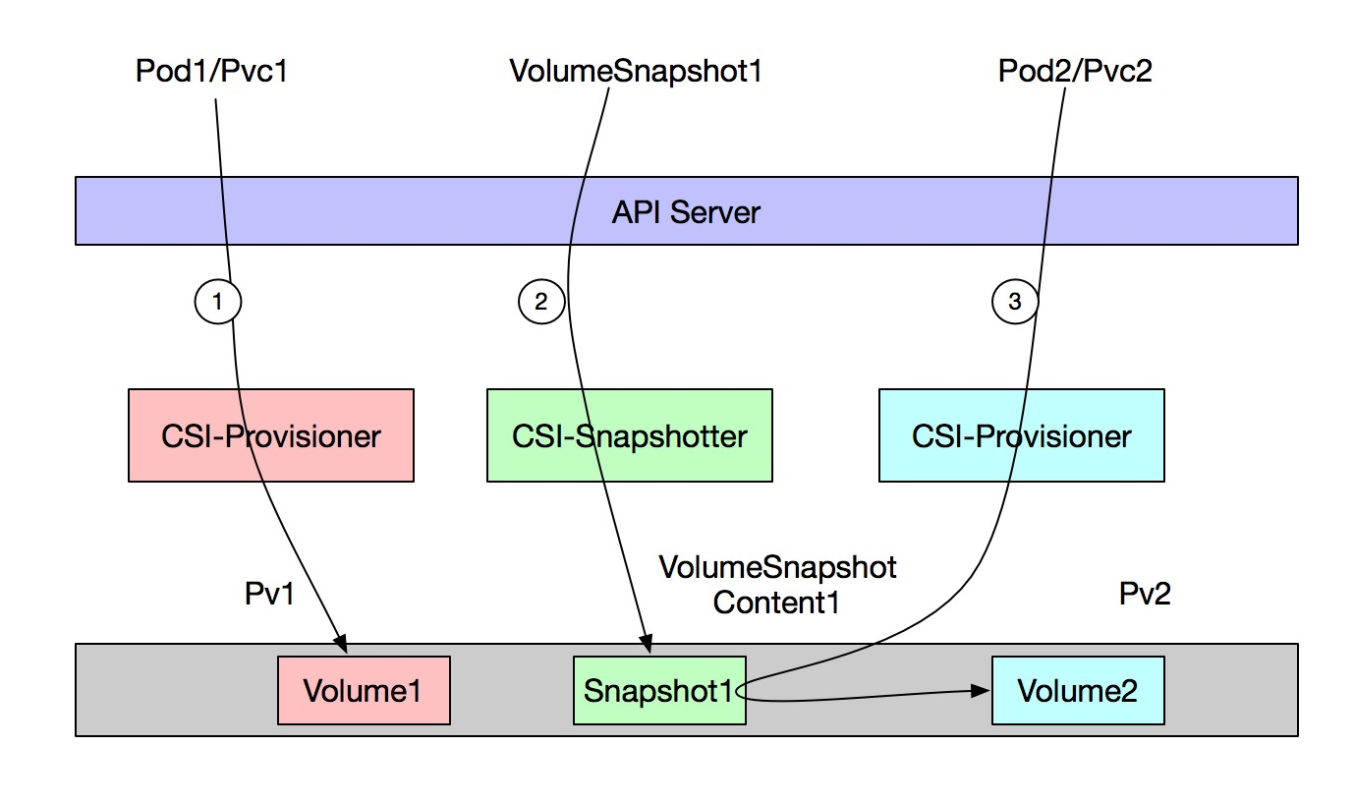
How it works
Container Service for Kubernetes (ACK) clusters use disk volumes for persistent storage on StatefulSets. Volume snapshots build on ECS disk snapshots and two Kubernetes mechanisms:
-
VolumeSnapshot: backs up data in a disk volume
-
DataSource: a PersistentVolumeClaim (PVC) field that restores data from a snapshot into a new volume
ACK implements snapshots through three CustomResourceDefinitions (CRDs):
| Resource | Description |
|---|---|
| VolumeSnapshotContent | A disk snapshot provisioned by a cluster administrator. Not namespace-scoped. Analogous to a PersistentVolume (PV). |
| VolumeSnapshot | A user request for a volume snapshot. Namespace-scoped. Analogous to a PVC. |
| VolumeSnapshotClass | Defines the driver and parameters used when creating snapshots. A VolumeSnapshotClass is analogous to a StorageClass, but snapshot-specific. Because the same volume can have snapshots with different attributes (for example, different retention periods), a dedicated class is needed rather than reusing the StorageClass. |
VolumeSnapshot and VolumeSnapshotContent are bound one-to-one, similar to PVC-PV binding:
-
If
volumeSnapshotClassNameis set to a valid VolumeSnapshotClass, ACK automatically provisions a VolumeSnapshotContent. -
If
volumeSnapshotClassNameis omitted or invalid, you must manually create a VolumeSnapshotContent and bind it to the VolumeSnapshot.
When you delete a VolumeSnapshotContent, the related volume snapshot is also deleted.
Billing
Volume snapshots are billed as ECS snapshots. For pricing details, see Snapshot billing.
Constraints
Before creating a snapshot, review the following constraints:
| Condition | Behavior |
|---|---|
| CSI plug-in version < V1.22.12-b797ad9-aliyun | Snapshots can only be created from disk volumes whose PVC is attached to a pod in the Running state. |
| CSI plug-in version >= V1.22.12-b797ad9-aliyun | Snapshots can be created from any used disk volume, regardless of pod state. |
By default, instance access is enabled for dynamically provisioned snapshots from volumes backed by Enhanced SSDs (ESSDs) and ESSD AutoPL disks at performance levels PL0, PL1, PL2, and PL3.
Create a volume snapshot dynamically
Use this approach to snapshot a live disk volume managed by ACK. The cluster automatically provisions both the VolumeSnapshotContent and the underlying ECS snapshot.
Overview: create a VolumeSnapshotClass (administrator) → deploy an app with a disk volume → create a VolumeSnapshot (ACK auto-creates VolumeSnapshotContent and the ECS snapshot) → restore data to a new volume by referencing the snapshot in a PVC.
Step 1: Create a VolumeSnapshotClass
Creating a VolumeSnapshotClass is a cluster administrator task. If your cluster already has one, skip to Step 2.
-
Create
volumesnapshotclass.yamlwith the following content:Parameter Description retentionDaysSnapshot retention period, in days. forceDeleteControls what happens when a snapshot is deleted. "true"forcefully deletes all snapshots;"false"deletes only unused snapshots. Default:"false"for csi-provisioner 1.26.5-92f859a-aliyun and later;"true"for earlier versions.deletionPolicyDelete: deletes the VolumeSnapshotContent and ECS snapshot when the VolumeSnapshot is deleted.Retain: keeps both when the VolumeSnapshot is deleted.apiVersion: snapshot.storage.k8s.io/v1 kind: VolumeSnapshotClass metadata: name: default-snapclass driver: diskplugin.csi.alibabacloud.com parameters: retentionDays: "5" forceDelete: "true" deletionPolicy: Delete -
Apply the manifest:
kubectl apply -f volumesnapshotclass.yaml
Step 2: Deploy an app and write data
-
Create
nginx.yamlwith the following content:apiVersion: apps/v1 kind: StatefulSet metadata: name: nginx spec: selector: matchLabels: app: nginx serviceName: "nginx" replicas: 1 template: metadata: labels: app: nginx spec: containers: - name: nginx image: anolis-registry.cn-zhangjiakou.cr.aliyuncs.com/openanolis/nginx:1.14.1-8.6 imagePullPolicy: IfNotPresent volumeMounts: - name: disk mountPath: /data volumeClaimTemplates: - metadata: name: disk spec: accessModes: [ "ReadWriteOnce" ] storageClassName: "alicloud-disk-topology-alltype" resources: requests: storage: 20Gi -
Deploy the StatefulSet:
kubectl apply -f nginx.yaml -
Verify the pod is running:
kubectl get pod -l app=nginxExpected output:
NAME READY STATUS RESTARTS AGE nginx-0 1/1 Running 0 82s -
Write test data to the volume:
kubectl exec -it nginx-0 -- touch /data/test
kubectl exec -it nginx-0 -- ls /data
Expected output:
lost+found test
Step 3: Create a VolumeSnapshot
-
Create
snapshot-1.yamlwith the following content:apiVersion: snapshot.storage.k8s.io/v1 kind: VolumeSnapshot metadata: name: new-snapshot-demo namespace: default spec: volumeSnapshotClassName: default-snapclass # The VolumeSnapshotClass used by the VolumeSnapshot. source: persistentVolumeClaimName: disk-nginx-0 -
Apply the manifest:
kubectl apply -f snapshot-1.yaml
Step 4: Verify the snapshot
-
Check the VolumeSnapshot status:
kubectl get volumesnapshotsExpected output:
NAME                READYTOUSE   SOURCEPVC      SOURCESNAPSHOTCONTENT   RESTORESIZE   SNAPSHOTCLASS       SNAPSHOTCONTENT                                    CREATIONTIME   AGE
new-snapshot-demo   true         disk-nginx-0                           20Gi          default-snapclass   snapcontent-48b04625-679a-490f-9ef3-f04b2b8e6c57   28s            28s
When
READYTOUSEistrue, the snapshot is ready for use. -
Check the VolumeSnapshotContent:
kubectl get VolumeSnapshotContentExpected output:
NAME                                               READYTOUSE   RESTORESIZE   DELETIONPOLICY   DRIVER                            VOLUMESNAPSHOTCLASS   VOLUMESNAPSHOT      VOLUMESNAPSHOTNAMESPACE   AGE
snapcontent-48b04625-679a-490f-9ef3-f04b2b8e6c57   true         21474836480   Delete           diskplugin.csi.alibabacloud.com   default-snapclass     new-snapshot-demo   default                   49s
The corresponding ECS disk snapshot is also visible on the Snapshots page in the ECS console.
Step 5 (optional): Restore data to a new app
Reference the snapshot in a StatefulSet's volumeClaimTemplates to restore data into a new volume.
-
Create
nginx-restore.yamlwith the following content. ThedataSourceblock points to the snapshot you created:apiVersion: apps/v1 kind: StatefulSet metadata: name: nginx-restore spec: selector: matchLabels: app: nginx serviceName: "nginx" replicas: 1 template: metadata: labels: app: nginx spec: containers: - name: nginx image: anolis-registry.cn-zhangjiakou.cr.aliyuncs.com/openanolis/nginx:1.14.1-8.6 imagePullPolicy: IfNotPresent volumeMounts: - name: disk mountPath: /data volumeClaimTemplates: - metadata: name: disk spec: accessModes: [ "ReadWriteOnce" ] storageClassName: "alicloud-disk-topology-alltype" resources: requests: storage: 20Gi dataSource: name: new-snapshot-demo # Name of the VolumeSnapshot to restore from kind: VolumeSnapshot apiGroup: snapshot.storage.k8s.io -
Deploy the StatefulSet:
kubectl apply -f nginx-restore.yaml -
Verify that the data was restored:
kubectl exec -it nginx-restore-0 -- ls /dataExpected output:
lost+found test
Step 6 (optional): Restore data to a standalone PVC
To restore data without deploying a workload, create a PVC directly from the snapshot.
-
Create
pvc-restore.yamlwith the following content:apiVersion: v1 kind: PersistentVolumeClaim metadata: name: pvc-disk namespace: default spec: accessModes: - ReadWriteOnce resources: requests: storage: 20Gi dataSource: name: new-snapshot-demo # Name of the VolumeSnapshot to restore from kind: VolumeSnapshot apiGroup: snapshot.storage.k8s.io storageClassName: alicloud-disk-topology-alltype volumeMode: Filesystem -
Create the PVC:
The
alicloud-disk-topology-alltypeStorageClass usesvolumeBindingMode: WaitForFirstConsumer. The PVC stays in thePendingstate until it is mounted to a pod. Do not delete the VolumeSnapshot, VolumeSnapshotContent, or the underlying ECS snapshot before the PVC is bound.kubectl apply -f pvc-restore.yaml
Import an existing disk snapshot
Use this approach to import a disk snapshot that already exists in the ECS console into an ACK cluster, without creating a live app first.
Step 1: Create a VolumeSnapshotContent
Creating a VolumeSnapshotContent is a cluster administrator task.
-
Create
snapshot-content.yaml. Replace<YOUR-SNAPSHOTID>with the snapshot ID from the Snapshots page in the ECS console:Parameter Description snapshotHandleThe ID of the existing ECS disk snapshot. volumeSnapshotRef.nameThe name of the VolumeSnapshot to bind. Must match metadata.namein the VolumeSnapshot manifest.volumeSnapshotRef.namespaceThe namespace of the VolumeSnapshot. apiVersion: snapshot.storage.k8s.io/v1 kind: VolumeSnapshotContent metadata: name: new-snapshot-content-test spec: deletionPolicy: Retain driver: diskplugin.csi.alibabacloud.com source: snapshotHandle: <YOUR-SNAPSHOTID> # ID of the existing ECS disk snapshot volumeSnapshotRef: name: new-snapshot-demo # Must match the VolumeSnapshot name below namespace: default -
Apply the manifest:
kubectl apply -f snapshot-content.yaml
Step 2: Create a VolumeSnapshot and bind it
-
Create
snapshot-2.yamlwith the following content:Parameter Description metadata.nameThe VolumeSnapshot name. Must match the volumeSnapshotRef.namevalue in the VolumeSnapshotContent.volumeSnapshotContentNameThe name of the VolumeSnapshotContent to bind. apiVersion: snapshot.storage.k8s.io/v1 kind: VolumeSnapshot metadata: name: new-snapshot-demo # Must match volumeSnapshotRef.name in the VolumeSnapshotContent namespace: default spec: source: volumeSnapshotContentName: new-snapshot-content-test # Name of the VolumeSnapshotContent to bind -
Apply the manifest:
kubectl apply -f snapshot-2.yaml
Step 3 (optional): Restore data
After binding is complete, restore data using the same approach as Step 5 and Step 6 in the dynamic snapshot workflow.