When FPGAs are used for computing in a Container Service for Kubernetes (ACK) cluster, you can schedule pods to FPGA-accelerated nodes. This allows you to make full use of FPGA resources. This topic describes how to schedule pods to FPGA-accelerated nodes by using labels.
Prerequisites
An ACK cluster with FPGA-accelerated nodes is created. For more information, see Create an ACK cluster with FPGA-accelerated nodes.
You are connected to the ACK cluster. This way, you can view the labels that are added to the nodes. For more information, see Obtain the kubeconfig file of a cluster and use kubectl to connect to the cluster.
Background Information
When you deploy FPGA-accelerated nodes in an ACK cluster, FPGA-related attributes are exposed by node labels. This offers the following benefits:
You can use the labels to filter FPGA-accelerated nodes.
The labels can be used as conditions to schedule pods.
Step 1: View the labels of the FPGA-accelerated nodes
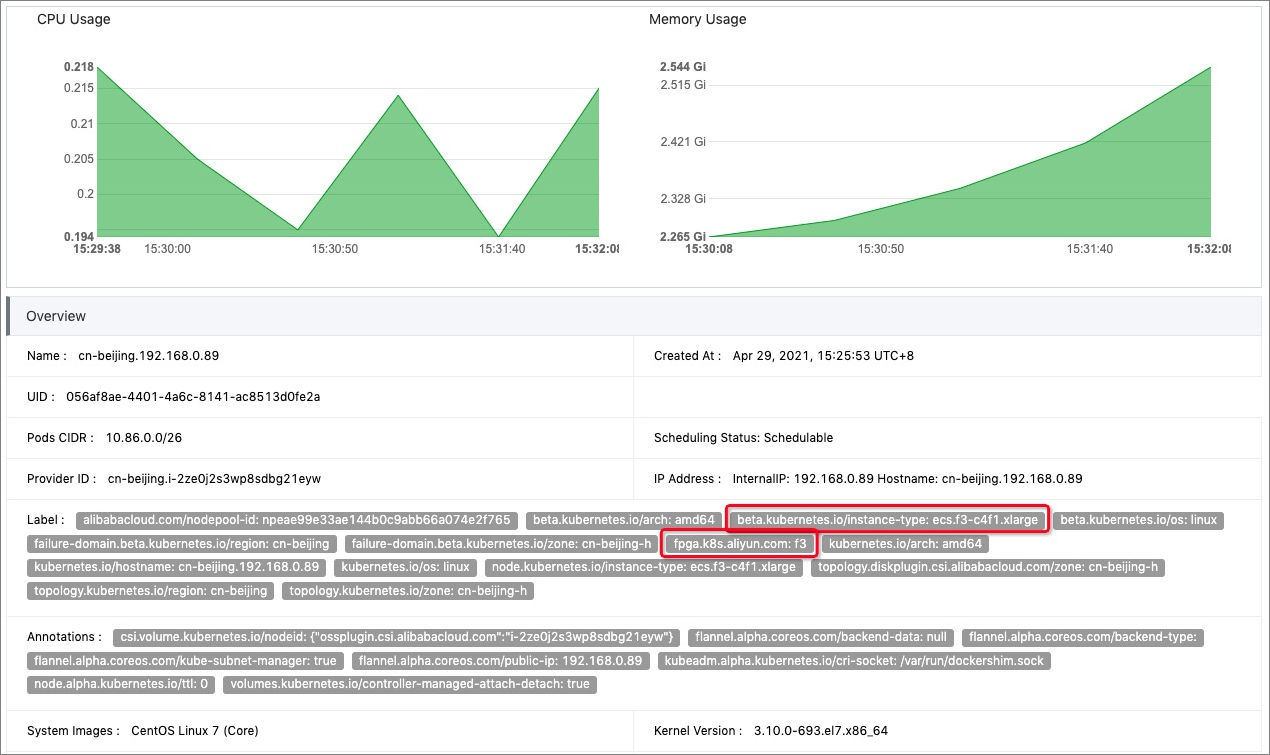
Method 1: View the labels of the FPGA-accelerated nodes in the console
Log on to the ACK console. In the left-side navigation pane, click Clusters.
On the Clusters page, find the cluster that you want to manage and click its name. In the left-side navigation pane, choose .
On the Nodes page, find the FPGA-accelerated node and choose in the Actions column.
View the labels of the FPGA-accelerated node.

Method 2: Run the kubectl command to view the labels of the FPGA-accelerated nodes
Run the following command to view the details of the FPGA-accelerated nodes:
kubectl get nodesExpected output:
NAME                       STATUS   ROLES    AGE     VERSION
cn-beijing.192.168.XX.X1   Ready    <none>   3h51m   v1.18.8-aliyun.1
cn-beijing.192.168.XX.X2   Ready    <none>   3h41m   v1.18.8-aliyun.1
Select an FPGA-accelerated node and run the following command to view the labels of the FPGA-accelerated node:
kubectl describe node cn-beijing.192.168.XX.X2Expected output:
Name:               cn-beijing.192.168.XX.X2
Roles:              <none>
Labels:             ack.aliyun.com=c05888610e***
                    alibabacloud.com/nodepool-id=npfda879b6***
                    beta.kubernetes.io/arch=amd64
                    beta.kubernetes.io/instance-type=ecs.f3-c4f1.xlarge
                    beta.kubernetes.io/os=linux
                    failure-domain.beta.kubernetes.io/region=cn-beijing
                    failure-domain.beta.kubernetes.io/zone=cn-beijing-h
                    fpga.k8s.aliyun.com=f3
                    kubernetes.io/arch=amd64
                    kubernetes.io/hostname=cn-beijing.192.168.XX.X2
                    kubernetes.io/os=linux
                    node.kubernetes.io/instance-type=ecs.f3-c4f1.xlarge
                    topology.diskplugin.csi.alibabacloud.com/zone=cn-beijing-h
                    topology.kubernetes.io/region=cn-beijing
                    topology.kubernetes.io/zone=cn-beijing-h
The output shows that the
fpga.k8s.aliyun.com=f3label is added to the FPGA-accelerated node. The label is used to schedule pods in the following example.
Step 2: Schedule pods to the FPGA-accelerated nodes
Log on to the ACK console. In the left-side navigation pane, click Clusters.
On the Clusters page, find the cluster that you want to manage and click its name. In the left-side pane, choose .
On the Deployments page, click Create from YAML.
Select a custom template from the drop-down list of sample templates, and copy the following content to the Template field.
apiVersion: batch/v1 kind: Job metadata: name: fpga-run-task1 spec: backoffLimit: 0 completions: 1 parallelism: 1 template: spec: nodeSelector: fpga.k8s.aliyun.com: f3 containers: - image: <your image> imagePullPolicy: Always name: fpga-run-task1 resources: limits: xilinx.com/fpga-aliyun-f3: 1 securityContext: privileged: trueNoteReplace the value of
<your image>with the address of your custom image.Click Create.
In the left-side navigation pane of the details page, choose .
In the list of pods, you can view that the specified pod is scheduled to the required FPGA-accelerated node. You can use labels to schedule pods to specific FPGA-accelerated nodes with ease.