If the current CoreDNS version is outdated but its Upgrade button is not displayed on the Add-ons page of the Container Service for Kubernetes (ACK) console, you cannot configure the ACK cluster to automatically update CoreDNS. In such a case, manually update CoreDNS. This topic describes how to do so.
Prerequisites
Connect to your cluster using the kubectl tool. For more information, see Connect to a cluster using kubectl.
Update notes
If the load balancing mode of kube-proxy is set to IP Virtual Server (IPVS), all DNS queries within the cluster may fail or time out after CoreDNS is updated. This situation lasts about 5 minutes. Use one of the following methods to avoid this issue:
Modify the timeout period for IPVS UDP sessions in the kube-proxy configuration. For more information, see Configure the UDP timeout for an IPVS cluster.
Use NodeLocal DNSCache to optimize DNS resolution. For more information, see Improve stability with NodeLocal DNSCache.
The update takes approximately 2 minutes, though the actual duration may vary depending on the number of CoreDNS replicas in your cluster. Existing replicas are not terminated during the process, so there will be no impact on service resolution.
Query the CoreDNS version
Console
Log on to the ACK console. In the left navigation pane, click Clusters.
On the Clusters page, find the cluster you want to manage and click its name. In the left navigation pane, choose .
On the Deployments page, set Namespace to kube-system and check the CoreDNS version in the Image column.

kubectl
Run the following command to query the CoreDNS version:
kubectl get deployment coredns -n kube-system -o jsonpath="{.spec.template.spec.containers[0].image}"Expected output:
registry-vpc.cn-hangzhou.aliyuncs.com/acs/coredns:1.6.2 # Version 1.6.2 is used in this example.Confirm the update version
Confirm the CoreDNS version that you want to update to. The following table describes the Kubernetes versions that are compatible with CoreDNS. We recommend using the latest CoreDNS version that is compatible with the Kubernetes version.
Kubernetes version range | CoreDNS version(s) |
1.11 to 1.16 | 1.6.2 (discontinued) |
1.14.8 to 1.22 | 1.6.7 (discontinued) and 1.7.0 |
1.20.4 and later | 1.8.4 and 1.9.3 Important v1.8.4 and v1.9.3 have multiple minor versions, such as |
1.21 and later | 1.11.3 |
Update manually
Console
(Optional) Replace the
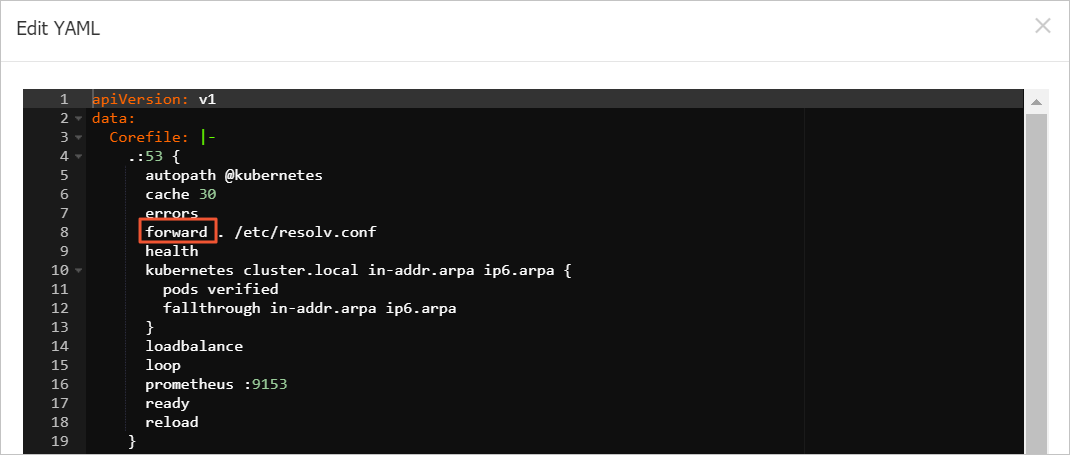
proxyfield with theforwardfield.The Proxy plug-in was deprecated in CoreDNS v1.6.2. When you upgrade from a version earlier than v1.6.2, you must perform the following steps to manually modify the CoreDNS configuration.
Log on to the ACK console. In the left navigation pane, click Clusters.
On the Clusters page, click the name of the one you want to change. In the left-side navigation pane, choose .
In the upper part of the ConfigMap page, set Namespace to kube-system. Then, find the coredns ConfigMap and click Edit YAML in the Actions column.
In the View in YAML panel, replace proxy with forward and click OK.
Change the image version of CoreDNS.
Log on to the ACK console. In the left navigation pane, click Clusters.
On the Clusters page, find the cluster you want to manage and click its name. In the left navigation pane, choose .
In the upper part of the Deployments page, set Namespace to kube-system. Then, find coredns and choose
 > Edit YAML in the Actions column.
 In the Edit YAML dialog box, change the version number in the
imagefield. Then, click Update.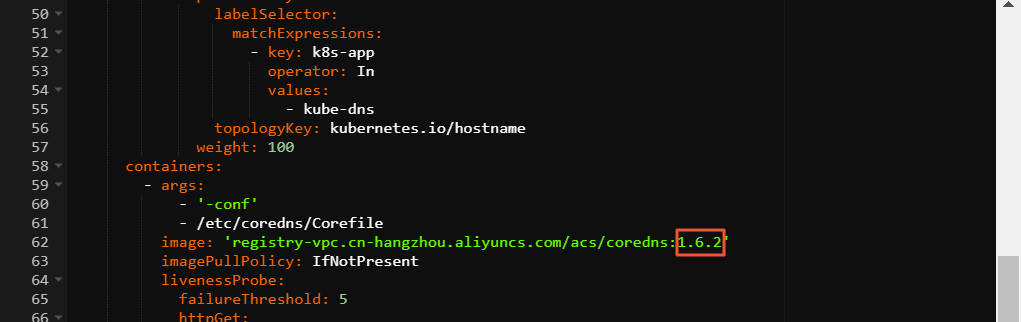
Verify the update.
Run the following command to query the CoreDNS version:
kubectl get deployment coredns -n kube-system -o jsonpath="{.spec.template.spec.containers[0].image}"Expected output:
registry-cn-shanghai-vpc.ack.aliyuncs.com/acs/coredns:v1.9.3.10-5e7ba42d-aliyunRun the following command to check whether all CoreDNS pods in the cluster are in the Running state:
kubectl get pods -n kube-system | grep corednsExpected output:
coredns-78d4b8****-6g62w                           1/1     Running   0          9d
coredns-78d4b8****-n6wjm                           1/1     Running   0          9d
kubectl
(Optional) Replace the
proxyfield with theforwardfield.The Proxy plug-in was deprecated in CoreDNS v1.6.2. When you upgrade from a version earlier than v1.6.2 to v1.6.2 or later, perform the following steps to manually modify the CoreDNS configuration.
Run the following command to change the version number in the
imagefield in the CoreDNS configuration file, save the configuration file, then exit.kubectl edit deployment/coredns -n kube-systemVerify the update.
Run the following command to query the CoreDNS version:
kubectl get deployment coredns -n kube-system -o jsonpath="{.spec.template.spec.containers[0].image}"Expected output:
registry-cn-shanghai-vpc.ack.aliyuncs.com/acs/coredns:v1.9.3.10-5e7ba42d-aliyunRun the following command to check whether all CoreDNS pods in the cluster are in the Running state:
kubectl get pods -n kube-system | grep corednsExpected output:
coredns-78d4b8****-6g62w                           1/1     Running   0          9d
coredns-78d4b8****-n6wjm                           1/1     Running   0          9d
Configure the UDP timeout for an IPVS cluster
If your cluster uses the kube-proxy IPVS mode, the IPVS session persistence policy might cause intermittent DNS resolution failures across the cluster for five minutes after the upgrade. To reduce the number of resolution failures, you can reduce the IPVS UDP session persistence timeout to 10 seconds. If your cluster has UDP-based services, evaluate the potential impact of this operation before you proceed.
If your cluster is not an IPVS cluster, you can ignore this section. For more information about how to check the kube-proxy proxy mode, see View cluster information.
For Kubernetes 1.18 or later clusters
Using the console
Log on to the ACK console. In the left navigation pane, click Clusters.
On the Clusters page, click the name of the one you want to change. In the left-side navigation pane, choose .
On the ConfigMaps page, select the kube-system namespace. Find the kube-proxy-worker ConfigMap and click Edit YAML in the Actions column.
In the Edit YAML panel, add
udpTimeout: 10sunder the ipvs field and click OK.apiVersion: v1 data: config.conf: | apiVersion: kubeproxy.config.k8s.io/v1alpha1 kind: KubeProxyConfiguration # Other irrelevant fields are omitted. mode: ipvs # If the ipvs key does not exist, add it. ipvs: udpTimeout: 10sRecreate all pods named kube-proxy-worker.
On the cluster details page, in the navigation pane on the left, select .
In the DaemonSet list, find and click kube-proxy-worker.
On the kube-proxy-worker page, click the Pods tab. In the row of a pod, choose , and then click OK.
Repeat this step to delete all pods. After the pods are deleted, the system automatically recreates them.
Verify that the UDP timeout is configured.
Run the following command to install ipvsadm.
ipvsadm is a management tool for the IPVS module. For more information, see ipvsadm.
sudo yum install -y ipvsadmRun the following command on any ECS node in the cluster and check the third number in the output.
sudo ipvsadm -L --timeoutIf the third number in the output is 10, the UDP timeout for the IPVS cluster is successfully changed.
After the change is successful, wait at least five minutes before you proceed with the next step.
Using the command line
Run the following command to edit the kube-proxy-worker configuration file.
kubectl -n kube-system edit configmap kube-proxy-workerIn the kube-proxy configuration file, add
udpTimeout: 10sunder the ipvs field. Then, save the file and exit.apiVersion: v1 data: config.conf: | apiVersion: kubeproxy.config.k8s.io/v1alpha1 kind: KubeProxyConfiguration # Other irrelevant fields are omitted. mode: ipvs # If the ipvs key does not exist, add it. ipvs: udpTimeout: 10sRun the following commands to recreate all pods named kube-proxy-worker.
Run the following command to view information about the existing pods.
kubectl -n kube-system get pod -o wide | grep kube-proxy-workerRun the following command to delete the pods that you found in the previous step. The system automatically recreates the pods named kube-proxy-worker.
kubectl -n kube-system delete pod <kube-proxy-worker-****>Replace <kube-proxy-worker-****> with the names of the pods that you found in the previous step.
Verify that the UDP timeout is configured.
Run the following command to install ipvsadm.
ipvsadm is a management tool for the IPVS module. For more information, see ipvsadm.
sudo yum install -y ipvsadmRun the following command on any ECS node in the cluster and check the third number in the output.
sudo ipvsadm -L --timeoutIf the third number in the output is 10, the UDP timeout for the IPVS cluster is successfully changed.
After the change is successful, wait at least five minutes before you proceed with the next step.
For Kubernetes 1.16 or earlier clusters
The kube-proxy component in clusters that run these versions does not support the udpTimeout parameter. You can use Operation Orchestration Service (OOS) to run the ipvsadm command in batches on all cluster nodes to adjust the UDP timeout configuration. The command is as follows:
sudo yum install -y ipvsadm
sudo ipvsadm -L --timeout > /tmp/ipvsadm_timeout_old
sudo ipvsadm --set 900 120 10
sudo ipvsadm -L --timeout > /tmp/ipvsadm_timeout_new
diff /tmp/ipvsadm_timeout_old /tmp/ipvsadm_timeout_new
For more information about batch operations in OOS, see Batch operation instances.
What to do next
After CoreDNS is updated, optimize the configurations of CoreDNS based on your business requirements. See Optimize CoreDNS configurations.