Build custom OS images with Alicloud Image Builder to speed up node provisioning in ACK node pools.
Prerequisites
-
An ACK managed cluster is created.
A kubectl client is connected to the ACK cluster. For more information, see Connect to an ACK cluster using kubectl.
Why use custom images for scaling
ACK node pools support auto scaling with built-in OS images, such as Alibaba Cloud Linux and CentOS, that cover most use cases. For scenarios that require pre-installed software or high-performance configurations, use Alicloud Image Builder to build custom OS images.
Submit the image build task to the cluster as a Job or CronJob.
Build a custom image with an ACK Job
The following examples use a ConfigMap named build-config and a Job named build.
Step 1: Configure build parameters
Create a ConfigMap named build-config to configure the image build parameters.
-
Create a file named build-config.yaml with the following YAML content.
The following tables list the YAML parameters.
Table 1. Parameters in the Alicloud Image Builder configuration file
Parameter
Example
Description
variables{"<variable1>":"<value>"}variables{"access_key":"{{env ALICLOUD_ACCESS_KEY}}"}
The
variablesfor Alicloud Image Builder.NoteHard-coding sensitive information such as
access_keyandsecret_keyin the configuration file poses a security risk. Define them as variables that receive values at runtime.builders{"type":"<value>"}builders{"type":"alicloud-ecs"}
The image builder (
builders). When type is alicloud-ecs, a temporary ECS instance is created to build the image and released afterward.provisioners{"type":"<value>"}provisioners{"type":"shell"}
The image provisioner (
provisioners) that defines operations on the temporary instance. When type is shell, a shell script runs automatically on the instance. For example,yum install redis.x86_64 -yinstalls Redis.Table 2. Image build parameters
Parameter
Example
Description
Required
access_keyyourAccessKeyID
The AccessKey pair ID. See Obtain an AccessKey pair.
Yes
secret_keyyourAccessKeySecret
The AccessKey pair secret.
Yes
regioncn-beijing
The custom image region.
Yes
image_nameack-custom_image
The custom image name. Must be unique across existing images.
Yes
source_imagealiyun_2_1903_x64_20G_alibase_20200904.vhd
The Alibaba Cloud public image ID with the matching OS. See OS images supported by ACK.
Yes
instance_typeecs.c6.xlarge
The ECS instance type for the temporary build instance. Specify a GPU-accelerated type for GPU images.
Yes
RUNTIMEcontainerd
The container runtime. Valid values:
dockerandcontainerd.Yes
RUNTIME_VERSION1.6.28
-
If the container runtime is docker, the default
RUNTIME_VERSIONis 19.03.15. -
If the container runtime is containerd, the default
RUNTIME_VERSIONis 1.6.20.
Yes
SKIP_SECURITY_FIXtrue
Specifies whether to skip security updates.
Yes
KUBE_VERSION1.30.1-aliyun.1
The cluster version.
Yes
PRESET_GPUtrue
Specifies whether to pre-install the GPU driver to accelerate startup.
No
NVIDIA_DRIVER_VERSION460.91.03
The GPU driver version to pre-install. Default value: 460.91.03.
No
OS_ARCHamd64
The CPU architecture. Valid values:
amd64andarm64.Yes
MOUNT_RUNTIME_DATADISK
true
Set to true if the custom image has cached application images and a data disk needs to be mounted to the ECS instance during use.
No
Important-
Before assigning a custom image to a node pool, ensure the node pool configuration (cluster version, region, container runtime, GPU instance type) matches the image build settings. Otherwise, the node cannot join the cluster.
-
To validate, add the image to a regular node pool with matching parameters and verify your workloads run as expected.
-
-
Deploy Alicloud Image Builder to the cluster:
kubectl apply -f build-config.yaml
Step 2: Create a build Job
-
Grant the required permissions to the AccessKey pair with the following policy.
-
Generate Base64-encoded strings for your AccessKey pair:
echo -n "yourAccessKeyID" | base64 echo -n "yourAccessKeySecret" | base64 -
Create a Secret named my-secret with the following YAML.
apiVersion: v1 kind: Secret metadata: name: my-secret namespace: default type: Opaque data: ALICLOUD_ACCESS_KEY: TFRI**************** # The Base64-encoded string from the previous step. ALICLOUD_SECRET_KEY: a0zY**************** -
Create a file named build.yaml with the following YAML content.
The Job creates a temporary ECS instance from the
source_image, runs theprovisionersscripts, then creates a custom image and pushes it to the specified region. -
Deploy the Job to start the image build.
kubectl apply -f build.yaml
Step 3: (Optional) View build logs
The build process generates logs that record steps such as parameter validation, temporary resource creation, software pre-installation, and cleanup.
Log on to the ACK console. In the left navigation pane, click Clusters.
On the Clusters page, click the name of your cluster. In the left navigation pane, click .
-
In the Jobs list, find the Job that you created. In the Actions column, click Details, then click the Logs tab to view the build logs.
Provisioner configuration
A provisioner installs and configures software on a running machine before capturing it as an OS image. Typical use cases:
-
Install software packages.
-
Patch the kernel.
-
Create users.
-
Download application code.
-
Build a custom Alibaba Cloud Linux 3 image.
Run shell scripts
  "provisioners": [{
      "type": "shell",
      "script": "script.sh"
  }]
Run Ansible playbooks
  "provisioners": [
    {
    "type": "ansible",
    "playbook_file": "./playbook.yml"
    }
  ]
Install CPFS client
CPFS client installation requires many packages and on-the-fly compilation, which can be slow. A custom image reduces installation cost at scale.
Build a custom image for Arm architecture
Build a GPU node OS image
Custom GPU images and custom CPU images cannot be used together.
Cache application images
Adding an ECS instance with an attached data disk to a node pool initializes the data disk, removing pre-cached application images. To preserve them, create a data disk snapshot when building the custom image.
{
"variables": {
"image_name": "ack-custom_image",
"source_image": "aliyun_3_x64_20G_alibase_20240528.vhd",
"instance_type": "ecs.c6.xlarge",
"access_key": "{{env `ALICLOUD_ACCESS_KEY`}}",
"region": "{{env `ALICLOUD_REGION`}}",
"secret_key": "{{env `ALICLOUD_SECRET_KEY`}}"
},
"builders": [
{
"type": "alicloud-ecs",
"system_disk_mapping": {
"disk_size": 120,
"disk_category": "cloud_essd"
},
"image_disk_mappings": {
"disk_size": 40,
"disk_category": "cloud_auto"
}, # Configure a data disk when you build the custom image. After building the image, the process automatically creates a snapshot of the data disk.
"access_key": "{{user `access_key`}}",
"secret_key": "{{user `secret_key`}}",
"region": "{{user `region`}}",
"image_name": "{{user `image_name`}}",
"source_image": "{{user `source_image`}}",
"instance_type": "{{user `instance_type`}}",
"ssh_username": "root",
"skip_image_validation": "true",
"io_optimized": "true"
}
],
"provisioners": [
{
"type": "file",
"source": "scripts/ack-optimized-os-linux3-all.sh",
"destination": "/root/"
},
{
"type": "shell",
"inline": [
"export RUNTIME=containerd",
"export RUNTIME_VERSION=2.1.6",
"export SKIP_SECURITY_FIX=true",
"export KUBE_VERSION=1.30.1-aliyun.1",
"export OS_ARCH=amd64",
"export MOUNT_RUNTIME_DATADISK=true", # Mount container runtime file paths to the data disk.
"bash /root/ack-optimized-os-linux3-all.sh",
"ctr -n k8s.io i pull registry-cn-hangzhou-vpc.ack.aliyuncs.com/acs/pause:3.9", # Bake the application image into the OS image.
"mv /var/lib/containerd /var/lib/container/containerd" # Move the image files to the data disk.
]
}
]
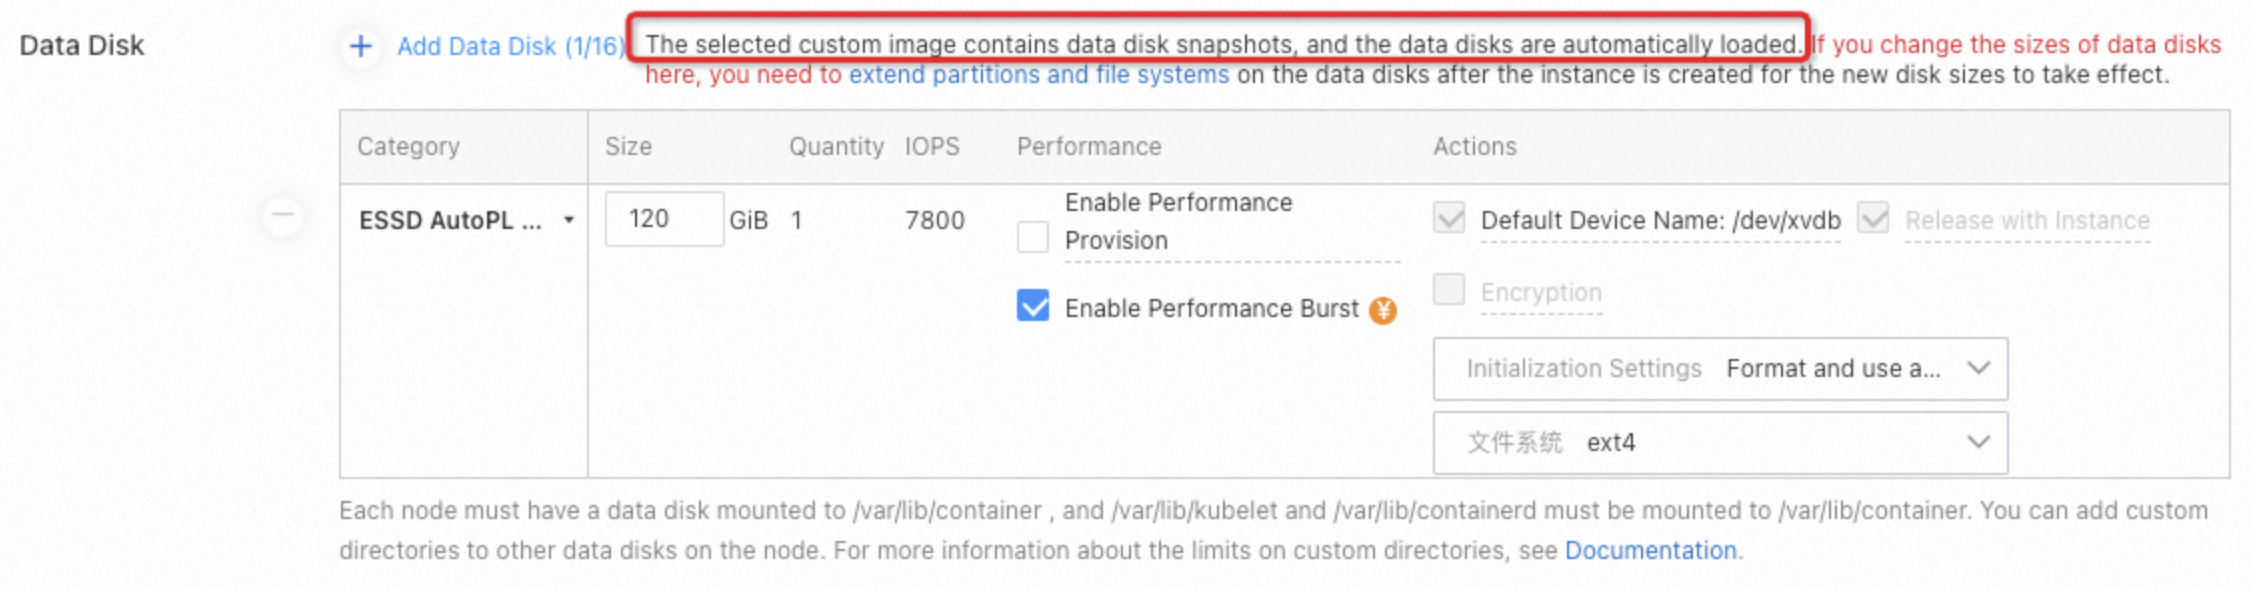
}When configuring a node pool, select a custom image with a data disk snapshot. The system prompts that a data disk snapshot is automatically loaded, with the disk type set to ESSD AutoPL, capacity of 120 GiB, and options for burst performance and release-with-instance. The disk is initialized in the container runtime format using ext4. If you modify the data disk capacity, you must manually expand the partition and file system after the ECS instance is created.
Pull from a private registry (Docker)
docker login <image_address> -u user -p password
docker pull nginx
Pull from a private registry (containerd)
ctr -n k8s.io i pull --user=username:password nginxPull from a private registry during build
-
On a Linux machine with Docker installed, run
docker loginto generate credentials.docker login --username=zhongwei.***@aliyun-test.com --password xxxxxxxxxx registry.cn-beijing.aliyuncs.comA successful
docker logincreates config.json in the/root/.dockerdirectory.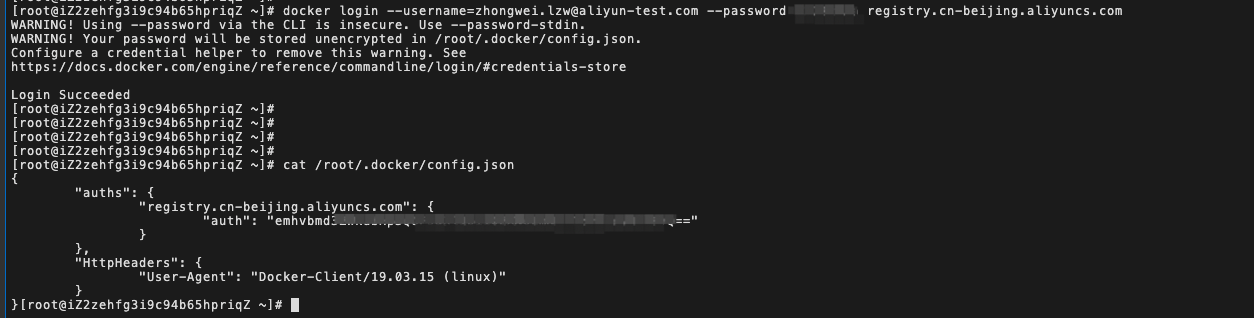
-
Create a ConfigMap from the generated config.json.
apiVersion: v1 kind: ConfigMap metadata: name: docker-config data: config.json: |- { "auths": { "registry.cn-beijing.aliyuncs.com": { "auth": "xxxxxxxxxxxxxx" } }, "HttpHeaders": { "User-Agent": "Docker-Client/19.03.15 (linux)" } } -
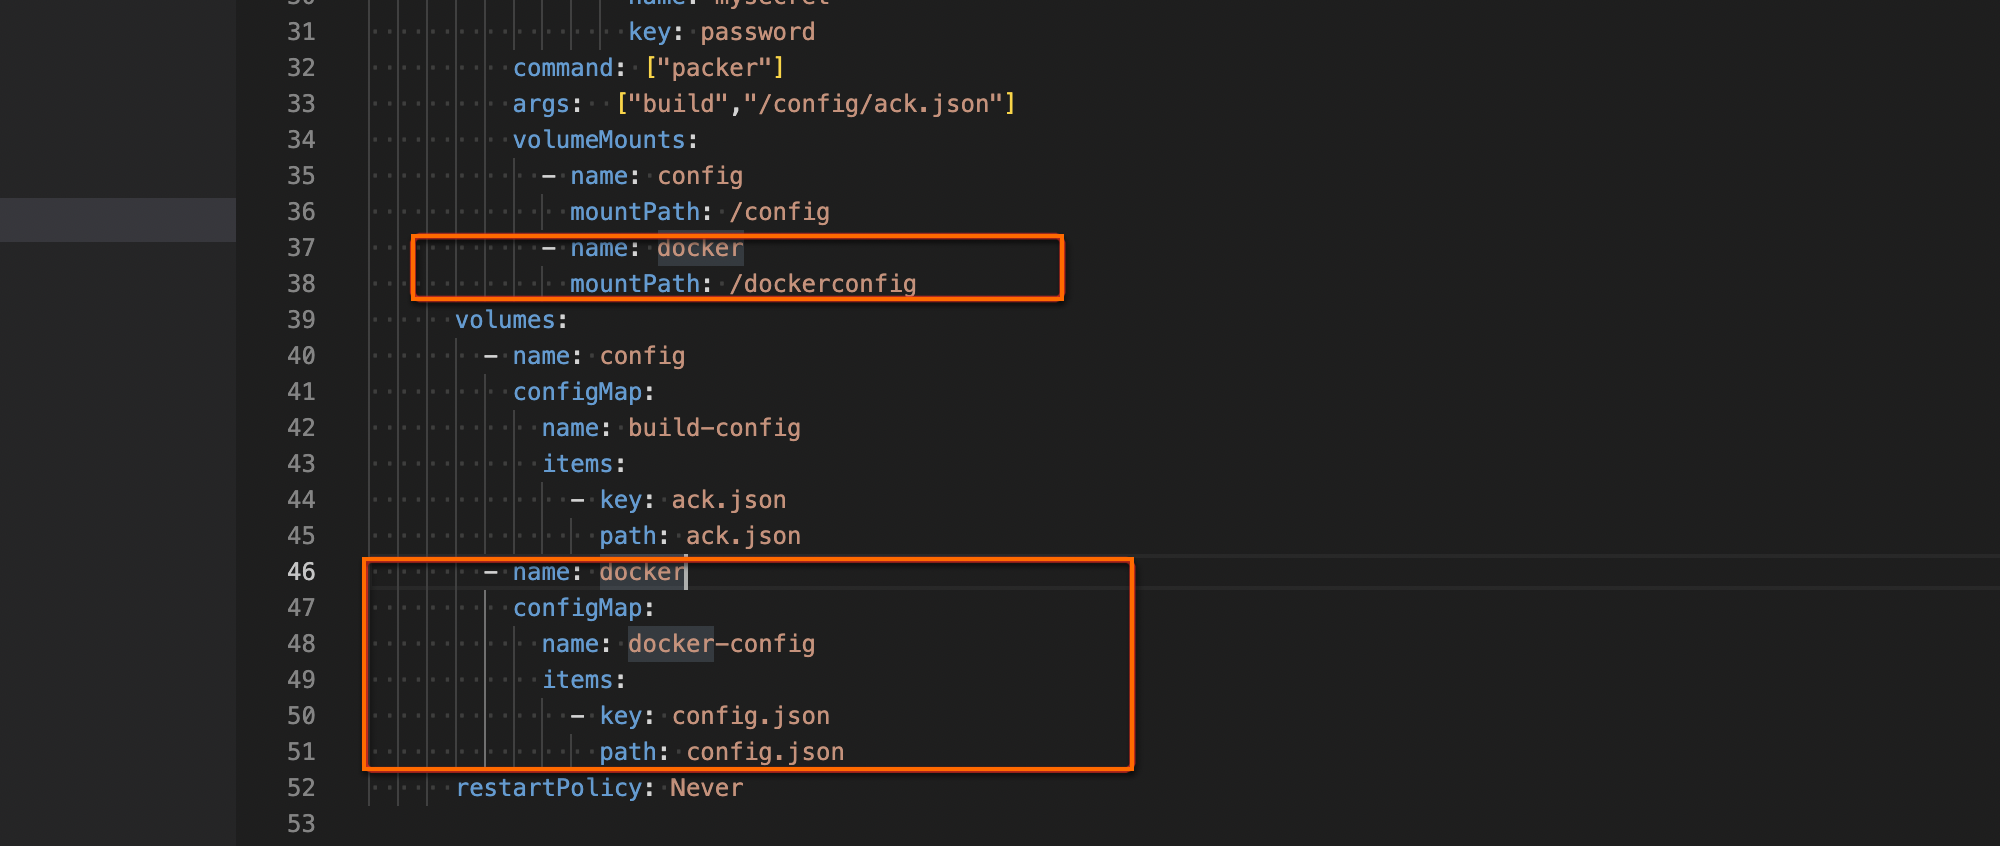
Modify the Job YAML to mount the ConfigMap into the Pod.
-
Modify the build-config file as follows.

-
Run the Job.
Set concurrent image uploads and downloads
Log on to the ACK console. In the left navigation pane, click Clusters.
On the Clusters page, click the name of your cluster. In the left navigation pane, click .
-
Click the name of the target node pool. On the Basic Information tab, find the Node Pool Information section and click the link next to Auto Scaling Group.
-
Click the Instance Configuration Sources tab. Find the target scaling configuration, click Modify in the Actions column, and then click OK.
-
On the Modify scaling configuration page, expand Advanced Settings and copy the User Data content. Base64-decode the data in the User Data box.
-
Decode and modify the user data.
Base64-decode the Instance User Data and append the following code to the script.
This code installs
jq, updates the Docker daemon configuration to increase concurrent downloads and uploads, and restarts Docker.yum install -y jq echo "$(jq '. += {"max-concurrent-downloads": 20,"max-concurrent-uploads": 20}' /etc/docker/daemon.json)" > /etc/docker/daemon.json service docker restart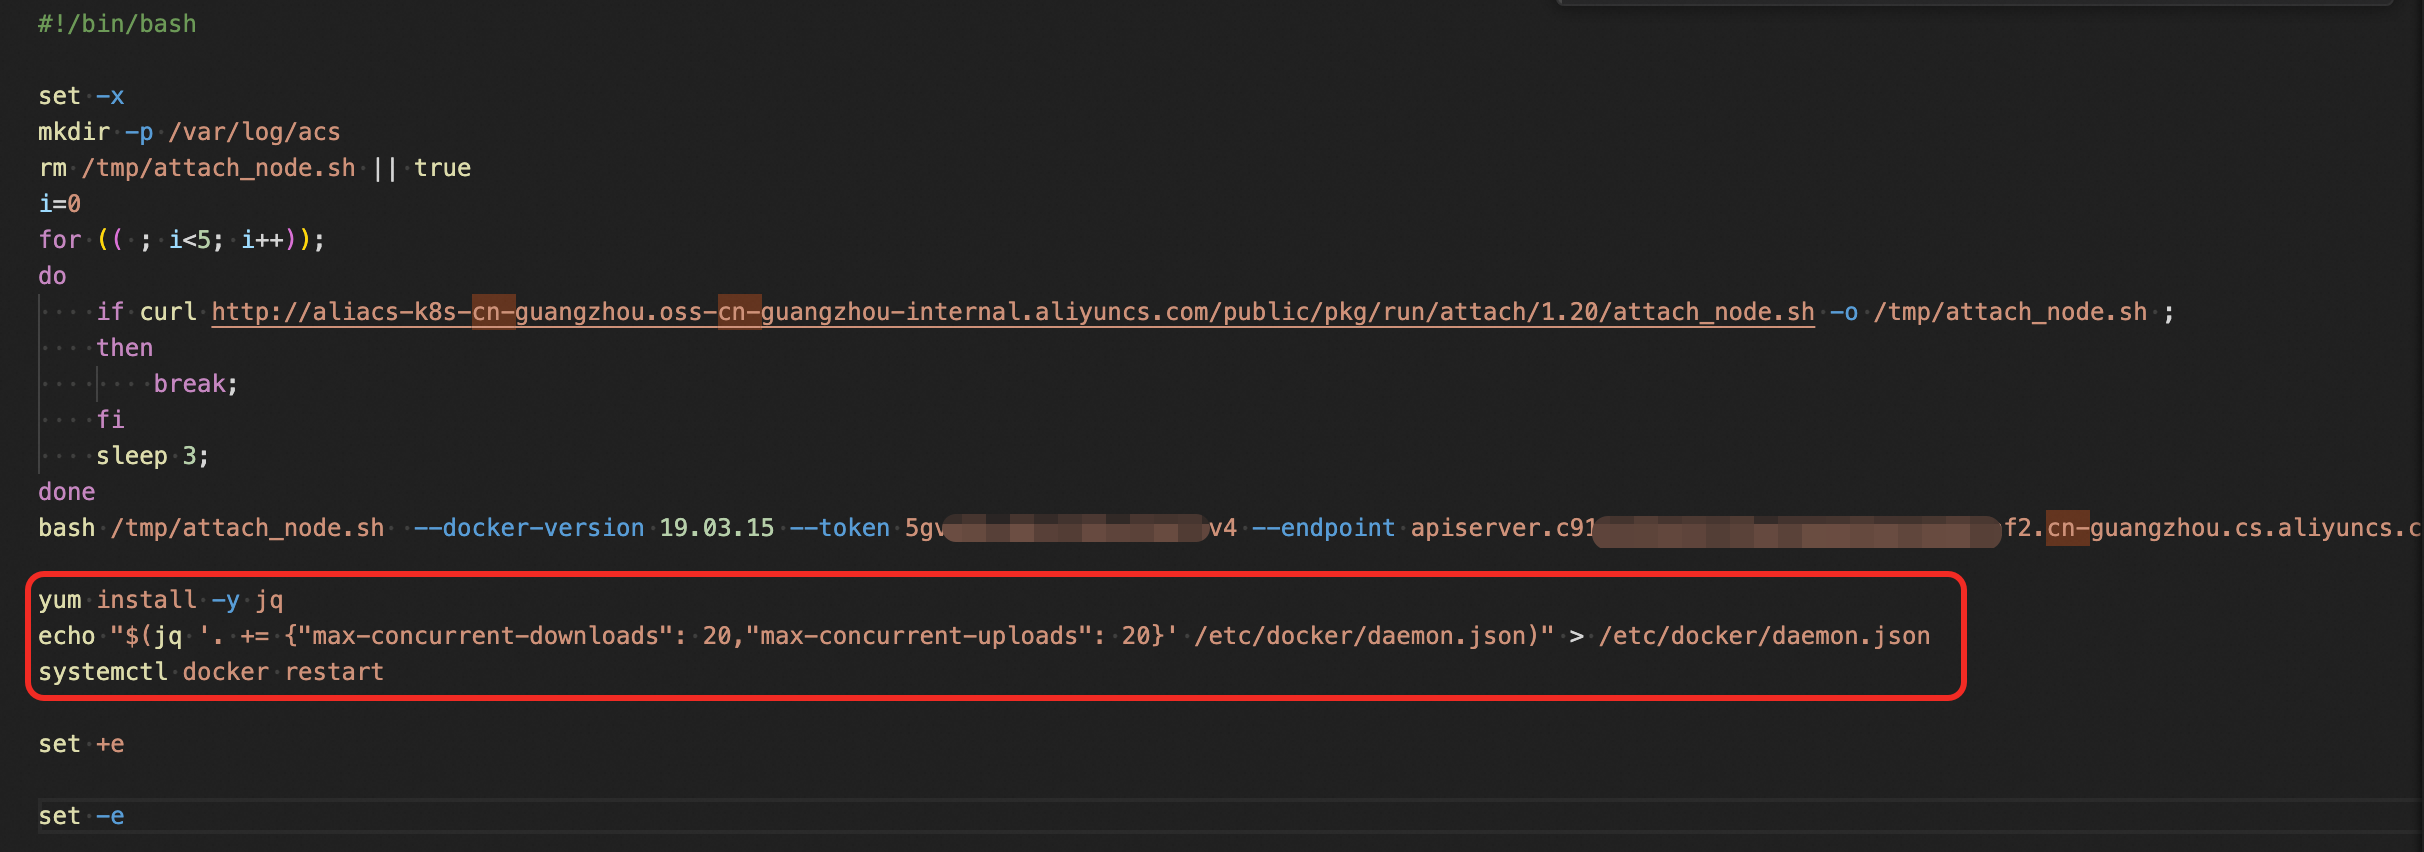
-
Re-encode and update the data.
Base64-encode the modified script. Replace the content in the User Data box with the encoded output and click OK.