This guide walks you through deploying Keycloak in a Container Service for Kubernetes (ACK) managed cluster and configuring it as an OpenID Connect (OIDC) identity provider for the Kubernetes API server. After completing this guide, Kubernetes can authenticate users against Keycloak and enforce RBAC authorization based on their identity.
How it works
The OIDC authentication flow involves three parties: the user, Keycloak (the identity provider), and the Kubernetes API server.
User → Keycloak:      1. Log in and authenticate
Keycloak → User:      2. Return access_token, id_token, and refresh_token
User → kubectl:       3. Call kubectl with --token=<id_token>
kubectl → API server: 4. Authorization: Bearer <id_token>
API server:           5. Verify JWT signature
API server:           6. Check token expiry (iat + exp)
API server:           7. Evaluate RBAC authorization
API server → kubectl: 8. Return result
Understanding this flow helps explain each configuration step:
Keycloak realm — the tenant boundary that isolates users, clients, and scopes
Keycloak client — represents the API server as a registered OIDC application
Client scope and mapper — controls which user attributes are embedded in the ID token
API server OIDC parameters — tells the API server which issuer to trust and which claim to use as the Kubernetes username
Prerequisites
Before you begin, make sure you have:
An ACK managed cluster running Kubernetes 1.22 or later. See Create an ACK managed cluster.
The kubeconfig file of the cluster, used to connect via kubectl. See Connect to an ACK cluster via kubectl.
The NGINX Ingress controller installed. See Install the NGINX Ingress controller.
(Optional) jwt-cli installed, for parsing JSON Web Tokens (JWT).
Set up the environment
Prepare a domain name
Prepare a domain name for the Keycloak Service. You will use this domain name throughout the setup.
Generate TLS certificates
To secure Keycloak in a production environment, generate a root certificate and a server certificate. The server certificate must include the Keycloak Service domain name as a Subject Alternative Name (SAN).
# Generate a CA (Certificate Authority) key
openssl genrsa -out rootCA.key 2048

# Generate a CA certificate (valid for 10 years)
openssl req -x509 -new -nodes -key rootCA.key -sha256 -days 3650 -out rootCA.crt

# Generate a server key
openssl genrsa -out server.key 2048

# Create a Certificate Signing Request (CSR)
openssl req -new -key server.key -out server.csr

# Generate the server certificate with the Keycloak domain as SAN
openssl x509 -req -in server.csr -CA rootCA.crt -CAkey rootCA.key -CAcreateserial \
  -out server.crt -days 3650 -sha256 -extensions v3_req \
  -extfile <(echo '[v3_req]'; echo 'subjectAltName = DNS:${Service domain name}')
Prepare a database
By default, Keycloak persists data to local files. For production environments, use an external database. Keycloak supports the following database engines:
| Database engine | Option value | Version |
|---|---|---|
| MariaDB Server | mariadb | 10.11 |
| Microsoft SQL Server | mssql | 2022 |
| MySQL | mysql | 8.0 |
| Oracle Database | oracle | 19.3 |
| PostgreSQL | postgres | 15 |
This guide uses ApsaraDB RDS for MySQL with a database named Keycloak. See Create an ApsaraDB RDS for MySQL instance.
Step 1: Deploy Keycloak in the ACK cluster
Deploy five Kubernetes resources to run Keycloak: a Service, two Secrets, an Ingress, and a Deployment.
1.1 Create the Keycloak Service
Create keycloak.yaml with the following content:
apiVersion: v1
kind: Service
metadata:
  labels:
    app: keycloak
  name: keycloak
  namespace: default
spec:
  ports:
    - name: http
      port: 80
      protocol: TCP
      targetPort: 8080
  selector:
    app: keycloak
  type: ClusterIP
Apply the Service:
kubectl apply -f keycloak.yaml1.2 Create the credentials Secret
Create keycloak-secret.yaml. This Secret stores Base64-encoded database credentials and the initial Keycloak admin account.
apiVersion: v1
data:
  db_passwd: ${Database password encoded by Base64}
  db_username: ${Database username encoded by Base64}
  db_url: ${Database URL or host encoded by Base64}
  keycloak_admin: ${Keycloak administrator username encoded by Base64}
  keycloak_admin_password: ${Keycloak administrator password encoded by Base64}
kind: Secret
metadata:
  name: keycloak-secret
  namespace: default
type: Opaque
Apply the Secret:
kubectl apply -f keycloak-secret.yaml1.3 Create the TLS Secret
Create keycloak-pki.yaml with the server certificate and key generated in Generate TLS certificates:
apiVersion: v1
data:
  tls.crt: ${Server certificate encoded by Base64}
  tls.key: ${Server key encoded by Base64}
kind: Secret
metadata:
  name: keycloak-pki
  namespace: default
type: IngressTLS
Apply the TLS Secret:
kubectl apply -f keycloak-pki.yaml1.4 Create the Ingress
Create keycloak-ingress.yaml. Replace ${Service domain name} with the domain name you prepared.
apiVersion: networking.k8s.io/v1
kind: Ingress
metadata:
  labels:
    ingress-controller: nginx
  name: keycloak
  namespace: default
spec:
  ingressClassName: nginx
  rules:
    - host: ${Service domain name}
      http:
        paths:
          - backend:
              service:
                name: keycloak
                port:
                  number: 80
            path: /
            pathType: ImplementationSpecific
  tls:
    - hosts:
        - ${Service domain name}
      secretName: keycloak-pki
Apply the Ingress:
kubectl apply -f keycloak-ingress.yamlAfter the Ingress is created, a public IP address is assigned. Point your domain name DNS to this IP address.
Verify Keycloak is running
Open https://${Keycloak Service domain name} in a browser. If the Keycloak welcome page appears, the deployment is successful.

Step 2: Configure Keycloak
User settings
On the Keycloak welcome page, click Administration Console and log in with the admin credentials from
keycloak-secret.yaml.In the upper-left corner, open the realm drop-down list and click Create Realm.

Set Realm name to
myrealmand click Create.Switch to the
myrealmrealm. In the left navigation pane, click Users, then click Add user.
Set Username to
myuserand click Create.On the myuser page, click Attributes. Add an attribute with Key
nameand Valueack, then click Save. This attribute will be injected into the ID token.
Click Credentials, then click Set Password. Set Temporary to On and click Save. The user must change their password on first login. Users can log in to their Keycloak account at
https://${Keycloak Service domain name}/realms/${Your realm}/account.
Client settings
In the left navigation pane, click Clients, then click Create client.
Complete the three-step client creation wizard:
General settings: Set both Client ID and Name to
ack, then click Next.
Capability config: Set Client authentication to On (this makes the client confidential), keep other defaults, and click Next.

Login settings: Set Valid redirect URIs to
http://*to allow all HTTP redirect URIs, then click Save.
Client scope settings
Client scopes let you share protocol mappings across clients. Set up a scope that injects the user's name attribute into the ID token.
In the left navigation pane, click Client scopes, then click Create client scope.
Set Name to
ack-kubernetes, keep other defaults, and click Save.
On the ack-kubernetes page, click Mappers, then click Configure a new mapper.

On the Add mapper page, configure the mapper to inject the
name: ackattribute into the ID token: Keep other defaults and click Save.Name:
nameUser Attribute:
nameToken Claim Name:
name

In the left navigation pane, click Clients and select the
ackclient.Click the Client scopes tab, then click Add client scope. Select
ack-kubernetesand click Add.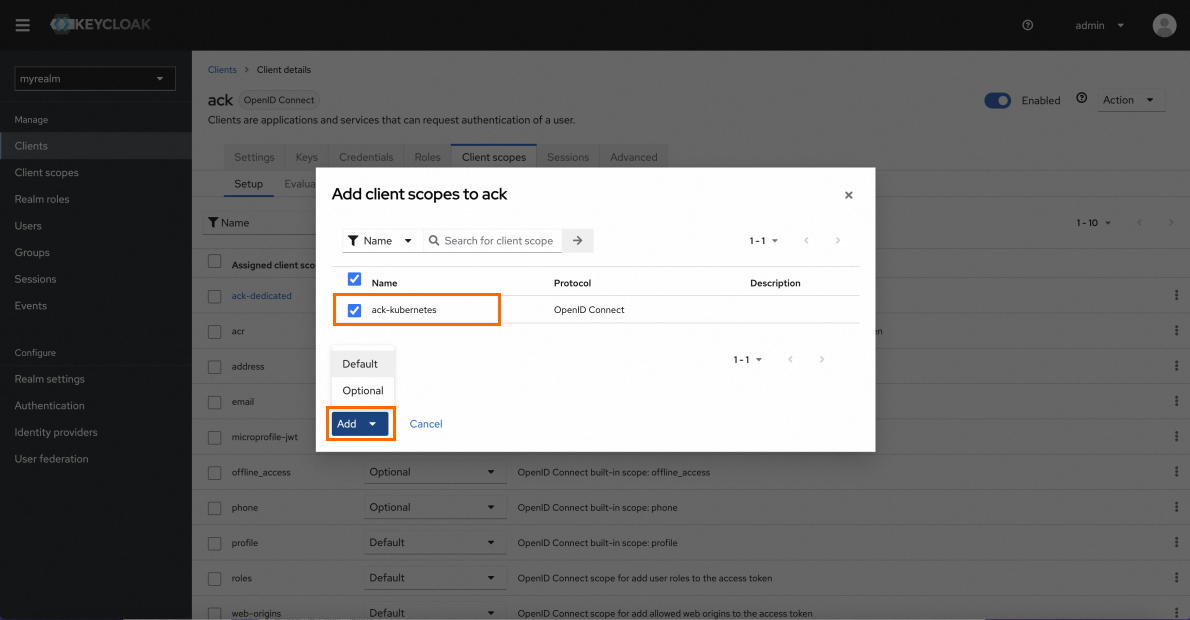
Step 3: Configure the Kube API Server OIDC parameters
Before you configure the API server, gather the following values from Keycloak:
OIDC issuer URL: Visit
https://${Keycloak Service domain name}/realms/myrealm/.well-known/openid-configurationand copy theissuerfield. The URL ishttps://${Keycloak Service domain name}/realms/myrealm.Client ID:
ack(configured in Client settings).CA certificate: The Base64-encoded
rootCA.crtgenerated in Generate TLS certificates.
The Kubernetes API server supports OIDC natively. Configure the following parameters to point it to the Keycloak issuer.
Log in to the ACK console. In the left navigation pane, click Clusters.
Click the cluster name. In the left navigation pane, click Add-ons.
On the Core Components tab, find Kube API Server and click Configuration.
In the Kube API Server Parameters dialog box, set the following parameters and click OK.
ImportantThe API server must be able to reach the
oidcIssuerURL. If the cluster does not have internet access, enable it first. See Enable an existing ACK cluster to access the Internet. If the API server still cannot reach the URL after enabling internet access, runkubectl get endpointsto check the number of backend IP addresses: - If there are multiple IP addresses, log in to a worker node and test connectivity to theoidcIssuerURL. Check internet access and security group rules. - If there is only one IP address, submit a ticketsubmit a ticket.Parameter Description Example Required oidcIssuerURL (OIDC provider URL) The OIDC issuer URL. The API server uses this URL to discover public signing keys and validate tokens. https://${Keycloak Service domain name}/realms/myrealmYes oidcClientId (OIDC Token Client ID) The client ID registered in Keycloak. ackYes oidcUsernameClaim (Username JWT claim) The JWT claim to use as the Kubernetes username. Must match the Token Claim Name configured in the client scope mapper. nameNo oidcUsernamePrefix (Username prefix) A prefix prepended to the username claim to avoid conflicts with existing Kubernetes users. Enter -to disable prefixing.-No oidcCAContent (CA certificate) The Base64-encoded root certificate generated in Generate TLS certificates. The API server uses this to verify the Keycloak TLS certificate. Base64-encoded rootCA.crtNo 
Step 4: Verify the authentication flow
Get an ID token
Run the following command to request an ID token from Keycloak:
curl -ks -X POST https://${Keycloak Service domain name}/realms/myrealm/protocol/openid-connect/token \
  -d grant_type=password \
  -d client_id=ack \
  -d username=myuser \
  -d password=${myuser password} \
  -d scope=openid \
  -d client_secret=${client secret}
Replace the following placeholders:
| Placeholder | Value |
|---|---|
${Keycloak Service domain name} | The domain name of your Keycloak Service |
${myuser password} | The password set for myuser in User settings |
${client secret} | In the Keycloak console, go to Clients > ack > Credentials and copy the Client secret value |
The response body contains the id_token field. Copy that value.
(Optional) Parse the ID token
Use jwt-cli to decode the token and confirm the claims:
jwt decode <id_token>The output should show iss matching your oidcIssuerURL and name set to ack — the user attribute injected by the client scope mapper.
Set up RBAC and call the API server
Create a ClusterRole and ClusterRoleBinding that grant the ack user read access to namespaces:
kind: ClusterRole
apiVersion: rbac.authorization.k8s.io/v1
metadata:
  name: keycloak-example
rules:
  - apiGroups: [""]
    resources: ["namespaces"]
    verbs: ["get", "list"]
---
kind: ClusterRoleBinding
apiVersion: rbac.authorization.k8s.io/v1
metadata:
  name: ack-crb
roleRef:
  apiGroup: rbac.authorization.k8s.io
  kind: ClusterRole
  name: keycloak-example
subjects:
  - kind: User
    name: ack
    apiGroup: rbac.authorization.k8s.io
Call the API server with the ID token:
curl -k https://${API server address}/api/v1/namespaces \
  -H "Authorization: Bearer ${id_token}"
Replace ${API server address} with the public or internal endpoint of your cluster. Find these in the ACK console under Cluster Information > Basic Information > Network: API server Public Endpoint or API server Internal Endpoint.
The API server returns the list of namespaces, confirming that OIDC authentication is working.

To verify that role-based access control (RBAC) authorization also works, request a resource the ack user is not authorized to access. The API server identifies the user and denies the request, confirming that both authentication and authorization are enforced.
