The csi-secrets-store-provider-alibabacloud add-on provides a secure way to consume Key Management Service (KMS) credentials in Kubernetes workloads. It allows you to mount secrets directly as CSI inline volumes or synchronize them as native Kubernetes Secrets. Additionally, it supports automatic secret rotation to minimize credential exposure and simplifies integration between your applications and KMS Secrets Manager.

Security considerations
By default, workloads that read secrets directly from the file system may encounter compatibility issues when interacting with KMS Secrets Manager. csi-secrets-store-provider-alibabacloud resolves these compatibility issues and supports synchronizing secrets as Kubernetes Secret objects for environment variable injection. Evaluate the following security risks before proceeding:
File system traversal: Secrets mounted through the file system can be exposed if flawed applications are exploited to perform directory traversal attacks.
Debug and log exposure: Misconfigured debug breakpoints or overly permissive log access can leak Secrets. Referencing Secrets through environment variables is insecure and not recommended.
Excessive permissions: Apply the least privilege principle when granting
ack-secret-manageraccess to KMS.
If your application doesn't need to persist secrets locally, grant pods minimal permissions by using RRSA and call GetSecretValue directly from the application. This avoids exposing secrets in the pod file system or Kubernetes Secrets entirely.
Prerequisites
You have a Container Service for Kubernetes (ACK) cluster running Kubernetes 1.20 or later. Supported cluster types include:
ACK managed cluster
ACK dedicated cluster
ACK Edge cluster
registered cluster
To create a cluster, see Create an ACK managed cluster or Create an ACK One registered cluster.
Step 1: Configure add-on authentication
Configure authentication for csi-secrets-store-provider-alibabacloud to grant it permission to retrieve secrets from KMS. Otherwise, the add-on cannot import or synchronize credentials to the cluster. Choose one of the following authorization methods based on your cluster type:
Authorize using RRSA: Applicable to ACK managed clusters running Kubernetes 1.22 or later.
Grant permissions to the worker RAM role: Applicable to ACK managed clusters, ACK dedicated clusters, and ACK One registered clusters.
Configure AccessKey credentials to assume a RAM role: Applicable to all ACK clusters.
Authorize using RRSA
Compared to other methods, RRSA provides pod-level permission isolation and avoids the risk of credential leakage caused by hardcoding AccessKey IDs and AccessKey secrets.
Enable the RRSA feature for your cluster in the ACK console. RRSA uses the identity provider information that was specified when the cluster was created.
Create a RAM role with an OIDC identity provider as the trusted entity. Configure the parameters based on the following table:
Parameter
Description
IdP Type
Select OIDC.
Identity Provider
Select
ack-rrsa-<cluster_id>. Replace<cluster_id>with the ID of your cluster.Condition
oidc:iss: Keep the default value.
oidc:aud: Keep the default value.
oidc:sub: Manually add this condition.
Key: Select oidc:sub.
Operator: Select StringEquals.
Value: Enter
system:serviceaccount:<namespace>:<serviceAccountName>. Replace<namespace>with the application namespace and<serviceAccountName>with the service account name. For this topic, usesystem:serviceaccount:kube-system:csi-secrets-store-provider-alibabacloud.NoteWe recommend installing the add-on in the default
kube-systemnamespace. If you install it in a different namespace, replacekube-systemwith your target namespace.
Create a custom policy and attach it to the RAM role created in the preceding step.
Create a custom policy for csi-secrets-store-provider-alibabacloud to import KMS credentials. Policy content:
{
    "Action": [
       "kms:GetSecretValue",
       "kms:Decrypt"
    ],
    "Resource": [
        "*"
    ],
    "Effect": "Allow"
}
Attach the policy to the RAM role from the preceding step. See Manage permissions for a RAM role.
Create a Kubernetes Secret named
alibaba-credentialsin the cluster.Create a file named
secretstore-rrsa.yamlwith the following content. Replace the placeholders with your actual values.{rolearn}: Base64-encoded ARN of the RAM role created in step 2.{oidcproviderarn}: Base64-encoded ARN of the OIDC provider generated after enabling RRSA.
apiVersion: v1
data:
  rolearn: {rolearn}
  oidcproviderarn: {oidcproviderarn}
kind: Secret
metadata:
  name: alibaba-credentials
  namespace: kube-system
type: Opaque
Deploy the Kubernetes Secret:
kubectl apply -f secretstore-rrsa.yaml
Grant permissions to the worker RAM role
Create a custom policy. Policy content:
{
  "Action": [
    "kms:GetSecretValue",
    "kms:Decrypt"
  ],
  "Resource": [
    "*"
  ],
  "Effect": "Allow"
}
Configure AccessKey credentials
Create a RAM role with its trusted entity set as your current Alibaba Cloud account.
NoteFor the trusted entity, select Current Account.
Create a custom policy and grant permissions to the RAM role created in the preceding step.
Create a custom policy for KMS credential access. Policy content:
{
  "Action": [
    "kms:GetSecretValue",
    "kms:Decrypt"
  ],
  "Resource": [
    "*"
  ],
  "Effect": "Allow"
}
Grant permissions to the RAM role from the preceding step. See Manage permissions for a RAM role.
Create a custom policy to assume the preceding role, then attach it to a RAM user.
Create a custom policy to assume the role. Policy content:
{
    "Statement": [
        {
            "Action": "sts:AssumeRole",
            "Effect": "Allow",
            "Resource": "acs:ram:*:<account-id>:role/<role-name>"
        }
    ],
    "Version": "1"
}
In this custom policy, the
Resourceelement specifies the role ARN, where<ACCOUNT_ID>is the Alibaba Cloud account ID and<ROLE_NAME>is the RAM role name.Granting the custom policy to a RAM user allows you to specify which RAM roles the user can assume. For more information, see Manage RAM user permissions.
Create a Kubernetes Secret named
alibaba-credentialsin the cluster.Create a file named
alibaba-credentials.yamlwith the following content. Replace the placeholders with your actual values.{rolearn}: Base64-encoded ARN of the RAM role from step 1.{ak}: Base64-encoded AccessKey ID of the RAM user.{sk}: Base64-encoded AccessKey secret of the RAM user.apiVersion: v1 data: id: {ak} secret: {sk} rolearn: {rolearn} kind: Secret metadata: name: alibaba-credentials namespace: kube-system type: Opaque
Deploy the Kubernetes Secret.
kubectl apply -f alibaba-credentials.yaml
Step 2: Install csi-secrets-store-provider-alibabacloud
Log on to the ACK console. In the left navigation pane, click Clusters.
On the Clusters page, click the name of your cluster. In the left navigation pane, click .
On the Helm page, click Deploy. Search for and select csi-secrets-store-provider-alibabacloud. Keep default settings and click Next.
In the confirm dialog, the chart installs to the
kube-systemnamespace by default. Click Yes to proceed. To use a custom namespace, configure Application Name and Namespace in the Basic Information step.Select the latest Chart Version. In the Parameters section, configure parameters based on the authentication method from step 1. Then, click OK.
If you authorized using RRSA, set
rrsa.enableto true.
Other parameters:
envVarsFromSecret:
#  ACCESS_KEY_ID:
#    secretKeyRef: alibaba-credentials
#    key: id
#  SECRET_ACCESS_KEY:
#    secretKeyRef: alibaba-credentials
#    key: secret
  ALICLOUD_ROLE_ARN:
    secretKeyRef: alibaba-credentials
    key: rolearn
#  ALICLOUD_ROLE_SESSION_NAME:
#    secretKeyRef: alibaba-credentials
#    key: rolesessionname
#  ALICLOUD_ROLE_SESSION_EXPIRATION:
#    secretKeyRef: alibaba-credentials
#   key: rolesessionexpiration
  ALICLOUD_OIDC_PROVIDER_ARN:
    secretKeyRef: alibaba-credentials
    key: oidcproviderarn
If you granted permissions to the worker RAM role, use the default settings.
If you configured AccessKey credentials to assume a RAM role, configure the following parameters:
envVarsFromSecret:
  ACCESS_KEY_ID:
    secretKeyRef: alibaba-credentials
    key: id
  SECRET_ACCESS_KEY:
    secretKeyRef: alibaba-credentials
    key: secret
  ALICLOUD_ROLE_ARN:
    secretKeyRef: alibaba-credentials
    key: rolearn
#  ALICLOUD_ROLE_SESSION_NAME:
#    secretKeyRef: alibaba-credentials
#    key: rolesessionname
#  ALICLOUD_ROLE_SESSION_EXPIRATION:
#    secretKeyRef: alibaba-credentials
#    key: rolesessionexpiration
#  ALICLOUD_OIDC_PROVIDER_ARN:
#    secretKeyRef: alibaba-credentials
#    key: oidcproviderarn
To enable Secret synchronization to native Kubernetes Secrets, set
syncSecret.enabledtotrueto deploy the required RBAC Role and RoleBinding.syncSecret: enabled: trueTo enable automatic secret rotation, configure the following parameters:

secrets-store-csi-driver.enableSecretRotation: Enables automatic secret rotation. Set to true.secrets-store-csi-driver.rotationPollInterval: Secret synchronization interval. Example: 120s synchronizes every two minutes. Adjust based on your requirements.
After deployment, you are redirected to the csi-secrets-store-provider-alibabacloud page. Verify that all resources are created. On the Resource section, verify the following Kubernetes resources are created:
ServiceAccount:
secrets-store-csi-driverandcsi-secrets-store-provider-alibabacloudClusterRole:
secretproviderclasses-admin-role,secretproviderclasses-viewer-role, andsecretproviderclasses-roleClusterRoleBinding:
secretproviderclasses-rolebindingDaemonSet:
secrets-store-csi-driverandcsi-secrets-store-provider-alibabacloudCSIDriver:
secrets-store.csi.k8s.io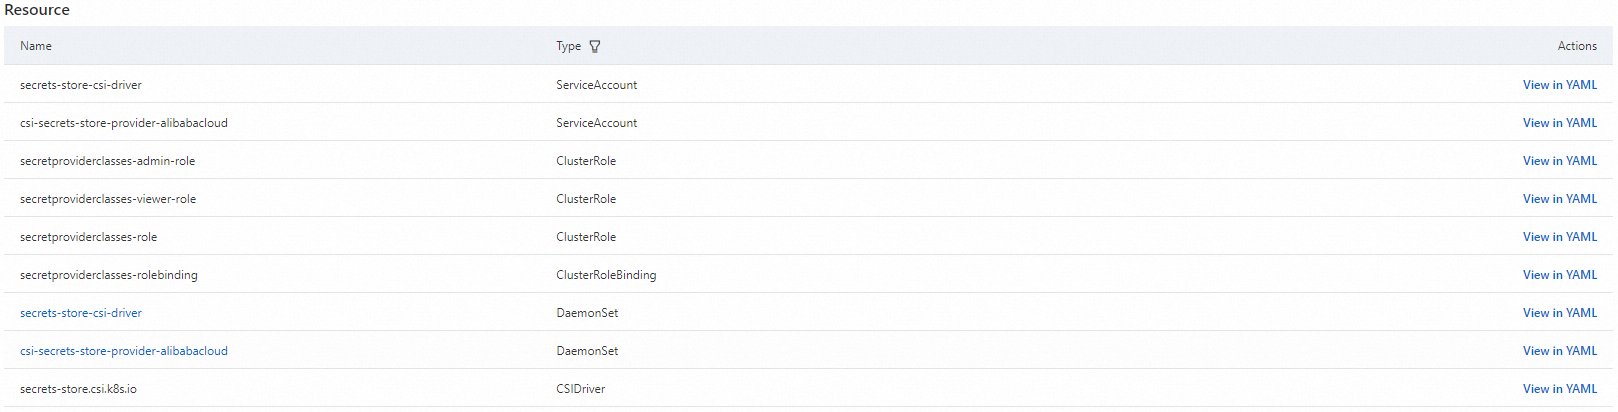
Step 3: Configure secret synchronization
After configuring authentication, use a SecretProviderClass to specify the KMS credentials to import.
Template
apiVersion: secrets-store.csi.x-k8s.io/v1
kind: SecretProviderClass
metadata:
  name: <NAME>
spec:
  provider: alibabacloud   # This value is fixed to 'alibabacloud'.
  parameters:
    objects: |
      - objectName: <KMS Encryption Parameter Name> # Name of the KMS credential.
        objectType: kms # Fixed to kms when synchronizing KMS credentials.
The parameters field supports the following settings:
Parameter | Required | Description |
| Yes | Specifies the secrets to mount as a YAML array. Example: The
|
| Optional | The KMS Secrets Manager region. Defaults to the node region, which may add performance overhead in large-scale deployments. Specify a region is recommended. |
| Optional |
|
Usage example
Use a SecretProviderClass to import a KMS credential named test from the same region as an ACK managed cluster into a workload.
Create a file named
secretstore.yamlwith the following content.apiVersion: secrets-store.csi.x-k8s.io/v1 kind: SecretProviderClass metadata: name: test-secrets spec: provider: alibabacloud # This value is fixed to alibabacloud. parameters: objects: | # objectType supports oos and kms. The default is kms. - objectName: "test-hangzhou" objectType: "kms" objectAlias: "hangzhou-public" kmsEndpoint: "kms.{region}.aliyuncs.com"Deploy the
SecretProviderClass.kubectl apply -f secretstore.yamlCreate a file named
deploy.yamlwith the following content.This NGINX Deployment mounts credentials from the preceding
SecretProviderClassusing a CSI inline volume to/mnt/secrets-store(Deployment examples).apiVersion: apps/v1 # For versions earlier than 1.8.0, use apps/v1beta1. kind: Deployment metadata: name: nginx-deployment-basic labels: app: nginx spec: replicas: 2 selector: matchLabels: app: nginx template: metadata: labels: app: nginx spec: volumes: - name: secrets-store-inline csi: driver: secrets-store.csi.k8s.io readOnly: true volumeAttributes: secretProviderClass: "test-secrets" containers: - name: nginx image: anolis-registry.cn-zhangjiakou.cr.aliyuncs.com/openanolis/nginx:1.14.1-8.6 # Replace with your actual image. ports: - containerPort: 80 resources: limits: cpu: "500m" volumeMounts: - name: secrets-store-inline mountPath: "/mnt/secrets-store" readOnly: trueDeploy the application.
kubectl apply -f deploy.yamlVerify that the secret is mounted correctly.
Log on to the pod and verify that a file matching the secret name exists in
/mnt/secrets-storewith content matching the KMS credential.
Synchronize KMS credentials to Kubernetes Secrets
Secrets Store CSI Driver supports automatically synchronizing secrets retrieved from external secret management services (such as KMS and OOS) and creating them as native Kubernetes Secrets in the cluster. Applications can use these external secrets in the standard Kubernetes way without any code changes.
Configuration: SecretProviderClass
You can add the optional secretObjects field to the spec of a SecretProviderClass resource to enable this feature.
apiVersion: secrets-store.csi.x-k8s.io/v1
kind: SecretProviderClass
metadata:
  name: <NAME>
spec:
  provider: alibabacloud   # This value is fixed to alibabacloud. Do not modify.
  parameters:
    objects: |
      - objectName: <KMS Encryption Parameter Name>  # Name of the KMS credential.
        objectType: kms     # Fixed to kms when synchronizing KMS credentials.
  secretObjects:
  - secretName: <Kubernetes Secret Name>            # Name of the Kubernetes Secret.
    type: <Kubernetes Secret Type>                  # Type of the Kubernetes Secret.
    data:
    - objectName: <parameters.objects.objectName>   # The name from parameters.objects.objectName. Use the alias if specified.
      key: <Kubernetes Secret Data Key>             # The key name in the Kubernetes Secret data.
secretObjects typically includes the following three parameters:
|
Parameter |
Type |
Description |
|
secretName |
Required |
The name of the Kubernetes Secret to create. |
|
type |
Required |
The Secret type. Valid values: |
|
data |
Required |
Defines how to map an external secret to a
|
Synchronization lifecycle
The synchronization and cleanup of a Secret object are dynamically triggered by a Pod that mounts the corresponding SecretProviderClass:
-
Creation: The Kubernetes Secret is created only when the first Pod using the
SecretProviderClassstarts and mounts the volume. -
Update: When
secrets-store-csi-driver.enableSecretRotationistrue, the Kubernetes Secret is periodically refreshed at thesecrets-store-csi-driver.rotationPollIntervalinterval. Otherwise, it is not updated. -
Deletion: When the last Pod using the
SecretProviderClassis deleted, the corresponding Kubernetes Secret is also deleted.
Example: Synchronize and inject credentials
Synchronize a KMS credential to a Kubernetes Secret and inject it as an environment variable into an NGINX pod.
Create a
SecretProviderClass.Create a file named
syncSecret.yamlwith the following content.apiVersion: secrets-store.csi.x-k8s.io/v1 kind: SecretProviderClass metadata: name: alibabacloud-sync-secret spec: provider: alibabacloud parameters: objects: | - objectName: test-kms objectAlias: secretalias objectType: kms secretObjects: - secretName: test-sync-secret # Name of the generated Kubernetes Secret. type: Opaque data: - objectName: secretalias # Corresponds to objectName or objectAlias. key: test # Populates the data key of the generated Kubernetes Secret.Deploy the
SecretProviderClass.kubectl apply -f syncSecret.yamlCreate an application pod to trigger the synchronization.
Create a
pod-sync-secret.yamlfile with the following content. This pod mounts the precedingSecretProviderClassand attempts to usesecretKeyRefto reference theSecretnamedtest-sync-secretthat will be generated.kind: Pod apiVersion: v1 metadata: name: pod-sync-secret spec: containers: - name: nginx image: nginx:latest volumeMounts: - name: secrets-store-inline mountPath: "/mnt/secrets-store" readOnly: true env: - name: SECRET_TEST valueFrom: secretKeyRef: name: test-sync-secret key: test volumes: - name: secrets-store-inline csi: driver: secrets-store.csi.k8s.io readOnly: true volumeAttributes: secretProviderClass: "alibabacloud-sync-secret"Deploy the pod to trigger synchronization.
kubectl apply -f pod-sync-secret.yamlVerify the result.
Check if the Kubernetes Secret was created.
kubectl get secret test-sync-secretThe output shows the
test-sync-secretKubernetes Secret.Check if the environment variable was injected into the pod.
kubectl exec -it $(kubectl get pods | awk '/pod-sync-secret/{print $1}' | head -1) -- envThe output includes
SECRET_TESTwith a value matching the KMS secret.
kmsEndpoint configuration
Configure the KMS endpoint for a dedicated or shared gateway (see Differences between shared and dedicated gateways).
KMS endpoint addresses
Gateway type | Domain type | Endpoint address | Description |
Dedicated gateway | KMS private | {kms-instance-id}.cryptoservice.kms.aliyuncs.com |
|
Shared gateway | VPC | kms-vpc.{region}.aliyuncs.com |
|
Shared gateway | Public | kms.{region}.aliyuncs.com |
|
KMS endpoint configuration example
apiVersion: secrets-store.csi.x-k8s.io/v1
kind: SecretProviderClass
metadata:
  name: test
spec:
  provider: alibabacloud # Fixed to 'alibabacloud'
  parameters:
    # Gateway usage examples:
    # hangzhou-public uses the public endpoint of a shared gateway. Replace {region} with the region where the KMS credential is located. This method allows you to access KMS credentials from a different region than the cluster.
    # hangzhou-vpc does not specify a kmsEndpoint field and uses the default VPC endpoint of a shared gateway.
    # hangzhou-cryptoservice uses a dedicated gateway. Replace {kms-instance-id} with the ID of the KMS instance.
    # london-public uses the public endpoint of a shared gateway. Replace {region} with the region where the KMS credential is located. This method allows you to access KMS credentials from a different region than the cluster.
    objects: |
      - objectName: "test-hangzhou"
        objectType: "kms"
        objectAlias: "hangzhou-public"
        kmsEndpoint:  "kms.{region}.aliyuncs.com"
      - objectName: "test-hangzhou"
        objectType: "kms"
        objectAlias: "hangzhou-vpc"
      - objectName: "test-hangzhou"
        objectType: "kms"
        objectAlias: "hangzhou-cryptoservice"
        kmsEndpoint:  "{kms-instance-id}.cryptoservice.kms.aliyuncs.com"
      - objectName: "test-london"
        objectAlias: "london-public"
        kmsEndpoint:  "kms.{region}.aliyuncs.com"
References
For ACK Serverless cluster workloads, see Use ack-secret-manager to import Alibaba Cloud KMS service credentials.
To protect cached KMS secrets, encrypt them with Alibaba Cloud KMS.