As enterprises migrate to the cloud, integrating their existing account systems is essential to simplify user credential management. This topic describes how to connect your self-managed Lightweight Directory Access Protocol (LDAP) directory to Alibaba Cloud, enabling centralized authentication for your ACK clusters.
Background
This topic involves the following products:
-
IDaaS (Identity as a Service): A service that connects your organization's account system to the Alibaba Cloud account system.
-
LDAP (Lightweight Directory Access Protocol): Used to store account information and enable single sign-on (SSO). OpenLDAP is an open-source implementation of LDAP.
How it works
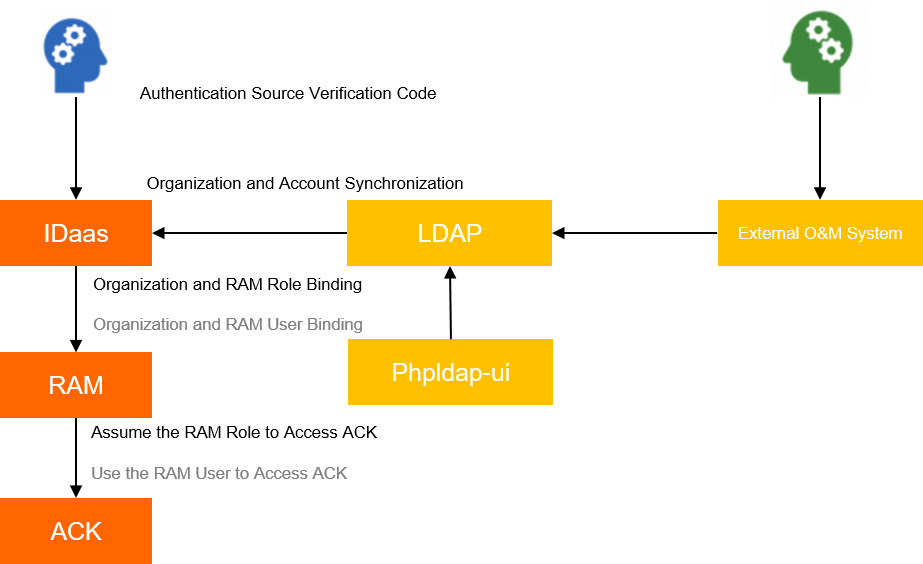
The integration process works as follows:
-
In IDaaS, you add an LDAP configuration to sync LDAP accounts to IDaaS. Passwords are not synced. To sign in with an LDAP username, you must reset the password in IDaaS. If you prefer not to manage multiple passwords, you can configure SSO.
-
Add an application in IDaaS:
-
The application requires an AccessKey to connect to a RAM user that has the
AliyunRAMFullAccesspermission, allowing the application to manage RAM permissions. -
Associate the application with a RAM role or RAM user to grant permissions to the LDAP accounts used for sign-in.
-
Import the LDAP accounts that are synced to IDaaS into the application, allowing these accounts to use the application and inherit the permissions of the associated RAM role or RAM user.
-
-
Configure the IDaaS SSO feature to connect to the LDAP service.
-
LDAP users sign in to the Alibaba Cloud console with SSO and gain the permissions of the RAM role or RAM user associated with the application in IDaaS.
-
Grant PaaS-level permissions to the federated accounts on the container platform.
Step 1: Prepare the environment
Follow these steps to simulate an LDAP environment.
-
Deploy OpenLDAP.
Set up OpenLDAP to simulate an LDAP data source and use php-LDAP-admin as the LDAP management tool.
-
Run the following command to clone the repository.
git clone https://github.com/lilongthinker/demo-base-code.gitExpected output:
Cloning into 'demo-base-code'... remote: Enumerating objects: 12, done. remote: Counting objects: 100% (12/12), done. remote: Compressing objects: 100% (10/10), done. remote: Total 12 (delta 0), reused 9 (delta 0), pack-reused 0 Unpacking objects: 100% (12/12), done. -
Check the directory structure and create a new YAML file.
cd demo-base-code/01_ldap
tree ./
./ ├── ingress-phpadmin.yaml ├── ldap-deploy.yaml ├── ldap-secret.yaml ├── ldap-service.yaml ├── phpldapadmin-deploy.yaml └── phpldapadmin-svc.yaml 0 directories, 6 files ################################################ apiVersion: networking.k8s.io/v1 kind: Ingress metadata: labels: ingress-controller: nginx name: ldap-ui namespace: public-service spec: ingressClassName: nginx rules: - host: phpldap.example.com # Replace with your actual domain name. http: paths: - backend: service: name: phpldapadmin port: number: 8080 path: / pathType: ImplementationSpecific ################################################ -
Run the following command to create a namespace.
kubectl create ns public-serviceExpected output:
namespace/public-service created -
Run the following command to deploy the application.
kubectl apply -f ./Expected output:
ingress.extensions/ldap-ui created
deployment.extensions/ldap created
secret/ldap-secret created
service/ldap-service created
deployment.extensions/phpldapadmin created
service/phpldapadmin created
-
-
Initialize accounts.
-
Sign in to php-LDAP-admin.
-
Run the following command to get the Ingress domain name and address.
kubectl get ingNAME HOSTS ADDRESS PORTS AGE ldap-ui phpldap.example.com 121.xx.xxx.xxx 80 45s -
Copy the Ingress domain name to your browser, then sign in to the php-LDAP-admin console with the default distinguished name (DN) and password.
Note-
Default DN: cn=admin,dc=example,dc=org.
-
Default password: admin.
-
If you receive a permission error for
/var/lib/php/sessions, use thechmodcommand to modify the path permissions.
-
-
-
Create an organizational unit and user accounts.
-
In the left-side navigation pane of the php-LDAP-admin console, click Create new entry here. On the Create Object page, click Generic: Organizational Unit, and then click Create Object.
-
Enter an organization name and click Create Object. In this example, the organization name is dev.
-
In the left-side navigation pane of the php-LDAP-admin console, click the
ou=devorganizational unit that you created. Click Create a child entry, click Courier Mail: Account, configure the user information, and then click Create Object.ImportantBy default, account names generated in php-LDAP-admin may contain spaces. Make sure to remove them.
-
-
Step 2: Configure IDaaS
-
Sign in to the IDaaS console and click Create Instance.
-
In the Create Instance panel, enter an Description, select the agreement checkbox, and then click Create.
-
In the instance list, select the target instance. On the Quick Start page, click Bind OpenLDAP.
-
On the Connect to LDAP page of the Bind OpenLDAP wizard, enter the LDAP configuration information and click Next.
For more information about binding OpenLDAP, see Bind OpenLDAP - Inbound synchronization.
Category
Parameter
Description
Basic Information
Display Name
Enter a custom name.
Server Configuration
Server Address
The external IP address of the
ldap-serviceservice. To obtain the IP address, perform the following steps:Log on to the ACK console. In the left navigation pane, click Clusters.
-
On the Clusters page, click the name of the target cluster. In the left-side navigation pane, choose .
-
Find the service named
ldap-serviceand record its external IP address.
LDAP Domain Configuration
Administrator Account
The default administrator DN is
cn=admin,dc=example,dc=org.Administrator Password
The password is
admin. -
On the Select Scenario page, configure the scenario settings, and then click Create. For more information about scenario settings, see Bind OpenLDAP - Inbound synchronization.
-
On the Field Mapping page, configure the field mappings. For this example, you only need to configure the Username and Email Address fields. Then, click Save and Push.
Note-
When you configure field mapping, if the mapping rule is Select Field, choose an IDaaS field based on your requirements. For example, this topic maps the account name to the
CNattribute in OpenLDAP, but you can map it to other attributes as needed. -
You can designate a field as a unique identifier for mapping. If the field values match for an unbound account on both sides, the accounts are bound and the data is updated. If the values do not match, a new account is created and bound.
-
-
After you save and synchronize the settings, choose in the left-side navigation pane. The OpenLDAP organization and user information has been synced.
-
In the left-side navigation pane, choose Sign-In. On the General tab, set the sign-in method. For this example, set the sign-in method for both PC and mobile to
ack-ldap.
Step 3: Verification
In the left-side navigation pane, choose . Copy the delegation link and paste it into your browser. If the Alibaba Cloud IDaaS sign-in page appears and you can sign in, the configuration is successful.
Related operations
For more information about configuring SSO for IDaaS accounts, see Create an application and Configure SSO for an application.