Remove worker nodes that are no longer needed from a node pool or cluster in the Container Service for Kubernetes (ACK) console.
To prevent service disruptions, perform node removal during off-peak hours. Back up data before you proceed.
Use cases
Replace an ECS instance: Add a new Elastic Compute Service (ECS) instance to the node pool, then remove the old one.
Scale in a node pool: Remove specific ECS instances to reduce costs in a manually or automatically scaled node pool.
Migrate a node between node pools: Remove the node from the source node pool and add it to the destination node pool.
Change instance specifications: Remove the node, upgrade or downgrade the instance configuration in the ECS console, then add the node back.
Change the billing method: Remove the node, switch the billing method (for example, from pay-as-you-go to subscription) in the ECS console, then add the node back.
Re-initialize an abnormal node: Remove the node and add it back to the cluster. This replaces the system disk. Back up important data on the system disk before you proceed.
Manage unmanaged nodes: For clusters created before the node pool feature was introduced, remove unmanaged nodes and add them to a node pool for batch management.
Node removal behavior
When you remove one or more worker nodes from a node pool or cluster:
Pods on the node are drained (evicted to other nodes) if the Automatically Drain The Node option is selected.
The Desired Number Of Nodes for the node pool is automatically adjusted to reflect the removal.
If Release The ECS Instance is selected, the ECS instance and its data disks are permanently deleted.
System disks and data disks are bound to the node lifecycle. When a node is released, all disk data is permanently lost. Use a PersistentVolume (PV) to store data that must persist beyond the node lifecycle.
Before you begin
Use the ACK console to remove nodes. Do not run
kubectl delete nodeto remove a node manually. This causes the node pool's desired count to become inconsistent with the actual state, potentially triggering unintended scale-out.Do not release instances outside ACK. Do not release or remove instances through the ECS console, Auto Scaling (ESS) console, or their APIs. Do not allow subscription instances to be automatically released upon expiration. In these cases, the nodes are stopped and automatically removed from the ACK console. If a desired number of nodes is set for the node pool, the node pool automatically scales out to create new instances to maintain the specified count.
Removing a node involves pod migration, which may affect running services. Back up data in advance.
Make sure other nodes have enough resources. ACK drains the node during removal. If the remaining nodes lack sufficient resources, application pods may fail to be scheduled.
Check node affinity rules and scheduling policies for the pods on the node. Make sure pods can be scheduled to other nodes after the node is removed.
Removal options
Before removing a node, choose whether to enable these two options.
Automatically drain the node
When enabled, ACK drains the node before removal. Draining safely evicts pods to other available nodes based on your Pod Disruption Budget (PDB) rules, which prevents service interruptions.
Drain timeout: The default timeout for graceful pod shutdown is 30 minutes. Even if a pod specifies a longer terminationGracePeriodSeconds value (for example, 40 minutes), the system enforces the 30-minute limit. If a pod does not shut down within 30 minutes, the system forcibly terminates it. The drain operation fails and the node removal process stops. Manually retry the operation to proceed.
Long graceful termination periods:
If application pods require more than 30 minutes for graceful termination, manually drain the node first:
kubectl drain <nodeName> [options]After all application pods are evicted, clear the Auto Drain Node (drain) checkbox and then remove the node.
PDB considerations:
The drain operation respects PDB rules. If PDB rules prevent pod eviction, the drain fails. Check and modify or delete PDB rules that block eviction before you remove the node.
Release the ECS instance
When enabled, the ECS instance and its data disks are released after the node is removed. Back up data before enabling this option. Only pay-as-you-go ECS instances can be released directly. If this option is not enabled, the ECS instance continues to run and incur charges.
| Instance billing method | Release behavior |
|---|---|
| Pay-as-you-go | Released upon removal. If not released, the instance continues to be billed. |
| Subscription | Cannot be released directly. The instance is automatically released after the subscription expires. To release it early, request a refund or convert the billing method from subscription to pay-as-you-go, then release. |
| Smart hosting (node pool) | The system automatically manages the node lifecycle. When a node is removed, the underlying ECS resources are completely removed. |
Remove a node from a node pool
Log on to the Container Service Management Console . In the navigation pane on the left, click Clusters.
On the Clusters page, click the name of your cluster. In the navigation pane on the left, click .
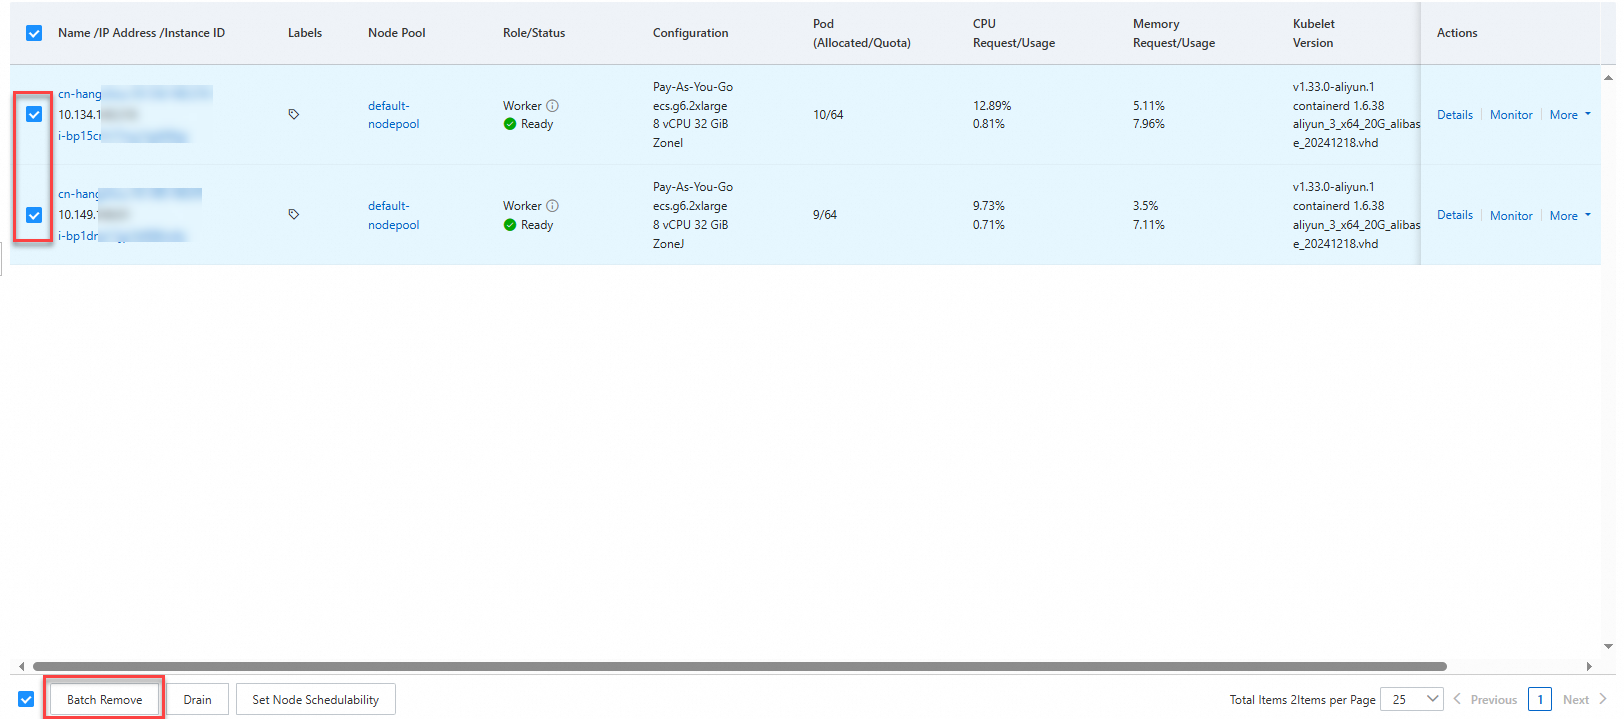
Click the name of the node pool. On the Nodes tab, remove the node:
Single node: Find the node and choose More > Remove in the Actions column.
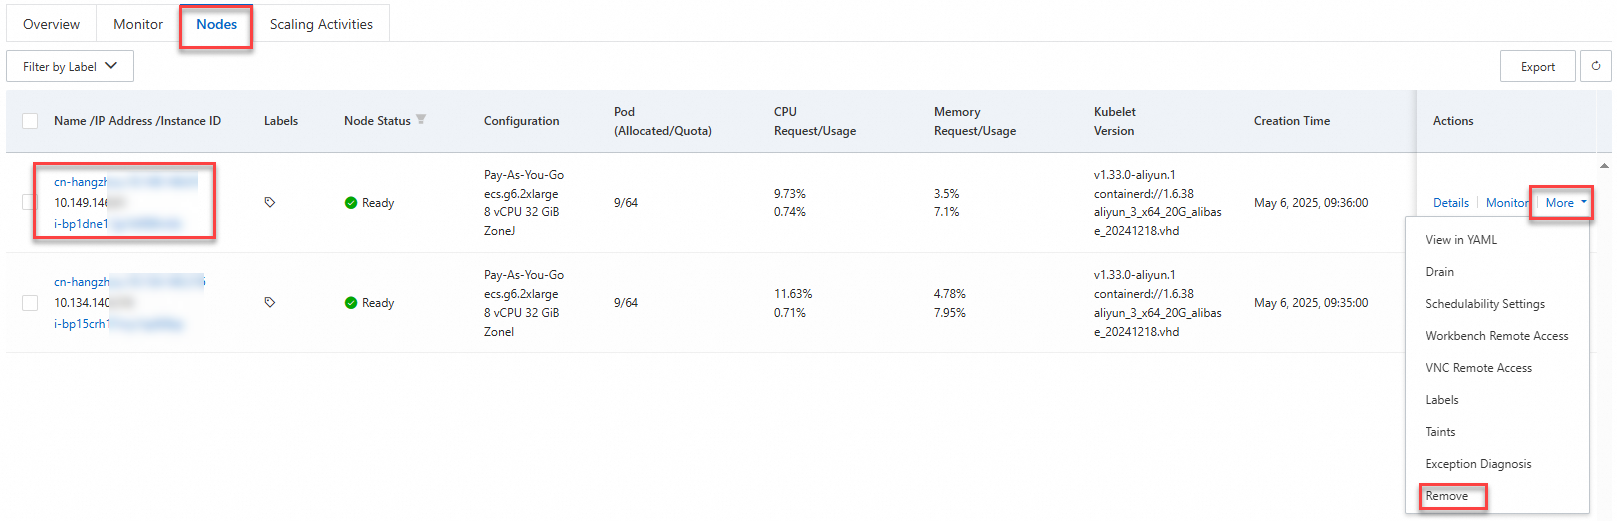
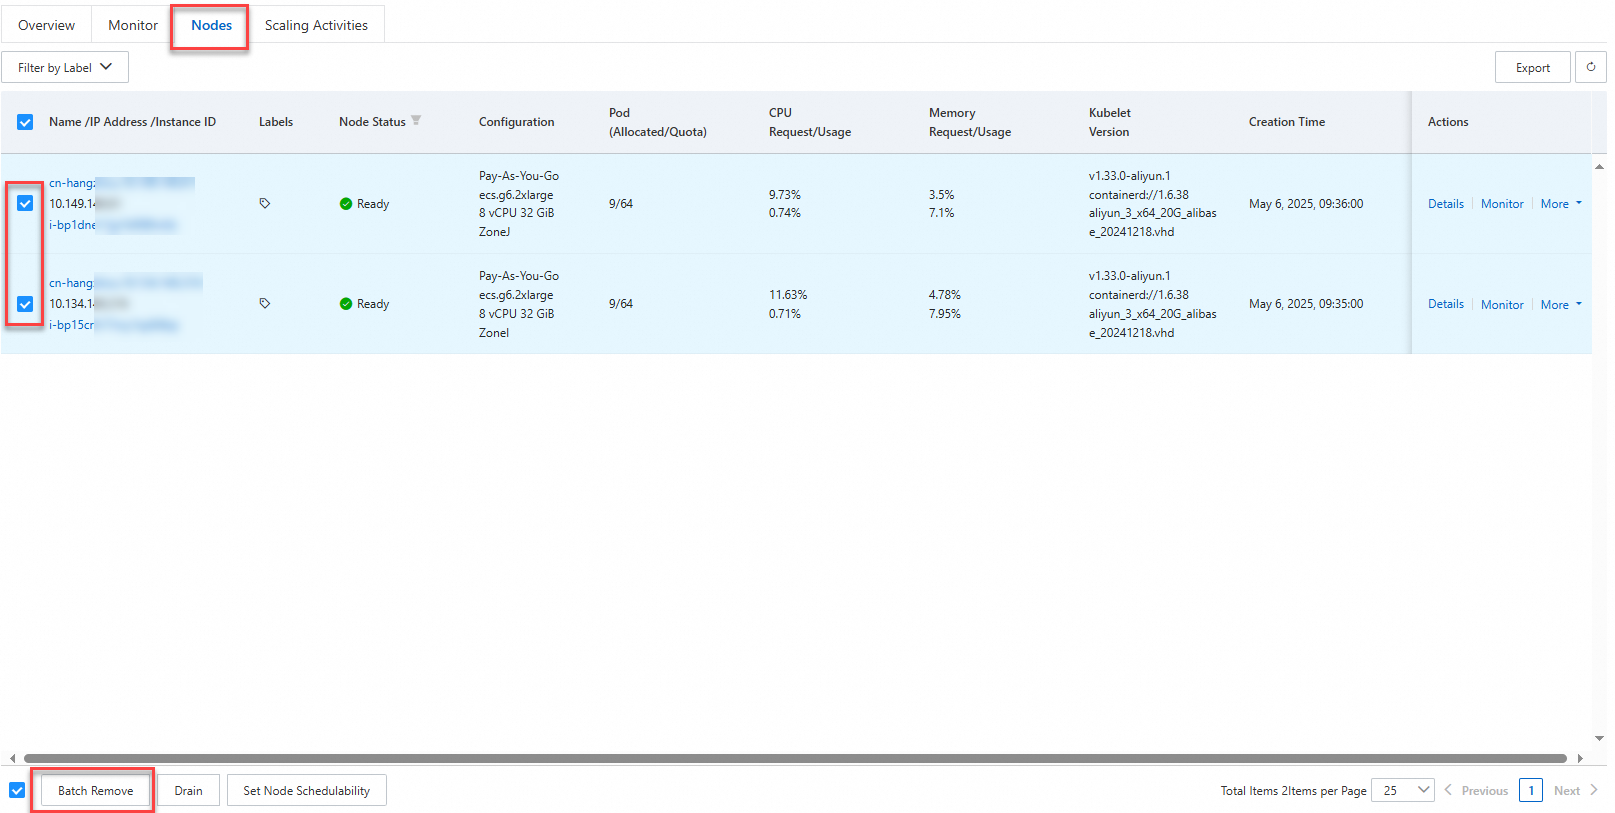
Multiple nodes: Select the nodes and click Batch Remove at the bottom of the page.
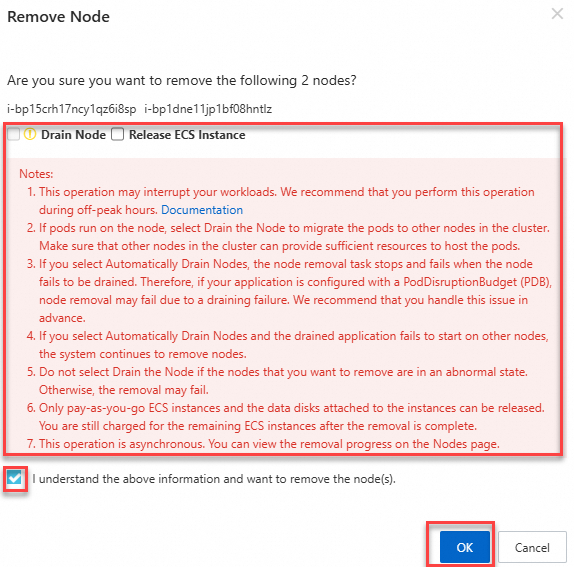
Select whether to enable Automatically Drain The Node and Release The ECS Instance. Read the notes on the page and follow the on-screen instructions. For details about these options, see Removal options.
Remove a node from a cluster
Log on to the Container Service Management Console . In the navigation pane on the left, click Clusters.
On the Clusters page, click the name of your cluster. In the navigation pane on the left, click .
On the Nodes page, remove the node:
Single node: Find the node and choose More > Remove in the Actions column.
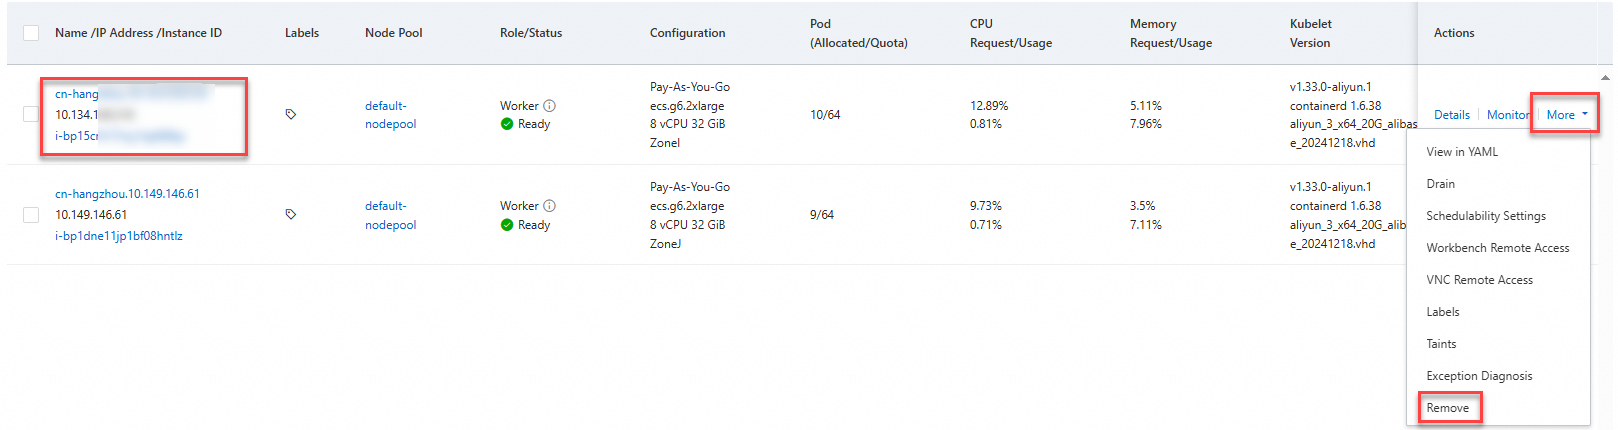
Multiple nodes: Select the nodes and click Batch Remove at the bottom of the page.
Select whether to enable Automatically Drain The Node and Release The ECS Instance. Read the notes on the page and follow the on-screen instructions. For details about these options, see Removal options.
Verify node removal
After removing a node, verify that the removal is complete:
In the ACK console, go to Nodes > Nodes or Nodes > Node Pools and confirm that the node no longer appears in the list.
Run
kubectl get nodesto confirm the node is no longer registered in the cluster.
FAQ
What do I do if a node fails to be removed?
Node removal typically fails because the drain operation times out or PDB rules prevent pod eviction. To resolve this:
Manually drain the node:
<nodeName>: The node name, for example,cn-hangzhou.10.126.XX.XX.[options]: Optional parameters. For example, you can set this parameter to--force --ignore-daemonsets --delete-local-data. For more information, run thekubectl drain --helpcommand.
kubectl drain <nodeName> [options]After all application pods are evicted, remove the node from the ACK console.
If PDB rules are blocking the drain, review and adjust the PDB configuration to allow pod eviction before retrying.
References
To add a removed node back to the cluster, see Add existing nodes.
To remove nodes programmatically, see the RemoveNodePoolNodes and DeleteClusterNodes API operations.
To migrate unmanaged nodes to a node pool, see Migrate unmanaged nodes to a node pool.
To scale a node pool by adjusting the Desired Number Of Nodes, see Manually scale a node pool.
To reset an ECS instance or clear data on its system disk, see Re-initialize a system disk.