ApsaraDB RDS for SQL Server provides a solution to migrate a local SQL Server database to an ApsaraDB RDS for SQL Server instance. You can upload the full backup data of your local SQL Server database to Alibaba Cloud Object Storage Service (OSS). Then, you can use the ApsaraDB RDS console to migrate the full backup data to a specified ApsaraDB RDS for SQL Server instance. This solution is suitable for scenarios such as data backup, data migration, and disaster recovery.
Prerequisites
The ApsaraDB RDS for SQL Server instance must meet the following requirements:
The remaining storage space of the instance must be larger than the data file to be migrated. If the storage space is insufficient, you can upgrade the instance storage.
For instances that run SQL Server 2012 or later, or SQL Server 2008 R2 with cloud disks: Make sure that the instance does not contain a database with the same name as the database to be migrated.
For instances that run SQL Server 2008 R2 with high-performance local disks: Make sure that a database with the same name as the database to be migrated has been created on the instance.
If you use a Resource Access Management (RAM) user, the following conditions must be met:
The RAM user has the AliyunOSSFullAccess and AliyunRDSFullAccess permissions. For more information about how to grant permissions to a RAM user, see Manage OSS permissions using RAM and Manage ApsaraDB RDS permissions using RAM.
Your Alibaba Cloud account has granted the ApsaraDB RDS service account permissions to access your OSS resources.
Your Alibaba Cloud account must manually create an access policy and then attach the policy to the RAM user.
Notes
Migration level: This solution supports only database-level migration. To migrate multiple or all databases, use the instance-level migration solution.
Version compatibility: You cannot migrate data from a backup file of a local SQL Server instance to an ApsaraDB RDS for SQL Server instance that runs an earlier version of SQL Server.
Permission management: After you grant the ApsaraDB RDS service account permissions to access OSS, a role named
AliyunRDSImportRoleis created in Role Management of the RAM console. Do not modify or delete this role. Otherwise, the migration task fails. If you perform a misoperation, you must re-grant the permissions using the data migration wizard.Account management: After the migration is complete, the original database accounts become unavailable. You must create new accounts in the ApsaraDB RDS console.
OSS file retention: Do not delete the backup file from OSS before the migration task is complete. Otherwise, the task fails.
Backup file requirements:
File name restrictions: The file name cannot contain special characters, such as
!@#$%^&*()_+-=. Otherwise, the migration fails.File name extension: ApsaraDB RDS supports backup files with the
.bak(full backup),.diff(differential backup),.trn, or.log(log backup) extension. The system cannot identify other file types.File type: Only full backup files can be uploaded. Differential backups and log backups are not supported.
File source: If the source data is a full backup file downloaded from ApsaraDB RDS for SQL Server, which is in
.zipformat by default, you must decompress the file to a.bakfile before you migrate the data.
Billing
This solution incurs only OSS-related fees, as shown in the following figure.

Scenario | Description |
Upload local data backup files to OSS | No fees are incurred. |
Store backup files in OSS | OSS storage fees are incurred. For more information, see OSS Pricing. |
Migrate backup files from OSS to ApsaraDB RDS |
|
Preparations
In your local database environment, run the DBCC CHECKDB statement to make sure that the database has no allocation errors or consistency errors. The following result indicates that the command was executed successfully:
...
CHECKDB found 0 allocation errors and 0 consistency errors in database 'xxx'.
DBCC execution completed. If DBCC printed error messages, contact your system administrator.
1. Back up the local database
Select a method based on the version of your ApsaraDB RDS for SQL Server instance.
SQL Server 2012 or later, or SQL Server 2008 R2 with cloud disks
Before you perform a full backup of the local database, stop writing data to the database. Data that is written during the backup process is not backed up.
Download the backup script and open it in SQL Server Management Studio (SSMS).
In the script, modify the parameters in the SELECT statement that are located under
YOU HAVE TO INIT PUBLIC VARIABLES HERE.Configuration item
Description
@backup_databases_list
The databases to be backed up. Separate multiple databases with semicolons (;) or commas (,).
@backup_type
The backup type. Valid values:
FULL: full backup.
DIFF: differential backup.
LOG: log backup.
@backup_folder
The local directory where the backup file is stored. If the directory does not exist, it is automatically created.
@is_run
Specifies whether to perform the backup. Valid values:
1: Perform the backup.
0: Perform only a check and do not perform the backup.
Run the backup script.
SQL Server 2008 R2 with high-performance local disks
Open the Microsoft SQL Server Management Studio (SSMS) client.
Log on to the database that you want to migrate.
Run the following command to check the current recovery model of the source database.
USE master;
GO
SELECT name, CASE recovery_model
WHEN 1 THEN 'FULL'
WHEN 2 THEN 'BULK_LOGGED'
WHEN 3 THEN 'SIMPLE' END model FROM sys.databases
WHERE name NOT IN ('master','tempdb','model','msdb');
GO
If the value of
modelin the result is notFULL, proceed to Step 4.If the value of
modelin the result isFULL, proceed to Step 5.
Run the following command to set the recovery model of the source database to
FULL.ALTER DATABASE [dbname] SET RECOVERY FULL; GO ALTER DATABASE [dbname] SET AUTO_CLOSE OFF; GOImportantAfter you set the recovery model to
FULL, the amount of log information in SQL Server increases. Ensure that you have sufficient disk space.Run the following command to back up the source database.
The following example shows how to back up the dbtest database to the backup.bak file.
USE master;
GO
BACKUP DATABASE [dbtest] to disk ='d:\backup\backup.bak' WITH COMPRESSION,INIT;
GO
Run the following command to verify the integrity of the backup file.
USE master GO RESTORE FILELISTONLY FROM DISK = N'D:\backup\backup.bak';ImportantIf a result set is returned, the backup file is valid.
If an error is reported, perform the backup again.
Optional: Run the following command to restore the original recovery model of the database.
ImportantIf the recovery model of the database is already
FULL, you do not need to perform this step.ALTER DATABASE [dbname] SET RECOVERY SIMPLE; GO
2. Upload the backup file to OSS
Select a method based on the version of your ApsaraDB RDS for SQL Server instance.
SQL Server 2012 or later, or SQL Server 2008 R2 with cloud disks
Before you upload the backup file to OSS, you must create a bucket in OSS.
If a bucket already exists in OSS, ensure that it meets the following requirements:
The storage class of the bucket is Standard. Other storage classes, such as Infrequent Access, Archive, Cold Archive, and Deep Cold Archive, are not supported.
Server-side encryption is disabled for the bucket.
If no bucket exists in OSS, you must create one. (Make sure that you have activated OSS.)
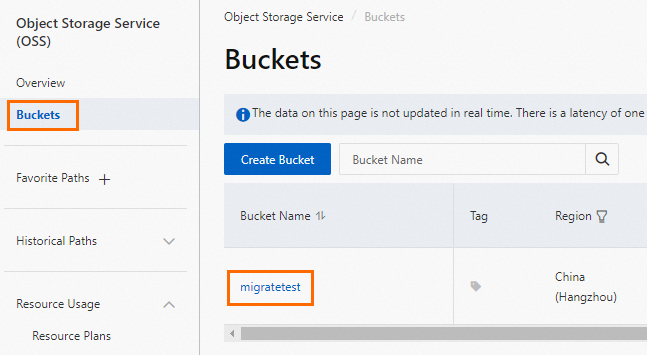
Log on to the OSS console, click Buckets, and then click Create Bucket.
Configure the following key parameters. You can retain the default values for other parameters.
ImportantThe bucket is created primarily for this data migration. you need to configure only the key parameters. You can delete the bucket after the migration is complete to prevent data breaches and reduce costs.
When you create the bucket, do not enable server-side encryption.
Parameter
Description
Example
Bucket Name
The name of the bucket. The name must be globally unique and cannot be changed after the bucket is created.
Naming conventions:
The name can contain only lowercase letters, digits, and hyphens (-).
The name must start and end with a lowercase letter or a digit.
The name must be 3 to 63 characters in length.
migratetest
Region
The region where the bucket resides. If you upload data to the bucket from an ECS instance over the internal network and restore the data to an ApsaraDB RDS instance over the internal network, the bucket, ECS instance, and ApsaraDB RDS instance must be in the same region.
China (Hangzhou)
Storage Class
Select Standard. The migration operation in this topic does not support buckets of other storage classes.
Standard
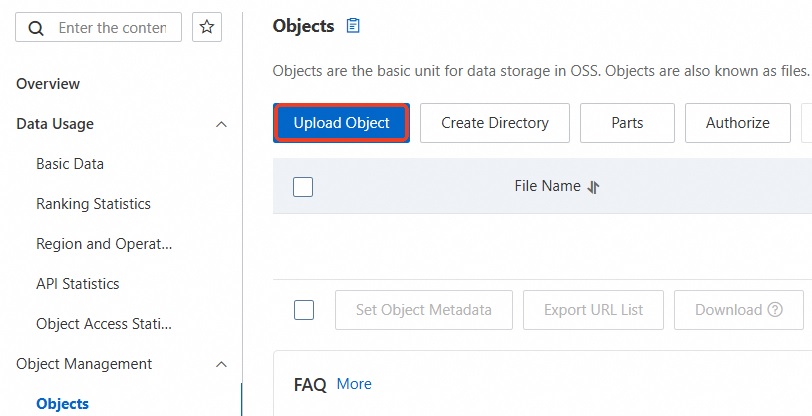
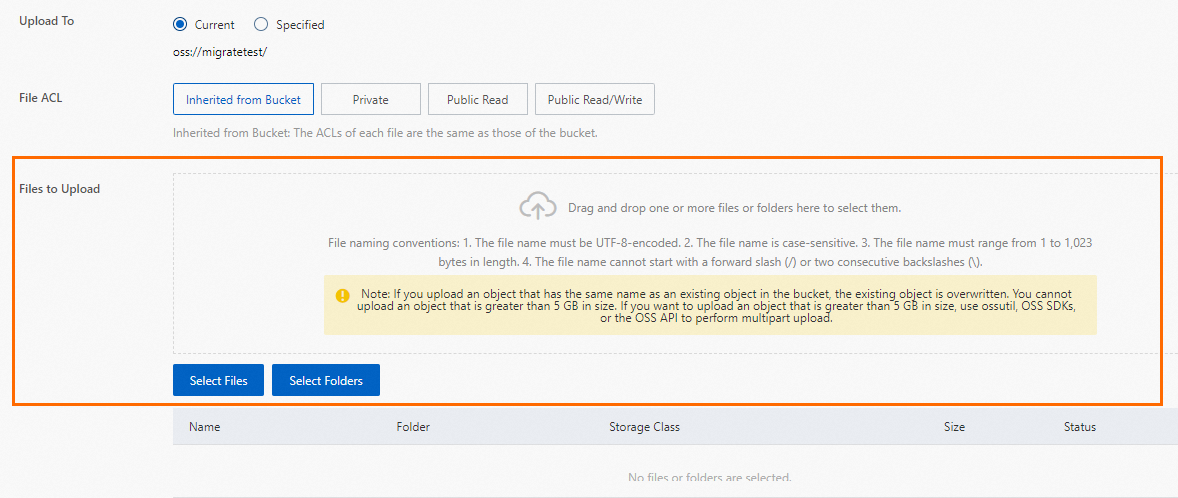
Upload the backup file to OSS.
After you back up the local database, upload the backup file to an OSS bucket that is in the same region as your ApsaraDB RDS instance. If the bucket and the instance are in the same region, you can use the internal network for service interconnection. This method is free of charge for outbound internet traffic and provides faster data upload speeds. You can use one of the following methods:
SQL Server 2008 R2 with high-performance local disks
Before you upload the backup file to OSS, you must create a bucket in OSS.
If a bucket already exists in OSS, ensure that it meets the following requirements:
The storage class of the bucket is Standard. Other storage classes, such as Infrequent Access, Archive, Cold Archive, and Deep Cold Archive, are not supported.
Server-side encryption is disabled for the bucket.
If no bucket exists in OSS, you must create one. (Make sure that you have activated OSS.)
Log on to the OSS console, click Buckets, and then click Create Bucket.
Configure the following key parameters. You can retain the default values for other parameters.
ImportantThe bucket is created primarily for this data migration. you need to configure only the key parameters. You can delete the bucket after the migration is complete to prevent data breaches and reduce costs.
When you create the bucket, do not enable server-side encryption.
Parameter
Description
Example
Bucket Name
The name of the bucket. The name must be globally unique and cannot be changed after the bucket is created.
Naming conventions:
The name can contain only lowercase letters, digits, and hyphens (-).
The name must start and end with a lowercase letter or a digit.
The name must be 3 to 63 characters in length.
migratetest
Region
The region where the bucket resides. If you upload data to the bucket from an ECS instance over the internal network and restore the data to an ApsaraDB RDS instance over the internal network, the bucket, ECS instance, and ApsaraDB RDS instance must be in the same region.
China (Hangzhou)
Storage Class
Select Standard. The migration operation in this topic does not support buckets of other storage classes.
Standard
Upload the backup file to OSS.
After you back up the local database, upload the backup file to an OSS bucket that is in the same region as your ApsaraDB RDS instance. If the bucket and the instance are in the same region, you can use the internal network for service interconnection. This method is free of charge for outbound internet traffic and provides faster data upload speeds. You can use one of the following methods:
Set the validity period for the backup file link and obtain the URL of the file.
Log on to the OSS console.
Click Buckets. Then, click the name of the destination bucket.
In the navigation pane on the left, select File Management > Files.
In the Actions column for the destination database backup file, click Details. In the panel that appears, set Expiration (Seconds) to 28800 (8 hours).
ImportantWhen you migrate a backup file from OSS to ApsaraDB RDS, you must use the URL of the backup file. The data migration fails if the link expires.
Click Copy File URL to copy the file URL.
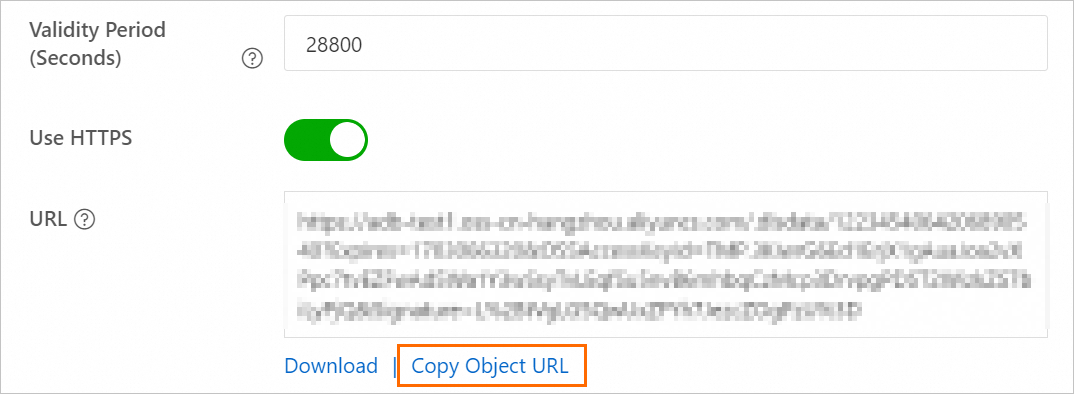
Modify the obtained URL of the data backup file.
By default, the public endpoint of the file is retrieved. To migrate data over the internal network, you must change the endpoint in the file URL to an internal endpoint.
For example, if the URL of the backup file is
http://rdstest.oss-cn-shanghai.aliyuncs.com/testmigraterds_20170906143807_FULL.bak?Expires=15141****&OSSAccessKeyId=TMP****, you must changeoss-cn-shanghai.aliyuncs.comin the URL tooss-cn-shanghai-internal.aliyuncs.com.ImportantThe internal endpoint varies based on the network type and region. For more information, see Endpoints and data centers.
3. Import the OSS backup data to ApsaraDB RDS
Select a method based on the version of your ApsaraDB RDS for SQL Server instance.
SQL Server 2012 or later, or SQL Server 2008 R2 with cloud disks
Go to the Instances page. In the top navigation bar, select the region in which the RDS instance resides. Then, find the RDS instance and click the ID of the instance.
In the navigation pane on the left, click Backup and Restoration.
At the top of the page, click the Migrate OSS Backup Data to RDS button.
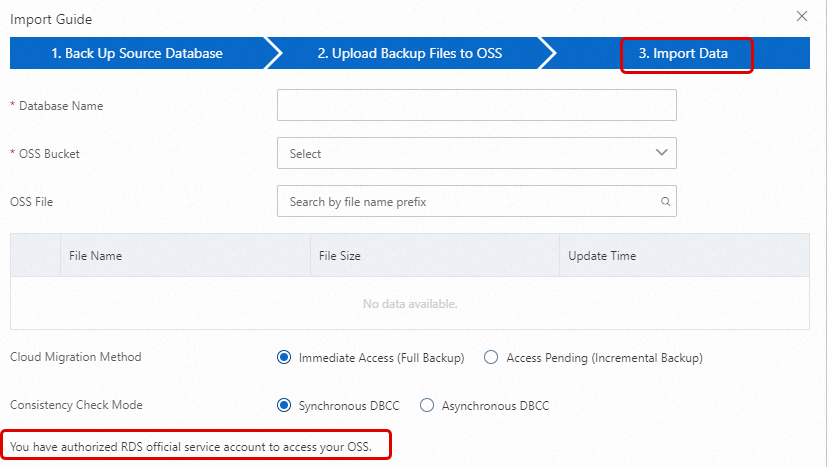
In the Import Guide, click Next twice to proceed to the data import step.
NoteWhen you use the Restore from OSS Backup feature for the first time, you must authorize ApsaraDB RDS to access OSS. Click the Authorization URL and grant the required permissions. If this authorization is not granted, the OSS Bucket drop-down list will be empty.
If you cannot find the destination file on this page, check whether the file name extension of the backup file in OSS meets the requirements. For more information, see the Notes section of this topic. Also, make sure that the ApsaraDB RDS instance and the OSS bucket are in the same region.
Set the following parameters.
Configuration item
Description
Database Name
Enter the name of the destination database on your RDS instance. The destination database is used to store the data that is migrated from the source database on the self-managed SQL Server instance. The name of the destination database must meet the requirements of open source SQL Server.
ImportantBefore migration, you must make sure that the names of the databases on the destination RDS instance are different from the name of the database that you want to restore by using the specified backup file. In addition, make sure that database files with the same name as the database that you want to restore by using the specified backup file are not added to the databases on the destination RDS instance. If both preceding requirements are met, you can restore the database by using a database file in the backup set. Note that the database file must have the same name as the database that you want to restore.
If a database with the same name as the database specified in the backup file already exists on the destination instance, or if there are unattached database files with the same name, the restoration operation will fail.
OSS Bucket
Select the OSS bucket where the backup file is stored.
OSS File
Click the
 button on the right to perform a fuzzy search by the prefix of the backup file name. The file name, file size, and update time are displayed. Select the backup file that you want to migrate.
Cloud Migration Method
Immediate Access (Full Backup): This option is for full migration and is suitable for scenarios where only one full backup file is migrated. In this case, select Immediate Access (Full Backup). The BackupMode parameter in the CreateMigrateTask operation is set to
FULL, and the IsOnlineDB parameter is set toTrue.Access Pending (Incremental Backup): This option is for incremental migration and is suitable for scenarios where a full backup file plus log backups (or differential backup files) are migrated. In this case, the BackupMode parameter in the CreateMigrateTask operation is set to
UPDF, and the IsOnlineDB parameter is set toFalse.
Consistency Check Mode
Asynchronous DBCC: The system does not run DBCC CheckDB when opening the database. Instead, it asynchronously runs DBCC CheckDB after the database is opened. This reduces the time overhead of opening the database (DBCC CheckDB is very time-consuming for large databases) and minimizes your business downtime. If you are highly sensitive to business downtime and do not care about the DBCC CheckDB result, we recommend that you use this option. In this case, the CheckDBMode parameter in the CreateMigrateTask operation is set to
AsyncExecuteDBCheck.Synchronous DBCC: Compared with asynchronous execution, some users are very concerned about the DBCC CheckDB result to identify data consistency errors in their on-premises databases. In this case, we recommend that you select this option. The impact is that it will prolong the time it takes to open the database. In this case, the CheckDBMode parameter in the CreateMigrateTask operation is set to
SyncExecuteDBCheck.
Click OK.
Wait for the migration task to complete. You can click Refresh to check the task status. If the task fails, use its description to troubleshoot the error. For more information, see the Common errors section of this topic.
NoteAfter data migration is complete, the system backs up the ApsaraDB RDS instance at the specified backup time based on the automatic backup policy. You can manually adjust the backup time. The resulting backup set contains the migrated data and is available on the Backup and Restoration page of the ApsaraDB RDS instance.
To generate a backup in the cloud before the scheduled backup time, you can also perform a manual backup.
SQL Server 2008 R2 with high-performance local disks
Log on to the ApsaraDB RDS console and go to the Instances page. In the top navigation bar, select the region in which the RDS instance resides. Then, find the RDS instance and click the ID of the instance.
In the left navigation pane, click Databases.
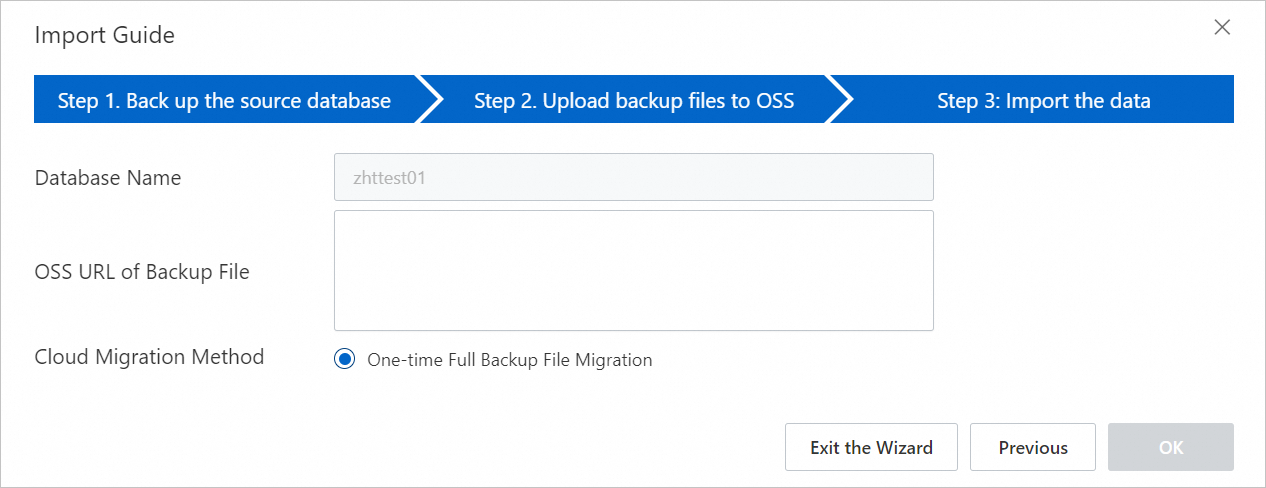
For the destination database, click Migrate Backup Files from OSS in the Actions column.

In the Import Guide dialog box, review the information and click Next.
Review the prompts for the OSS upload and click Next.
In the OSS URL of Backup File field, enter the OSS URL of the backup file and click OK.
 Note
NoteApsaraDB RDS for SQL Server 2008 R2 instances with high-performance local disks support only a one-time import of a full backup file.
4. View the migration progress
Select a method based on the version of your ApsaraDB RDS for SQL Server instance.
SQL Server 2012 or later, or SQL Server 2008 R2 with cloud disks
Go to the Backup and Restoration page of the ApsaraDB RDS instance. On the Cloud Migration Records of Backup Data tab, you can view the migration records, including the task status, start time, and end time. By default, records from the last week are displayed. You can adjust the time range as needed.

If the Task Status is Failed, check the Task Description or click View File Details to identify the cause of the failure. After you resolve the issue, rerun the data migration task.
SQL Server 2008 R2 with high-performance local disks
On the Data Migration To Cloud page of the ApsaraDB RDS instance, find the destination migration task to view its progress.
If the Task Status is Failed, check the Task Description or click View File Details to determine the cause of the failure. After resolving the issue, rerun the data migration task.
Common errors
Each migration record contains a task description that you can use to identify the cause of a task failure. The following are common error messages:
A database with the same name already exists
Error message 1: The database (xxx) already exists on RDS. Please back it up and drop it, then try again.
Error message 2: Database 'xxx' already exists. Choose a different database name.
Cause: To ensure data security, ApsaraDB RDS for SQL Server does not support migrating a database with the same name as an existing database.
Solution: To overwrite an existing database, back up the existing data, delete the database, and then run the data migration task again.
Using a differential backup file
Error message: Backup set (xxx.bak) is a Database Differential backup, we only accept a FULL Backup.
Cause: The provided backup file is a differential backup, not a full backup. This migration method supports only full backup files.
Using a log backup file
Error message: Backup set (xxx.trn) is a Transaction Log backup, we only accept a FULL Backup.
Cause: The provided backup file is a log backup, not a full backup. This migration method supports only full backup files.
Backup file verification failed
Error message: Failed to verify xxx.bak, backup file was corrupted or newer edition than RDS.
Cause: The backup file is corrupted, or the SQL Server version of the source database is later than the version of the destination ApsaraDB RDS for SQL Server instance. This version incompatibility causes the verification to fail. For example, this error is reported when you restore a SQL Server 2016 backup to an ApsaraDB RDS for SQL Server 2012 instance.
Solution: If the backup file is corrupted, create a new full backup of the source database and then create a new migration task. If the versions are incompatible, use an ApsaraDB RDS for SQL Server instance that runs a version that is the same as or later than the source database version.
NoteTo upgrade an existing ApsaraDB RDS for SQL Server instance to a later version, see Upgrade the database engine version.
DBCC CHECKDB failed
Error message: DBCC checkdb failed.
Cause: An error occurred during the DBCC CHECKDB operation, which indicates that an error exists in the source database.
Solution: Run the following command to fix the error in the source database and then migrate the data again.
ImportantRunning this command to fix the error may cause data loss.
DBCC CHECKDB (DBName, REPAIR_ALLOW_DATA_LOSS) WITH NO_INFOMSGS, ALL_ERRORMSGS
Insufficient space 1
Error message: Not Enough Disk Space for restoring, space left (xxx MB) < needed (xxx MB).
Cause: The remaining storage space on the ApsaraDB RDS instance is insufficient for migrating the backup file.
Solution: Upgrade the instance storage.
Insufficient space 2
Error message: Not Enough Disk Space, space left xxx MB < bak file xxx MB.
Cause: The remaining storage space on the ApsaraDB RDS instance is smaller than the size of the backup file.
Solution: Upgrade the instance storage.
Insufficient logon account permissions
Error message: Cannot open database "xxx" requested by the login. The login failed.
Cause: The user account used to log on to the ApsaraDB RDS instance does not have access permissions for the database.
Solution: On the Account Management page of the ApsaraDB RDS instance, grant database access or operation permissions to the user account. For more information, see Grant permissions to an account and Permissions supported by different account types.
No privileged account
Error message: Your RDS doesn’t have any init account yet, please create one and grant permissions on RDS console to this migrated database (xxx).
Cause: The ApsaraDB RDS instance does not have a privileged account, so the data migration task does not know which user to grant permissions to. However, the backup file was successfully restored to the destination instance, so the task status is successful.
Solution: Create a privileged account.
Insufficient RAM user operation permissions
Q1: In step 5 of creating a data migration task, I have entered all the configuration parameters, but the OK button is grayed out. Why?
A1: The button may be unavailable because you are using a RAM user that has insufficient permissions. For more information, see the Prerequisites section of this topic to ensure that the necessary permissions are granted.
Q2: When I use a RAM user to grant permissions for
AliyunRDSImportRole, apermission deniederror is returned. How do I solve this?A2: Use your Alibaba Cloud account to temporarily add the AliyunRAMFullAccess permission to the RAM user.
Common return messages
Task type | Task status | Task description | Description |
One-time import of a full backup file | Success |
| The migration is successful. |
Failed |
| The migration failed because the OSS download URL expired. | |
| The migration failed because the backup file is corrupted or is from a later version than the ApsaraDB RDS instance. | ||
| The migration failed because the DBCC CHECKDB command failed. | ||
| The migration failed because the file is a log backup. | ||
| The migration failed because the file is a differential backup. |
Related API operations
API | Description |
Restores a backup file from OSS to an ApsaraDB RDS for SQL Server instance and creates a data migration task. | |
Opens the database of an ApsaraDB RDS for SQL Server data migration task. | |
Queries the list of data migration tasks for an ApsaraDB RDS for SQL Server instance. | |
Queries the file details of an ApsaraDB RDS for SQL Server data migration task. |


 , select the backup file that you want to upload, and then click Open. The local file is uploaded to OSS.