After applying for an SSL certificate, complete domain ownership verification before the certification authority (CA) can issue it. This topic covers all three verification methods for DV certificates — Automatic DNS Verification, Manual DNS Verification, and File Verification — as well as the CA-contact process for OV and EV certificates.
Usage notes
Applicable certificate type: Commercial Certificates
Certificate status: Validating Application
Verify domain ownership for a DV certificate
Step 1: Open the Verify Information panel
If the Verify Information panel is not already open, go to the SSL Certificate Management page. In the certificate list, find the target certificate and click Verify in the Actions column.
Step 2: Choose a verification method
After submitting a DV certificate application, choose one of three verification methods: Automatic DNS Verification, Manual DNS Verification, or File Verification. The table below summarizes when to use each method.
| Method | When to use | Limitations |
|---|---|---|
| Automatic DNS Verification | Your domain's DNS is managed by Alibaba Cloud DNS and meets auto-verification conditions | Cannot be switched to another method |
| Manual DNS Verification | You manage DNS yourself or use a third-party DNS provider | Requires manual TXT record creation |
| File Verification | You have direct access to your web server | Ports 80 and 443 must be open; no URL redirects allowed |
Once domain ownership verification is complete, the CA automatically reviews and issues the DV certificate, typically within 1 to 15 minutes. Passing verification does not mean the CA has completed its review. To check the final review result, see Processing CA review results.
Automatic DNS verification
If your domain meets the conditions for automatic verification, the system selects Automatic DNS Verification by default and this selection cannot be changed.
After you submit the application, Alibaba Cloud automatically adds a DNS TXT record in the Alibaba Cloud DNS console to verify domain ownership. Verification is complete when the message Domain name verification succeeded appears below the Verify button.
If the message has not appeared, follow the instructions in the prompt, check the FAQ for help, and click Verify again.
When the new DNS record is added, any conflicting TXT records in your DNS service are deleted. Check whether any third-party services rely on those TXT records before proceeding.
The console may lag behind actual DNS propagation. If your DNS record has taken effect but the console still shows No DNS record found. after clicking Verify, wait a few minutes and try again.Manual DNS verification
Manually add a TXT record at your DNS provider to verify domain ownership.
DNS record propagation times
| Action | Propagation time |
|---|---|
| Adding a new record | Real time |
| Deleting or modifying a record | Depends on TTL (Time to Live); typically 10 minutes |
| Changing nameservers | Up to 48 hours |
Steps
Do not delete the TXT record before the certificate is issued — doing so causes issuance to fail.
After the certificate is issued, delete the TXT record to prevent conflicts when adding records later.
If the console shows
The current operation is not authorized. Contact an administrator for authorization., contact your Resource Access Management (RAM) account administrator to grant theAliyunDNSFullAccesspermission (or the specific permissions listed in the console prompt). Follow the principle of least privilege and grant only the permissions the system requests. For details, see Manage RAM user permissions.
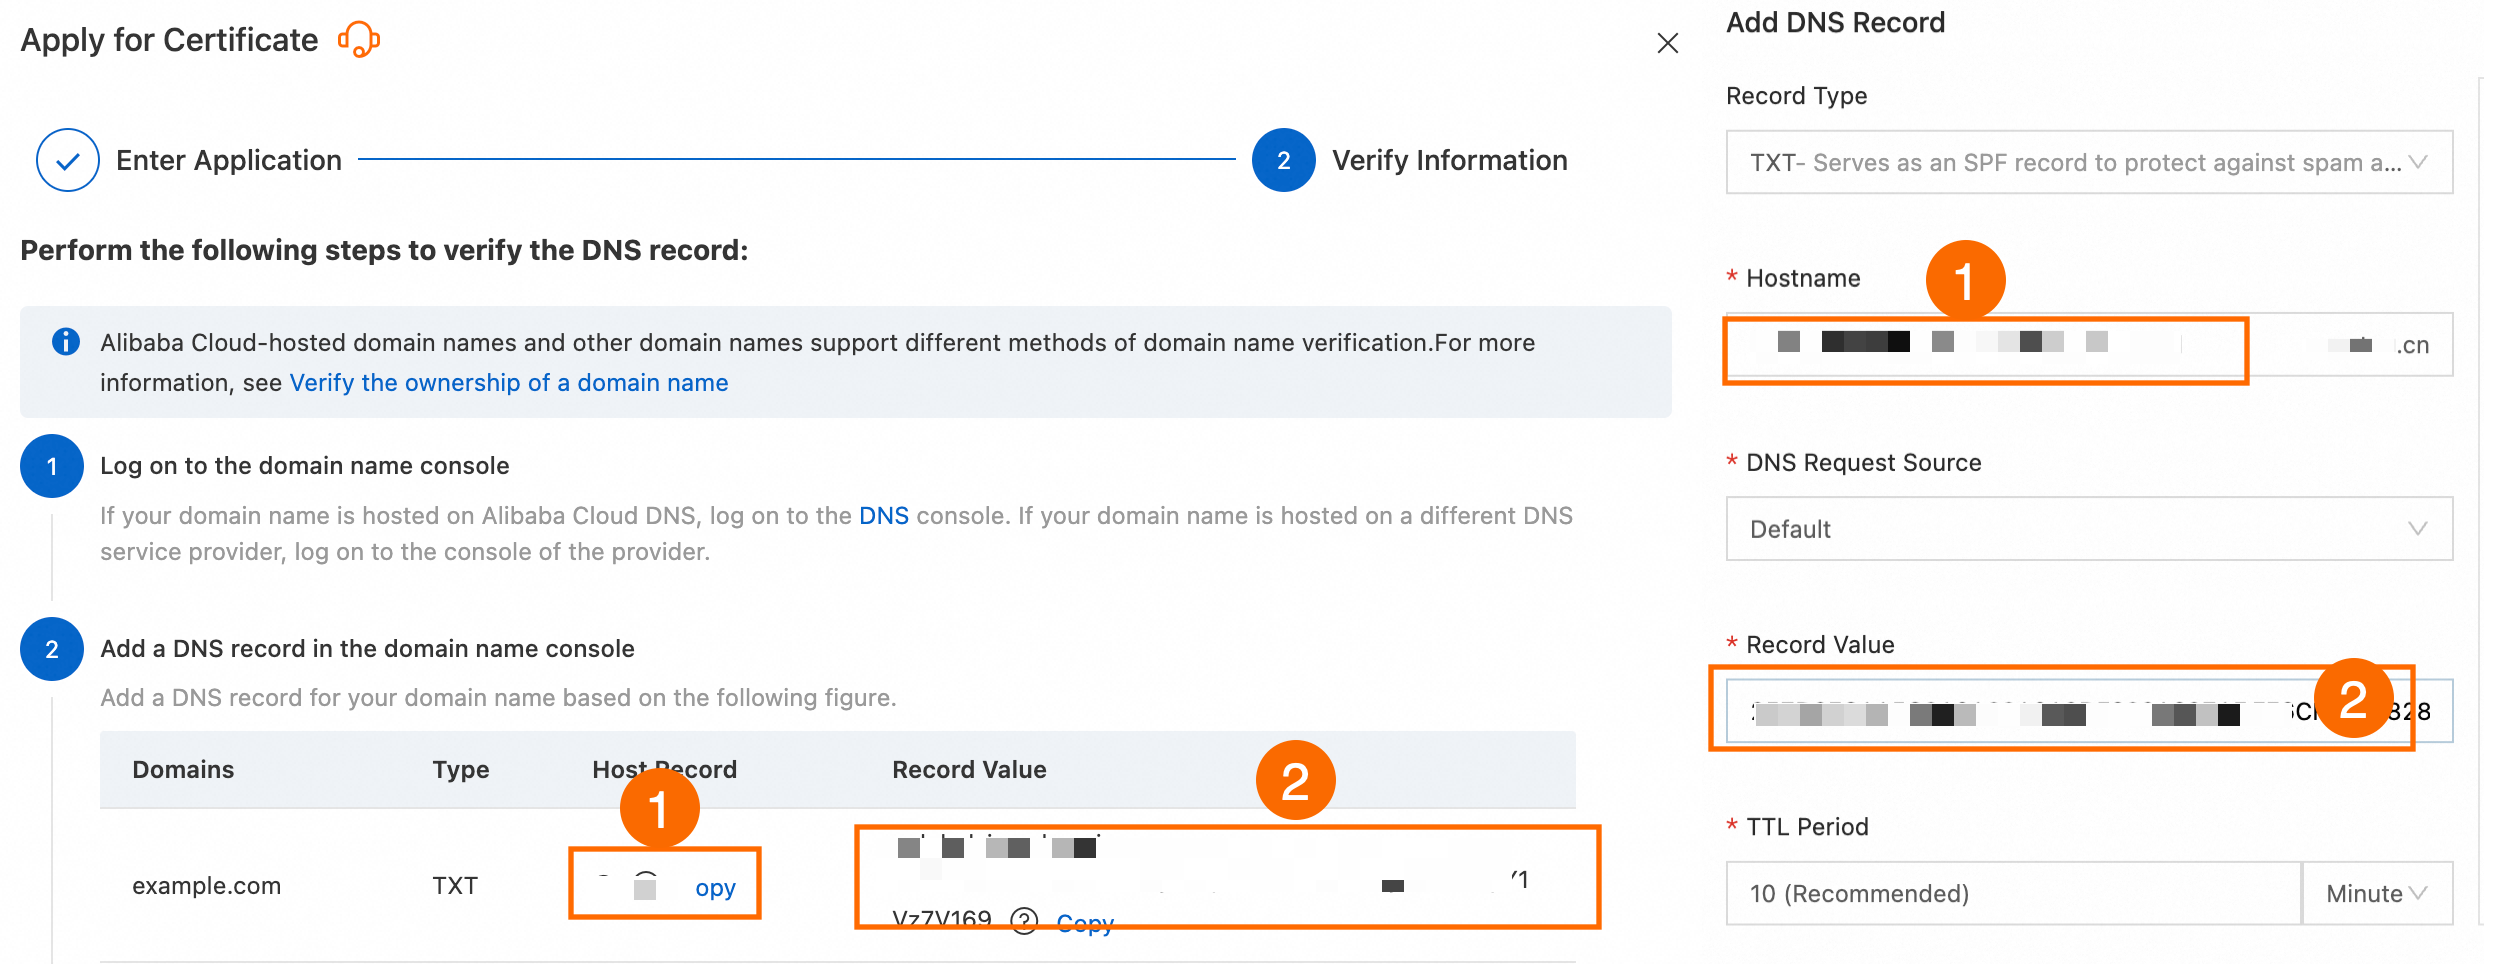
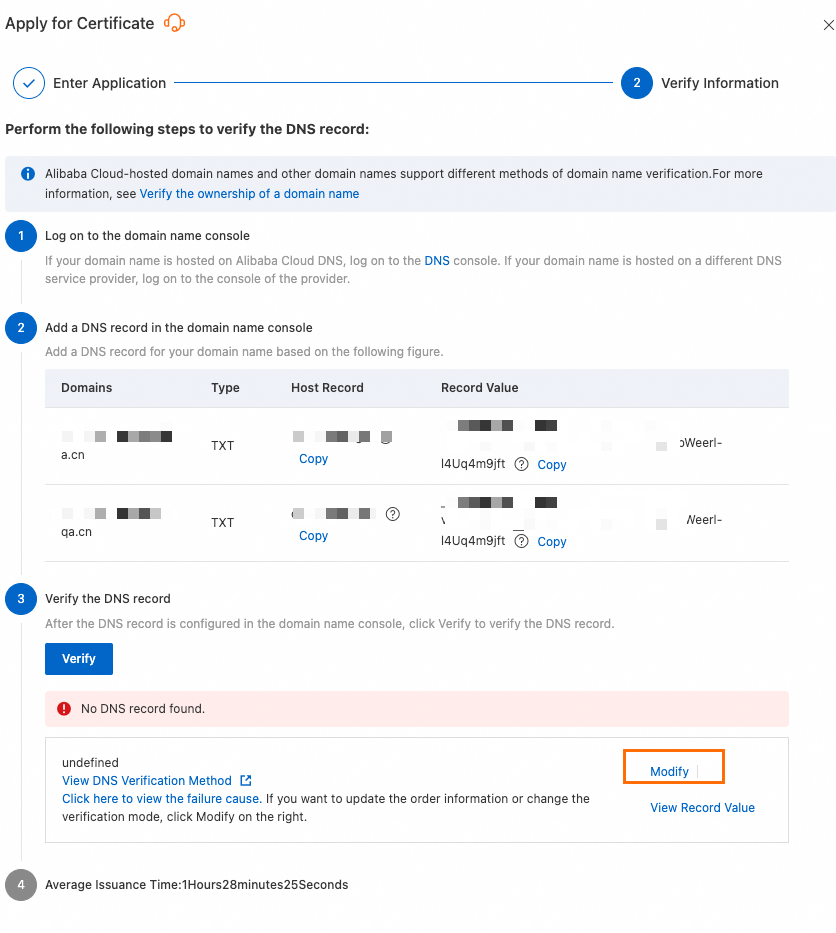
Get the verification information. In the Verify Information panel, under Add a DNS record in the domain name console, copy the Type, Host Record, and Record Value. You will add these at your DNS provider.
Add the DNS record. Add a TXT record at your domain's DNS provider. The following example shows how to add the record in Alibaba Cloud DNS.
Log on to the Alibaba Cloud DNS console using the registrant's Alibaba Cloud account. Find the target domain and click Settings in the Actions column.
Click Add Record. In the panel that appears, enter the Type, Host Record, and Record Value you copied in step 1, then click OK.
If your domain does not use Alibaba Cloud DNS, perform this step at your DNS provider instead.
The left image shows the record information from the Certificate Management Service console; the right image shows the settings in the Alibaba Cloud DNS console.
Verify the domain. After adding the DNS record, click Verify in the Verify Information panel. If
Domain name verification succeededappears below the button, verification is complete. Otherwise, follow the instructions in the prompt, check the FAQ for help, and click Verify again.ImportantThe console may lag behind actual DNS propagation. If your record has taken effect but the console still shows
No DNS record found., wait a few minutes and try again.
File verification
Prerequisites
Before uploading the verification file, confirm that your server meets all of the following requirements:
Ports 80 and 443 are open. The CA retrieves the verification file only over port 80 (HTTP) and port 443 (HTTPS). If your HTTPS service is unavailable, temporarily shut it down (stop listening on port 443).
Both the root domain and www subdomain are publicly accessible. Whether you applied for a root domain (such as
aliyundoc.com) or awwwdomain, both must be reachable.No URL redirects are in place. The CA's verifier does not follow 301 or 302 redirects.
Steps
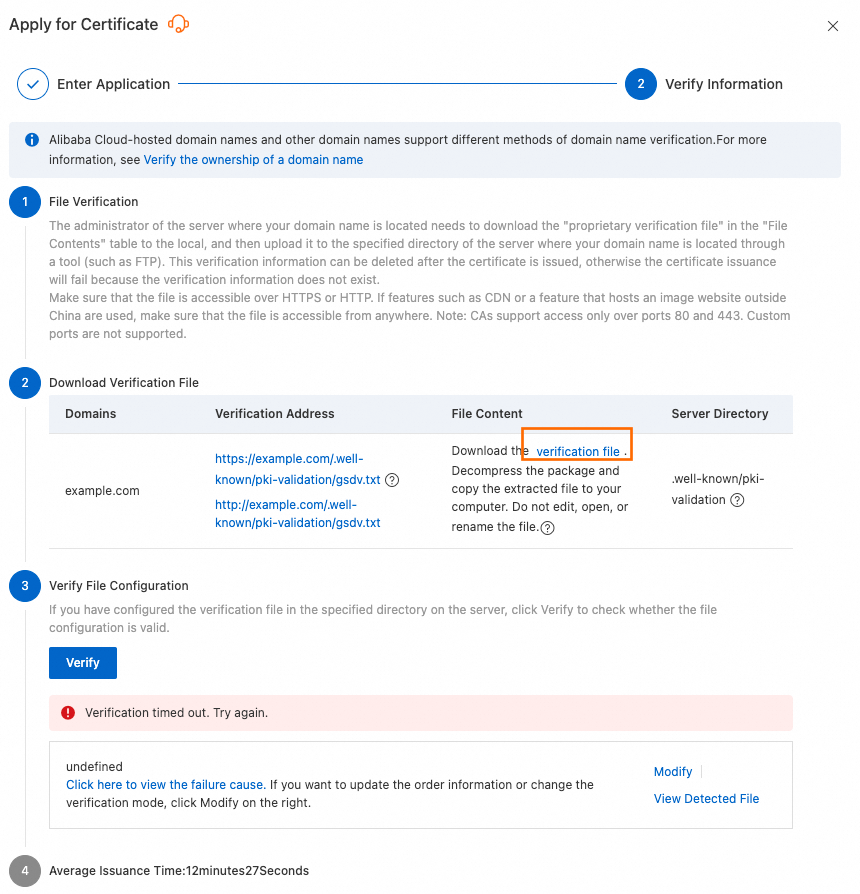
Download the verification file. In the Verify Information panel, go to the Download Verification File section and click verification file to download the package. Unzip the package to get the verification file.
Important- Do not open, edit, or rename the verification file after downloading it. - The file is valid for only 3 days after download. If you do not complete verification within this period, download a new file.
Upload the verification file. The following example shows how to configure file verification on an Nginx (Linux) server running on an Alibaba Cloud Elastic Compute Service (ECS) instance.
Connect to the ECS instance. For details, see Select a method to connect to an ECS instance.
Run the following commands to create the verification directory under the Nginx web root (
/var/www/html/by default): ``bash cd /var/www/html mkdir -p .well-known/pki-validation``Upload the verification file to
/var/www/html/.well-known/pki-validation/. Use the file-upload feature of a remote login tool such as PuTTY, XShell, or WinSCP. If you are using an ECS instance, see Upload or download files for instructions.
A server administrator should perform this step.
WarningDo not delete the verification file before the certificate is issued — doing so causes issuance to fail.
Trigger verification. Return to the Certificate Management Service console. In the certificate list, click Verify in the Actions column for the target certificate. The system checks for the file at: If the console shows
No file found, wait about one minute and click Verify again. If verification still fails after multiple attempts, re-upload the correct file.http://<your_domain_name>/.well-known/pki-validation/<verification_file_name>https://<your_domain_name>/.well-known/pki-validation/<verification_file_name>
Verify domain ownership for an OV or EV certificate
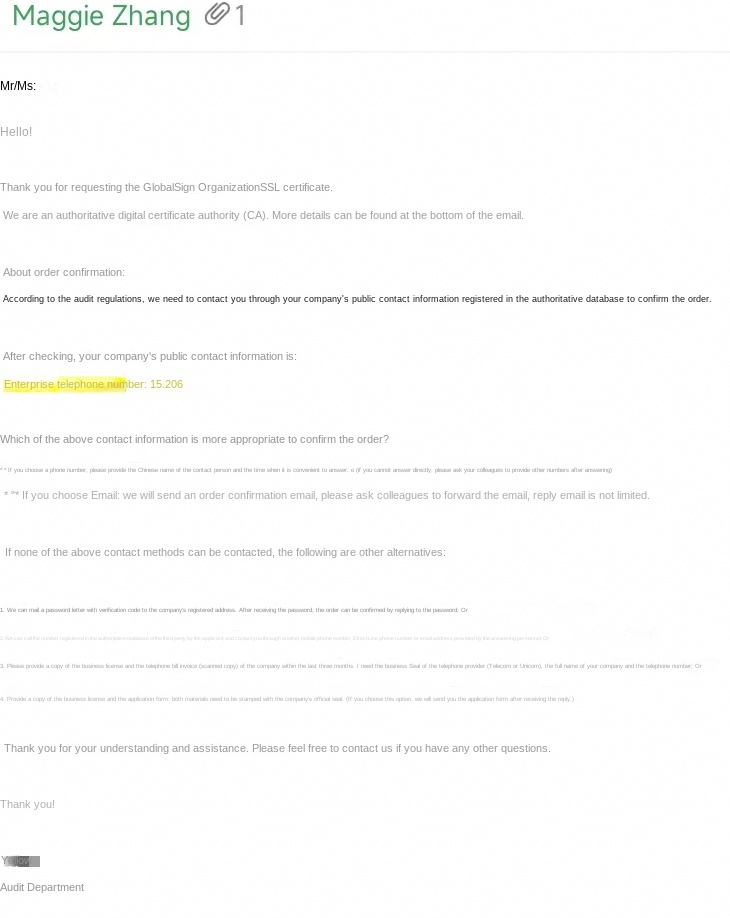
For OV and EV certificates, domain ownership verification is handled by the CA directly. After you submit your application, the CA contacts you using the phone number or email address in your application — typically within one business day (based on the CA's local time zone, excluding holidays).
OV and EV certificates are typically issued within 5 calendar days if the application information is correct and you respond promptly. Applications not completed within 30 calendar days are automatically rejected.
If you have not received a call or email after 5 business days, contact your account manager.
To check the current progress, go to the SSL Certificate Management page, find the target certificate, and click theicon in the Status column.
Phone
CA staff will call the contact phone number in your certificate application to verify the application information. Make sure the contact person's phone is available to receive the call.
The CA sends a domain verification email to the contact email address in your application. Check your email promptly and follow the instructions in the message.
The email content varies by certificate brand. The following example is for reference only — the actual email you receive is the one that is valid.
GlobalSign example:
GlobalSign
View the CA review result
After domain ownership verification is complete, the CA reviews your application. For information on how to handle the review results, see Processing CA review results.
FAQ
DNS verification
Can I switch from Automatic DNS Verification to a different method?
No. If the system defaulted to Automatic DNS Verification for your domain, you cannot switch to Manual DNS Verification or File Verification. To use a different method, use a separate Alibaba Cloud account to either purchase the certificate or manage the domain's DNS.
How do I check if a DNS record has taken effect?
Use Alibaba Cloud's Network Detect Tool:
In the Apply for Certificate panel, click View Record Value.
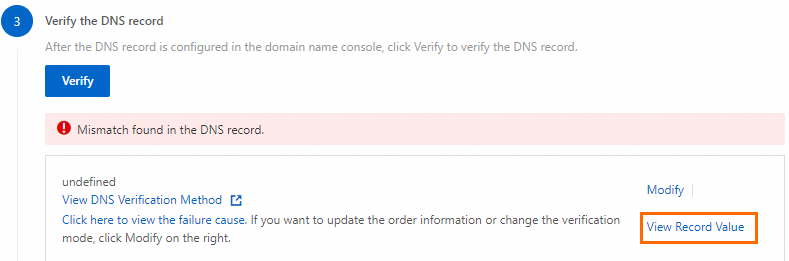
On the DNS tab, click OK.

If the resolution result in the Probe Check Result list matches your configured DNS record value, the record is in effect.
Why do I get a `No DNS record found.` error?
The most common cause is that the required TXT record has not been added at your DNS provider. Go to your DNS provider's console and add the record. For instructions, see the Manual DNS verification section above.
Other causes:
DNS propagation delay. DNS changes can take up to 1 hour to propagate — especially to the CA's servers. If the record is correct, wait and click Verify again.
Domain name mismatch. The domain in your certificate application must exactly match the domain where you created the DNS record. If they differ, click Modify on the validation page, correct the domain, and resubmit the application.
If you do not use Alibaba Cloud DNS, confirm the domain name in your DNS provider's console.

Why do I get a `Mismatch found in the DNS record.` error?
This error means the CA found a TXT record for your domain, but its value is incorrect. Start by re-copying the Host Record and Record Value from the certificate application panel — a copy-paste error is the most common cause.

Common mistakes to check:
| Issue | What happens |
|---|---|
| Extra trailing period in record value | Some DNS providers automatically append a period. If you also add one, validation fails. |
| Apex domain appended twice | Some providers append the domain to the Host Record you enter. If you enter the full hostname, it becomes _dnsauth.example.com.example.com, which fails. |
| Wrong record type | The record must be a TXT record — not a CNAME or A record. |
Other causes:
Third-party DNS provider (such as DNSPod). The Alibaba Cloud console may report an error even if the record is set up correctly at your provider. Ignore the console error and wait for the CA to complete its own verification.
Expired TXT record for a DigiCert DV certificate. DigiCert DV certificate TXT records are valid for only 24 hours. If the record has expired:
Delete the old TXT record from your DNS provider.
In the Certificate Management Service console, reapply for the certificate to get a new TXT record value.
Add the new TXT record to your DNS configuration.
This 24-hour limit does not apply to GeoTrust DV certificates — their timestamps remain valid.
DNS propagation delay. DNS changes may not have reached the CA's servers yet. Allow up to 1 hour and verify that your DNS service is working correctly.
Why do I get a `Verification timed out. Try again.` error during DNS validation?
This error indicates a network problem that is preventing the verification system from querying your domain's nameservers. Contact your DNS provider to investigate potential network connectivity issues on their end.
My DNS record has propagated correctly, but console verification keeps failing.
The console's check can lag behind actual DNS propagation. Even if dig shows the record is correct, the verification service may be reading from a cached or delayed state. Wait one minute and click Verify again.
How do I resolve an SSL verification failure caused by a CAA DNS record?
A Certification Authority Authorization (CAA) record restricts which CAs can issue certificates for your domain. If your chosen CA is not listed, verification fails. Fix it using one of the following options:
Option 1: Delete the CAA record in your DNS provider's console (such as the Alibaba Cloud DNS console), then reapply for the certificate.
Option 2: Add the certificate's CA to the CAA record, wait for the record to propagate, then reapply.
If your domain uses a CNAME record pointing togithub.io, it inherits GitHub's CAA policy. Either temporarily pause the CNAME record, or addtrust-provider.com,globalsign.com, andsectigo.comto your domain's CAA record.
How do I set up DNS verification if my domain isn't managed by Alibaba Cloud DNS?
| Option | Method | Advantage |
|---|---|---|
| Configure the record at your current provider | Log on to your current domain platform and add the SSL certificate validation TXT record. Contact your provider's support if needed. | Fast and direct — no domain transfer required. |
| Transfer your domain to Alibaba Cloud | Follow the steps to transfer a domain name to Alibaba Cloud, then manage all DNS records in the Alibaba Cloud DNS console. Important Transferring a domain requires paying a one-year renewal fee. | Convenient for future certificate renewals and unified DNS management. |
File verification
Why do I get a `No file found.` error?
The CA's server could not find the verification file at the expected URL. Check the following:
Wrong directory. The file must be in the
/.well-known/pki-validation/directory within your website's root folder.Console delay. If the file is in the correct location and accessible over both HTTP and HTTPS, the console check may simply be delayed. Wait a few minutes and click Verify again.
Why do I get a `Verification timed out. Try again.` error during file verification?
This error means the CA's servers could not connect to your web server — typically a network or server configuration issue.
Ports 80 or 443 are blocked. The CA connects over HTTP (port 80) or HTTPS (port 443). Make sure your server's firewall and any cloud security groups allow inbound traffic on TCP ports 80 and 443.
To check whether port 443 is open, run the appropriate command for your OS:
Linux (RHEL/CentOS)
command -v nc > /dev/null 2>&1 || sudo yum install -y nc
# Replace <your_server_public_ip> with your server's public IP address.
sudo ss -tlnp | grep -q ':443 ' || sudo nc -l 443 & sleep 1; nc -w 3 -vz <your_server_public_ip> 443
If the output is Ncat: Connected to <your_server_public_ip>:443, port 443 is open.
Linux (Debian/Ubuntu)
command -v nc > /dev/null 2>&1 || sudo apt-get install -y netcat
# Replace <your_server_public_ip> with your server's public IP address.
sudo ss -tlnp | grep -q ':443 ' || sudo nc -l -p 443 & sleep 1; nc -w 3 -vz <your_server_public_ip> 443
If the output is Connection to <your_server_public_ip> port [tcp/https] succeeded! or [<your_server_public_ip>] 443 (https) open, port 443 is open.
If port 443 is closed, open it in your security group and firewall.
Open port 443 in the security group (Alibaba Cloud ECS)
The following steps use Alibaba Cloud ECS as an example. For other cloud platforms, refer to their official documentation.
Go to the Elastic Compute Service (ECS) instances page and click the target instance name. In the Security Group Details section, follow Add a security group rule to add a rule with Action set to Allow, Protocol to Custom TCP, Destination (Current Instance) to HTTPS (443), and Source to 0.0.0.0/0 (anywhere).
Open port 443 in the firewall (Linux)
Run the following command to identify the active firewall on your system:
if command -v systemctl >/dev/null 2>&1 && systemctl is-active --quiet firewalld; then
    echo "firewalld"
elif command -v ufw >/dev/null 2>&1 && sudo ufw status | grep -qw active; then
    echo "ufw"
elif command -v nft >/dev/null 2>&1 && sudo nft list ruleset 2>/dev/null | grep -q 'table'; then
    echo "nftables"
elif command -v systemctl >/dev/null 2>&1 && systemctl is-active --quiet iptables; then
    echo "iptables"
elif command -v iptables >/dev/null 2>&1 && sudo iptables -L 2>/dev/null | grep -qE 'REJECT|DROP|ACCEPT'; then
    echo "iptables"
else
    echo "none"
fi
If the output is none, no further action is needed. Otherwise, run the corresponding command to open port 443:
firewalld
sudo firewall-cmd --permanent --add-port=443/tcp && sudo firewall-cmd --reloadufw
sudo ufw allow 443/tcpnftables
sudo nft add table inet filter 2>/dev/null
sudo nft add chain inet filter input '{ type filter hook input priority 0; }' 2>/dev/null
sudo nft add rule inet filter input tcp dport 443 counter accept 2>/dev/null
iptables
sudo iptables -A INPUT -p tcp --dport 443 -j ACCEPTTo persist iptables rules after a reboot:
RHEL/CentOS:
sudo yum install -y iptables-services
sudo service iptables save
Debian/Ubuntu:
sudo apt-get install -y iptables-persistent
sudo iptables-save | sudo tee /etc/iptables/rules.v4 >/dev/null
Open port 443 in the security group and firewall (Windows)
Open port 443 in the security group.
Go to the ECS instance page, select the region of the target instance, and click the instance name.
Click Security Group > All Intranet Inbound Rules and check for a rule with Authorization Policy set to Allow, Protocol Type set to TCP, Destination Port Range set to HTTPS (443), and Authorization Object set to Anywhere (0.0.0.0/0).
If the rule does not exist, see Add a security group rule to add it.
ImportantThe following steps use Alibaba Cloud ECS as an example. For other cloud platforms, refer to their official documentation.
Open port 443 in the Windows Firewall.
Click Start > Control Panel > System and Security > Windows Firewall > Check firewall status.
If the firewall is off, no further action is needed.
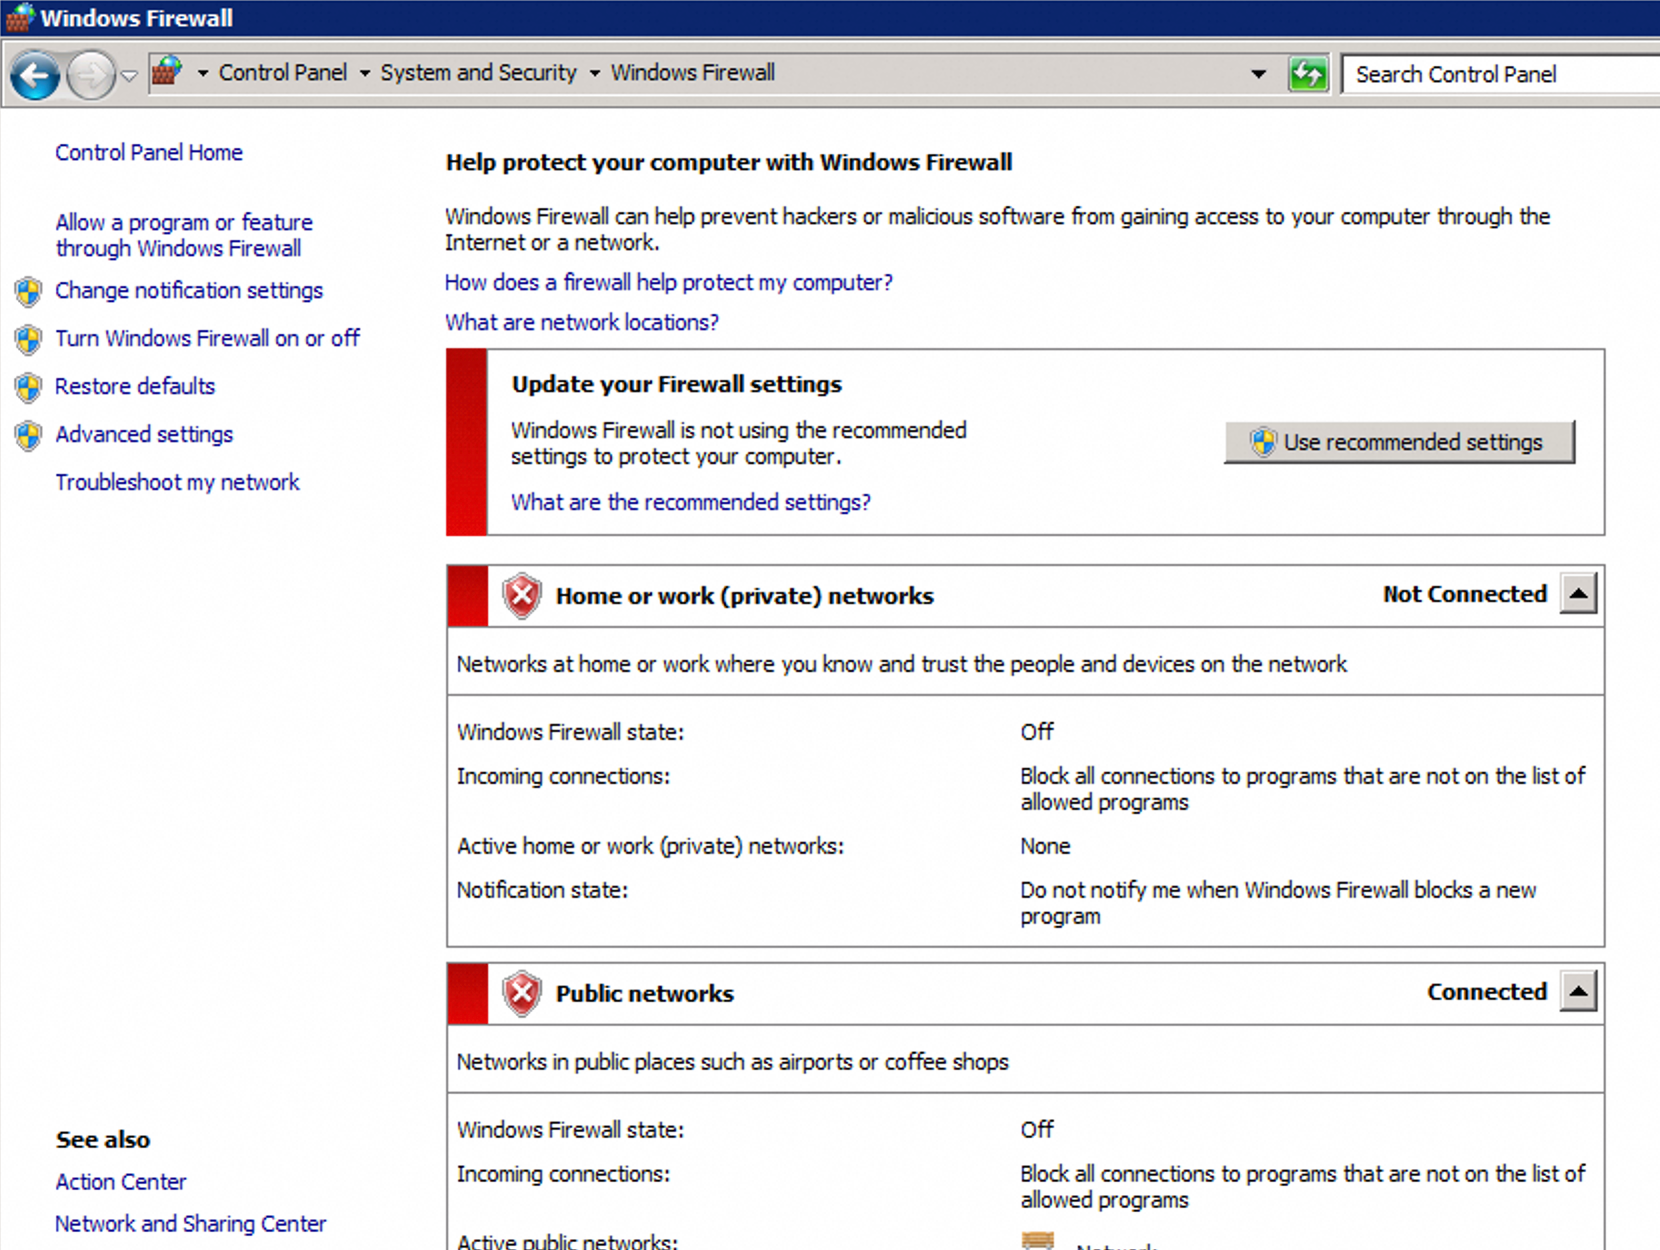
If the firewall is on, click Advanced settings > Inbound Rules and look for a rule where Protocol is TCP, Local Port is 443, and Action is Block. If such a rule exists, right-click it, select Properties, and on the General tab, change the setting to Allow the connection, then click Apply.
Alternative: If you cannot open the required ports, cancel the application and reapply using Manual DNS Verification.
A URL redirect is configured on my server.
The CA's verifier does not follow 301 or 302 redirects. To check for redirects, run:
wget -S http://<your_domain>/.well-known/pki-validation/<verification_file_name>If the output includes 301 Moved Permanently or 302 Found, temporarily disable the redirect rules in your web server configuration that affect the /.well-known/pki-validation/ path. The following examples show how to identify and disable 301 and 302 redirects in an nginx.conf file.
301 redirect configuration example:
server {
    listen 80;
    server_name <your_root_domain> <your_www_subdomain>;
    return 301 <redirect_domain>$request_uri;
}
302 redirect configuration example:
location /.well-known/ {
    return 302 <redirection_URL>
}
An IP allowlist is blocking the CA.
If your server or network firewall restricts access to specific IP addresses, it may block the CA's verification servers. Temporarily add the following IP address ranges to your firewall's allowlist:
| CA vendor | IP addresses |
|---|---|
| DigiCert | 216.168.247.9, 64.78.193.238, 216.168.249.9 |
| GlobalSign | 211.123.204.251, 180.222.177.99, 114.179.250.1, 114.179.250.2, 27.115.18.218 |
Why do I get a `File content is invalid.` error?
This error means the CA found a file at the verification URL, but its content is incorrect. Common causes:
The root domain and www subdomain cannot both access the verification file. The CA checks for the file on both
your-domain.comandwww.your-domain.com. Make sure your server serves the file for both hostnames. For example, both of these URLs must be accessible:http://aliyundoc.com/.well-known/pki-validation/fileauth.txthttp://www.aliyundoc.com/.well-known/pki-validation/fileauth.txt
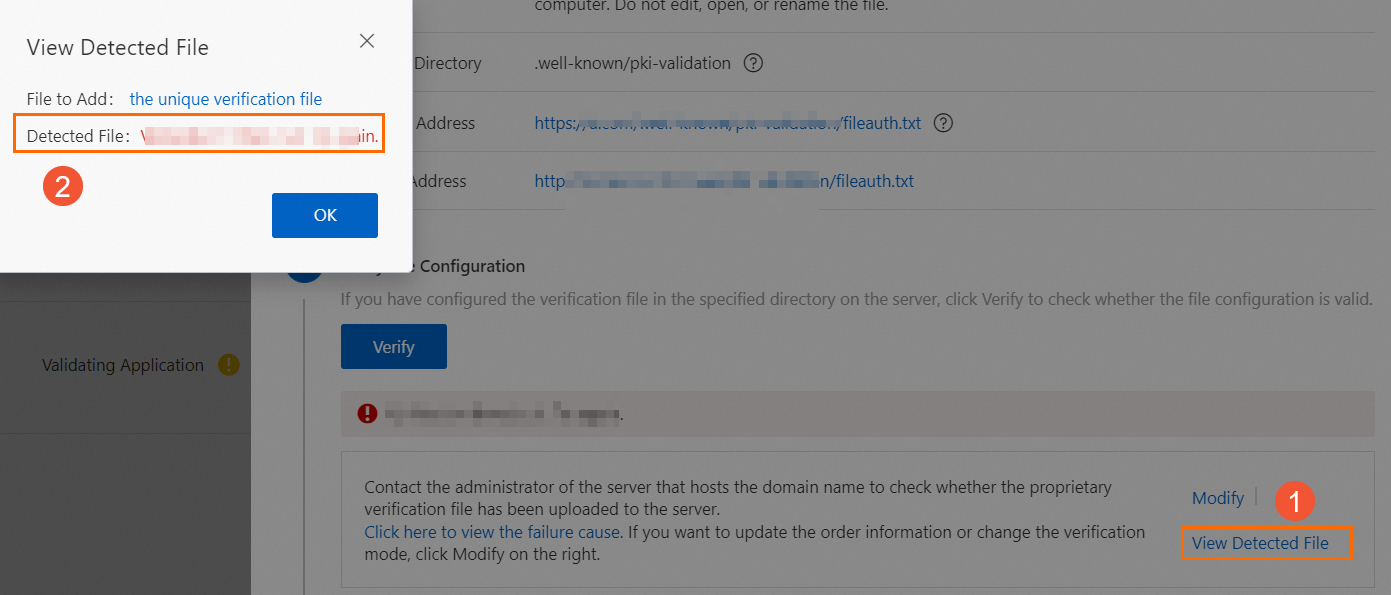
The verification file was opened, edited, or renamed. In the Verify Information panel, click View Detected File and compare its content with the latest verification file. If they differ, download and upload the verification file again, then retry verification.
The file is inaccessible over HTTPS. If your site uses HTTPS, the CA will attempt to access the file over a secure connection. Either ensure your HTTPS configuration serves the file correctly, or temporarily disable the HTTP-to-HTTPS redirect for the verification path.
A CDN is serving a stale or incorrect file. If you use a CDN, an edge node may be caching an old version of the file. Sync the verification file to CDN nodes outside China, or temporarily disable CDN acceleration for regions outside China. If you cannot update the CDN, click Cancel Application and switch to Manual DNS Verification.
The verification file has expired. The downloaded file is valid for only 3 days. Download a new verification file from the console and upload it to your server.