This topic describes how to use DataWorks Data Integration and Flink to write data from sharded MySQL databases and tables to a single Hologres table. This guide helps you choose the right method to write sharded MySQL data to Hologres based on your business scenario.
Background information
In many business scenarios, data synchronization requires more than just a few simple offline or real-time tasks. It often involves a combination of offline sync, real-time sync, and data processing tasks. This complexity makes configuration difficult—especially for MySQL sharding, where data from many upstream databases and tables must be written to a single Hologres table. Configuring multiple tasks for this process is complex and hard to maintain.
To solve these problems, the Data Integration sync task feature in Alibaba Cloud DataWorks offers a solution designed for business scenarios. It supports one-click synchronization from various data sources, which simplifies and accelerates data synchronization. Alibaba Cloud Flink also provides powerful real-time capabilities to ingest data into data warehouses and data lakes, enabling you to write data from multiple sources to Hologres quickly and easily.
Prerequisites
-
Activate Hologres. For more information, see Purchase a Hologres instance.
-
Create an RDS for MySQL instance. For more information, see (Deprecated, redirected to "Step 1") Quickly create an RDS for MySQL instance.
-
If you choose to use DataWorks for synchronization, activate DataWorks. For more information, see Activate DataWorks. You also need to purchase an exclusive resource group for Data Integration in DataWorks and configure the resources. For more information, see Use an exclusive resource group for Data Integration.
-
If you choose to use Flink for synchronization, activate Flink. For more information, see Activate Realtime Compute for Apache Flink.
Make sure the Alibaba Cloud services you activate are in the same region.
Synchronize sharded MySQL data to Hologres using DataWorks
Hologres is deeply integrated with DataWorks and provides a one-click solution to synchronize data from various data sources to Hologres. Follow these steps to synchronize data from sharded MySQL databases and tables to Hologres using this solution.
-
Prepare MySQL data
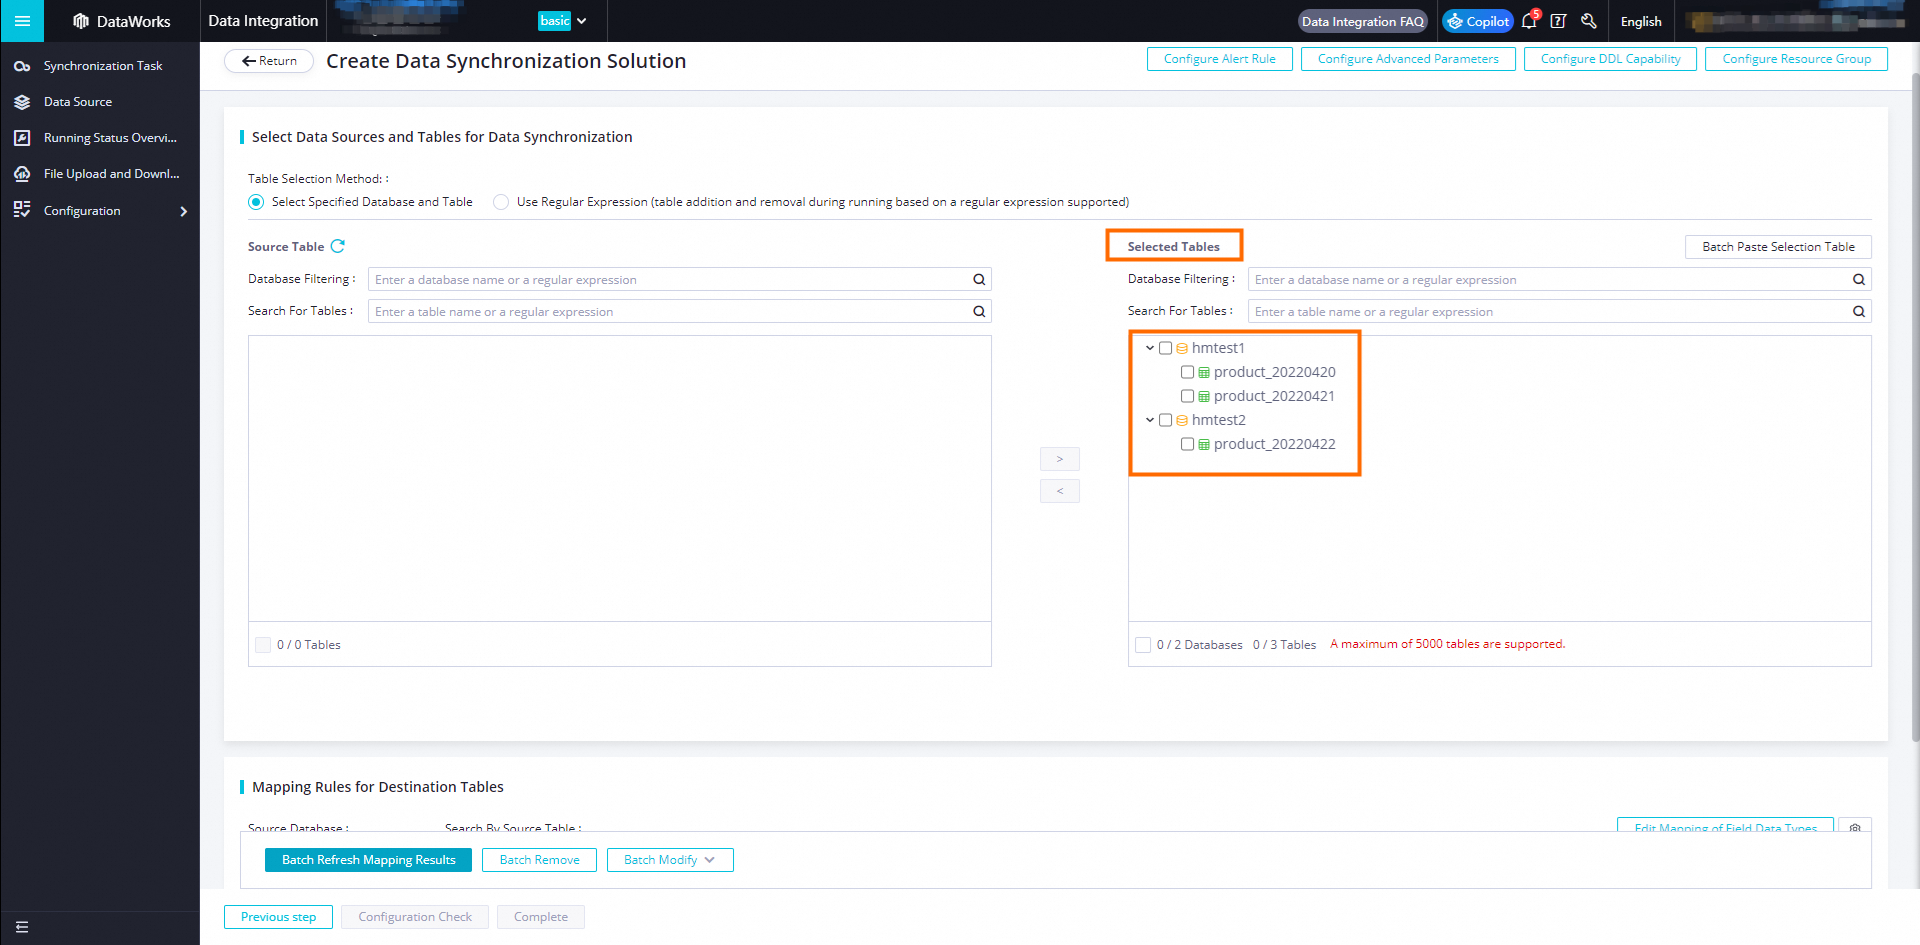
Before you start, prepare the sharded MySQL data. This example uses two databases and three tables as shown below.
Database name
Table name
hmtest1
product_20220420
hmtest1
product_20220421
hmtest2
product_20220422
The Data Definition Language (DDL) for the tables is shown below. The three tables have the same schema, but some data is duplicated across the tables.
CREATE TABLE product_20220420 ( value_id int8, attribute_id int8 not null, id_card int8, name text, potion text, ds text, PRIMARY KEY (`value_id`) ); -
Configure a one-click real-time sync task to Hologres
-
Create a one-click real-time sync task
-
In the navigation pane on the left of DataWorks Data Integration, select Sync Task to create a sync task. For more information, see Select a synchronization solution. Select MySQL as the data source and Hologres as the data destination.

-
Click Create Sync Task.
-
-
Configure the network connection for synchronization
-
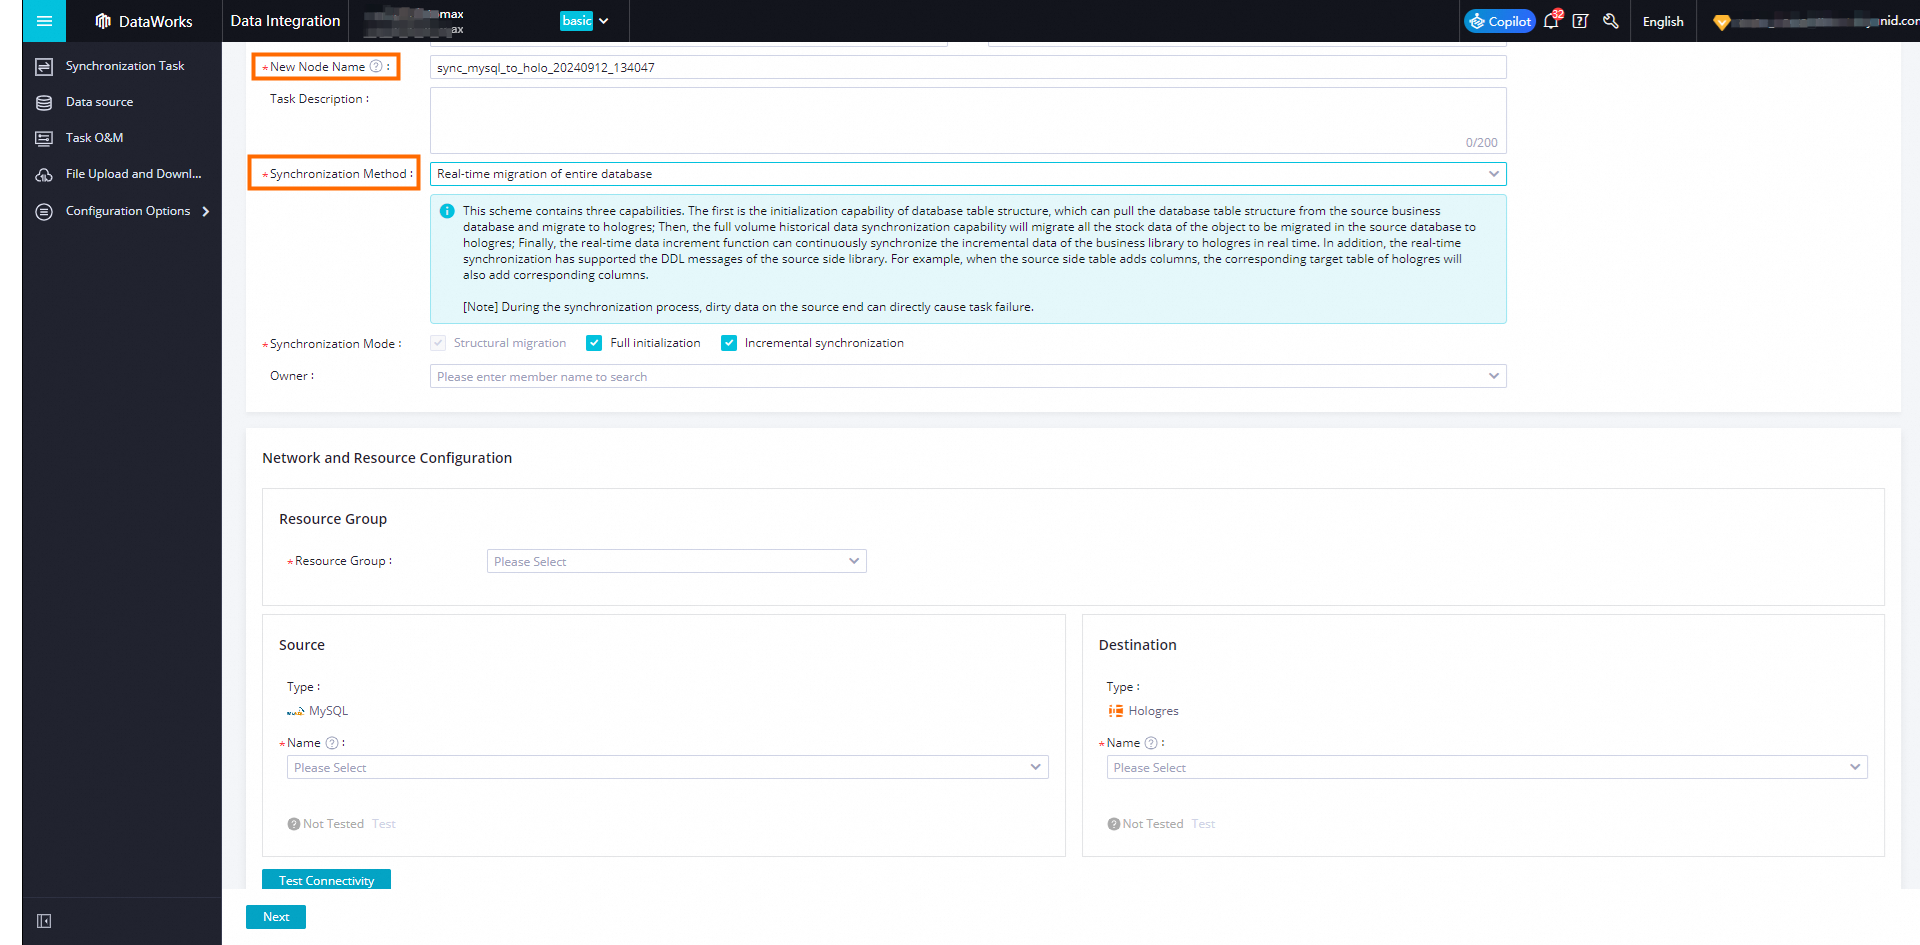
Configure the New Task Name.
-
Set Sync Type to Real-time synchronization for the entire database.
-
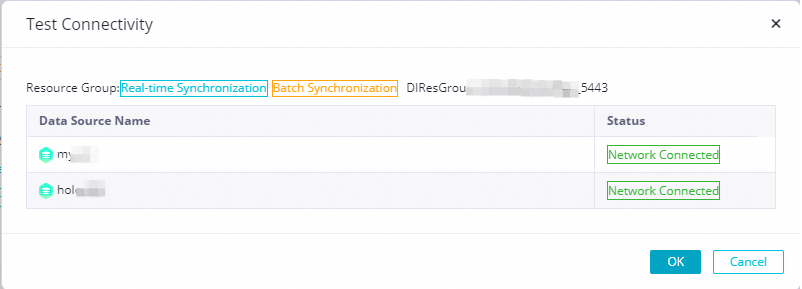
Select the resource group, the source data source name, and the destination data source name. Then, click Test All Connections.
If this is your first time, you need to create a new resource group and data source.
-
After the status for both the data source and data destination is Connected, click OK and then click Next.
-
-
Configure the synchronization source and rules
-
Basic configuration information, including the configuration name, source, time zone, and source table.
-
Set table name mapping rules.
-
If you have already created mapping tables in the Hologres database, select the corresponding table name in the Destination Table Name column and the corresponding schema in the Target Schema Name column for the source table you want to synchronize.

-
If you have not created mapping tables in the Hologres database, you can define new mapping tables using Customize Target Table Name Mapping. The system automatically creates the tables and completes the mapping.
-
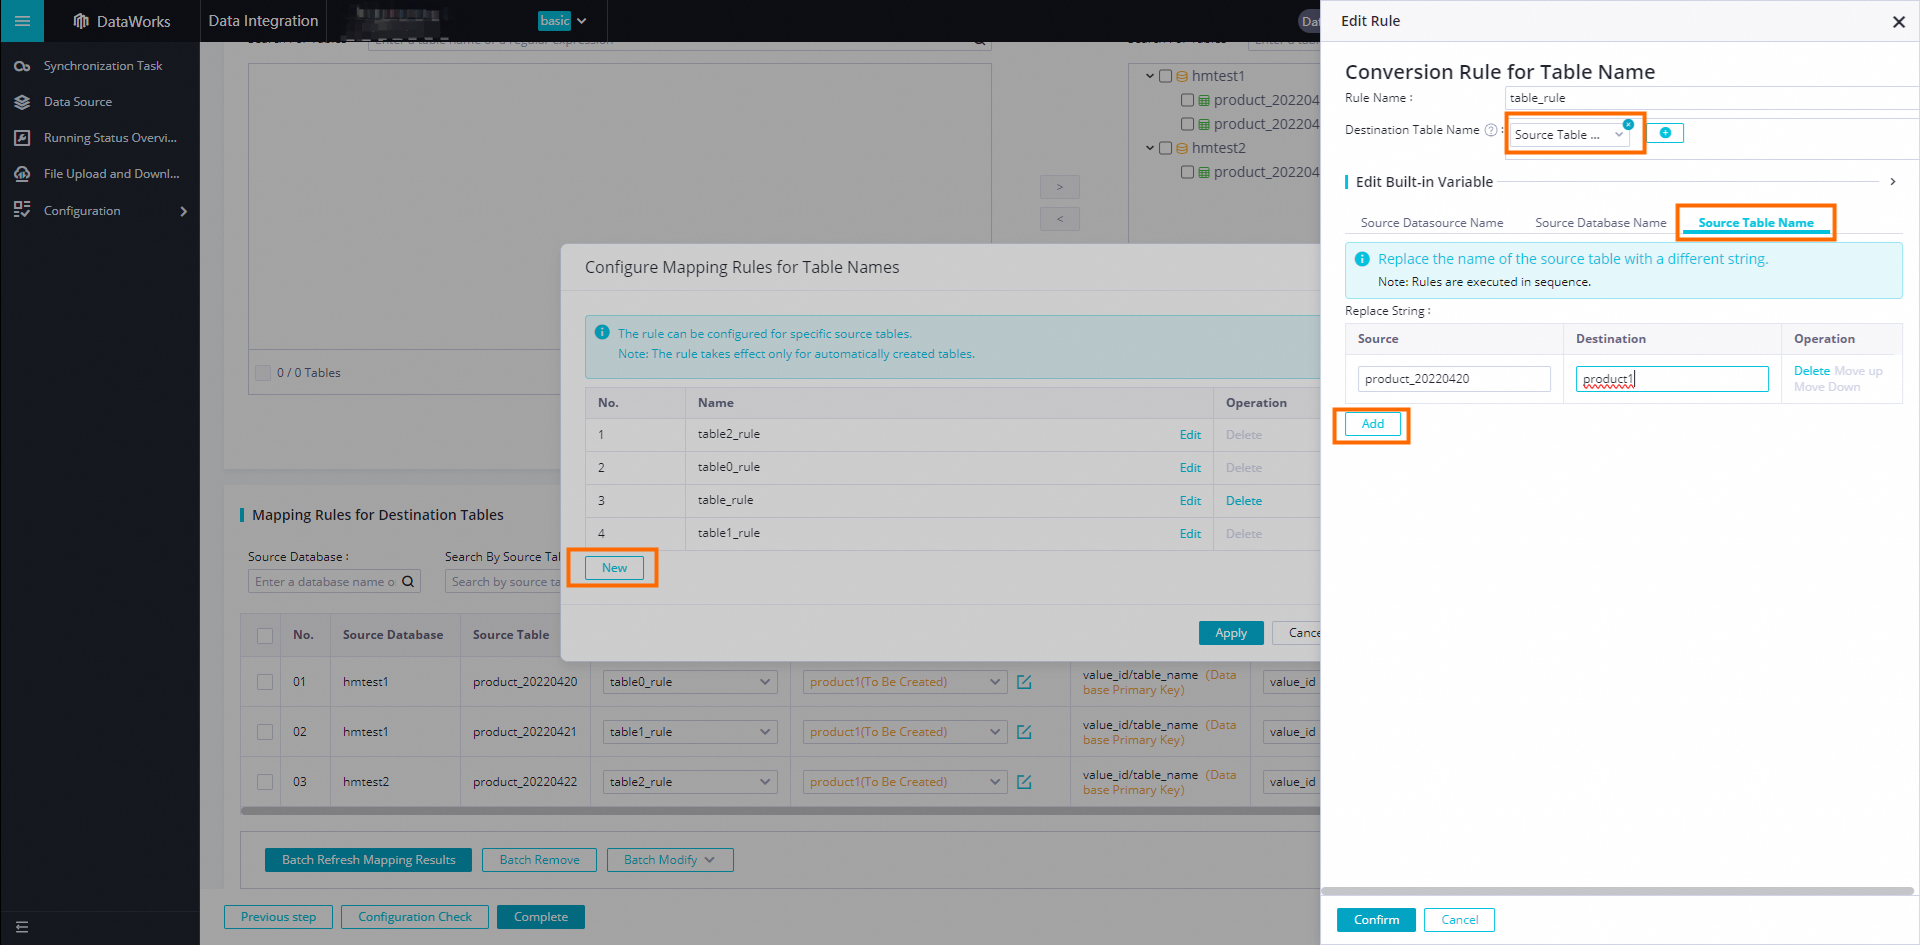
Click Edit to the right of Customize Target Table Name Mapping.
-
In the Design Table Name Mapping Rules dialog box, click Add.
-
In the Edit Rule dialog box, enter a custom Rule Name, select the Source Table Name, click Actions, enter the source table name in the Source field, and enter the new table name in the Target field.
-
Click OK to apply the rule. In the row for the source table, select the rule you defined and refresh the mapping. In the Target Schema Name column, select the corresponding schema.
-
-
-
-
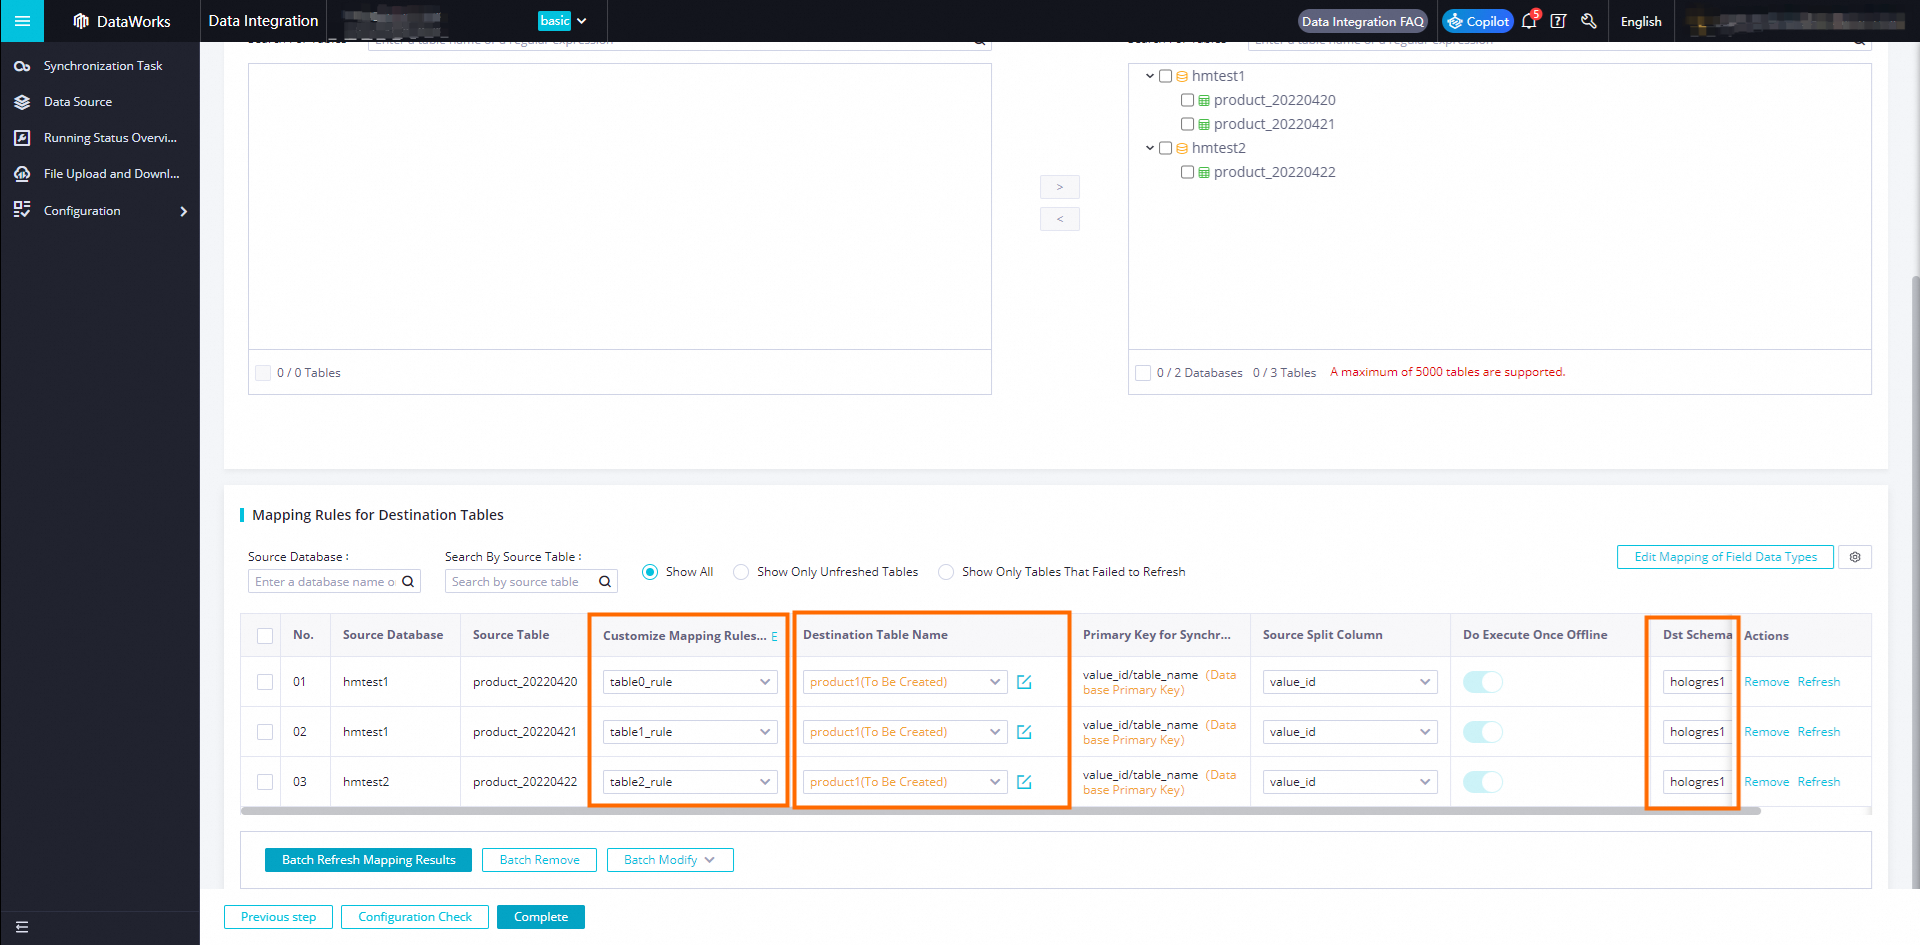
Configure the target table
-
Click Refresh Source and Hologres Table Mappings.
NoteThe mapping relationship shows the relationship between each upstream table and its target table. If the target table is the same for multiple source tables, it means they are all mapped to the same target table.
-
Add extra fields
To better distinguish the source of the upstream tables, add extra fields to the target table.
-
Select all tasks, click Batch Modify, and select Target Table Schema - Batch Modify and Add Fields.
-
In the Target Table Schema - Batch Modify and Add Fields dialog box, click Add Field to add two fields: db_name and table_name.
-
After adding the fields, click Apply and Refresh Mapping.
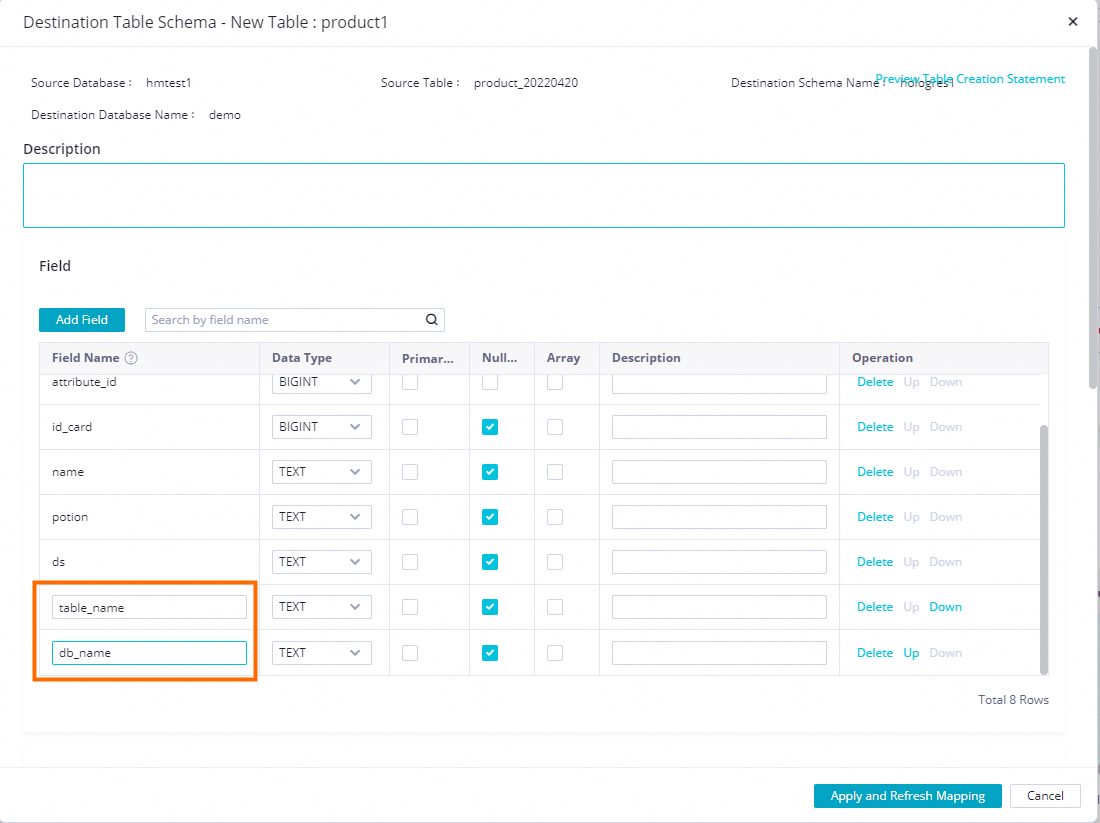
This example uses DB_NAME_SRC to represent the source database name and TABLE_NAME_SRC to represent the source table name.
-
(Optional) Set the extra fields as the primary key (PK)
If you have a large amount of upstream data and many tables, set the extra fields as part of a composite primary key with the source table's primary key. This prevents primary key conflicts from different source tables. Also, set the extra fields as the distribution key. This ensures that related data is written to the same shard, which improves performance.
-
Click
 to the right of Destination Table Name to open the SQL Table Creation Statement Preview dialog box.
-
Modify the table creation statement to add the extra column table_name as part of the primary key and distribution key.
Note-
We recommend adding the source table name `tablename` to the composite primary key. You can add more fields as needed.
-
You can also set more indexes for the table to improve performance. For more information, see CREATE TABLE.
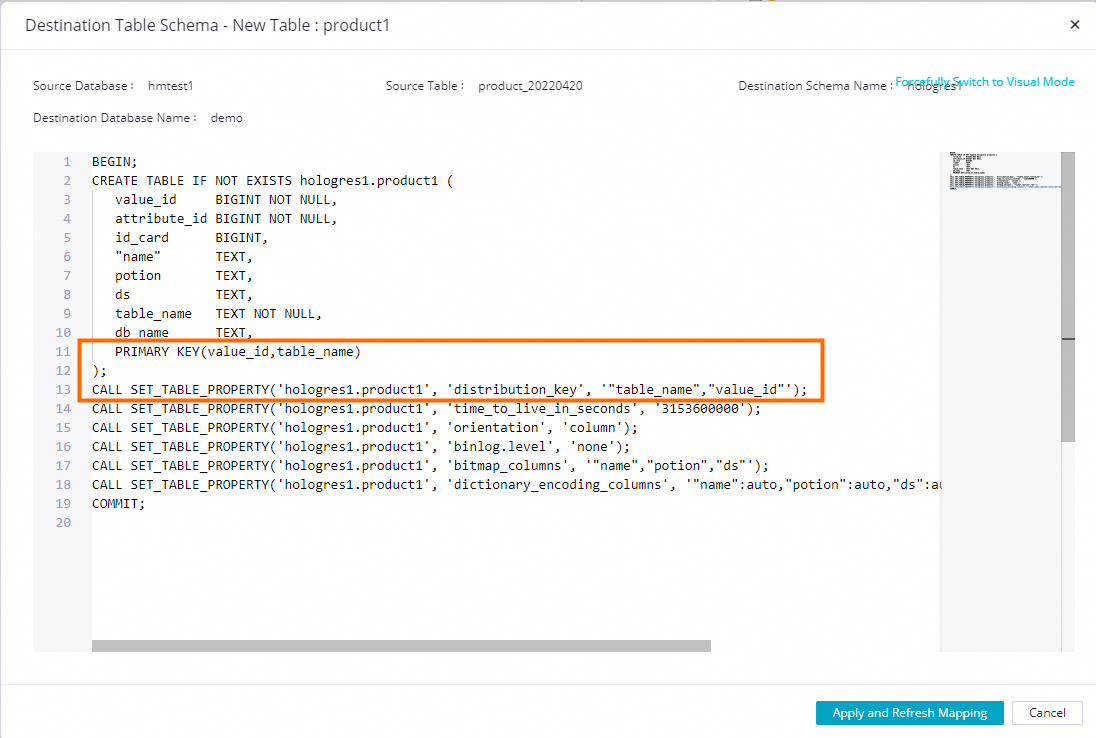
BEGIN; CREATE TABLE IF NOT EXISTS hologres1.product1 ( value_id BIGINT NOT NULL, attribute_id BIGINT NOT NULL, id_card BIGINT, "name" TEXT, potion TEXT, ds TEXT, table_name TEXT NOT NULL, db_name TEXT, PRIMARY KEY(value_id,table_name) ); CALL SET_TABLE_PROPERTY('hologres1.product1', 'distribution_key', '"table_name","value_id"'); CALL SET_TABLE_PROPERTY('hologres1.product1', 'time_to_live_in_seconds', '3153600000'); CALL SET_TABLE_PROPERTY('hologres1.product1', 'orientation', 'column'); CALL SET_TABLE_PROPERTY('hologres1.product1', 'binlog.level', 'none'); CALL SET_TABLE_PROPERTY('hologres1.product1', 'bitmap_columns', '"name","potion","ds"'); CALL SET_TABLE_PROPERTY('hologres1.product1', 'dictionary_encoding_columns', '"name":auto,"potion":auto,"ds":auto,"table_name":auto,"db_name":auto'); COMMIT; -
-
-
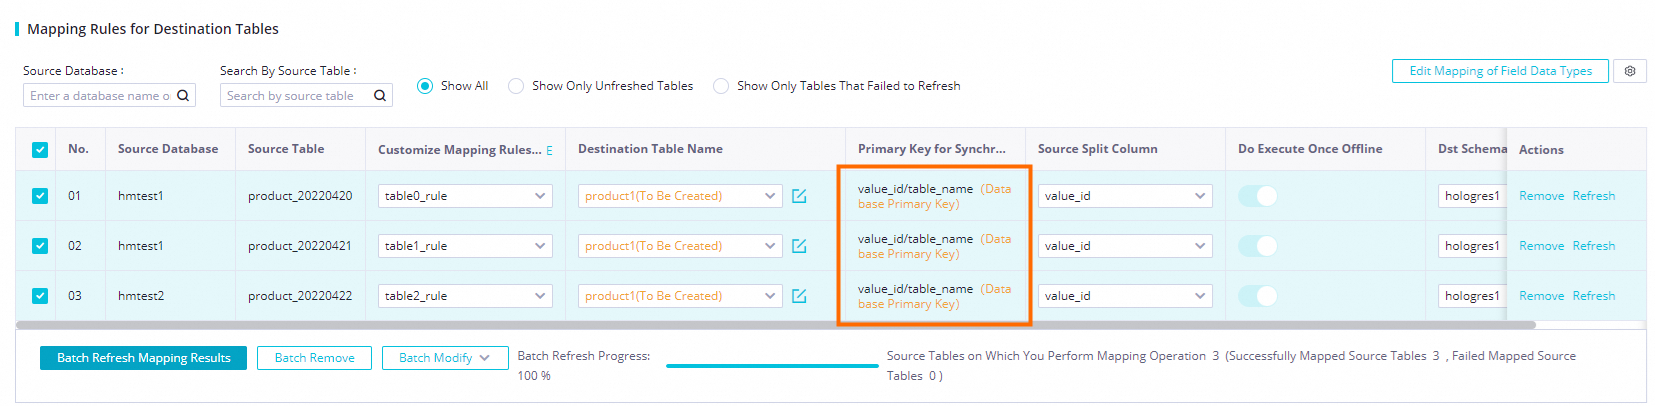
Click Apply and Refresh Mapping, as shown in the figure.
-
-
-
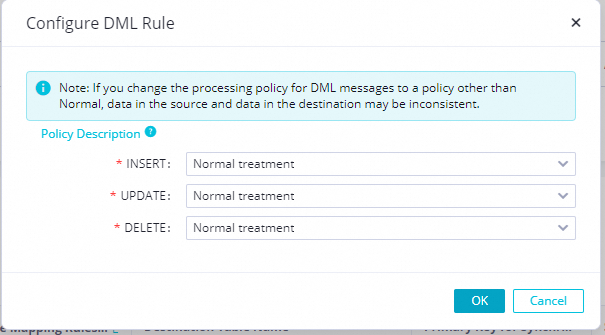
Set the DML policy
After you set the target table, configure the DML policy for the task. You can apply the policy to a single table or to multiple tables in a batch.
-
Select all tasks, click Batch Modify, and then select DML Rule Configuration.
-
In the DML Rule Configuration dialog box, set Processing Policy to Normal.
-
Click OK to complete the DML rule configuration.
-
-
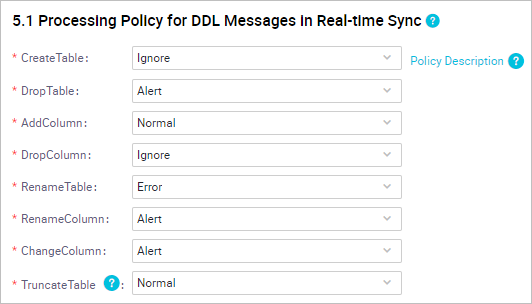
Configure DDL capabilities
-
Configure the DDL settings for the task as needed. The DDL message processing policy in this example is set as follows.
-
Click OK.
-
-
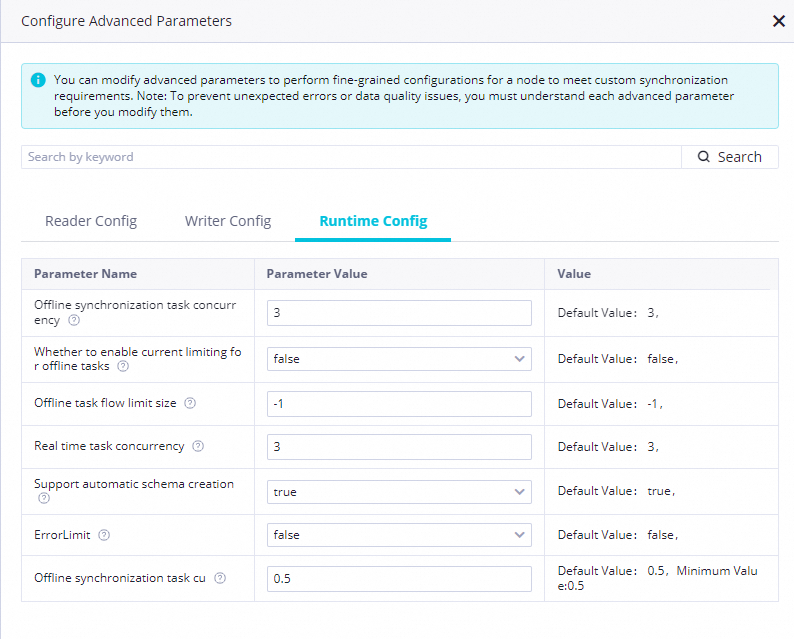
Advanced parameter settings
-
Configure advanced parameters as needed, including Read-side configuration, Write-side configuration, and Runtime configuration.
-
Click OK.
-
-
When you are finished, click Complete Configuration.
-
-
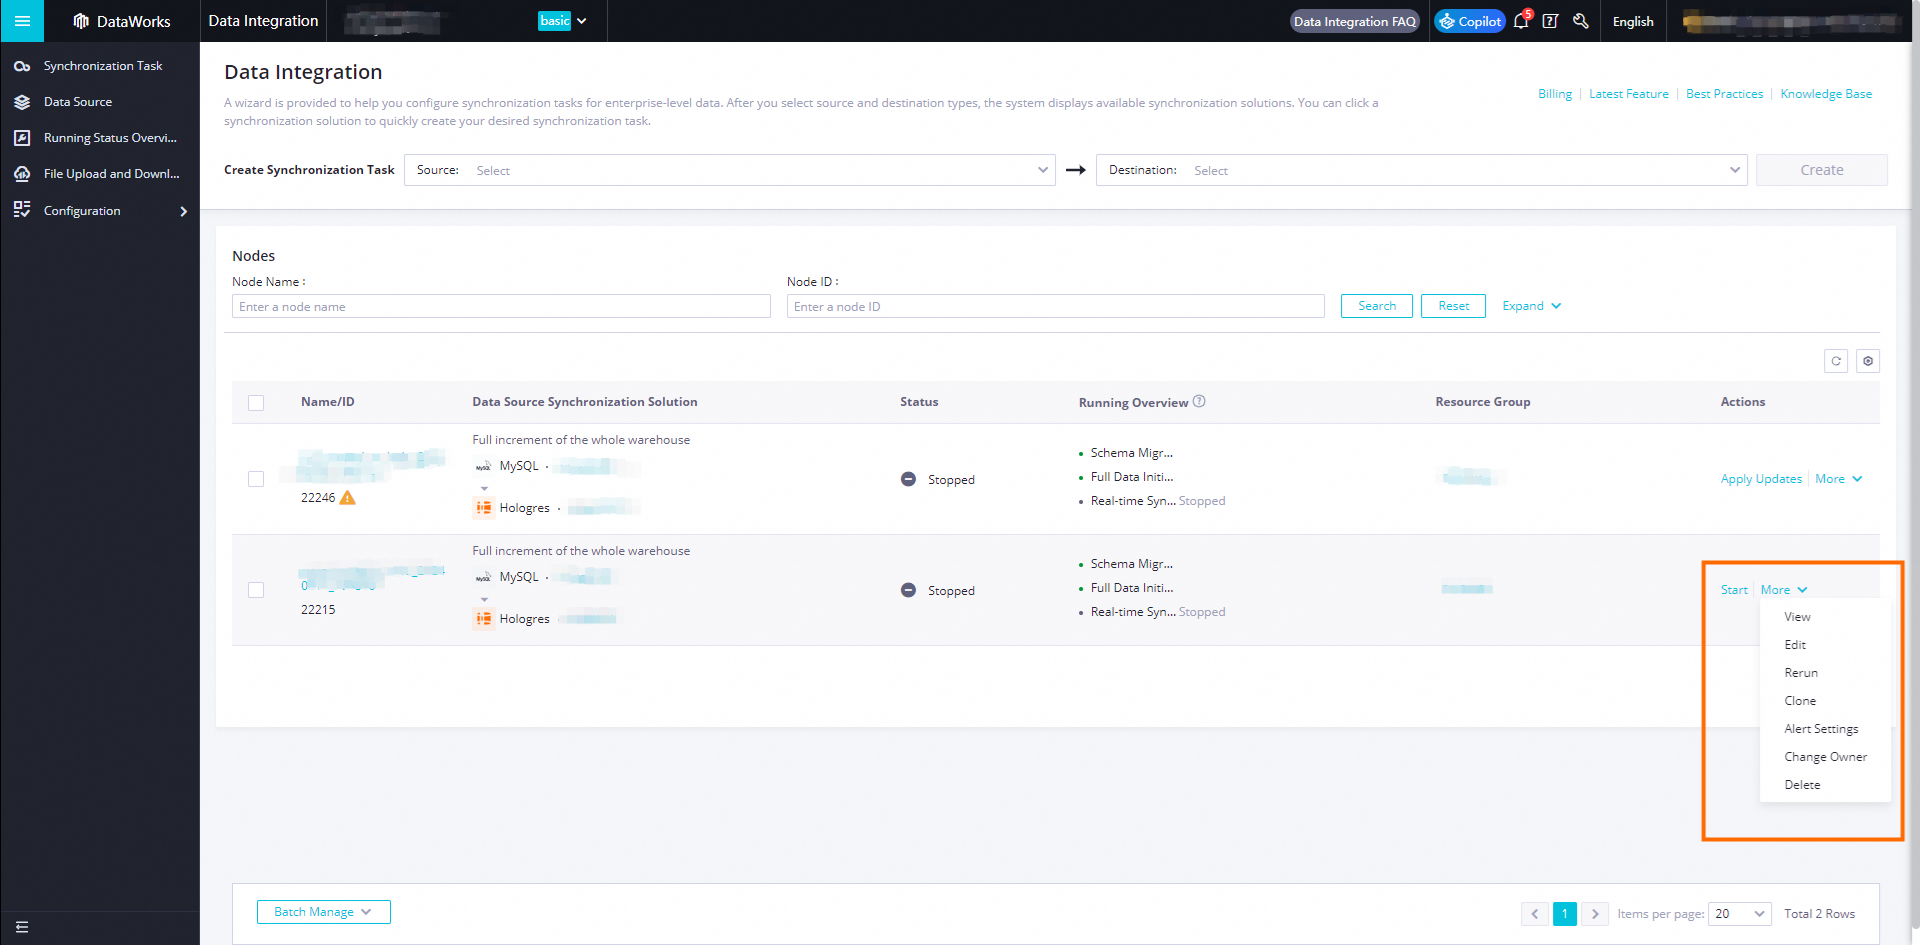
Run the job
After the configuration is complete, in the Actions column for the job, click Start. To view the running details, choose More > View.
-
Query data
The one-click solution first runs full data synchronization, then real-time sync. After the full offline task completes, query data in Hologres.
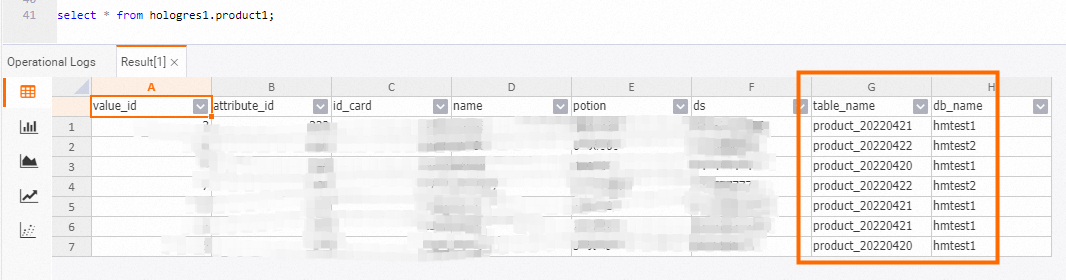
As shown in the example above, the additional columns contain data indicating the source database and table name. This shows that upstream sharding has been written into the same table in Hologres.
If incremental data is written to the source tables, the incremental data is synchronized to Hologres in real time. This example describes how to synchronize data from tables in sharded MySQL databases to a Hologres table using a synchronization task. You can configure a synchronization task to perform other synchronization operations as needed.
Synchronize sharded MySQL data to Hologres using Flink
For detailed instructions on how to synchronize data from sharded MySQL databases and tables to Hologres using Flink, see Quick Start for real-time data warehousing.