To produce videos with multiple bitrates, audio tracks, subtitles, or formats, you can create a workflow. A workflow lets you orchestrate a series of tasks that are executed in sequence based on preset steps and conditions. You can set up task nodes in the workflow for transcoding, analysis, snapshots, packaging, content moderation, media fingerprinting, and smart thumbnails.
Background information
A workflow is an orchestrated series of tasks. After you upload a file to a specified Object Storage Service (OSS) bucket, the workflow is automatically or manually triggered to execute jobs in sequence based on the preset steps and conditions. You can set up Transcoding, Analysis, Snapshot, Packaging, Content Moderation, Media Fingerprint, and Smart Thumbnail nodes in a workflow. You can combine these nodes to support common scenarios, such as multi-resolution transcoding, multi-language subtitle packaging, and HLS encryption.
To learn about the complete workflow process, see Use a workflow. This topic describes how to create a workflow in the console.
Prerequisites
Set an input bucket and an output bucket. For more information, see Add media buckets.
Enable the required MPS queue for the task type. For more information, see Create an MPS queue.
Optional: Create a template. If preset transcoding templates do not meet your business requirements, you can create a custom transcoding template. For more information, see Transcoding templates.
Procedure
After a workflow is created, it is automatically set to the Enabled state and the trigger mode is set to Auto. This means that when a new file is uploaded to the Input Path of the Input node, the workflow is automatically triggered if the file matches the trigger rules. This applies to all upload methods, such as uploading through OSS or the console. For more information about trigger rules, see File matching rules for a workflow.
Workflows also support Manual Triggering For New Files, which is recommended for M3U8 files from live recordings, and Manual Triggering For Historical Files. For more information, see What to do next in this topic.
Log on to the ApsaraVideo Media Processing console.
In the top menu bar, select a region.
In the navigation pane on the left, choose .
Click Create Workflow.
Configure the workflow parameters as needed.
Workflow Name: Enter a name for the workflow in the text box.
Configuration Plan: Select a configuration plan from the drop-down list. The following table describes the plans.
NoteApsaraVideo Media Processing provides several preset workflows for common scenarios. You can select a preset workflow and quickly edit it, or create a custom workflow.
Plan Name
Description
Custom
No preset information. Create a workflow from scratch.
M3U8
Takes a single thumbnail snapshot and converts the video to the M3U8 format.
Preset Intelligent Template Workflow
Takes a single thumbnail snapshot, transcodes the video based on an intelligent analysis of the video information, and then takes a snapshot of the transcoded standard definition (SD) video.
Multi-bitrate and Multi-format Workflow
Takes a single thumbnail snapshot and generates videos in multiple formats and at multiple bitrates.
Multi-bitrate FLV Workflow
Takes a single thumbnail snapshot and generates FLV videos at multiple bitrates.
Multi-bitrate M3U8 Workflow
Takes a single thumbnail snapshot and generates M3U8 videos at multiple bitrates.
Multi-bitrate MP4 Workflow
Takes a single thumbnail snapshot and generates MP4 videos at multiple bitrates.
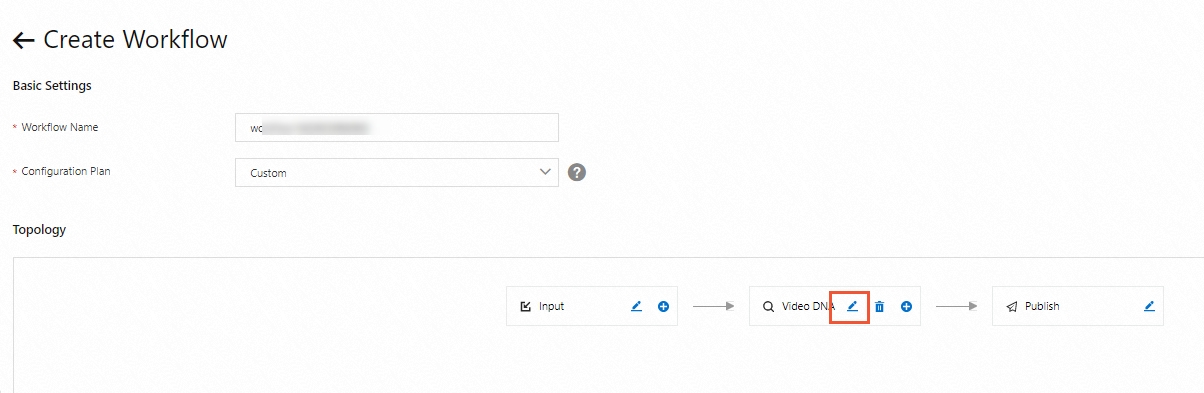
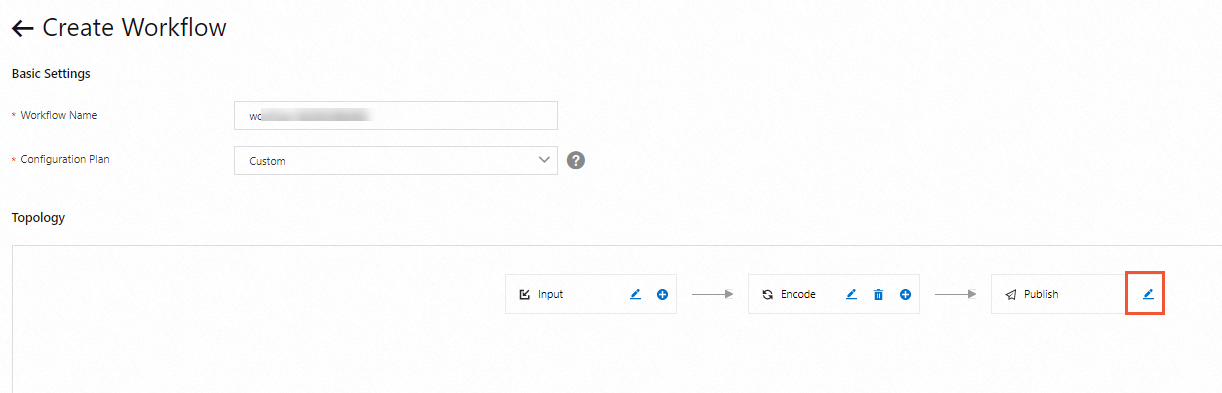
Edit the workflow topology. Add and configure nodes as needed. For more information about each node, see Node descriptions.
Click Save to create the workflow.
Node descriptions
You can add the following nodes when you create a workflow in the console:
The following table lists all workflow nodes in MPS. The nodes displayed in the console depend on the features supported in the current region. For more information about features available in each region, see Service regions.
Node Name | Node Description |
Input (Required) | Sets the input path and binds message notifications. |
Analysis | Intelligently analyzes the input file and recommends a suitable preset template. |
Transcoding | Transcodes a video file into a format suitable for playback on all platforms. |
Snapshot | Captures a frame at a specified time point to use as a video thumbnail or to generate a sprite. |
Packaging | Packages multiple subtitle, audio, and multi-bitrate video streams into a Master Playlist file. |
Content Moderation | Intelligently detects content such as pornography, terrorism, politically sensitive information, and other undesirable content in the video's audio, text, and visuals. This greatly reduces manual review costs and lowers compliance risks. |
Media Fingerprint | Uniquely identifies a video. It extracts and compares fingerprint features from the video's images and audio to find duplicate videos, trace video clips to their source, and identify original content. |
Publish (Required) | Sets the publishing mode to manual or automatic. |
Input node
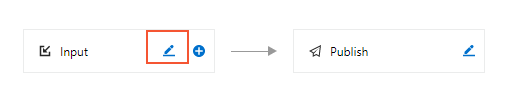
Click the pen icon next to the Input node to open the Input Settings page.
Set the input parameters.
Parameter
Description
Input Path
Click Select. From the Bucket drop-down list, select a bucket. The folders in the bucket are displayed under Path. Select a folder as the input path.
Transcoding Queue
Select a queue from the drop-down list.
(Optional) Message Notification
Click the switch to turn it on. Select a message queue or topic and specify the queue or topic instance.
NoteAfter you configure message notifications, a notification is sent to the specified topic or queue when a task in the workflow starts and when it is complete. For more information, see Configure message notifications.
Click OK to finish configuring the Input node.
Analysis node
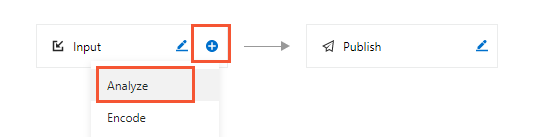
You can click the plus icon (+) next to an Input, Content Moderation, Media Fingerprint, or Smart Thumbnail node to add an Analysis node.
Click the plus icon (+) to the right of the relevant node and select the Analysis node from the drop-down list.
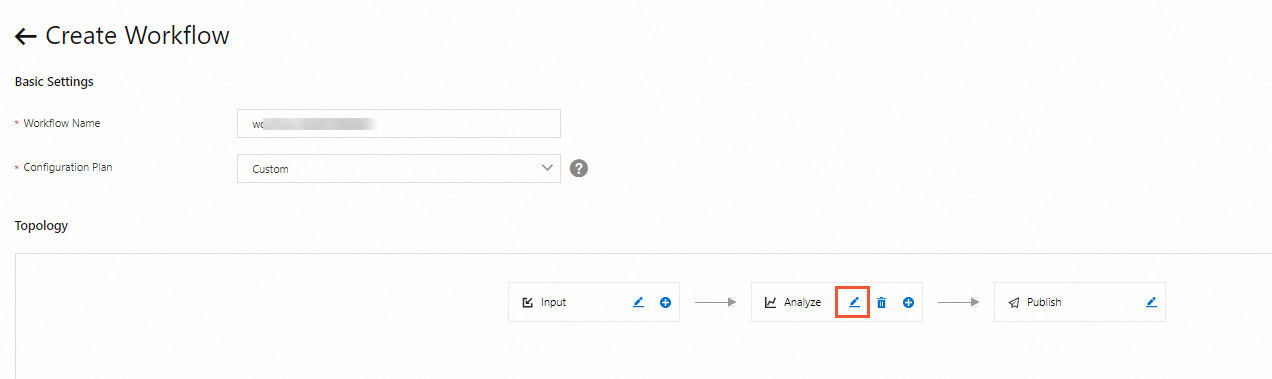
Click the pen icon next to the Analysis node to open the Analysis Configuration page.
Select a definition from the Conditional Transcoding drop-down list.
Click OK to finish configuring the Analysis node.
Transcoding node
You can click the plus icon (+) next to an Input, Content Moderation, or Media Fingerprint node to add a Transcoding node.
Click the plus icon (+) to the right of the relevant node and select the Transcoding node from the drop-down list.
Click the pen icon next to the Transcoding node to open the Basic Configuration page.

Set the transcoding parameters.
Parameter
Description
Name
Enter a name for this node in the text box.
Transcoding Template
Click Select. In the pop-up window, set the Transcoding Template.
Select a Template Type.
Select an Output Format.
Select a Template.
Click OK.
NoteFor more information about preset templates, see Preset template details. To create a custom template, see Transcoding templates.
Output Path
Click Select. From the Bucket drop-down list, select a bucket. The folders in the bucket are displayed under Path. Select a folder as the output path.
NoteIf the output path is the same as the input path:
If the files have different names, the output file does not overwrite the source file.
If the files have the same name, whether the source file is overwritten is determined by the OSS configuration. For information about how to prevent overwriting files with the same name, see Prevent objects with the same name from being overwritten (Java SDK). If you configure this setting, writing the transcoded file to OSS will fail. We recommend that you do not set the output file name to be the same as the source file name.
To prevent the output file from being overwritten when the workflow is executed multiple times, you can use a combination of the following system variables:
{RunId}: The execution ID of the media workflow.
{ObjectPrefix}: The source file path without the bucket information.
{FileName}: The source file name with its extension. The suffix is completed based on the format of the transcoding template.
{ExtName}: The file name extension of the source file.
(Optional) Watermark
Click the switch to turn it on.
Select a template name from the Watermark Template drop-down list.
NoteIf no watermark templates are in the drop-down list, create a watermark template.
To the right of Watermark Image, click Select to add the watermark image path.
NoteImage watermarks support PNG images, animated PNG images, and animated images in MOV format.
(Optional) Encryption
Click the switch to turn it on.
In the Encryption Method option, select Alibaba Cloud Private Encryption or HLS Standard Encryption. For more information about video encryption, see Video encryption.
(Optional) Clip
Click the switch to turn it on.
For Clip Method, select Video Clip or Ending Clip.
In the Clip Start Time text box, select a time.
In the Duration text box, select a time.
NoteThe clip start time must be less than the total duration of the video. Otherwise, the transcoding fails.
If the clip duration exceeds the remaining length of the video, the clip is captured until the end of the source video.
(Optional) Add Ending Clip
Click the switch to turn it on. To the right of File Path, click Select and choose the path of the video to add as a fixed ending clip.
(Optional) Rotation Angle
Enter the clockwise rotation angle. The value must be in the range of [0, 360].
Click OK to finish configuring the Transcoding node.
Snapshot node
You can click the plus icon (+) next to an Input, Transcoding, Content Moderation, Media Fingerprint, or Smart Thumbnail node to add a Snapshot node.
Click the plus icon (+) to the right of the relevant node and select the Snapshot node from the drop-down list.
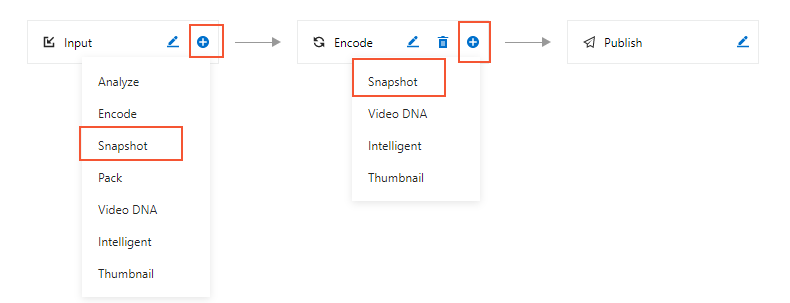
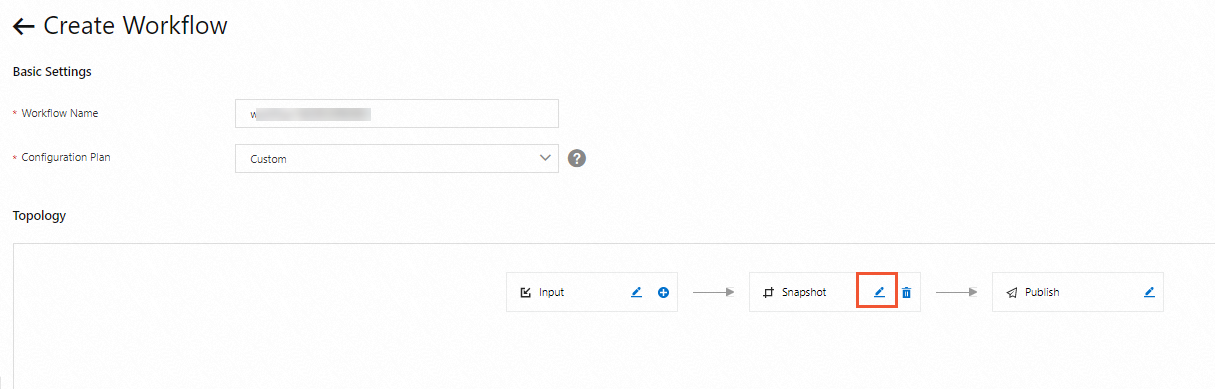
Click the pen icon next to the Snapshot node to open the Snapshot Configuration page.
Set the snapshot parameters.
Parameter
Required
Description
Snapshot Method
Required
Single Snapshot: Captures a video frame at a specific time point.
Multiple Snapshots: Captures multiple video frames at a specified interval. Each frame is a separate image file. This is also known as batch or sequential snapshots.
Average Snapshots: Evenly divides the video and captures a specified number of frames.
Snapshot Interval (s)
Required for multiple snapshots
Enter the snapshot interval in seconds in the text box.
Number Of Snapshots
Required for average snapshots
Enter the number of snapshots in the text box.
NoteIf you do not set the number of snapshots, snapshots are captured at the specified interval until the end of the video.
If the number of snapshots is greater than 1, snapshots are captured at the specified interval until the specified number of images is reached.
If you only set the number of snapshots, snapshots are captured at an interval equal to the total duration divided by the number of snapshots.
Name
Required
Enter a name for this node in the text box.
Output Path
Required
Click Select. From the Bucket drop-down list, select a bucket. The folders in the bucket are displayed under Path. Select a folder as the output path.
NoteSingle snapshot path format:
http://bucket.oss-cn-hangzhou.aliyuncs.com/path/{RunId}/{SnapshotTime}.jpg.Multiple/Average snapshot path format: Requires the {Count} placeholder. The path is
/{RunId}/{SnapshotTime}/{Count}.jpg.
Start Time
Optional
Select the time in hours, minutes, and seconds from the drop-down list.
Width × Height
Optional
Enter the width and height values in the text boxes.
NoteIf you do not set the width and height, the image size is the same as the video size.
If you set only the width or the height, the other dimension is scaled to maintain the video's aspect ratio and avoid image distortion.
Generate WebVTT Index File
Optional for multiple and average snapshots
Click the switch to turn it on. This generates a WebVTT index file.
Set As Thumbnail
Optional
Click the switch to turn it on. The captured image is automatically set as the thumbnail for the media asset in the Media Library. If multiple images are captured, the first one is set as the thumbnail by default.
Keyframe
Optional
Click the switch to turn it on. If the snapshot type is keyframe, only keyframes are captured. If the specified time point is not a keyframe, the nearest keyframe is selected.
Black Screen Detection
Optional for multiple and average snapshots
Click the switch to turn it on. This detects the first 5 seconds of the video. If a non-black screen frame exists within the first 5 seconds, the first non-black screen frame is captured.
Packaging node
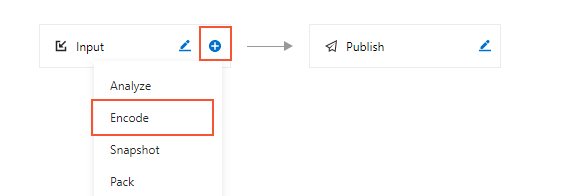
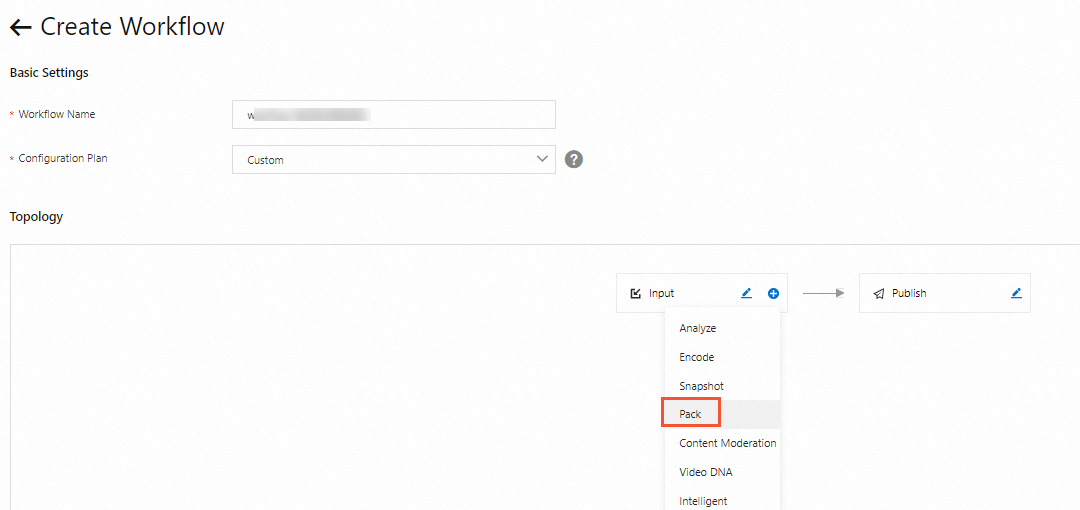
You can add this node only by clicking the plus icon (+) next to the Input node.
Click the plus icon (+) to the right of the Input node and select the Packaging node from the drop-down list.
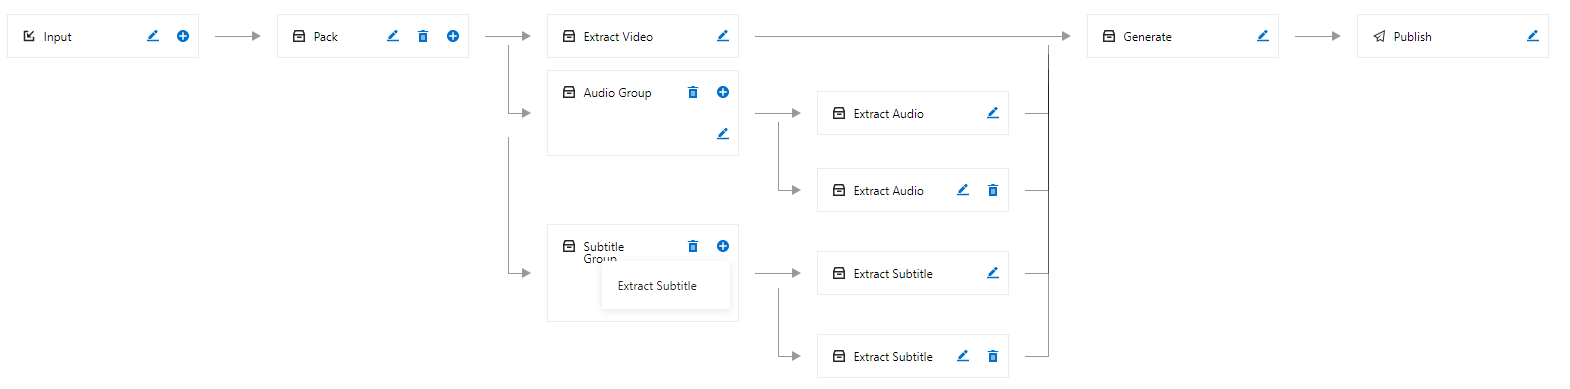
The Packaging node is divided into the following three child nodes:
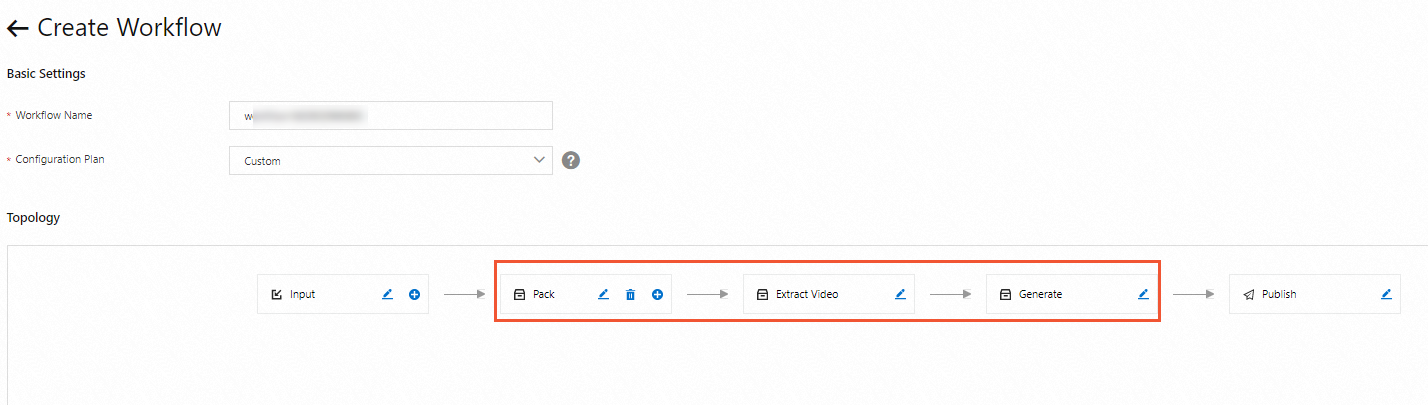
By default, three child nodes are added: Packaging Configuration, Video Extraction, and Packaging Generation. Follow the instructions below to add more child nodes for multi-stream packaging.
To create multiple bitrates: Click the plus icon (+) next to the Packaging Configuration node and select the Video Extraction node.
To create multiple audio tracks: Click the plus icon (+) next to the Packaging Configuration node and select the Audio Group node. Then, click the plus icon (+) next to the Audio Group node and select the Audio Extraction node.
To create multiple subtitles: Click the plus icon (+) next to the Packaging Configuration node and select the Subtitle Group node. Then, click the plus icon (+) next to the Subtitle Group node and select the Caption Extraction node.
Click the pen icon next to Packaging Configuration to open the configuration page. The following sections describe the configurations for each child node.
Packaging configuration
Parameter
Description
Packaging Name
Enter a name for this node in the text box.
Packaging Type
The default value is HLS.
Output Bucket
Automatically displayed after you select an input path.
Output Path
Click Select. In the Bucket drop-down list, select a bucket. The folders in the bucket are displayed under Path. Select a folder as the output path.
Video extraction
Parameter
Description
Name
Enter a name for this node in the text box.
Transcoding Template
Click Select and choose a transcoding template.
NoteFor more information about preset transcoding templates, see Preset template details. To set a custom transcoding template, see Transcoding templates.
Resource Path
We recommend that you use the default value. You can also modify it as needed.
NoteIf the output path of the Packaging Configuration node is a/b/c.m3u8 and the resource path of the Video Extraction node is d/e/f.m3u8, the actual storage location of the extracted file is a/b/d/e/f.m3u8.
(Optional) Watermark
Click the switch to turn it on.
Select a template name from the Watermark Template drop-down list. To create a watermark template, see Watermark templates.
To the right of Watermark Image, click Select to add the watermark image path.
NoteImage watermarks support PNG images, animated PNG images, and animated images in MOV format.
(Optional) Encryption
Turn on the switch and set Encryption Method to Alibaba Cloud proprietary cryptography or HLS encryption. For more information about video encryption, see Video encryption.
(Optional) Clip
Click the switch to turn it on.
For Clip Method, select Video Clip or Ending Clip.
In the Clip Start Time text box, select a time.
In the Duration text box, select a time.
NoteThe clip start time must be less than the total duration of the video. Otherwise, the transcoding fails.
If the clip duration exceeds the remaining length of the video, the clip is captured until the end of the source video.
(Optional) Add Ending Clip
Click the switch to turn it on. To the right of File Path, click Select and choose the path of the video to add as a fixed ending clip.
(Optional) Rotation Angle
Enter the clockwise rotation angle in the text box. The value must be in the range of [0, 360].
Packaging generation
Parameter
Description
Network Bandwidth
Set a suitable bandwidth value for the playback of this video stream.
Audio Group
Attach a created audio group to this video stream.
Subtitle Group
Attach a created subtitle group to this video stream.
Audio group and audio extraction
Child Node
Parameter
Description
Audio Group
Name
Enter a name for this audio group in the text box.
Audio Extraction
Name
Enter a name for this node in the text box.
Transcoding Template
Click Select. In the pop-up window, set the Transcoding Template.
NoteFor more information about preset transcoding templates, see Preset template details. To set a custom transcoding template, see Transcoding templates.
Resource Path
We recommend that you use the default value. You can also modify it as needed.
NoteIf the output path of the Packaging Configuration node is a/b/c.m3u8 and the resource path of the Video Extraction node is d/e/f.m3u8, the actual storage location of the extracted file is a/b/d/e/f.m3u8.
Audio Track Name
Enter a name for the audio track in the text box.
Extract Audio Track
Enter the ordinal number of the audio track to extract from the input file in the text box.
Audio Track Language
Select the corresponding language from the drop-down list.
Subtitle group and caption extraction
Child Node
Parameter
Description
Subtitle Group
Name
Enter a name for this subtitle group in the text box.
Caption Extraction
Name
Enter a name for this node in the text box.
Subtitle Upload URI
Click Select. In the Bucket drop-down list, select a bucket. The folders in the bucket are displayed under Path. Select a file as the input caption path. STL, TTML, and VTT formats are supported for input captions.
Resource Path
We recommend that you use the default value. You can also modify it as needed.
NoteIf the output path of the Packaging Configuration node is a/b/c.m3u8 and the resource path of the Video Extraction node is d/e/f.m3u8, the actual storage location of the extracted file is a/b/d/e/f.m3u8.
Subtitle Name
Enter a name for the caption in the text box.
Subtitle Language
Select the corresponding language from the drop-down list.
Click OK to finish configuring each node.
Content Moderation node
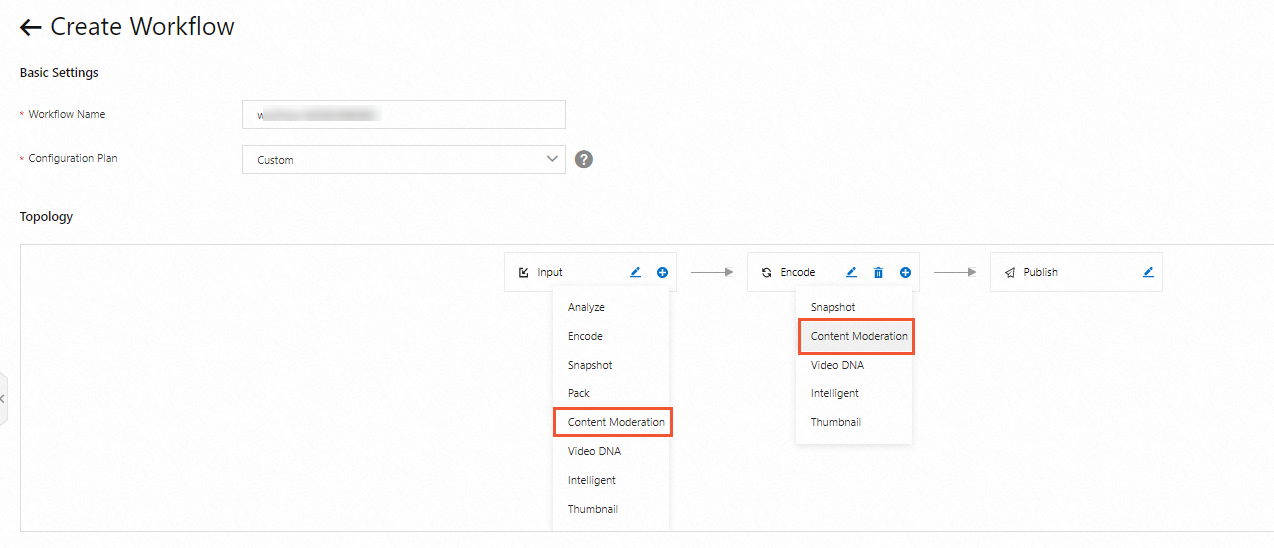
The Content Moderation node is supported only in the China (Beijing), China (Shanghai), and Singapore regions. You can click the plus icon (+) next to an Input or Transcoding node to add a Content Moderation node.
Click the plus icon (+) to the right of the relevant node and select the Content Moderation node from the drop-down list.
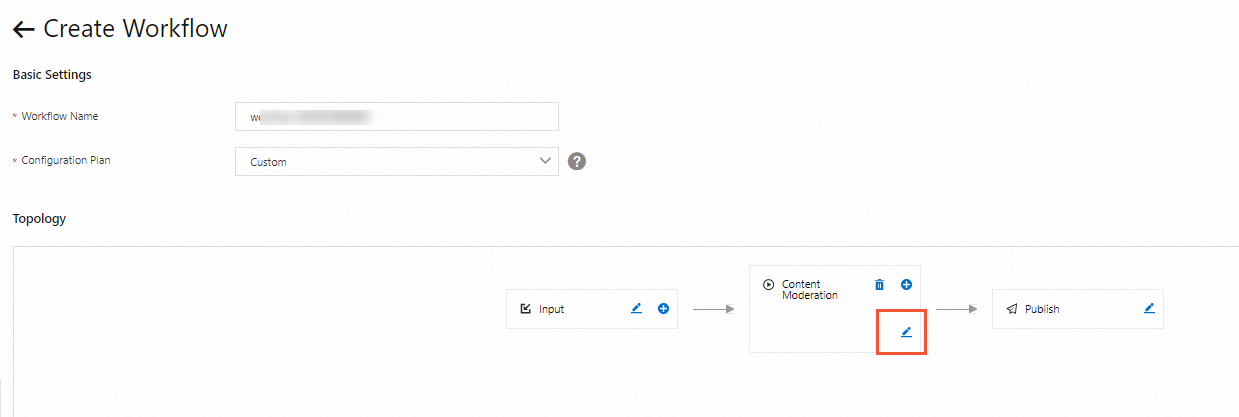
Click the pen icon next to the Content Moderation node to open the Content Moderation Configuration page.
Set the content moderation parameters.
Parameter
Description
Content Moderation Queue
Select a queue from the drop-down list.
NoteIf no queue is available in the Content Moderation Queue drop-down list, first enable a dedicated content moderation queue. For more information, see Create an MPS queue.
Output Path
Click Select. In the Bucket drop-down list, select a bucket. The folders in the bucket are displayed under Path. Select a folder as the output path.
NoteIf the output path is the same as the input path:
If the files have different names, the output file does not overwrite the source file.
If the files have the same name, whether the source file is overwritten is determined by the OSS configuration. For information about how to prevent overwriting files with the same name, see Prevent objects with the same name from being overwritten (Java SDK). If you configure this setting, writing the transcoded file to OSS will fail. We recommend that you do not set the output file name to be the same as the source file name.
To prevent the output file from being overwritten when the workflow is executed multiple times, you can use a combination of the following system variables:
{RunId}: The execution ID of the media workflow.
{ObjectPrefix}: The source file path without the bucket information.
{FileName}: The source file name with its extension. The suffix is completed based on the format of the transcoding template.
{ExtName}: The file name extension of the source file.
Terminate Workflow
You can decide whether to stop the workflow based on the moderation result. The options are:
Do not stop the workflow
Stop the workflow if the moderation result is "Manual Review" or "Block"
Stop the workflow if the moderation result is "Block"
Click OK to finish configuring the Content Moderation node.
Media Fingerprint node
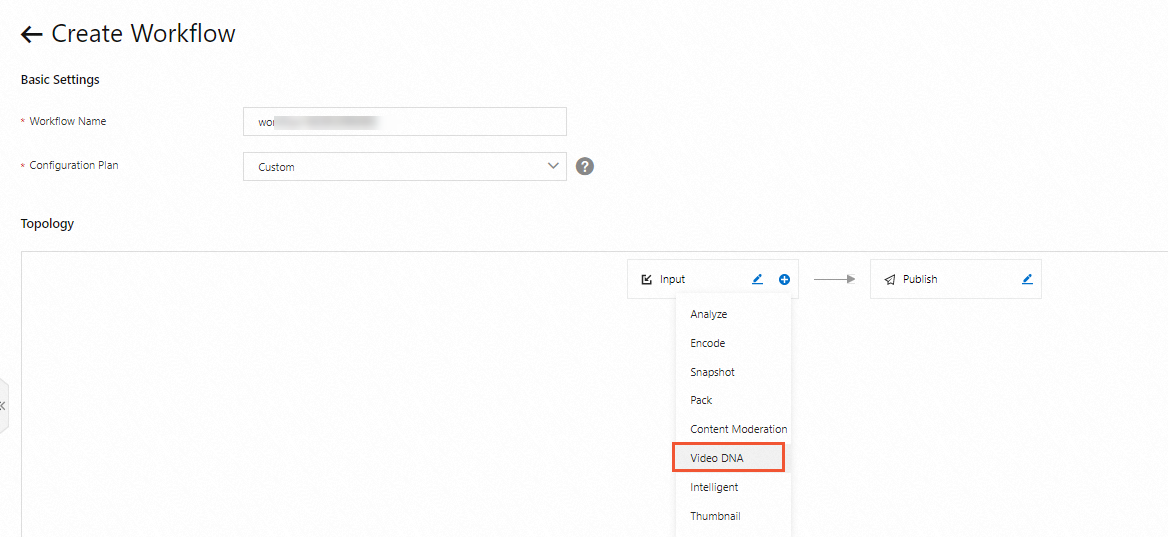
The Media Fingerprint node is supported only in the China (Beijing), China (Hangzhou), China (Shanghai), and Singapore regions. You can click the plus icon (+) next to an Input or Transcoding node to add a Media Fingerprint node.
Click the plus icon (+) to the right of the relevant node and select the Media Fingerprint node from the drop-down list.
Click the pen icon next to the Media Fingerprint node to open the Media Fingerprint Configuration page.
Set the media fingerprint parameters.
Parameter
Description
Media Fingerprint Queue
Select the pipeline from the drop-down list.
NoteIf no queue is available in the Media Fingerprint Queue drop-down list, first enable a dedicated media fingerprint queue. For more information, see Create an MPS queue.
Library Entry Rule
Add Unique Content Only: Only fingerprints of unique videos are saved to the media fingerprint library. Fingerprints of duplicate videos are not added.
Do Not Add Any Video: Videos are only compared, and their fingerprints are not saved.
Terminate Workflow
You can decide whether to stop the workflow based on the processing result. The options are:
Do not stop the workflow
Stop the workflow if the video is a duplicate
Click OK to finish configuring the Media Fingerprint node.
Smart Thumbnail node
The Smart Thumbnail node is supported only in the China (Beijing), China (Shanghai), and Singapore regions. You can click the plus icon (+) next to an Input or Transcoding node to add a Smart Thumbnail node.
Click the plus icon (+) to the right of the relevant node and select the Smart Thumbnail node from the drop-down list.
Click the pen icon next to the Smart Thumbnail node to open the Smart Thumbnail page.
Set the smart thumbnail parameters.
Parameter
Description
Name
Enter a name for the thumbnail in the text box.
Smart Thumbnail Queue
Select a queue from the drop-down list.
NoteIf the Smart Thumbnail Pipeline drop-down list is empty, you must first enable a smart thumbnail pipeline. For more information, see Create a pipeline.
Output Path
Click Select. In the Bucket drop-down list, select a bucket. The folders in the bucket are displayed under Path. Select a folder as the output path.
NoteIf the output path is the same as the input path:
If the files have different names, the output file does not overwrite the source file.
If the files have the same name, whether the source file is overwritten is determined by the OSS configuration. For information about how to prevent overwriting files with the same name, see Prevent objects with the same name from being overwritten (Java SDK). If you configure this setting, writing the transcoded file to OSS will fail. We recommend that you do not set the output file name to be the same as the source file name.
To prevent the output file from being overwritten when the workflow is executed multiple times, you can use a combination of the following system variables:
{RunId}: The execution ID of the media workflow.
{ObjectPrefix}: The source file path without the bucket information.
{FileName}: The source file name with its extension. The suffix is completed based on the format of the transcoding template.
{ExtName}: The file name extension of the source file.
(Optional) Set As Thumbnail
Click the switch to turn it on. This sets the image as the thumbnail.
Click OK to finish configuring the Smart Thumbnail node.
Publish node
Click the pen icon next to the Publish node to open the Publish Settings page.
Set the publishing parameters.
Parameter
Description
Media Publish Type
Select the publishing method for the media after the workflow task is complete.
Manual publish: After the workflow is successfully executed, the media status is set to unpublished. You can then publish the media manually. To manually publish a media file, see Manage media assets.
Auto publish: After the workflow is successfully executed, the media status is set to published.
NoteThe publishing status affects the access permissions of the output file.
Unpublished: The access permissions for video, audio, and snapshot files are private.
Published: The access permissions for video, audio, and snapshot files are inherited from the bucket where they are stored.
Click OK to finish configuring the Publish node.
What to do next
For M3U8 files from live recordings, if you call the OSS PutObject operation multiple times to update the M3U8 file during the recording, the workflow is triggered multiple times. To avoid repeated triggers, set the workflow to be manually triggered. Then, call the AddMedia API operation to trigger the workflow after the M3U8 file is finalized. Alternatively, you can set the workflow to be automatically triggered, but you must upload the M3U8 file to OSS in a single operation after the entire live recording is complete.
After a workflow is created, it is automatically set to the Enabled state and the trigger mode is set to Auto. This means that when a new file is uploaded to the Input Path of the Input node, the workflow is automatically triggered if the file matches the trigger rules. This applies to all upload methods, such as uploading through OSS or the console. To upload a file, see Upload videos. For more information about trigger rules, see File matching rules for a workflow.
If you want to manually trigger a workflow for new files:
Call the UpdateMediaWorkflowTriggerMode API operation and set the TriggerMode parameter to NotInAuto to disable automatic triggering for an existing workflow. Alternatively, call the AddMediaWorkflow API operation and set the TriggerMode parameter to NotInAuto to create a new workflow that does not trigger automatically.
When you need to trigger the workflow, call the AddMedia API operation to submit a new media job.
If you want to trigger a workflow for existing files, call the AddMedia API operation to submit a new media job.
If you want to edit or deactivate a workflow, see Edit a workflow.