If you want to migrate full or incremental data from a self-managed Elasticsearch cluster to an Alibaba Cloud Elasticsearch cluster, you can deploy a self-managed Logstash cluster on Elastic Compute Service (ECS) instances and use the pipeline configuration feature of Logstash to migrate the data. This topic describes the migration procedure in detail. In this example, the self-managed Elasticsearch cluster and Logstash cluster are deployed on the same ECS instance.
Precautions
The ECS instance that hosts the self-managed Logstash cluster must reside in the same virtual private cloud (VPC) as the Alibaba Cloud Elasticsearch cluster. In addition, you must make sure that the Logstash cluster can connect to both the self-managed Elasticsearch cluster and the Alibaba Cloud Elasticsearch cluster.
Both full data migration and incremental data migration are supported. If data writes or updates occur at all time on the business side, you must perform full data migration when you migrate data from your self-managed Elasticsearch cluster for the first time. Then, you can perform incremental data migration based on the related time field or the field that can be used to identify incremental data. Otherwise, new data may be overwritten by old data in the destination cluster. If full data already exists in the destination cluster, you can perform only incremental data migration based on the related field.
Procedure
Create an Alibaba Cloud Elasticsearch cluster, deploy a self-managed Elasticsearch cluster on an ECS instance, prepare the data that you want to migrate in the self-managed Elasticsearch cluster, and deploy a self-managed Logstash cluster on the ECS instance.
Step 2: (Optional) Migrate the metadata of indexes in the self-managed Elasticsearch cluster
Run a Python script on the ECS instance to migrate the metadata of indexes in the self-managed Elasticsearch cluster.
Configure a pipeline in the self-managed Logstash cluster to migrate full data from the self-managed Elasticsearch cluster to the Alibaba Cloud Elasticsearch cluster.
Step 1: Make preparations
Create an Alibaba Cloud Elasticsearch cluster.
For more information, see Create an Alibaba Cloud Elasticsearch cluster. The following table describes the configurations of the Alibaba Cloud Elasticsearch cluster used in this example.
Configuration item
Description
Region
China (Hangzhou).
Edition and version
V7.10.0 of the Standard Edition.
Specifications
Three zones and three data nodes. Specifications of a single data node: 4 vCPUs, 16 GiB of memory, and an enhanced SSD (ESSD) with 100 GiB of storage space.
Create an ECS instance, which is used to deploy a self-managed Elasticsearch cluster, the self-managed Kibana service, and a self-managed Logstash cluster.
For more information, see Create an instance on the Custom Launch tab. The following table describes the configurations of the Alibaba Cloud Elasticsearch cluster used in this example.
Configuration item
Description
Region
China (Hangzhou).
Specifications
4 vCPUs and 16 GiB of memory.
Image
Public image: CentOS 7.9 64-bit.
Storage
System disk: an ESSD with 100 GiB of storage space.
Network
The ECS instance resides in the same VPC as the Alibaba Cloud Elasticsearch cluster, and Assign Public IPv4 Address is selected for the ECS instance. The network usage of the ECS instance is charged based on the pay-by-traffic billing method. The peak bandwidth is 100 Mbit/s.
Security group
An inbound rule that allows traffic on port 5601 is added to a security group of the ECS instance. Port 5601 is the port of the Kibana service. The IP address of your client is added as an authorization object.
ImportantIf your client is in a home network or in a LAN of an office, you must add the IP address of the Internet egress rather than the IP address of the client to a security group of the ECS instance. We recommend that you visit cip.cc to query the IP address of the Internet egress.
You can add 0.0.0.0/0 as an authorization object. If you make this configuration, all public IPv4 addresses can be used to access the ECS instance. This poses security risks. We recommend that you do not make this configuration in the production environment.
Deploy a self-managed Elasticsearch cluster on the ECS instance.
In this example, a self-managed Elasticsearch 7.6.2 cluster that has one data node is used. To deploy the cluster on the ECS instance, perform the following steps:
Connect to the ECS instance.
For more information, see Connect to a Linux instance by using a password or key.
Create a user named elastic as the root user.
useradd elasticSpecify the password of the elastic user.
passwd elasticYou will be prompted to enter and confirm the password for the elastic user.
Switch from the root user to the elastic user.
su -l elasticDownload the Elasticsearch package and decompress the package.
wget https://artifacts.elastic.co/downloads/elasticsearch/elasticsearch-7.6.2-linux-x86_64.tar.gz
tar -zvxf elasticsearch-7.6.2-linux-x86_64.tar.gz
Start the Elasticsearch cluster.
Go to the directory in which the Elasticsearch cluster is deployed and start the Elasticsearch cluster.
cd elasticsearch-7.6.2
./bin/elasticsearch -d
Check whether the Elasticsearch cluster runs as expected.
cd ~
curl localhost:9200
If the Elasticsearch cluster runs as expected, the result shown in the following figure is returned. The result contains the version number of the Elasticsearch cluster and the message
"You Know, for Search".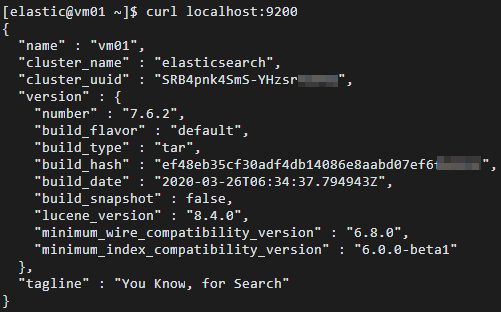
Deploy the self-managed Kibana service and prepare test data.
In this example, the self-managed Kibana 7.6.2 service that has one data node is used. To deploy the self-managed Kibana service, perform the following steps:
Connect to the ECS instance.
For more information, see Connect to a Linux instance by using a password or key.
NoteIn this example, a regular user is used.
Download the Kibana package and decompress the package.
wget https://artifacts.elastic.co/downloads/kibana/kibana-7.6.2-linux-x86_64.tar.gz
tar -zvxf kibana-7.6.2-linux-x86_64.tar.gz
Modify the kibana.yml configuration file in the config/ installation directory of the Kibana service. Add the
server.host: "0.0.0.0"configuration to the configuration file to allow access to the Kibana service from all public IP addresses.Go to the installation directory of the Kibana service and modify the kibana.yml configuration file.
cd kibana-7.6.2-linux-x86_64
vi config/kibana.yml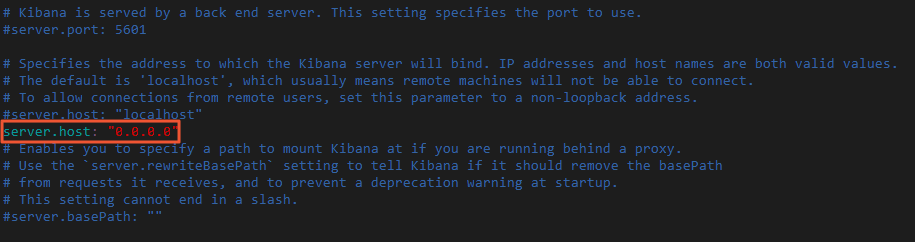
Start the Kibana service as a user other than the root user.
sudo nohup ./bin/kibana &Log on to the Kibana console and add the test data.
Use the URL that contains the public IP address of the ECS instance to log on to the Kibana console.
The URL is in the following format: http://<Public IP address of the ECS instance>:5601/app/kibana#/home.
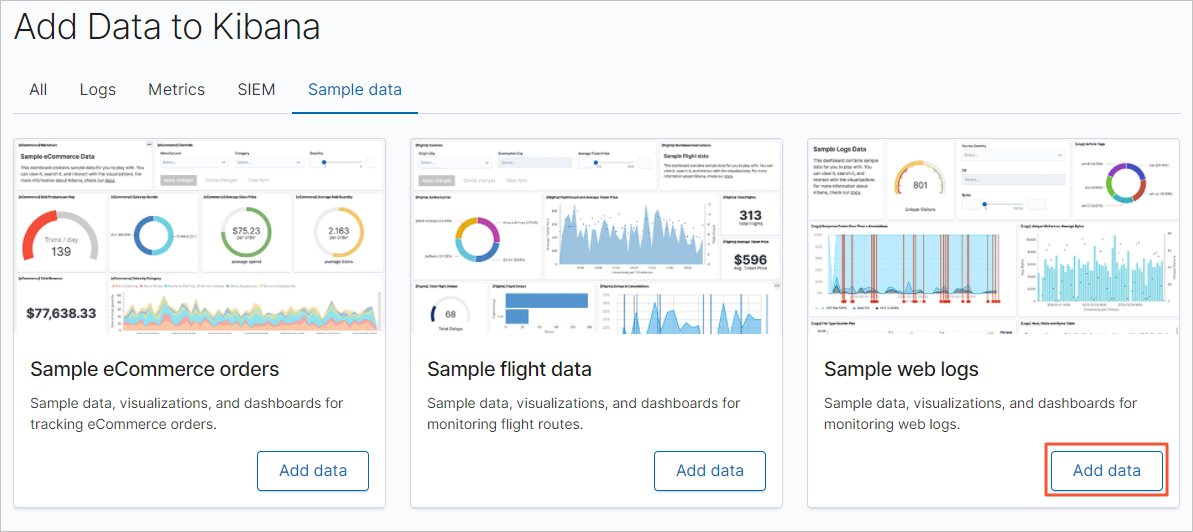
On the homepage of the Kibana console, click Try our sample data.
On the Sample data tab, click Add data in the Sample web logs card and add the test data.
Deploy a self-managed Logstash cluster on the ECS instance.
In this example, a self-managed Logstash 7.10.0 cluster that has one node is used. To deploy the self-managed Logstash cluster, perform the following steps:
Connect to the ECS instance.
For more information, see Connect to a Linux instance by using a password or key.
NoteIn this example, a regular user is used.
Go back to the root directory, download the Logstash package, and then decompress the package.
cd ~
wget https://artifacts.elastic.co/downloads/logstash/logstash-7.10.0-linux-x86_64.tar.gz
tar -zvxf logstash-7.10.0-linux-x86_64.tar.gz
Change the JVM heap memory setting of the Logstash cluster.
The default JVM heap memory size of the Logstash cluster is 1 GiB. You must specify an appropriate heap memory size for the Logstash cluster based on the specifications of the ECS instance to accelerate data migration.
Go to the installation directory of the Logstash cluster and modify the jvm.options configuration file in the config/ directory. Add the -Xms8g and -Xmx8g settings to the configuration file.
cd logstash-7.10.0
sudo vi config/jvm.options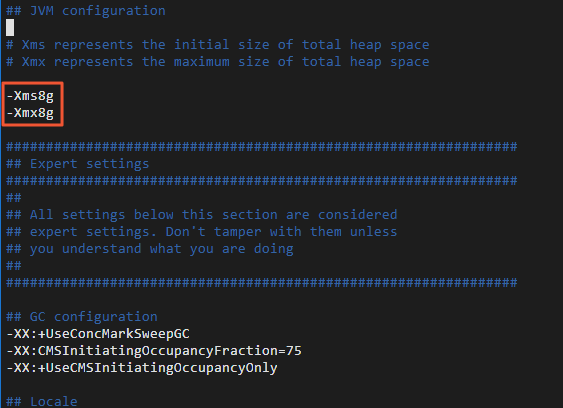
Change the number of data records that can be written by the Logstash cluster at a time.
Enable the Logstash cluster to write 5 MiB to 15 MiB of data records at a time. This can accelerate data migration.
Modify the pipelines.yml configuration file in the config/ directory. Change the value of the pipeline.batch.size parameter in the configuration file from 125 to 5000. The pipeline.batch.size parameter specifies the number of data records that can be written by the Logstash cluster at a time.
vi config/pipelines.yml
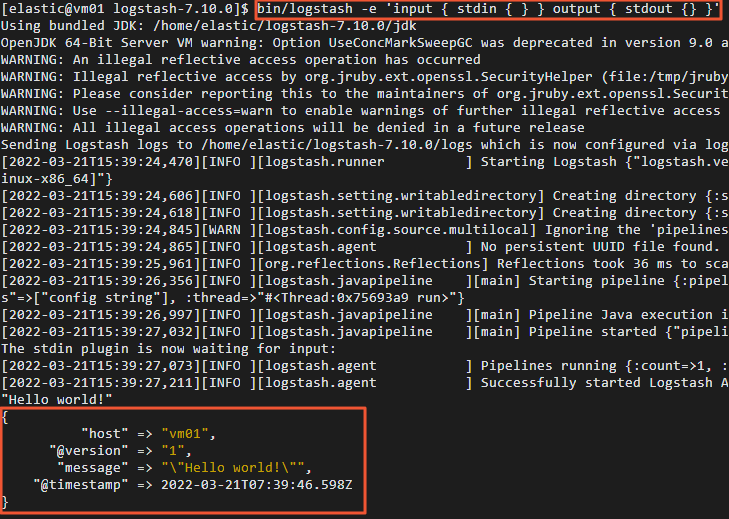
Check whether the Logstash cluster runs as expected.
Run the following command in the command-line tool of the host of the ECS instance to collect the input and output data:
bin/logstash -e 'input { stdin { } } output { stdout {} }'Enter "Hello world!" in the command-line tool as the input.
If the Logstash cluster runs as expected, "Hello world!" is returned as the output.
Step 2: (Optional) Migrate the metadata of indexes in the self-managed Elasticsearch cluster
If you enable the Auto Indexing feature for the Alibaba Cloud Elasticsearch cluster, Logstash automatically creates indexes in the cluster during data migration. However, these indexes may be different from the indexes that you want to migrate from the self-managed Elasticsearch cluster. As a result, the formats of data in the Alibaba Cloud Elasticsearch cluster may be different from those of data in the self-managed Elasticsearch cluster. We recommend that you manually create indexes in the Alibaba Cloud Elasticsearch cluster before data migration. This ensures that data in the Alibaba Cloud Elasticsearch cluster is the same as the data in the self-managed Elasticsearch cluster.
You can use Python scripts to create indexes in the Alibaba Cloud Elasticsearch cluster. To create an index, perform the following steps:
Connect to the ECS instance.
For more information, see Connect to a Linux instance by using a password or key.
NoteIn this example, a regular user is used.
Create and open a Python script file. In this example, a Python script file named indiceCreate.py is created.
sudo vi indiceCreate.pyModify the Python script file. Copy the following code to the Python script file. You must change the hosts, usernames, and passwords of the source and destination Elasticsearch clusters in the following code based on your business requirements.
#!/usr/bin/python
# -*- coding: UTF-8 -*-
# File name: indiceCreate.py
import sys
import base64
import time
import httplib
import json
## Specify the host information of the source Elasticsearch cluster.
oldClusterHost = "localhost:9200"
## Specify the username of the source Elasticsearch cluster. This parameter can be left empty.
oldClusterUserName = "elastic"
## Specify the password of the source Elasticsearch cluster. This parameter can be left empty.
oldClusterPassword = "xxxxxx"
## Specify the host information of the destination Elasticsearch cluster. You can obtain the information from the Basic Information page of the destination Elasticsearch cluster.
newClusterHost = "es-cn-zvp2m4bko0009****.elasticsearch.aliyuncs.com:9200"
## Specify the username of the destination Elasticsearch cluster.
newClusterUser = "elastic"
## Specify the password of the destination Elasticsearch cluster.
newClusterPassword = "xxxxxx"
DEFAULT_REPLICAS = 0
def httpRequest(method, host, endpoint, params="", username="", password=""):
    conn = httplib.HTTPConnection(host)
    headers = {}
    if (username != "") :
        'Hello {name}, your age is {age} !'.format(name = 'Tom', age = '20')
        base64string = base64.encodestring('{username}:{password}'.format(username = username, password = password)).replace('\n', '')
        headers["Authorization"] = "Basic %s" % base64string;
    if "GET" == method:
        headers["Content-Type"] = "application/x-www-form-urlencoded"
        conn.request(method=method, url=endpoint, headers=headers)
    else :
        headers["Content-Type"] = "application/json"
        conn.request(method=method, url=endpoint, body=params, headers=headers)
    response = conn.getresponse()
    res = response.read()
    return res
def httpGet(host, endpoint, username="", password=""):
    return httpRequest("GET", host, endpoint, "", username, password)
def httpPost(host, endpoint, params, username="", password=""):
    return httpRequest("POST", host, endpoint, params, username, password)
def httpPut(host, endpoint, params, username="", password=""):
    return httpRequest("PUT", host, endpoint, params, username, password)
def getIndices(host, username="", password=""):
    endpoint = "/_cat/indices"
    indicesResult = httpGet(oldClusterHost, endpoint, oldClusterUserName, oldClusterPassword)
    indicesList = indicesResult.split("\n")
    indexList = []
    for indices in indicesList:
        if (indices.find("open") > 0):
            indexList.append(indices.split()[2])
    return indexList
def getSettings(index, host, username="", password=""):
    endpoint = "/" + index + "/_settings"
    indexSettings = httpGet(host, endpoint, username, password)
    print (index + "  Original settings: \n" + indexSettings)
    settingsDict = json.loads(indexSettings)
    ## By default, the number of primary shards is the same as that for the indexes in the source Elasticsearch cluster.
    number_of_shards = settingsDict[index]["settings"]["index"]["number_of_shards"]
    ## The default number of replica shards is 0.
    number_of_replicas = DEFAULT_REPLICAS
    newSetting = "\"settings\": {\"number_of_shards\": %s, \"number_of_replicas\": %s}" % (number_of_shards, number_of_replicas)
    return newSetting
def getMapping(index, host, username="", password=""):
    endpoint = "/" + index + "/_mapping"
    indexMapping = httpGet(host, endpoint, username, password)
    print (index + " Original mappings: \n" + indexMapping)
    mappingDict = json.loads(indexMapping)
    mappings = json.dumps(mappingDict[index]["mappings"])
    newMapping = "\"mappings\" : " + mappings
    return newMapping
def createIndexStatement(oldIndexName):
    settingStr = getSettings(oldIndexName, oldClusterHost, oldClusterUserName, oldClusterPassword)
    mappingStr = getMapping(oldIndexName, oldClusterHost, oldClusterUserName, oldClusterPassword)
    createstatement = "{\n" + str(settingStr) + ",\n" + str(mappingStr) + "\n}"
    return createstatement
def createIndex(oldIndexName, newIndexName=""):
    if (newIndexName == "") :
        newIndexName = oldIndexName
    createstatement = createIndexStatement(oldIndexName)
    print ("New index " + newIndexName + " Index settings and mappings: \n" + createstatement)
    endpoint = "/" + newIndexName
    createResult = httpPut(newClusterHost, endpoint, createstatement, newClusterUser, newClusterPassword)
    print ("New index " + newIndexName + " Creation result: " + createResult)
## main
indexList = getIndices(oldClusterHost, oldClusterUserName, oldClusterPassword)
systemIndex = []
for index in indexList:
    if (index.startswith(".")):
        systemIndex.append(index)
    else :
        createIndex(index, index)
if (len(systemIndex) > 0) :
    for index in systemIndex:
        print (index + " It may be a system index and will not be recreated. You can manually recreate the index based on your business requirements.")
Run the Python script to create an index in the Alibaba Cloud Elasticsearch cluster.
sudo /usr/bin/python indiceCreate.pyLog on to the Kibana console of the Alibaba Cloud Elasticsearch cluster and view the created index. For information about how to log on to the Kibana console, see Log on to the Kibana console.
GET /_cat/indices?v
Step 3: Migrate full data
Connect to the ECS instance.
For more information, see Connect to a Linux instance by using a password or key.
Create a configuration file for the Logstash cluster in the config directory and open the configuration file.
cd logstash-7.10.0/config
vi es2es_all.conf
Modify the configuration file by referring to the following code.
NoteThe configuration parameters of Logstash are modified in 8.5. In this topic, both the code for 8.5.1 and the code for 7.10.0 are provided.
To ensure the accuracy of data migration, we recommend that you create multiple Logstash pipelines and use each pipeline to migrate part of the data.
7.10.0
input{
    elasticsearch{
        # Specify the host information of the source Elasticsearch cluster.
        hosts =>  ["http://localhost:9200"]
        # Specify the username and password of the source Elasticsearch cluster.
        user => "xxxxxx"
        password => "xxxxxx"
        # Specify the names of the indexes that you want to migrate. Separate the names with commas (,).
        index => "kibana_sample_data_*"
        # Retain the following default settings. The settings are related to the number of threads used for data migration, the size of data that needs to be migrated, and the JVM heap memory size of the Logstash cluster.
        docinfo=>true
        slices => 5
        size => 5000
    }
}

filter {
  # Remove some fields that are added by Logstash.
  mutate {
    remove_field => ["@timestamp", "@version"]
  }
}

output{
    elasticsearch{
        # Specify the host information of the destination Elasticsearch cluster. You can obtain the information from the Basic Information page of the destination Elasticsearch cluster.
        hosts => ["http://es-cn-zvp2m4bko0009****.elasticsearch.aliyuncs.com:9200"]
        # Specify the username and password of the destination Elasticsearch cluster.
        user => "elastic"
        password => "xxxxxx"
        # Specify the names of the indexes in the destination Elasticsearch cluster. The following setting indicates that the names of the indexes in the destination Elasticsearch cluster are the same as those of the indexes in the source Elasticsearch cluster.
        index => "%{[@metadata][_index]}"
        # Specify the types of the indexes in the destination Elasticsearch cluster. The following setting indicates that the types of the indexes in the destination Elasticsearch cluster are the same as those of the indexes in the source Elasticsearch cluster.
        document_type => "%{[@metadata][_type]}"
        # Specify the IDs of the documents in the destination Elasticsearch cluster. If you do not want to retain the IDs of the source documents in the destination Elasticsearch cluster, you can delete the setting in the following row. This provides better performance.
        document_id => "%{[@metadata][_id]}"
        ilm_enabled => false
        manage_template => false
    }
}
8.5.1
input{
    elasticsearch{
        # Specify the host information of the source Elasticsearch cluster.
        hosts =>  ["http://es-cn-uqm3811160002***.elasticsearch.aliyuncs.com:9200"]
        # Specify the username and password of the source Elasticsearch cluster.
        user => "elastic"
        password => ""
        # Specify the names of the indexes that you want to migrate. Separate the names with commas (,).
        index => "test_ecommerce"
        # Retain the following default settings. The settings are related to the number of threads used for data migration, the size of data that needs to be migrated, and the JVM heap memory size of the Logstash cluster.
        docinfo => true
        size => 10000
        docinfo_target => "[@metadata]"
    }
}

filter {
  # Remove some fields that are added by Logstash.
  mutate {
    remove_field => ["@timestamp","@version"]
  }
}

output{
    elasticsearch{
        # Specify the host information of the destination Elasticsearch cluster. You can obtain the information from the Basic Information page of the destination Elasticsearch cluster.
        hosts => ["http://es-cn-nwy38aixp0001****.elasticsearch.aliyuncs.com:9200"]
        # Specify the username and password of the destination Elasticsearch cluster.
        user => "elastic"
        password => ""
        # Specify the names of the indexes in the destination Elasticsearch cluster. The following setting indicates that the names of the indexes in the destination Elasticsearch cluster are the same as those of the indexes in the source Elasticsearch cluster.
        index => "%{[@metadata][_index]}"
        # Specify the IDs of the documents in the destination Elasticsearch cluster. If you do not want to retain the IDs of the source documents in the destination Elasticsearch cluster, you can delete the setting in the following row. This provides better performance.
        document_id => "%{[@metadata][_id]}"
        ilm_enabled => false
        manage_template => false
    }
}
An input plug-in for which an Elasticsearch cluster is specified can read data from the cluster based on the query statement that is configured for the plug-in. The plug-in is suitable for scenarios in which multiple test logs need to be imported at a time. By default, the synchronization operation is automatically disabled and the Logstash process is stopped after data is read. However, Logstash needs to ensure that the process continuously runs. Therefore, Logstash restarts the process. This may cause duplicate data writes if only one pipeline exists. To address this issue, you can specify a period to enable Logstash to run a pipeline on a regular basis. For example, you can enable Logstash to run a pipeline at 13:20 on March 5 every year. After the pipeline is run for the first time, Logstash stops it. You can use the schedule parameter together with the syntax of cron expressions to specify the period. For more information, see Scheduling in open source Logstash documentation.
The following code provides an example. In this example, a pipeline is scheduled to run at 13:20 on March 5 every year.
schedule => "20 13 5 3 *"Go to the installation directory of the Logstash cluster.
cd ~/logstash-7.10.0Start the Logstash cluster to migrate full data.
nohup bin/logstash -f config/es2es_all.conf >/dev/null 2>&1 &
Step 4: Migrate incremental data
Connect to the ECS instance, create a configuration file for the Logstash cluster in the config directory, and then open the configuration file.
cd config vi es2es_kibana_sample_data_logs.confNoteIn this example, a regular user is used.
Modify the configuration file by referring to the following code.
The following sample code shows the content in the configuration file of a Logstash 7.10.0 cluster.
NoteThe configuration parameters of Logstash are modified in 8.5. You need to remove the
document_type => "%{[@metadata][_type]}"setting.After you modify the configuration file by referring to the following code, you can enable a scheduled Logstash task to trigger incremental data migration.
input{ elasticsearch{ # Specify the host information of the source Elasticsearch cluster. hosts => ["http://localhost:9200"] # Specify the username and password of the source Elasticsearch cluster. user => "xxxxxx" password => "xxxxxx" # Specify the names of the indexes that you want to migrate. Separate the names with commas (,). index => "kibana_sample_data_logs" # Specify the time range in which you want to query incremental data. The following setting indicates that incremental data over the last 5 minutes is queried. query => '{"query":{"range":{"@timestamp":{"gte":"now-5m","lte":"now/m"}}}}' # Specify the interval at which incremental data is collected. The following setting indicates that incremental data is collected every minute. schedule => "* * * * *" scroll => "5m" docinfo=>true size => 5000 } } filter { # Remove some fields that are added by Logstash. mutate { remove_field => ["@timestamp", "@version"] } } output{ elasticsearch{ # Specify the host information of the destination Elasticsearch cluster. You can obtain the information from the Basic Information page of the destination Elasticsearch cluster. hosts => ["http://es-cn-zvp2m4bko0009****.elasticsearch.aliyuncs.com:9200"] # Specify the username and password of the destination Elasticsearch cluster. user => "elastic" password => "xxxxxx" # Specify the names of the indexes in the destination Elasticsearch cluster. The following setting indicates that the names of the indexes in the destination Elasticsearch cluster are the same as those of the indexes in the source Elasticsearch cluster. index => "%{[@metadata][_index]}" # Specify the types of the indexes in the destination Elasticsearch cluster. The following setting indicates that the types of the indexes in the destination Elasticsearch cluster are the same as those of the indexes in the source Elasticsearch cluster. document_type => "%{[@metadata][_type]}" # Specify the IDs of the documents in the destination Elasticsearch cluster. If you do not want to retain the IDs of the source documents in the destination Elasticsearch cluster, you can delete the setting in the following row. This provides better performance. document_id => "%{[@metadata][_id]}" ilm_enabled => false manage_template => false } }ImportantThe timestamps that are recorded by Logstash are in UTC. If your local time is in UTC+8, the time difference between the timestamps and local time is eight hours. In this case, you must convert the timestamps into time in UTC+8. For example, the @timestamp field in the input part of the preceding configuration specifies a time range for filtering incremental data. You must convert the timestamps specified by using this field into time in UTC+8.
If you want Logstash to migrate incremental data based on a time field, you must make sure that the source index contains a time field. If the source index does not contain a time field, you can use an ingest pipeline and specify the _ingest.timestamp parameter in the configuration of the pipeline to obtain metadata. This way, you can specify the @timestamp field in the configuration.
Go to the installation directory of the Logstash cluster.
cd ~/logstash-7.10.0Start the Logstash cluster to migrate incremental data.
sudo nohup bin/logstash -f config/es2es_kibana_sample_data_logs.conf >/dev/null 2>&1 &In the Kibana console of the Alibaba Cloud Elasticsearch cluster, query data records that are most recently updated to check whether incremental data is migrated.
In this example, the data records that are updated over the last 5 minutes in the kibana_sample_data_logs index are queried.
GET kibana_sample_data_logs/_search
{
  "query": {
    "range": {
      "@timestamp": {
        "gte": "now-5m",
        "lte": "now/m"
      }
    }
  },
  "sort": [
    {
      "@timestamp": {
        "order": "desc"
      }
    }
  ]
}
Step 5: View the data migration results
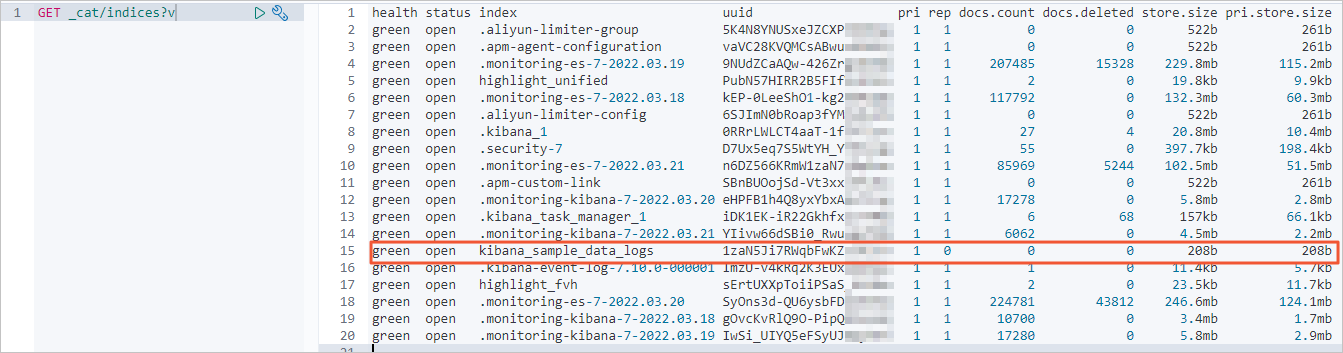
Check whether the full data is migrated.
Query information about indexes, the number of data records, and the volume of data stored in the self-managed Elasticsearch cluster.
GET _cat/indices?vThe following result is returned.

Query information about indexes, the number of data records, and the volume of data stored in the Alibaba Cloud Elasticsearch cluster before the data migration.
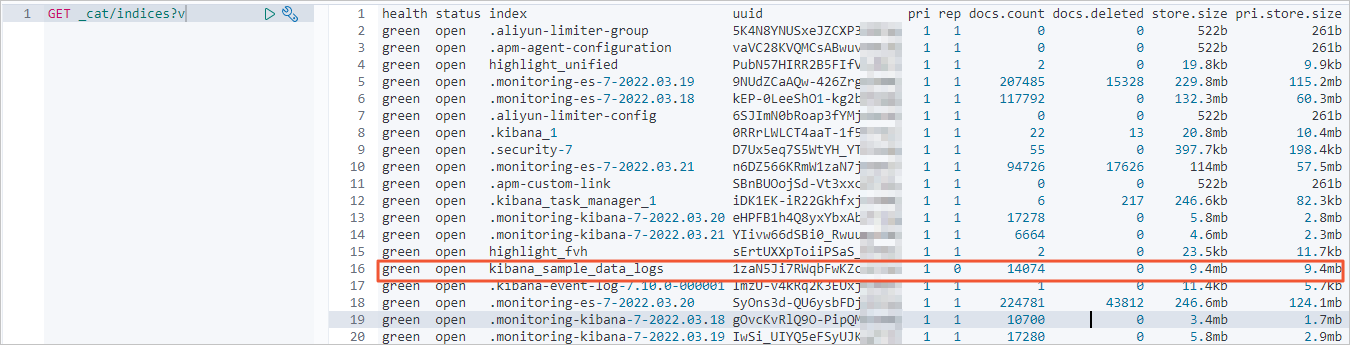
Query information about indexes, the number of data records, and the volume of data stored in the Alibaba Cloud Elasticsearch cluster after the data migration.
If the full data is migrated, the number of returned data records is the same as the number of data records in the self-managed Elasticsearch cluster.
Check whether the incremental data is migrated.
Query the data records that are most recently updated in the self-managed Elasticsearch cluster.
GET kibana_sample_data_logs/_search
{
  "query": {
    "range": {
      "@timestamp": {
        "gte": "now-5m",
        "lte": "now/m"
      }
    }
  },
  "sort": [
    {
      "@timestamp": {
        "order": "desc"
      }
    }
  ]
}
The following result is returned.
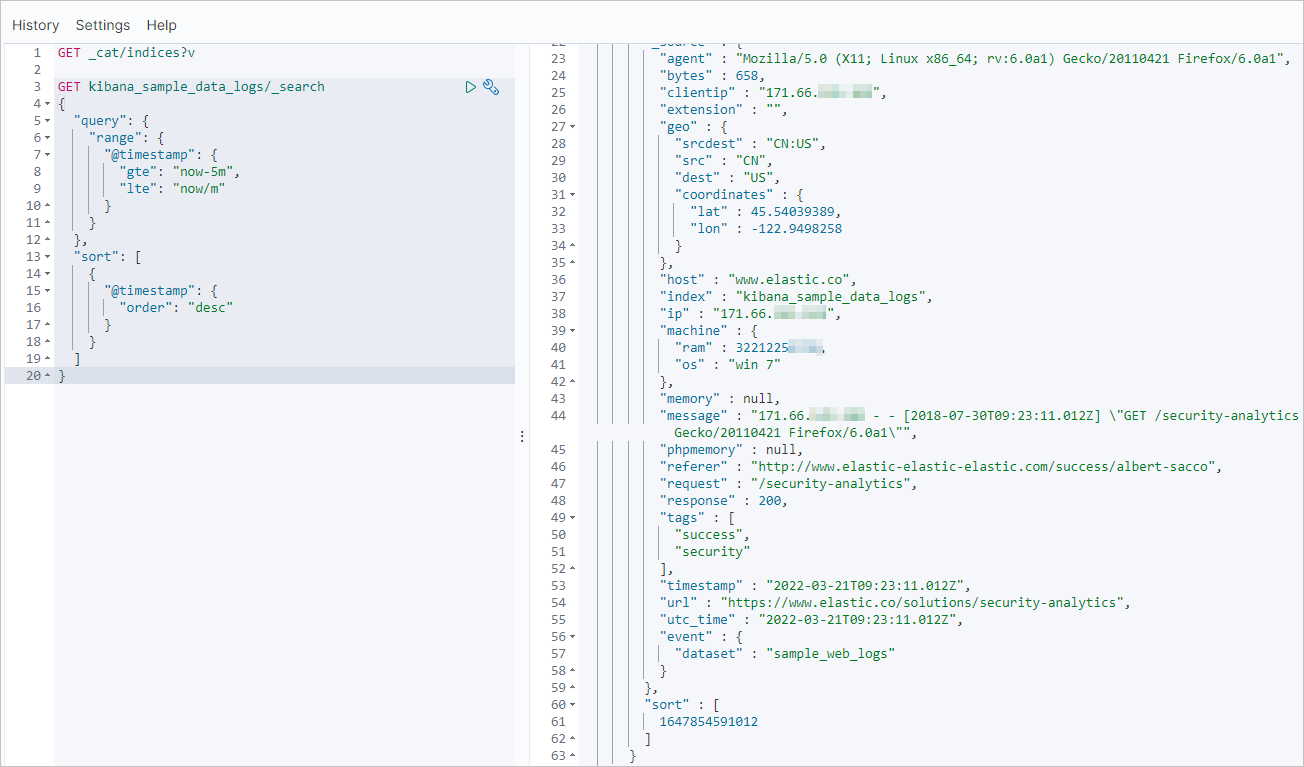
Run the same command to query the data records that are most recently updated in the Alibaba Cloud Elasticsearch cluster. If the incremental data is migrated, the data records that are most recently updated in the Alibaba Cloud Elasticsearch cluster are the same as those in the self-managed Elasticsearch cluster.