When you need to quickly and efficiently process a large number of concurrent HTTPS requests in large-scale microservices scenarios, you can enable multi-buffer to accelerate Transport Layer Security (TLS) processing in Envoy. The multi-buffer feature helps accelerate the encryption and decryption of data packets, reduce network latency, and improve the security and the capability of processing concurrent requests of your system.
Prerequisites
A Service Mesh (ASM) instance of Enterprise Edition or Ultimate Edition is created. The version of the ASM instance is 1.10 or later. For more information, see Create an ASM instance.
A Container Service for Kubernetes (ACK) cluster is created, and the nodes in the cluster use Intel Ice Lake CPUs that provide the multi-buffer feature. For more information, see Create an ACK managed cluster.
The cluster is added to the ASM instance. For more information, see Add a cluster to an ASM instance.
Background information
With the development of network security technologies, TLS has become the cornerstone of network communication. A TLS session is generally divided into the handshake phase and the data transmission phase. The most important task in the handshake phase is to use asymmetric encryption to negotiate a session key. In the data transmission phase, the session key is used to perform symmetric encryption on the data before data is transmitted.
In microservice scenarios, Envoy needs to process a large number of TLS requests, whether Envoy serves as an ingress gateway or as a proxy for microservices. Especially during the handshake phase, asymmetric encryption and decryption consume a large amount of CPU resources. This may become a bottleneck in large-scale microservices scenarios. ASM uses Intel multi-buffer to accelerate TLS processing in Envoy to alleviate the bottleneck.
Multi-buffer uses the Intel CPU AVX-512 instructions to process multiple independent buffers at the same time. In other words, multiple encryption and decryption operations can be simultaneously executed in one execution cycle, which accelerates encryption and decryption. Multi-buffer does not need additional hardware. It requires that the corresponding CPU must support the AVX-512 instruction set. Alibaba Cloud uses Ice Lake CPUs that support the latest AVX-512 instruction set.
Procedure
Method 1: Enable multi-buffer for an ASM instance
Log on to the ASM console. In the left-side navigation pane, choose .
On the Mesh Management page, click the name of the ASM instance. In the left-side navigation pane, choose .
In the upper-right corner of the Base Information page, click Settings.
In the Settings Update panel, select Enable MultiBuffer-based TLS encryption and decryption performance optimization, and then click OK.
If your cluster nodes are of the general-purpose instance family g7, multi-buffer increases the query per second (QPS) performance by 75%. If your cluster nodes are running on Elastic Compute Service (ECS) bare metal instances, the performance is further improved.
Method 2: Enable multi-buffer for an ingress gateway
Enable multi-buffer when you create an ingress gateway
Log on to the ASM console. In the left-side navigation pane, choose .
On the Mesh Management page, click the name of the ASM instance. In the left-side navigation pane, choose .
On the Ingress Gateway page, click Create. In the Advanced Options section of the Create page, select Enable MultiBuffer-based TLS encryption and decryption performance optimization, configure the parameters, and then click Create.
For more information about these parameters, see Create an ingress gateway.
Parameter
Description
supported nodeaffinity
Select the label of the nodes on which multi-buffer takes effect.
Poll Delay(ms)
In most cases, you do not need to change the value of this parameter.
Multi-buffer encrypts and decrypts multiple requests at the same time. Assume that multi-buffer can encrypt and decrypt eight requests at the same time. Multi-buffer does not start to work until it receives eight requests. If the number of requests is large, multi-buffer receives eight requests within a short period of time. However, if the number of requests is small, multi-buffer may wait for a long time. In this case, if you specify a polling delay, multi-buffer encrypts and decrypts existing requests after the specified delay ends even if the number of requests is smaller than eight.
Enable multi-buffer for an existing ingress gateway
Log on to the ASM console. In the left-side navigation pane, choose .
On the Mesh Management page, click the name of the ASM instance. In the left-side navigation pane, choose .
On the Ingress Gateway page, click the name of the desired gateway. Choose . In the Advanced Options section of the page that appears, click the
 icon next to Performance Optimization, select Enable MultiBuffer-based TLS encryption and decryption performance optimization, configure the parameters, and then click Submit.
 For more information about these parameters, see Create an ingress gateway.
Parameter
Description
supported nodeaffinity
Select the label of the nodes on which multi-buffer takes effect.
Poll Delay(ms)
In most cases, you do not need to change the value of this parameter.
Multi-buffer encrypts and decrypts multiple requests at the same time. Assume that multi-buffer can encrypt and decrypt eight requests at the same time. Multi-buffer does not start to work until it receives eight requests. If the number of requests is large, multi-buffer receives eight requests within a short period of time. However, if the number of requests is small, multi-buffer may wait for a long time. In this case, if you specify a polling delay, multi-buffer encrypts and decrypts existing requests after the specified delay ends even if the number of requests is smaller than eight.
Method 3: Enable multi-buffer for a pod
To enable multi-buffer for a pod, the version of your ASM instance must be 1.14.3 or later. For more information about how to update an ASM instance, see Update an ASM instance.
Make sure that the pod will be scheduled to a node that supports multi-buffer.
Configure a special annotation for the pod.
Sample annotation:
proxy.istio.io/config: |
  privateKeyProvider:
    cryptomb:
      pollDelay: 10ms
Restart the pod to make the configuration take effect.
FAQ
What happens if multi-buffer is enabled on the control plane, but the nodes in the data-plane Kubernetes cluster do not use Intel Ice Lake?
Alert logs are generated from Envoy and multi-buffer does not take effect.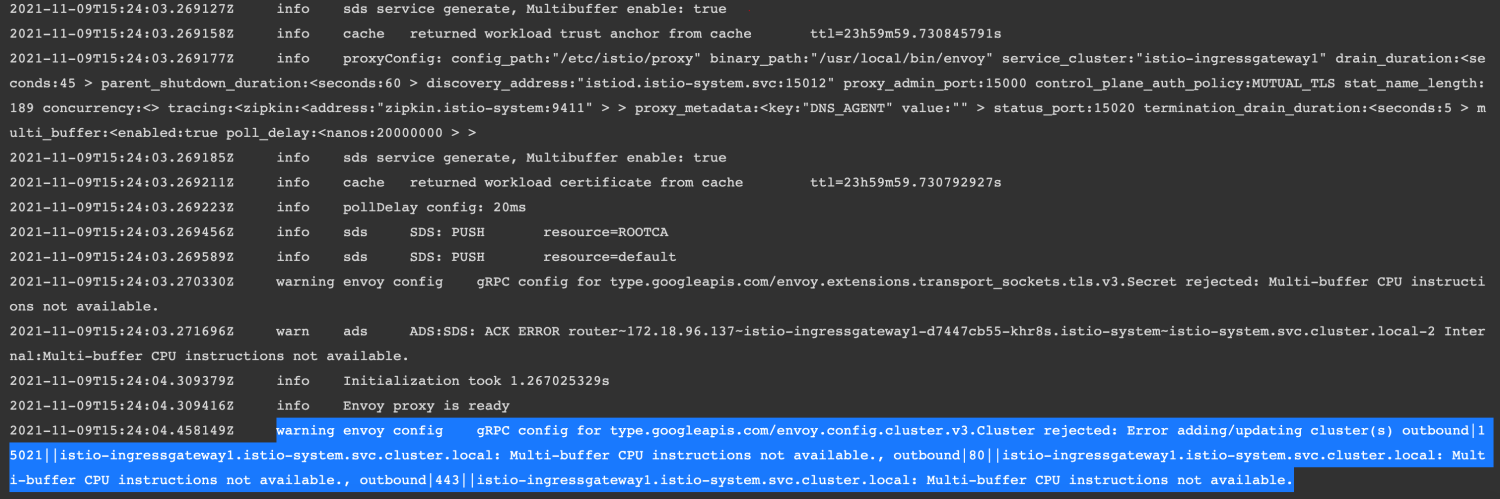
ASM instances whose type is Enterprise Edition or Ultimate Edition and version is 1.10 or later can automatically determine whether TLS acceleration takes effect when TLS acceleration is enabled. If the node to which the service or gateway pod is scheduled does not use Intel Ice Lake, ASM does not deliver the corresponding acceleration configuration to the node. In this case, TLS acceleration does not take effect.
How do I add a node that supports multi-buffer to a Kubernetes cluster and enable multi-buffer?
Add a node that uses Intel Ice Lake to the Kubernetes cluster. For more information, see Add existing ECS instances to an ACK cluster.
Add the
multibuffer-support:truelabel to the newly added node. For more information, see Manage node labels and taints.Add the following content to the YAML file of the ingress gateway to add the node affinity. For more information, see CRD fields for an ASM gateway.
After you add the node affinity, the ingress gateway pod is scheduled to the newly-added node that supports multi-buffer.
affinity:
    nodeAffinity:
      preferredDuringSchedulingIgnoredDuringExecution:
        - preference:
            matchExpressions:
              - key: feature.node.kubernetes.io/mb-feature-enabled
                operator: In
                values:
                  - 'true'
          weight: 1
Enable the multi-buffer feature in your ASM instance of Enterprise Edition or Ultimate Edition. For more information, see the Method 1: Enable multi-buffer for an ASM instance section.
After you enable multi-buffer for the ASM instance, the newly-added node can use multi-buffer to accelerate TLS processing.
References
ASM provides service discovery selectors, sidecar recommendation, and adaptive xDS optimization features to help you improve the configuration push efficiency of the control plane and reduce the configuration size of a sidecar. For more information, see Configuration push optimization overview.