Connect OpenClaw to Alibaba Cloud Token Plan Team Edition. OpenClaw (formerly Moltbot/Clawdbot) is an open source personal AI assistant platform for interacting with AI through various messaging channels.
Install OpenClaw
Qwen Code
OpenClaw requires the Node.js environment. To avoid potential issues during manual installation, use Qwen Code to handle the setup and verification.
Install and configure Qwen Code.
In your terminal, run the following command to start Qwen Code.
qwenIn the Qwen Code dialog box, enter the following prompt.
Authorize Qwen Code to run commands until the installation is complete.
Enter
/exitto exit Qwen Code./exit
Manual
Install or update Node.js
Run the following command in a terminal to check your
Node.jsversion. OpenClaw requires v22.0 or later. A "command not found" error means Node.js is not installed. If the version is below v22.0, update it.To open a terminal: On macOS, open the Terminal application. On Windows, open Terminal, PowerShell, or cmd.
node -vDownload and install: Visit Node.js, select an LTS version with a
version number >= 22.x.x, and download the installation package for your operating system. Then, run the installer.For example, on Windows, download the Windows Installer (.msi). On macOS, download the macOS Installer (.pkg).
Run one of the following commands to start the OpenClaw installation.
macOS/Linux:
To open a terminal, press Command + Space, type terminal, and press the Enter key. Then, run the following command:
curl -fsSL https://openclaw.ai/install.sh | bashWindows:
In the taskbar search box, enter
PowerShell, select Run as administrator, and inPowerShell, run the following command:iwr -useb https://openclaw.ai/install.ps1 | iex
After the installation is complete, follow the on-screen prompts to configure OpenClaw. Refer to the table below for recommended settings.
Parameter
Value
I understand this is powerful and inherently risky. Continue?
Select "Yes"
Onboarding mode
Select "QuickStart"
Model/auth provider
Select "Skip for now". You can configure this later.
Filter models by provider
Select "All providers"
Default model
Keep the default setting.
Select channel (QuickStart)
Select "Skip for now". You can configure this later.
Configure skills now? (recommended)
Select "No". You can configure this later.
Enable hooks?
Press the Spacebar to select "Skip for now", then press the Enter key.
How do you want to hatch your bot?
Select "Hatch in TUI".
Configure Token Plan Team Edition in OpenClaw
We recommend using Method 1 for a guided configuration with an AI agent, such as Qwen Code. If you are familiar with OpenClaw, you can use Method 2 to modify the configuration file directly.
Method 1: Guided configuration
Install and configure Qwen Code.
In your terminal, run the following command to start Qwen Code.
qwenIn the Qwen Code dialog, enter the following prompt.
Authorize Qwen Code to run commands until the configuration is complete.
After the configuration is complete, Qwen Code displays the output of
openclaw models list. If models such asbailian/qwen3.6-plusare marked as configured, the configuration is successful.
Method 2: Direct modification
Use terminal
Run the following command in your terminal to open the configuration file.
nano ~/.openclaw/openclaw.jsonFirst-time configuration: Copy the following content to the configuration file. Replace
YOUR_API_KEYwith your Token Plan Team Edition API key.Existing configuration: If you have an existing configuration, do not replace the entire content. For more information, see How to safely modify an existing configuration.
{
  "models": {
    "mode": "merge",
    "providers": {
      "bailian": {
        "baseUrl": "https://token-plan.ap-southeast-1.maas.aliyuncs.com/compatible-mode/v1",
        "apiKey": "YOUR_API_KEY",
        "api": "openai-completions",
        "models": [
          {
            "id": "qwen3.6-plus",
            "name": "qwen3.6-plus",
            "reasoning": false,
            "input": ["text", "image"],
            "cost": { "input": 0, "output": 0, "cacheRead": 0, "cacheWrite": 0 },
            "contextWindow": 1000000,
            "maxTokens": 65536,
            "compat": {
              "thinkingFormat": "qwen"
            }
          },
          {
            "id": "MiniMax-M2.5",
            "name": "MiniMax-M2.5",
            "reasoning": false,
            "input": ["text"],
            "cost": { "input": 0, "output": 0, "cacheRead": 0, "cacheWrite": 0 },
            "contextWindow": 196608,
            "maxTokens": 32768
          },
          {
            "id": "glm-5",
            "name": "glm-5",
            "reasoning": false,
            "input": ["text"],
            "cost": { "input": 0, "output": 0, "cacheRead": 0, "cacheWrite": 0 },
            "contextWindow": 202752,
            "maxTokens": 16384,
            "compat": {
              "thinkingFormat": "qwen"
            }
          },
          {
            "id": "deepseek-v3.2",
            "name": "deepseek-v3.2",
            "reasoning": false,
            "input": ["text"],
            "cost": { "input": 0, "output": 0, "cacheRead": 0, "cacheWrite": 0 },
            "contextWindow": 163840,
            "maxTokens": 16384,
            "compat": {
              "thinkingFormat": "qwen"
            }
          }
        ]
      }
    }
  },
  "agents": {
    "defaults": {
      "model": {
        "primary": "bailian/qwen3.6-plus"
      },
      "models": {
        "bailian/qwen3.6-plus": {},
        "bailian/MiniMax-M2.5": {},
        "bailian/glm-5": {},
        "bailian/deepseek-v3.2": {}
      }
    }
  },
  "gateway": {
    "mode": "local"
  }
}
Save the file and exit. Then, run the following command to apply the configuration.
openclaw gateway restart
Use web browser
Run the following command in your terminal. Your browser automatically opens the OpenClaw dashboard, typically at an address like
http://127.0.0.1:xxxx. Use this page to manage conversations and configurations.openclaw dashboardIn the left navigation bar, select (or ).
First-time configuration: Copy the following content into the Raw JSON5 input box, replacing any existing content.
Existing configuration: If you have an existing configuration, do not replace the entire content. For more information, see How to safely modify an existing configuration.
Replace
YOUR_API_KEYwith your Token Plan Team Edition API key.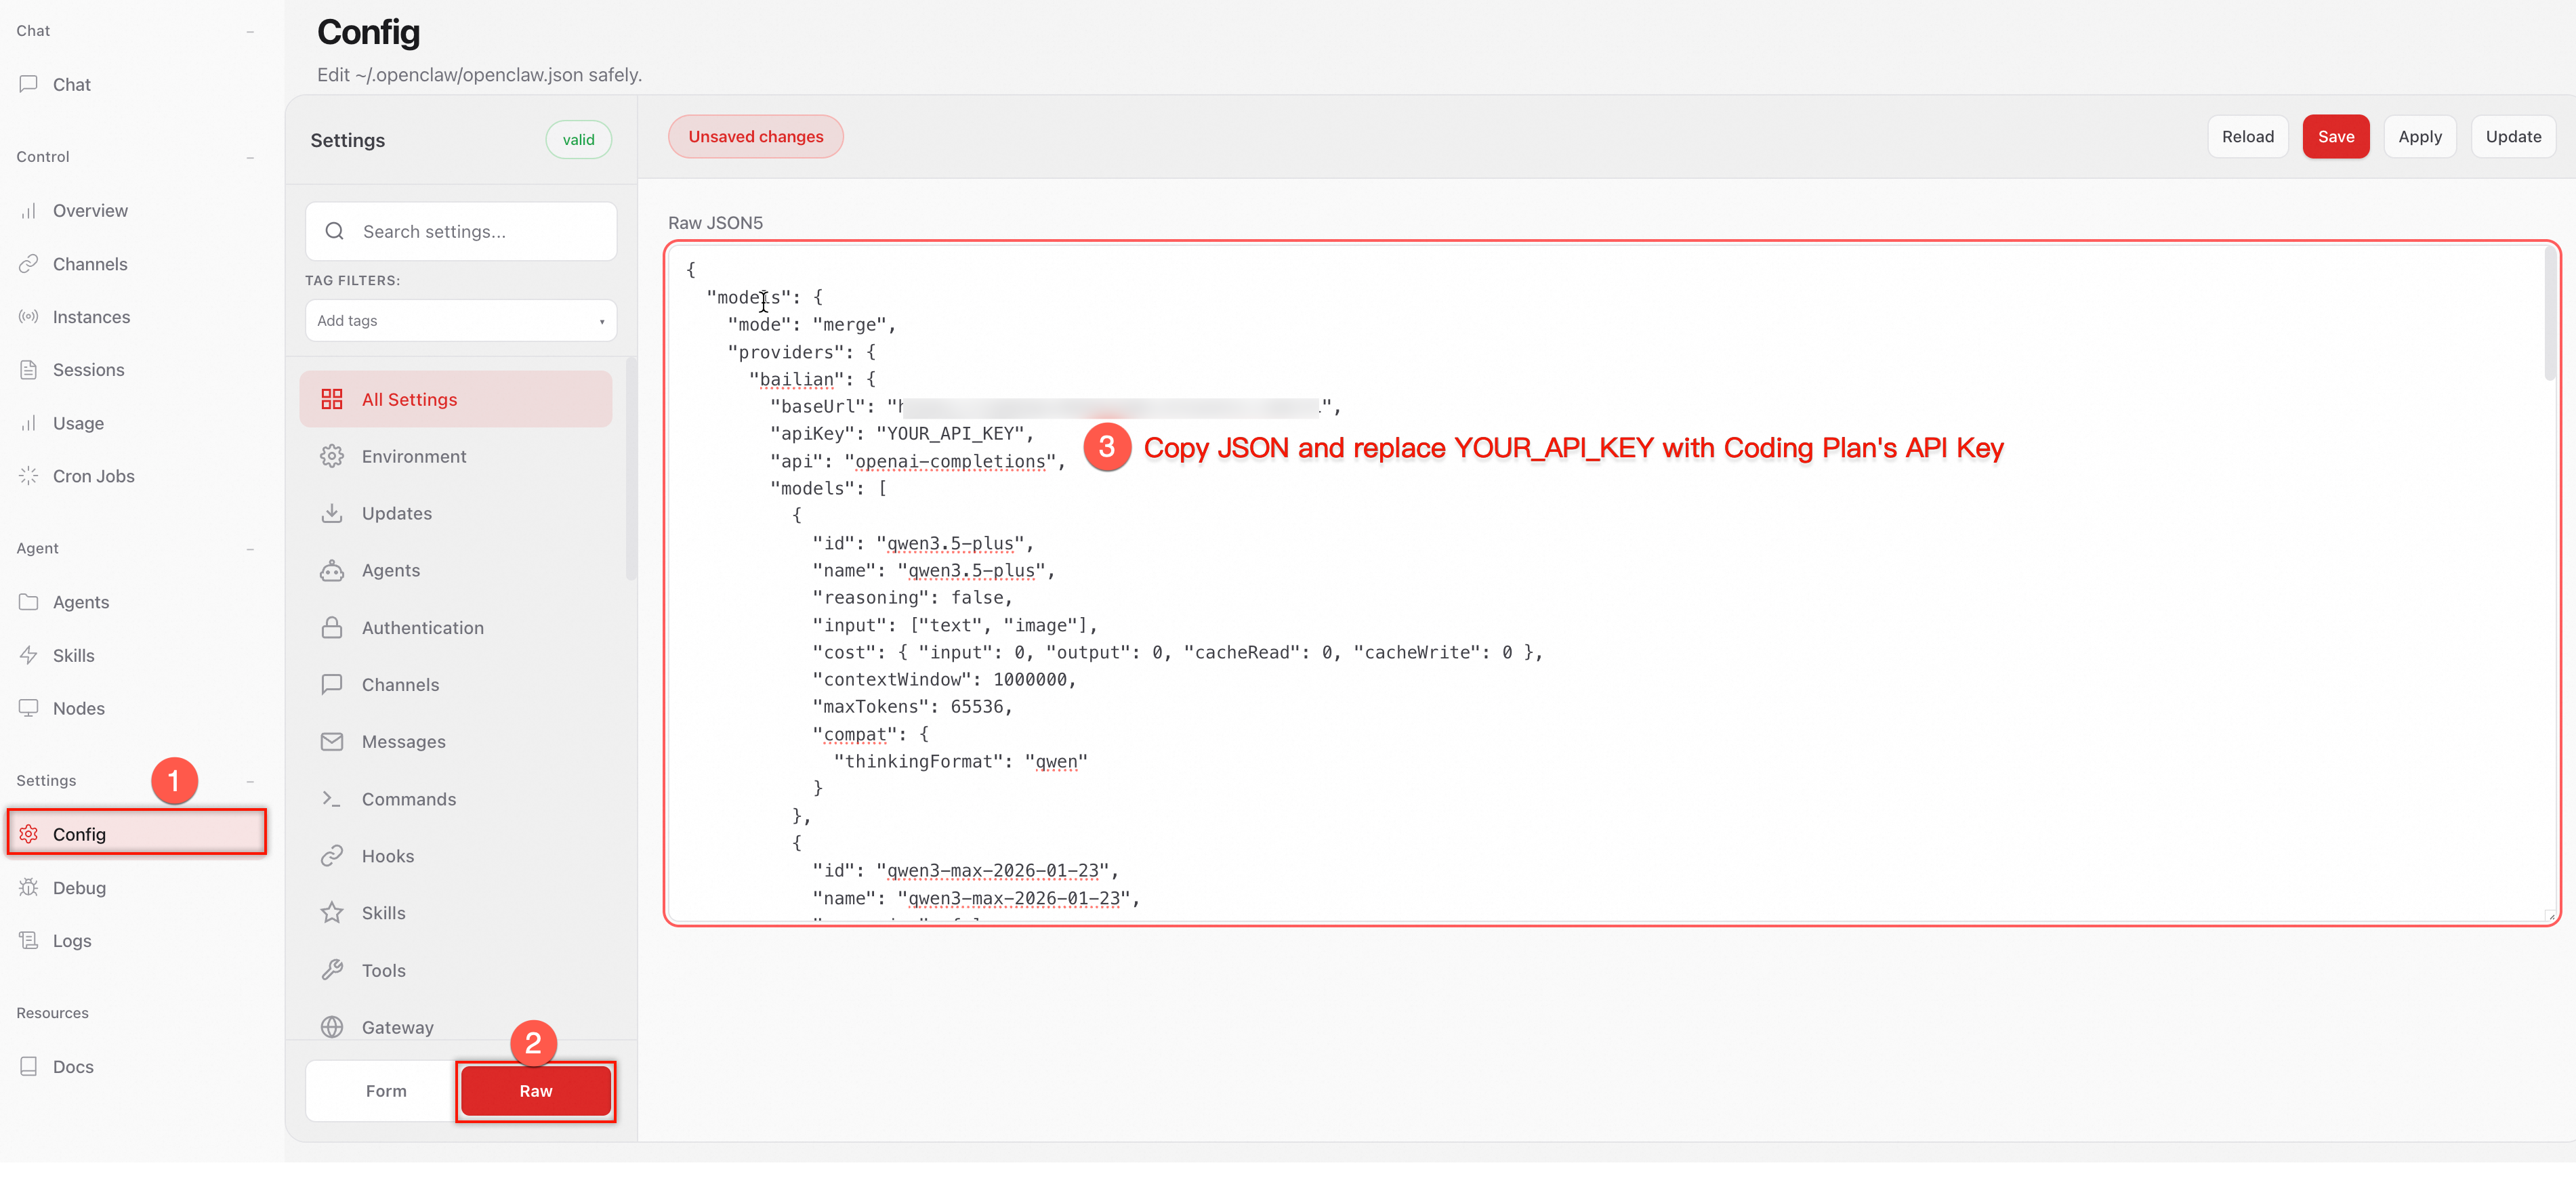
{
  "models": {
    "mode": "merge",
    "providers": {
      "bailian": {
        "baseUrl": "https://token-plan.ap-southeast-1.maas.aliyuncs.com/compatible-mode/v1",
        "apiKey": "YOUR_API_KEY",
        "api": "openai-completions",
        "models": [
          {
            "id": "qwen3.6-plus",
            "name": "qwen3.6-plus",
            "reasoning": false,
            "input": ["text", "image"],
            "cost": { "input": 0, "output": 0, "cacheRead": 0, "cacheWrite": 0 },
            "contextWindow": 1000000,
            "maxTokens": 65536,
            "compat": {
              "thinkingFormat": "qwen"
            }
          },
          {
            "id": "MiniMax-M2.5",
            "name": "MiniMax-M2.5",
            "reasoning": false,
            "input": ["text"],
            "cost": { "input": 0, "output": 0, "cacheRead": 0, "cacheWrite": 0 },
            "contextWindow": 196608,
            "maxTokens": 32768
          },
          {
            "id": "glm-5",
            "name": "glm-5",
            "reasoning": false,
            "input": ["text"],
            "cost": { "input": 0, "output": 0, "cacheRead": 0, "cacheWrite": 0 },
            "contextWindow": 202752,
            "maxTokens": 16384,
            "compat": {
              "thinkingFormat": "qwen"
            }
          },
          {
            "id": "deepseek-v3.2",
            "name": "deepseek-v3.2",
            "reasoning": false,
            "input": ["text"],
            "cost": { "input": 0, "output": 0, "cacheRead": 0, "cacheWrite": 0 },
            "contextWindow": 163840,
            "maxTokens": 16384,
            "compat": {
              "thinkingFormat": "qwen"
            }
          }
        ]
      }
    }
  },
  "agents": {
    "defaults": {
      "model": {
        "primary": "bailian/qwen3.6-plus"
      },
      "models": {
        "bailian/qwen3.6-plus": {},
        "bailian/MiniMax-M2.5": {},
        "bailian/glm-5": {},
        "bailian/deepseek-v3.2": {}
      }
    }
  },
  "gateway": {
    "mode": "local"
  }
}
In the upper-right corner, click Save, and then click Update to apply the configuration.
After saving the configuration, the apiKey value is displayed as "__OPENCLAW_REDACTED__". This security redaction only hides the key in the user interface and does not affect actual API calls.
Use OpenClaw
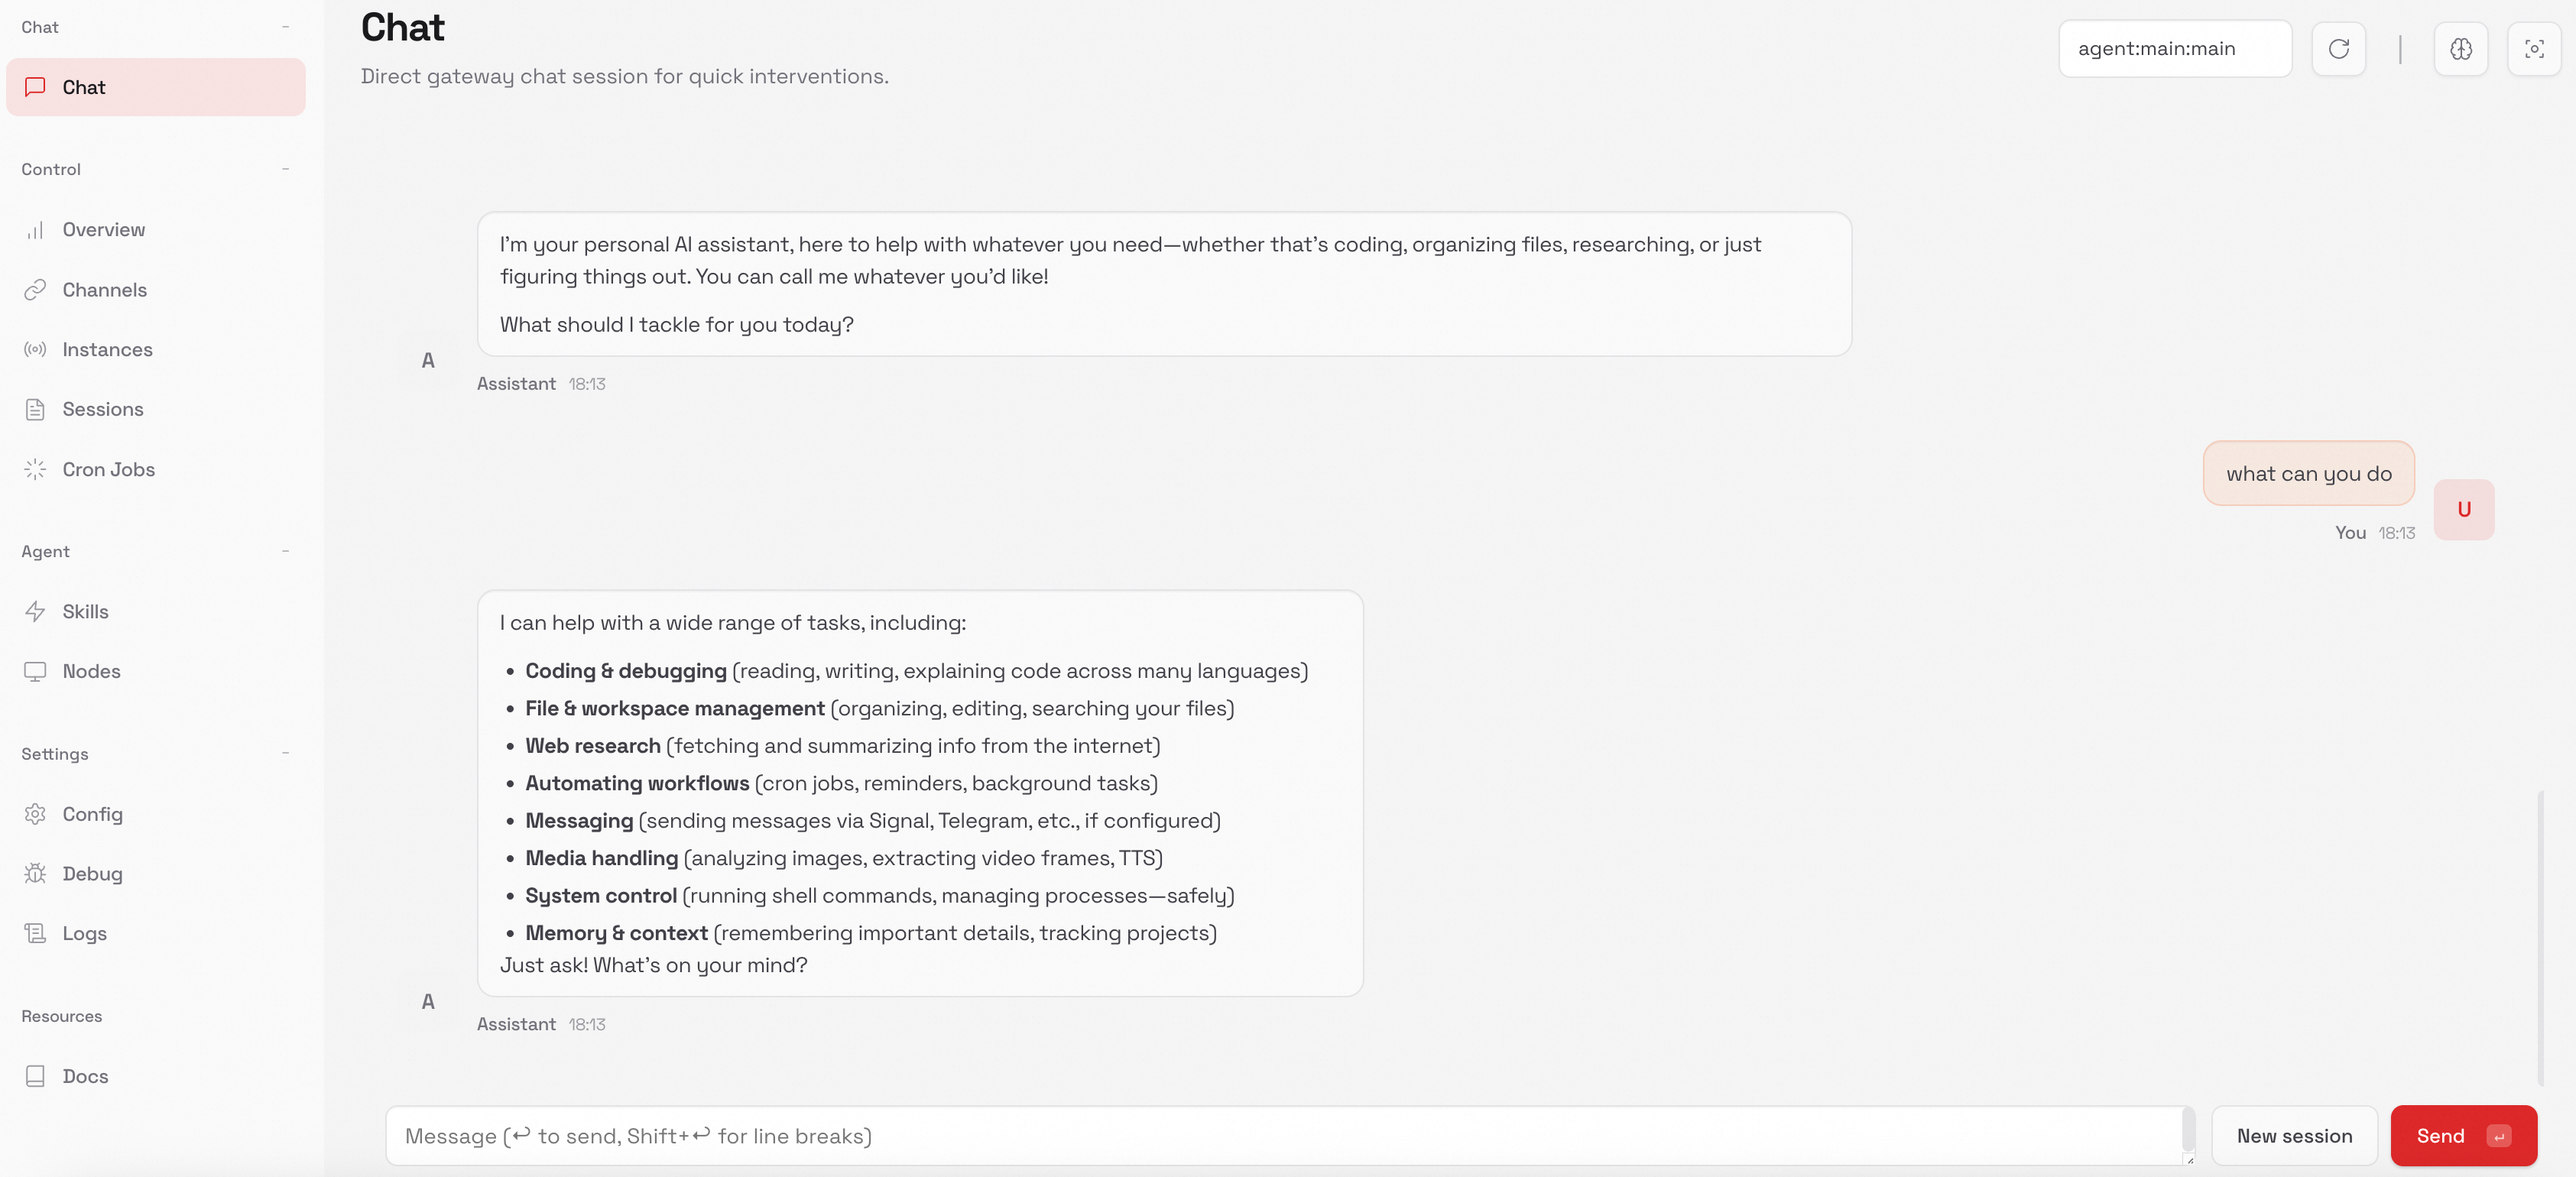
You can use OpenClaw in a web browser or on the command line.
Web browser
Run the following command in a new terminal to open the OpenClaw dashboard in your web browser.
openclaw dashboardStart a conversation.
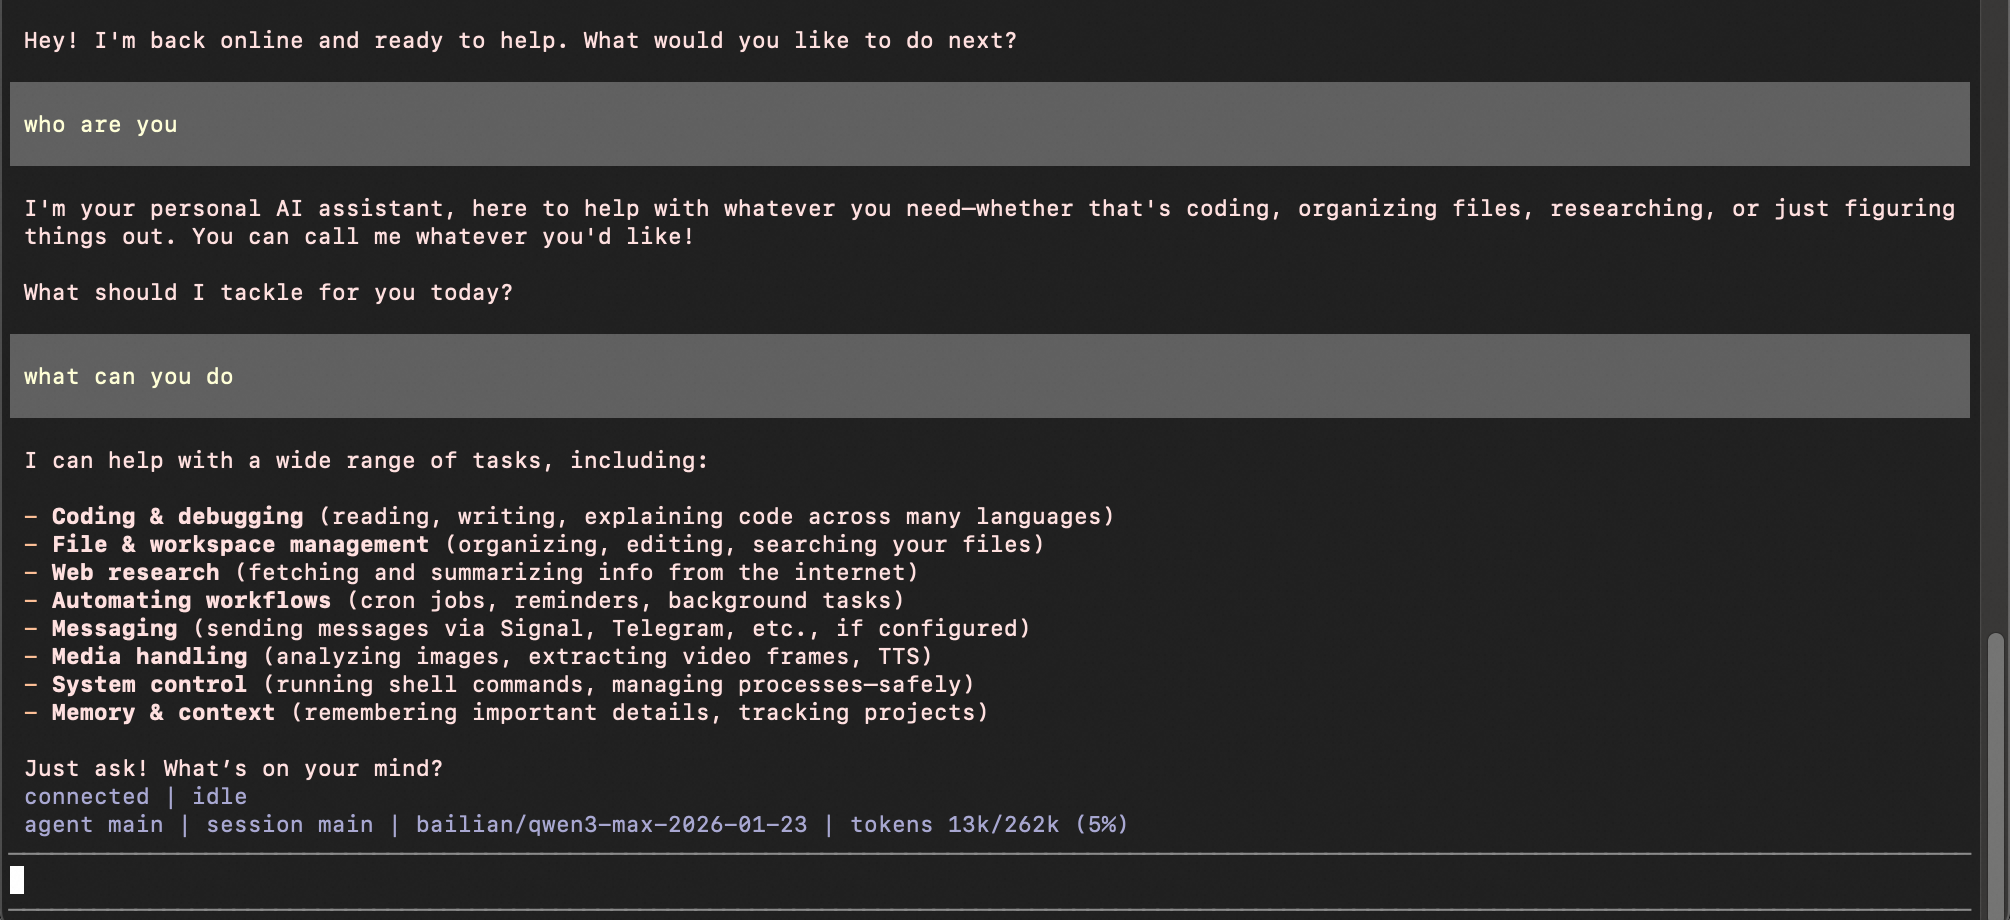
CLI
Run the following command in a new terminal.
openclaw tuiStart a conversation.
Common commands
Command | Description | Example |
/help | Lists available commands. | /help |
/status | Shows the current model, session, and gateway. | /status |
/model <model_name> | Switches the model for the current session. | /model qwen3.6-plus |
/new | Starts a new session. | /new |
/compact | Compacts the conversation history, freeing space in the context window. | /compact |
/think <level> | Sets the inference depth level. Options include off, low, medium, and high. | /think high |
/skills | Lists all available skills. | /skills |
Switch models
Switch model in current session (temporary)
Run
openclaw tuiin your terminal to launch the OpenClaw TUI. Use/model <model_name>to switch the model for the current session./model qwen3.6-plusThe message "model set to qwen3.6-plus" confirms the switch.
Switch the default model (persistent)
To set a default model for new sessions, change the
agents.defaults.model.primaryfield to the desired model identifier. See Modify the configuration file.{ "agents": { "defaults": { "model": { "primary": "bailian/qwen3.6-plus" } } } }
Text models (such as qwen3.6-plus and glm-5) work out of the box. Image generation models use a separate API and must be integrated via extension mechanisms. See Integrate multimodal generation models.
Integrate message channels
Step 1: Install the WhatsApp plugin
The WhatsApp channel is integrated as a plugin. Run the following command to install the plugin:
openclaw plugins install @openclaw/whatsappStep 2: Configure the WhatsApp channel
Enter the following prompt in an OpenClaw conversation. OpenClaw will ask for your phone number, which must be in E.164 format (a plus sign, followed by the country code and phone number). It then automatically adds the number to the configuration and completes the setup.
Please help me configure the WhatsApp channel. First, ask for my phone number, then automatically fill the number into the allowFrom and groupAllowFrom fields in the following configuration and complete the setup.
{
"channels": {
"whatsapp": {
"dmPolicy": "pairing",
"allowFrom": ["<phone_number>"],
"groupPolicy": "allowlist",
"groupAllowFrom": ["<phone_number>"]
}
}
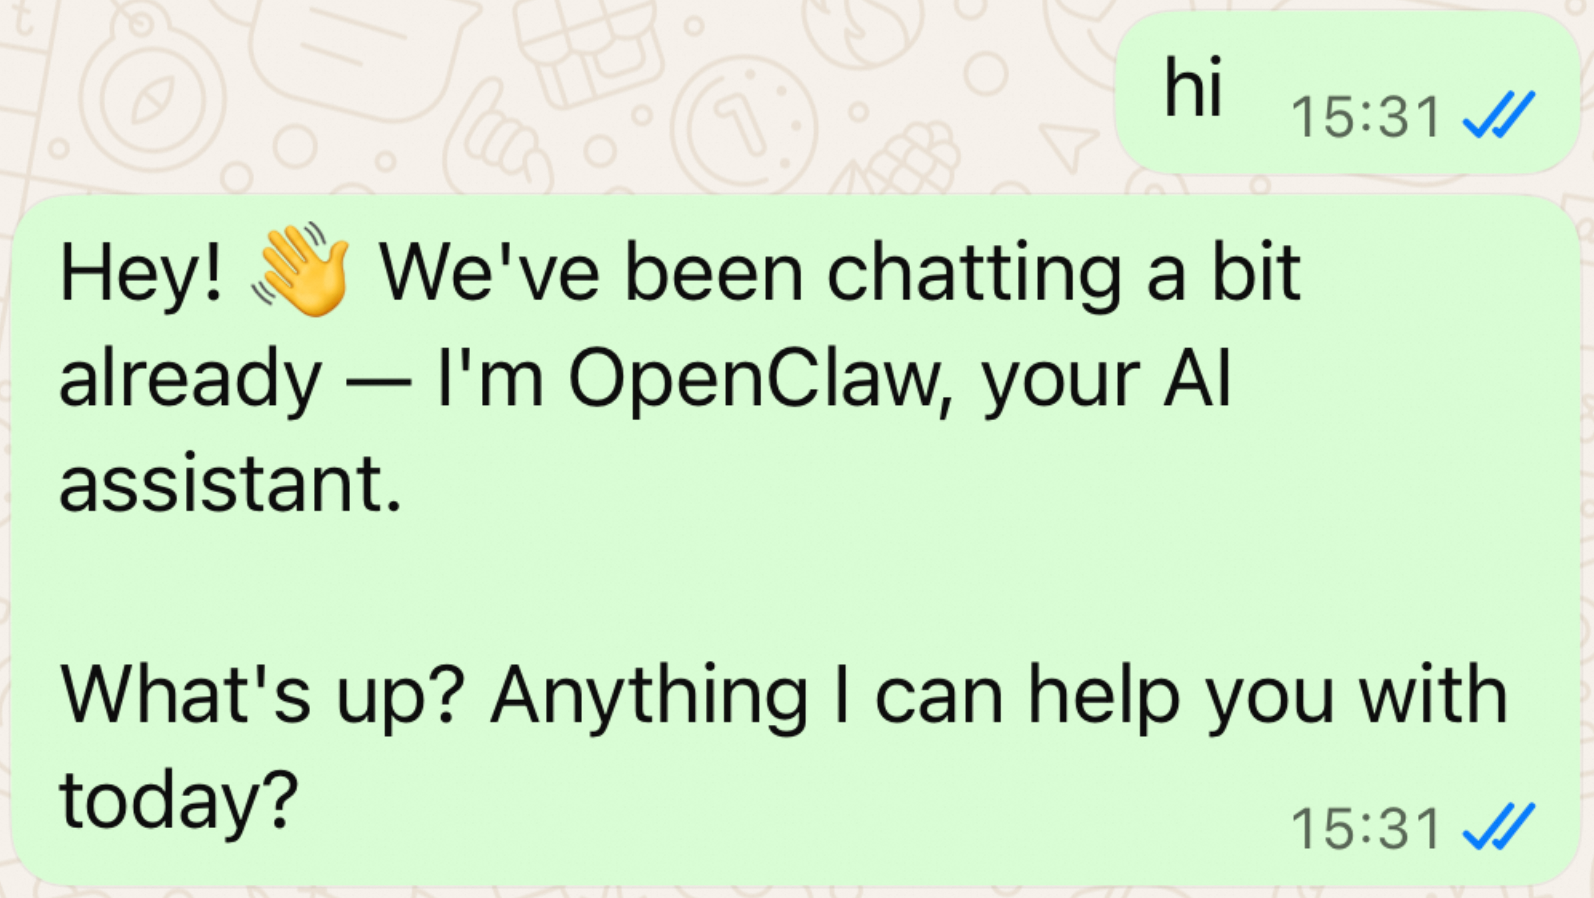
}We recommend using a separate phone number for the WhatsApp channel to prevent the bot from responding to your daily messages. If you use your personal phone number, you can enter a prompt in an OpenClaw conversation to enable selfChatMode. In this mode, the bot responds only to messages you send to yourself, without affecting other chats.Step 3: Link WhatsApp
Run the following command to start the WhatsApp linking process. A QR code is displayed in the terminal.
openclaw channels login --channel whatsappOpen WhatsApp on your phone and scan the QR code in the terminal to complete the linking process.
Restart the gateway.
openclaw gateway restart
Step 4: Test
Run the following command to check the WhatsApp channel status:
openclaw statusIn the Channels section, WhatsApp should be
ONwith a status ofOK.In WhatsApp, send a message to yourself to verify that the bot responds correctly.
Telegram
Step 1: Configure a Telegram bot
Create a bot using BotFather
Send the
/newbotcommand and follow the prompts to enter a bot name and username. The username must end withbot. Copy and save the returned Bot Token, which has the format123456789:ABCdefGHIjklMNOpqrsTUVwxyz.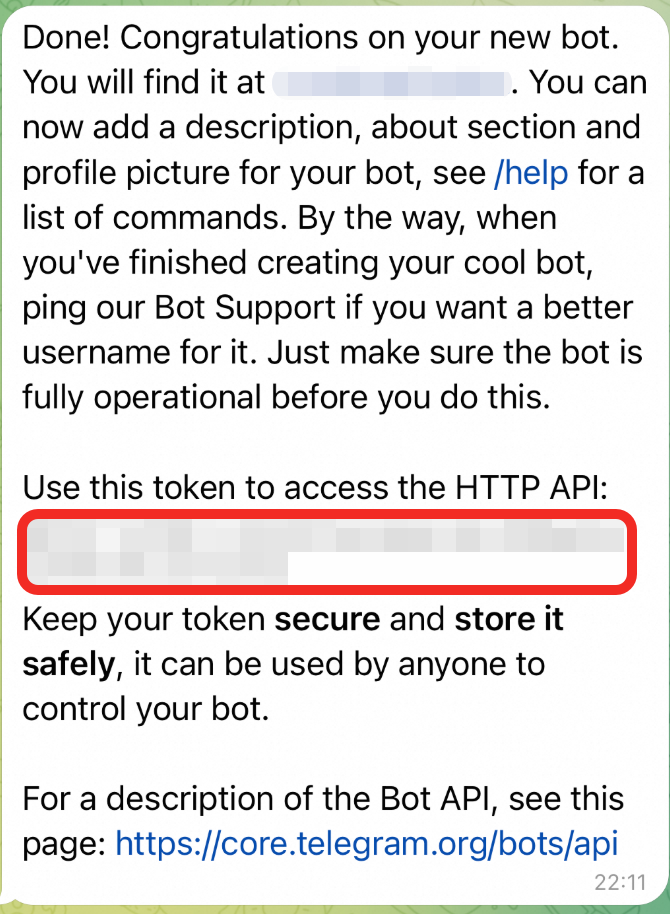
Enter the following prompt in an OpenClaw conversation, replacing xxxx with your actual Bot Token. OpenClaw will then complete the configuration automatically.
Please help me configure Telegram with the following settings. My Bot Token is xxxx.
{
  "channels": {
    "telegram": {
      "enabled": true,
      "botToken": "xxxx",
      "dmPolicy": "pairing"
    }
  }
}
After the configuration is complete, restart the gateway.
openclaw gateway restartSend a message to your bot in Telegram. The first time you send a message, you will receive a pairing code.
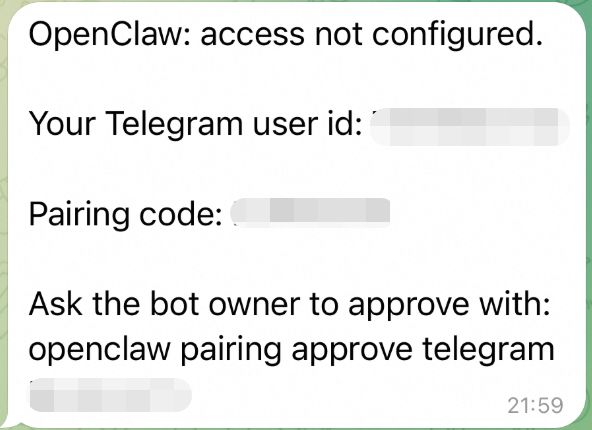
Run the following command in your terminal, replacing xxx with the actual pairing code:
openclaw pairing approve telegram xxx
Discord
Step 1: Create a Discord application and bot
Create a Discord application
Go to the Discord Developer Portal, click New Application, enter an application name, and then click Create.
Create a bot and enable intents
In the left navigation pane, click Bot and set a bot username.
On the Bot page, scroll down to Privileged Gateway Intents and enable the following intents:
Message Content Intent
Server Members Intent
Presence Intent
When finished, click Save Changes.
Get the Bot Token
At the top of the Bot page, click Reset Token to generate a new token. Copy and save the token securely, as it is only displayed once.
Add the bot to a server
In the left navigation pane, click OAuth2 and scroll down to OAuth2 URL Generator.
In the Scopes section, select
botandapplications.commands.In the Bot Permissions section that appears, select the following permissions:
View Channels
Send Messages
Read Message History
Embed Links
Attach Files
Copy the URL generated at the bottom of the page, open it in your browser, select the target server, and click Continue to add the bot.
Step 2: Configure Discord in OpenClaw
On the machine where OpenClaw is running, set the Bot Token environment variable:
export DISCORD_BOT_TOKEN="YOUR_BOT_TOKEN"Run the following commands to complete the Discord configuration:
openclaw config set channels.discord.token --ref-provider default --ref-source env --ref-id DISCORD_BOT_TOKEN
openclaw config set channels.discord.enabled true --strict-json
Restart the gateway to apply the configuration.
openclaw gateway restart
Step 3: Pair and test
Send a direct message to the bot in Discord. The first time you send a message, you will receive a pairing code.
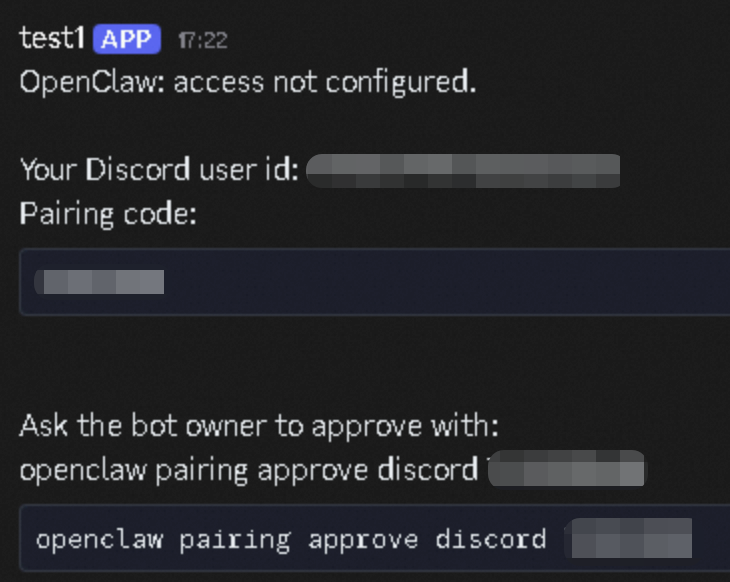
Run the following command in your terminal to complete the pairing, replacing xxx with the actual pairing code:
openclaw pairing approve discord xxxThe pairing code is valid for one hour. If it expires, you must send another message to get a new one.
Run the following command to check the Discord channel status:
openclaw statusIn the Channels section, Discord should be
ONwith a status ofOK.Send a message in Discord to test the bot.
Use cases
Use case 1: Automating X (Twitter)
You can use OpenClaw to automate your X (Twitter) account, letting you create posts, reply to posts, search, and browse your timeline.
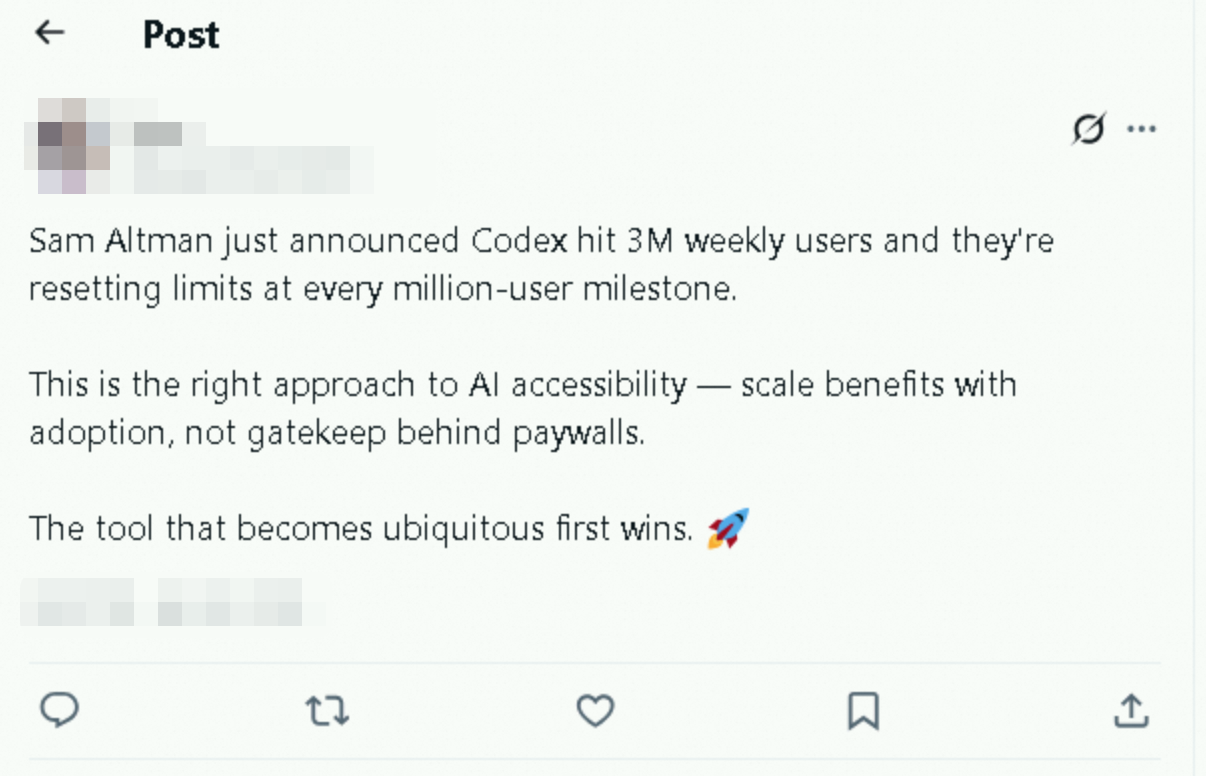
In an OpenClaw conversation, enter Check Sam Altman's recent posts, summarize the key points, and then help me publish a post with my take on it. OpenClaw will automatically fetch the latest updates, analyze the content, and publish the post.
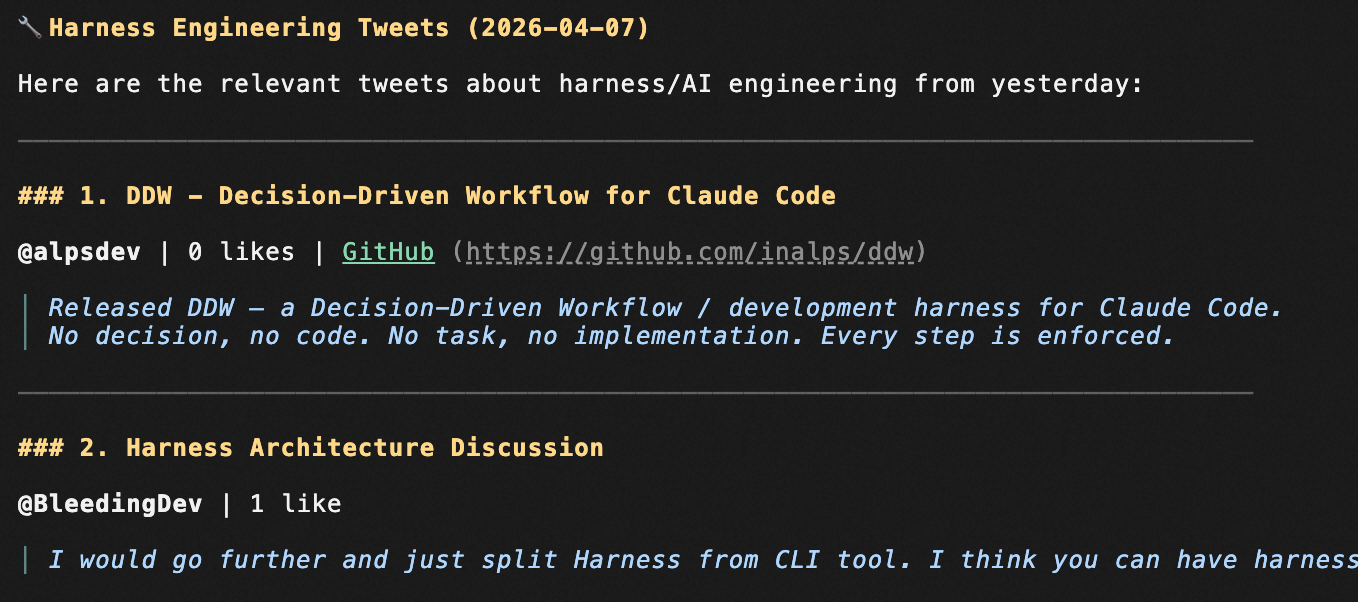
Enter Help me search for posts about harness engineering from yesterday. OpenClaw will search for relevant posts and summarize the key points.
Use case 2: YouTube video analysis and download
With OpenClaw, you can search for YouTube videos by keyword, sort them by date, retrieve video metadata in batches, and download them.
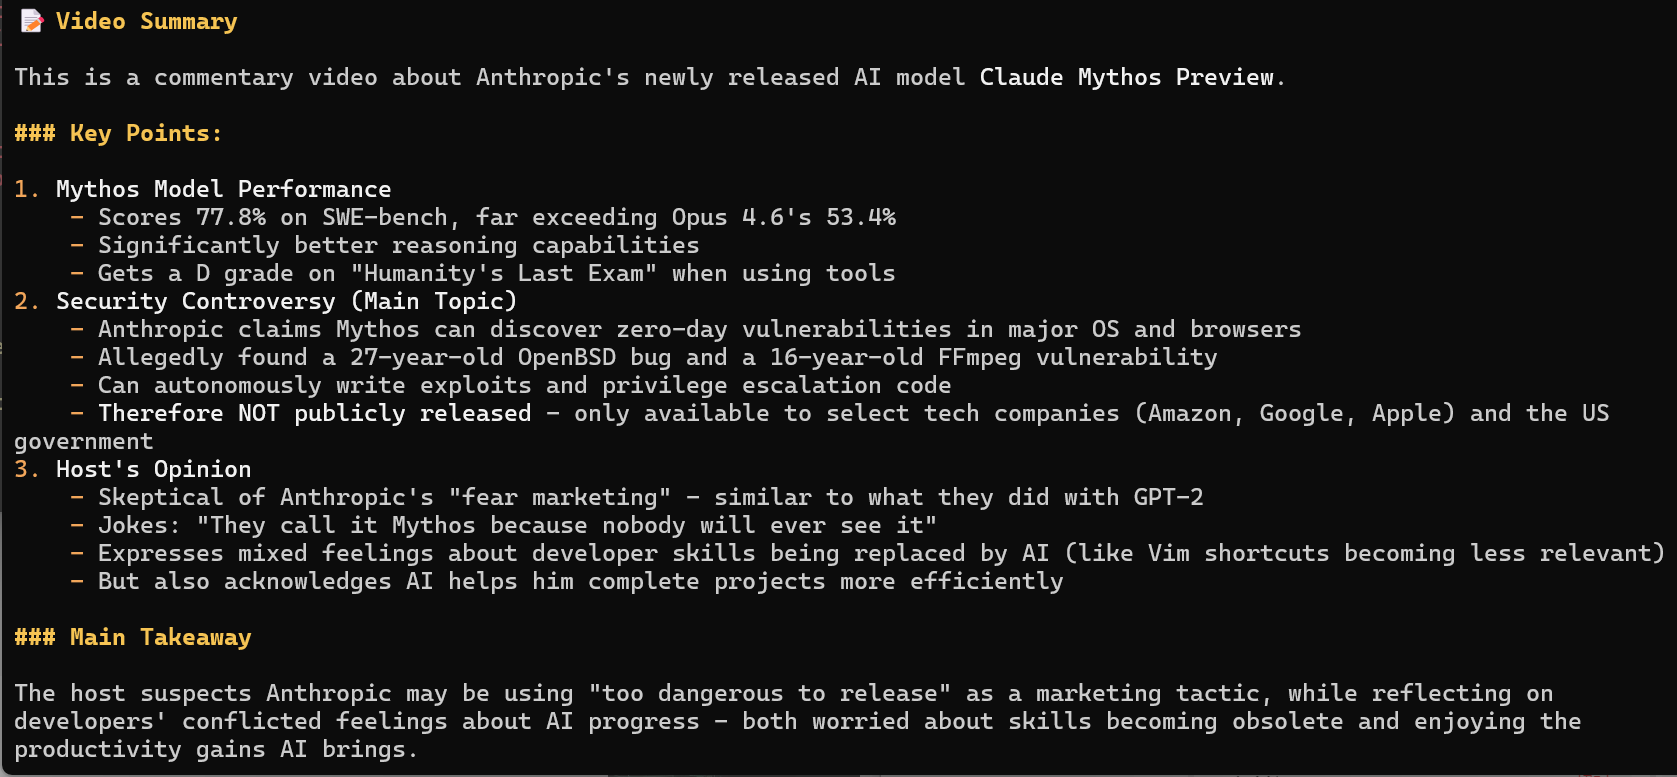
In an OpenClaw conversation, enter Help me summarize the main content of this video: https://www.youtube.com/watch?v=XRgGFQ0EgM0. OpenClaw will extract the video information and generate a summary.
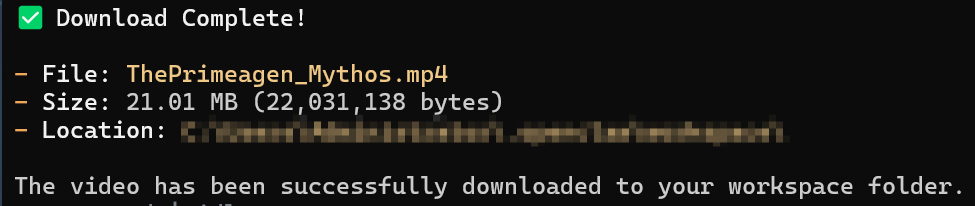
In an OpenClaw conversation, enter Help me download this video: https://www.youtube.com/watch?v=XRgGFQ0EgM0. OpenClaw will call yt-dlp to download the video to your local machine.
Use case 3: Scheduling AI news delivery
Use the OpenClaw cron job feature to automatically fetch the latest AI news and send it to WhatsApp daily.

Use case 4: Stock market monitoring and analysis
Use OpenClaw to analyze stock trends and get technical analysis and investment advice.
AI-generated content is for reference only and does not constitute investment advice or a basis for decision-making.
Learn more
Skill
A skill is an extensible capability module. The agent automatically matches and loads the appropriate skill for a given request. OpenClaw lets you view and enable built-in skills, install community skills from ClawHub, or create custom skills.
View existing skills
Run the following commands to view your installed skills and their status.
# List installed skills
openclaw skills list

# Check skill status (enabled, disabled, missing dependencies, etc.)
openclaw skills check

# View details for a specific skill
openclaw skills info <skill-name>
Built-in skills are disabled by default. To enable built-in skills, add them to the
skills.allowBundledwhitelist in your~/.openclaw/openclaw.jsonfile. OpenClaw loads only the built-in skills listed in this whitelist.{ "skills": { "allowBundled": [ "github", "weather", "summarize", "coding-agent", "clawhub", "nano-pdf", "google-web-search", "image-lab" ] } }Some built-in skills require a third-party API key. Configure these keys in the
skills.entriessection of your~/.openclaw/openclaw.jsonfile. For details, refer to the Skills configuration documentation.
Find more skills
Use one of the following methods to find and install more skills.
Search and install from ClawHub
ClawHub offers over 3,000 community skills. You can browse them on the website or search for them from the command line.
# Search by keyword
npx clawhub search [keyword]

# Browse recently updated skills
npx clawhub explore
Once you find a suitable skill, run the following command to install it. After installation, restart the gateway to use the skill.
npx clawhub install <skill-name>Ask OpenClaw directly
Describe what you need directly in the conversation, for example:
Help me find a skill that can check the weather. OpenClaw will automatically search for and install a matching skill.
Create a custom skill
Create a directory for your skill.
mkdir -p ~/.openclaw/workspace/skills/my-custom-skillIn this directory, create a
SKILL.mdfile. The file consists of two parts: YAML front matter and Markdown instructions. Thenameanddescriptionfields are required. The agent uses thedescriptionto determine whether to load the skill, so ensure it is accurate.--- name: my-custom-skill description: A short description --- # My Custom Skill When the user requests XXX, perform the following actions: 1. Use the bash tool to run the xxx command 2. Parse the output 3. Return the result to the user in a tableRestart the gateway to activate the skill.
# Restart the gateway
openclaw gateway restart

# Verify the skill is available
openclaw skills list
For more information about Skill configuration, see OpenClaw official documentation.
FAQ
For more information, see the FAQ.