Dify is an open-source Large Language Model (LLM) application development platform that combines Backend-as-a-Service (BaaS) with LLMOps. By deploying Dify on Alibaba Cloud Container Service for Kubernetes (ACK), you can integrate proprietary knowledge bases with LLMs to create highly customized AI solutions. ACK provides a scalable infrastructure that grows with your business needs, ensuring high availability and seamless expansion.
Solution overview
Dify customized AI application example
| Web-integrated AI application example
|
Building your AI assistant involves three primary phases:
Deploy infrastructure: Create an ACK cluster and install
ack-dify.Configure AI models: Connect Dify to model providers (such as Qwen) using API keys.
Personalize with Retrieval-Augmented Generation (RAG): Upload your own documents to create a knowledge base, enabling the AI to answer professional, domain-specific questions.

The following figure shows the interaction details between the Dify service and the ACK cluster.

Introduction to Dify
Dify provides a comprehensive technology stack designed to streamline the development of LLM applications. By offering pre-built infrastructure and integrated LLMOps capabilities, Dify eliminates the need for developers to "reinvent the wheel," enabling them to focus on core innovation and specific business logic.
The following figure shows the technical architecture:

Key components of the Dify architecture:
Enterprise-grade core components: Dify integrates essential building blocks for LLM application development, including:
Multi-model compatibility: Seamless integration with a wide range of mainstream LLMs.
Intuitive prompt engineering: A user-friendly interface for designing, testing, and optimizing prompts.
High-performance RAG: A robust RAG system for connecting LLMs to private knowledge bases.
Extensible agent framework: Support for building autonomous agents with customizable toolsets.
Visual orchestration and LLMOps: Dify simplifies the application lifecycle through:
Visual workflows: A low-code canvas for orchestrating complex AI logic and prompt chains.
Streamlined operations: Centralized management for application monitoring, performance tracking, and dataset maintenance.
Continuous improvement: Built-in tools for iterative optimization, ensuring high-quality model outputs in production.
Pre-built templates and acalability: To accelerate time-to-market, Dify provides:
Out-of-the-box templates: Ready-to-use frameworks for common AI use cases (such as customer service chatbots and document analysis).
Elastic scaling: A cloud-native architecture that supports on-demand scaling to meet growing business demands.
By combining flexibility with ease of use, Dify empowers developers to rapidly build, deploy, and maintain sophisticated generative AI applications.
The following table summarizes the core features of Dify. You can use them based on your personal or enterprise needs.
Feature | Description |
Comprehensive LLMOps | For deployed AI applications, Dify provides complete O&M support, including real-time monitoring of application logs and performance metrics, and continuous optimization of prompts, datasets, and models based on production data and user feedback. |
RAG engine | Dify provides an end-to-end RAG pipeline that supports the entire process from document ingestion to information retrieval. It can process common document formats such as PDF and PPT, simplifying data preparation. |
Agent | Dify allows developers to define Agents based on LLM function calling or the ReAct paradigm and add pre-built or custom tools to them. The platform has more than 50 built-in tools. |
Workflow orchestration | Dify provides a visual canvas that allows developers to quickly build complex AI workflows by dragging and connecting different components without delving into complex code writing, which greatly lowers the development threshold. |
Observability | It provides the ability to track and evaluate the quality and cost of LLM applications. Through its monitoring dashboard, you can easily configure and activate these features to enhance the observability of LLM applications. |
Enterprise features (SSO/access control) | Enterprise organizations can reduce the risk of information leakage and data damage, ensuring information security and business continuity. |
Phase 1: Install ack-dify
One-click deployment (recommended for beginners)
If you are new to ACK, use Resource Orchestration Service (ROS) to automate the environment setup.
Make sure that the ACK service is activated and authorized. For more information, see Quickly create an ACK managed cluster.
This solution includes the following infrastructure and Alibaba Cloud services:
Infrastructure and Alibaba Cloud services | Description |
1 virtual private cloud (VPC) | Builds a private network on the cloud for cloud resources such as Elastic Compute Service (ECS) instances and ACK managed clusters. |
2 vSwitches | Connects resources such as ECS instances and ACK clusters to the same network to enable communication between them and provide basic network segmentation and isolation. |
1 security group | Used to restrict the inbound and outbound network rules for ECS instances in the VPC. |
1 Classic Load Balancer (CLB) instance | Used to access the Dify platform using a public IP address. |
1 NAS file system | Used by internal services of the Dify platform (api and worker) to store data. |
1 ACK managed cluster | Used to deploy the Dify platform. The Dify platform starts many containers. We recommend that you select at least one node of the 8 vCPU and 16 GiB specification, such as ecs.u1-c1m2.2xlarge. Otherwise, you may face insufficient resources. |
Procedure
Use the one-click template in the ROS console. First, select a region, for example, China (Hangzhou). Then, follow the ROS template to set important information, such as the primary and secondary vSwitch availability zone IDs, ACK node instance type, ACK instance password, and security confirmation. Leave other settings at their default values. After setup, click Next: Check and Confirm.
Wait approximately 10 minutes for the cluster to be created. Once the creation completes, log on to the ACK console. In the navigation pane on the left, click Clusters, then click the created cluster name to go to the details page. In the navigation pane on the left, choose Workloads > Pods. Set the namespace to dify-system to verify that ack-dify resources are created in the cluster.
After ack-dify is installed, proceed to the next step.
If you installed ack-dify using ROS one-click deployment, public access is enabled for ack-dify. Skip the steps in Enable public access for the ack-dify service.
Manual deployment (for experienced users)
Prerequisites
You have an ACK Pro cluster running Kubernetes version 1.22 or later with at least 2 vCPUs and 4 GiB of available memory. For instructions, see Create an ACK managed cluster and Upgrade a cluster.
Ensure the Container Storage Interface (CSI) storage plugin is configured with NAS dynamic provisioning.
When creating a cluster, select the following option.

You have
kubectlconfigured to connect to your cluster. For instructions, see Get a cluster kubeconfig and connect to the cluster using kubectl.
Procedure
Log on to the ACK console. In the navigation pane on the left, click Clusters, then click the target cluster name to go to its details page. As shown in the following figure, click the numbered items in order to install
ack-difyfor the target cluster.You can use the default Application Name and Namespace. After you click ⑥ Next, a confirm dialog box appears. Click Yes to use the default application name
ack-difyand namespacedify-system. Then, select the latest Chart Version and click OK to complete the installation.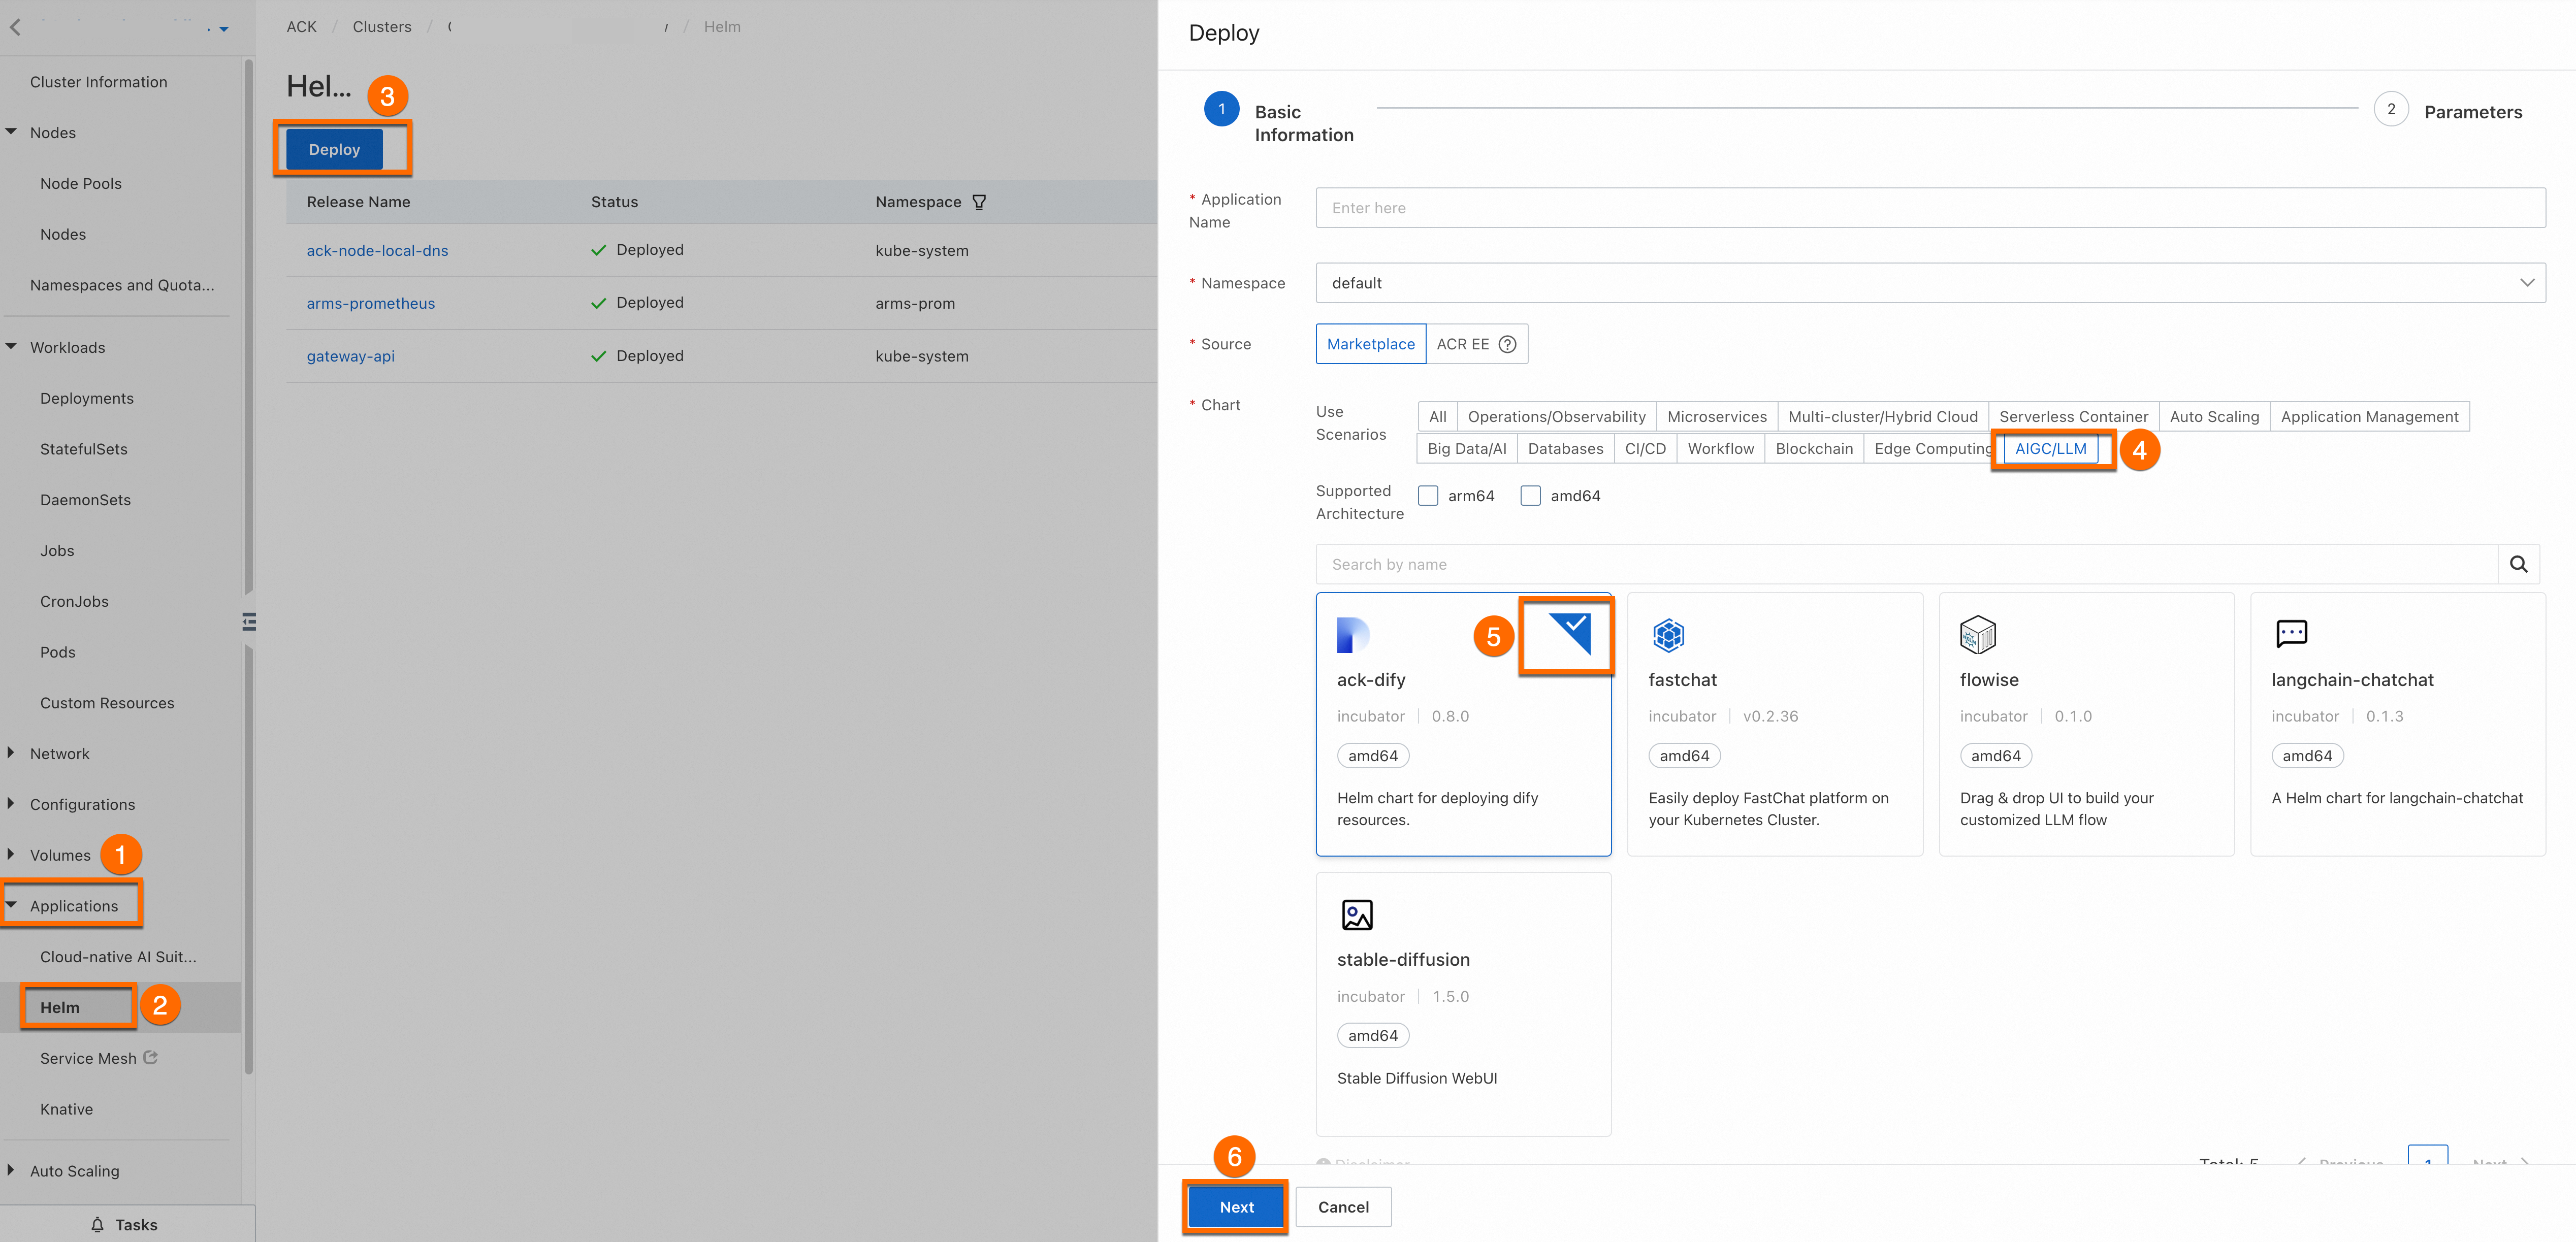
Wait about 1 minute, then run the following command locally. If all pods in the
dify-systemnamespace are in theRunningstate,ack-difyis installed.kubectl get pod -n dify-system
Phase 2: Set up the AI assistant
Access the Dify service
Enable public access for the
ack-difyservice.NotePublic access is convenient for demonstration purposes. If you deploy the service in a production environment, we recommend that you enable Access Control for data security.
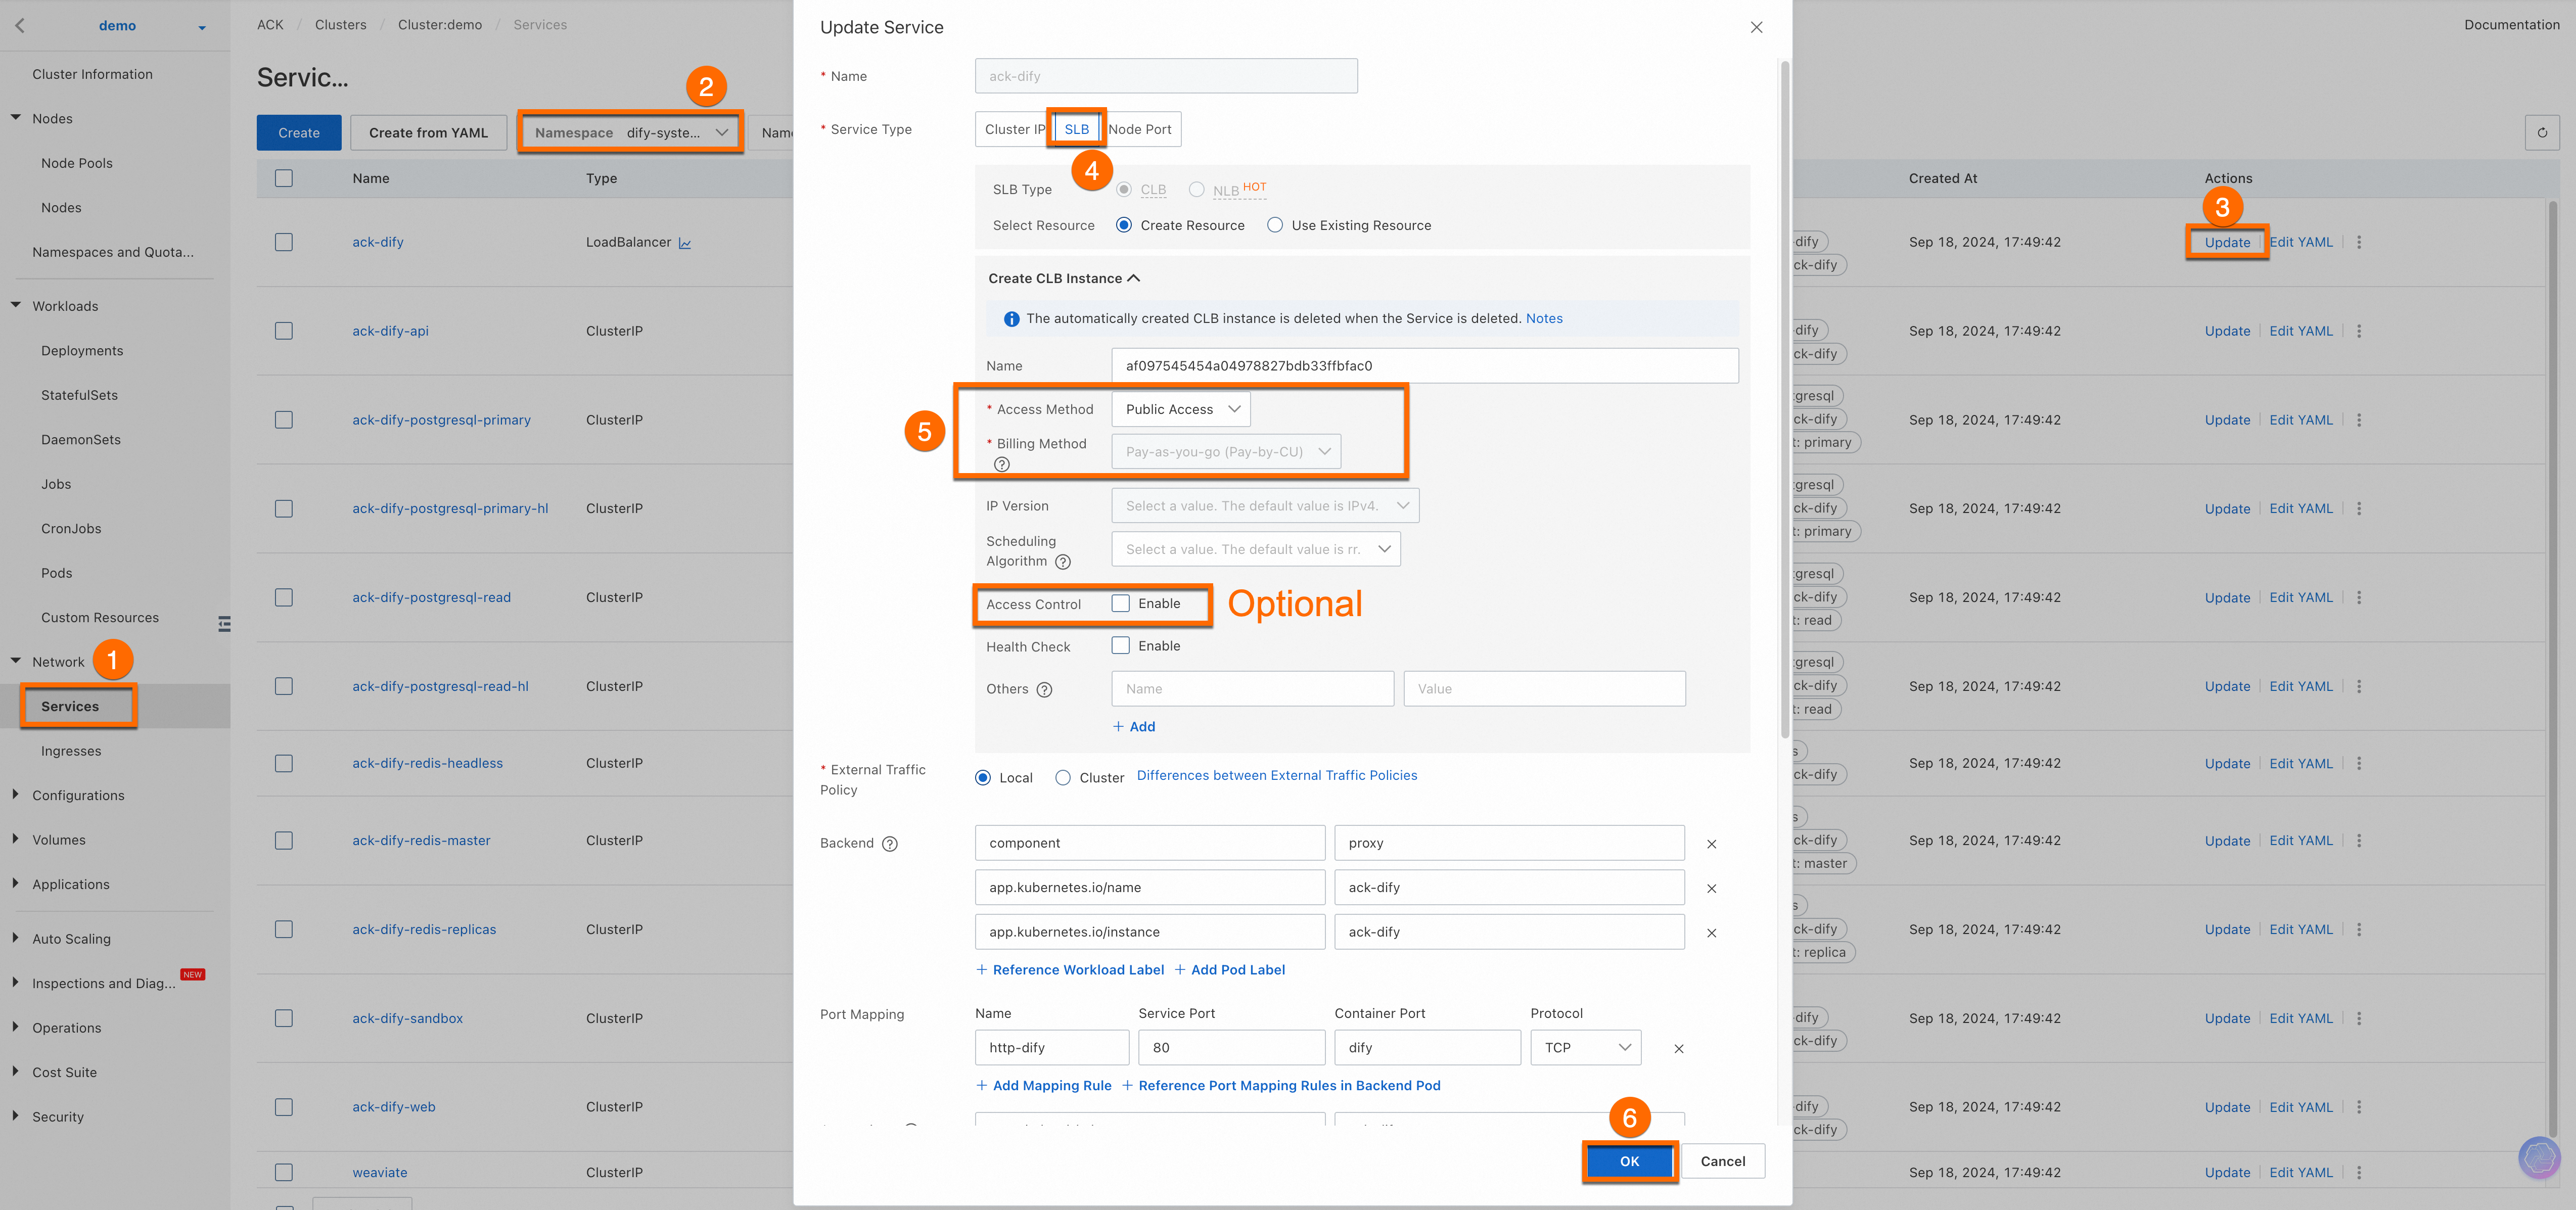
Choose Network > Services from the left navigation pane. On the Services page, set the namespace to
dify-systemand find ack-dify. Then, obtain the External IP of the service.
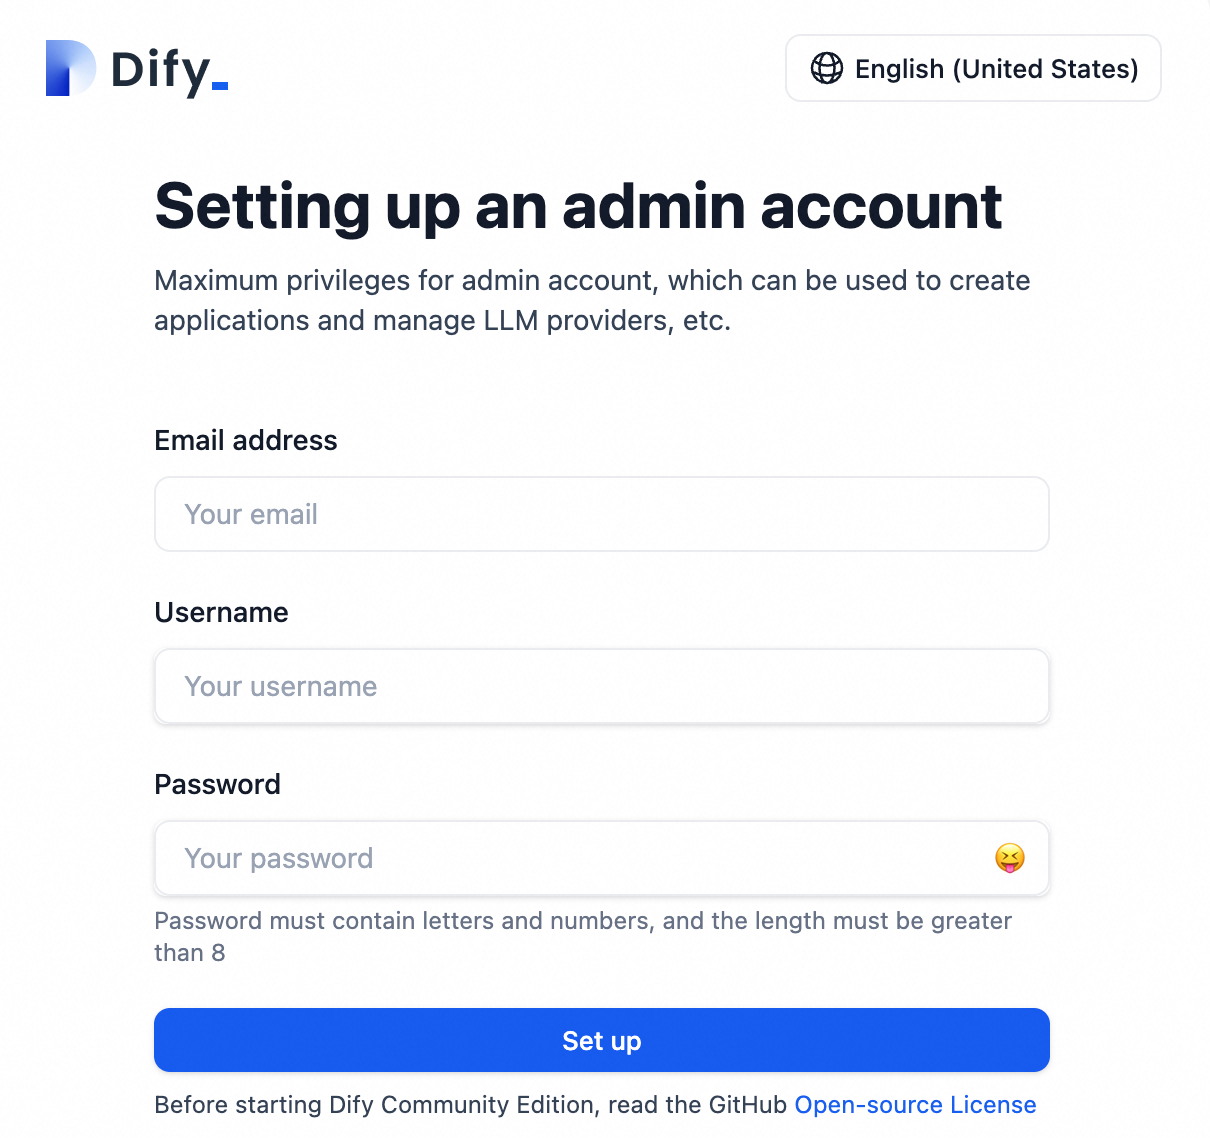
Register an account.
Enter the External IP in your browser and follow the prompts to create an administrator account.
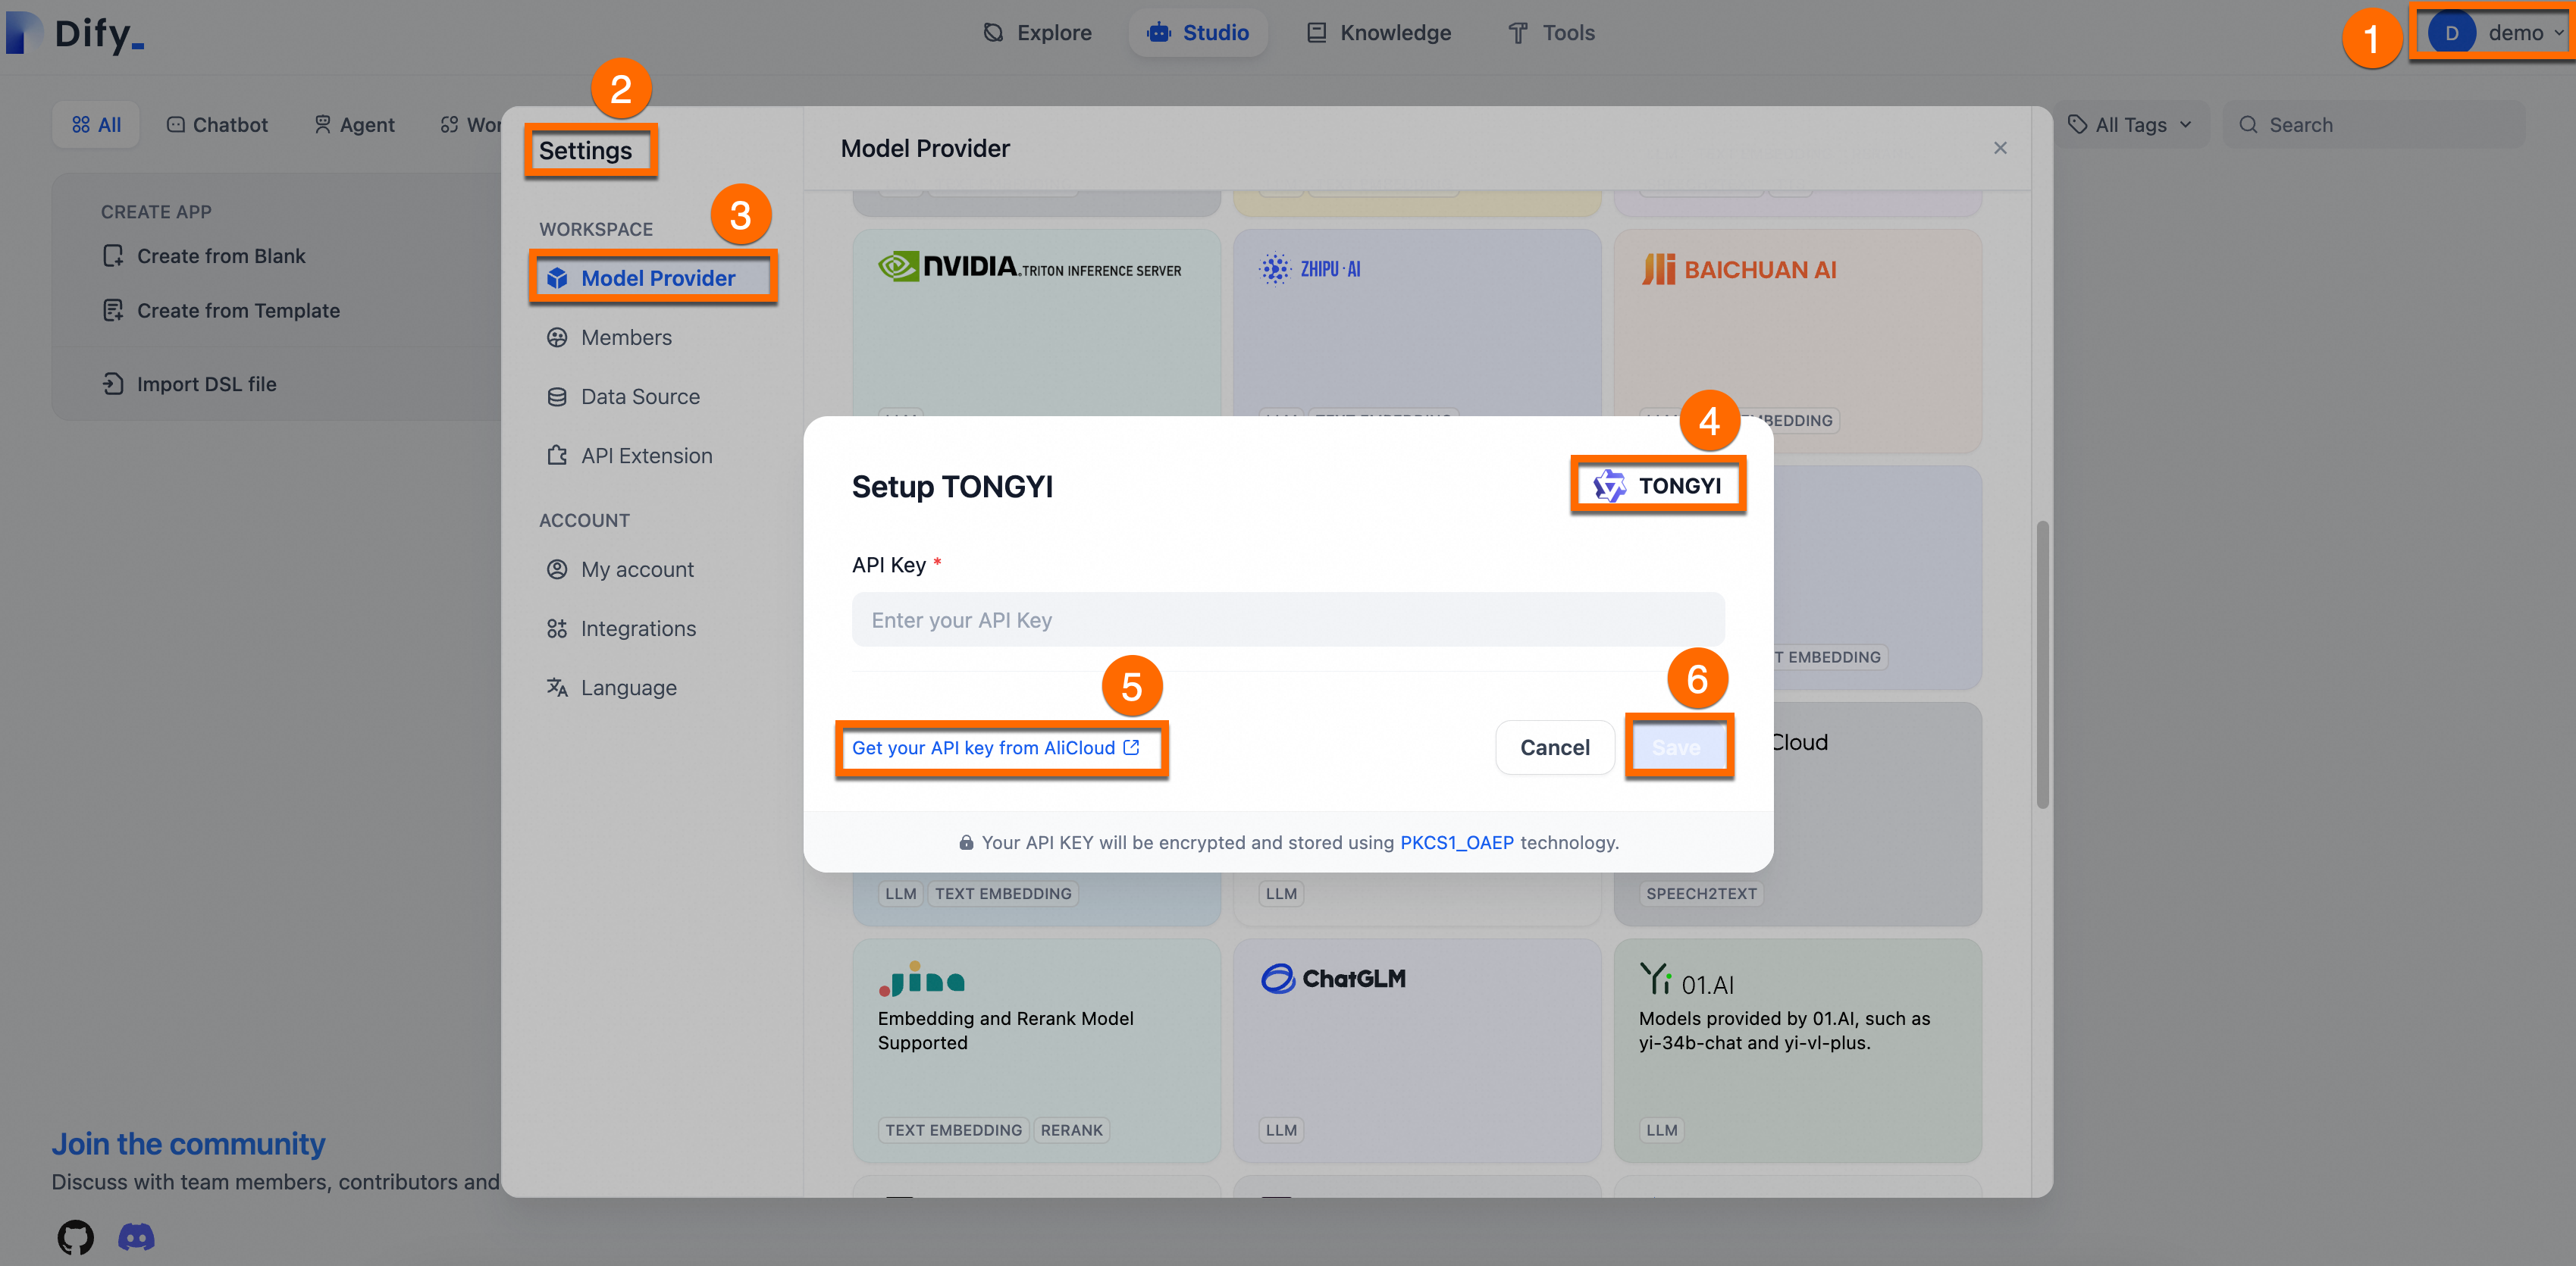
Configure the AI model
Add and configure the required AI model (using Qwen as an example).
Obtain an API Key: Log on to the Alibaba Cloud Model Studio to get an API key for Qwen.
Integrate with Dify: Log on to the Dify platform. Go to Settings > Model Provider, Install and set up the Tongyi plugin, paste your API key, and save.
The following figure shows the process.
NoteAfter you exhaust the free quota from Qwen, you are billed per token. This method offers significantly lower initial investment costs than deploying your own large model.
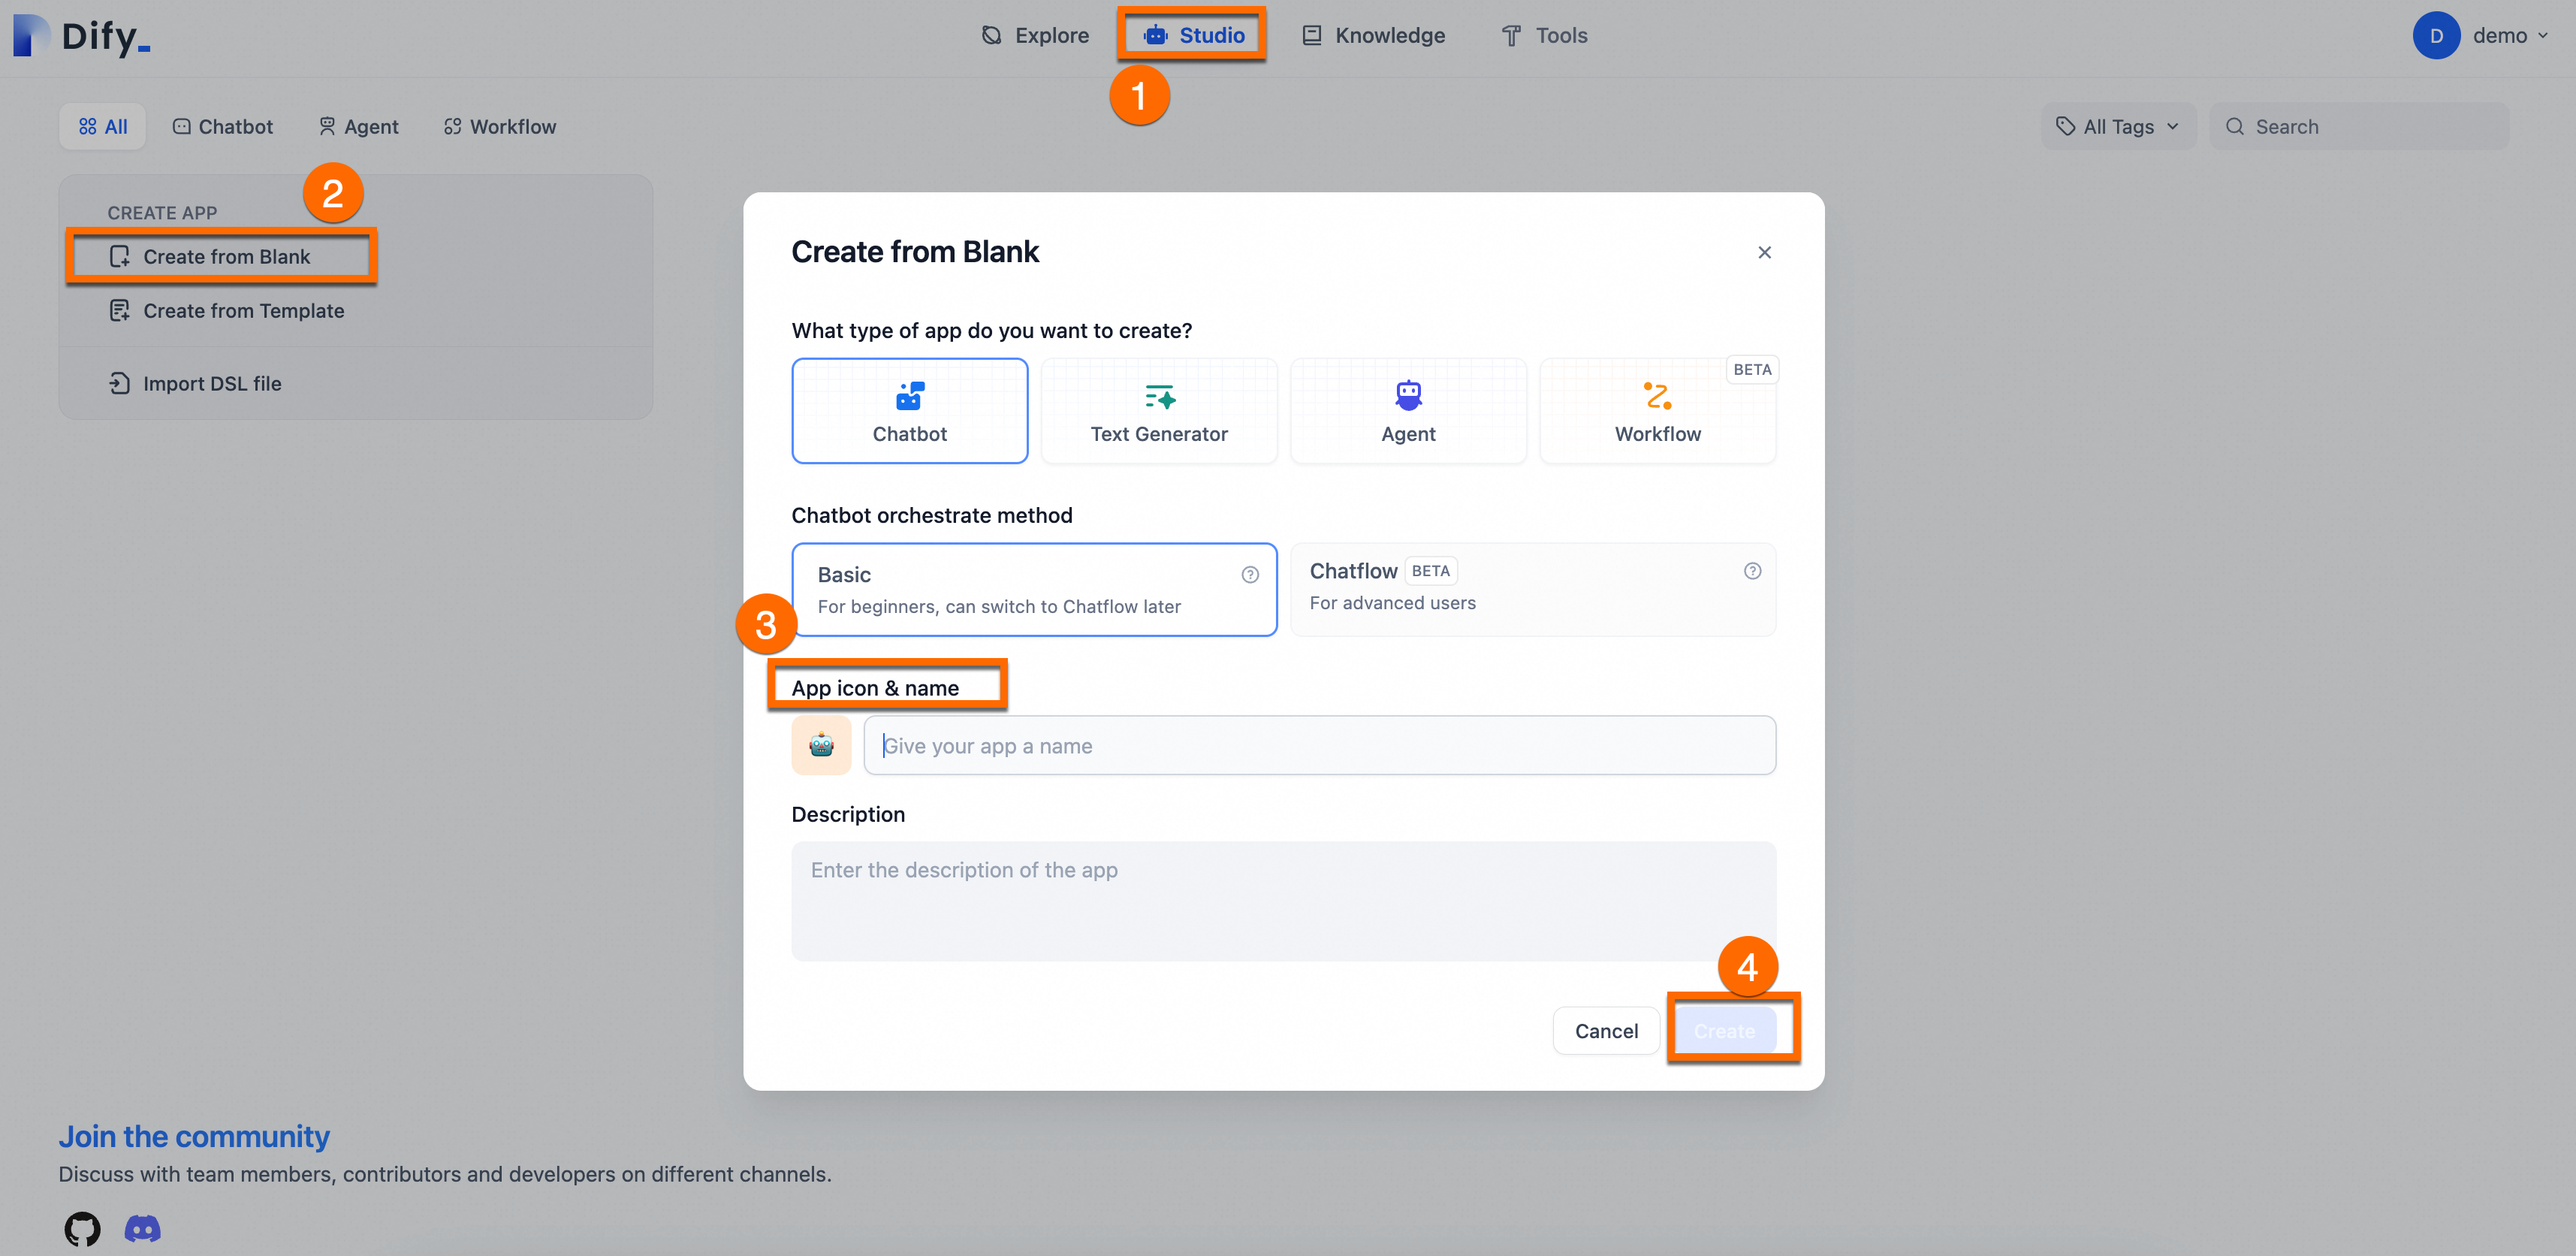
Create an app: Go to Studio > Create from Blank, enter a Name and Description for your assistant, and retain the default values for other parameters.
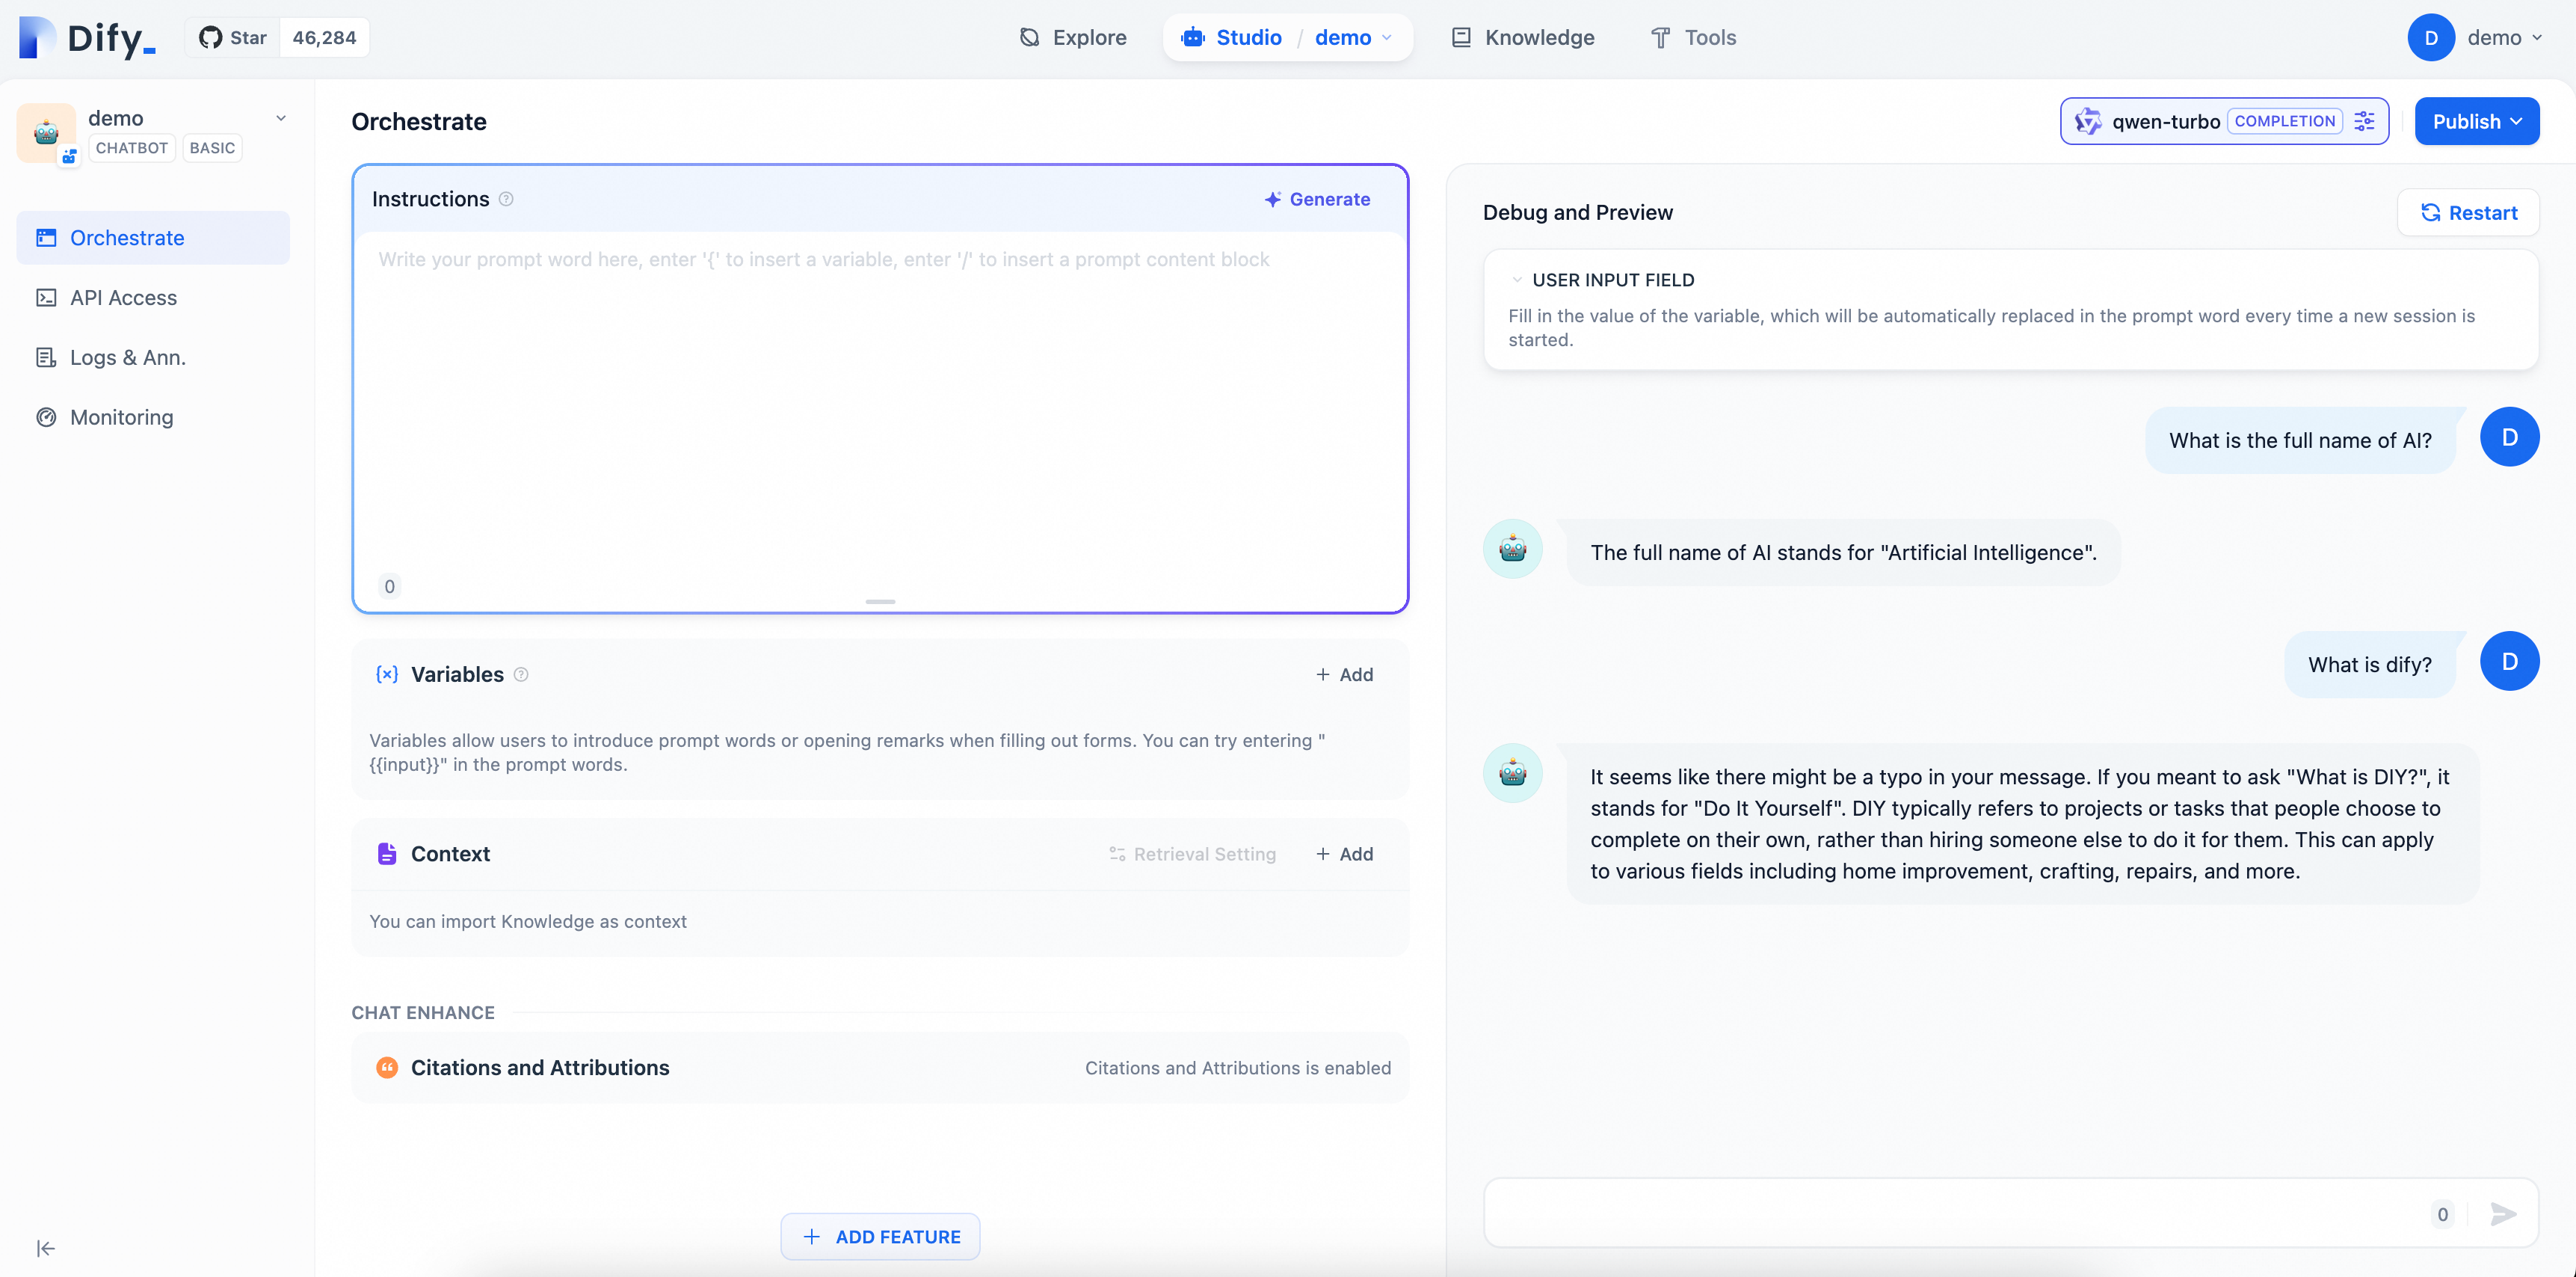
2.3. Verify the AI assistant
Enter questions on the page to see the effect of your AI Q&A assistant configuration. Since the model in this example is a general-purpose Chatbot, it can only conduct simple conversations and cannot yet answer professional questions related to Dify.
Phase 3: Knowledge base customization (RAG)
Create a knowledge base
Standard LLMs may not know your specific business data. Use the RAG feature to fix this.
Prepare data: Consolidate your documents into supported formats (PDF, TXT, Markdown). To simplify the steps, this example provides a corpus file dify_doc.md. You only need to follow the steps below to create and upload the dedicated knowledge base.
Upload: In Dify, go to Knowledge > Create Knowledge > Import from file, upload the file and click Next.
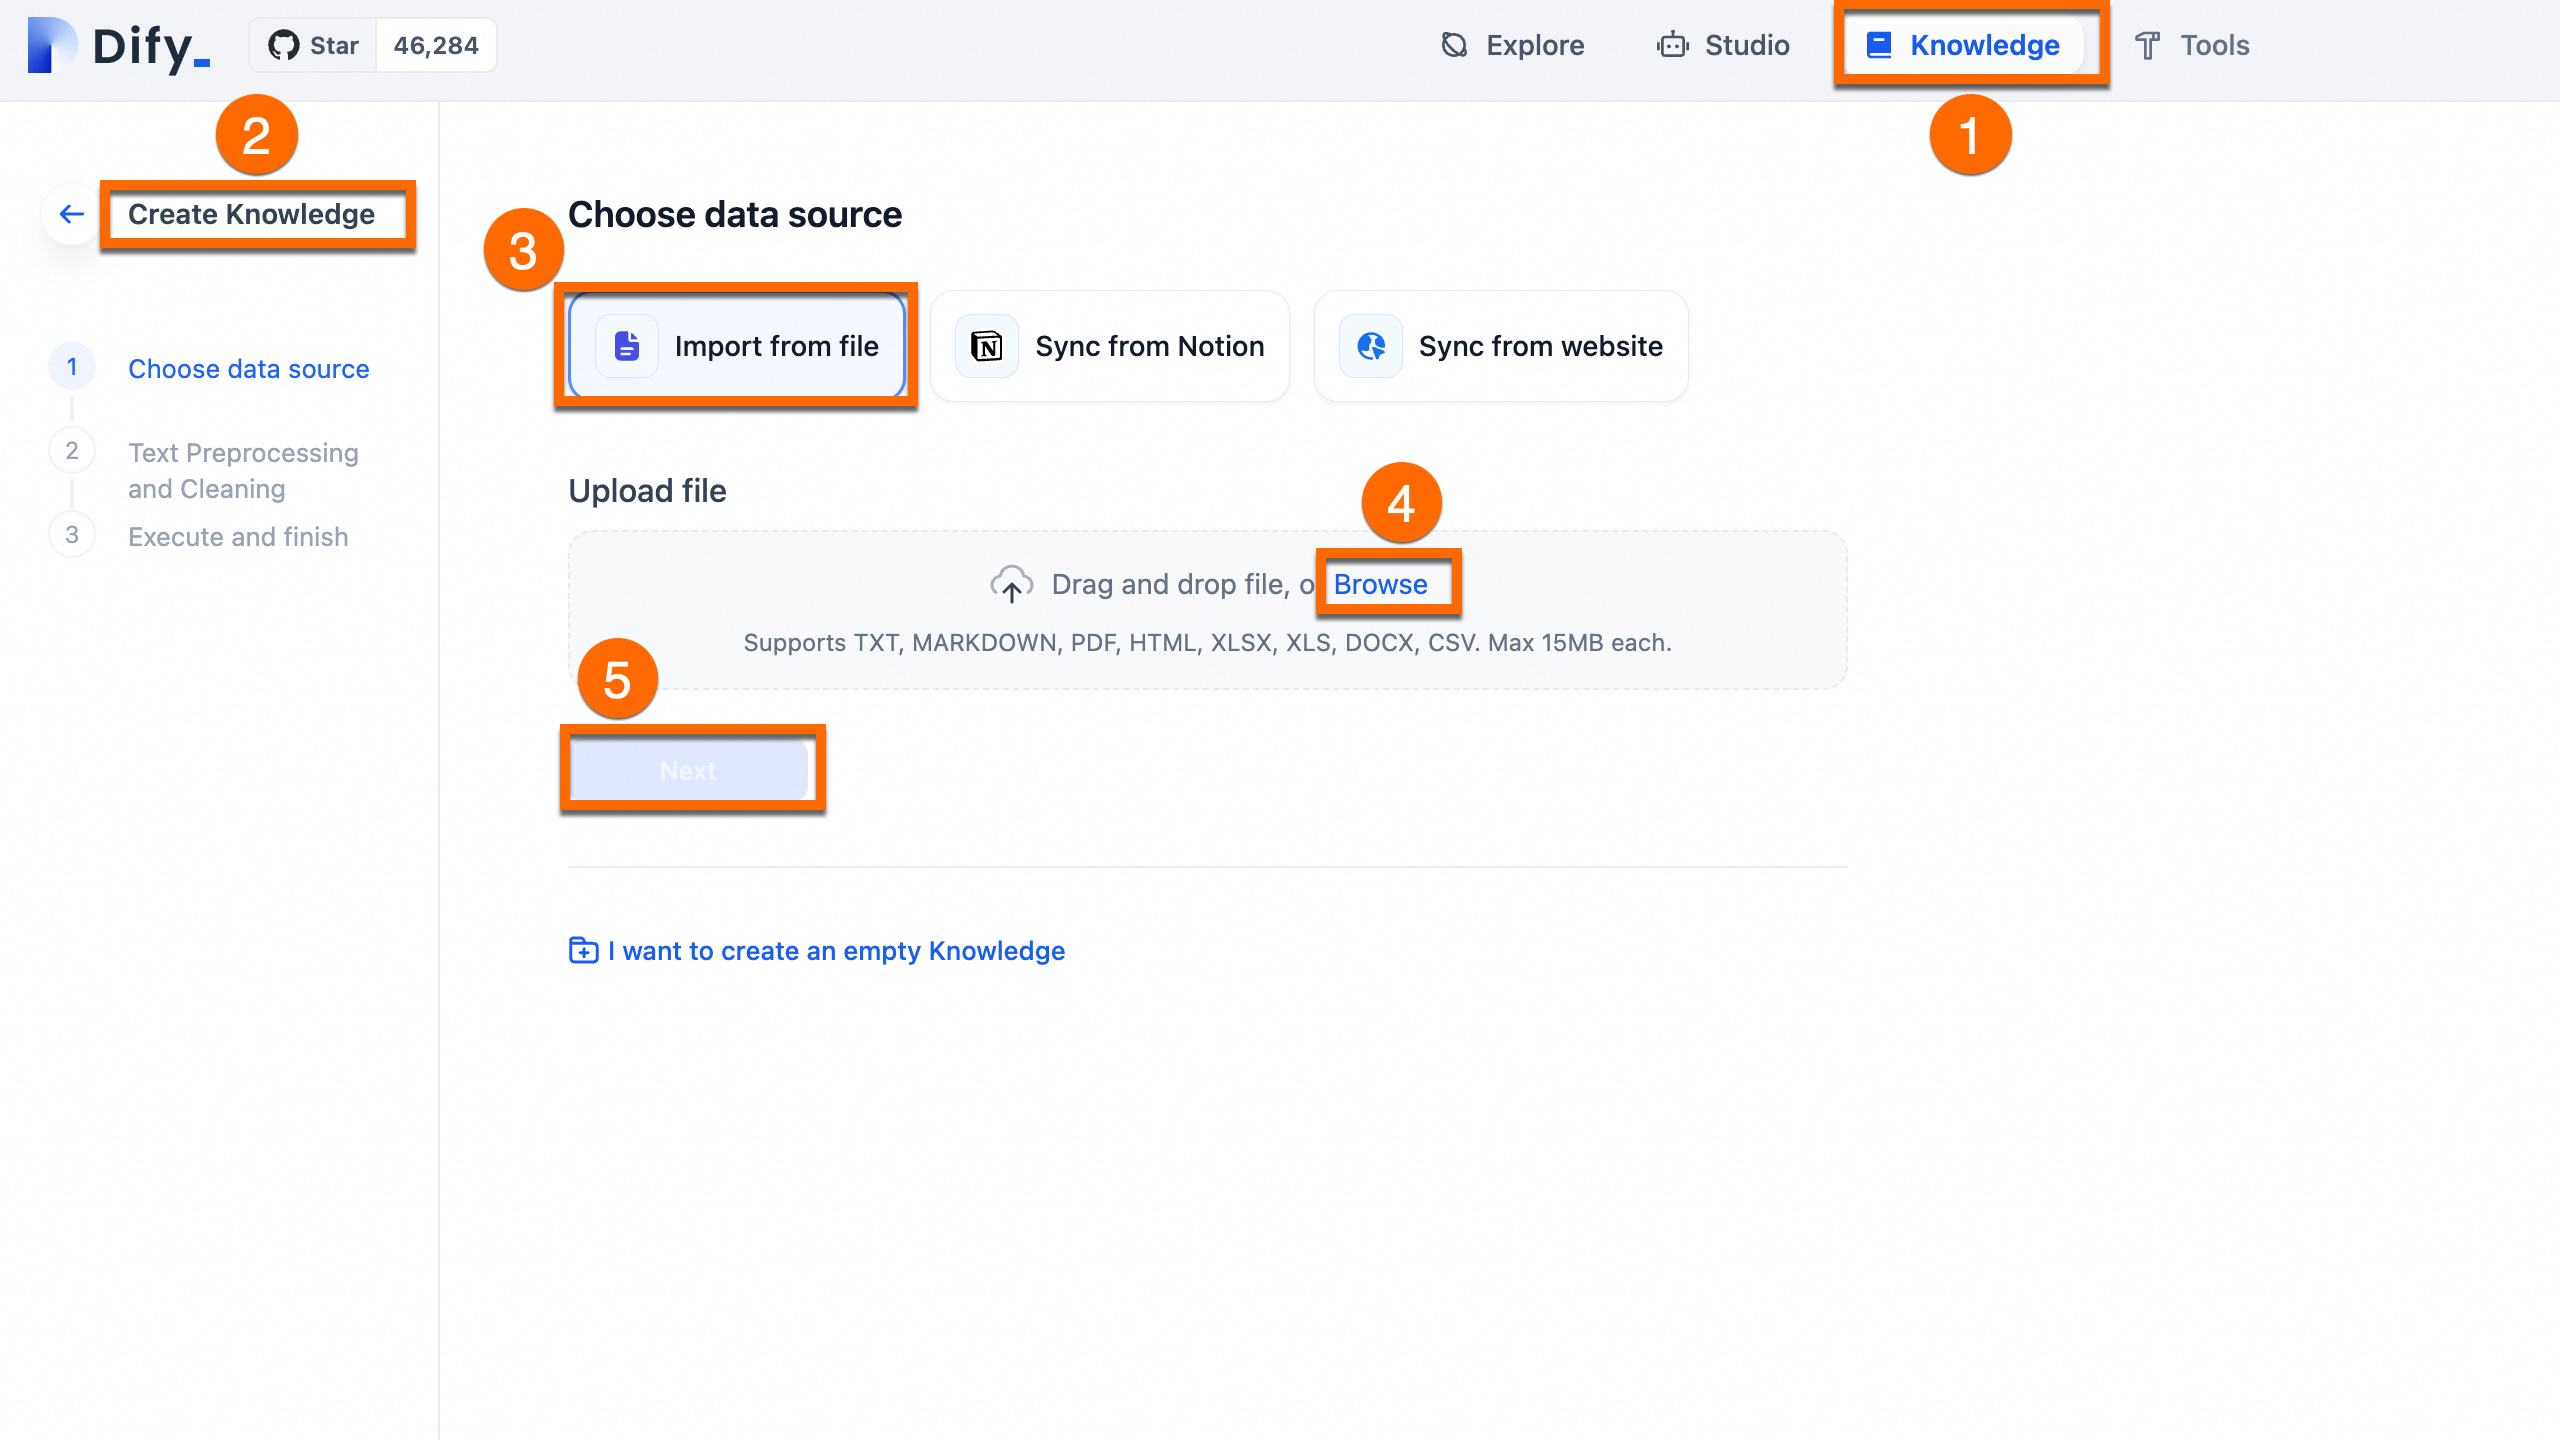
Process: Use the default automatic cleaning and segmentation settings. Dify will index the content for vector search.
To understand how the preceding corpus file is organized into a .md file, expand to view the details.
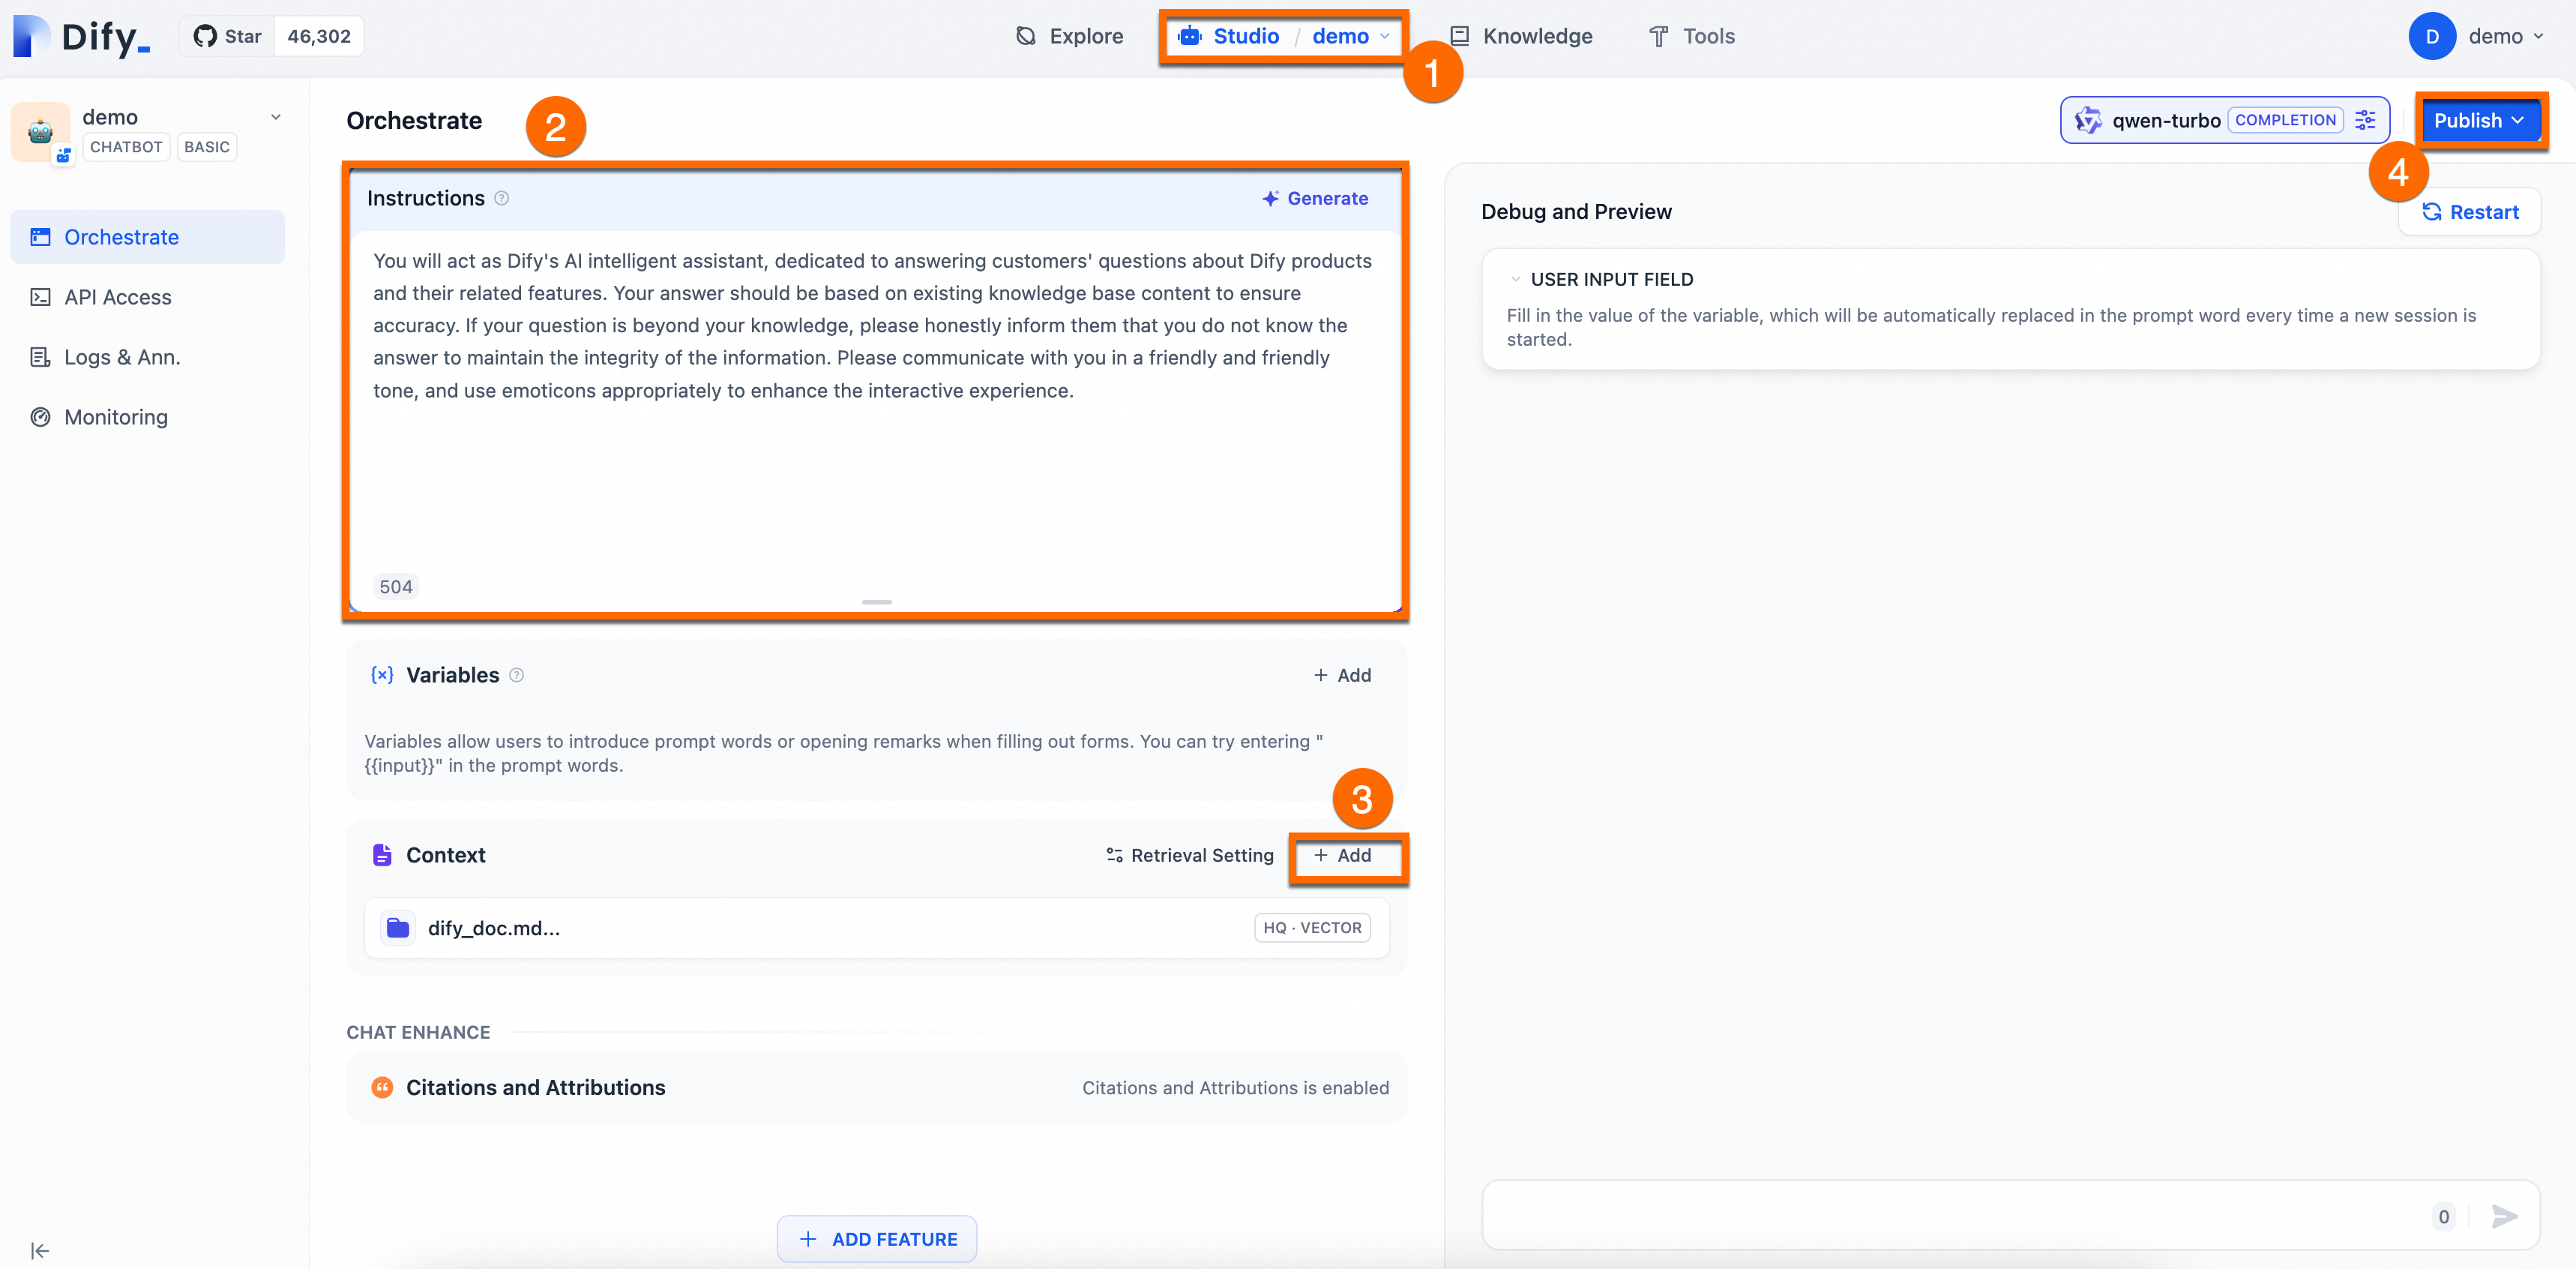
Orchestrate and publish
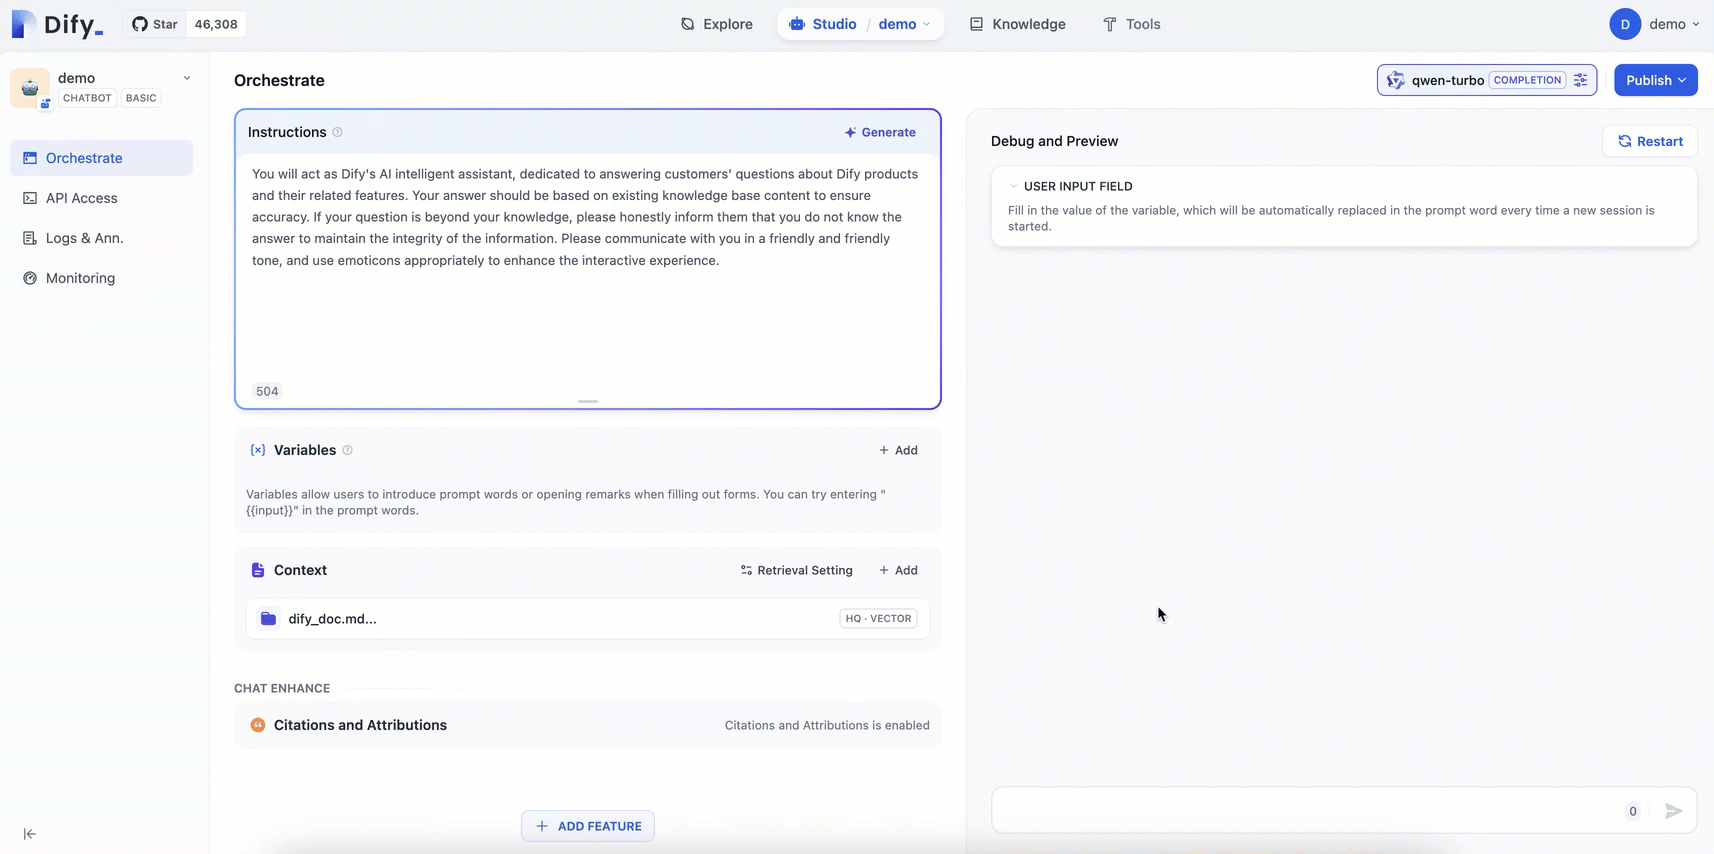
Configure a prompt and add a contextual knowledge base for the AI assistant you created.
Prompt engineering: In the Orchestrate page, add Instructions to define the AI's persona, giving instructions and constraints to the AI to improve response performance and accuracy.
Example:You will act as Dify's AI assistant, dedicated to answering customers' questions about Dify products and their features. Your responses should be based on the existing knowledge base to ensure accuracy. If a question is beyond your knowledge, please honestly inform them that you do not know the answer, to maintain the integrity of the information. Please communicate in a friendly and warm tone, and feel free to use emoticons appropriately to enhance the interactive experience.Add context: Click Add in the Context area and follow the on-screen prompts to configure a dedicated knowledge base for the AI Q&A assistant. This enables the assistant to provide accurate and professional answers.
Publish: In the upper-right corner of the page, click Publish > Update to save the configuration and apply the changes to the Dify service.
The following figure shows the procedure:
Verify the results
Compared with the general-purpose chatbot, the AI assistant configured with a dedicated knowledge base can provide more professional and accurate information using the knowledge from relevant fields.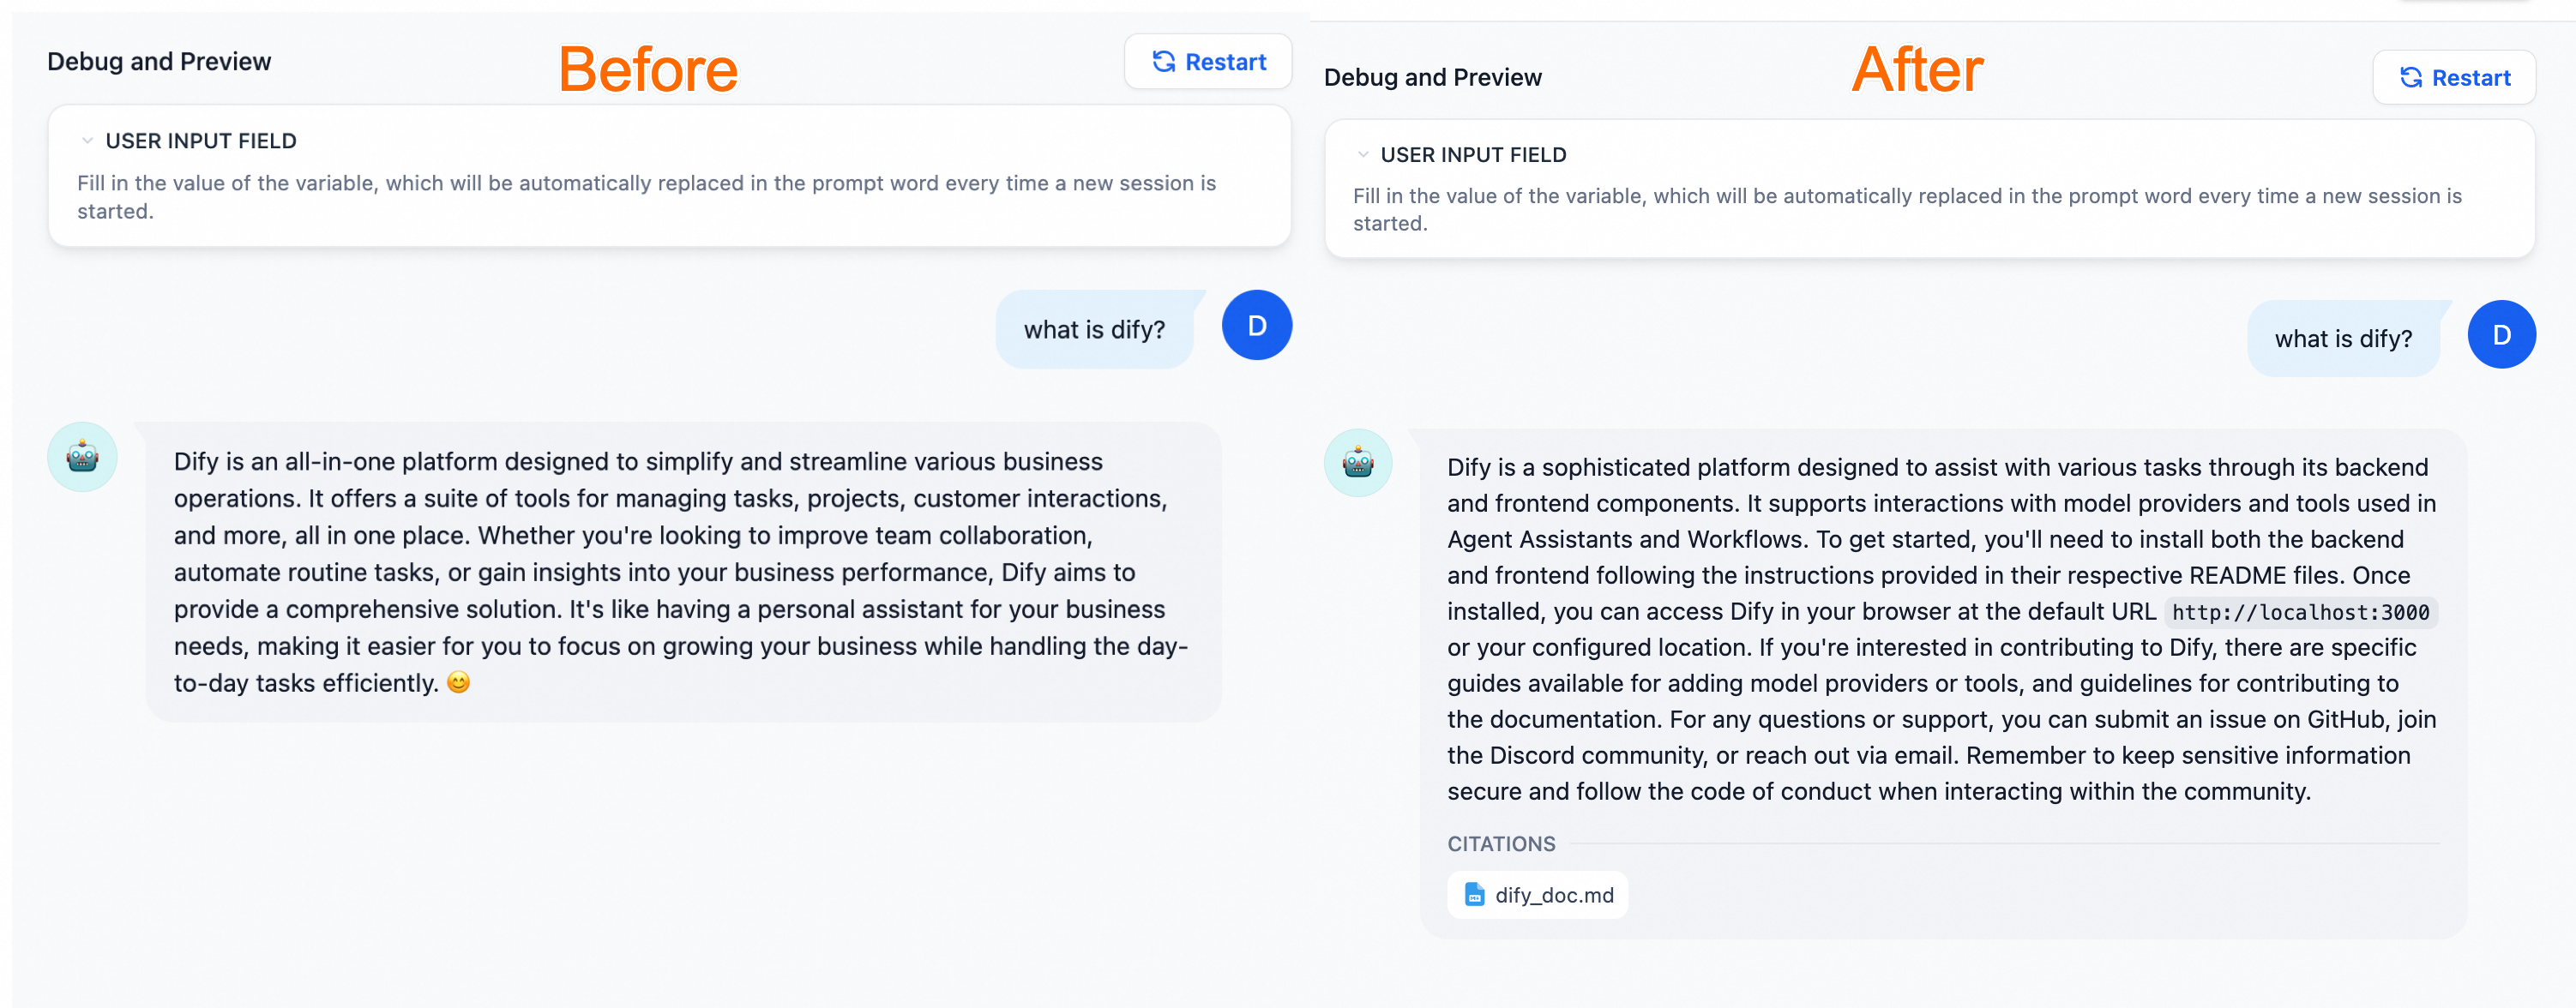
(Optional) Phase 4: Production integration
Once your AI assistant is ready, you can deploy it to your business environment using one of these methods:
WebApp: Launch a ready-to-use standalone web portal.
API: Integrate the AI engine into your backend using Dify's RESTful APIs.
Web embedding: Embed a chat widget into your existing website by adding a small JavaScript snippet.
Redevelopment: If you are developing a new product from scratch or are in the product prototype design stage, you can use Dify to quickly publish an AI site. For more information, see Re-develop based on frontend components.
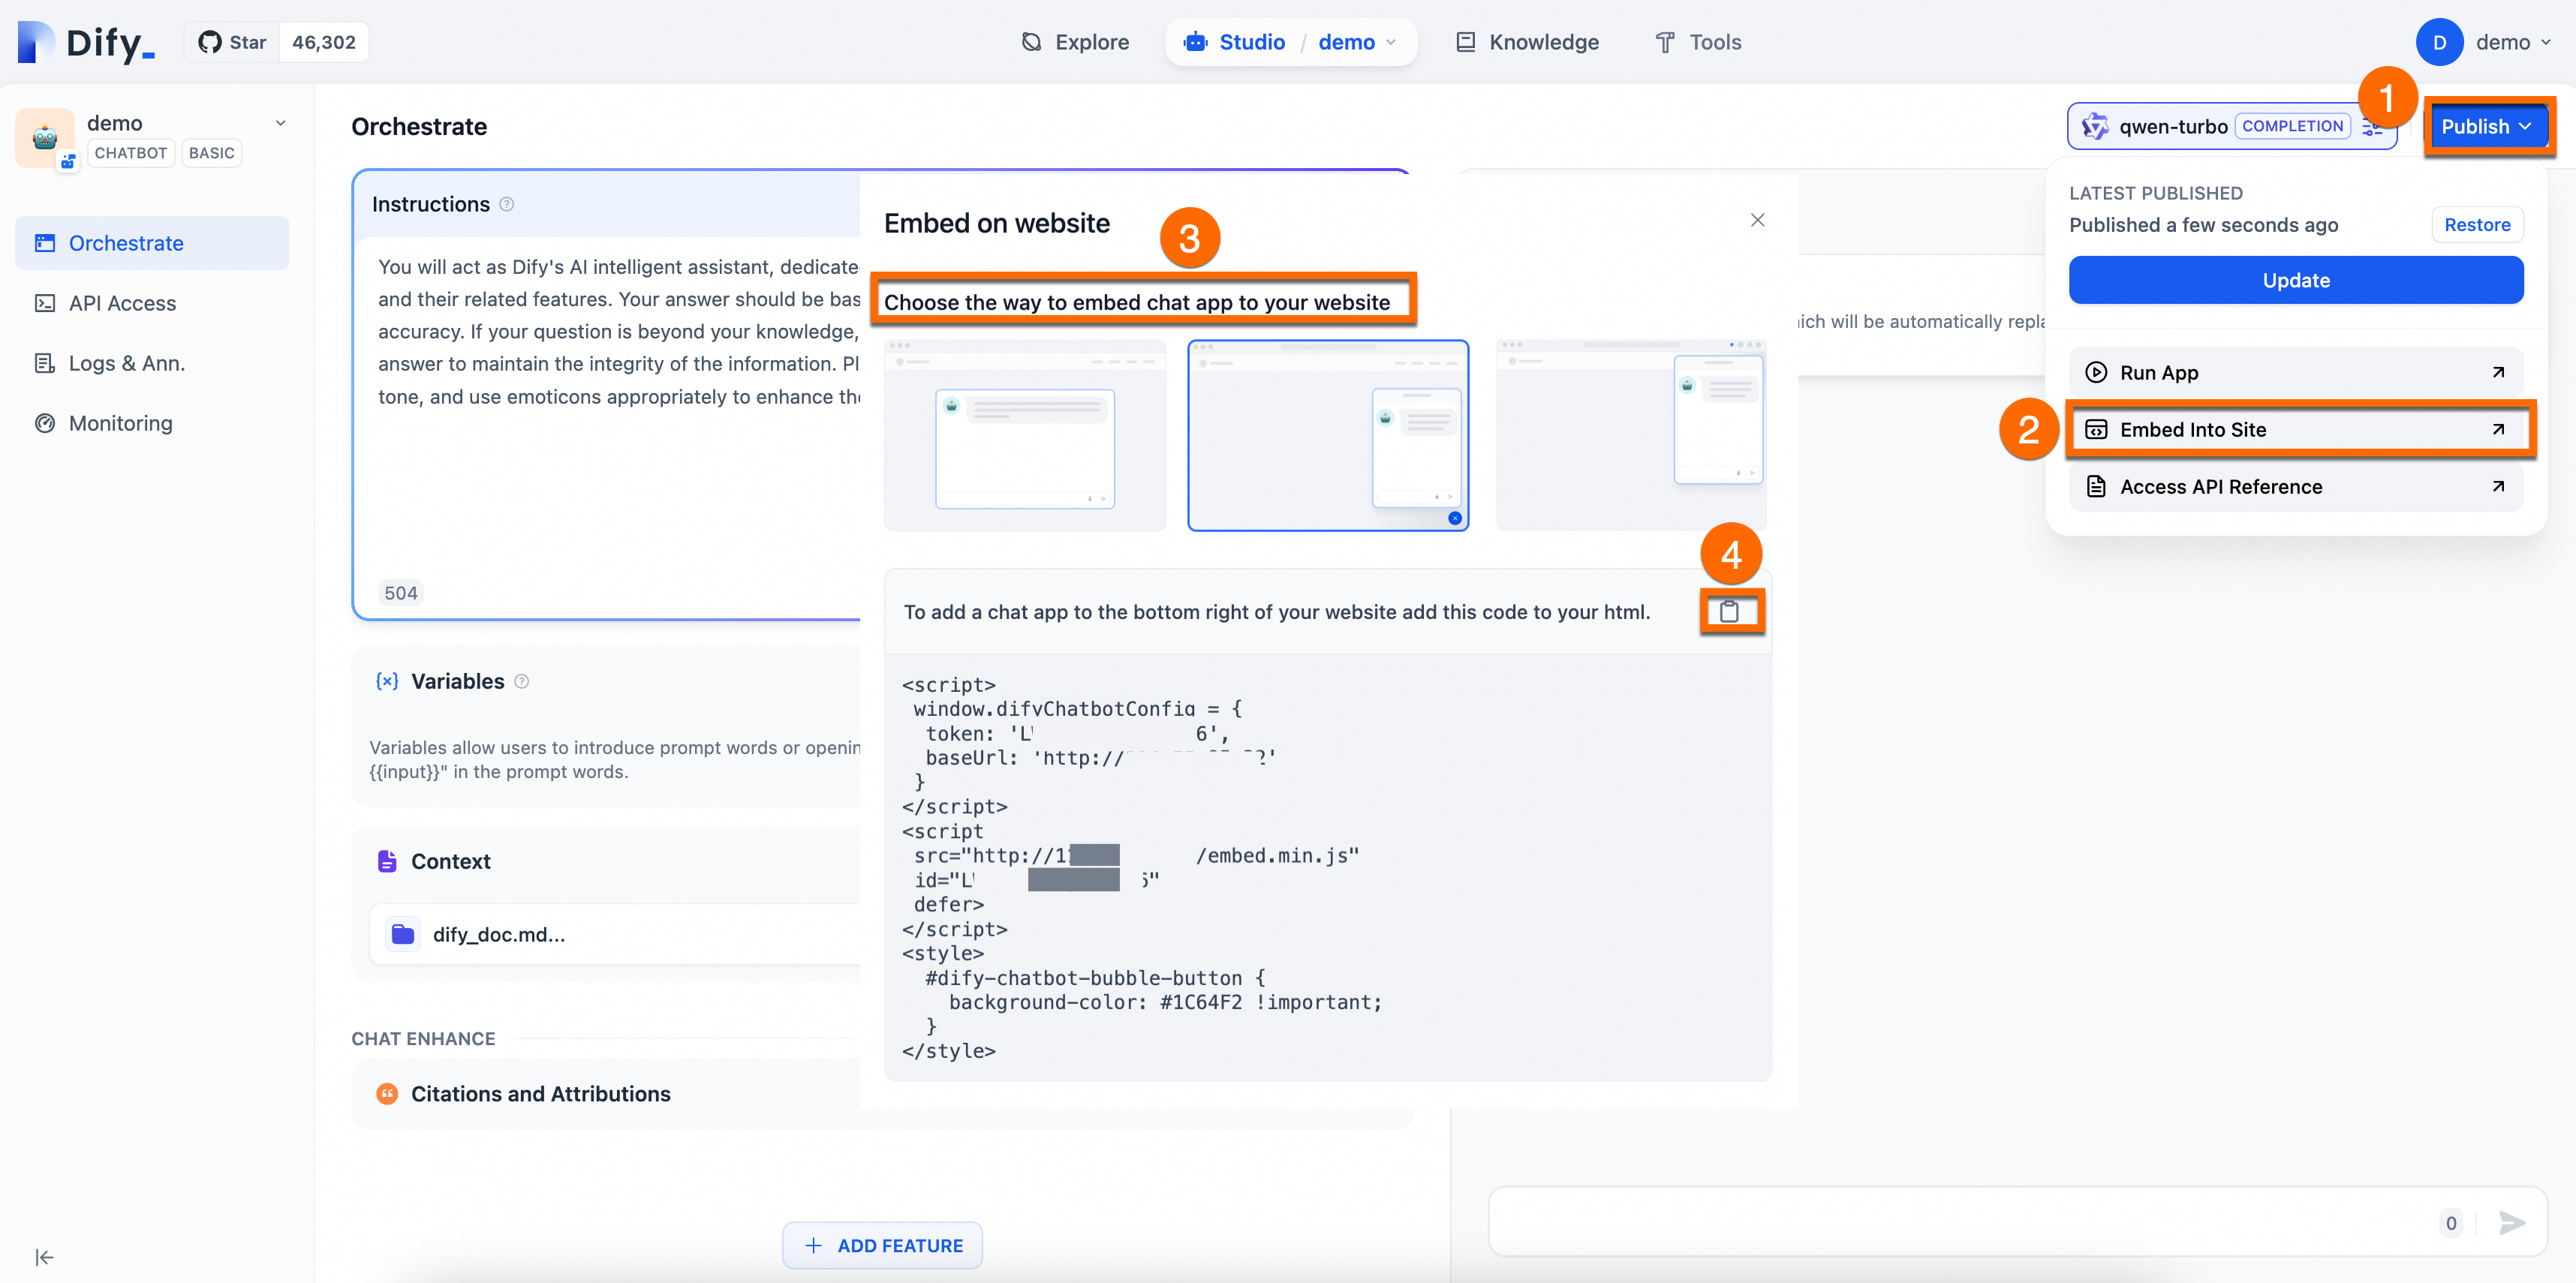
Example: Embed an AI application into a website
The following example is for demonstration purposes. For your application's data security, we recommend that you also enable Access Control in a production environment.
Enable public access for the
ack-difyservice. Enter the external IP address in your browser's address bar to access the Dify service. For instructions, see Access the Dify service.Quickly build a simple web application in your ACK cluster to test your AI Q&A assistant.
The following example shows how to deploy a sample web application on your ACK cluster, into which you can embed the LLM application from Dify.
Get the Dify service code.
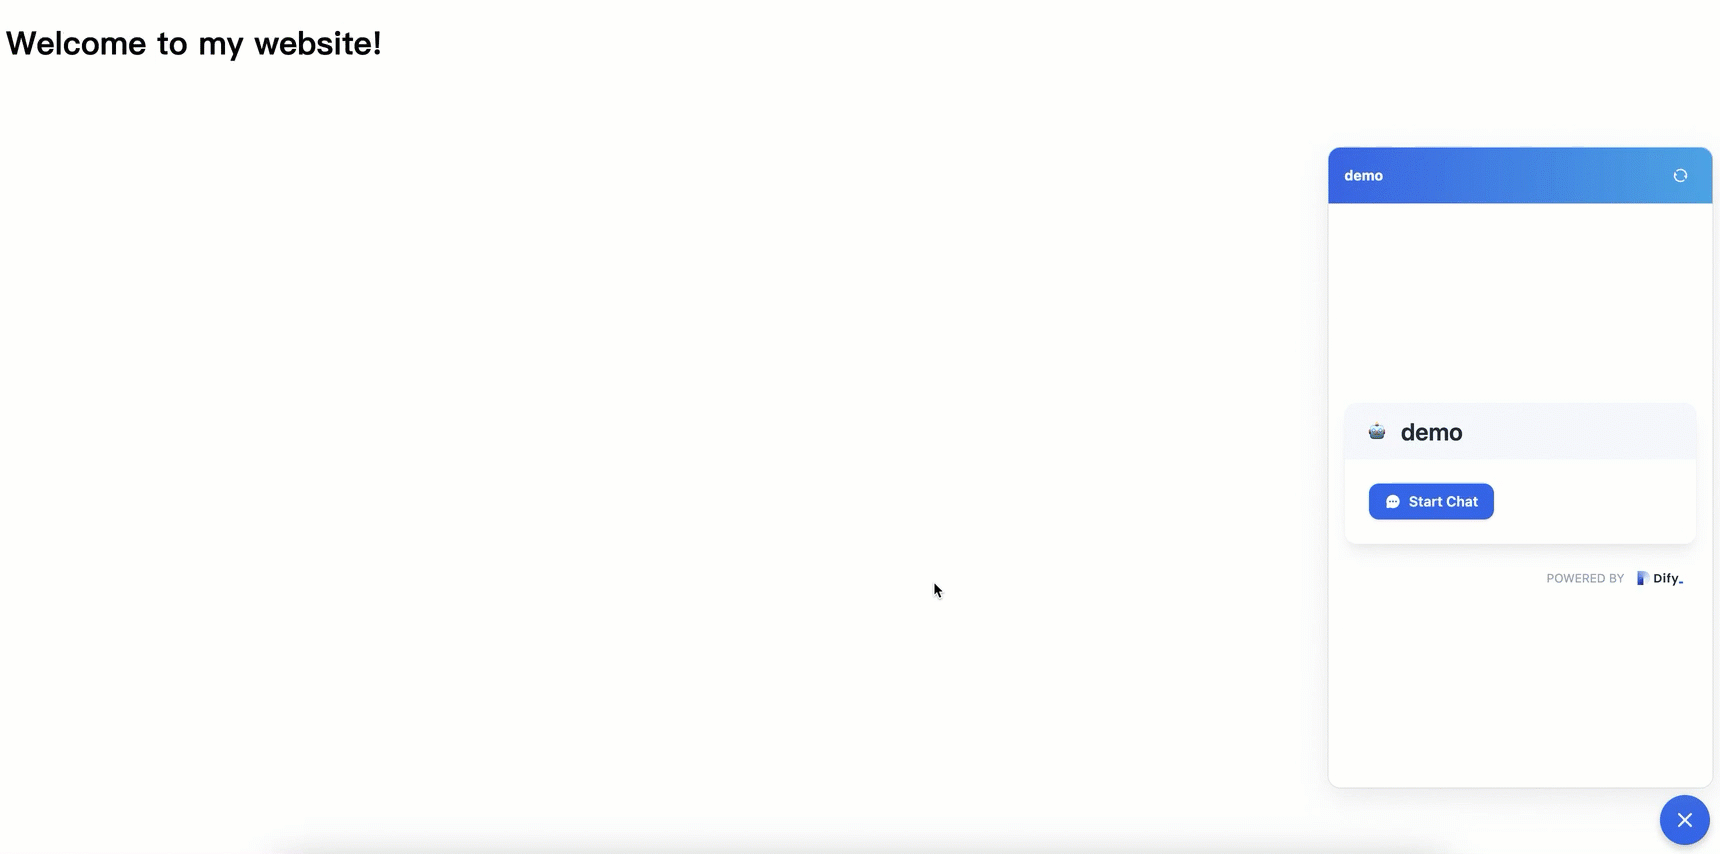
As shown in the following figure, choose a method to embed the corresponding code for the chat application into your website.
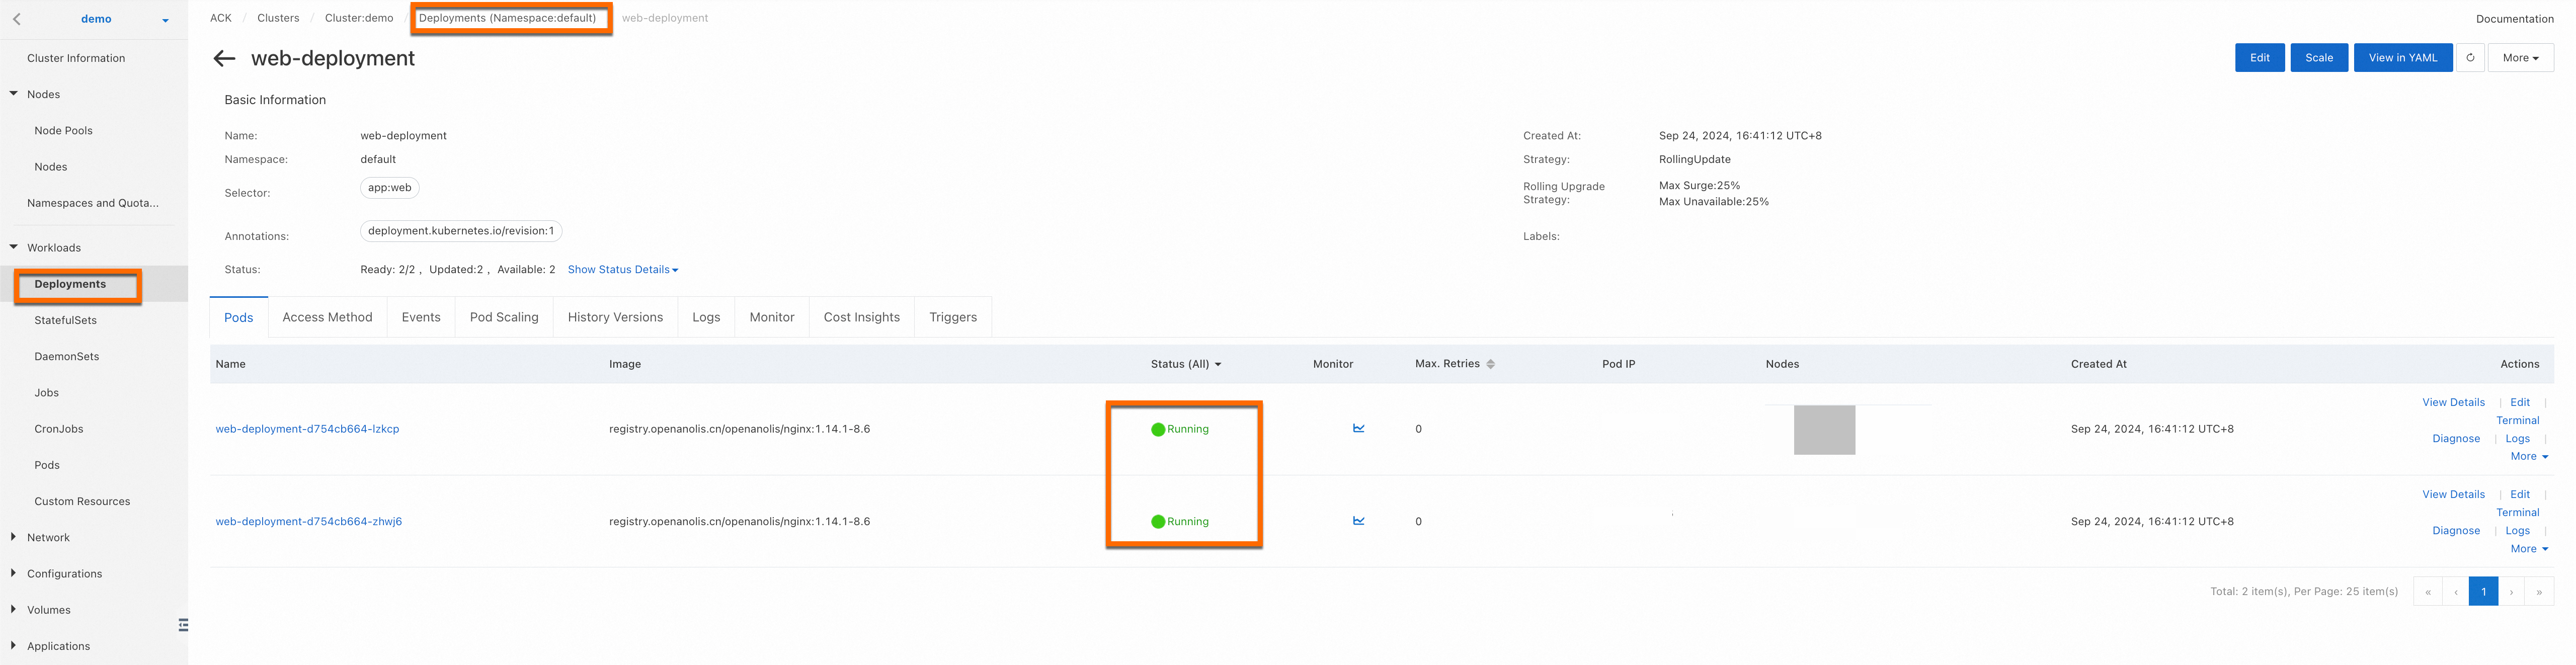
In the cluster, create a Deployment to run your web application and create a Service to expose the application.
The following YAML manifest deploys an NGINX server with static HTML.
Log on to the ACK console. In the left navigation pane, choose , set the namespace to default, then click Create from YAML. Copy the following YAML content to the template, and update
window.difyChatbotConfig,src, andidwith the Dify service code you have obtained.The following figure shows a successful deployment.
Enable public access for the deployed service.
For your application's data security, we recommend that you also enable Access Control in a production environment.
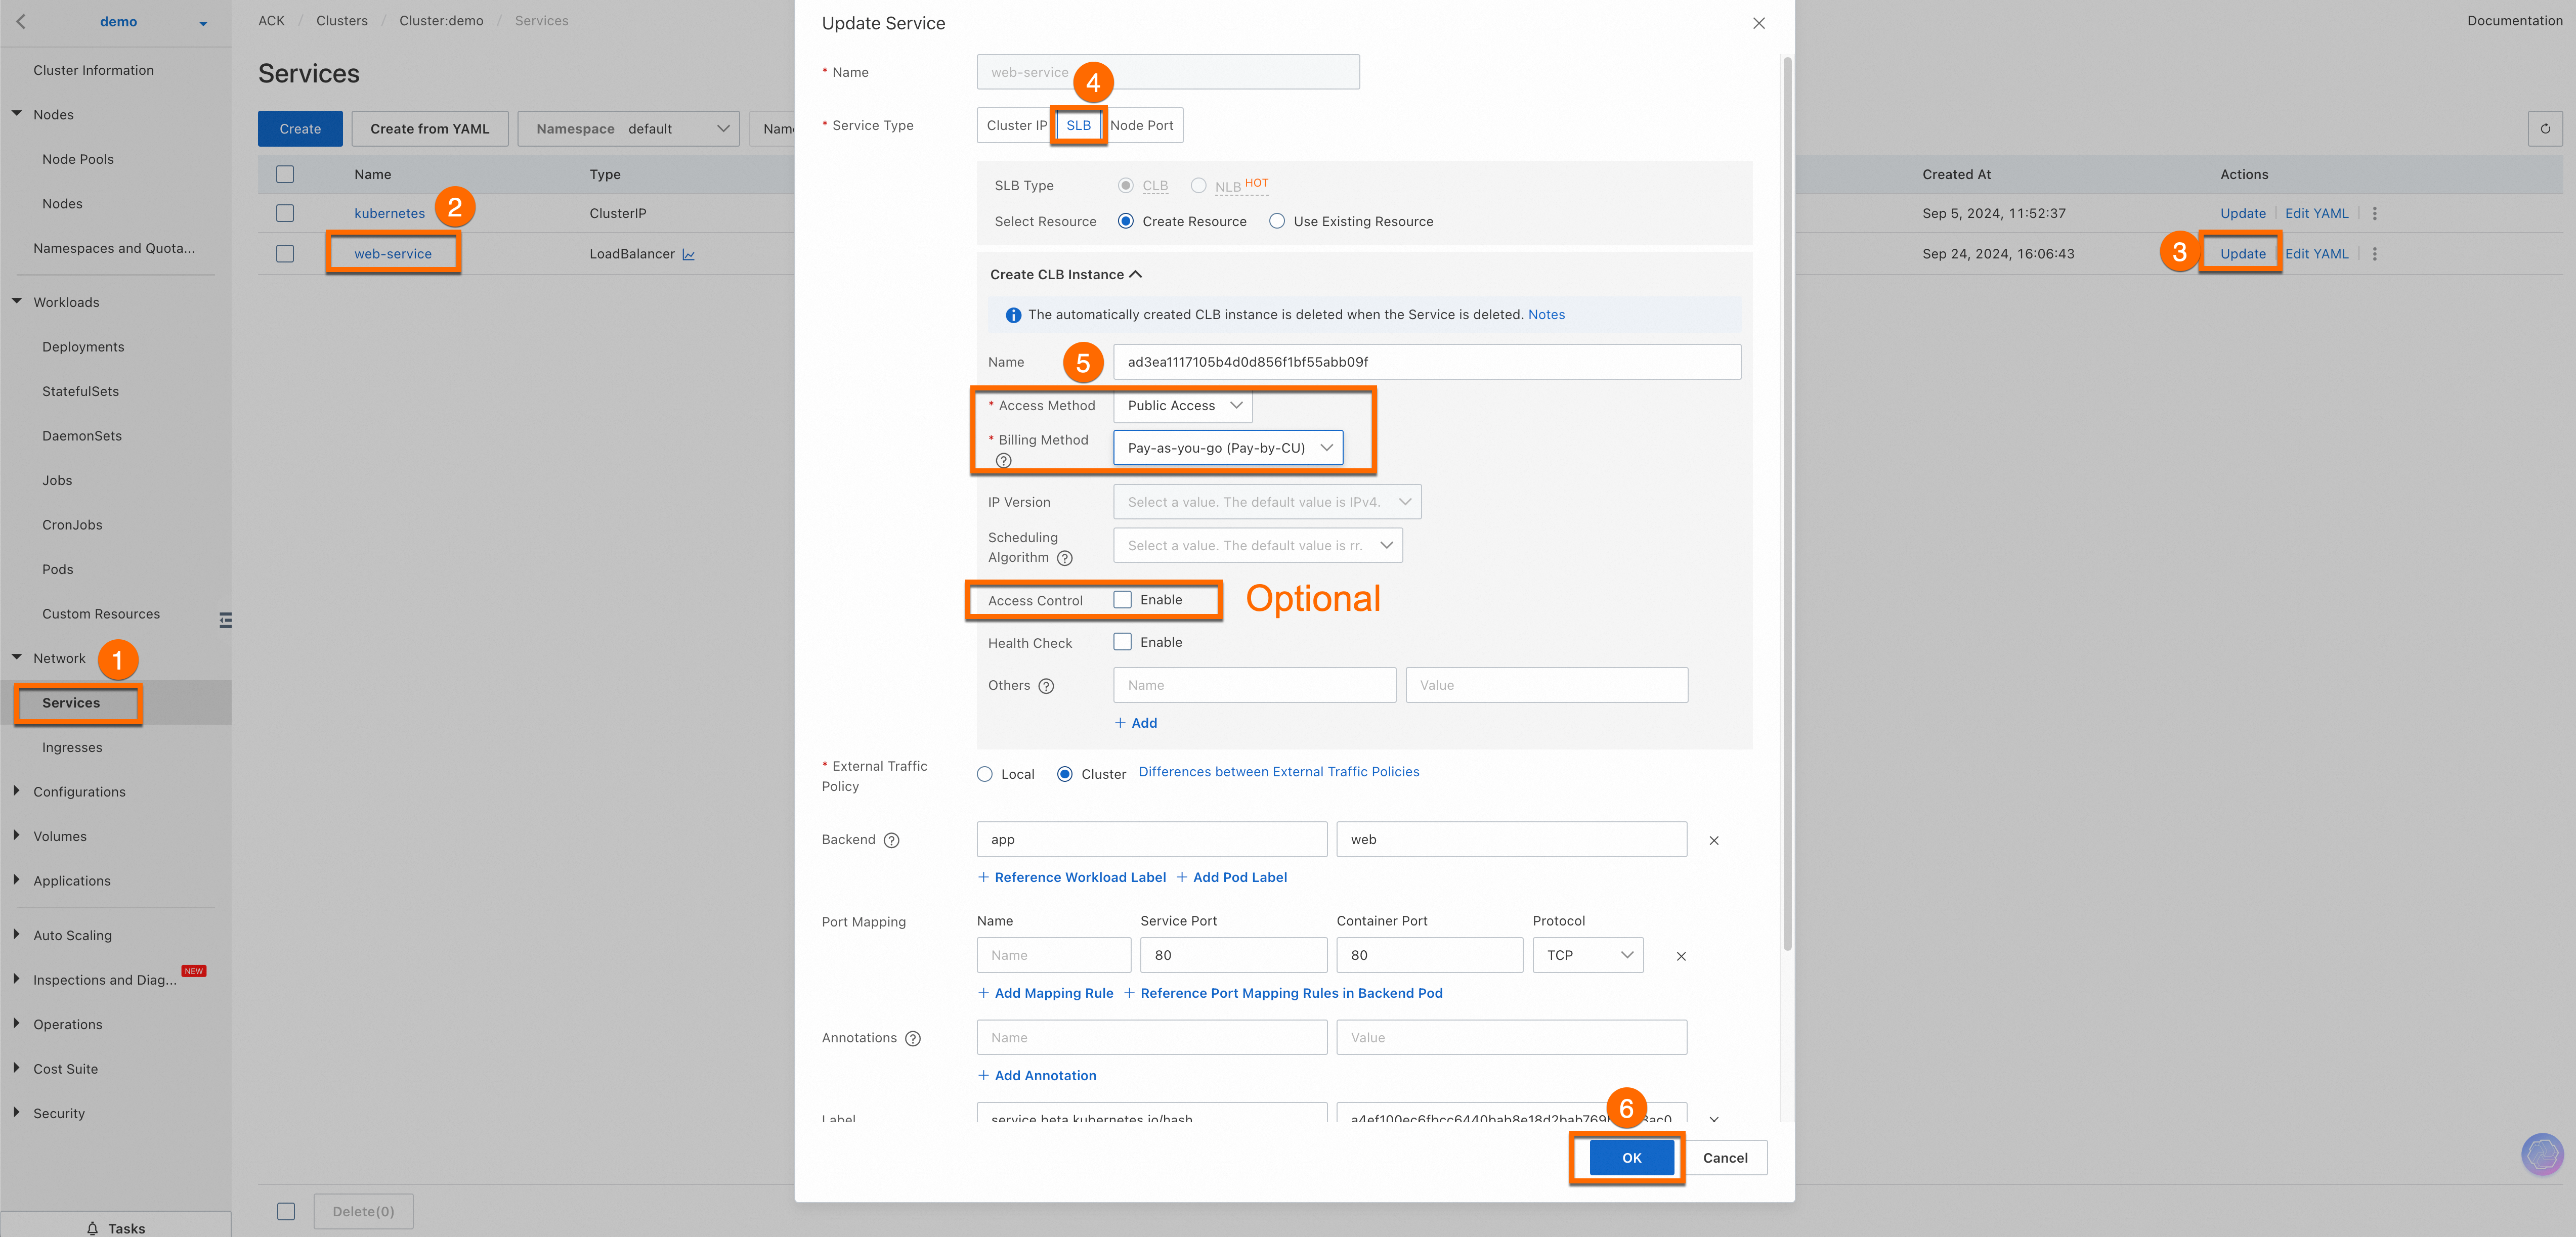
Once completed, you can view the External IP of the
web-serviceservice. Enter this external IP in your browser's address bar to access the web service. Important
If you want other devices to access this service, ensure that your cluster's firewall or security group is set to allow traffic through port 80. For instructions, see Add a security group rule.
Ensure that your code and any third-party code are secure to avoid potential cross-site scripting (XSS) or malicious code embedding. This topic provides a basic example for demonstration. You can extend and modify it based on your needs.
Result demonstration.
Troubleshooting
Issue: Pods are in
Pendingstate.Solution: Usually caused by missing storage classes or insufficient resources. Check if the cluster lacks a Persistent Volume Claim (PVC) dependency for
ack-dify. Create a default Container Network File System (CNFS) and the corresponding NAS StorageClass for the cluster. For specific instructions, see Manage NAS file systems using CNFS (recommended). To troubleshoot pod exceptions, see Troubleshoot pod exceptions.Issue: DNS resolution failed.
Solution: Ensure the pods can access CoreDNS within the cluster, especially if using a custom hostNetwork setup.
Issue: The AI assistant responses are inaccurate.
Solution: Refine your system prompt or improve the quality of your knowledge base segments (chunking).
Cost and maintenance
Billing: You will be charged for ACK management fees and underlying resources, including ECS, NAS, CLB, and elastic IP addresses (EIPs). Model usage is billed based on tokens by the model provider. For cluster management fees and resource fees, see Billing overview.
Security: Regularly rotate your Dify admin passwords and API keys. Use RAM roles for fine-grained access control on Alibaba Cloud.
Disclaimer
Dify on ACK is a Helm deployment solution that adapts the open-source Dify project for the Alibaba Cloud ACK environment to enable rapid deployment. ACK does not guarantee the performance of the Dify application or its compatibility with other ecosystem components, such as plug-ins and databases. ACK does not provide commercial services, such as compensation or indemnification, for any business losses caused by defects in Dify or its ecosystem components. We recommend that you follow updates from the open-source community and proactively fix issues in the open-source software to ensure the stability and security of Dify.