All Products
Search
Document Center

Container Service for Kubernetes:Implement colocated scheduling for Slurm and Kubernetes in ACK clusters

Last Updated:Dec 16, 2025

This topic describes how to implement colocated scheduling for Slurm and Kubernetes in Container Service for Kubernetes (ACK) clusters. This solution helps you optimize resource allocation and workload scheduling for high-performance computing (HPC) jobs and containerized applications in your cluster. In addition, this solution improves resource utilization, cluster stability, and workload performance. You can use this solution to meet requirements in various computing scenarios and build a computing platform that features high efficiency and flexibility.

Overview

Why do we need to implement colocated scheduling in ACK clusters?

  • Default scheduling solution: ACK statically allocates resources. ACK and Slurm schedule workloads separately. In a Slurm cluster, each Slurm pod pre-occupies cluster resources. Kubernetes cannot use idle resources that are pre-occupied by Slurm pods. This results in cluster resource fragments. If you want to modify the resource configuration of a Slurm pod, you must delete and then recreate the pod. Therefore, in scenarios where there is a great gap between resources occupied by Slurm clusters and resources occupied by Kubernetes clusters, it is hard to migrate workloads to other nodes.

  • Colocated scheduling solution: ACK provides the ack-slurm-operator component to implement colocated scheduling for Slurm and Kubernetes in ACK clusters. This solution runs a copilot in the Kubernetes cluster and an extended resource plug-in in the Slurm cluster. This allows Kubernetes and Slurm to share cluster resources and avoids repetitively allocating resources.

The following figure shows the preceding resource sharing solutions.

Static resource allocation and separate workload scheduling

Colocated scheduling for Slurm and Kubernetes

imageimage

The following figure shows how the colocated scheduling solution works.

yuque_diagram (2)

Key component

Description

SlurmOperator

This component launches a Slurm cluster in an ACK cluster. The Slurm cluster is containerized and each Slurm worker pod runs on a separate node. Other Slurm system components are scheduled to random nodes.

SlurmCopilot

This component uses the cluster token to coordinate with slurmctld on resource allocation. By default, when slurmctld is started, the component automatically generates a token and updates the token to a Secret by using kubectl. To manually update the token, you can use a custom initialization script or revoke the Secret update permissions. Then, you need to manually update the token to ack-slurm-jwt-token in the ack-slurm-operator namespace. ack-slurm-jwt-token is a key-value pair. The key is the cluster name and the value is the Base64-encoded content of the generated token (base64 --wrap=0). After an admission check is added to a GenericNode, this component modifies the amount of available resources on the corresponding node in slurmctld. After the modification is completed, the resource status is updated to the GenericNode. Then, this component notifies the ACK scheduler to perform workload scheduling.

Slurmctld

The central manager of Slurm. This component monitors resources and jobs in the Slurm cluster, schedules jobs, and allocates resources. To improve the availability of slurmctld, you can configure a secondary pod for slurmctld.

GenericNodes

This component is a custom resource that functions as a resource ledger between Kubernetes and Slurm. When the ACK scheduler schedules a pod to a node, an admission check is added to the GenericNode of the node to request the Slurm system to confirm resource allocation.

Slurmd

A daemon that runs on each computing node. This component runs jobs and reports the status of nodes and jobs to slurmctld.

Slurmdbd

The Slurm database daemon. This component records and manages the ledger information of different jobs and provides API operations for data queries and statistics. slurmdbd is an optional component. If you do not install slurmdbd, you can record the ledger information in files.

Slurmrested

A RESTful API daemon that allows you to interact with Slurm and use the features of Slurm by calling RESTful APIs. slurmrestd is an optional component. If you do not install slurmrestd, you can use a command-line tool to interact with Slurm.

1. Prepare the environment

1.1 Install ack-slurm-operator

An ACK cluster that runs Kubernetes 1.26 or later is created. For more information, see Add GPU-accelerated nodes to a cluster and Update clusters.

Install ack-slurm-operator and enable the Copilot feature. This way, you can use Slurm to schedule jobs and use Kubernetes to schedule pods on the same batch of physical servers.

  1. Log on to the ACK console. Click the name of the cluster you created. On the cluster details page, click the callouts in sequence to install ack-slurm-operator.

    The Application Name and Namespace parameters are optional. Click Next (callout ④). In the Confirm message, click Yes. In this case, the default application ack-slurm-operator and the default namespace ack-slurm-operator are used.

    image

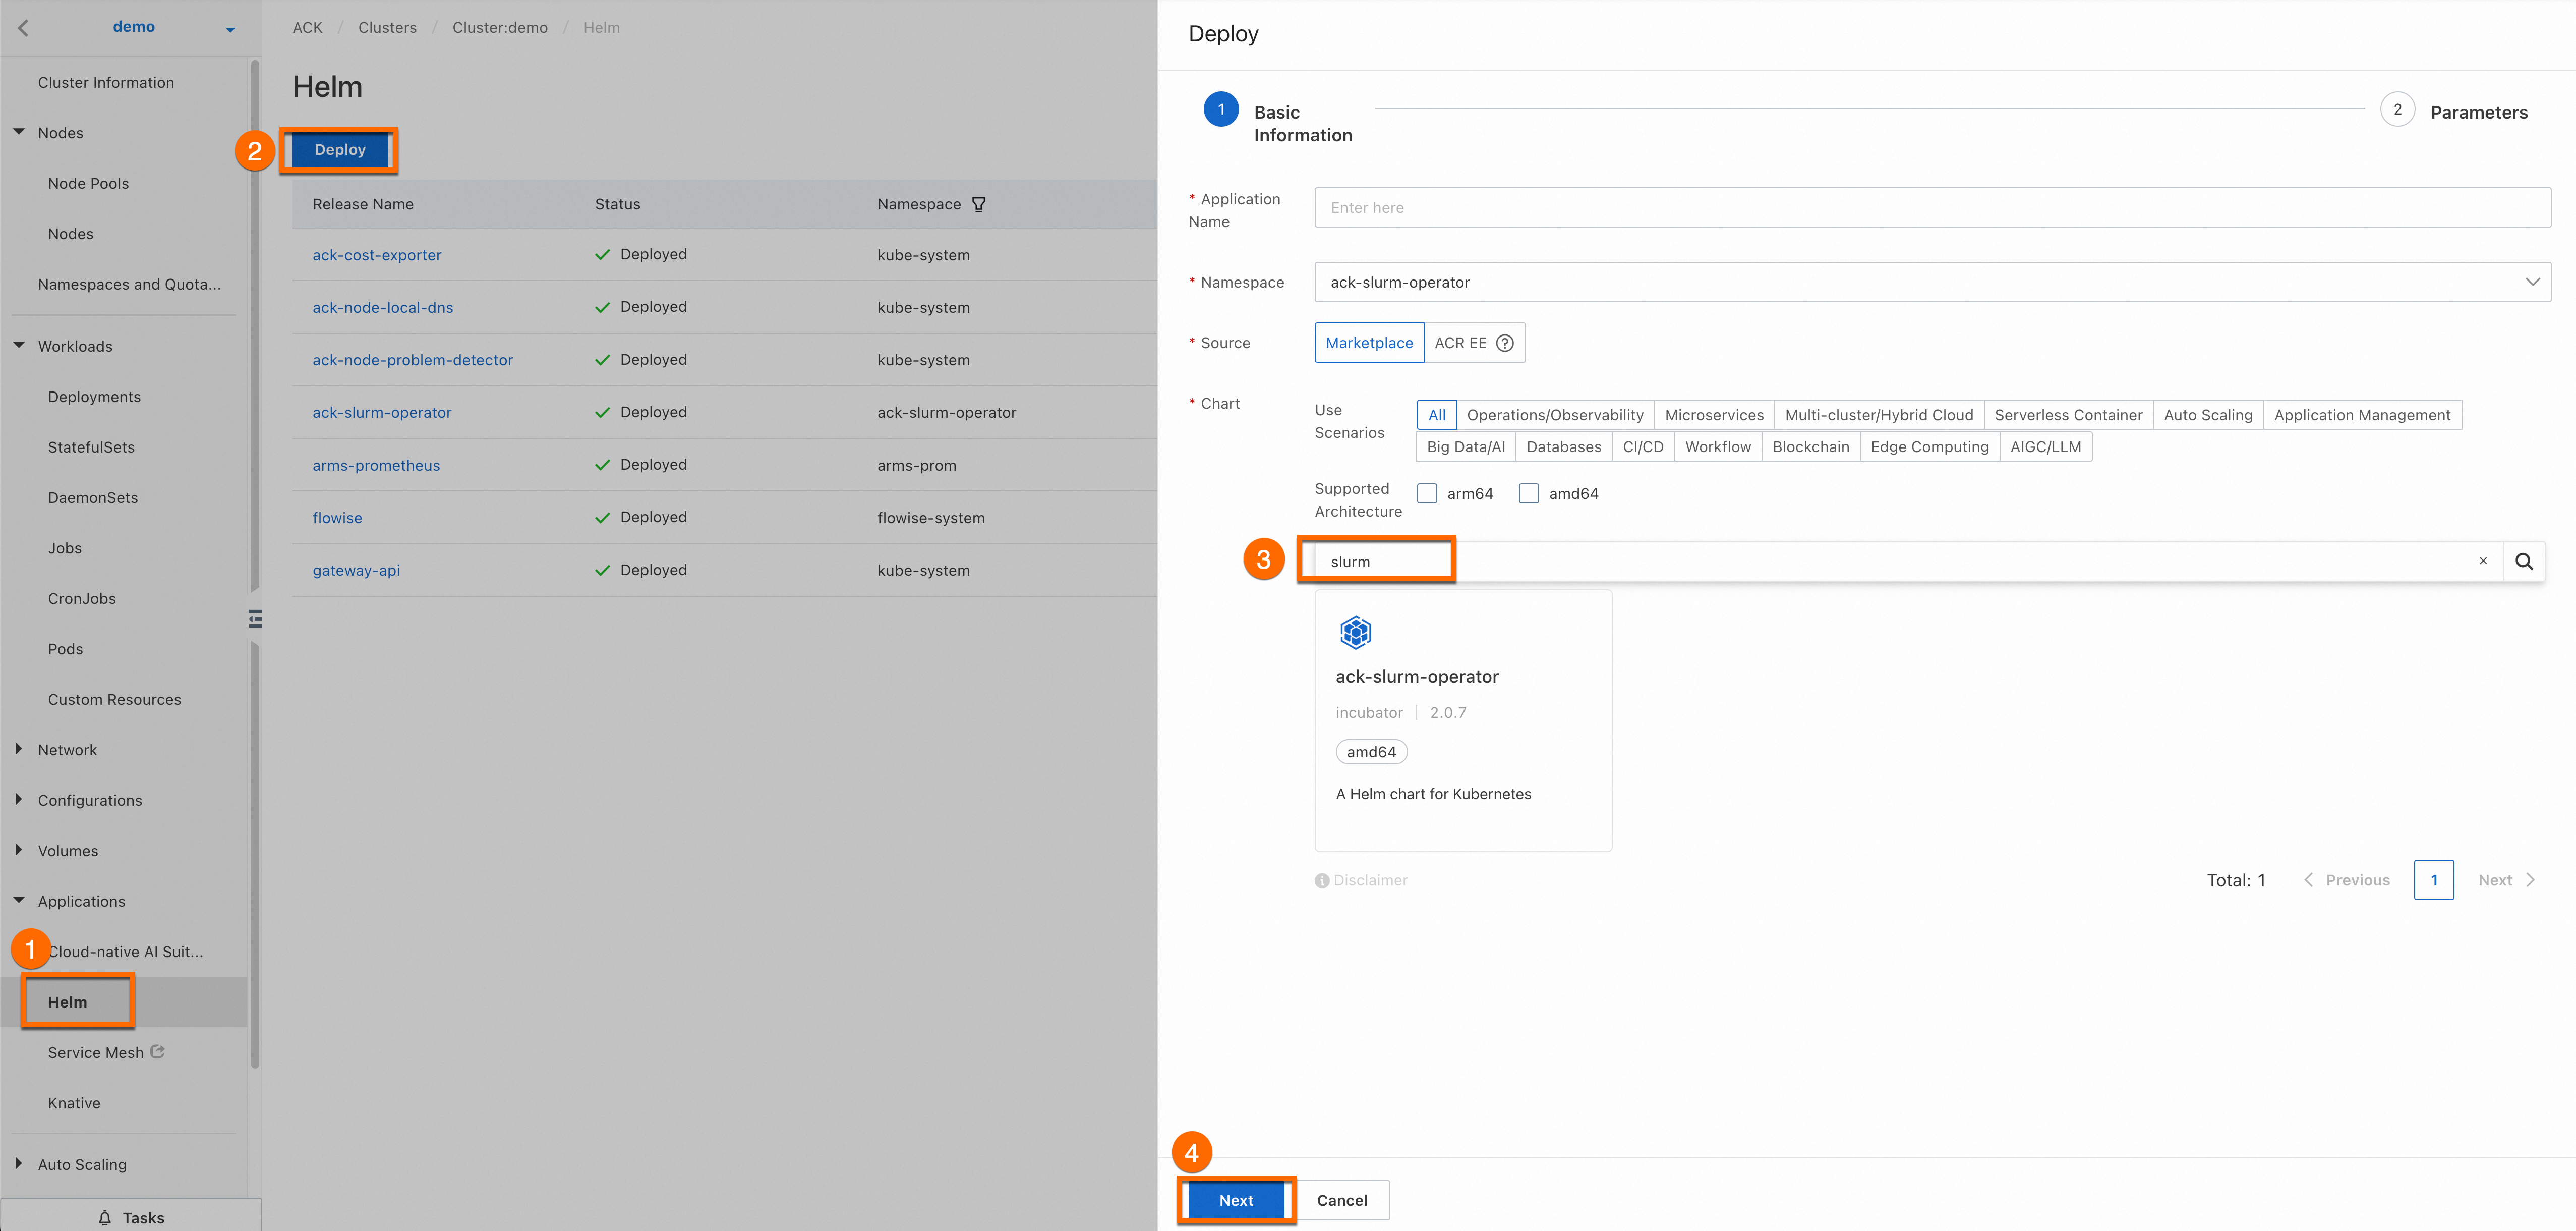
  2. Select the latest version for Chart Version. Set enableCopilot (callout ) to true and watchNamespace (callout ) to default. You can set watchNamespace to a custom namespace based on your business requirements. Then, click OK to install ack-slurm-operator.image

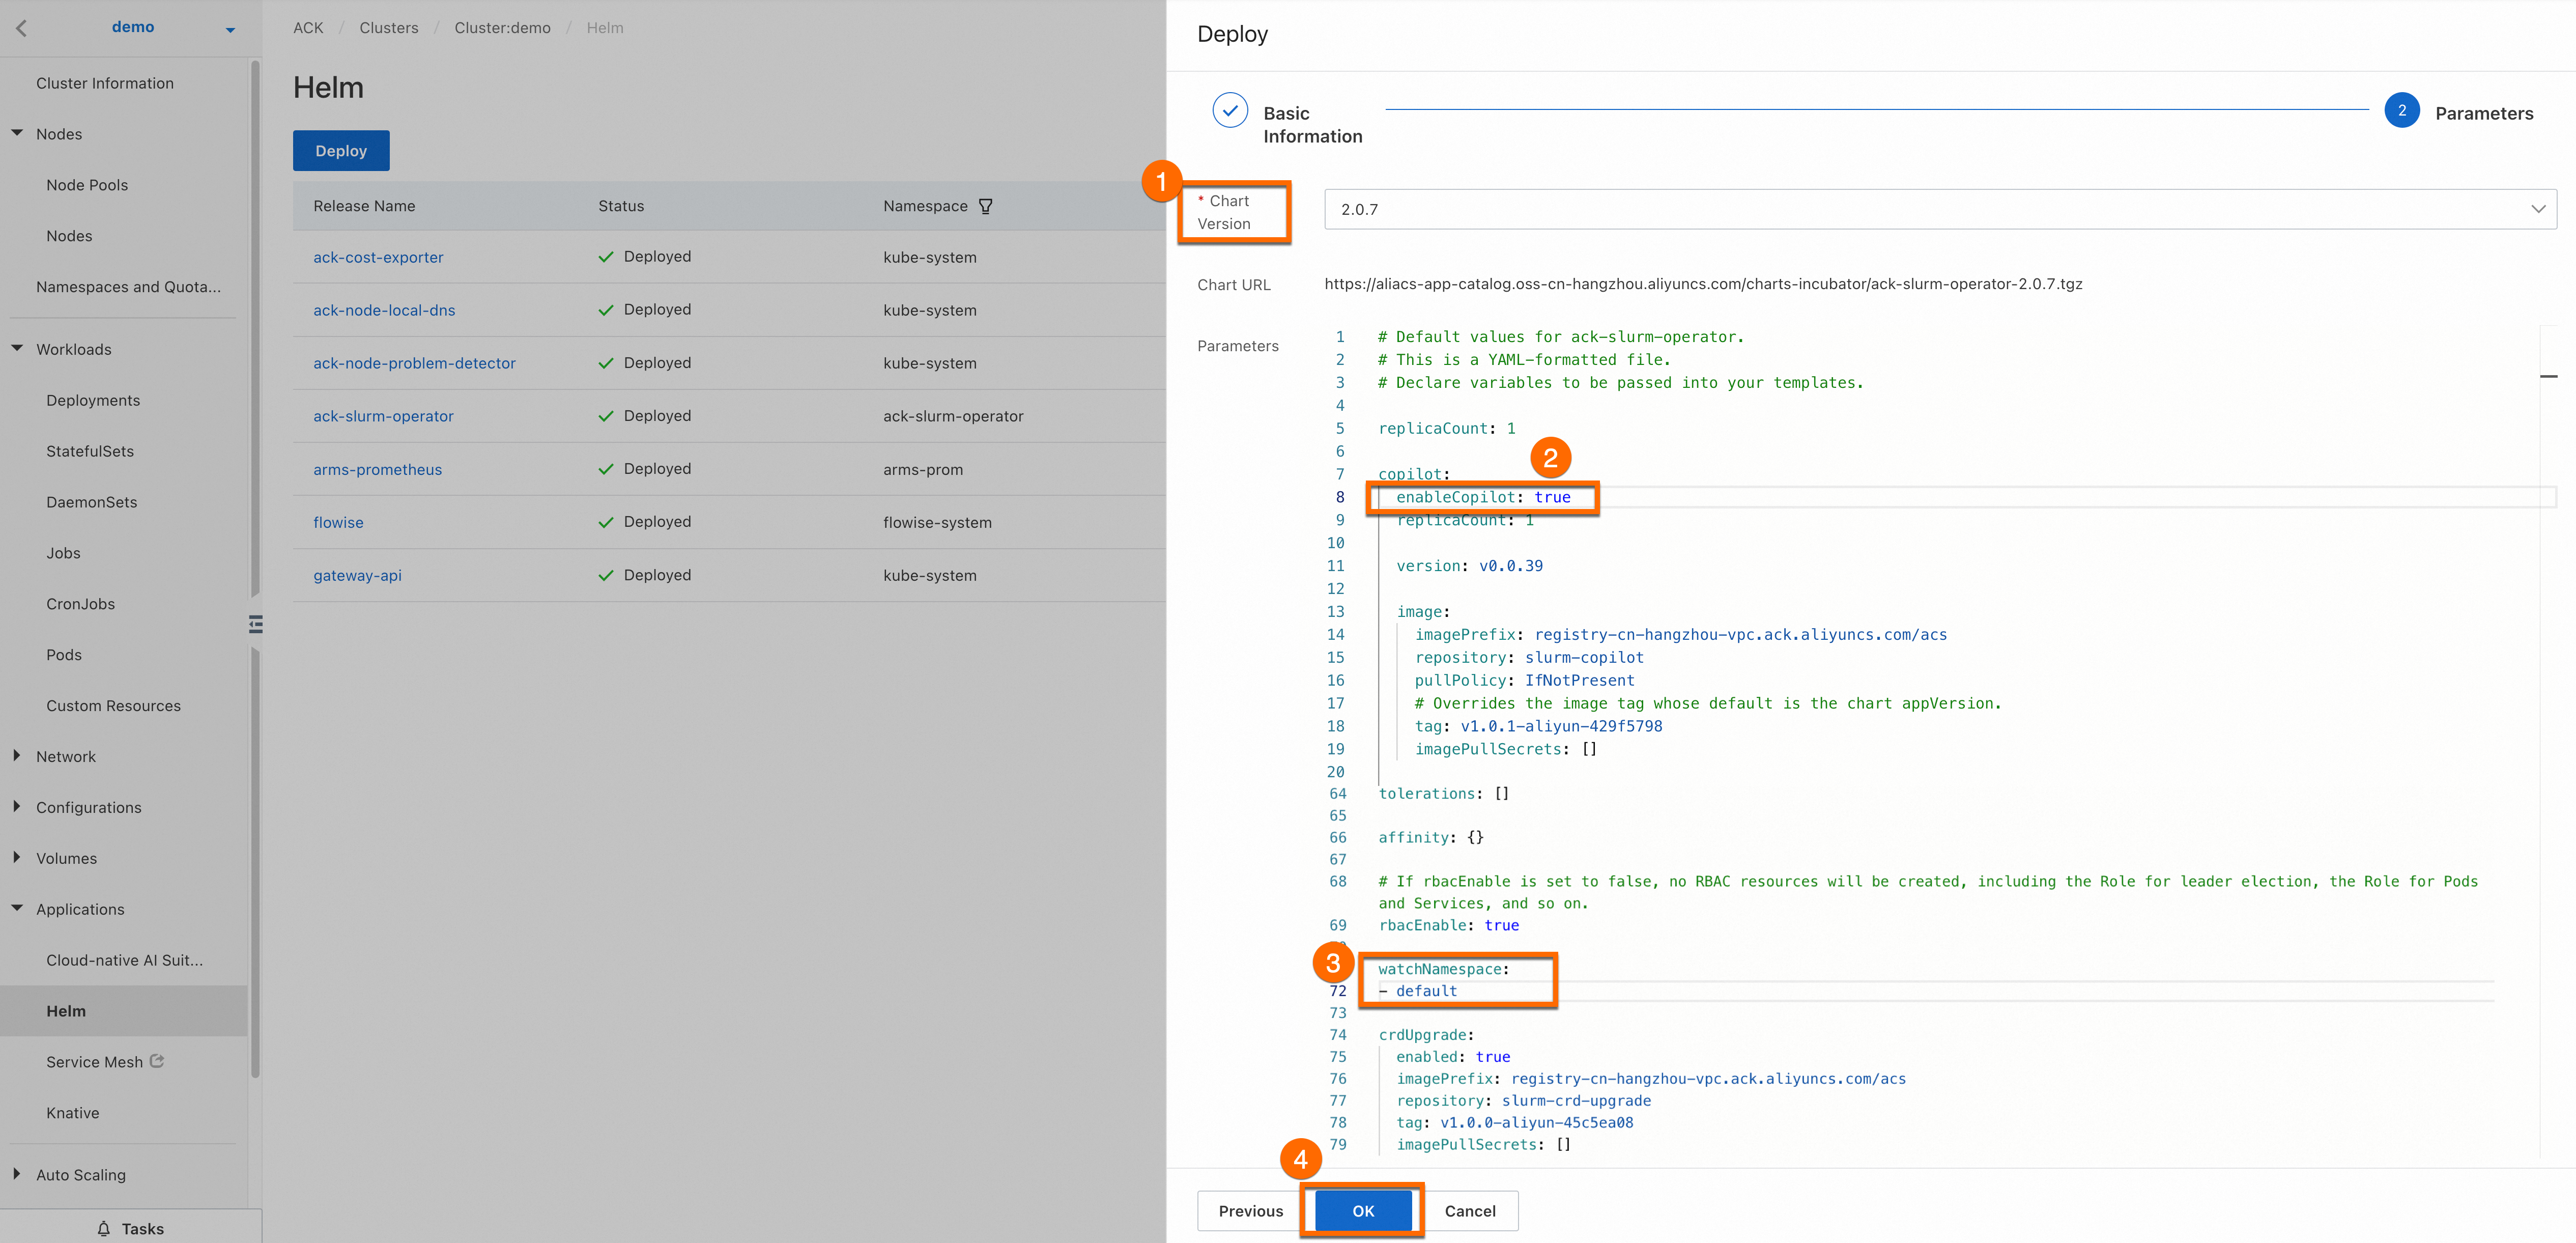
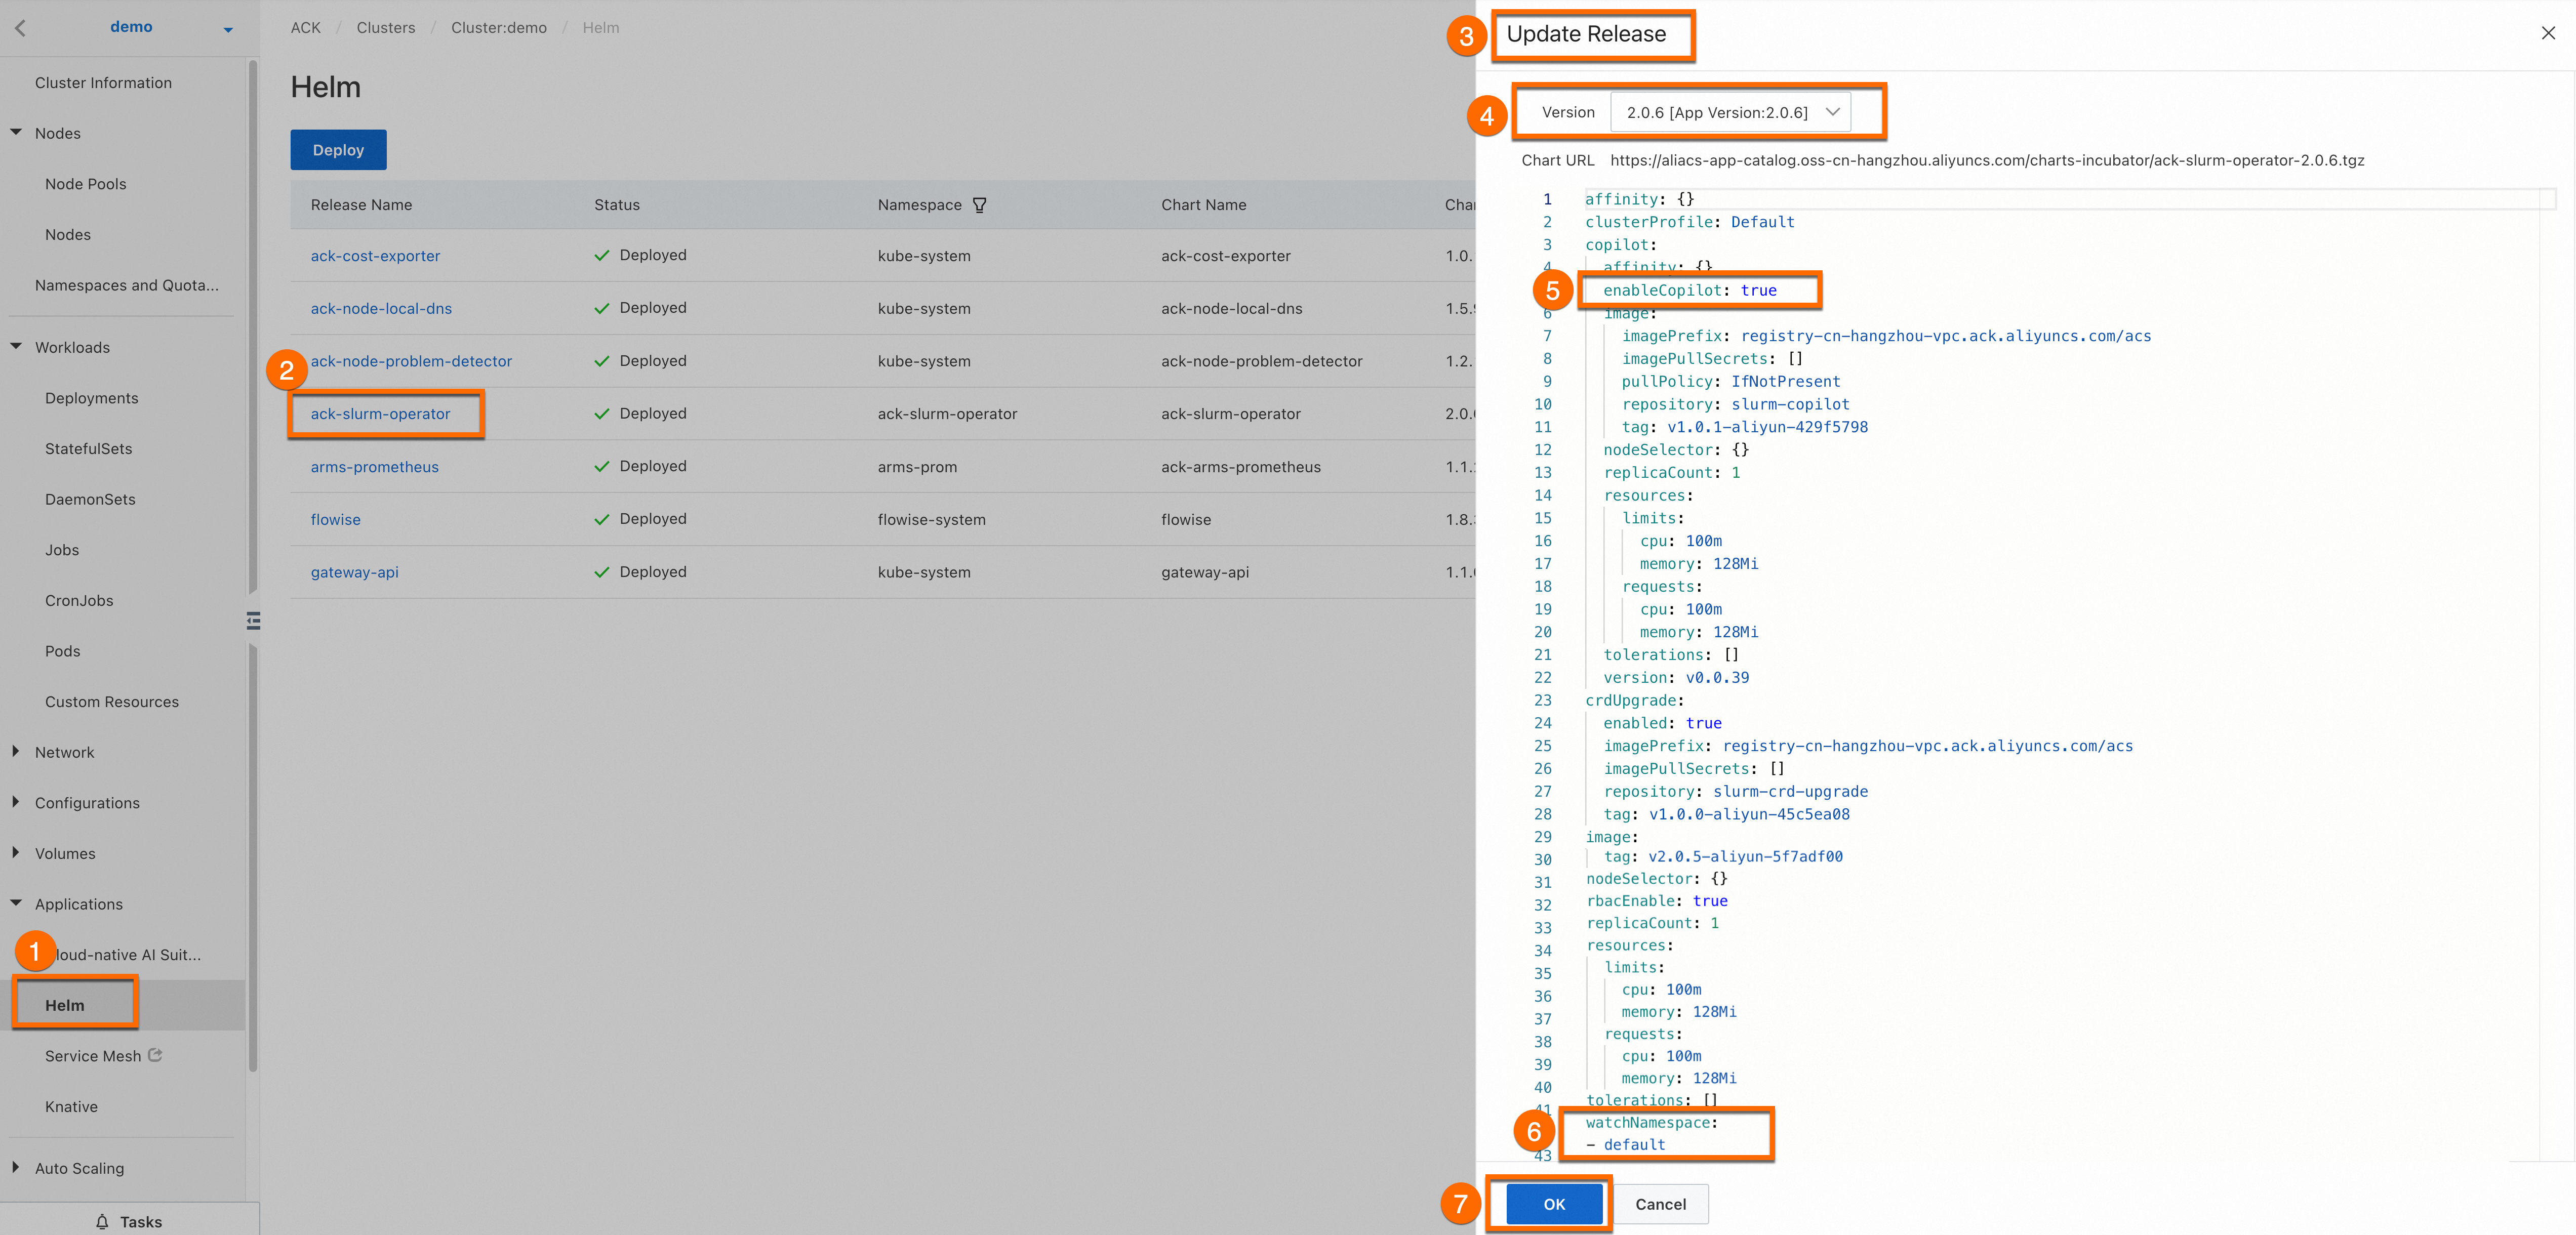
  3. Optional: Update ack-slurm-operator.

    Log on to the ACK console. On the Cluster Information page, choose Applications > Helm. On the Applications page, find ack-slurm-operator and click Update.image

1.2 Install and configure ack-slurm-cluster

To quickly deploy and manage a Slurm cluster and flexibly modify the configurations of the cluster, you can use Helm to install the SlurmClusterart package provided by Alibaba Cloud. Download the Helm chart for a Slurm cluster from charts-incubator and set the relevant parameters. Then, Helm will create role-based access control (RBAC) resources, ConfigMaps, Secrets, and a Slurm cluster for you.

Show the content of the Helm chart and the parameter description

The Helm chart includes the configurations of the following resources.

Resource type

Resource name

Function and feature

ConfigMap

{{ .Values.slurmConfigs.configMapName }}

When the .Values.slurmConfigs.createConfigsByConfigMap parameter is set to True, the ConfigMap is created and used to store user-defined Slurm configurations. The ConfigMap is mounted to the path specified by the .Values.slurmConfigs.slurmConfigPathInPod parameter. The specified path is also rendered to the .Spec.SlurmConfPath parameter of the Slurm cluster and the startup commands of the pod. When the pod is started, the ConfigMap is copied to the /etc/slurm/ path and access to the ConfigMap is limited.

ServiceAccount

{{ .Release.Namespace }}/{{ .Values.clusterName }}

This resource allows the slurmctld pod to modify the configurations of the Slurm cluster. The Slurm cluster can use this resource to enable auto scaling of on-cloud nodes.

Role

{{ .Release.Namespace }}/{{ .Values.clusterName }}

This resource allows the slurmctld pod to modify the configurations of the Slurm cluster. The Slurm cluster can use this resource to enable auto scaling of on-cloud nodes.

RoleBinding

{{ .Release.Namespace }}/{{ .Values.clusterName }}

This resource allows the slurmctld pod to modify the configurations of the Slurm cluster. The Slurm cluster can use this resource to enable auto scaling of on-cloud nodes.

Role

{{ .Values.slurmOperatorNamespace }}/{{ .Values.clusterName }}

This resource allows the slurmctld pod to modify the Secrets in the SlurmOperator namespace. When Slurm and Kubernetes are deployed on the same batch of physical servers, the Slurm cluster can use this resource to update tokens.

RoleBinding

{{ .Values.slurmOperatorNamespace }}/{{ .Values.clusterName }}

This resource allows the slurmctld pod to modify the Secrets in the SlurmOperator namespace. When Slurm and Kubernetes are deployed on the same batch of physical servers, the Slurm cluster can use this resource to update tokens.

Secret

{{ .Values.mungeConfigs.secretName }}

This resource is used by Slurm components for authentication when they communicate with each other. When the .Values.mungeConfigs.createConfigsBySecret parameter is set to True, this resource is automatically created. This resource contains the following content: "munge.key"={{ .Values.mungeConfigs.content }}. When the .Values.mungeConfigs.createConfigsBySecret parameter is set to True, the .Values.mungeConfigs.createConfigsBySecret parameter is rendered as the .Spec.MungeConfPath parameter and then rendered as the mount path of the resource in the pod. The startup commands of the pod initialize /etc/munge/munge.key based on the mount path.

SlurmCluster

Customizable

The rendered Slurm cluster.

The following table describes the relevant parameters.

Parameter

Example

Description

clusterName

N/A

The cluster name. The cluster name is used to generate Secrets and roles. The value must be the same as the cluster name specified in other Slurm configuration files.

headNodeConfig

N/A

This parameter is required. This parameter specifies the configurations of the slurmctld pod.

workerNodesConfig

N/A

This parameter specifies the configurations of the slurmd pod.

workerNodesConfig.deleteSelfBeforeSuspend

true

When the value is set to true, a preStop hook is automatically added to the worker pod. A preStop hook triggers automatic node draining before the node is removed and marks the node as unschedulable.

slurmdbdConfigs

N/A

This parameter specifies the configurations of the slurmdbd pod. If you leave this parameter empty, no pod is created to run slurmdbd.

slurmrestdConfigs

N/A

This parameter specifies the configurations of the slurmrestd pod. If you leave this parameter empty, no pod is created to run slurmrestd.

headNodeConfig.hostNetwork

slurmdbdConfigs.hostNetwork

slurmrestdConfigs.hostNetwork

workerNodesConfig.workerGroups[].hostNetwork

false

Rendered as the hostNetwork parameter of the slurmctld pod.

headNodeConfig.setHostnameAsFQDN

slurmdbdConfigs.setHostnameAsFQDN

slurmrestdConfigs.setHostnameAsFQDN

workerNodesConfig.workerGroups[].setHostnameAsFQDN

false

Rendered as the setHostnameAsFQDN parameter of the slurmctld pod.

headNodeConfig.nodeSelector

slurmdbdConfigs.nodeSelector

slurmrestdConfigs.nodeSelector

workerNodesConfig.workerGroups[].nodeSelector

nodeSelector:
  example: example

Rendered as the nodeSelector parameter of the slurmctld pod.

headNodeConfig.tolerations

slurmdbdConfigs.tolerations

slurmrestdConfigs.tolerations

workerNodesConfig.workerGroups[].tolerations

tolerations:
- key:
  value:
  operator:

Rendered as the tolerations of the slurmctld pod.

headNodeConfig.affinity

slurmdbdConfigs.affinity

slurmrestdConfigs.affinity

workerNodesConfig.workerGroups[].affinity

affinity:
  nodeAffinity:
    requiredDuringSchedulingIgnoredDuringExecution:
      nodeSelectorTerms:
      - matchExpressions:
        - key: topology.kubernetes.io/zone
          operator: In
          values:
          - zone-a
    preferredDuringSchedulingIgnoredDuringExecution:
    - weight: 1
      preference:
        matchExpressions:
        - key: another-node-label-key
          operator: In
          values:
          - another-node-label-value

Rendered as the affinity rules of the slurmctld pod.

headNodeConfig.resources

slurmdbdConfigs.resources

slurmrestdConfigs.resources

workerNodesConfig.workerGroups[].resources

resources:
  requests:
    cpu: 1
  limits:
    cpu: 1

Rendered as the resources of the main container in the slurmctld pod. The resource limit of the primary container in the worker pod is rendered as the resource limit of the Slurm node.

headNodeConfig.image

slurmdbdConfigs.image

slurmrestdConfigs.image

workerNodesConfig.workerGroups[].image

"registry-cn-hangzhou.ack.aliyuncs.com/acs/slurm:23.06-1.6-aliyun-49259f59"

Rendered as the slurmctld image. You can also download a custom image from ai-models-on-ack/framework/slurm/building-slurm-image at main · AliyunContainerService/ai-models-on-ack (github.com).

headNodeConfig.imagePullSecrets

slurmdbdConfigs.imagePullSecrets

slurmrestdConfigs.imagePullSecrets

workerNodesConfig.workerGroups[].imagePullSecrets

imagePullSecrets:
- name: example

Rendered as the Secret used to pull the slurmctld image.

headNodeConfig.podSecurityContext

slurmdbdConfigs.podSecurityContext

slurmrestdConfigs.podSecurityContext

workerNodesConfig.workerGroups[].podSecurityContext

podSecurityContext:
  runAsUser: 1000
  runAsGroup: 3000
  fsGroup: 2000
  supplementalGroups: [4000]

Rendered as the security context of slurmctld.

headNodeConfig.securityContext

slurmdbdConfigs.securityContext

slurmrestdConfigs.securityContext

workerNodesConfig.workerGroups[].securityContext

securityContext:
  allowPrivilegeEscalation: false

Rendered as the security context of the primary container in the slurmctld pod.

headNodeConfig.volumeMounts

slurmdbdConfigs.volumeMounts

slurmrestdConfigs.volumeMounts

workerNodesConfig.workerGroups[].volumeMounts

N/A

Rendered as the volume mounting configurations of the primary container in the slurmctld pod.

headNodeConfig.volumes

slurmdbdConfigs.volumes

slurmrestdConfigs.volumes

workerNodesConfig.workerGroups[].volumes

N/A

Rendered as the volume mounted to the slurmctld pod

slurmConfigs.slurmConfigPathInPod

N/A

The mount path of the Slurm configuration file in the pod. If the Slurm configuration file is mounted to the pod as a volume, you must set the value to the path to which the slurm.conf file is mounted. The startup commands of the pod will copy the file in the mount path to the /etc/slurm/ path and limit access to the file.

slurmConfigs.createConfigsByConfigMap

true

Specifies whether to automatically create a ConfigMap to store the Slurm configurations.

slurmConfigs.configMapName

N/A

The name of the ConfigMap that stores the Slurm configurations.

slurmConfigs.filesInConfigMap

N/A

The content in the ConfigMap that is automatically created to store the Slurm configurations.

mungeConfigs.mungeConfigPathInPod

N/A

The mount path of the MUNGE configuration file in the pod. If the MUNGE configuration file is mounted to the pod as a volume, you must set the value to the path to which the munge.key file is mounted. The startup commands of the pod will copy the file in the mount path to the /etc/munge/ path and limit access to the file.

mungeConfigs.createConfigsBySecret

N/A

Specifies whether to automatically create a Secret to store the MUNGE configurations.

mungeConfigs.secretName

N/A

The name of the Secret that stores the MUNGE configurations.

mungeConfigs.content

N/A

The content in the Secret that is automatically created to store the MUNGE configurations.

For more information about the slurmConfigs.filesInConfigMap parameter, see Slurm System Configuration Tool (schedmd.com).

Important

If you modify the slurmConfigs.filesInConfigMap parameter after the pod is created, you must recreate the pod to make the modification take effect. In this case, we recommend that you check whether the parameter is modified as required before you recreate the pod.

Perform the following operations:

  1. Run the following command to add a chart repository provided by Alibaba Cloud to your Helm client: After the repository is added, you can access the Helm charts provided by Alibaba Cloud, such as the chart of the ack-slurm-cluster component.

    helm repo add aliyun https://aliacs-app-catalog.oss-cn-hangzhou.aliyuncs.com/charts-incubator/
  2. Run the following command to pull and decompress the ack-slurm-cluster chart. This operation creates a subdirectory named ack-slurm-cluster in the current directory. The ack-slurm-cluster directory contains all the files and templates included in the chart.

    helm pull aliyun/ack-slurm-cluster --untar=true
  3. Run the following commands to modify the chart parameters in the values.yaml file.

    The values.yaml file contains the default configurations of the chart. You can modify the parameter settings in the file based on your business requirements. The settings include Slurm configurations, resource requests and limits, and storage configurations.

    cd ack-slurm-cluster
    vi values.yaml

    Show the steps to generate a JSON Web Token (JWT) and submit the JWT to the cluster

    Generate a key for a JWT authentication plug-in and run a command to import the key to the cluster. For more information, see JWT authentication plug-in.

    1. Obtain a JSON Web Key (JWK) to sign and authenticate a JWT.

      A JWT authentication plug-in uses a JWK (RFC7517) to sign and authenticate a JWT. To configure a JWT authentication plug-in, you must first generate a valid JWK. You can manually generate a JWK or use an online JWK generator, such as mkjwk.org, to generate a JWK. The following sample code shows the content of a JWK. The private key is used to sign the JWT. The public key in the JWT authentication plug-in is used to authenticate the JWT. Sample JWK content:

      {
        "kty": "RSA",
        "e": "AQAB",
        "kid": "O9fpdhrViq2zaaaBEWZITz",
        "use": "sig",
        "alg": "RS256",
        "n": "qSVxcknOm0uCq5vGsOmaorPDzHUubBmZZ4UXj-9do7w9X1uKFXAnqfto4TepSNuYU2bA_-tzSLAGBsR-BqvT6w9SjxakeiyQpVmexxnDw5WZwpWenUAcYrfSPEoNU-0hAQwFYgqZwJQMN8ptxkd0170PFauwACOx4Hfr-9FPGy8NCoIO4MfLXzJ3mJ7xqgIZp3NIOGXz-GIAbCf13ii7kSStpYqN3L_zzpvXUAos1FJ9IPXRV84tIZpFVh2lmRh0h8ImK-vI42dwlD_hOIzayL1Xno2R0T-d5AwTSdnep7g-Fwu8-sj4cCRWq3bd61Zs2QOJ8iustH0vSRMYdP5oYQ"
      }        

      The preceding JWK is in the JSON format. If you want to configure a JWT authentication plug-in in the YAML format, you must use a JWK in the YAML format.*

      • For a JWT authentication plug-in, you need only to configure a public key. Keep your private key credential. The following table describes the signature signing algorithms supported by the JWT authentication plug-in.

      Signature algorithm

      Supported alg setting

      RSASSA-PKCS1-V1_5 with SHA-2

      RS256, RS384, RS512

      Elliptic Curve (ECDSA) with SHA-2

      ES256, ES384, ES512

      HMAC using SHA-2

      HS256, HS384, HS512

      Important

      When you configure a key of the HS256, HS384, or HS512 type, the key value is Base64URL-encoded. If the signature is invalid, check whether your key is in the same format as the key used to generate the token.

    2. Import the JWK to the cluster.

      kubectl create configmap jwt --from-literal=jwt_hs256.key={{ .jwtkey }}

    Show the steps to specify a database address and configure Generic Resources (GREs)

    Enable slurmrestd and slurmdbd. Modify the .Values.slurmConfigs.filesInConfigMap parameter in the values.yaml file to specify a database address and configure GREs.

    slurmConfigs:
      ...
      filesInConfigMap:
        gres.conf: |
          # Configure Copilot to update the information about the resources allocated from Kubernetes to Slurm.
          Name=k8scpu Flags=CountOnly
          Name=k8smemory Flags=CountOnly
        slurmdbd.conf: |
          # The path of the logs. The path must be the same as the path specified in the following authentication configurations.
          LogFile=/var/log/slurmdbd.log
          # When you use slurmrestd, you must specify JWT authentication.
          AuthAltTypes=auth/jwt
          # slurmdbd needs to use the key in the following path to authenticate the token. Use the following configurations to mount the key to the pod.
          AuthAltParameters=jwt_key=/var/jwt/jwt_hs256.key
          AuthType=auth/munge
          SlurmUser=slurm
          # Specify a MySQL database account.
          StoragePass=
          StorageHost=
          StorageType=accounting_storage/mysql
          StorageUser=root
          StoragePort=3306
        slurm.conf: |
          # Specify the following extended resource attributes for nodes in the Slurm cluster: k8scpu and k8smemory. This prevents the nodes from entering the DOWN state.
          NodeFeaturesPlugins=node_features/k8s_resources
          # Enable Slurm to automatically add k8scpu and k8smemory when you use Slurm to submit jobs.
          JobSubmitPlugins=k8s_resource_completion
          AccountingStorageHost=slurm-test-slurmdbd
          # When you use slurmrestd, you must specify JWT authentication.
          AuthAltTypes=auth/jwt
          # slurmctld needs to use the key in the following path to authenticate the token. Use the following configurations to mount the key to the pod.
          AuthAltParameters=jwt_key=/var/jwt/jwt_hs256.key
          # Configure Copilot to update the information about the resources allocated from Kubernetes to Slurm.
          GresTypes=k8scpu,k8smemory
          # Specify ${slurmClusterName}-slurmdbd. slurmOperator automatically deploys slurmdbd.
          AccuntingStorageHost=
          AccountingStoragePort=6819
          AccountingStorageType=accounting_storage/slurmdbd
          # Information used by the JobComp plug-in to access the MySQL database.
          JobCompHost=
          JobCompLoc=/var/log/slurm/slurm_jobcomp.log
          JobCompPass=
          JobCompPort=3306
          JobCompType=jobcomp/mysql
          JobCompUser=root
          # Configurations that ensure high availability.
          SlurmctldHost=

    Show the steps to configure the slurmrestd pod and slurmdbd pod

    Configure the slurmrestd pod and slurmdbd pod.

    ...
    headNodeConfig:
      image: "registry-cn-hangzhou.ack.aliyuncs.com/acs/slurm:23.06-1.6-aliyun-49259f59"
      # Mount the generated JWT key to Slurm. The mount path must be the same as the path specified in the preceding section.
      volumes: 
      - configMap:
          defaultMode: 444
          name: jwt
        name: config-jwt
      volumeMounts: 
      - mountPath: /var/jwt
        name: config-jwt
    slurmdbdConfigs:
      nodeSelector: {}
      tolerations: []
      affinity: {}
      resources: {}
      image: "registry-cn-hangzhou.ack.aliyuncs.com/acs/slurm:23.06-1.6-aliyun-49259f59"
      imagePullSecrets: []
      # if .slurmConfigs.createConfigsByConfigMap is true, slurmConfPath and volume and volumeMounts will be auto set as:
      #  volumeMounts:
      #    - name: config-{{ .Values.slurmConfigs.configMapName }}
      #      mountPath: {{ .Values.slurmConfigs.slurmConfigPathInPod }}
      # volumes:
      #   - name: config-{{ .Values.slurmConfigs.configMapName }}
      #     configMap:
      #       name: {{ .Values.slurmConfigs.configMapName }}
      # also for mungeConfigs.createConfigsBySecret
      # Mount the generated JWT key to Slurm. The mount path must be the same as the path specified in the preceding section.
    
      volumes: 
      - configMap:
          defaultMode: 444
          name: jwt
        name: config-jwt
      volumeMounts: 
      - mountPath: /var/jwt
        name: config-jwt
    
    slurmrestdConfigs:
      nodeSelector: {}
      tolerations: []
      affinity: {}
      resources: {}
      image: "registry-cn-hangzhou.ack.aliyuncs.com/acs/slurm:23.06-1.6-aliyun-49259f59"
      imagePullSecrets: []
      # if .slurmConfigs.createConfigsByConfigMap is true, slurmConfPath and volume and volumeMounts will be auto set as:
      #  volumeMounts:
      #    - name: config-{{ .Values.slurmConfigs.configMapName }}
      #      mountPath: {{ .Values.slurmConfigs.slurmConfigPathInPod }}
      # volumes:
      #   - name: config-{{ .Values.slurmConfigs.configMapName }}
      #     configMap:
      #       name: {{ .Values.slurmConfigs.configMapName }}
      # also for mungeConfigs.createConfigsBySecret
      # Mount the generated JWT key to Slurm. The mount path must be the same as the path specified in the preceding section.
      volumes: 
      - configMap:
          defaultMode: 444
          name: jwt
        name: config-jwt
      volumeMounts: 
      - mountPath: /var/jwt
        name: config-jwt
  4. Run the following command to install the ack-slurm-cluster chart. If the ack-slurm-cluster chart is already installed, you can run the helm upgrade command to update the installed chart. After you update the installed chart, you must manually delete the existing pod and the StatefulSet created for slurmctld to make the update take effect.

    cd ..
    helm install my-slurm-cluster ack-slurm-cluster # Replace my-slurm-cluster with the actual value.
  5. After installing the chart, run the helm list command to check whether the ack-slurm-cluster chart is successfully installed.

    helm list

    Expected output:

    NAME                    NAMESPACE       REVISION        UPDATED                                 STATUS          CHART                   APP VERSION
    ack-slurm-cluster       default         1               2024-07-19 14:47:58.126357 +0800 CST    deployed        ack-slurm-cluster-2.0.0 2.0.0      
  6. Check whether slurmrestd and slurmdbd run as expected.

    1. Use kubectl to connect to the cluster and check whether the slurmdbd pod runs as expected.

      kubectl get pod

      The following sample output shows that one worker pod and three control plane pods run in the cluster.

      NAME                          READY   STATUS    RESTARTS   AGE
      slurm-test-slurmctld-dlncz    1/1     Running   0          3h49m
      slurm-test-slurmdbd-8f75r     1/1     Running   0          3h49m
      slurm-test-slurmrestd-mjdzt   1/1     Running   0          3h49m
      slurm-test-worker-cpu-0       1/1     Running   0          166m
    2. Run the following command to query logs. You can view the logs to check whether slurmdbd runs as expected.

      kubectl exec slurm-test-slurmdbd-8f75r cat /var/log/slurmdbd.log | head

      Expected output:

      kubectl exec [POD] [COMMAND] is DEPRECATED and will be removed in a future version. Use kubectl exec [POD] -- [COMMAND] instead.
      [2024-07-22T19:52:55.727] accounting_storage/as_mysql: _check_mysql_concat_is_sane: MySQL server version is: 8.0.34
      [2024-07-22T19:52:55.737] error: Database settings not recommended values: innodb_lock_wait_timeout
      [2024-07-22T19:52:56.089] slurmdbd version 23.02.7 started

Click Show the steps to build a Slurm image to view how to install dependencies in Slurm.

Show the steps to build a Slurm image

Prepare a Slurm image. The image (registry-cn-beijing.ack.aliyuncs.com/acs/slurm:23.06-1.6-aliyun-49259f59) is pre-installed with all software used in this topic. You can use the following Dockerfile to build a Slurm image. You can also add custom dependencies. Check whether the following plug-ins are installed in the image. You can obtain the packages of the following plug-ins and the source code of the following Dockerfile from an open source code repository of Alibaba Cloud.

  • kubectl, node_features, and k8s_resources are required.

  • You must install job_submit or k8s_resource_completion. job_submit or k8s_resource_completion is used to enable auto completion for GREs.

    By default, when slurmd sends a _slurm_rpc_node_registration request, slurmctld checks the usage of GREs on the node. If the usage of GREs changes, the node is considered as invalid and marked as INVAL. No jobs can be scheduled to a node in the INVAL state. As a result, the cluster may not run as expected. To resolve this issue, you must remove the node from the cluster and add the node to the cluster again. When the ActivateFeature attribute of a node is updated, the k8s_resources plug-in sets the k8scpu and k8smemory attributes to 0 and sets the node_feature flag of k8scpu and k8smemory to true. This skips GRE checks on the node and ensures that the resources in the cluster can be used as expected.

Show the content of the sample Dockerfile

FROM nvidia/cuda:11.4.3-cudnn8-devel-ubuntu20.04 as exporterBuilder
ENV TZ=Asia/Shanghai
ENV DEBIAN_FRONTEND=noninteractive
RUN ln -snf /usr/share/zoneinfo/$TZ /etc/localtime && echo $TZ > /etc/timezone
RUN apt-get update && apt install -y golang git munge libhttp-parser-dev libjson-c-dev libyaml-dev libjwt-dev libgtk2.0-dev libreadline-dev libpmix-dev libmysqlclient-dev libhwloc-dev openmpi-bin openmpi-common libopenmpi-dev rpm libmunge-dev libmunge2 libpam-dev perl python3 systemd lua5.3 libnvidia-ml-dev libhdf5-dev
# Download the source code before building the image
COPY ./slurm-23.02.7.tar.bz2 ./slurm-23.02.7.tar.bz2
RUN tar -xaf slurm-23.02.7.tar.bz2
COPY ../node_features/k8s_resources ./slurm-23.02.7/src/plugins/node_features/k8s_resources
RUN sed -i '/"src\/plugins\/node_features\/Makefile") CONFIG_FILES="\$CONFIG_FILES src\/plugins\/node_features\/Makefile" ;;/ a "    src/plugins/node_features/k8s_resources/Makefile") CONFIG_FILES="\$CONFIG_FILES src/plugins/node_features/k8s_resources/Makefile" ;;' ./slurm-23.02.7/configure
RUN awk '/^ac_config_files="\$ac_config_files/ && !found { print; print "ac_config_files=\"$ac_config_files src/plugins/node_features/k8s_resources/Makefile\""; found=1; next } { print }' ./slurm-23.02.7/configure > ./slurm-23.02.7/configure.new && mv ./slurm-23.02.7/configure.new ./slurm-23.02.7/configure && chmod +x ./slurm-23.02.7/configure
RUN cat ./slurm-23.02.7/configure
RUN sed -i '/^SUBDIRS =/ s/$/ k8s_resources/' ./slurm-23.02.7/src/plugins/node_features/Makefile & \
sed -i '/^SUBDIRS =/ s/$/ k8s_resources/' ./slurm-23.02.7/src/plugins/node_features/Makefile.in & \
sed -i '/^SUBDIRS =/ s/$/ k8s_resources/' ./slurm-23.02.7/src/plugins/node_features/Makefile.am
RUN cd slurm-23.02.7 && ./configure --prefix=/usr/ --sysconfdir=/etc/slurm && make 

FROM nvidia/cuda:11.4.3-cudnn8-runtime-ubuntu20.04
ENV TZ=Asia/Shanghai
ENV DEBIAN_FRONTEND=noninteractive
RUN ln -snf /usr/share/zoneinfo/$TZ /etc/localtime && echo $TZ > /etc/timezone

RUN apt update
RUN apt install -y munge libhttp-parser-dev libjson-c-dev libyaml-dev libjwt-dev libgtk2.0-dev libreadline-dev libpmix-dev libmysqlclient-dev libhwloc-dev openmpi-bin openmpi-common libopenmpi-dev rpm libmunge-dev libmunge2 libpam-dev perl python3 systemd lua5.3 inotify-tools openssh-server pip libnvidia-ml-dev libhdf5-dev
COPY --from=0 /slurm-23.02.7 /slurm-23.02.7
RUN cd slurm-23.02.7 && make install && cd ../ && rm -rf /slurm-23.02.7
RUN apt remove libnvidia-ml-dev libnvidia-compute-545 -y; apt autoremove -y ; ln -s /usr/lib/x86_64-linux-gnu/libnvidia-ml.so.1 /usr/lib/x86_64-linux-gnu/libnvidia-ml.so
COPY ./sh ./
RUN mkdir /etc/slurm
RUN chmod +x create-users.sh munge-inisitalization.sh slurm-initialization.sh slurm-suspend.sh slurm-resume.sh slurmd slurmctld slurmdbd slurmrestd
RUN touch /var/log/slurm-resume.log /var/log/slurm-suspend.log ; chmod 777 /var/log/slurm-resume.log /var/log/slurm-suspend.log
RUN mv slurmd /etc/init.d/slurmd && mv slurmdbd /etc/init.d/slurmdbd && mv slurmctld /etc/init.d/slurmctld
RUN ./create-users.sh && ./munge-inisitalization.sh && ./slurm-initialization.sh
RUN rm ./create-users.sh ./munge-inisitalization.sh ./slurm-initialization.sh
ENV NVIDIA_VISIBLE_DEVICES=
RUN apt-get update && apt-get upgrade -y && rm -rf /var/cache/apt/

2. Test colocated scheduling

2.1 Test colocated scheduling

  1. Check the status of GenericNodes to view Slurm workloads and Kubernetes workloads.

    kubectl get genericnode

    Expected output:

    NAME                    CLUSTERNAME   ALIAS                     TYPE    ALLOCATEDRESOURCES
    cn-hongkong.10.1.0.19                 slurm-test-worker-cpu-0   Slurm   [{"allocated":{"cpu":"0","memory":"0"},"type":"Slurm"},{"allocated":{"cpu":"1735m","memory":"2393Mi"},"type":"Kubernetes"}]
  2. Run the following commands to submit a job to the Slurm cluster and query GenericNodes. The returned GenericNode records the resource usage of a job in the Slurm cluster and the resource usage of a job in the Kubernetes cluster.

    root@iZj6c1wf3c25dbynbna3qgZ ~]# kubectl exec slurm-test-slurmctld-dlncz -- nohup srun --cpus-per-task=3 --mem=4000 --gres=k8scpu:3,k8smemory:4000 sleep inf &
    [1] 4132674
    
    [root@iZj6c1wf3c25dbynbna3qgZ ~]# kubectl scale deployment nginx-deployment-basic --replicas 2
    deployment.apps/nginx-deployment-basic scaled
    
    [root@iZj6c1wf3c25dbynbna3qgZ ~]# kubectl get genericnode
    NAME                    CLUSTERNAME   ALIAS                     TYPE    ALLOCATEDRESOURCES
    cn-hongkong.10.1.0.19                 slurm-test-worker-cpu-0   Slurm   [{"allocated":{"cpu":"3","memory":"4000Mi"},"type":"Slurm"},{"allocated":{"cpu":"2735m","memory":"3417Mi"},"type":"Kubernetes"}]
  3. In this case, if you submit another job to the Slurm cluster, the second job enters the Pending state.

    [root@iZj6c1wf3c25dbynbna3qgZ ~]# kubectl exec slurm-test-slurmctld-dlncz -- nohup srun --cpus-per-task=3 --mem=4000 sleep inf &
    [2] 4133454
    
    [root@iZj6c1wf3c25dbynbna3qgZ ~]# srun: job 2 queued and waiting for resources
    
    [root@iZj6c1wf3c25dbynbna3qgZ ~]# kubectl exec slurm-test-slurmctld-dlncz -- squeue
     JOBID PARTITION     NAME     USER ST       TIME  NODES NODELIST(REASON)
         2     debug    sleep     root PD       0:00      1 (Resources)
         1     debug    sleep     root  R       2:34      1 slurm-test-worker-cpu-0

In this example, no GREs are manually specified. However, GREs are still displayed in the preceding srun command. This is because the Slurm cluster is pre-installed with the job_resource_completion plug-in, which automatically adds GREs based on the CPU request and memory request. If job_resource_completion is not installed, you need to manually specify GREs. In this example, the following GRE configuration is specified: --gres=k8scpu:3,k8smemory:4000. Click Show the Slurm job script description to view how to specify parameters in the Slurm job script.

Show the Slurm job script description

When you submit a job in a Slurm cluster, you must calculate the amount of GREs. The following section describes the available parameters when you use srun and sbatch to submit jobs and provides examples on how to calculate the amount of GREs for a job.

Parameter

Description

--tres-per-task

The Trackable Resources (TREs) required by each task in the job.

--gres

The GREs required by the job.

Show the steps to calculate resources for a Slurm job

When you calculate the amount of GREs required by a job, you must calculate the number of vCPUs and the amount of memory that the job requires from each node by using the following methods:

  1. Calculate the total number of vCPUs required.

    When you use Slurm to schedule jobs, the key to ensuring efficient resource allocation and job scheduling is to properly calculate the total number of vCPUs that each task requires from each node.

    The calculation is based on the following parameters:

    • Nodes: the number of nodes required by the job.

    • Tasks per Node: the number of tasks that run on each node.

    • CPUs per Task: the number of vCPUs required by the task.

    The preceding parameters can be specified in the options of the Slurm script or commands.

    Formula

    Total number of vCPUs required from a node = Number of tasks per node × Number of vCPUs required by each task

    Example

    The following parameters are used:

    • Nodes: 2

    • Tasks per Node: 4

    • CPUs per Task: 2

    The total number of vCPUs required from each node is 8 (4 × 2). In this case, two nodes are used. Therefore, the total number of vCPUs required by the job is 16 (8 × 2).

  2. Calculate the total amount of memory required.

    When you use Slurm to schedule jobs, the key to ensuring proper memory allocation and preventing memory waste or shortage is to calculate the total amount of memory that each task requires from each node. The total amount of memory required depends on the number of tasks that run on each node and the amount of memory required by each task.

    Total amount of memory required from a node = Number of tasks per node × Number of vCPUs required by each task × Amount of memory per vCPU

  3. Enable auto completion for GREs when you submit jobs.

    If you want to manually add the --gres configuration when you submit a job, you must manually calculate the number of vCPUs (CPU) and the amount of memory (MEM) required by the job from each node. However, you can still submit jobs without the --gres configuration.

    In this case, you can install the job_submit plug-in to enable auto completion for the --gres configuration. A sample code is provided. When you use the sample code to submit a job, you must add the -n or --tasks configuration to specify the number of tasks. Otherwise, the job submission fails. If you use the --gpus or --gpus-per-socket configuration to claim the number of GPUs required by the job, the job submission fails. To claim GPUs, you must use the --gpus-per-task configuration.

Sample Slurm job script

#!/bin/bash
#SBATCH --job-name=test_job                   # The job name.
#SBATCH --nodes=2                             # The number of nodes required by the job.
#SBATCH --ntasks-per-node=4                   # The number of tasks to run on each node.
#SBATCH --cpus-per-task=2                     # The number of vCPUs required by each task.
#SBATCH --time=01:00:00                       # The maximum duration of the job.
#SBATCH --output=job_output_%j.txt            # The name of the stdout file.
#SBATCH --error=job_error_%j.txt              # The name of the stderr file.

# User-defined job commands.
srun my_program

You can also specify the preceding parameters in commands.

sbatch --nodes=2 --ntasks-per-node=4 --cpus-per-task=2 --time=01:00:00 --job-name=test_job my_job_script.sh

Parameter description:

  • --nodes (-N): The number of nodes required by the job.

  • --ntasks-per-node (--tasks-per-node): The number of tasks to run on each node.

  • --cpus-per-task: The number of vCPUs required by each task.

  • --time (-t): The maximum duration of the job.

  • --job-name (-J): The job name.

Optional: 2.2 Implement colocated scheduling in non-containerized Slurm clusters

SlurmCopilot uses the Slurm API to interact with Slurm. This interaction method also applies to non-containerized Slurm cluster scenarios.

In non-containerized Slurm cluster scenarios, specific Kubernetes resources can only be manually created, including the tokens mentioned in the preceding sections. The following section describes the Kubernetes resources that must be manually created.

  1. Create a Service for each Slurm cluster.

    SlurmCopilot queries information about Services from the cluster and submits API requests to the ${.metadata.name}.${.metadata.namespace}.svc.cluster.local:${.spec.ports[0].port} endpoint. In non-containerized Slurm cluster scenarios, you must create a Service for each Slurm cluster. The following code block provides an example of a Service configuration. Take note that the name of the Service of a Slurm cluster must be in the ${slurmCluster}-slurmrestd format. The ${slurmCluster} value must match the GenericNodes in the Slurm cluster.

    apiVersion: v1
    kind: Service
    metadata:
      name: slurm-slurmrestd
      namespace: default
    spec:
      ports:
      - name: slurmrestd
        port: 8080
        protocol: TCP
        targetPort: 8080
  2. Configure DNS records for each Slurm cluster.

    To enable access to the slurmrestd process, you must configure DNS records in the SlurmCopilot configurations to point ${.metadata.name}.${.metadata.namespace}.svc.cluster.local:${.spec.ports[0].port} to the IP address of the slurmrestd process.

  3. Create GenericNodes for nodes in the Slurm cluster.

    SlurmCopilot uses GenericNodes as the aliases of nodes in a Slurm cluster. If you do not create a GenericNode for a node in a Slurm cluster, SlurmCopolit cannot obtain information about the node. The name of a GenericNode for a node must be the same as the node name in the Kubernetes system. The value of the .spec.alias parameter must be the same as the node name in the Slurm system. The kai.alibabacloud.com/cluster-name and kai.alibabacloud.com/cluster-namespace labels must match the Service of the Slurm cluster.

    apiVersion: kai.alibabacloud.com/v1alpha1
    kind: GenericNode
    metadata:
      labels:
        kai.alibabacloud.com/cluster-name: slurm-test
        kai.alibabacloud.com/cluster-namespace: default
      name: cn-hongkong.10.1.0.19
    spec:
      alias: slurm-test-worker-cpu-0
      type: Slurm
    

Summary

In a workload colocation environment, you can use Slurm to schedule HPC jobs and use Kubernetes to orchestrate containerized workloads. This colocated scheduling solution allows you to use the Kubernetes ecosystem and services, including Helm charts, continuous integration/continuous delivery (CI/CD) pipelines, and monitoring tools. In addition, you can use a unified platform to schedule, submit, and manage both HPC jobs and containerized workloads. This way, HPC jobs and Kubernetes containerized workloads can be deployed in the same cluster to make full use of hardware resources.