In microservices scenarios, calls among applications are random. If a new version is available for the Spring Cloud or Dubbo application that you deploy, traffic with certain features cannot be routed to the destination version of the application. Microservices Engine (MSE) provides the end-to-end canary release capability that allows you to implement end-to-end traffic throttling without the need to modify your business code. You can create lanes and use them as independent runtime environments to isolate application versions. By configuring lane rules, you route traffic that matches the rules to the destination version. This topic explains how to implement end-to-end canary release using the MSE cloud-native gateway in Serverless App Engine (SAE).
Terms
MSE cloud-native gateway: a next-generation gateway that is compatible with Kubernetes Ingress. MSE cloud-native gateways support service discovery based on multiple sources such as Container Service for Kubernetes (ACK) and Nacos instances. MSE cloud-native gateways also support multiple logon authentication methods to provide security protection.
Lane: an isolated environment that is defined for applications of the same version. Only requests that match specific routing rules can be routed to the tagged applications in a lane. An application can belong to multiple lanes. A lane can contain multiple applications. Applications have a many-to-many relationship with lanes.
Lane group: a collection of lanes. A lane group is used to distinguish between different teams or scenarios.
Base environment: an environment in which untagged applications run. Base environments provide disaster recovery for other environments.
Scenario
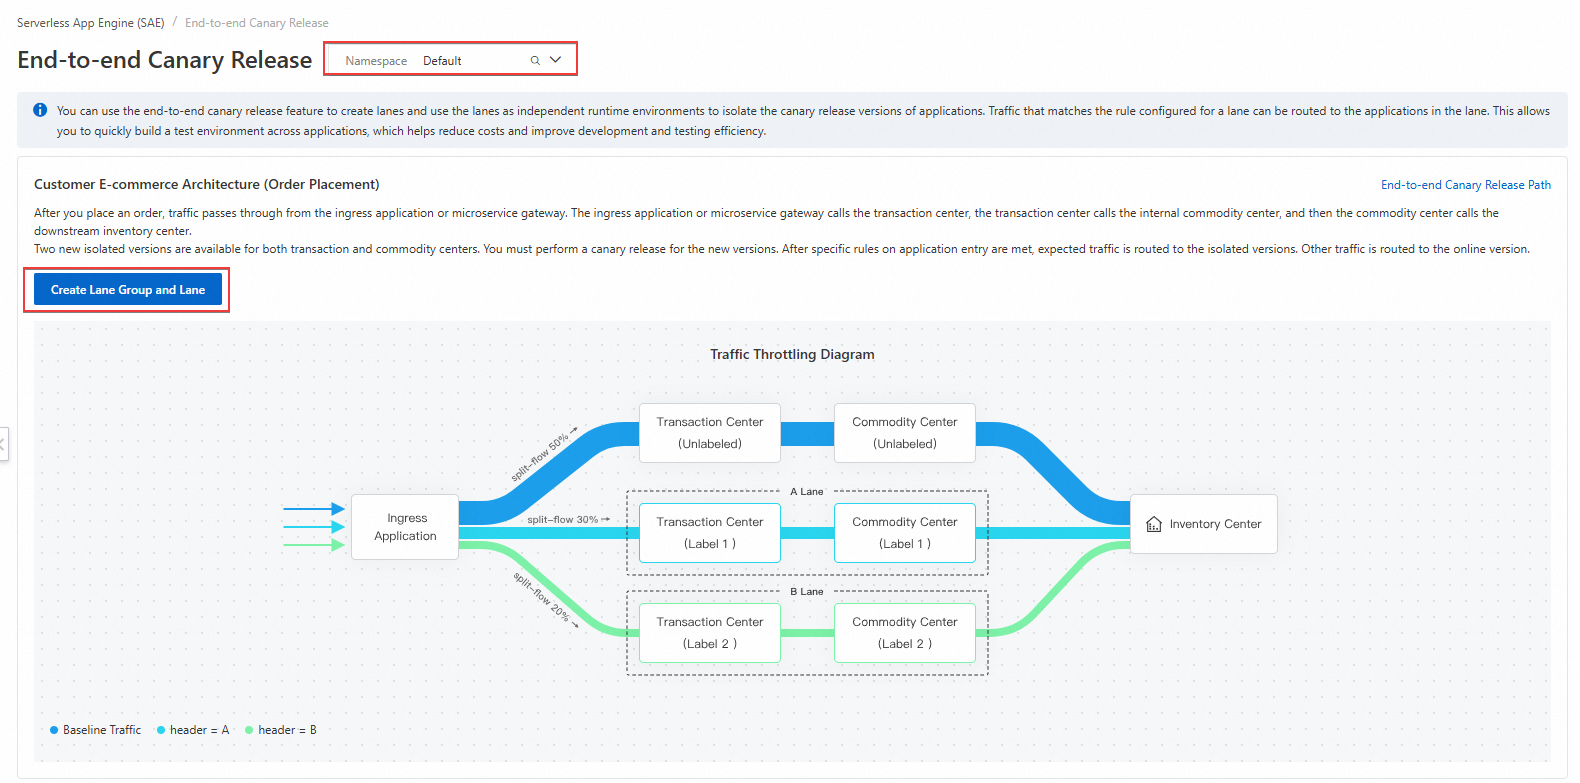
This topic simulates an invocation trace to demonstrate the end-to-end canary release. Without changing any code, you only need to configure tag-based routing rules for an ingress application. The tags will be propagated through the trace to subsequent applications. Traffic that meets the specified rules is routed to the canary versions based on version tags.
The deployment of each test application is as follows:
Test application: End-to-end canary release demo program.zip, which includes three backend applications: A, B, and C. These applications can be deployed as baseline or canary applications.
Application | Baseline application | Canary application | Canary application tag |
A | sae-a | sae-a-a1 | alicloud.service.tag:g1 |
sae-a-a2 | alicloud.service.tag:g2 | ||
B | sae-b | sae-b-b2 | alicloud.service.tag:g2 |
C | sae-c | sae-c-c1 | alicloud.service.tag:g1 |
sae-c-c2 | alicloud.service.tag:g2 |
The traffic distribution diagram is as follows:

The call chain is as follows:
Normal traffic invocation:
MSE cloud-native gateway -> Application sae-a -> Application sae-b -> Application sae-c.
Tagged traffic invocation:
t=g1 traffic: MSE cloud-native gateway -> Application sae-a-a1 -> Application sae-b -> Application sae-c-c1.
t=g2 traffic: MSE cloud-native gateway -> Application sae-a-a2 -> Application sae-b-b2 -> Application sae-c-c2.
Prerequisites
The Microservices Governance Professional or Enterprise Edition has been activated. For more information, see Activate Microservices Governance.
An MSE cloud-native gateway has been created. For more information, see Create an MSE cloud-native gateway.
An MSE Nacos instance and namespace have been created. For more information, see Create an instance and Create a namespace.
MSE cloud-native gateway instances and baseline applications can be in the same or different VPCs. If they are in different VPCs, ensure the VPCs are connected by using Cloud Enterprise Network (CEN) or other connectivity solutions.
Limits
The end-to-end canary release feature is applicable only to microservice applications created on or after November 8, 2023.
The feature is supported only in the new version of the console.
End-to-end canary release integrates the tag-based routing feature of Microservices Governance. If you want to use the end-to-end canary release feature, do not configure canary release and tag-based routing rules for your applications.
1. Deploy baseline applications and enable microservices governance
1.1 Deploy baseline applications
Create three baseline applications: sae-a, sae-b, and sae-c. This topic only covers the key steps. For more details, see Application deployment.
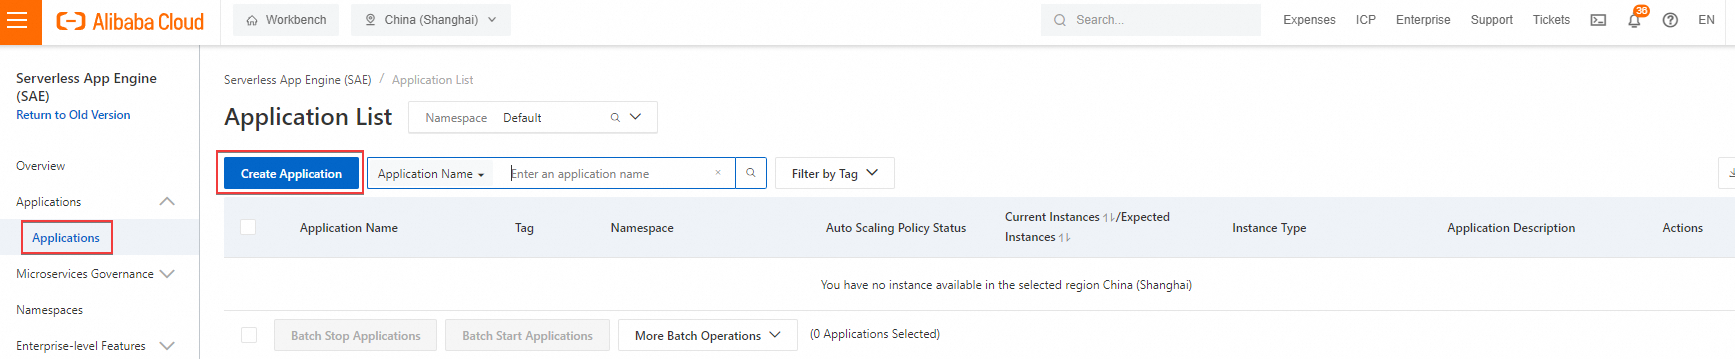
Log on to the SAE console. In the left-side navigation pane, choose . Select a region in the top navigation bar and a namespace from the Namespace drop-down list, and then click Create Application.
On the Application Basic Information wizard page, configure the parameters in the Basic Information Settings and Capacity Settings sections, and then click Next: Advanced Settings.
In this example, select to deploy the three baseline applications sae-a, sae-b, and sae-c by uploading a code package.
Find and expand the Service Registration and Discovery section. Select Nacos-based Registry Service and Discovery as MSE Nacos Professional Edition, and choose the target MSE Nacos Instance and Namespace. For other advanced settings, see Advanced settings.
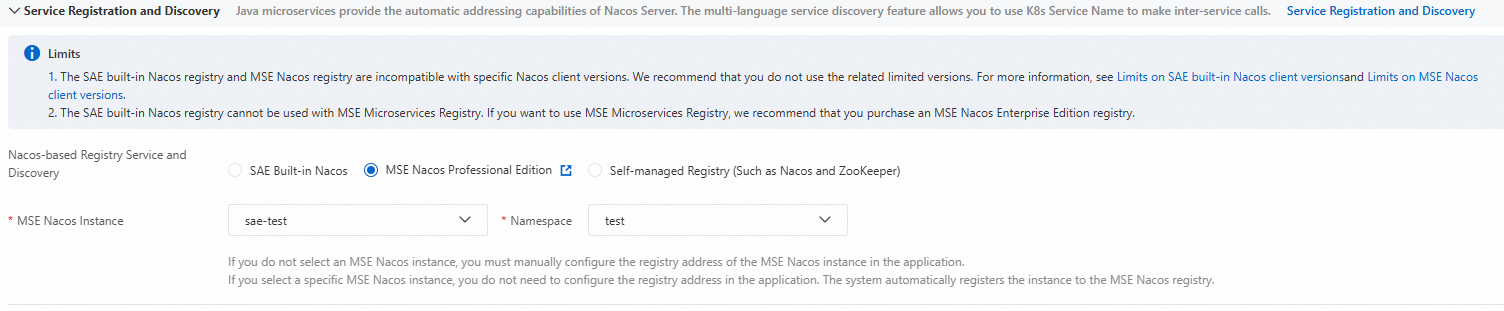 Important
All three baseline applications use the same MSE Nacos instance and namespace.
Click Create Application.
1.2 Enable microservices governance for baseline applications
End-to-end canary release is a feature of the MSE Microservices Governance Professional Edition. All applications involved must have it enabled.
On the Application List page, click the application name. In the left-side navigation pane, select , and click Enable Microservices Governance.
The microservice governance version enabled for the application matches the version of MSE.
If your application is not integrated with MSE Commercial Edition, upgrade microservice governance.
All instances will restart during the activation process. Perform it during off-peak hours.

The enabling process takes 1 to 2 minutes. Please wait patiently.
2. Deploy canary applications
Deploy canary applications based on baseline applications:
Two canary applications, sae-a-a1 and sae-a-a2, on application sae-a.
One canary application sae-b-b1 on application sae-b.
Two canary applications, sae-c-c1 and sae-c-c2, on application sae-c
The procedure is as follows.
On the Application List page, click the
 icon on the right side of the baseline application, and then click Create Canary Application.Note
If microservice governance is not activated for the baseline application, you cannot create a canary application.
On the Basic Information wizard page, configure the following information, and click Next: Advanced Settings.
In the Basic Information Settings section, set the canary Application Name and choose to deploy the canary application by image or code package. For more information, see Application deployment.
NoteThe Namespace configurations of the canary applications inherit from the baseline applications, so no modifications are needed.
The Application Deployment Method also inherits from the baseline applications. In this example, re-uploading the code package is not required. But you can adjust this parameter as needed in a production environment.
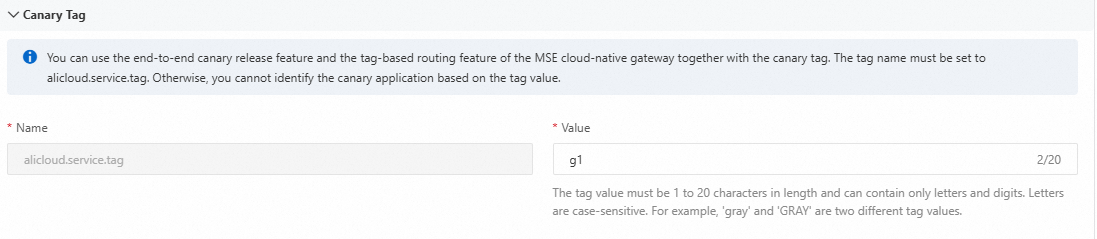
In the Canary Tag section, set the Value for the tag. See Scenario for the tag configurations.
In the Capacity Settings section, configure the resource specifications and number of instances.
On the Advanced Settings wizard page, configure the features as needed. For more information, see Advanced configuration.
NoteThe Service Discovery Feature of the canary application will automatically inherit the configurations of the baseline application. Manual modification is not required.
Click Create Application.
3. Create MSE cloud-native gateway routing
After creating the canary application, return to the Application List page, and select Namespace in the left-side navigation pane. On the Namespace page, click the name of the namespace where the baseline and canary applications are located.
After entering the target namespace, click Gateway Routing in the left-side navigation pane, and click Create Gateway Route.
Create an MSE cloud-native gateway routing on the Create Route page. This topic only describes the key steps. For more details, see Create and manage a route for an application (MSE).
NoteThe configurations are only applicable to this example. Adjust the settings as needed in the production environment.
Select Gateway Type as MSE Cloud-native Gateway.
Select the gateway instance created in the prerequisites in Gateway Instance.
Select Path as Prefix
/.Select Service Source as MSE Nacos.
Select the same MSE Nacos instance and namespace as the baseline application for MSE Nacos Instance and Namespace of MSE Nacos Instance.

Select Scenario as Single Service scenario.
Select sae-a as Application Name for Backend Service, enter sc-A in Service Name, choose HTTP as Service Protocol, and set Service Port to
20001.
Click Save.
4. Create lane groups and lanes
4.1 Create lane groups
After the MSE cloud-native gateway is created, return to the Namespace page. In the left-side navigation pane, select . On the End-to-end Canary Release page, select the target namespace, and then click Create Lane Groups and Lanes.
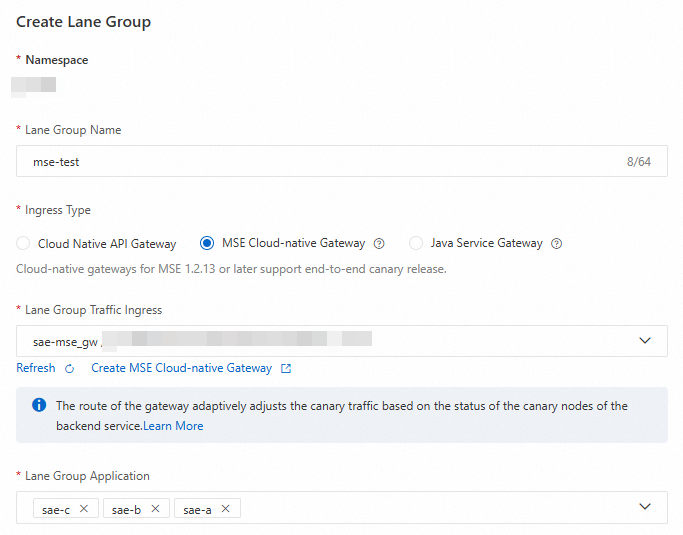
In the pop-up Create Lane Group panel, configure the following parameters, and then click OK.
Customize the Lane Group Name.
Select Ingress Type as MSE Cloud-native Gateway.
Select the cloud-native API gateway instance created in the prerequisites as Lane Group Traffic Ingress.
Select all baseline applications as Lane Group Application.
4.2 Create lanes
When creating lanes, you can choose either Canary Release by Content or Canary Release by Ratio. However, once the first lane is created, you cannot change the mode for subsequent lanes.
The following table provides configuration examples for this scenario. Adjust according to your needs in a production environment.
By content
Create two lanes as follows:
On the End-to-end Canary Release page, click Create First Split Lane.
ImportantAfter the first lane is created, click Create Lane to create the second lane.
In the pop-up Create Lane panel, configure the following parameters, and then OK.

Parameter
Example
Description
Lane Name
First lane name: test-1
Second lane name: test-2
Customize the lane name. Each lane name must be unique.
Lane Tag
First lane tag: g1
Second lane tag: g2
Select the tag value to be marked for the request from the drop-down list. This tag is the one configured when creating the canary application.
Lane Status
Enabled for both lanes.
The lane status is enabled by default.
Canary Release Mode
Canary Release by Content for both lanes.
Select Canary Release by Content. See the console for the detailed description of this mode.
Canary Conditions
First lane canary conditions:
All of the following conditions are met
Parameter type:
HeaderParameter:
tCondition:
==Value:
g1
Second lane canary conditions:
All of the following conditions are met
Parameter type:
HeaderParameter:
tCondition:
==Value:
g2
When the request meets the configured canary conditions, it will be marked with the specified lane tag.
The following two filtering conditions are supported:
All of the following conditions are met: Marked with a canary tag only when all the following conditions are met.
Any of the following conditions are met: Marked with a canary tag when any of the following conditions are met.
Conditions can be filtered through the following parameters:
Parameter Type: Supports Header, Cookie, and Parameter.
Parameter: Supports customization.
Condition: Supports
==,!=,in, percentage, regular expression matching, and prefix matching.Value: Supports customization.
By ratio
Create two lanes as follows:
On the End-to-end Canary Release page, click Create First Split Lane.
ImportantAfter the first lane is created, click Create Lane to create the second lane.
In the pop-up Create Lane panel, configure the following parameters, and click OK.

Parameter
Example
Description
Lane Name
First lane name: test-1
Second lane name: test-2
Customize the lane name. Each lane name must be unique.
Lane Tag
First lane tag: g1
Second lane tag: g2
Select the tag value to be marked for the request from the drop-down list. This tag is the one configured when creating the canary application.
Lane Status
Enabled for both lanes.
The lane status is enabled by default.
Canary Mode
The canary release mode for both lanes is Canary Release by Ratio.
Select Canary Release by Ratio. See the console for the detailed description of this mode.
Traffic Proportion
First lane: 50%
Second lane: 50%
Set the traffic ratio for the selected route or Path. By default, all routes or Paths within a lane use a unified traffic ratio.
5. Verify results
5.1 Test canary release traffic
By content
Run the following curl command to test the baseline traffic:
# Test command curl 8.130.XX.XX/a # Test result A[192.168.XX.XX][config=base] -> B[192.168.XX.XX] -> C[192.168.XX.XX]Note8.130.XX.XXin the command is the public IP address exposed by the cloud-native gateway.Test the canary traffic with the following curl command, using Header as the parameter type:
# Test command curl 8.130.XX.XX/a -H "tag: ${tag}" # Test result A${tag}[192.168.XX.XX][config=base] -> B[192.168.XX.XX] -> C${tag}[192.168.XX.XX]NoteIf the request headers contain
tag: ${tag}, they are passed through to the canary versions.
By ratio
Run the following curl command to verify the results:
# Test command
curl 8.130.XX.XX/a
# Test result
A[192.168.XX.XX][config=base] -> B[192.168.XX.XX] -> C[192.168.XX.XX]
A${tag}[192.168.XX.XX][config=base] -> B[192.168.XX.XX] -> C${tag}[192.168.XX.XX]8.130.XX.XX in the command is the public IP address exposed by the cloud-native gateway.
5.2 Microservices governance observability
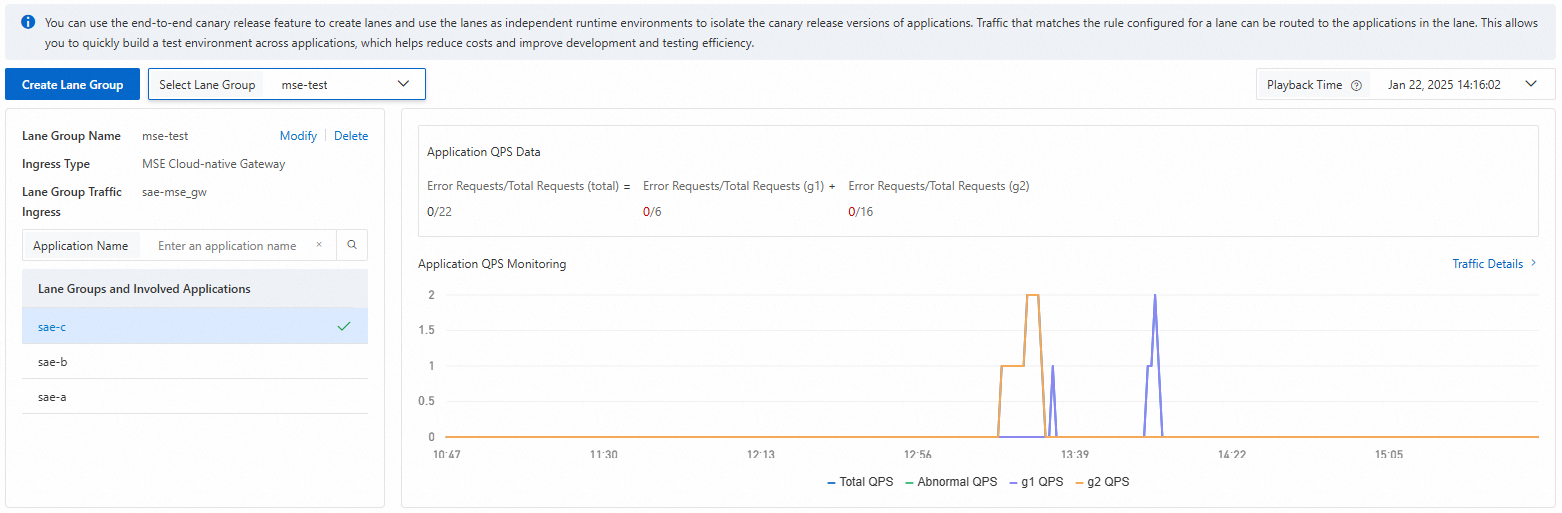
Log on to the SAE console. On the End-to-end Canary Release page, In the Lane Group and Involved Applications section, click the target application. In the Application QPS Monitoring section, view the lane traffic of baseline and canary versions. Select the playback time to display the data within the specific time frame.
You can also click Traffic Details in the Application QPS Monitoring section to view more details.