A security group acts as a virtual firewall for your ECS instances. By managing security groups and their rules, you can implement fine-grained network security isolation and access control.
The following figure shows how to configure two security group rules: one to allow remote management from an authorized IP address, and another to block the instance from accessing high-risk websites.
Inbound rule: Allows a specific IP address (
121.XX.XX.XX) to access the instance through SSH (port 22).Outbound rule: Denies the instance access to a known high-risk IP address (
XX.XX.XX.XX).

Configure a security group for a new instance
Go to the instance purchase page: On the ECS console - Custom Launch page, configure the instance.
Create a security group: In the Network and Security Group section, create and name a basic or enterprise security group.
Quickly configure common rules: When you purchase an instance, the console provides a list of commonly used ports and protocols. You can select the checkboxes to allow traffic from all IP addresses (
0.0.0.0/0) to the specified ports or to allow traffic using the specified protocols to access the created instance.
When creating a security group with an instance, you can only configure fine-grained rules after the instance is created. If you select ports used for instance management, such as the remote connection ports SSH (22) and RDP (3389), we recommend that you configure the security group rules to allow access only from trusted IP addresses after the instance is created.
Modify, add, or delete rules after creation: After you create the instance, refer to Security group rules to add, modify, or delete security group rules for the new instance.
For more examples of how to configure security group rules for different business scenarios, such as restricting instance access and defining database security policies, see security group application guidance and examples.
Manage security groups
You can modify the rules of a security group created with an ECS instance at any time. You can also create and manage security groups independently and then associate them with existing ECS instances.
Create a security group
Console
On the ECS console - Security groups page, click Create Security Group.
Set a name for the security group and select a Virtual Private Cloud.
For Basic Security Group, select Basic Security Group or Advanced Security Group.
After you configure the security group rules, click OK.
API
Call the CreateSecurityGroup operation to create a security group.
By default, a new basic security group without any rules allows all outbound traffic, permits inbound traffic from other ECS instances within the same group, and denies all other inbound traffic.
Manage security group rules
Security group rules define the conditions for allowing or denying network traffic to or from a security group. When you configure a rule, you must specify the traffic direction, destination, and priority. Because rules are stateful, adding an inbound rule automatically allows the corresponding outbound response traffic.
Console
On the ECS console - Security groups page, click the ID of the target security group to go to its details page.
Configure the security group rules.
Add a rule: On the security group details page, select a traffic direction and click Add rule.
Modify a rule: On the Access Rule tab of the security group details page, find the rule that you want to modify and click Modify in the Operation column.
Delete a rule: On the Access Rule tab of the security group details page, find the rule that you want to delete and click Delete in the Operation column.
API
Call the AuthorizeSecurityGroup operation to add an inbound rule.
Call the AuthorizeSecurityGroupEgress operation to add an outbound rule.
Call the ModifySecurityGroupRule operation to modify an inbound rule.
Call the ModifySecurityGroupEgressRule operation to modify an outbound rule.
Call the RevokeSecurityGroup operation to delete an inbound rule.
Call the RevokeSecurityGroupEgress operation to delete an outbound rule.
For rules with the same priority, a deny rule takes precedence. Security groups allow some specific types of network traffic by default.
To reduce security risks in your production environment, configure security group rules based on the principle of least privilege (whitelist). Avoid allowing access from all sources (for example, by using
0.0.0.0/0or::/0) in high-risk scenarios, such as when you log on to or manage ECS instances.Avoid directly modifying a production environment's security group. First, clone the security group and test the changes in a staging environment. After you confirm that there is no impact on instance traffic, apply the rules to the security group in the production environment.
Associate a security group with an instance
Associating an ECS instance with a security group links the group to the instance's primary NIC.
Console
On the ECS console - Instances page, click the ID of the instance that you want to manage.
On the instance details page, click the Security Group tab. Then, click Change Security Groups to add a security group to the instance or remove one from it. If you associate multiple security groups with the instance, their rules are combined and take effect based on their priorities.
API
Call the ModifyInstanceAttribute operation to associate multiple security groups with an ECS instance.
Call the JoinSecurityGroup operation to add an ECS instance to a security group.
Call the LeaveSecurityGroup operation to remove an ECS instance from a security group.
Manage security for secondary ENI
Security groups are applied to the elastic network interfaces (ENIs) of an ECS instance. If an instance has multiple ENIs, you can associate different security groups with these ENIs and configure different security group rules. This enables granular control and service isolation of internal network traffic.
Console
On the ECS console - Elastic network interfaces page, click the ID of the secondary ENI that you want to manage.
Click Change Security Groups, select the security groups that you want to associate, and then click OK.
API
Call the JoinSecurityGroup operation to add an ENI to a specified security group.
Call the LeaveSecurityGroup operation to remove an ENI from a specified security group.
Call the ModifyNetworkInterfaceAttribute operation to associate multiple security groups with an ENI.
Use a prefix list
If you need to grant permissions to multiple CIDR blocks, you can use a prefix list for centralized management. This simplifies security group rule configuration and improves batch maintenance efficiency.
Console
Create a prefix list:
Go to ECS console - Prefix lists.
On the required tab, click Create Prefix List.
For a security group that references a prefix list, the number of rules in the security group is calculated based on the maximum number of entries that you specify for the list.
On the details page of the target security group, add or modify a rule in the Access Rule section:
Set Source to a prefix list and select the target prefix list.
API
Call the CreatePrefixList operation to create a prefix list. After the prefix list is created, you can call the DescribePrefixListAttributes operation to query the details of the prefix list.
Call the AuthorizeSecurityGroup operation and set the SourcePrefixListId parameter in an inbound rule to grant access from the prefix list.
Call the AuthorizeSecurityGroupEgress operation and set the DestPrefixListId parameter in an outbound rule to grant access to the prefix list.
Clone a security group
You can clone security groups to create multiple security groups with the same configuration, or to replicate and back up security groups across regions or network types. After cloning, the new security group appears in the security group list of the destination region.
Go to the ECS console - Security groups page. Find the security group that you want to clone and click Clone Security Group in the Operation column.
Configure the destination security group. After the security group is cloned, it appears in the security group list of the destination region.
VPC ID: The VPC to which the new security group will belong.
Retain rules: Select this option to retain all rules from the source security group. The system changes the priority for rules with a value greater than 100 to 100.
Copy Tags of Current Security Group: Select whether to copy the tags from the source security group to the new security group.
Check for redundant rules
The health check feature for security groups can identify redundant rules. A rule is considered redundant if another rule with an equal or higher priority completely covers its conditions. We recommend that you periodically remove redundant rules to avoid failing to add new rules due to quota limits.
Go to the ECS console - Security groups page. On the details page of the security group that you want to manage, click the Access Rule tab and click Health check.
In the Health check dialog box, select the redundant rules that you want to delete and click Delete rules.
Import and export rules
You can use the import and export features to back up, restore, and migrate security group rules.
Import rules
Imported security group rules must meet the following requirements:
File format: JSON or CSV.
Number of rules: A maximum of 200 rules can be imported at a time.
Rule priority: 1 to 100. Rules with a priority greater than 100 are ignored.
When you import rules across regions, security group rules that use security groups or prefix lists as authorization objects, or that use port lists as port ranges, are not supported.
Go to the ECS console - Security groups page. On the details page of the security group that you want to manage, click the Access Rule tab and click Import Security Group Rule.
On the Import Security Group Rule page, click Select a file, select a local JSON or CSV file, and then click OK.
If the import fails, you can hover over the warning icon to view the cause of the failure.
Export rules
Go to the ECS console - Security groups page. On the details page of the security group that you want to manage, click the Access Rule tab and click Export. The exported rule file is named using one of the following formats:
JSON format: ecs_${region_id}_${groupID}.json.
For example, if the region ID is
cn-qingdaoand the security group ID issg-123, the exported file is namedecs_cn-qingdao_sg-123.json.CSV format: ecs_sgRule_${groupID}_${region_id}_${time}.csv.
For example, if the region ID is
cn-qingdao, the security group ID issg-123, and the export date is2020-01-20, the exported file is namedecs_sgRule_sg-123_cn-qingdao_2020-01-20.csv.
Security group snapshots
A security group snapshot automatically backs up security group rules. When you modify a security group rule, the system automatically creates a snapshot. You can use snapshots to restore security group rules to a specific point in time to recover rules after accidental modifications.
The system creates a snapshot five minutes after a rule is modified. If you make multiple changes within a five-minute window, the system creates a single snapshot of the state that existed before the first change.
Security group snapshots use OSS to store backup data. OSS is a pay-as-you-go service. You are charged for the storage and requests generated by security group snapshots.
Create a snapshot policy
Go to the ECS console - Security group snapshots page and click Create Security Group Snapshot Policy.
In the Create snapshot policy dialog box, configure the following parameters:
Policy Name:: Enter a name for the snapshot policy.
Policy status: Select Enable or Disable. Snapshots are created for associated security groups only if the policy is enabled.
Retention Period: Specify the number of days to retain snapshots. The value can be an integer from 1 to 30. The default value is 1. Snapshots are automatically deleted after the retention period expires.
OSS Storage Configuration: Configure the OSS Bucket that is used to store snapshot data. If you leave the Bucket name empty, the system uses the default bucket.
Click OK.
When you create a snapshot policy for the first time, the system prompts you to authorize the service-linked role (SLR)
ALIYUNSECURITYGROUPSNAPSHOTROLEto access the OSS bucket. If this role already exists, you do not need to grant the permission again.
Associate with a snapshot policy
After you create a snapshot policy, you must associate it with a security group to start backing up the security group rules.
When you associate a security group with a snapshot policy, the system immediately creates a snapshot for the security group.
Go to the ECS console - Security group snapshots page. Find the snapshot policy that you want to manage and click Associated Security Group in the Operation column.
In the Associated Security Group dialog box, select the security groups that you want to associate.
A snapshot policy can be associated with up to 10 security groups. A security group can be associated with multiple snapshot policies that have different settings.
Click OK to complete the association.
Restore rules from a snapshot
The restore operation takes effect immediately. This operation overwrites all current rules with the rules from the snapshot. This operation cannot be undone.
Go to the ECS console - Security groups page and click the ID of the security group that you want to manage.
On the security group details page, click the Snapshots tab. Find the snapshot that you want to restore and click Restore Snapshot in the Operation column.
In the Restore Security Group dialog box, confirm the restore information.
On the Inbound and Outbound tabs, compare the Current Security Group Rules and Restored Security Group Rules.
After you confirm the information, click OK.
Delete a security group
Deleting a security group permanently removes all its rules and is irreversible. Before you proceed, make sure you have backed up any required configurations.
Console
Go to the ECS console - Security groups page. Find the security group that you want to delete and click Delete in the Operation column.
In the Delete Security Group dialog box, confirm the information and click OK.
If a security group is not associated with any ECS instances or elastic network interfaces, but the Delete Security Group dialog box still displays the message Undeletable, you can click Try to Force Delete.
API
Call the DeleteSecurityGroup operation to delete a security group.
You cannot delete a security group in the following scenarios:
The security group is associated with an ECS instance or an ENI. You must disassociate the security group first.
It is referenced by another security group rule. You must delete the referencing rule first.
Managed security groups are view-only and cannot be deleted.
Deletion protection is enabled for the security group. You must disable it before deleting the security group.
If the error code
InvalidOperation.DeletionProtectionis returned when you use the DeleteSecurityGroup API to delete a security group, or if you see a message such as Deletion Protection in the console, this indicates that deletion protection is enabled for the security group.
Intra-group communication
By default, ECS instances in the same basic security group can communicate with each other over the internal network. To improve security, you can change the internal access control policy to internal isolation to prohibit internal network communication between the instances.
You cannot modify the internal access control policy of an enterprise security group.
If an instance belongs to multiple security groups, it can communicate internally with other instances in any of those groups that allow internal access.
If the internal access control policy of a security group is set to internal isolation, you can add security group rules to allow communication between instances.
Console
Go to the ECS console - Security groups page and click the ID of the security group that you want to manage.
On the Security group details page, in the Basic Information section, click Modify intragroup network connectivity policy.
Change the intragroup network connectivity policy to Isolated.
API
Call the ModifySecurityGroupPolicy operation to modify the internal access control policy of a basic security group.
Inter-group communication
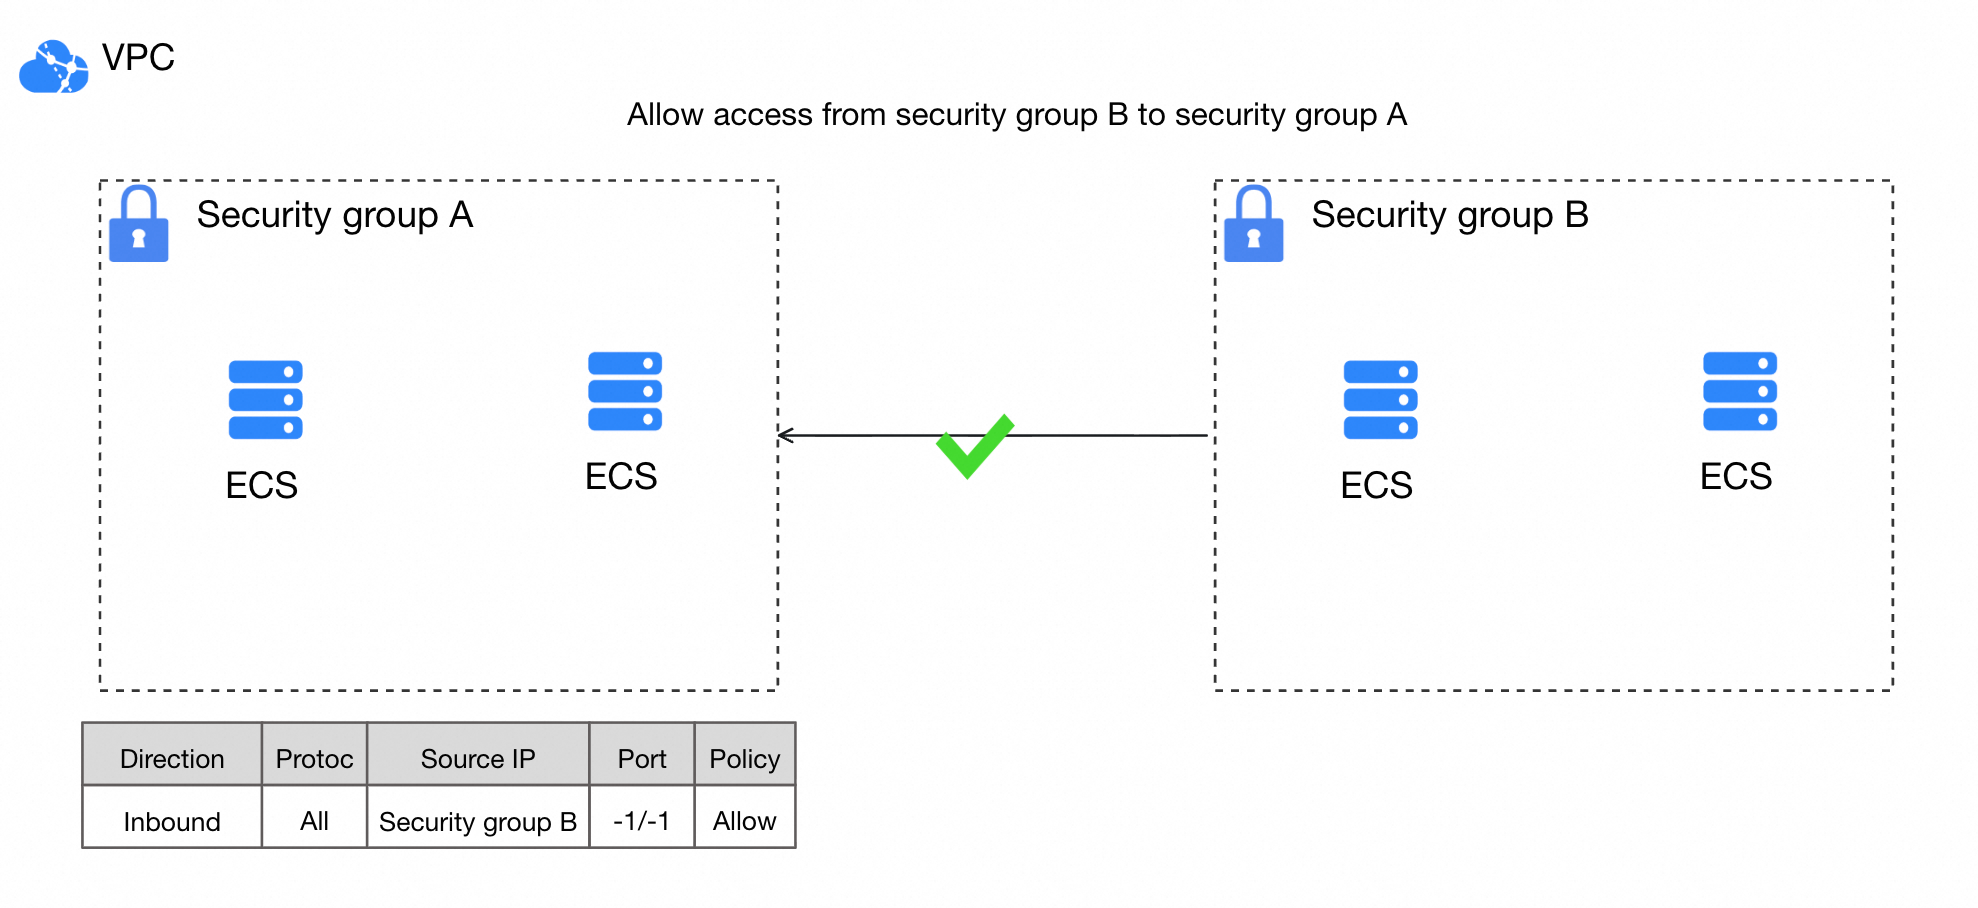
By setting another security group as the authorization object in a rule, you allow its instances to access instances in the current security group over the internal network. In the following figure, after Security Group B is set as the authorization object for an inbound rule of Security Group A, instances in Security Group B can access instances in Security Group A over the internal network.
You cannot add rules that use a security group as the authorization object to an enterprise security group.
Console
Go to the ECS console - Security groups page and click the ID of the security group that you want to manage.
On the Security group details page, select a traffic direction and click Add rule.
On the Create Security Group Rule page, set Source to Security Group or Cross-account security group.
API
Call the AuthorizeSecurityGroup operation and set the SourceGroupId parameter in an inbound rule to grant access from a security group.
Call the AuthorizeSecurityGroupEgress operation and set the DestGroupId parameter in an outbound rule to grant access to a security group.
Recommendations for production environments
Security group planning
Single responsibility: Use separate security groups for different services, such as web servers, databases, and cache servers.
Environment isolation: Use separate security groups for your production and staging environments.
Naming convention: Use the
environment-application-purpose-sgformat. For example,prod-mysql-db-sg.
Rule configuration
Least privilege: Only open necessary ports to necessary sources. Avoid opening management ports such as SSH (22) and RDP (3389) to
0.0.0.0/0. Access to these ports should always be restricted to trusted, fixed IP addresses.Default deny: Deny all inbound traffic by default. Add inbound rules to allow access from specific ports and sources only when necessary.
Rule priority conflicts: When an instance is in multiple security groups, a deny rule with a higher priority overrides an allow rule with a lower priority. When you troubleshoot network connectivity issues, check all associated security groups.
Change management
Avoid directly modifying the production environment: Avoid directly modifying a production environment's security group. We recommend that you first clone the security group and test it in a staging environment. After you confirm that there is no impact on instance traffic, apply the rules to the security group in the production environment.
Billing
Security groups are free of charge.
Limitations
Restriction | Basic security group limits | Enterprise security group limits |
Maximum number of security groups for a single Alibaba Cloud account in a specific region | To view or increase this quota, use the quota ID | Same as for basic security groups |
Number of security groups that can be associated with a single Elastic Network Interface (ENI) | 10 | Same as for basic security groups |
Maximum number of rules (inbound and outbound) for all security groups associated with a single ENI | 1,000 | Same as for basic security groups |
Maximum number of rules per security group that specify another security group as the authorization object | 20 | 0. You cannot add rules that use a security group as the authorization object to an enterprise security group. You also cannot use an enterprise security group as the authorization object in other security group rules. |
Number of ECS instances that a security group in a virtual private cloud (VPC) can contain | This number is not fixed. It depends on the number of private IP addresses that the security group can contain. | No limit |
Maximum number of private IP addresses that a security group in a VPC can contain per Alibaba Cloud account in a region | 6,000 Note
| 65,536 Note The number of used IP addresses represents the total number of ENIs associated with a security group, including both primary and secondary network interfaces of an instance. |
Public port access | For security reasons, port 25 on ECS instances is restricted by default. We recommend that you use an SSL-encrypted port, such as port 465, to send emails. | Same as for basic security groups |
FAQ
Cannot ping an instance
Connection or access issues
Security group vs. NACL
Primary NIC security groups
Allow internal service access
References
Prevent RAM users from creating high-risk security group rules
Automatically audit and remediate the compliance of security group rules
Troubleshoot remote connection issues with a Windows instance
Troubleshoot ineffective security group rules for an ECS instance
Troubleshoot a failure to ping the public IP address of an ECS instance