To improve the security of data in transit, you can enable Secure Sockets Layer (SSL) encryption and install an SSL CA certificate on your clients. SSL encrypts network connections at the transport layer, which enhances the security and integrity of your data but can also increase connection response times.
Background
The Internet Engineering Task Force (IETF) standardized SSL 3.0 and renamed it Transport Layer Security (TLS). Although TLS is the modern standard, this topic uses the more common term 'SSL' to refer to TLS encryption.
Use cases
Publicly accessing the database: When a client connects to a PolarDB cluster over the public internet, the data link is exposed to an untrusted network and must be encrypted to prevent man-in-the-middle attacks.
Meeting security and compliance requirements: Certain industry or data protection regulations, such as PCI-DSS and GDPR, require encryption for sensitive data in transit.
Cross-network communication: In hybrid cloud or multi-VPC architectures, data flows that cross network boundaries must be encrypted with SSL to ensure confidentiality and integrity.
Limitations
Single-endpoint encryption limit: Each cluster supports SSL encryption for only one endpoint at a time. If your cluster has both a public endpoint and an internal endpoint, you must choose one to encrypt based on your use case. You cannot encrypt both endpoints simultaneously.
Recommendations for choosing an endpoint to encrypt:
If you access the database over the public internet, enable SSL encryption for the public endpoint to mitigate security risks during data transmission.
If you only access the database from within a VPC and need to meet security and compliance requirements, enable SSL encryption for the internal endpoint.
Endpoint length limit: The endpoint of a PolarDB cluster with SSL encryption enabled must be fewer than 64 characters. To learn how to modify the endpoint, see Configure a database proxy.
Precautions
Certificate validity period: An SSL certificate is valid for one year. To avoid connection failures, you must update the validity period of the certificate and reconfigure your clients with the new CA certificate before the current one expires.
Service interruptions: Operations such as enabling or disabling SSL encryption, updating the validity period of the certificate, changing the protected endpoint, and enabling automatic certificate rotation restart the cluster. Perform these operations during off-peak hours and ensure your application can automatically reconnect.
Procedure
Step 1: Enable SSL encryption
Enabling SSL encryption restarts the cluster. Perform this operation during off-peak hours.
Log on to the PolarDB console. In the left-side navigation pane, click Clusters. Select the cluster's region, and then click the cluster ID.
In the left-side navigation pane, choose .
On the SSL Settings tab, click the slider next to SSL Status to enable SSL encryption.
NoteYou can configure SSL for the primary endpoint, cluster endpoint, and custom endpoint.
In the Configure SSL dialog box, select the endpoint to encrypt and click OK.
Step 2: Download certificate
After you enable SSL encryption, you can download the certificate for the PolarDB cluster to verify the authenticity of the database when a client remotely connects to the PolarDB cluster.
On the SSL Settings tab, click Download for the corresponding endpoint.
The downloaded file is a compressed archive that contains the following three files:
.p7b file: Used to import the CA certificate on Windows.
.pem file: Used to import the CA certificate into other operating systems or applications.
.jks file: A Java truststore file used to import the CA certificate chain into Java applications. The password is fixed at
apsaradb.NoteWhen you use the JKS certificate file in Java, you must modify the default security configurations for JDK 7 and JDK 8. On the server that connects to the PolarDB database, update the following two settings in the
jre/lib/security/java.securityfile:jdk.tls.disabledAlgorithms=SSLv3, RC4, DH keySize < 224 jdk.certpath.disabledAlgorithms=MD2, RSA keySize < 1024If you do not modify these configurations, an error similar to the following occurs. Other similar errors are also typically caused by Java security configuration issues.
javax.net.ssl.SSLHandshakeException: DHPublicKey does not comply to algorithm constraints
Step 3: Connect to PolarDB
After you enable SSL encryption, whether the connection between a client and a PolarDB cluster is actually encrypted depends on the type and settings of the client. For example, some clients might use encrypted connections by default. You can modify the client's settings or code to ensure that an encrypted connection is established and verify the identity of the PolarDB cluster.
If you use DMS (Data Management) to log on to and manage your PolarDB cluster, you do not need to encrypt the connection.
CLI
For MySQL client versions 5.7.11 and later, you can add the --ssl-mode option to the connection command to configure SSL encryption.
--ssl-mode=DISABLED: The connection is not encrypted.--ssl-mode=PREFERREDor omitting the--ssl-modeoption: Attempts an encrypted connection but falls back to an unencrypted one if the attempt fails.--ssl-mode=REQUIRED: Requires an encrypted connection; the connection fails if one cannot be established.--ssl-mode=VERIFY_CA: Requires an encrypted connection and verifies the server certificate against the local CA certificate.--ssl-mode=VERIFY_IDENTITY: Requires an encrypted connection, verifies the server certificate against the local CA certificate, and checks that the server's hostname or IP address matches the one specified in the connection.
Example 1: Attempt to establish an encrypted connection, falling back to an unencrypted connection if it fails.
mysql -h {endpoint} -u {username} -p --ssl-mode=PREFERREDExample 2: Require an encrypted connection and verify the server's certificate against a trusted CA.
mysql -h {endpoint} -u {username} -p --ssl-mode=VERIFY_CA --ssl-ca={path_to_ca_certificate}/ApsaraDB-CA-Chain.pemIn the preceding examples, replace
{endpoint},{username}, and{path_to_ca_certificate}with your actual values.For more information about the
--ssl-modeoption, see the official MySQL documentation.
MySQL Workbench
Open MySQL Workbench and choose Database > Manage Connections.
Enter the endpoint, username, and password for your PolarDB cluster.
On the SSL tab, select an option for Use SSL, provide the path to the downloaded PEM certificate for SSL CA File, and then click Test Connection or OK.
NoteFor the Use SSL options, see the description of --ssl-mode for command-line connections.
Application code
Java
Connector/J (mysql-connector-java) is the official JDBC driver provided by MySQL. This example uses mysql-connector-java 8.0.19 as a dependency.
<dependency>
    <groupId>mysql</groupId>
    <artifactId>mysql-connector-java</artifactId>
    <version>8.0.19</version>
</dependency>The following sample code uses the sslMode property to specify the SSL mode. This property is available in mysql-connector-java version 8.0.13 and later. If you use an earlier version, use the useSSL, requireSSL, and verifyServerCertificate properties instead. For details, see the MySQL documentation.
Sample code:
package com.example.ssltest;

import com.mysql.cj.jdbc.MysqlDataSource;
import java.sql.Connection;
import java.sql.ResultSet;
import java.sql.SQLException;
import java.sql.Statement;

public class Main {
    public static void main(String[] args) {
       Connection conn = null;
        MysqlDataSource mysqlDS=null;

        try{
            mysqlDS = new MysqlDataSource();
            // Set SslMode as needed. For available options, see the command-line connection instructions.
            mysqlDS.setSslMode("VERIFY_IDENTITY");

            // The truststore stores the CA certificate. Here, the truststore type is set to JKS.
            mysqlDS.setTrustCertificateKeyStoreType("JKS");
            // Replace the path after file:// with the path to your ApsaraDB-CA-Chain.jks file.
            mysqlDS.setTrustCertificateKeyStoreUrl("file://{path_to_ca_certificate}/ApsaraDB-CA-Chain.jks");
            // The password for the downloaded JKS file is apsaradb and cannot be changed.
            mysqlDS.setTrustCertificateKeyStorePassword("apsaradb");

            // Your cluster endpoint
            mysqlDS.setServerName("your_polardb_endpoint");
            // Your database port
            mysqlDS.setPort(3306);
            // Your database username
            mysqlDS.setUser("your_username");
            // Your database password
            mysqlDS.setPassword("your_password");
            // Your database name
            mysqlDS.setDatabaseName("your_database");

            System.out.println("Attempting to connect to the database...");
            conn = mysqlDS.getConnection();
            System.out.println("Database connection successful!");

            // Use try-with-resources to ensure that Statement and ResultSet are automatically closed.
            try (Statement stmt = conn.createStatement();
                 ResultSet rs = stmt.executeQuery("SELECT VERSION()")) {

                // Check if the query returned a result.
                if (rs.next()) {
                    // Get the result from the first column and print it.
                    String dbVersion = rs.getString(1);
                    System.out.println("Database version: " + dbVersion);
                } else {
                    System.out.println("Failed to retrieve database version information.");
                }
            }

        }catch(Exception e){
            e.printStackTrace();
        } finally {
            try {
                if (conn != null)
                    conn.close();
            } catch (SQLException e) {
                e.printStackTrace();
            }
        }
    }
}
Python
# Install pymysql
# pip install pymysql

import pymysql

# --- Configure your database information ---
db_config = {
    'host': 'your_polardb_endpoint',      # Your cluster endpoint
    'user': 'your_username',            # Your username
    'password': 'your_password',        # Your password
    'database': 'your_database',        # The database that you want to connect to
    'port': 3306
}

# --- Configure SSL information ---
ssl_args = {
    'ca': '{path_to_ca_certificate}/ApsaraDB-CA-Chain.pem',
    # Verifies the server's certificate against the specified CA.
    'ssl_verify_cert': True
}

try:
    # Establish the connection, passing the ssl arguments.
    print("Attempting to connect to MySQL using SSL...")
    connection = pymysql.connect(**db_config, ssl=ssl_args)
    print("SSL connection successful!")

    with connection.cursor() as cursor:
        # Execute a simple query to verify the connection.
        cursor.execute("SELECT VERSION()")
        version = cursor.fetchone()
        print(f"Database version: {version[0]}")

except pymysql.MySQLError as e:
    # Printing SSL-related errors can be helpful.
    print(f"Connection failed: {e}")
finally:
    if 'connection' in locals() and connection.open:
        connection.close()
        print("Database connection closed.")
Sysbench
Download the certificate and decompress the package.
Configure Sysbench:
Add the
--mysql-ssl=onflag to thesysbenchcommand line.If you use Sysbench 1.0.x, you must rename the .pem file to cacert.pem in the directory where you run the
sysbenchcommand. This is because Sysbench hardcodes the SSL certificate name as cacert.pem.If you use Sysbench 1.1.x, you can either follow the configuration for Sysbench 1.0.x or specify the path to the PEM file by using the
--mysql-ssl-caparameter.
For information about benchmark methods, see Performance test methods (OLTP).
NoteWhen you run the benchmark, ensure that the MySQL Client version is consistent with the MySQL version of your PolarDB cluster.
Step 4: Verify encrypted connection
The SSL protocol has many versions. PolarDB currently supports TLSv1.2 and later. During an SSL handshake, the client and the PolarDB server exchange negotiation information. This information includes the TLS version, encryption suites, and session keys. For a detailed list of encryption suites, see the OpenSSL website.
Connect to your PolarDB cluster by using a client with SSL configured.
Execute the following SQL query:
SHOW STATUS LIKE 'ssl_cipher';

+---------------+---------------------------+
| Variable_name | Value                     |
+---------------+---------------------------+
| Ssl_cipher    | DHE-RSA-AES256-GCM-SHA384 |
+---------------+---------------------------+
If the
Valuecolumn returns a non-empty value (such asDHE-RSA-AES256-GCM-SHA384), the current connection is encrypted.If the
Valuecolumn is empty, the current connection is not encrypted. Check whether your client configuration is correct.
Maintenance and management
Change the protected endpoint
To change the protected endpoint, click Configure SSL for the desired endpoint.
Changing the protected endpoint automatically updates the SSL certificate and restarts your cluster. Perform this operation during off-peak hours.
Update certificate validity
You must manually update the validity period of the certificate if you have changed the SSL endpoint or the certificate is about to expire. The following steps describe how to update the validity period.
Updating the validity period of the certificate restarts the cluster. Schedule this operation during off-peak hours.
Enable automatic certificate rotation
After you enable automatic certificate rotation, within 10 days before the certificate expires, PolarDB automatically updates the certificate during the cluster's maintenance window.
Automatic certificate renewal restarts the cluster. Perform this operation during off-peak hours.
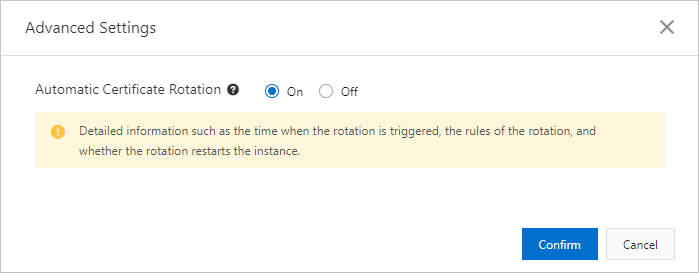
On the SSL Settings tab, click Advanced Settings.
In the Advanced Settings dialog box, enable automatic certificate rotation and click Confirm.
Disable SSL encryption
Disabling SSL encryption restarts the cluster. Perform this operation during off-peak hours.
On the SSL Settings tab, click the slider next to SSL Status to disable SSL encryption.
In the dialog box that appears, click OK.
Related APIs
API | Description |
Queries the SSL settings of a PolarDB cluster. | |
Enables or disables SSL encryption, or updates the CA certificate for a PolarDB cluster. |