JindoFS is a cloud-native file system that combines OSS and local storage to serve as the next-generation storage system for E-MapReduce (EMR). It uses OSS as the durable storage backend and keeps local redundant copies to accelerate reads. Metadata is managed by a local Namespace Service with performance comparable to Hadoop Distributed File System (HDFS). This topic describes how to set up, configure, and use JindoFS on EMR 3.22.0 and later.
EMR 3.20.0 and later support JindoFS. To use JindoFS, you must select the JindoFS service when you create a cluster. For EMR 3.20.0 to 3.22.0 (exclusive), see Use SmartData in EMR 3.20.0 to 3.22.0.
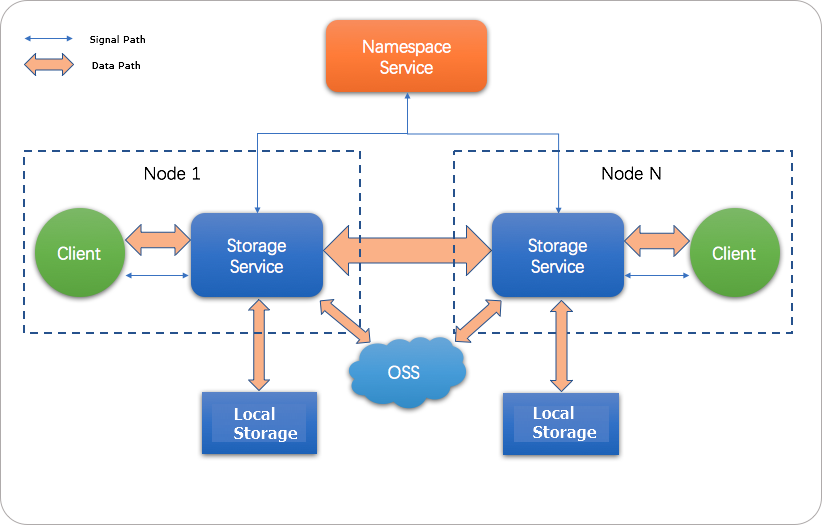
How JindoFS works
JindoFS uses a heterogeneous multi-backup mechanism. OSS provides durable storage; local disks hold redundant copies for read acceleration. The local Namespace Service manages metadata.
JindoFS supports two storage modes:
| Mode | How it works | Best for |
|---|---|---|
| Block | Data is split into blocks, stored in OSS, and cached locally. | Most big data workloads |
| Cache | OSS is the primary store; local disks act as a transparent cache layer. | Workloads where OSS is the source of truth |
All JindoFS paths use the jfs:// prefix. To use JindoFS, replace the hdfs:// prefix with jfs:// in your commands and job configurations.
All parameter names follow the pattern jfs.namespaces.<name>.<param>, where <name> is your namespace name. You can define multiple namespaces and configure each independently.
Prerequisites
Before you begin, make sure you have:
-
An EMR cluster running version 3.22.0 or later, with the SmartData service selected at creation time
-
An OSS bucket in the same region as your EMR cluster (recommended for passwordless access)
Set up JindoFS
Step 1: Create an EMR cluster with SmartData
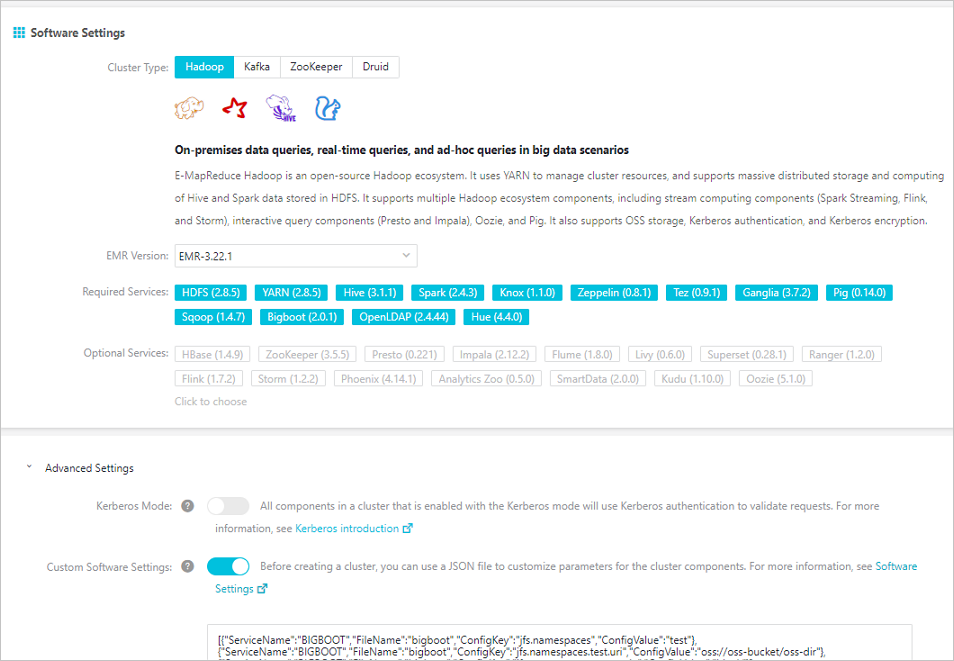
When creating a cluster, select EMR version 3.22.0 or later, then enable SmartData under Optional Services.

For cluster creation steps, see Create a cluster.
Step 2: Configure JindoFS
All JindoFS configuration is stored in the Bigboot component. Two methods are available:
-
After cluster creation (recommended for existing clusters): modify Bigboot parameters in the EMR console, then restart SmartData.
-
At cluster creation: pass configuration as a JSON array under Custom Software Settings.
The examples below configure a namespace named test.
Configure after cluster creation
-
In the EMR console, go to Service Configuration and click the bigboot tab.

-
Click Custom Configuration.
-
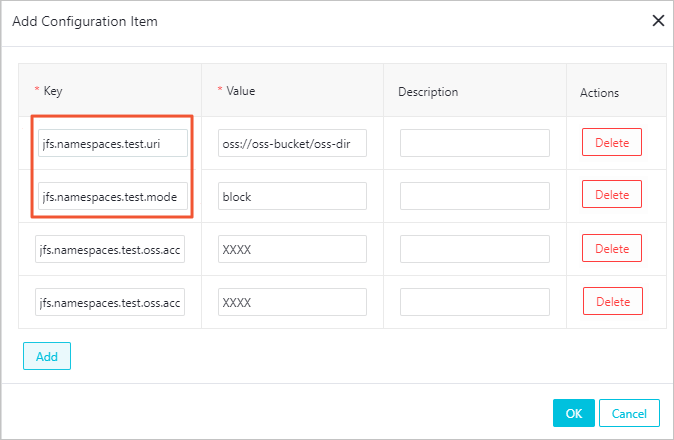
Add the required parameters. The table below lists all configuration items; items marked required must be set.
Parameter Required Description Example jfs.namespacesYes Namespaces to enable. Separate multiple namespaces with commas. testjfs.namespaces.test.uriYes OSS storage backend for this namespace. Set to a bucket root or a specific directory; that directory becomes the namespace root. oss://oss-bucket/oss-dirjfs.namespaces.test.modeYes Storage mode: blockorcache.blockjfs.namespaces.test.oss.access.keyNo AccessKey ID for the OSS backend. Omit if the EMR cluster and OSS bucket are in the same region under the same account (passwordless access applies). xxxxjfs.namespaces.test.oss.access.secretNo AccessKey secret for the OSS backend. Omit if using passwordless access. — -
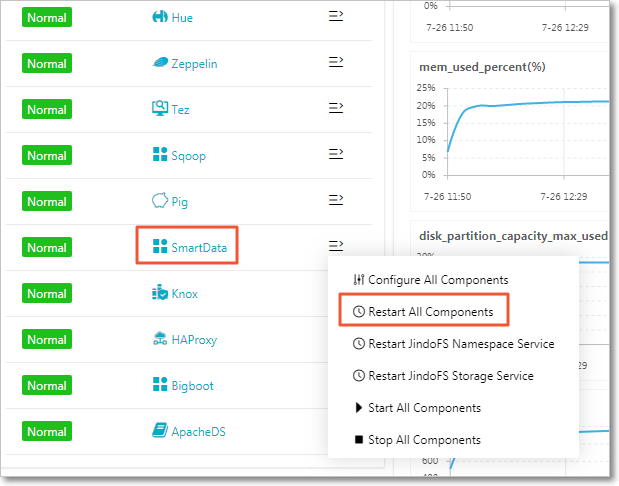
Save and deploy the configuration, then restart all components in the SmartData service.
Configure at cluster creation
Pass a JSON array of configuration entries under Custom Software Settings during cluster creation. The following example configures the test namespace with passwordless OSS access:
[
  {
    "ServiceName": "BIGBOOT",
    "FileName": "bigboot",
    "ConfigKey": "jfs.namespaces",
    "ConfigValue": "test"
  },
  {
    "ServiceName": "BIGBOOT",
    "FileName": "bigboot",
    "ConfigKey": "jfs.namespaces.test.uri",
    "ConfigValue": "oss://oss-bucket/oss-dir"
  },
  {
    "ServiceName": "BIGBOOT",
    "FileName": "bigboot",
    "ConfigKey": "jfs.namespaces.test.mode",
    "ConfigValue": "block"
  }
]
After the cluster is created, services start automatically with your custom parameters.
Use JindoFS
JindoFS is compatible with HDFS-based tools. Replace the hdfs:// prefix with jfs:// in your commands and job configurations. It supports Hadoop, Hive, Spark, Flink, Presto, and Impala.
Shell commands
hadoop fs -ls jfs://your-namespace/
hadoop fs -mkdir jfs://your-namespace/test-dir
hadoop fs -put test.log jfs://your-namespace/test-dir/
hadoop fs -get jfs://your-namespace/test-dir/test.log ./
MapReduce job
hadoop jar /usr/lib/hadoop-current/share/hadoop/mapreduce/hadoop-mapreduce-examples-2.8.5.jar teragen \
  -Dmapred.map.tasks=1000 10737418240 jfs://your-namespace/terasort/input

hadoop jar /usr/lib/hadoop-current/share/hadoop/mapreduce/hadoop-mapreduce-examples-2.8.5.jar terasort \
  -Dmapred.reduce.tasks=1000 jfs://your-namespace/terasort/input jfs://your-namespace/terasort/output
Spark SQL
CREATE EXTERNAL TABLE IF NOT EXISTS src_jfs (key INT, value STRING)
  LOCATION 'jfs://your-namespace/Spark_sql_test/';
Manage disk space
JindoFS stores data in OSS, so total capacity is effectively unlimited. Local disks are used for caching and redundant copies. JindoFS manages local disk usage automatically using two watermark parameters:
| Parameter | Description |
|---|---|
node.data-dirs.watermark.high.ratio |
Upper disk usage limit per disk (0–1). When a disk reaches this threshold, JindoFS evicts cold data. |
node.data-dirs.watermark.low.ratio |
Lower disk usage limit per disk (0–1). Eviction continues until disk usage drops to this level. |
The high watermark must be greater than the low watermark. By default, JindoFS uses the total capacity of all data disks.
Set storage policies
JindoFS provides four storage policies to balance performance, reliability, and cost. The default policy is WARM. New files inherit the storage policy of their parent directory.
| Policy | Description | Use when |
|---|---|---|
| COLD | One copy in OSS, no local backups. | Data is rarely accessed and local caching is not needed |
| WARM *(default)* | One copy in OSS, one local backup. Local copy accelerates subsequent reads. | Standard workloads |
| HOT | One copy in OSS, multiple local backups. | Data requiring maximum read throughput |
| TEMP | One local backup only. High-performance reads and writes for temporary data; reduces data reliability. | Temporary data with high-performance I/O requirements |
Set a storage policy
Sets the storage policy on a directory.
jindo dfsadmin -R -setStoragePolicy <path> <policy>| Argument | Description |
|---|---|
<path> |
Directory path to apply the policy to |
<policy> |
Policy name: COLD, WARM, HOT, or TEMP |
-R |
(Optional) Recursively applies the policy to all subdirectories within <path> |
Get the storage policy
Retrieves the current storage policy for a directory.
jindo dfsadmin -getStoragePolicy <path>| Argument | Description |
|---|---|
<path> |
Directory path to query |
Admin tool
The jindo dfsadmin tool provides administration commands for JindoFS. Run jindo dfsadmin --help to see all available options.
Archive cold data
Explicitly evicts local data blocks, retaining only the OSS copy. Use this to reclaim local disk space for directories whose data is no longer frequently accessed.
jindo dfsadmin -archive <path>| Argument | Description |
|---|---|
<path> |
Directory whose local data blocks to evict |
Example: If Hive partitions data by day and partitions older than one week are no longer active, run archive on those partition directories to free local disk space while keeping the data accessible in OSS.
Show metadata differences (cache mode)
Shows the differences between local cached data and the OSS backend. By default, compares only the immediate subdirectories of <path>.
jindo dfsadmin -R -diff <path>| Argument | Description |
|---|---|
<path> |
Path to compare |
-R |
(Optional) Recursively compares all paths within <path> |
Sync metadata (cache mode)
Synchronizes metadata between local storage and the OSS backend. By default, syncs only the immediate subdirectories of <path>.
jindo dfsadmin -R -sync <path>| Argument | Description |
|---|---|
<path> |
Path to synchronize |
-R |
(Optional) Recursively synchronizes all paths within <path> |