This topic explains how to clone an ApsaraDB RDS for MySQL instance to a PolarDB for MySQL cluster with one click. It describes the two cloning methods, their benefits and differences, prerequisites, limitations, and billing.
Usage notes
When you clone an ApsaraDB RDS for MySQL instance to a PolarDB cluster, incremental data from the source instance is not synchronized to the destination PolarDB cluster.
If you want to create a new PolarDB cluster and at the same time synchronize incremental data from a source RDS instance to the PolarDB cluster in real time to perform a smooth (zero-downtime) migration, see One-click Upgrade from RDS MySQL to PolarDB for MySQL.
Overview
PolarDB allows you to clone data from an ApsaraDB RDS for MySQL instance to a new PolarDB for MySQL cluster with a single click. This feature creates a new PolarDB cluster that has the same data as the source RDS instance. The new PolarDB cluster includes the accounts, databases, IP whitelist, and necessary parameters from the source instance.
The following table describes the supported versions and storage types for the source ApsaraDB RDS for MySQL instance and the destination PolarDB for MySQL cluster.
-
You can clone source ApsaraDB RDS for MySQL instances of all versions and all storage types. Whether the instance runs MySQL 5.6, 5.7, or 8.0, and uses local SSDs or cloud disks, you can clone it to a PolarDB for MySQL cluster with one click.
-
You can clone an ApsaraDB RDS for MySQL instance to a PolarDB for MySQL cluster that runs the same or a different version. For example, you can clone an ApsaraDB RDS for MySQL 5.6 instance to a PolarDB for MySQL 5.6 cluster, or to a PolarDB for MySQL 8.0 cluster.
One-click cloning of ApsaraDB RDS for MySQL 8.0 instances and ApsaraDB RDS for MySQL instances that use cloud disks to PolarDB for MySQL, and cross-version one-click cloning from ApsaraDB RDS for MySQL to PolarDB for MySQL use logical migration (DTS data synchronization).
Physical and logical migration
The one-click clone feature supports two methods: physical migration (physical replication) and logical migration (data synchronization by using DTS).
-
Physical migration (physical replication): This method copies the full data from the source ApsaraDB RDS for MySQL instance to the newly created PolarDB for MySQL cluster by using physical replication.
-
Logical migration (data synchronization by using DTS): This method uses Data Transmission Service (DTS) to create a data synchronization task that migrates the schema and full data from the source ApsaraDB RDS for MySQL instance to the newly created PolarDB for MySQL cluster.
The following table compares the two migration methods.
|
Item |
Physical migration (physical replication) |
Logical migration (data synchronization by using DTS) |
|
Requires DTS |
No |
Yes |
|
Supports incremental data synchronization |
No |
No |
|
Affects operations on the source RDS instance |
No |
No |
|
Supports different MySQL versions for the source and destination |
Supports only same-version cloning for instances that run MySQL 5.6 or 5.7 and use local disks. |
Supports both same-version and cross-version cloning. |
|
Requires creating database accounts in the PolarDB cluster after cloning |
No. After cloning, the PolarDB cluster contains the accounts from the source RDS instance. |
No. After cloning, the PolarDB cluster contains the accounts from the source RDS instance. |
|
Supports migrating newly added databases |
No |
No |
The following table describes the supported ApsaraDB RDS for MySQL editions and storage types.
|
RDS version |
Basic Edition |
High-availability Edition |
Cluster Edition |
Three-node Enterprise Edition |
|
5.6 |
N/A |
Local disk |
N/A |
Local disk |
|
5.7 |
cloud disk |
Local disk, cloud disk |
cloud disk |
Local disk |
|
8.0 |
cloud disk |
Local disk, cloud disk |
cloud disk |
Local disk |
Physical migration is used only when you clone an ApsaraDB RDS for MySQL 5.6 or 5.7 High-availability Edition instance that uses local SSDs to a PolarDB for MySQL cluster of the same version. In all other scenarios, logical migration is used to clone an ApsaraDB RDS for MySQL instance to a PolarDB for MySQL cluster of the same or a different version.
Benefits
The cloning process ensures zero data loss.
Prerequisites
-
If you use physical migration, the source RDS instance must meet the following version requirements. Logical migration has no version requirements.
-
For ApsaraDB RDS for MySQL 5.6, the minor version must be 20190815 or later.
-
For ApsaraDB RDS for MySQL 5.7, the minor version must be 20200331 or later.
NoteYou can run the
SHOW VARIABLES LIKE '%rds_release_date%';command to check the minor version of the source RDS instance. If the minor version is earlier than the required version, you can upgrade it to the latest version. For more information, see Upgrade the minor engine version. -
-
The one-click clone feature is supported only for source RDS instances whose tables use the InnoDB or X-Engine storage engines.
-
The source RDS instance does not have TDE or SSL enabled. If they are enabled, you can manually create a DTS data migration task to migrate the source RDS instance to PolarDB. For more information, see Migrate data from ApsaraDB RDS for MySQL to PolarDB for MySQL.
-
If the source RDS instance is in High-Security Mode (which uses a database proxy), you must create a privileged account or switch to High-Performance Mode to perform a one-click clone. For more information, see Create an account and [Product/Feature Change] RDS network link upgrade.

Limitations
-
You can clone an ApsaraDB RDS for MySQL instance only to a PolarDB for MySQL cluster of the same or a later version. Cloning to an earlier version is not supported.
For example, you cannot clone an ApsaraDB RDS for MySQL 5.7 instance to a PolarDB for MySQL 5.6 cluster, or clone an ApsaraDB RDS for MySQL 8.0.2 instance to a PolarDB for MySQL 8.0.1 cluster.
-
The physical migration method has the following limitations:
-
Cross-region migration is not supported.
-
You cannot change the parameters of the source RDS instance during the migration.
-
-
The logical migration method has the following limitations:
-
Cross-region migration is not supported.
-
You cannot change the parameters of the source RDS instance during the migration.
-
The source database has the following limitations:
Type
Description
Source database limitations
-
Tables to be synchronized must have a PRIMARY KEY or a unique constraint, and the fields in the constraint must be unique. Otherwise, duplicate data may appear in the destination database.
-
If you synchronize at the table level and need to edit objects (such as mapping column names), a single synchronization task supports a maximum of 1,000 tables. If you exceed this limit, the task submission fails. In this case, we recommend splitting the tables into multiple tasks or configuring a task to synchronize the entire database.
-
Binary log: The binary log must be enabled on the source instance, and the
binlog_row_imageparameter must be set tofull. Otherwise, the precheck will fail, and the data synchronization task cannot start. For more information, see Configure instance parameters.
-
-
Other limitations:
Type
Description
Other limitations
-
Before you start, evaluate the performance of the source and destination databases. We recommend performing data synchronization during off-peak hours. The initial full data synchronization consumes read and write resources on both databases, which may increase their load.
-
The initial full synchronization performs concurrent INSERT operations, which can cause table fragmentation in the destination database. As a result, the table space in the destination instance may be larger than in the source instance after the initial synchronization is complete.
-
If you are synchronizing individual tables (not the entire database), do not perform online DDL changes on the source tables using tools like gh-ost or pt-online-schema-change during the data synchronization. This can cause the synchronization to fail.
You can use Data Management Service (DMS) to perform online DDL changes. For more information, see Change schemas without locking tables.
-
During DTS synchronization, do not write any external data to the destination database. This can cause data inconsistency between the source and destination. For example, if you use DMS to perform an online DDL change while external data is being written to the destination, data loss may occur.
-
By default, DTS disables foreign key constraints on the destination database during synchronization. Therefore, cascaded operations like
DELETEfrom the source database are not synchronized to the destination.
-
-
Billing
-
The billing rules for physical migration are as follows:
Migrating from ApsaraDB RDS to PolarDB is free of charge. You are only charged for the purchased PolarDB cluster. For more information about PolarDB cluster fees, see Billable items overview.
-
The billing rules for logical migration are as follows:
In addition to the cost of the PolarDB cluster, you are also charged for the DTS synchronization task. However, this feature is currently in a trial period. Synchronization tasks are free for the first 30 days. This free trial is not available for some account types, including virtual network operator (VNO) users, Jushita users, Alibaba Cloud International website users, and RAM users. The details are as follows:
Migration object
Fee
Schema synchronization and full data synchronization
No fees are charged for the synchronization task within 30 days of its creation.
After 30 days, the synchronization task will be canceled.
NoteYou can go to the Data Synchronization Tasks page of the new DTS console to view the remaining time for the task.
The following sections describe how to clone an ApsaraDB RDS for MySQL instance to a PolarDB for MySQL cluster.
Prechecks (for logical migration only)
Check for the PolarDB service-linked role
Before you use logical migration (data synchronization by using DTS) to clone an instance, check if the PolarDB service-linked role has been created. Perform the following steps:
-
With your Alibaba Cloud account (primary account), go to the Identity Management > Role page in the RAM console.
-
Check whether a service-linked role named AliyunServiceRoleForPolarDB exists in the role list, as shown in the following figure.

-
If it exists, skip this check.
-
If it does not exist, proceed to the next step.
-
-
Click Create Role. On the Create Role page, click Create Service-linked Role in the upper-right corner.
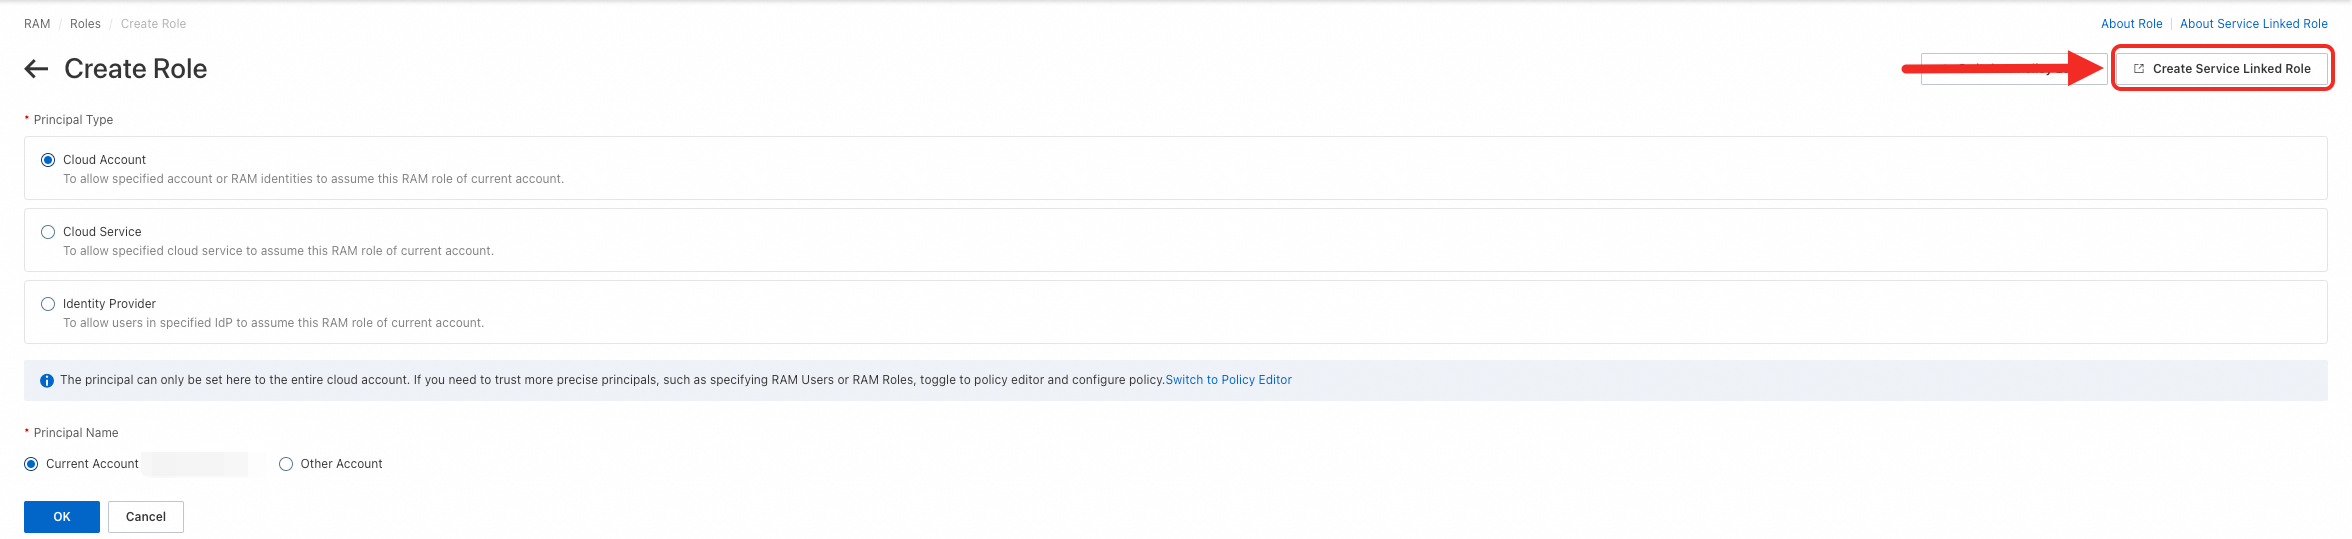
-
On the Create Service-linked Role page, select AliyunServiceRoleForPolarDB for Trusted Cloud Service, and then click Create Service-linked Role to complete the creation.

Delete redundant system accounts
To ensure compatibility between the system account structures of ApsaraDB RDS for MySQL and PolarDB, and to prevent the system accounts of the destination PolarDB cluster from being overwritten, the source RDS instance cannot have both root and aliyun_root accounts. Before cloning, delete any redundant system accounts from the source RDS instance.
The following table lists the correct system account name for each version of ApsaraDB RDS for MySQL.
|
RDS MySQL version |
Correct system account |
|
ApsaraDB RDS for MySQL 5.6 |
root |
|
ApsaraDB RDS for MySQL 5.7 |
aliyun_root |
|
ApsaraDB RDS for MySQL 8.0 |
aliyun_root |
For each version, you must delete any system accounts other than the correct one listed in the table. For example, the correct system account for an ApsaraDB RDS for MySQL 5.7 instance is aliyun_root. If you manually created a root account in the console, you must delete it. Before you delete the account, make sure your business does not use it.
System accounts may be created manually by users or left over from system version upgrades. In some cases, these accounts may not be visible in the console.
Example
The following example shows how to delete redundant system accounts from an ApsaraDB RDS for MySQL 5.6 instance:
-
Use a privileged account to connect to the instance.
-
Find all
rootandaliyun_rootsystem accounts.SELECT * FROM mysql.user WHERE `user` IN ('root', 'aliyun_root'); -
Delete the redundant system account. The correct system account for ApsaraDB RDS for MySQL 5.6 is
root. Therefore, you must delete thealiyun_rootaccount.DELETE FROM mysql.user WHERE `user` = 'aliyun_root' LIMIT n;
Step 1: Clone from an RDS instance
This operation creates a PolarDB cluster that has the same data as the source RDS instance.
-
Log on to the PolarDB console.
In the upper-left corner, select the region where the cluster is deployed.
-
Click Create Cluster.
-
Select a Billing Method: Subscription, Pay-As-You-Go, or Serverless.
-
Subscription: You pay for the compute nodes when you create the cluster. The storage space is billed hourly based on the actual data volume, with fees deducted from your account balance.
-
Pay-as-you-go: No upfront payment is required. Both the compute nodes and the storage space (based on actual data volume) are billed hourly, with fees deducted from your account balance.
-
Serverless: No upfront payment is required. The service dynamically scales resources such as compute nodes, storage space, and database proxies based on actual demand. You are billed for the actual usage of these scaled resources.
-
-
Configure the following parameters.
NoteFor information about parameters not described in the following table, see Purchase a cluster.
Parameter
Description
Creation Method
Select Clone from RDS.
Region
Select the region where the source ApsaraDB RDS for MySQL instance is located.
NoteThe new PolarDB cluster is created in the same region.
Source RDS Version
The version of the source RDS instance. You can select 5.6, 5.7, or 8.0.
Source RDS Instance
Select the source RDS instance. Read-only instances are not included.
Database Engine
The database engine version for the destination PolarDB cluster. You can choose a version that is the same as the source RDS instance or a different version.
Node Specifications
Select specifications based on your needs. We recommend selecting specifications that are equal to or higher than those of the source RDS instance. For more information about PolarDB node specifications, see Compute node specifications of Enterprise Edition.
In the upper-right corner, review the cluster configuration. Set the Subscription Duration (for subscription clusters), Quantity, and enable or disable Auto-renewal.
Read and select the checkbox to agree to the terms of service. Click Buy Now.
On the Payment page, confirm the order information and payment method, then click Purchase.
NoteAfter a successful payment, it takes 10 to 15 minutes to create the cluster. You can then view the new cluster in the Cluster List.
If the status of a node in the cluster is Creating, the cluster is unavailable. The cluster is ready only when its status changes to Running.
Make sure you have selected the correct region. Otherwise, you may not be able to see the cluster you created.
-
Log on to the PolarDB console and view the status of the new PolarDB cluster.
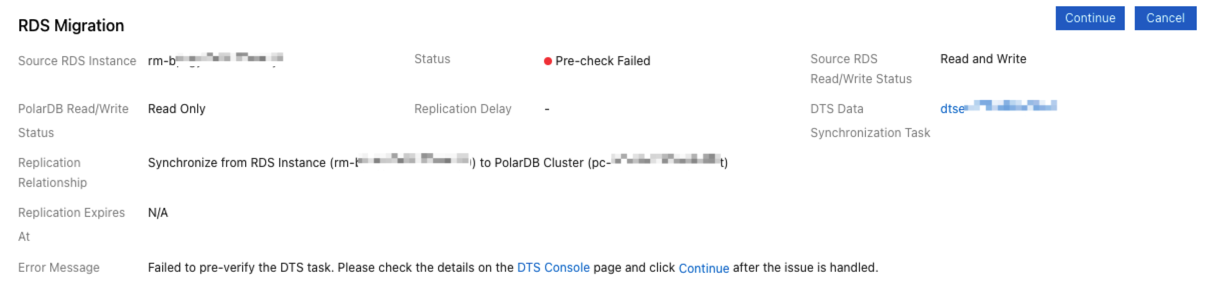
NoteIf you are cloning by using logical migration (data synchronization by using DTS), click the cluster ID to go to the Basic Information page and view the migration status. If the RDS migration status changes to Pre-check failed, handle the issue according to the Error Message.

For example, if triggers exist in the source RDS instance, the precheck fails with the error message "RDS instance exists trigger". First, delete the triggers from the source RDS instance and click Continue migrating. Alternatively, click Give up migration and manually create a migration task in the DTS console. For more information, see Configure a synchronization or migration task when triggers exist in the source database.
You can also choose to Give up migration at this step. For information about the consequences, see FAQ.
Step 2: View data synchronization task details
If you are using logical migration, click the cluster ID to go to the Basic Information page and view the migration status. If a migration error (such as a precheck failure) or another exception (such as high replication latency) occurs, you can go to the details page of the corresponding DTS data synchronization task to view more information.
-
Log on to the PolarDB console.
-
Find the destination cluster and click its ID.
-
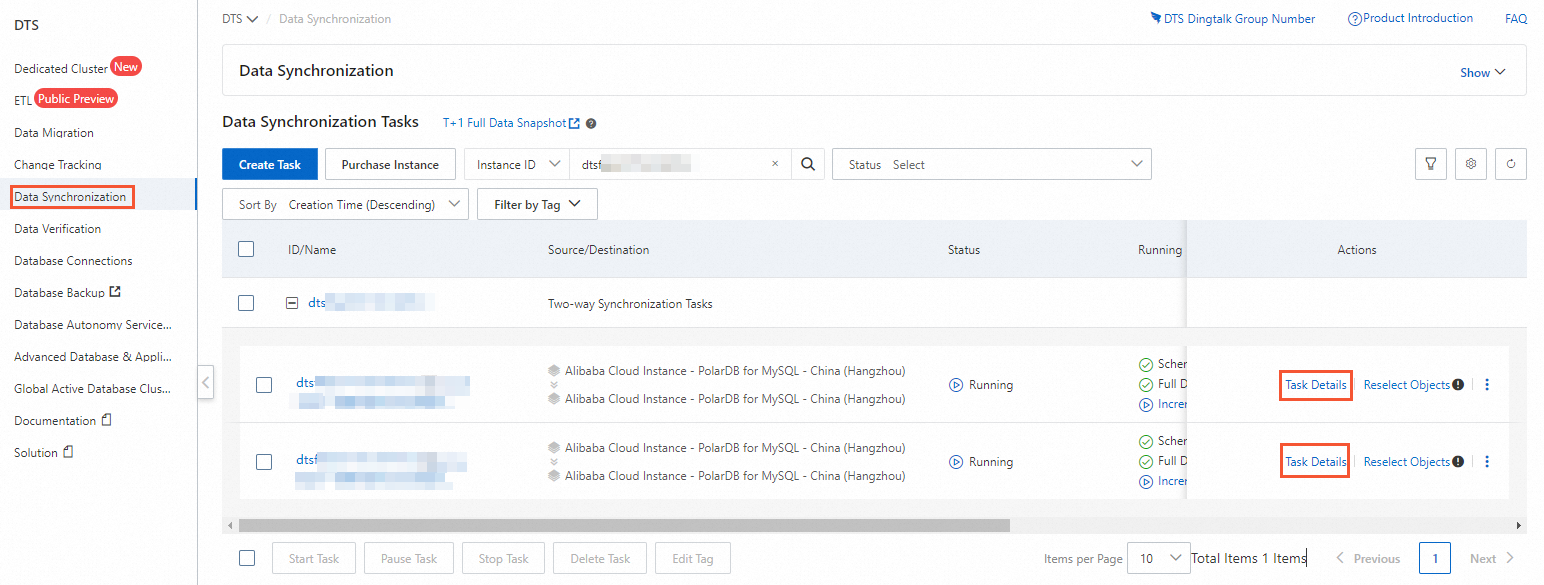
On the Basic Information page, in the RDS Migration section, click the task name under DTS Data Synchronization Task to open the data synchronization task list in the DTS console.
-
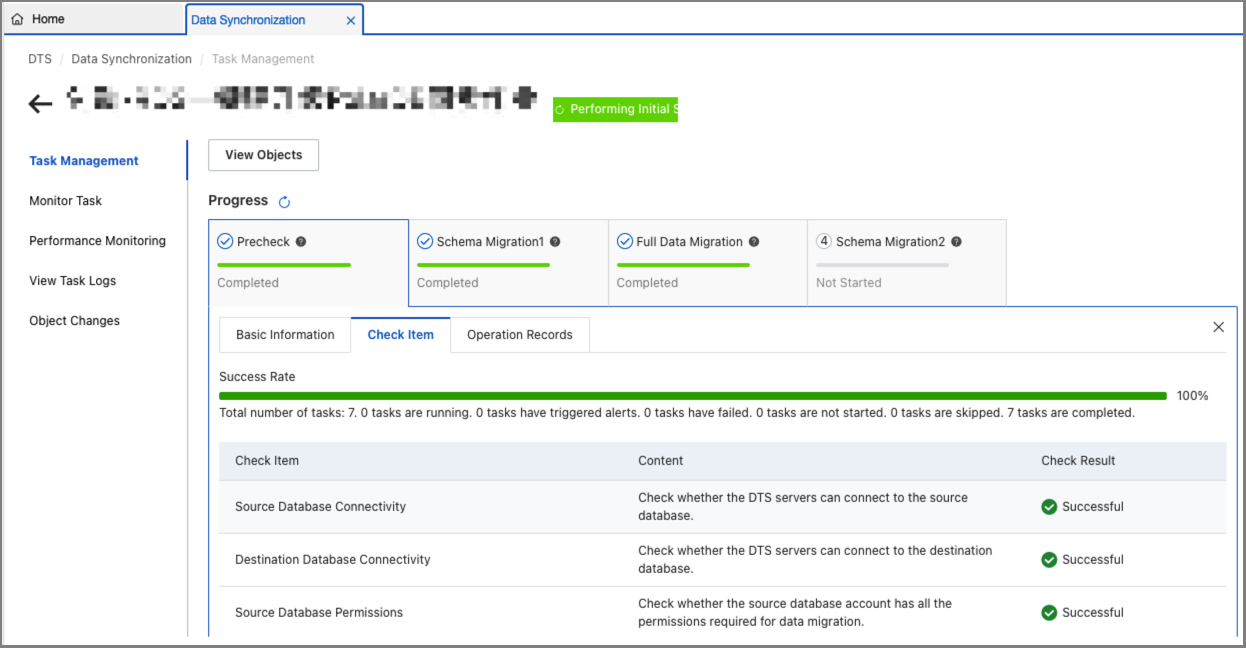
Find the corresponding data synchronization task. You can view precheck failure details, task details, task logs, and more.
FAQ
-
Q: What is the difference between upgrading an ApsaraDB RDS for MySQL instance and cloning it to a PolarDB for MySQL cluster?
A: The following table describes the differences.
Item
One-click clone ApsaraDB RDS for MySQL to PolarDB for MySQL
Supports incremental data synchronization
Yes
No
Affects operations on the source RDS instance
No
No
Supports different MySQL versions for the source and destination
Yes
Yes
-
Q: Does cloning from an RDS instance affect the source instance?
A: It does not affect the normal operation of the source RDS instance, but the full data clone consumes some resources from the source instance.
-
Q: What are the impacts of canceling a migration?
A: Canceling a migration has the following impacts:
-
The synchronization link between the source and destination clusters is removed.
-
The destination cluster becomes read/write and is not automatically released. If you no longer need the cluster, release it as soon as possible to avoid incurring unnecessary fees.
-
When you manually cancel a migration, you can choose whether to disable the binary log on the cluster. The binary log is not disabled when a migration is automatically canceled.
NoteDisabling the binary log provides a minor write performance improvement. After the binary log is disabled, existing binary log files are retained indefinitely. You can first reduce the retention period for binary log files and wait for unneeded files to be automatically deleted before you disable the binary log. Disabling the binary log triggers an automatic cluster restart, which completes within five minutes. During the restart, a service interruption of about 40 seconds occurs. The exact duration depends on the data volume and number of tables. We recommend that you perform this operation during off-peak hours and ensure your application has a reconnection mechanism.
-
API reference
|
API |
Description |
|
Creates a PolarDB cluster. Note
When you clone an instance, the CreationOption parameter must be set to CloneFromRDS. |
Next steps
After the migration is complete, you must update your application's database connection string to the endpoint of the PolarDB cluster as soon as possible. For more information, see Manage endpoints.