You can use syslog-ng to collect logs and upload them to Simple Log Service over the syslog protocol. This topic describes how to upload logs to Simple Log Service over the syslog protocol.
Limitations
-
The syslog protocol must be compliant with RFC 5424. For other syslog protocols, we recommend that you collect syslog from a Linux server.
-
The maximum size of a single log is 64 KB.
-
To ensure data transmission security, data must be transmitted over TCP using Transport Layer Security (TLS) 1.2.
Configuration
On-premises devices such as VPNs and routers often do not support the TLS protocol or the RFC 5424 format. We recommend using the syslog plug-in for Logtail to collect data from these devices. For more information, see Collect syslog from a Linux server.
When you upload logs using the syslog protocol, you must configure the log upload address in the format of ProjectName.endpoint:SyslogPort, such as test-project-1.cn-hangzhou-intranet.log.aliyuncs.com:10009. Select an endpoint based on the region where your Simple Log Service project is located. For more information, see Endpoints. The syslog port is 10009. You must also configure your Simple Log Service project, logstore, and AccessKey information in the STRUCTURED-DATA field.
|
Parameter |
Description |
Example |
|
STRUCTURED-DATA |
Set to |
logservice |
|
project |
The name of the Simple Log Service project. Create a project in advance. For more information, see Manage a project. |
test-project-1 |
|
logstore |
The name of the Simple Log Service logstore. Create a logstore in advance. For more information, see Create a logstore. |
test-logstore-1 |
|
access-key-id |
The AccessKey ID. We recommend using the AccessKey ID of a RAM user. For more information, see Permissions. |
LTAI**************** |
|
access-key-secret |
The AccessKey Secret. We recommend using the AccessKey Secret of a RAM user. For more information, see Permissions. |
yourAccessKeySecret |
Example 1: Collect logs with syslog-ng
Syslog-ng is an open source implementation of the syslog protocol for Unix and Unix-like systems. You can run the sudo yum install syslog-ng or sudo apt-get install syslog-ng command to install syslog-ng.
Rsyslog is installed on Linux servers by default. Rsyslog and syslog-ng are incompatible and cannot run at the same time. To use syslog-ng, you must first uninstall Rsyslog.
-
Open the syslog-ng configuration file.
The configuration file is typically located at
/etc/syslog-ng/syslog-ng.conf. -
Add the following configuration to the end of the syslog-ng configuration file.
### Syslog-ng Logging Config for LogService ### template LogServiceFormat { template("<${PRI}>1 ${ISODATE} ${HOST:--} ${PROGRAM:--} ${PID:--} ${MSGID:--} [logservice project=\"test-project-1\" logstore=\"test-logstore-1\" access-key-id=\"<yourAccessKeyId>\" access-key-secret=\"<yourAccessKeySecret>\"] $MSG\n"); template_escape(no); }; destination d_logservice{ tcp("test-project-1.cn-hangzhou.log.aliyuncs.com" port(10009) tls(peer-verify(required-untrusted)) template(LogServiceFormat)); }; log { source(s_sys); # default use s_sys destination(d_logservice); }; ### END Syslog-ng Logging Config for LogService ### -
Restart syslog-ng.
Run the
sudo /etc/init.d/syslog-ng restart,sudo service syslog-ng restart, orsudo systemctl restart syslog-ngcommand to restart syslog-ng. -
Use the
loggercommand to generate a test log.For example, run the
logger hello world!command to generate a log.
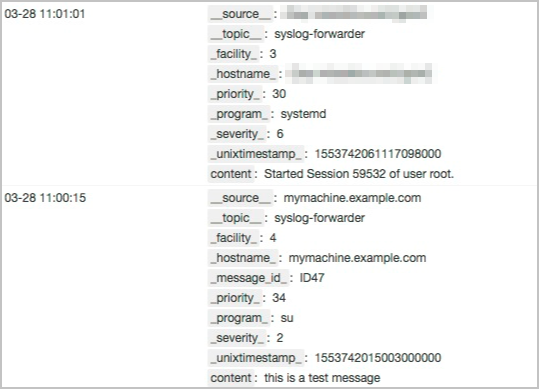
Sample logs
After logs are uploaded, you must create and configure an index to view the logs in the Simple Log Service console. For more information, see Create an index.
For more information about the log fields, see RFC 5424.
To prevent AccessKey information leakage, Simple Log Service removes the logservice field by default.
|
Field name |
Description |
|
__source__ |
The |
|
__topic__ |
Set to |
|
__facility__ |
The facility information, such as the device or module that generates the log. |
|
__program__ |
The process name. |
|
__severity__ |
The severity level of the log. |
|
__priority__ |
The priority of the log. |
|
__unixtimestamp__ |
The timestamp from the original log, in nanoseconds. |
|
content |
The |
FAQ and troubleshooting
-
Test a log upload
You can use Netcat to test a log upload. This helps verify network connectivity and check whether the AccessKey has the required upload permission.
-
Log on to the server that you will use for testing.
-
Run the following command to install Netcat.
sudo yum install nmap-ncat -
Run the following command to connect to Simple Log Service.
ncat --ssl <yourProject>.<yourEndpoint> 10009Example:
ncat --ssl test-project-1.cn-hangzhou.log.aliyuncs.com 10009 -
Netcat does not automatically detect a dropped connection. Within 30 seconds after you run the
ncatcommand, enter the log that you want to send and press Enter.<34>1 2019-03-28T03:00:15.003Z mymachine.example.com su - ID47 [logservice project="<yourProject>" logstore="<yourLogstore>" access-key-id="<yourAccessKeyID>" access-key-secret="<yourAccessKeySecret>"] this is a test messageExample:
<34>1 2019-03-28T03:00:15.003Z mymachine.example.com su - ID47 [logservice project="trace-doc-test" logstore="doc-test-001-logs" access-key-id="<yourAccessKeyID>" access-key-secret="<yourAccessKeySecret>"] this is a test message -
Preview the logs in the Simple Log Service console to verify that the upload is successful.
For more information, see Preview logs.

-
-
Diagnose collection errors
If a log upload fails, you can diagnose the collection error to view detailed error messages. For more information, see View Logtail collection errors.