You can use Cloud Backup to back up files from on-premises servers or virtual machines (VMs). Cloud Backup provides two backup methods: instant backup and scheduled backup. You can select a backup method based on your business requirements.
A Cloud Backup client backs up files in a folder incrementally based on the specified backup policy. This means that the client backs up only the files that have been added or modified since the last backup. For example, after Cloud Backup backs up three files named File 1, File 2, and File 3 for the first time, data is added or modified only in File 2. Then, Cloud Backup backs up only File 2 during the next backup.
Create an instant backup plan
If you require only a one-time full backup, perform the following steps to create an instant backup plan:
Log on to the Cloud Backup client.
Open a browser, and enter
http://localhost:8011in the address bar. Enter the password to log on to the client. For more information, see Before you begin.
On the Cloud Backup client, click Backup.
On the Backup Jobs page, click Create Backup Plan.
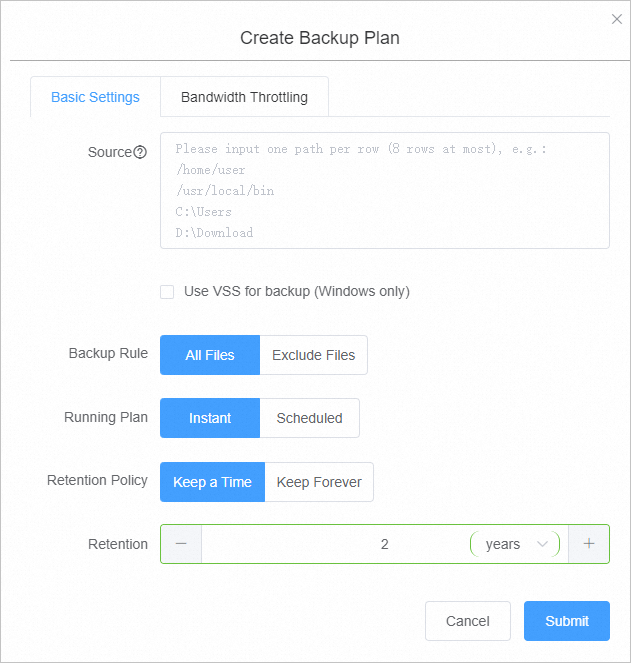
In the Create Backup Plan dialog box, click Basic Settings. Then, configure the parameters described in the following table.

Parameter
Description
Source
You must specify source paths based on the following rules:
If you do not use wildcards (*), you can enter up to eight paths.
If you use wildcards (*), you can enter only one path. You must specify the path in the
/*/*format.Only absolute paths are supported, such as paths that start with
/, \\, C:\, or D:\.
NoteYou can specify only one root path. For example, you cannot specify both C:\ and D:\.
If you use Volume Shadow Copy Service (VSS), you can enter only one path. Universal Naming Convention (UNC) paths and wildcards (*) are not supported. You cannot exclude files from the backup plan.
If you use UNC, VSS paths and wildcards (*) are not supported. You cannot exclude files from the backup plan. If a UNC path is specified, Cloud Backup does not back up the access control list (ACL) of Windows.
Use VSS for backup (Windows only)
Specifies whether to use VSS for backup. If data in the backup source changes, select this check box. VSS ensures data consistency between the source and the backup.
This parameter is valid only for Windows clients.
If VSS is used, you cannot back up data from multiple directories at the same time.
NoteThis parameter is unavailable if the backup source resides on a volume of the exFAT format.
Backup Rule
The rule that specifies the files to be excluded from the backup plan. Select All Files or Exclude Files.
If you select Exclude Files, specify the paths to files that you want to exclude from the backup plan.
NoteSpecify the paths based on the following rules:
You can enter a maximum of eight paths, including the paths that include wildcards (*).
If a path does not include forward slashes (
/), a wildcard (*) in the path matches multiple directory levels or folder names. For example, the*abc*path matches/abc/,/d/eabcd/, and/a/abc, and the *.txt path matches all files whose extension is TXT.If a path includes forward slashes (
/), each wildcard (*) in the path matches one directory level or folder name. For example, the/a/*/*/sharepath matches the/a/b/c/sharepath but does not match the/a/d/sharepath.If a path ends with a forward slash (/), the path matches a directory. For example, the
*tmp/path matches the/a/b/aaatmp/and/tmp/directories.The path separator in Linux is the forward slash (/). The path separator in Windows is the backslash (\).
Running Plan
The type of the backup plan. Select Instant. You can also configure the retention policy.
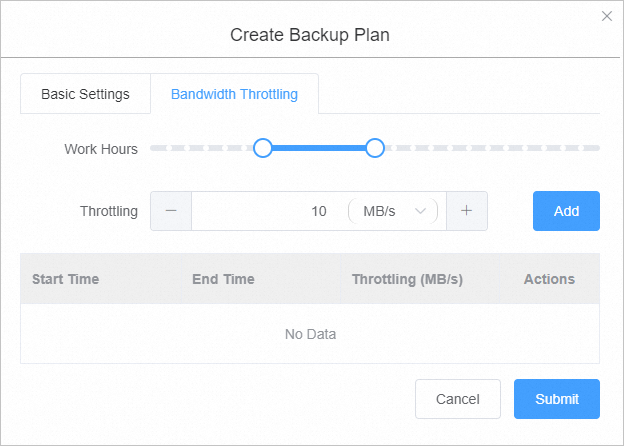
Optional. Click the Bandwidth Throttling tab. Set Work Hours. In the Throttling field, enter the maximum bandwidth that can be used for backup during the specified throttling period. Then, click Add.
 Note
NoteThe throttling period is accurate to hours. You can add multiple throttling periods based on your requirements.
If you need to modify a throttling period, find the throttling period, click Delete in the Actions column, and then specify a new throttling period.
The maximum bandwidth must be at least 1 MB/s.
Click Submit.
After a backup job is started, you can perform the following operations on the Backup Jobs page:
View the progress of the backup job.
Click Cancel or Retry in the Actions column to cancel or retry the backup job.
If some files fail to be backed up, find the related backup job on the Backup Jobs tab. Click Download to download the error report in Error Report.
Create a scheduled backup plan
If you require scheduled backup, perform the following steps to create a scheduled backup plan:
Log on to the Cloud Backup client.
In the left-side navigation pane, click Backup.
In the upper-right corner of the Backup Jobs page, click Create Backup Plan.
In the Create Backup Plan dialog box, click the Basic Settings tab.
Specify Source, select Scheduled, and then select an existing backup policy as Backup Policy. The following table describes the parameters.
Parameter
Description
Source
You must specify source paths based on the following rules:
If you do not use wildcards (*), you can enter up to eight paths.
If you use wildcards (*), you can enter only one path. You must specify the path in the
/*/*format.Only absolute paths are supported, such as paths that start with
/, \\, C:\, or D:\.
NoteYou can specify only one root path. For example, you cannot specify both C:\ and D:\.
If you use VSS, you can enter only one path. UNC paths and wildcards (*) are not supported. You cannot exclude files from the backup plan.
If you use UNC, VSS paths and wildcards (*) are not supported. You cannot exclude files from the backup plan. If a UNC path is specified, Cloud Backup does not back up the ACL of Windows.
Use VSS for backup (Windows only)
Specifies whether to use VSS for backup. If data in the backup source changes, select this check box. VSS ensures data consistency between the source and the backup.
This parameter is valid only for Windows clients.
If VSS is used, you cannot back up data from multiple directories at the same time.
NoteThis parameter is unavailable if the backup source resides on a volume of the exFAT format.
Backup Rule
The rule that specifies the files to be excluded from the backup plan. Select All Files or Exclude Files.
If you select Exclude Files, specify the paths to files that you want to exclude from the backup plan.
NoteSpecify the paths based on the following rules:
You can enter a maximum of eight paths, including the paths that include wildcards (*).
If a path does not include forward slashes (
/), a wildcard (*) in the path matches multiple directory levels or folder names. For example, the*abc*path matches/abc/,/d/eabcd/, and/a/abc, and the *.txt path matches all files whose extension is TXT.If a path includes forward slashes (
/), each wildcard (*) in the path matches one directory level or folder name. For example, the/a/*/*/sharepath matches the/a/b/c/sharepath but does not match the/a/d/sharepath.If a path ends with a forward slash (/), the path matches a directory. For example, the
*tmp/path matches the/a/b/aaatmp/and/tmp/directories.The path separator in Linux is the forward slash (/). The path separator in Windows is the backslash (\).
Running Plan
The type of the backup plan. Select Scheduled. Select a backup policy from the Backup Policy drop-down list.
Optional. Click the Bandwidth Throttling tab. Set Work Hours. In the Throttling field, enter the maximum bandwidth that can be used for backup during the specified throttling period. Then, click Add.
 Note
NoteThe throttling period is accurate to hours. You can add multiple throttling periods based on your requirements.
If you need to modify a throttling period, find the throttling period, click Delete in the Actions column, and then specify a new throttling period.
The maximum bandwidth must be at least 1 MB/s.
Click Submit.
After a backup job is started, you can perform the following operations on the Backup Jobs page:
View the progress of the backup job.
Click Cancel or Retry in the Actions column to cancel or retry the backup job.
Click Delete in the Actions column to delete the backup job. After you delete the backup job, Cloud Backup no longer runs the backup job based on the specified backup policy. However, Cloud Backup retains the backups that are created by the backup job. You can still restore data from these backups.
If some files fail to be backed up, find the related backup job on the Backup Jobs tab. Click Download to download the error report in Error Report.
View backup files online
In the Cloud Backup console, you can view all the files in each backup plan.
Log on to the Cloud Backup console.
In the left-side navigation pane, choose .
On the On-Premises File Backup tab, click Old Version. Click View in the Actions column.

On the page that appears, click Browse in the Actions column that corresponds to a source path.

In the Browse dialog box, view all files in the source path.
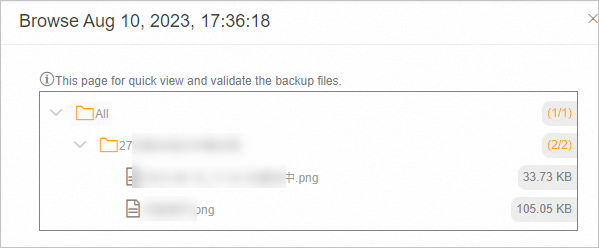 Important
In this dialog box, you can only query the files in the source path but cannot restore the files. For more information, see Restore files.
FAQ
If file backup fails due to an unstable network connection, you can perform the following operations and try again:
Log on to the ECS instance from which files need to be backed up.
Go to the installation directory of the Cloud Backup backup client.
In the
clientfolder, create a file namedhbr.config.NoteThe
hbr.configfile must be in the same directory as thehybridebackupandidsexecutable files.Add the following parameters to the
hbr.configfile.Parameter
Description
retry_times
The number of file backup retries. Default value: 3.
retry_interval
The interval at which file backup is retried. Default value: 100 ms.
skip_error_files
Specifies whether to skip files that fail to be backed up. Default value: false.
false: does not skip the failed files.
true: skips the failed files.
The following script shows example configurations of the parameters in the hbr.config file.
retry_times=3
retry_interval=100
skip_error_files=false