ApsaraDB RDS for SQL Server supports instance-level migration, letting you move multiple or all databases from a self-managed SQL Server instance in a single operation. Back up all databases, upload the backup files to an OSS bucket, then run the migration script.
This solution supports full migration only. Incremental migration is not supported. Do not write new data to the source instance during the backup.
This topic covers instance-level migration only, which migrates all databases at once as full backups. To migrate a single database — including incremental backups — see Migrating full backups to the cloud and Migrating incremental backups to the cloud.
How it works
The migration follows three stages:
Back up — Run the backup script on your self-managed SQL Server instance to produce full backup files (
.bak) for all databases.Upload — Upload all backup files into the same folder in an OSS bucket that is in the same region as your destination RDS instance.
Migrate — Run the migration script to create migration tasks. RDS reads the backup files from OSS and restores each database.
Prerequisites
Before you begin, make sure:
The source database is a self-managed SQL Server instance.
The destination ApsaraDB RDS for SQL Server instance meets the following conditions:
Available storage space is greater than the total size of the data files to be migrated. If space is insufficient, upgrade the instance specifications before proceeding.
SQL Server 2008 R2 only: Create databases on the destination instance with the same names as the databases to be migrated. For SQL Server 2012 and later, a database with the same name cannot already exist.
If you use a Resource Access Management (RAM) user:
The RAM user has the AliyunOSSFullAccess and AliyunRDSFullAccess permissions. For details, see Manage OSS permissions using RAM and Manage ApsaraDB RDS permissions using RAM.
Your Alibaba Cloud account has granted the ApsaraDB RDS service account access to your OSS resources. To verify or grant this authorization: If the message You have authorized RDS official service account to access your OSS appears in the lower-left corner, authorization is complete. Otherwise, click the Authorization URL on the page.
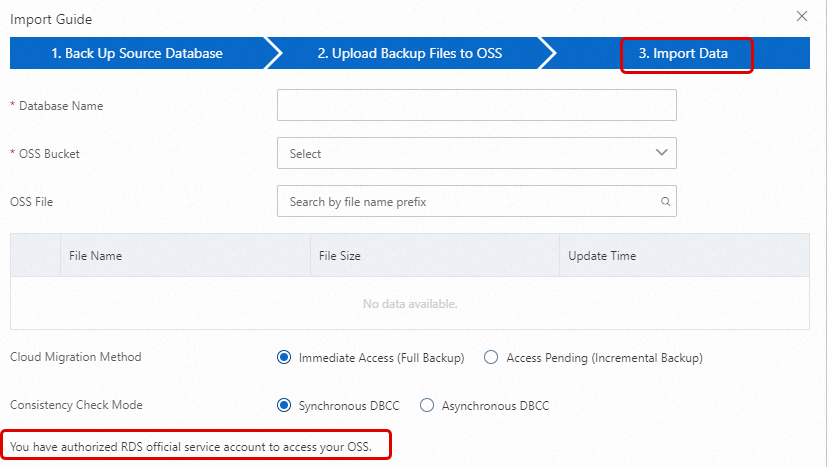
On the Backup and Restoration page of your RDS instance, click Migrate OSS Backup Data to RDS.
In the Import Guide, click Next twice to reach step 3. Import Data.
Your Alibaba Cloud account must create a custom access policy and attach it to the RAM user:
Billing
You are charged only for OSS bucket usage.

| Scenario | Billing rule |
|---|---|
| Upload backup files to an OSS bucket | Free of charge |
| Store backup files in an OSS bucket | Storage fees apply. See the OSS pricing page. |
| Migrate backup files from OSS to RDS over the internal network | Free of charge |
| Migrate backup files from OSS to RDS over the Internet | Charged based on OSS outbound traffic. See the OSS pricing page. |
Preparations
Complete these steps on the machine where you will run the migration script.
1. Install Python 3
Download and install Python 3 from the official Python website. Select Python 3.12 or later.
Windows: During installation, select the Add python.exe to PATH checkbox to avoid manually configuring environment variables.
macOS or Linux: Install from the official website or use a package manager such as Homebrew, apt, or dnf.
2. Verify the Python installation
The executable name varies by operating system and installation method. Try the following commands in order and use the one that works on your system.
3. Install SDK dependencies
pip install alibabacloud_rds20140815
pip install alibabacloud-oss-v2
Step 1: Back up all databases
To maintain data consistency, do not write new data to the source instance during the backup.
If you create backups manually without the backup script, name each file in the format
DatabaseName_BackupType_BackupTime.bak— for example,Testdb_FULL_20180518153544.bak. Incorrect naming causes the migration to fail.
Download the backup script.
Open the script in SQL Server Management Studio (SSMS). For connection instructions, see the SSMS quickstart.
Modify the parameters as needed:
Parameter Description @backup_databases_listDatabases to back up. Separate multiple databases with semicolons ( ;) or commas (,). Leave blank to back up all non-system databases.@backup_typeBackup type. Set to FULL for this migration. @backup_folderLocal folder for backup files. The folder is created automatically if it does not exist. @is_run1— perform the backup;0— check only without backing up.Run the script. Backup files are saved to the specified folder.

Step 2: Upload backup files to OSS
All backup files must be in the same folder within an OSS bucket that is in the same region as your ApsaraDB RDS instance. Using the same region enables internal network transfer, which is free and faster than transferring over the Internet.
Prepare the OSS bucket
If a bucket already exists, verify that it meets these requirements:
Storage class: Standard. Infrequent Access, Archive, Cold Archive, and Deep Cold Archive are not supported.
Server-side encryption: Disabled.
If no bucket exists, activate OSS and then create one:
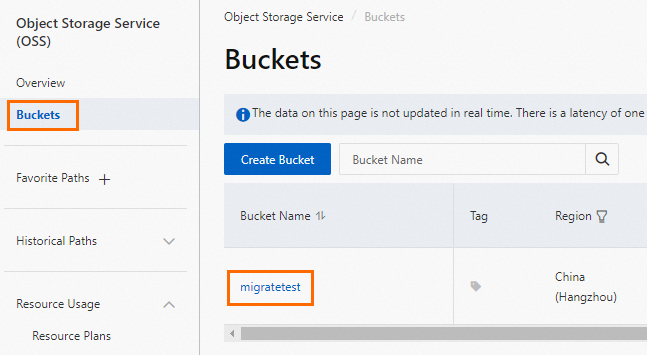
Log on to the OSS console, click Buckets, and then click Create Bucket.
Configure these parameters. Leave all others at their default values.
Important- Create this bucket specifically for the migration. Delete it after migration is complete to prevent data exposure and reduce costs. - Do not enable server-side encryption when creating the bucket.
Parameter Description Example Bucket name Globally unique name that cannot be changed after creation. Use only lowercase letters, digits, and hyphens (-); start and end with a letter or digit; 3–63 characters. migratetestRegion Must match the region of your ApsaraDB RDS instance. China (Hangzhou) Storage class Select Standard. Standard
Upload the backup files
Choose the upload method based on file size and your operating system:
Use ossbrowser (recommended for most cases)
Extract the downloaded package and launch
oss-browser.exe(Windows x64 example).Select Log On With AK, enter your AccessKey ID and AccessKey secret, keep the default values for other fields, and click Log On.
NoteAn AccessKey pair is used for identity verification. Keep it confidential.

Click the destination bucket.

Click
 , select the backup files, and click Open.
Use the OSS console (files smaller than 5 GB)
Log on to the OSS console.
Click Buckets, then click the name of the destination bucket.
In the Objects list, click Upload Object.

Drag backup files to the Files to Upload area, or click Select Files.
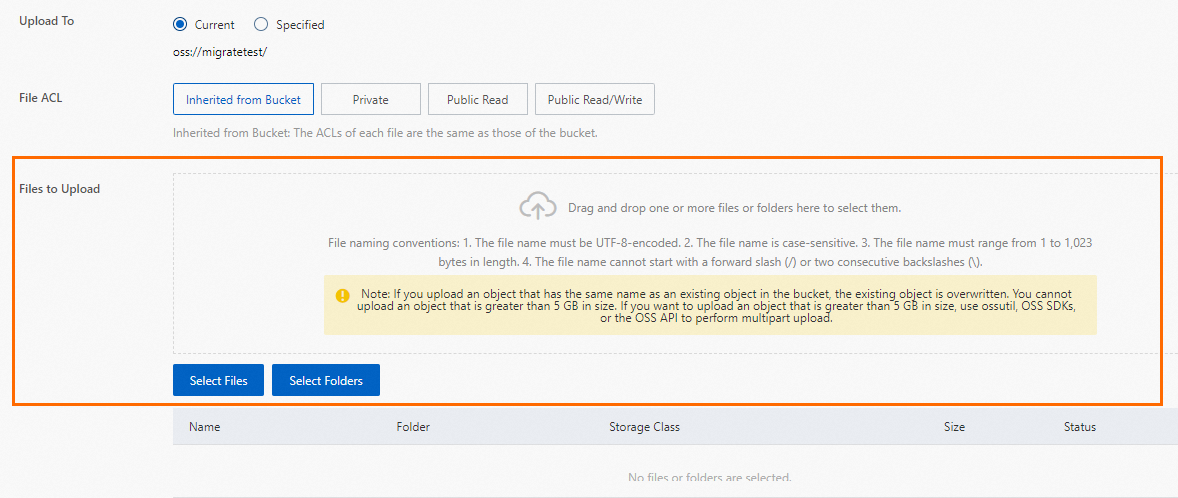
Click Upload Object at the bottom of the page.
Use the OSS API for multipart upload (files larger than 5 GB)
Set the following environment variables before running the script:
| Variable | Description |
|---|---|
OSS_ACCESS_KEY_ID | Your AccessKey ID |
OSS_ACCESS_KEY_SECRET | Your AccessKey secret |
OSS_SESSION_TOKEN (or OSS_SECURITY_TOKEN) | STS session token, if using STS credentials |
# -*- coding: utf-8 -*-
"""
Alibaba Cloud OSS Python SDK v2
Dependency: pip install alibabacloud-oss-v2
"""

import os
import sys
from pathlib import Path
import alibabacloud_oss_v2 as oss
from alibabacloud_oss_v2 import exceptions as oss_ex


def get_client_from_env(region: str, endpoint: str | None = None) -> oss.Client:
    """
    Create a v2 client from environment variables.
    - Prioritize using Region (recommended), but also support custom Endpoints (optional).
    - Compatible with both AK and STS:
        * AK: Requires OSS_ACCESS_KEY_ID / OSS_ACCESS_KEY_SECRET
        * STS: Also requires OSS_SESSION_TOKEN (compatible with the old variable OSS_SECURITY_TOKEN)
    """
    # Compatibility: If the user uses the old variable OSS_SECURITY_TOKEN, map it to the v2 expected OSS_SESSION_TOKEN
    sec_token_legacy = os.getenv("OSS_SECURITY_TOKEN")
    if sec_token_legacy and not os.getenv("OSS_SESSION_TOKEN"):
        os.environ["OSS_SESSION_TOKEN"] = sec_token_legacy

    ak = os.getenv("OSS_ACCESS_KEY_ID")
    sk = os.getenv("OSS_ACCESS_KEY_SECRET")
    st = os.getenv("OSS_SESSION_TOKEN")  # STS Token (optional)

    if not (ak and sk):
        raise ValueError("No valid AK found. Set the OSS_ACCESS_KEY_ID and OSS_ACCESS_KEY_SECRET environment variables. "
                         "If using STS, also set OSS_SESSION_TOKEN (or the old name OSS_SECURITY_TOKEN).")

    # Indicate the type of credential used
    if st:
        print("STS Token (OSS_SESSION_TOKEN) detected. Using STS credentials.")
    else:
        print("No STS Token detected. Using AccessKey (AK) credentials.")

    credentials_provider = oss.credentials.EnvironmentVariableCredentialsProvider()
    cfg = oss.config.load_default()
    cfg.credentials_provider = credentials_provider

    # Basic network configuration
    cfg.region = region  # Example: 'cn-hangzhou'
    if endpoint:
        # Optional: Custom Endpoint (e.g., internal network, accelerated, dedicated domain)
        cfg.endpoint = endpoint

    # You can also add other configurations here, such as: cfg.use_accelerate_endpoint = True
    return oss.Client(cfg)


def resumable_upload_file_v2(
    client: oss.Client,
    bucket_name: str,
    object_key: str,
    file_path: str,
    part_size: int = 1 * 1024 * 1024,
    parallel_num: int = 4,
    checkpoint_dir: str | None = None,
):
    """
    Implement concurrent multipart upload with resumable upload.

    :param client: Initialized oss.Client
    :param bucket_name: Destination bucket name
    :param object_key: Destination object key (without bucket name)
    :param file_path: Full path of the local file
    :param part_size: Part size in bytes, default is 1 MB
    :param parallel_num: Number of concurrent upload threads, default is 4
    :param checkpoint_dir: Directory to store breakpoint information; if None, resumable upload is disabled
    """
    file_path = str(file_path)
    if not Path(file_path).exists():
        raise FileNotFoundError(f"Error: Local file not found. Check the file_path configuration: {file_path}")

    # Construct the Uploader; enable resumable upload based on whether checkpoint_dir is provided
    if checkpoint_dir:
        uploader = client.uploader(
            enable_checkpoint=True,
            checkpoint_dir=checkpoint_dir,
            part_size=part_size,
            parallel_num=parallel_num,
        )
    else:
        uploader = client.uploader(
            part_size=part_size,
            parallel_num=parallel_num,
        )

    print(f"Starting to upload file: {file_path}")
    print(f"Destination Bucket: {bucket_name}")
    print(f"Destination Object: {object_key}")
    print(f"Part size: {part_size} bytes, Concurrency: {parallel_num}")
    if checkpoint_dir:
        print(f"Resumable upload: Enabled (checkpoint_dir={checkpoint_dir})")
    else:
        print("Resumable upload: Disabled (set checkpoint_dir to enable)")

    # Execute the upload (Uploader automatically chooses between multi/single part concurrent upload based on size)
    result = uploader.upload_file(
        oss.PutObjectRequest(bucket=bucket_name, key=object_key),
        filepath=file_path,
    )

    print("-" * 30)
    print("File uploaded successfully!")
    print(f"HTTP Status: {result.status_code}")
    print(f"ETag: {result.etag}")
    print(f"Request ID: {result.request_id}")
    # CRC-64 checksum; v2 enables data validation by default
    print(f"CRC64: {result.hash_crc64}")
    print("-" * 30)


def main():
    # Before running the code example, make sure you have set the corresponding environment variables.
    # macOS/Linux:
    #   AK method:
    #     export OSS_ACCESS_KEY_ID=YOUR_AK_ID
    #     export OSS_ACCESS_KEY_SECRET=YOUR_AK_SECRET
    #   STS method:
    #     export OSS_ACCESS_KEY_ID=YOUR_STS_ID
    #     export OSS_ACCESS_KEY_SECRET=YOUR_STS_SECRET
    #     export OSS_SECURITY_TOKEN=YOUR_STS_TOKEN
    #
    # Windows:
    #   Powershell: $env:OSS_ACCESS_KEY_ID="YOUR_AK_ID"
    #   cmd: set OSS_ACCESS_KEY_ID=YOUR_AK_ID

    # ===================== Parameters (modify as needed) =====================
    # Region example: 'cn-hangzhou'; use Region first
    region = "cn-hangzhou"

    # Optional: Custom Endpoint (for internal network, dedicated domain, accelerated domain name, etc.)
    # Example: 'https://oss-cn-hangzhou.aliyuncs.com'
    endpoint = 'https://oss-cn-hangzhou.aliyuncs.com'

    # Bucket and Object
    bucket_name = "examplebucket"
    object_key = "test.bak"

    # Full path of the local file to upload.
    # Windows example: r'D:\localpath\examplefile.txt'  (note the r at the beginning)
    # macOS/Linux example: '/Users/test/examplefile.txt'
    file_path = r"D:\oss\test.bak"

    # Sharding and concurrency
    part_size = 1 * 1024 * 1024  # Default is 1 MB; OSS requires a minimum part size of 100 KB
    parallel_num = 4

    # Resumable upload directory (pass None to disable; specify a writable directory)
    checkpoint_dir = str(Path.cwd() / ".oss_checkpoints")
    # =================== End of parameters ===================

    print("Script execution starts...")
    try:
        client = get_client_from_env(region=region, endpoint=endpoint)
        # If resumable upload is enabled, make sure the directory exists
        if checkpoint_dir:
            Path(checkpoint_dir).mkdir(parents=True, exist_ok=True)

        resumable_upload_file_v2(
            client=client,
            bucket_name=bucket_name,
            object_key=object_key,
            file_path=file_path,
            part_size=part_size,
            parallel_num=parallel_num,
            checkpoint_dir=checkpoint_dir,
        )
    except FileNotFoundError as e:
        print(e)
    except oss_ex.ServiceError as e:
        # Error returned by the OSS server
        print("\nAn OSS server-side error occurred.")
        print(f"HTTP Status: {getattr(e, 'status_code', 'N/A')}")
        print(f"Error Code: {getattr(e, 'code', 'N/A')}")
        print(f"Message: {getattr(e, 'message', 'N/A')}")
        print(f"Request ID: {getattr(e, 'request_id', 'N/A')}")
        print(f"Endpoint: {getattr(e, 'request_target', 'N/A')}")
    except oss_ex.BaseError as e:
        # SDK local/serialization/deserialization/credential errors
        print("\nAn OSS SDK client-side error occurred.")
        print(str(e))
    except Exception as e:
        print(f"\nAn unknown error occurred: {e}")


if __name__ == "__main__":
    main()
Step 3: Run the migration script
Extract the package. To view the required parameters, run:
Parameter Description access_key_idAccessKey ID of the Alibaba Cloud account that owns the destination RDS instance access_key_secretAccessKey secret of that account rds_instance_idID of the destination ApsaraDB RDS instance oss_endpointEndpoint of the OSS bucket containing the backup files oss_bucketName of the OSS bucket directoryFolder in the bucket where backup files are stored. Use /for the root directory.python ~/Downloads/RDSSQLCreateMigrateTasksBatchly.py -hThe command syntax is:
RDSSQLCreateMigrateTasksBatchly.py -k <access_key_id> -s <access_key_secret> -i <rds_instance_id> -e <oss_endpoint> -b <oss_bucket> -d <directory>Run the script. The following example migrates all eligible backup files from the
Migrationdatafolder in thetestdatabucketbucket to RDS instancerm-2zesz5774ud8s****:python ~/Downloads/RDSSQLCreateMigrateTasksBatchly.py -k yourAccessKeyID -s yourAccessKeySecret -i rm-2zesz5774ud8s**** -e oss-cn-beijing.aliyuncs.com -b testdatabucket -d Migrationdata
Step 4: Monitor migration progress
Select the tab for your SQL Server version.
SQL Server 2012 and later
In the left navigation pane of your ApsaraDB RDS instance, click Backup and Restoration. On the Cloud Migration Records of Backup Data tab, view migration records including task status, start time, and end time. By default, the last week of records is shown. Adjust the time range as needed.

If Task Status is Failed, check the Task Description or click View File Details to identify the cause. After fixing the issue, run the migration script again.
SQL Server 2008 R2
In the left navigation pane, click Data Migration To Cloud. Find the target migration task to view its progress.
If Task Status is Failed, check the Task Description or click View File Details to identify the cause. After fixing the issue, run the migration script again.
Troubleshooting
Script and API errors
| Error message | Cause | Solution |
|---|---|---|
HTTP Status: 404 Error:InvalidAccessKeyId.NotFound Specified access key is not found. | Incorrect AccessKey ID | Enter the correct AccessKey ID and AccessKey secret. |
HTTP Status: 400 Error:IncompleteSignature The request signature does not conform to Aliyun standards. | Incorrect AccessKey secret | Enter the correct AccessKey secret. |
RDS engine doesn't support, this is only for RDS SQL Server engine. | The destination instance is not running SQL Server | Use an ApsaraDB RDS for SQL Server instance as the destination. |
Couldn't find specify RDS [XXX]. | The RDS instance ID does not exist | Verify the instance ID is correct. |
{'status': -2, ..., 'Failed to establish a new connection'} | Incorrect OSS endpoint | Verify the OSS endpoint. |
{'status': 404, ..., 'The specified bucket does not exist.'} | OSS bucket does not exist | Verify the bucket name. |
There is no backup file on OSS Bucket [xxxxxx] under [xxxxxxxxx] folder | The folder does not exist or contains no eligible backup files | Verify that the folder path is correct and contains .bak files. |
Warning!!!!!, [autotest_2005_ent_broken_full_dbcc_failed.bak] is not backup file, filtered. | Backup file does not follow the naming convention | Rename files to DatabaseName_BackupType_BackupTime.bak — for example, Testdb_FULL_20180518153544.bak. |
HTTP Status: 403 Error:Forbidden.RAM ... AccessDenied | RAM user lacks required permissions | Grant the RAM user the AliyunOSSFullAccess and AliyunRDSFullAccess permissions. |
OPENAPI Response Error !!!!! : HTTP Status: <Http Status Code> Error:<Error> | OpenAPI returned an error | Identify the cause using the error code and message below. |
OpenAPI error codes
| HTTP status code | Error | Description | Resolution |
|---|---|---|---|
| 403 | InvalidDBName | The database name is invalid (system database names are not allowed). | Use a valid database name. |
| 403 | IncorrectDBInstanceState | The RDS instance is in an invalid state (for example, it is still being created). | Wait until the instance status is Running. |
| 400 | IncorrectDBInstanceType | The destination database engine is not SQL Server. | Use an ApsaraDB RDS for SQL Server instance. |
| 400 | IncorrectDBInstanceLockMode | The database is in an invalid lock state. | Check and resolve the lock state. |
| 400 | InvalidDBName.NotFound | For SQL Server 2008 R2: the database does not exist on the destination. For SQL Server 2012 and later: a database with the same name already exists on the destination. | For SQL Server 2008 R2, create a database with the same name on the destination instance first. For SQL Server 2012 and later, ensure that no database with the same name exists on the destination instance. |
| 400 | IncorrectDBType | The database type does not support this operation. | Verify the database type. |
| 400 | IncorrectDBState | The database is in an invalid state (for example, a migration task is already in progress). | Wait for the current task to complete. |
| 400 | UploadLimitExceeded | Exceeded the daily migration limit per database (maximum 20 per day). | Wait until the next day. |
| 400 | ConcurrentTaskExceeded | Exceeded the daily migration limit per instance (maximum 500 per day). | Wait until the next day. |
| 400 | IncorrectFileExtension | The backup file extension is invalid. | Use .bak files only. |
| 400 | InvalidOssUrl | The OSS download URL is unavailable. | Verify the OSS endpoint and bucket configuration. |
| 400 | BakFileSizeExceeded | The backup file exceeds the maximum size (3 TB). | Split the backup or use an alternative migration approach. |
| 400 | FileSizeExceeded | Restoring the backup would exceed the instance's storage capacity. | Upgrade the instance specifications before retrying. |
API reference
| API | Description |
|---|---|
| CreateMigrateTask | Creates a data migration task that restores a backup file from OSS to an ApsaraDB RDS for SQL Server instance |
| CreateOnlineDatabaseTask | Opens the database of an ApsaraDB RDS for SQL Server data migration task |
| DescribeMigrateTasks | Queries the list of data migration tasks for an ApsaraDB RDS for SQL Server instance |
| DescribeOssDownloads | Queries the file details of an ApsaraDB RDS for SQL Server data migration task |