A Cloud Monitor agent collects operating system )metrics from your host and uploads the data to Cloud Monitor for statistical analysis. You can monitor host status using visual charts and create alert rules for key metrics to promptly identify and resolve issues. This topic describes how to manage the Cloud Monitor agent on your hosts.
You can only manage the Cloud Monitor agent by using an administrator account (the root user for Linux or the Administrator user for Windows). However, using an administrator account may introduce certain risks, such as system stability or data security issues. Proceed with caution.
Before you begin
Agent version
Recommended: C++ 3.X
The Java and Go versions are no longer maintained, and the C++ version consumes significantly fewer resources.
Billing: Installing a Cloud Monitor agent, viewing host monitoring charts, and creating alert rules for metrics are free.
System requirements
Operating system
Hardware architecture
Windows 7, Windows Server 2008 R2, and later
i386, AMD64
Linux 2.6.23 and later (must include the Glibc library)
i386, AMD64, ARM64
For more information about supported installation paths, resource consumption, and logs for a Cloud Monitor agent for C++, see Cloud Monitor agent.
Host network
The host must be able to access the internet, either directly or through a network address translation (NAT) gateway or proxy server.
Firewall allowlist configuration
If a firewall or an Elastic Compute Service (ECS) security group is configured for the host, you must add the Cloud Monito server addresses and ports to the allowlist.
NoteThird-party hosts use port 443 to report data and heartbeats over the internet.
Cloud Monit server address
Method to query the IP address
Cloud Monitor server port
Description
Heartbeat service
nslookup cms-cloudmonitor.aliyun.comorping cms-cloudmonitor.aliyun.com8080, 3128, 443
Used to detect agent heartbeats.
Data reporting
Virtual Private Cloud (VPC):
nslookup metrichub-<regionid>.aliyun.comInternet:
nslookup metrichub-cms-<regionid>.aliyuncs.com
80, 443
Used to report monitoring data.
<regionid>is the region ID of the Alibaba Cloud host. Run the following command to obtain the region ID:curl http://100.100.100.200/latest/meta-data/region-id.Public network data reporting is available only in the China (Hangzhou), China (Shanghai), China (Beijing), and China (Shenzhen) regions.
Metadata service
Fixed CIDR block: 100.100.0.0/16
0-65535
Used to obtain instance information for Alibaba Cloud hosts.
Installation methods
Based on your host type and network environment, install the agent automatically or manually.
Method | Use case | Benefits |
Automatic installation from the console (recommended) |
|
|
Manual installation |
|
|
Automatic installation (recommended)
This method is suitable for Alibaba Cloud hosts and Alibaba Cloud-managed instances.
Go to Host Monitoring.
Select the target hosts, and click Batch Install in the lower-left corner. Then, click OK.
NoteFor new Alibaba Cloud hosts, you can enable Auto Install Agent in the upper-right corner for the Cloud Monitor agent to be automatically installed on your new ECS hosts. If this switch is not enabled, you need to install it manually.
The installation or upgrade process takes about 5 minutes. When the Agent Status column of a target host changes from Installing to Running, the installation or upgrade is complete.
Manual installation
If automatic installation fails or you need to install the agent in a special environment, use manual installation. To reinstall the agent, first uninstall any existing older or corrupted versions.
Go to Host Monitoring.
Click Agent Operation above the host list, and click Manual Installation from the drop-down list.
In the Manual Installation dialog box, follow the steps below.
Alibaba Cloud hosts
Linux
Set Region to the region where the Alibaba Cloud host is located.
In the Installation Command section, click the
 icon next to the command.
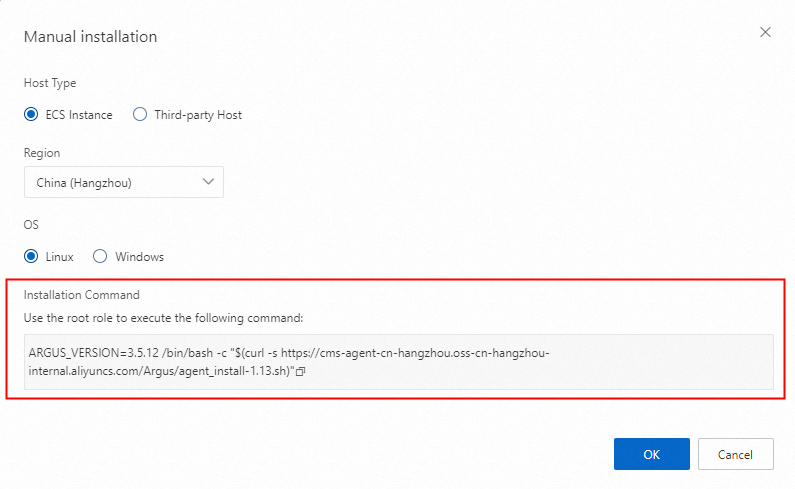
Log on to the host as the
rootuser.Paste and run the agent installation command.
Run the following command to check the agent status:
ps aux | grep argusagent | grep -v grep
If you see output similar to the following, the agent is running correctly.
root      2284  0.0  0.0  22516  1488 ?        Ss   Sep14   0:00 /usr/local/cloudmonitor/bin/argusagent -d
root      2286  0.2  0.3 939652 14300 ?        Sl   Sep14   3:15 /usr/local/cloudmonitor/bin/argusagent
Windows
Set Region to the region where the Alibaba Cloud host is located.
Download the 32-bit or 64-bit agent package based on your host's operating system.
Log on to the host as the
Administratoruser.Create the
C:\Program Files\Alibaba\cloudmonitordirectory. Upload the agent package to the host and extract it to this directory.Open the Command Prompt window. Press
Win+R, entercmdin the Run dialog box, and click OK.Run the following commands to install the Cloud Monitor agent:
cd C:\Program Files\Alibaba\cloudmonitor\binargusagent_service.exe install
Run the
net start argusagentcommand to start the Cloud Monitor agent.Check the agent status.
Open the Services page. Press Win+R, enter
services.mscin the Run dialog box, and click OK.Check the status of the argusagent service. If the status is Running, the agent is running correctly.
Third-party hosts
Linux
Set Region to the region that receives the monitoring data.
In the Installation Command section, click the
icon next to the command.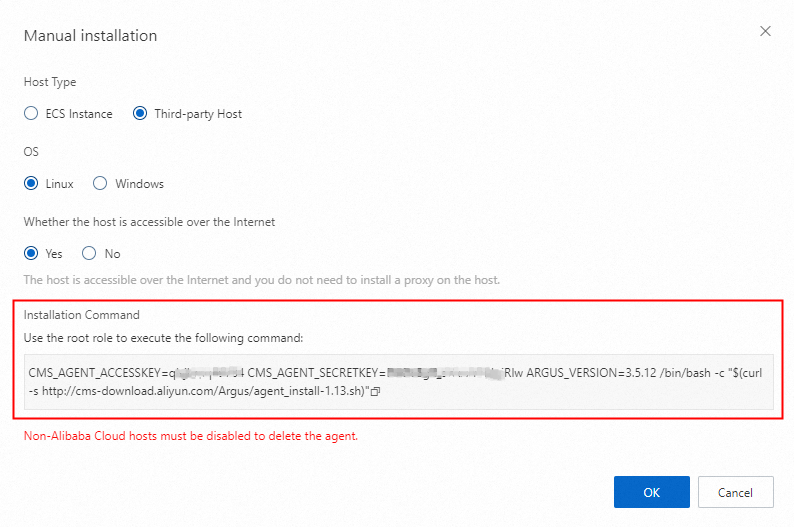
Log on to the host as the
rootuser.Paste and run the agent installation command.
Run the following command to check the agent status:
ps aux | grep argusagent | grep -v grep
If you see output similar to the following, the agent is running correctly.
root      2284  0.0  0.0  22516  1488 ?        Ss   Sep14   0:00 /usr/local/cloudmonitor/bin/argusagent -d
root      2286  0.2  0.3 939652 14300 ?        Sl   Sep14   3:15 /usr/local/cloudmonitor/bin/argusagent
Windows
Set Region to the region that receives the monitoring data.
Download the 32-bit or 64-bit agent package based on your host's operating system. Then, download the
accesskey.propertiesconfiguration file.Log on to the host as the
Administratoruser.Create the
C:\Program Files\Alibaba\cloudmonitordirectory. Upload the agent package to the host and extract it to this directory.Upload the configuration file to the host and place it in the
C:\Program Files\Alibaba\cloudmonitor\local_data\confdirectory.Run the following commands to install the Cloud Monitor agent:
cd C:\Program Files\Alibaba\cloudmonitor\binargusagent_service.exe install
Run the
net start argusagentcommand to start the Cloud Monitor agent.Check the agent status.
Open the Services page. Press Win+R, enter
services.mscin the Run dialog box, and click OK.Check the status of the argusagent service. If the service status is Running, the agent is running correctly.
Common issue
If a third-party host with a Cloud Monitor agent installed cannot access the internet, the agent will fail to report monitoring data to the Cloud Monitor server. To resolve this, configure a proxy server in the agent to forward the data. This requires modifying the agent.properties configuration file for the respective operating system.
Linux path:
/usr/local/cloudmonitor/local_data/conf/agent.propertiesWindows path:
C:\Program Files\Alibaba\cloudmonitor\local_data\conf\agent.properties
For more information, see How do I report the monitoring data of hosts that are not provided by Alibaba Cloud to CloudMonitor by using an NGINX proxy server?
Common operations
Start an agent
Run the following command to start a Cloud Monitor agent:
Linux
bash /usr/local/cloudmonitor/cloudmonitorCtl.sh startWindows
net start argusagentCheck agent status
Linux
Run the following command to check the agent status:
ps aux | grep argusagent | grep -v grepIf you see output similar to the following, the agent is running correctly.
root      2284  0.0  0.0  22516  1488 ?        Ss   Sep14   0:00 /usr/local/cloudmonitor/bin/argusagent -d
root      2286  0.2  0.3 939652 14300 ?        Sl   Sep14   3:15 /usr/local/cloudmonitor/bin/argusagent
Windows
Open the Services page. Press
Win+R, enterservices.mscin the Run dialog box, and click OK.Check the status of the argusagent service. If the status is Running, the agent is running correctly.
Stop an agent
Run the following command to stop a Cloud Monitor agent:
Linux
bash /usr/local/cloudmonitor/cloudmonitorCtl.sh stopWindows
net stop argusagentUninstall an agent
After uninstalling a Cloud Monitor agent for C++, you can no longer monitor the host in real time, but you can still view its historical monitoring data.
Linux
# 1. Run the following command to stop the agent.
bash /usr/local/cloudmonitor/cloudmonitorCtl.sh stop

# 2. Run the following command to uninstall the agent.
bash /usr/local/cloudmonitor/cloudmonitorCtl.sh uninstall

# 3. Run the following command to delete the cloudmonitor folder.
rm -rf /usr/local/cloudmonitor
Windows
# 1. Run the following command to stop the agent.
net stop argusagent

# 2. Run the command to uninstall the agent.
"C:\Program Files\Alibaba\cloudmonitor\bin\argusagent_service.exe" uninstall

# 3. Run the following commands to delete the cloudmonitor folder.
cd C:\Program Files\Alibaba
rd /s /q cloudmonitor
References
FAQs | |
Operations |