AI-generated content (Generative AI) is widely used in many fields so Stable Diffusion models and ecosystems are rapidly developing. Positioned at the center of computing capabilities and the intersection of various requirements, Alibaba Cloud’s Platform for AI (PAI) delves into the basic capabilities and pre-trained models of Generative AI, but also actively addresses the challenges of content generation in various vertical industries. This article describes how to build an end-to-end virtual dressing solution based on the basic capabilities of PAI.
Currently, the PAI end-to-end virtual dressing solution provides the following two usage methods:
Low-Rank Adaptive Relational Attention (LoRA) is a widely used algorithm in the field of image generation. The algorithm can quickly fine-tune the model by adding a small number of parameters and using a small number of data sets, thus providing a wide range of generation space for models, actions, backgrounds, etc. However, this training method cannot completely ensure that the details of the clothing are exactly the same as the originals.
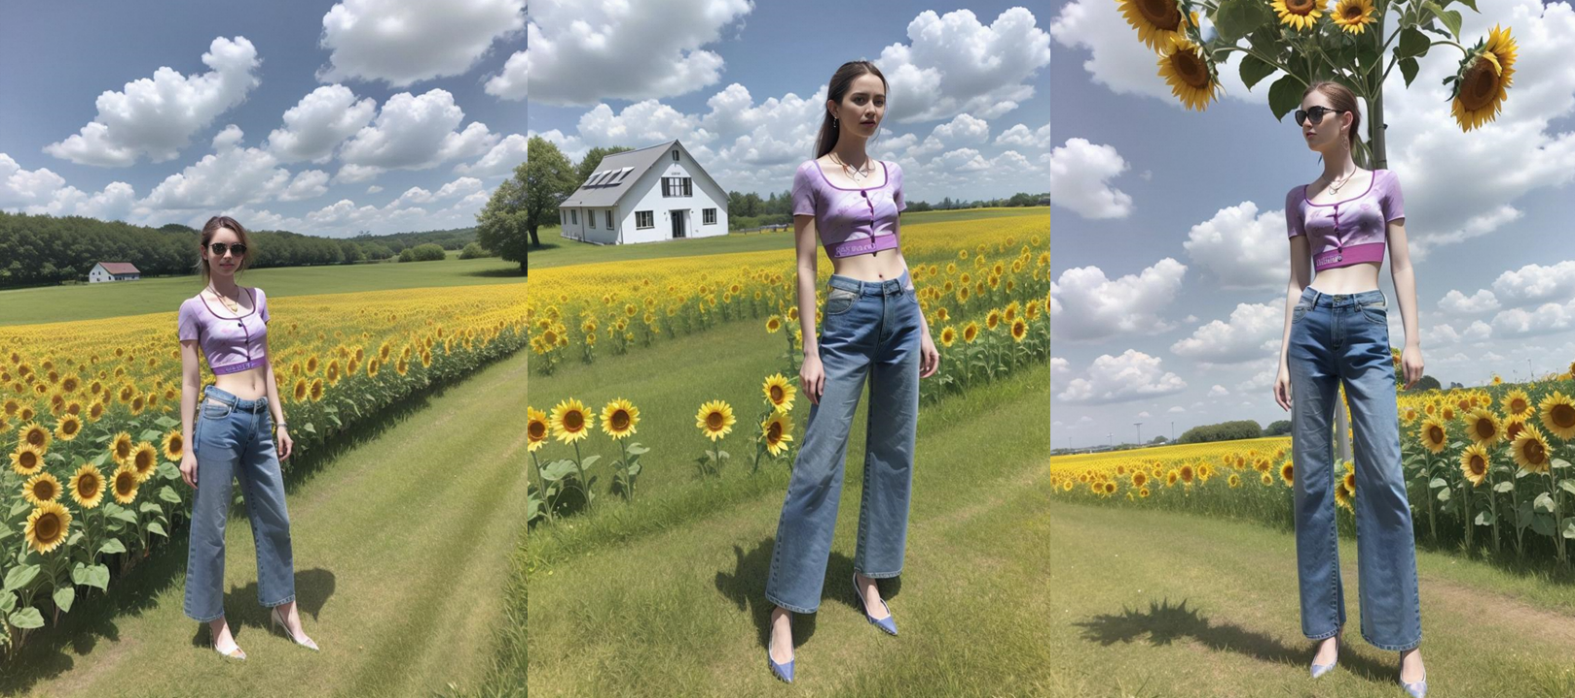
The effect pictures are as follows:
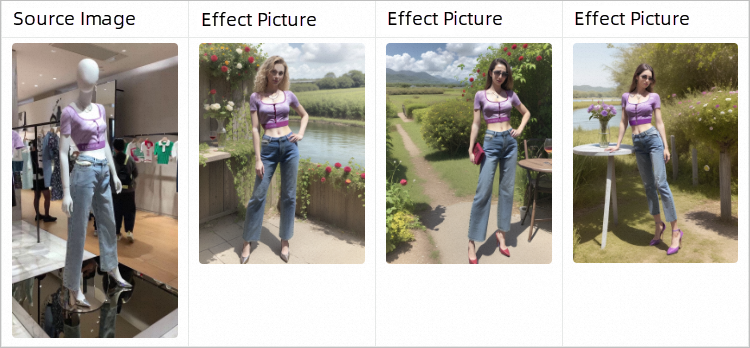
In the SDWeb UI, you can use multiple ControlNets at the same time to complete partial content editing in image generation. This means that you can keep all the details of the original clothing image and then create the rest of the details, such as inpainting people and backgrounds.
By combining Canny and OpenPose's ControlNet, PAI can use the original image provided and the clothing image mask that needs to be retained to completely replicate the details of the clothing while inpainting the background style, achieving the following effect pictures.
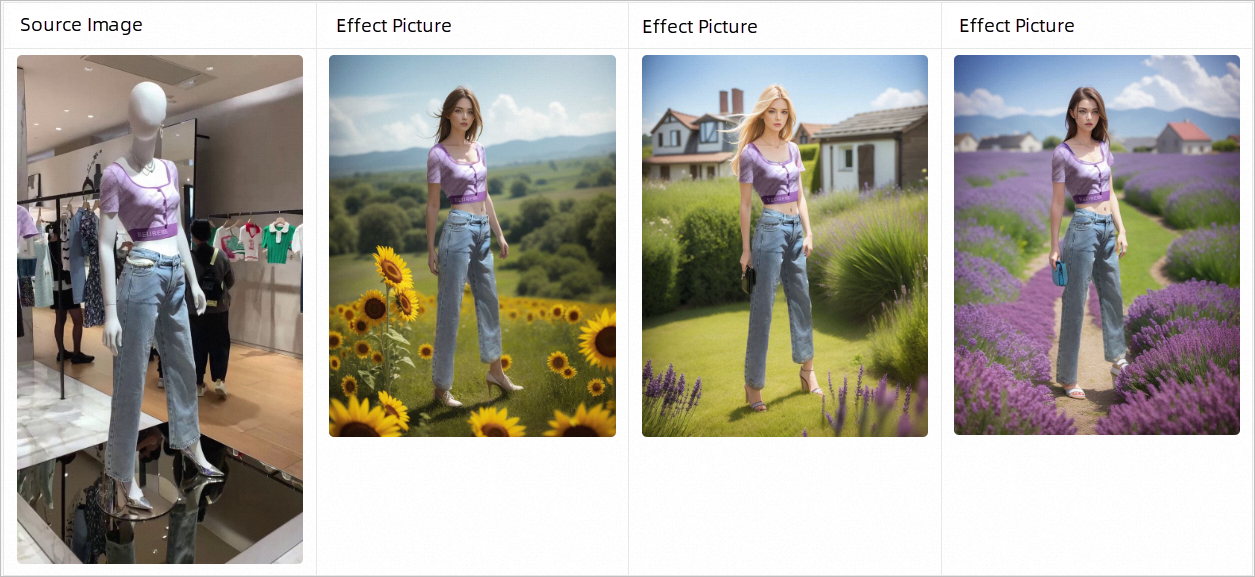
You can use the ControlNet model, ChilloutMix model, and the trained LoRA model to try out the effect. The steps are as follows:
1. Go to the Deploy Service page.
2. In the Configuration Editor section, click JSON Standalone Deployment. Configure the following content in the edit box.
{
    "cloud": {
        "computing": {
            "instance_type": "ecs.gn6v-c8g1.2xlarge"
        }
    },
    "containers": [
        {
            "image": "eas-registry-vpc.${region}.cr.aliyuncs.com/pai-eas/stable-diffusion-webui:3.1",
            "port": 8000,
            "script": "./webui.sh --listen --port=8000 --api"
        }
    ],
    "features": {
        "eas.aliyun.com/extra-ephemeral-storage": "100Gi"
    },
    "metadata": {
        "cpu": 8,
        "enable_webservice": true,
        "gpu": 1,
        "instance": 1,
        "memory": 32000,
        "name": "tryon_sdwebui"
    },
    "storage": [
        {
            "mount_path": "/code/stable-diffusion-webui/models/ControlNet/",
            "oss": {
                "path": "oss://pai-quickstart-${region}/aigclib/models/controlnet/official/",
                "readOnly": true
            },
            "properties": {
                "resource_type": "model"
            }
        },
        {
            "mount_path": "/code/stable-diffusion-webui/models/annotator/openpose/",
            "oss": {
                "path": "oss://pai-quickstart-${region}/aigclib/models/controlnet/openpose/",
                "readOnly": true
            },
            "properties": {
                "resource_type": "model"
            }
        },
        {
            "mount_path": "/code/stable-diffusion-webui/models/Stable-diffusion/",
            "oss": {
                "path": "oss://pai-quickstart-${region}/aigclib/models/custom_civitai_models/chilloutmix/",
                "readOnly": true
            },
            "properties": {
                "resource_type": "model"
            }
        },
        {
            "mount_path": "/code/stable-diffusion-webui/models/Lora/",
            "oss": {
                "path": "oss://pai-quickstart-${region}/aigclib/models/lora_models/tryon/",
                "readOnly": true
            },
            "properties": {
                "resource_type": "model"
            }
        }
    ]
}
The preceding configurations mount the ControlNet model, the ChilloutMix model, and the trained LoRA model. Among them:
${region} to the ID of the current region. For example, the China (Shanghai) region is set to cn-shanghai. For more information about other region IDs, see Regions and Zones.${region} to the ID of the current region. For example, the China (Shanghai) region is set to cn-shanghai. For more information about other region IDs, see Regions and Zones.3. Click Deploy. When the Service Status changes to Running, the service is deployed.
Note
If the Deploy button is unavailable, check whether there is a problem with the copied JSON text format.
4. After the service is deployed, click the service name to go to the Service Details page. Click View Call Information to obtain the endpoint and token of the SDWebUI service, and save it locally.
You can use one of the following methods to call the service:
After the service is deployed, click View Web Application in the Service Method column to go to the web UI and start debugging the service.
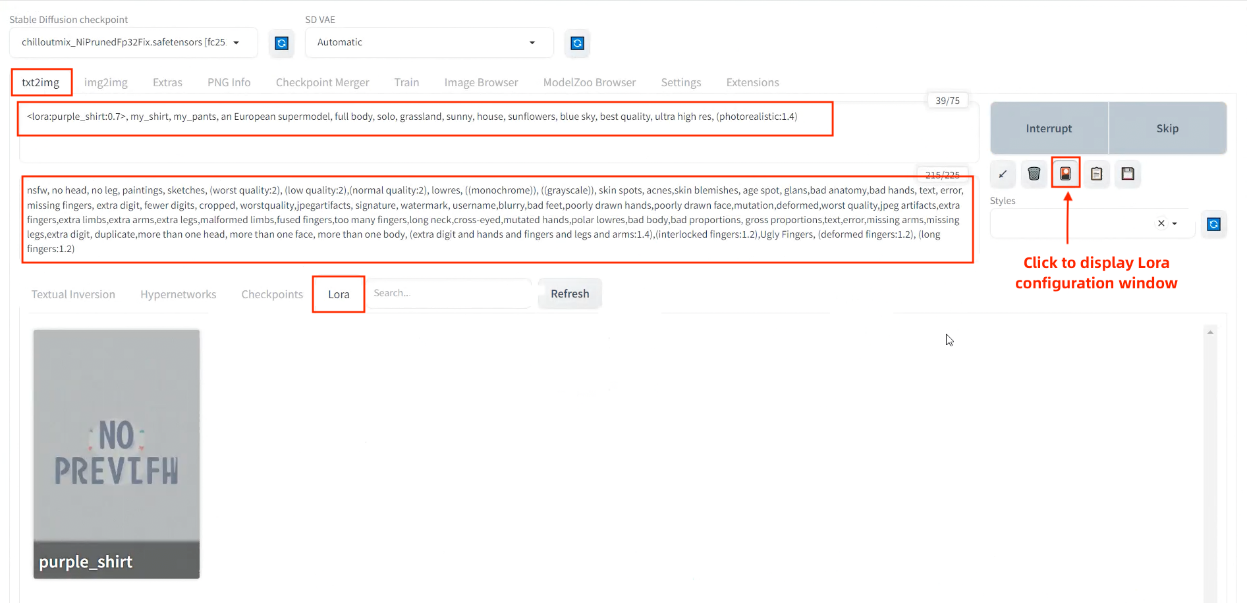
On the tex2img tab, set the following parameters and click Generate.
| Parameter | Example |
| Prompt |
<lora:purple_shirt:0.7>, my_shirt, my_pants, an European supermodel, full body, solo, grassland, sunny, house, sunflowers, blue sky, best quality, ultra high res, (photorealistic:1.4)Note: The my_shirt, my_pants clothing tags must be added to the Prompt, and the LoRA weight is recommended to set to 0.7-0.8. |
| Negative prompt | nsfw, no head, no leg, paintings, sketches, (worst quality:2), (low quality:2),(normal quality:2), lowres, ((monochrome)), ((grayscale)), skin spots, acnes,skin blemishes, age spot, glans,bad anatomy,bad hands, text, error, missing fingers, extra digit, fewer digits, cropped, worstquality,jpegartifacts, signature, watermark, username,blurry,bad feet,poorly drawn hands,poorly drawn face,mutation,deformed,worst quality,jpeg artifacts,extra fingers,extra limbs,extra arms,extra legs,malformed limbs,fused fingers,too many fingers,long neck,cross-eyed,mutated hands,polar lowres,bad body,bad proportions, gross proportions,text,error,missing arms,missing legs,extra digit, duplicate,more than one head, more than one face, more than one body, (extra digit and hands and fingers and legs and arms:1.4),(interlocked fingers:1.2),Ugly Fingers, (deformed fingers:1.2), (long fingers:1.2) |
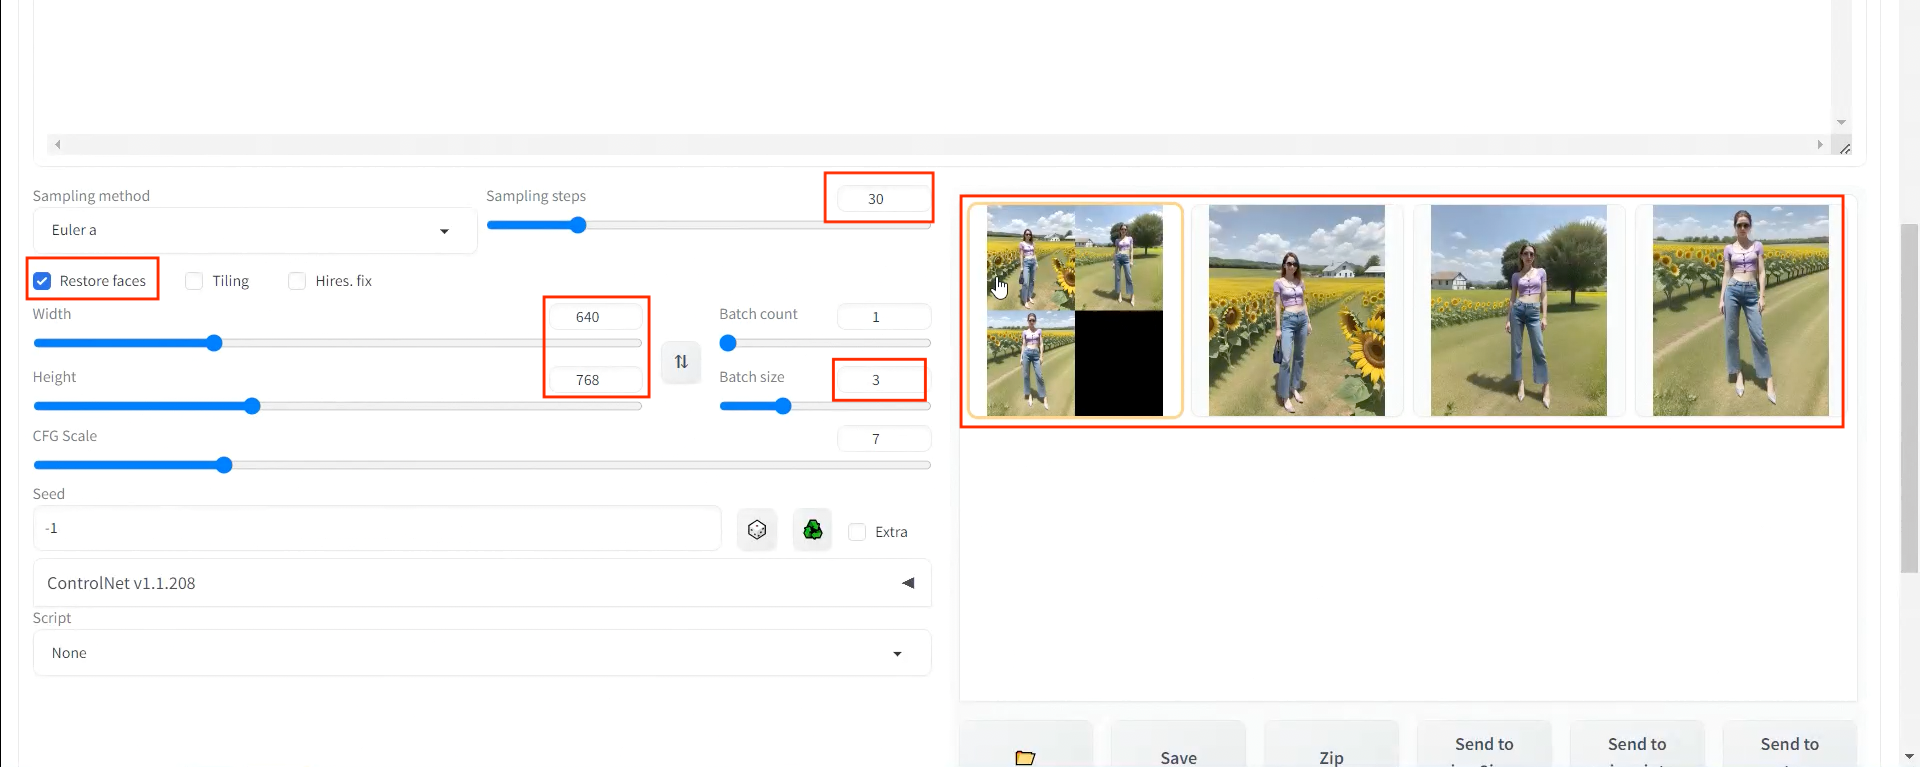
| Facial Repair | Select Facial Repair. The Width and Height are set to 768 × 1024 or 640 × 768 respectively. |
| Sampling steps | We recommend that you set the parameter to 30 or use the default configuration. |
Configure the parameters according to the following figure. The generated effect pictures are shown as follows. The actual effect picture prevails.
Refer to the following Python script to call the service through the API:
import os
import io
import base64
import requests
import copy
import numpy as np
from PIL import Image


def get_payload(prompt, negative_prompt, steps, width=512, height=512, batch_size=1, seed=-1):
    print(f'width: {width}, height: {height}')

    res = {
        'prompt': prompt,
        'negative_prompt': negative_prompt,
        'seed': seed,
        'batch_size': batch_size,
        'n_iter': 1,
        'steps': steps,
        'cfg_scale': 7.0,
        'image_cfg_scale': 1.5,
        'width': width,
        'height': height,
        'restore_faces': True,
        'override_settings_restore_afterwards': True
    }

    return res


if __name__ == '__main__':
    sdwebui_url = "<service_URL>"
    sdwebui_token = "<service_Token>"
    save_dir = 'lora_outputs'

    prompt = '<lora:purple_shirt:0.75>, my_shirt, my_pants, an European supermodel, solo, grassland, sunny, house, sunflowers, blue sky, best quality, ultra high res, (photorealistic:1.4)'
    negative_prompt = 'nfsw, no head, no leg, no feet, paintings, sketches, (worst quality:2), (low quality:2),\
        (normal quality:2), lowres, ((monochrome)), ((grayscale)), skin spots, acnes,\
        skin blemishes, age spot, glans,bad anatomy,bad hands, text, error, missing fingers,\
        extra digit, fewer digits, cropped, worstquality,jpegartifacts,\
        signature, watermark, username,blurry,bad feet,poorly drawn hands,poorly drawn face,\
        mutation,deformed,worst quality,jpeg artifacts,\
        extra fingers,extra limbs,extra arms,extra legs,malformed limbs,fused fingers,\
        too many fingers,long neck,cross-eyed,mutated hands,polar lowres,bad body,bad proportions,\
        gross proportions,text,error,missing arms,missing legs,extra digit, duplicate,\
        more than one head, more than one face, more than one body,\
        (extra digit and hands and fingers and legs and arms:1.4),(interlocked fingers:1.2),\
        Ugly Fingers, (deformed fingers:1.2), (long fingers:1.2)'
    steps = 30
    batch_size = 4

    headers = {"Authorization": sdwebui_token}
    payload = get_payload(prompt, negative_prompt, steps=steps, width=768, height=1024, batch_size=batch_size)
    response = requests.post(url=f'{sdwebui_url}/sdapi/v1/txt2img', headers=headers, json=payload)

    if response.status_code != 200:
        raise RuntimeError(response.status_code, response.text)

    r = response.json()

    os.makedirs(save_dir, exist_ok=True)
    images = [Image.open(io.BytesIO(base64.b64decode(i))) for i in r['images']]
    for i, img in enumerate(images):
        img.save(os.path.join(save_dir, f'image_{i}.jpg'))
Replace <service_URL> with the service access address queried in Step 1. Replace <service_Token> with the service token queried in Step 1.
After the service is called, the following effect images are generated in the lora_outputs directory. The actual effect picture prevails.
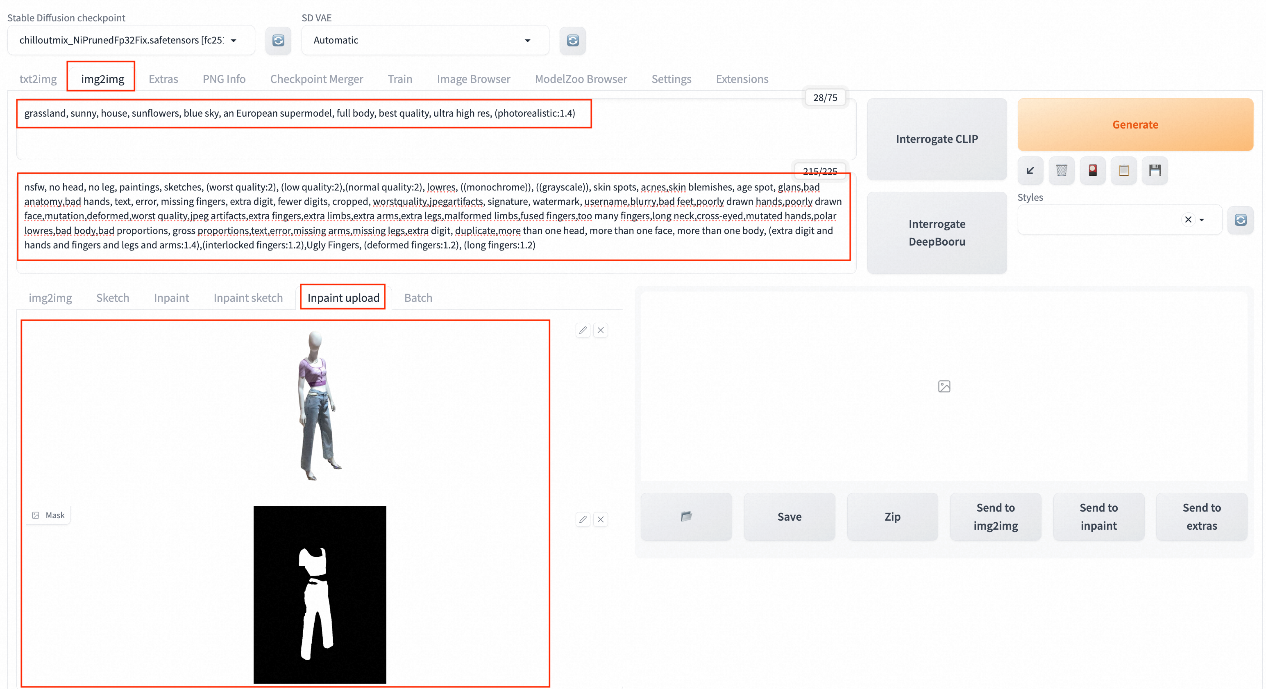
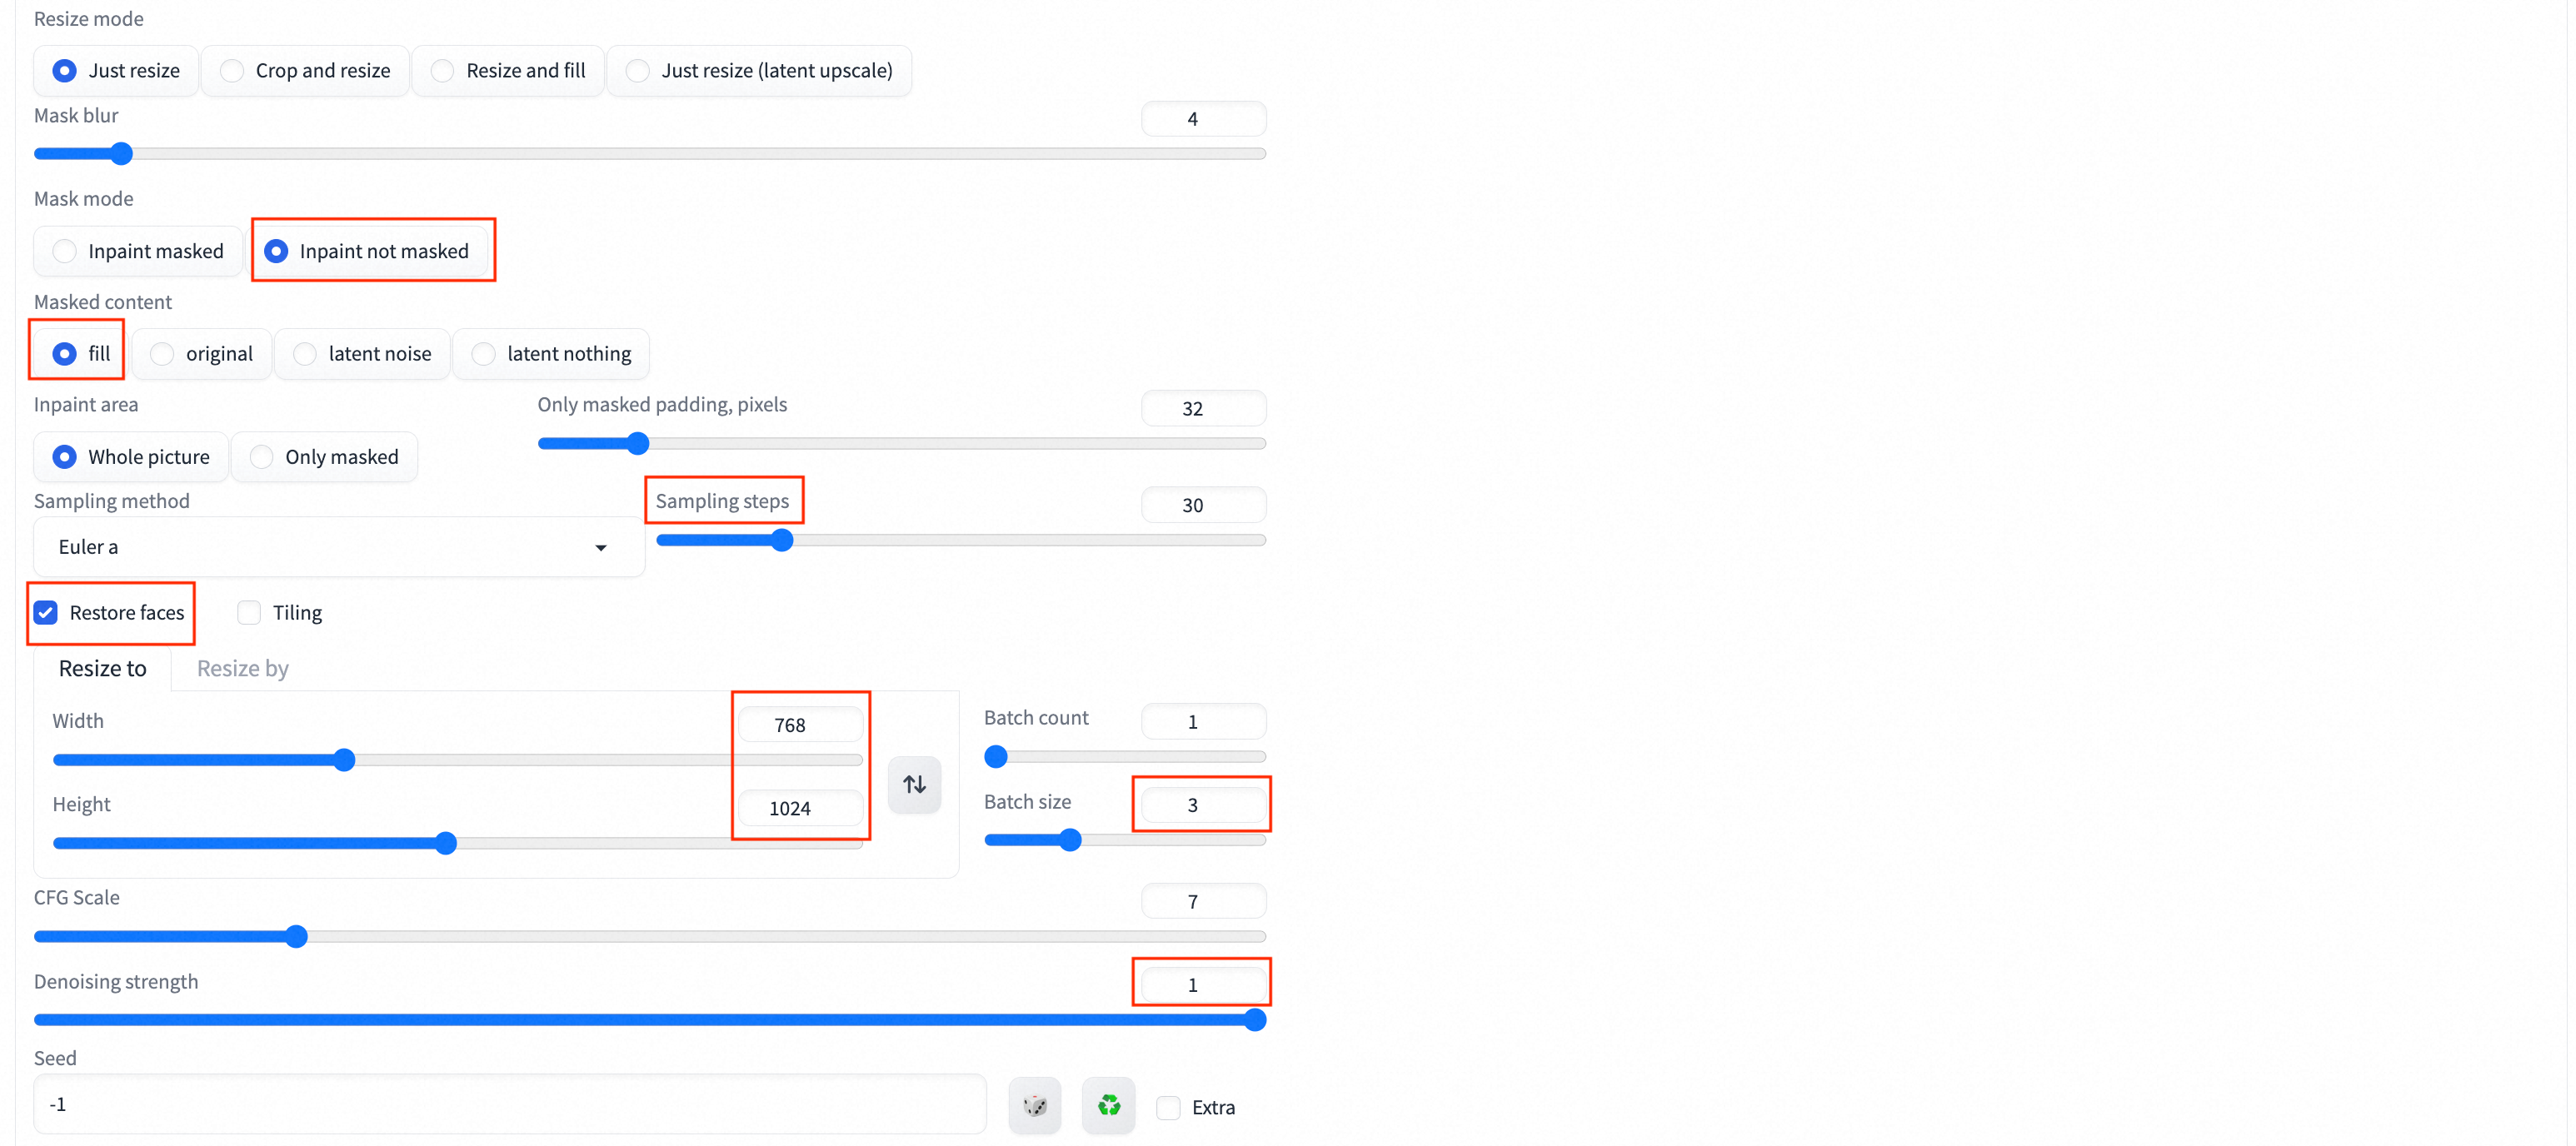
Take the clothing image mask obtained through matting as an example for demonstration. Click View Web Application in the Service Method column to start the web UI. On the img2img tab, configure the following parameters.
The basic configurations are as follows:
grassland, sunny, house, sunflowers, blue sky, a European supermodel, full body, best quality, ultra high res, (photorealistic:1.4).
nsfw, no head, no leg, paintings, sketches, (worst quality:2), (low quality:2), (normal quality:2), lowres, ((monochrome)), ((grayscale)), skin spots, acnes, skin blemishes, age spot, glans, bad anatomy, bad hands, text, error, missing fingers, extra digit, fewer digits, cropped, worstquality, jpegartifacts, signature, watermark, username,blurry, bad feet, poorly drawn hands, poorly drawn face, mutation, deformed,worst quality, jpeg artifacts, extra fingers, extra limbs, extra arms, extra legs, malformed limbs, fused fingers, too many fingers, long neck, cross-eyed, mutated hands, polar lowres, bad body, bad proportions, gross proportions, text, error, missing arms, missing legs, extra digit, duplicate, more than one head, more than one face, more than one body, (extra digit and hands and fingers and legs and arms:1.4), (interlocked fingers:1.2), Ugly Fingers, (deformed fingers:1.2), (long fingers:1.2).
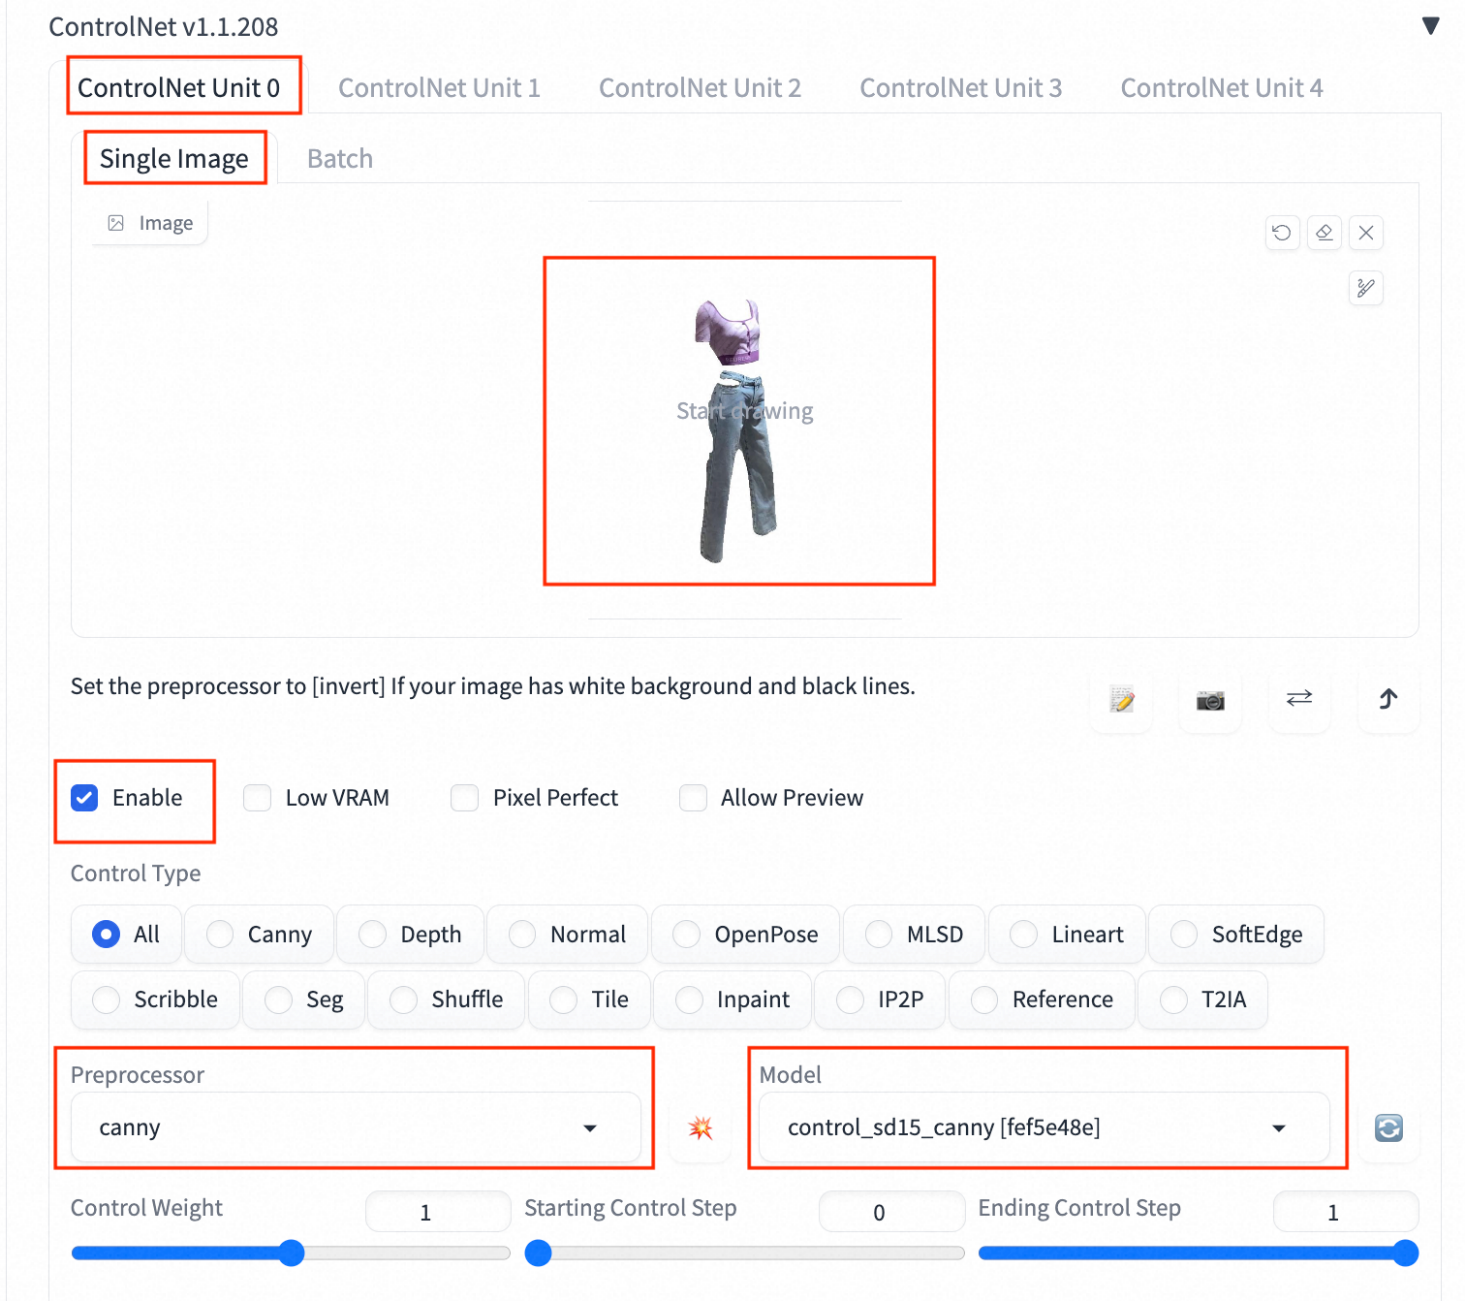
Click ControlNet Unit0. On the Single Image tab, upload a service matting and set the parameters according to the following figure.
Click ControlNet Unit1 to upload the source image on the Single Image tab and set the parameters according to the following figure.
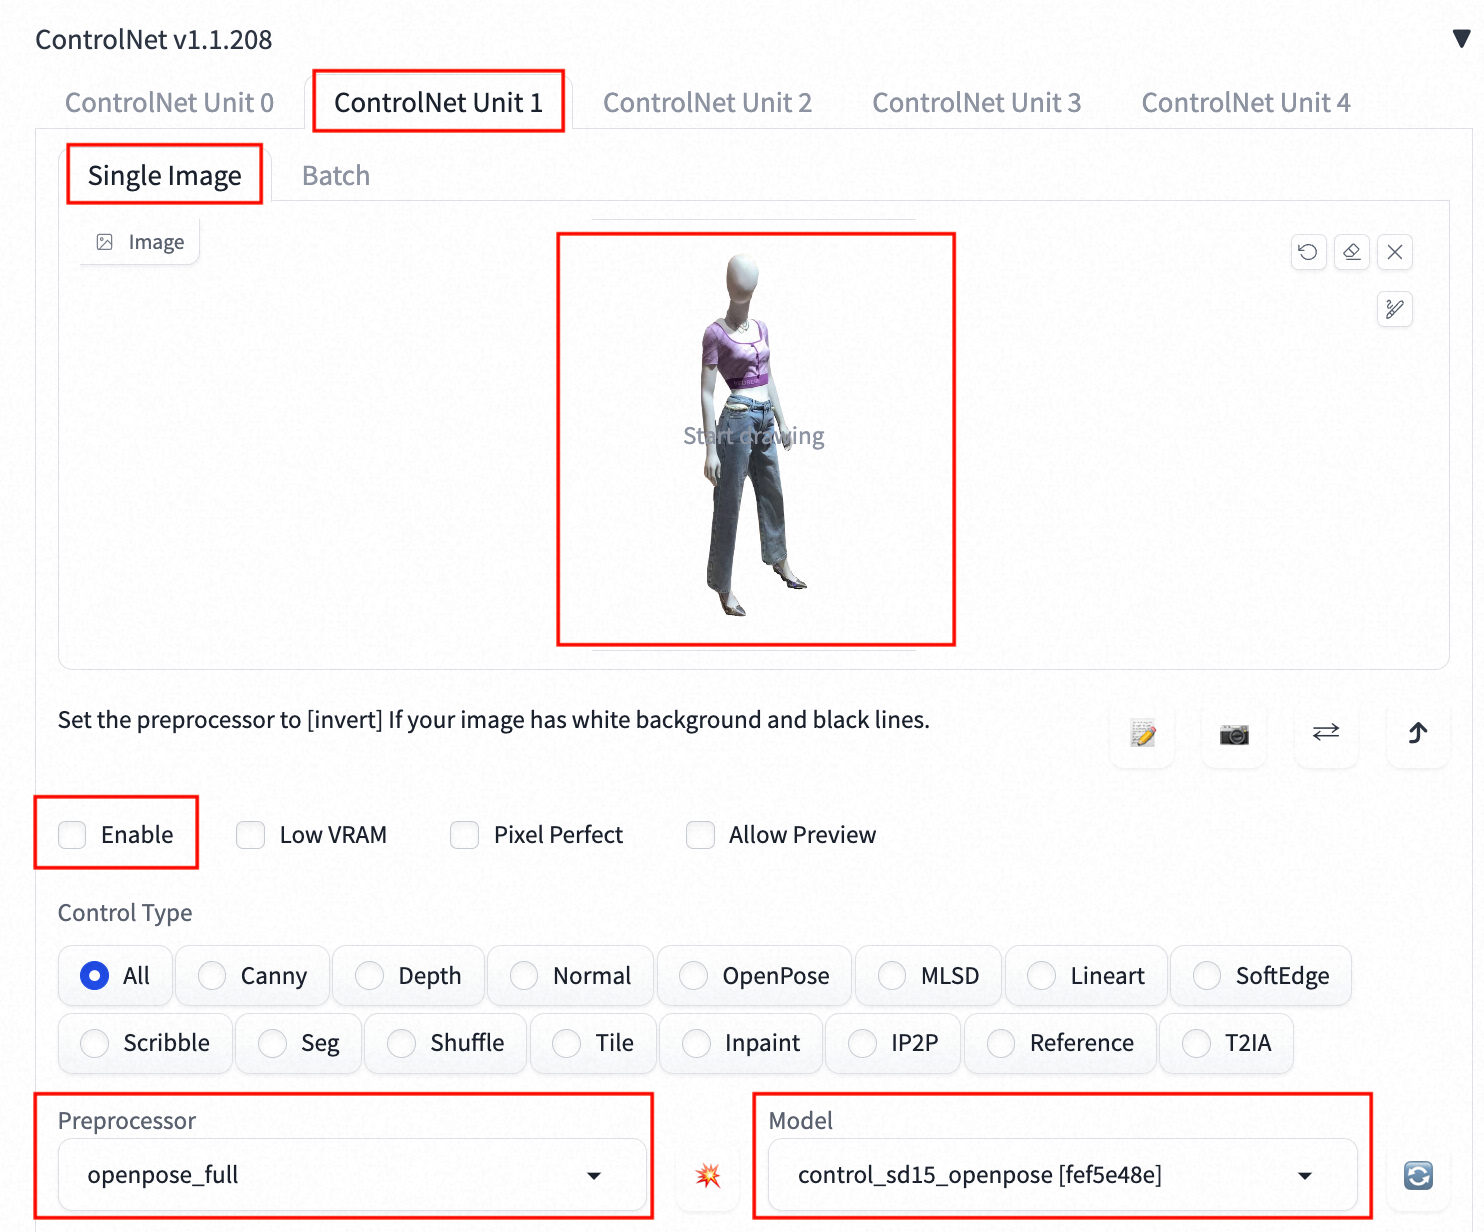
Click Generate to generate the following effect pictures:
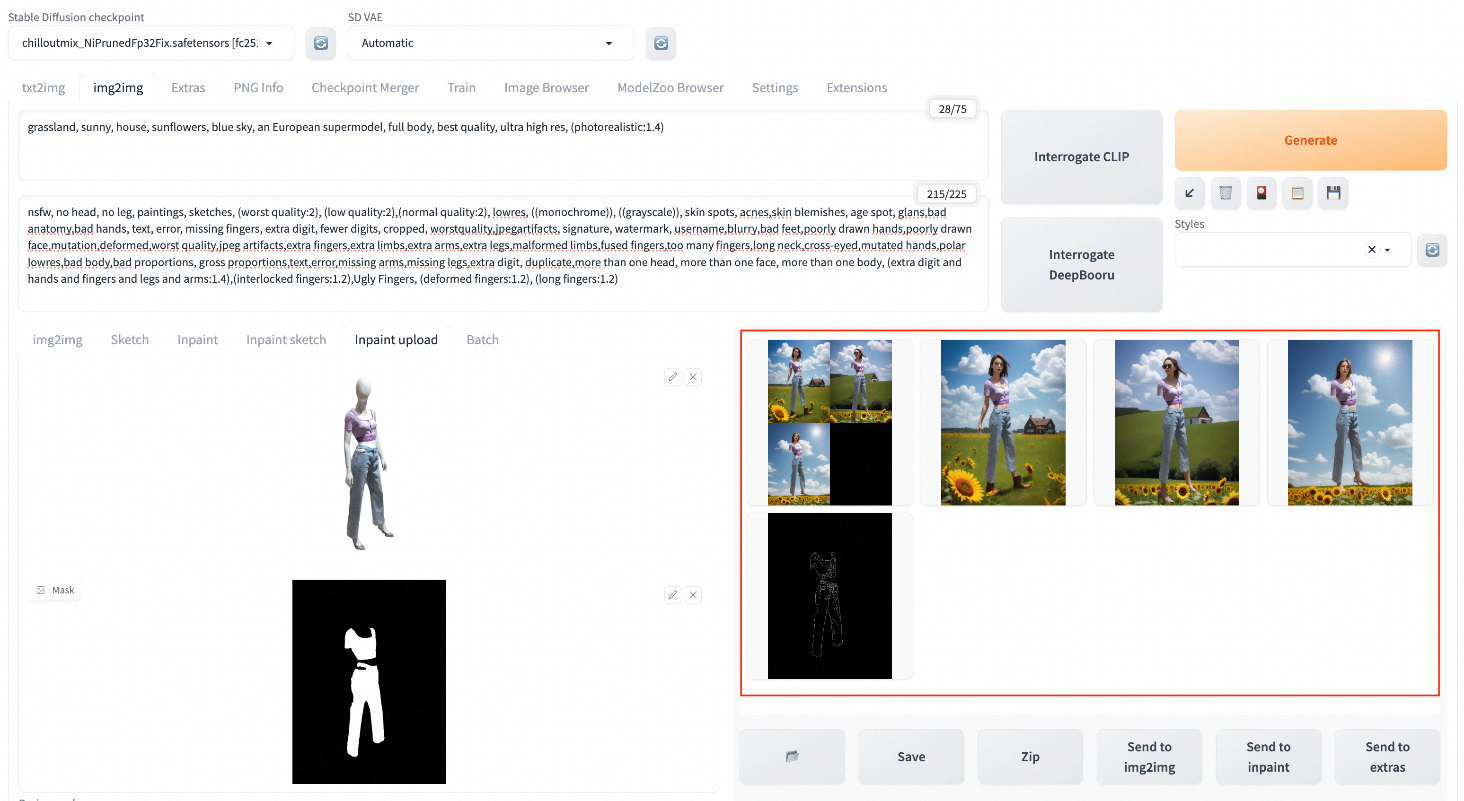
Download the demo data to your computer: source image, clothing matting, and clothing image mask.
In the current directory where the demo data is downloaded, refer to the following Python script to call the service through the API:
import os
import io
import base64
import requests
from PIL import Image


def sdwebui_b64_img(image: Image):
    buffered = io.BytesIO()
    image.save(buffered, format="PNG")
    img_base64 = 'data:image/png;base64,' + str(base64.b64encode(buffered.getvalue()), 'utf-8')
    return img_base64


def get_payload(human_pil, cloth_mask, cloth_pil, prompt, negative_prompt, steps, batch_size=1, seed=-1):
    input_image = sdwebui_b64_img(human_pil)
    mask_image = sdwebui_b64_img(cloth_mask)
    width = human_pil.size[0]
    height = human_pil.size[1]
    print(f'width: {width}, height: {height}')

    res = {
        'init_images': [input_image],
        'mask': mask_image,
        'resize_mode':0,
        'denoising_strength': 1.0,
        'mask_blur': 4,
        'inpainting_fill': 0,
        'inpaint_full_res': False,
        'inpaint_full_res_padding': 0,
        'inpainting_mask_invert': 1,
        'initial_noise_multiplier': 1,
        'prompt': prompt,
        'negative_prompt': negative_prompt,
        'seed': seed,
        'batch_size': batch_size,
        'n_iter': 1,
        'steps': steps,
        'cfg_scale': 7.0,
        'image_cfg_scale': 1.5,
        'width': width,
        'height': height,
        'restore_faces': True,
        'tiling': False,
        'override_settings_restore_afterwards': True,
        'sampler_name': 'Euler a',
        'sampler_index': 'Euler a',
        "save_images": False,
        'alwayson_scripts': {
            'ControlNet': {
                'args': [
                    {
                        'input_image': sdwebui_b64_img(cloth_pil),
                        'module': 'canny',
                        'model': 'control_sd15_canny [fef5e48e]',
                        'weight': 1.0,
                        'resize_mode': 'Scale to Fit (Inner Fit)',
                        'guidance': 1.0
                    },
                    {
                        'input_image': input_image,
                        'module': 'openpose_full',
                        'model': 'control_sd15_openpose [fef5e48e]',
                        'weight': 1.0,
                        'resize_mode': 'Scale to Fit (Inner Fit)',
                        'guidance': 1.0
                    }
                ]
            }
        }
    }

    return res


if __name__ == '__main__':
    sdwebui_url = "<service_URL>"
    sdwebui_token = "<service_Token>"

    raw_image_path = '1.png'  # Source image
    cloth_path = 'cloth_pil.jpg'  # Clothing matting
    cloth_mask_path = 'cloth_mask.png'  # Clothing image mask

    steps = 30
    batch_size = 4
    prompt = 'grassland, sunny, house, sunflowers, blue sky, an European supermodel, full body, best quality, ultra high res, (photorealistic:1.4)'
    negative_prompt = 'nfsw, no head, no leg, no feet, paintings, sketches, (worst quality:2), (low quality:2),\
        (normal quality:2), lowres, ((monochrome)), ((grayscale)), skin spots, acnes,\
        skin blemishes, age spot, glans,bad anatomy,bad hands, text, error, missing fingers,\
        extra digit, fewer digits, cropped, worstquality,jpegartifacts,\
        signature, watermark, username,blurry,bad feet,poorly drawn hands,poorly drawn face,\
        mutation,deformed,worst quality,jpeg artifacts,\
        extra fingers,extra limbs,extra arms,extra legs,malformed limbs,fused fingers,\
        too many fingers,long neck,cross-eyed,mutated hands,polar lowres,bad body,bad proportions,\
        gross proportions,text,error,missing arms,missing legs,extra digit, duplicate,\
        more than one head, more than one face, more than one body,\
        (extra digit and hands and fingers and legs and arms:1.4),(interlocked fingers:1.2),\
        Ugly Fingers, (deformed fingers:1.2), (long fingers:1.2)'

    save_dir = 'repaint_outputs'
    os.makedirs(save_dir, exist_ok=True)

    headers = {"Authorization": sdwebui_token}

    human_pil = Image.open(raw_image_path)
    cloth_mask_pil = Image.open(cloth_mask_path)
    cloth_pil = Image.open(cloth_path)

    payload = get_payload(human_pil, cloth_mask_pil, cloth_pil, prompt, negative_prompt, steps=steps, batch_size=batch_size)
    response = requests.post(url=f'{sdwebui_url}/sdapi/v1/img2img', headers=headers, json=payload)

    if response.status_code != 200:
        raise RuntimeError(response.status_code, response.text)

    r = response.json()

    images = [Image.open(io.BytesIO(base64.b64decode(i))) for i in r['images']]
    for i, img in enumerate(images):
        img.save(os.path.join(save_dir, f'image_{i}.jpg'))
Replace <service_URL> with the service access address that is queried in Step 1. Replace <service_Token> with the service token that is queried in Step 1.
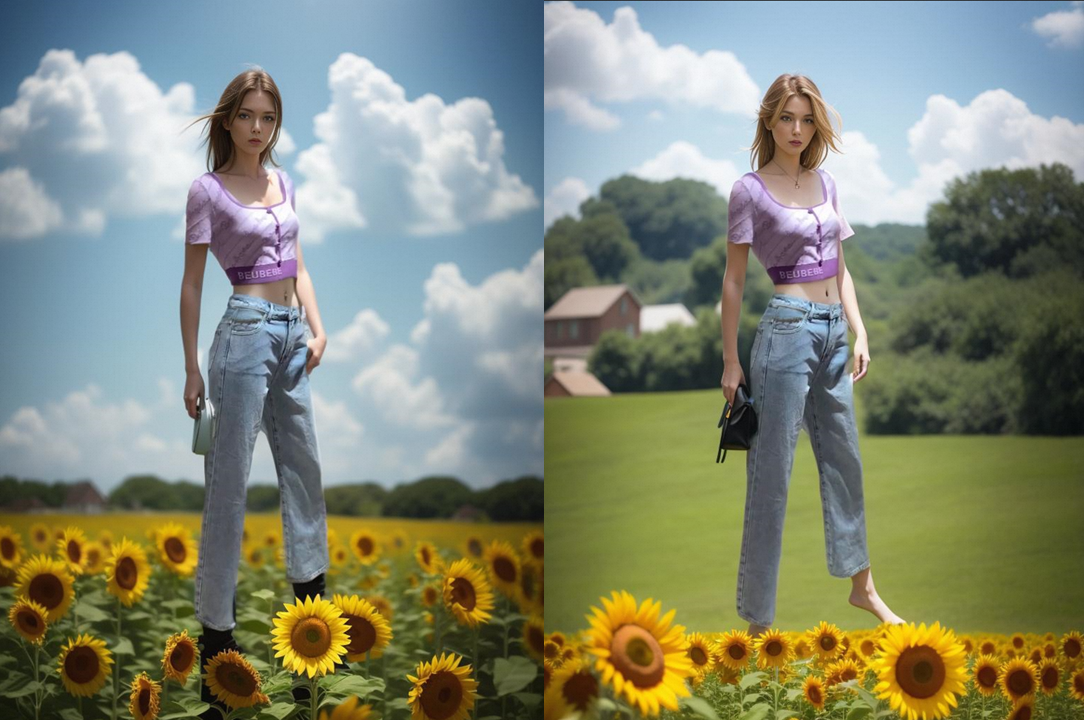
After the service is called, the following effect images are generated to the repaint_outputs directory under the current directory. The actual effect picture prevails.
EasyCV | Out-of-the-Box Visual Self-Supervision + Transformer Algorithm Library
Deploy Stable Diffusion for AI Painting with EAS in a Few Clicks
44 posts | 1 followers
FollowPM - C2C_Yuan - June 3, 2024
Alibaba Cloud Community - October 20, 2023
Alibaba Cloud Community - November 23, 2023
Farruh - April 10, 2023
Alibaba Cloud MaxCompute - September 18, 2019
Ashish-MVP - April 8, 2025
44 posts | 1 followers
Follow Platform For AI
A platform that provides enterprise-level data modeling services based on machine learning algorithms to quickly meet your needs for data-driven operations.
Learn More Tongyi Qianwen (Qwen)
Top-performance foundation models from Alibaba Cloud
Learn More AI Acceleration Solution
Accelerate AI-driven business and AI model training and inference with Alibaba Cloud GPU technology
Learn More Alibaba Cloud for Generative AI
Accelerate innovation with generative AI to create new business success
Learn MoreMore Posts by Alibaba Cloud Data Intelligence