By Bingkun Zhao (Bingjun)
In traditional microservice systems, Spring Cloud Alibaba and Zuul are commonly used as microservice gateways in conjunction with Spring Cloud. However, these traditional Java gateways often encounter various issues when dealing with high traffic scenarios. For instance, Zuul's non-asynchronous I/O architecture can lead to blocking problems under heavy traffic. Similarly, Spring Cloud Gateway may experience Full GC occurrences, resulting in longer response times (RT) and impacting user experience and business stability. Therefore, there is a need to explore alternative options to replace these traditional microservice gateways.
Higress is a cutting-edge cloud-native microservice gateway developed by Alibaba. It seamlessly connects to various registries, including Nacos, Zookeeper, and Eureka. Higress provides seamless integration with Spring Cloud applications and deep integration with microservice ecosystems like Dubbo, Sentinel, and OpenSergo. Utilizing a C++ kernel, Higress offers superior performance and stability compared to traditional Java gateways, resulting in 2-4 times performance improvement when compared to Spring Cloud Gateway and Zuul. Moreover, Higress naturally complies with the Ingress/Gateway API standard of Kubernetes, making it an ideal choice for a standard microservice gateway in the cloud-native era.
As software architectures evolve towards microservices and cloud-native frameworks, the frequency of application updates and iterations continues to increase rapidly. Ensuring a smooth and uninterrupted application deployment process without impacting user experience is crucial. In the industry, several commonly used application deployment strategies include blue-green release, canary release, and A/B testing release. This article explores how to leverage Higress to implement best practices for Spring Cloud Alibaba application deployment.
Higress allows you to deploy Nacos and Spring Cloud applications in Kubernetes clusters or deploy them outside the Kubernetes clusters. To make the demonstration easier, Higress, Nacos, and Spring Cloud applications are deployed in on-premises Kubernetes clusters.
apiVersion: apps/v1
kind: Deployment
metadata:
  name: spring-cloud-demo-v1
spec:
  replicas: 1
  selector:
    matchLabels:
      app: spring-cloud-demo
  template:
    metadata:
      labels:
        app: spring-cloud-demo
    spec:
      containers:
        - name: server
          image: higress-registry.cn-hangzhou.cr.aliyuncs.com/samples/spring-cloud-demo:v1
          imagePullPolicy: IfNotPresent
          env:
# The address of the Nacos that is registered to.
            - name: NACOS_REGISTRY_ADDRESS
              value: nacos-server.default.svc.cluster.local
# The version metadata that is carried during registration.
- name: SPRING_CLOUD_NACOS_DEMO_VERSION
              value: v1
The above contents are deployed in the Kubernetes cluster. The NACOS_REGISTRY_ADDRESS and SPRING_CLOUD_NACOS_DEMO_VERSION environment variables specify the address of Nacos and the version metadata carried during registration. The application.properties configuration of SpringCloud applications will read these two environment variables. The code is as follows:
spring.cloud.nacos.discovery.server-addr=${NACOS_REGISTRY_ADDRESS}:8848
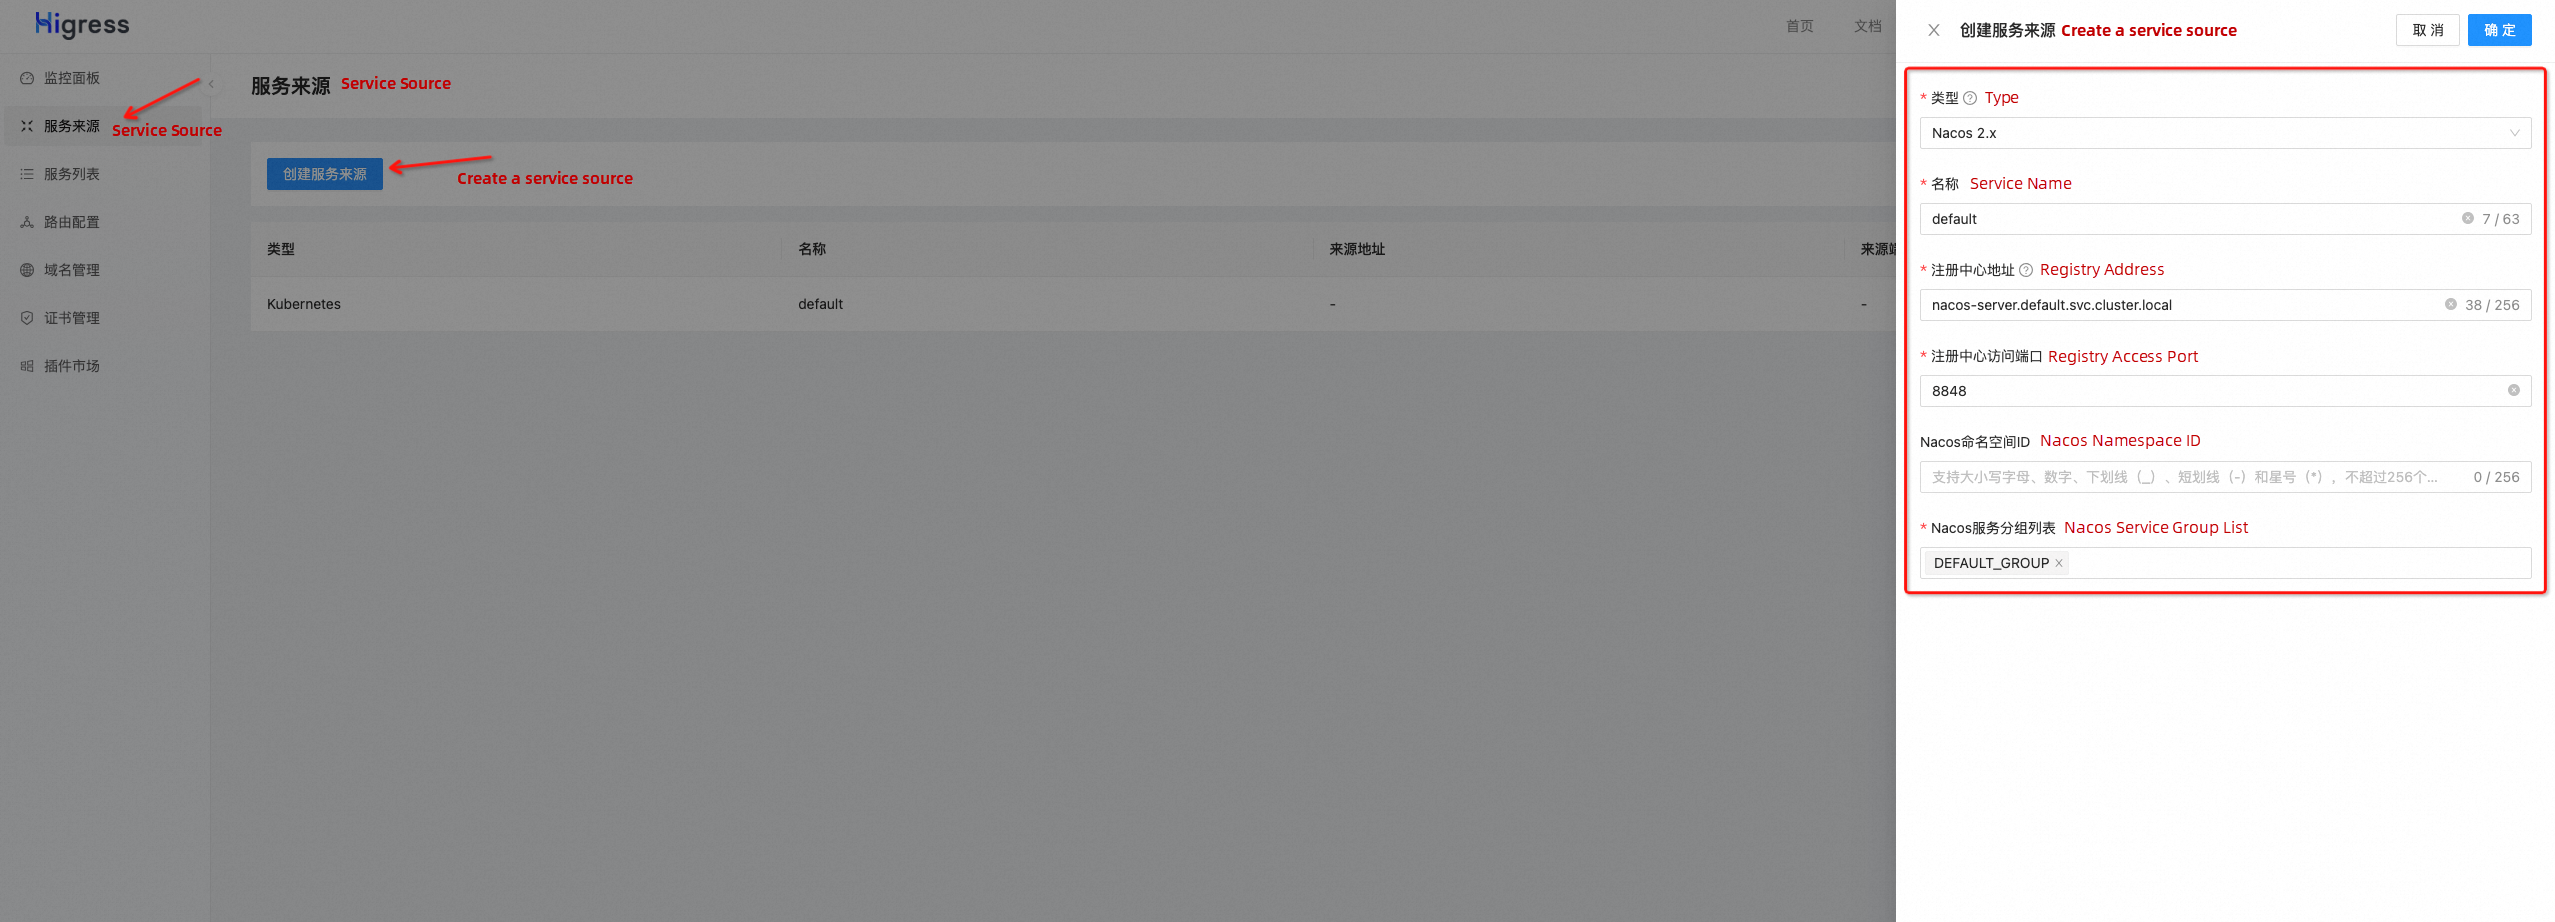
spring.cloud.nacos.discovery.metadata.version=${SPRING_CLOUD_NACOS_DEMO_VERSION}Higress supports multiple service sources, including Nacos, Zookeeper, DNS, and static IP. By creating a Nacos service source, Higress can discover the services registered on Nacos and forward requests to them. To create a service source, go to the Higress console and click on Service Source - Create Service Source. Choose Nacos 2.X, and then provide the address, port, namespace, and service group of the registry. The registry address can be an IP or domain name. In this article, Nacos is deployed within an on-premises Kubernetes environment. The Nacos port is exposed through the Kubernetes service, so please provide the corresponding service domain name.
After configuring the Nacos service source, we can see the application we just deployed in the service list.

In the Higress console, click Domain Name Management - Create Domain Name to create a domain name, demo.springcloud.com, for subsequent access.

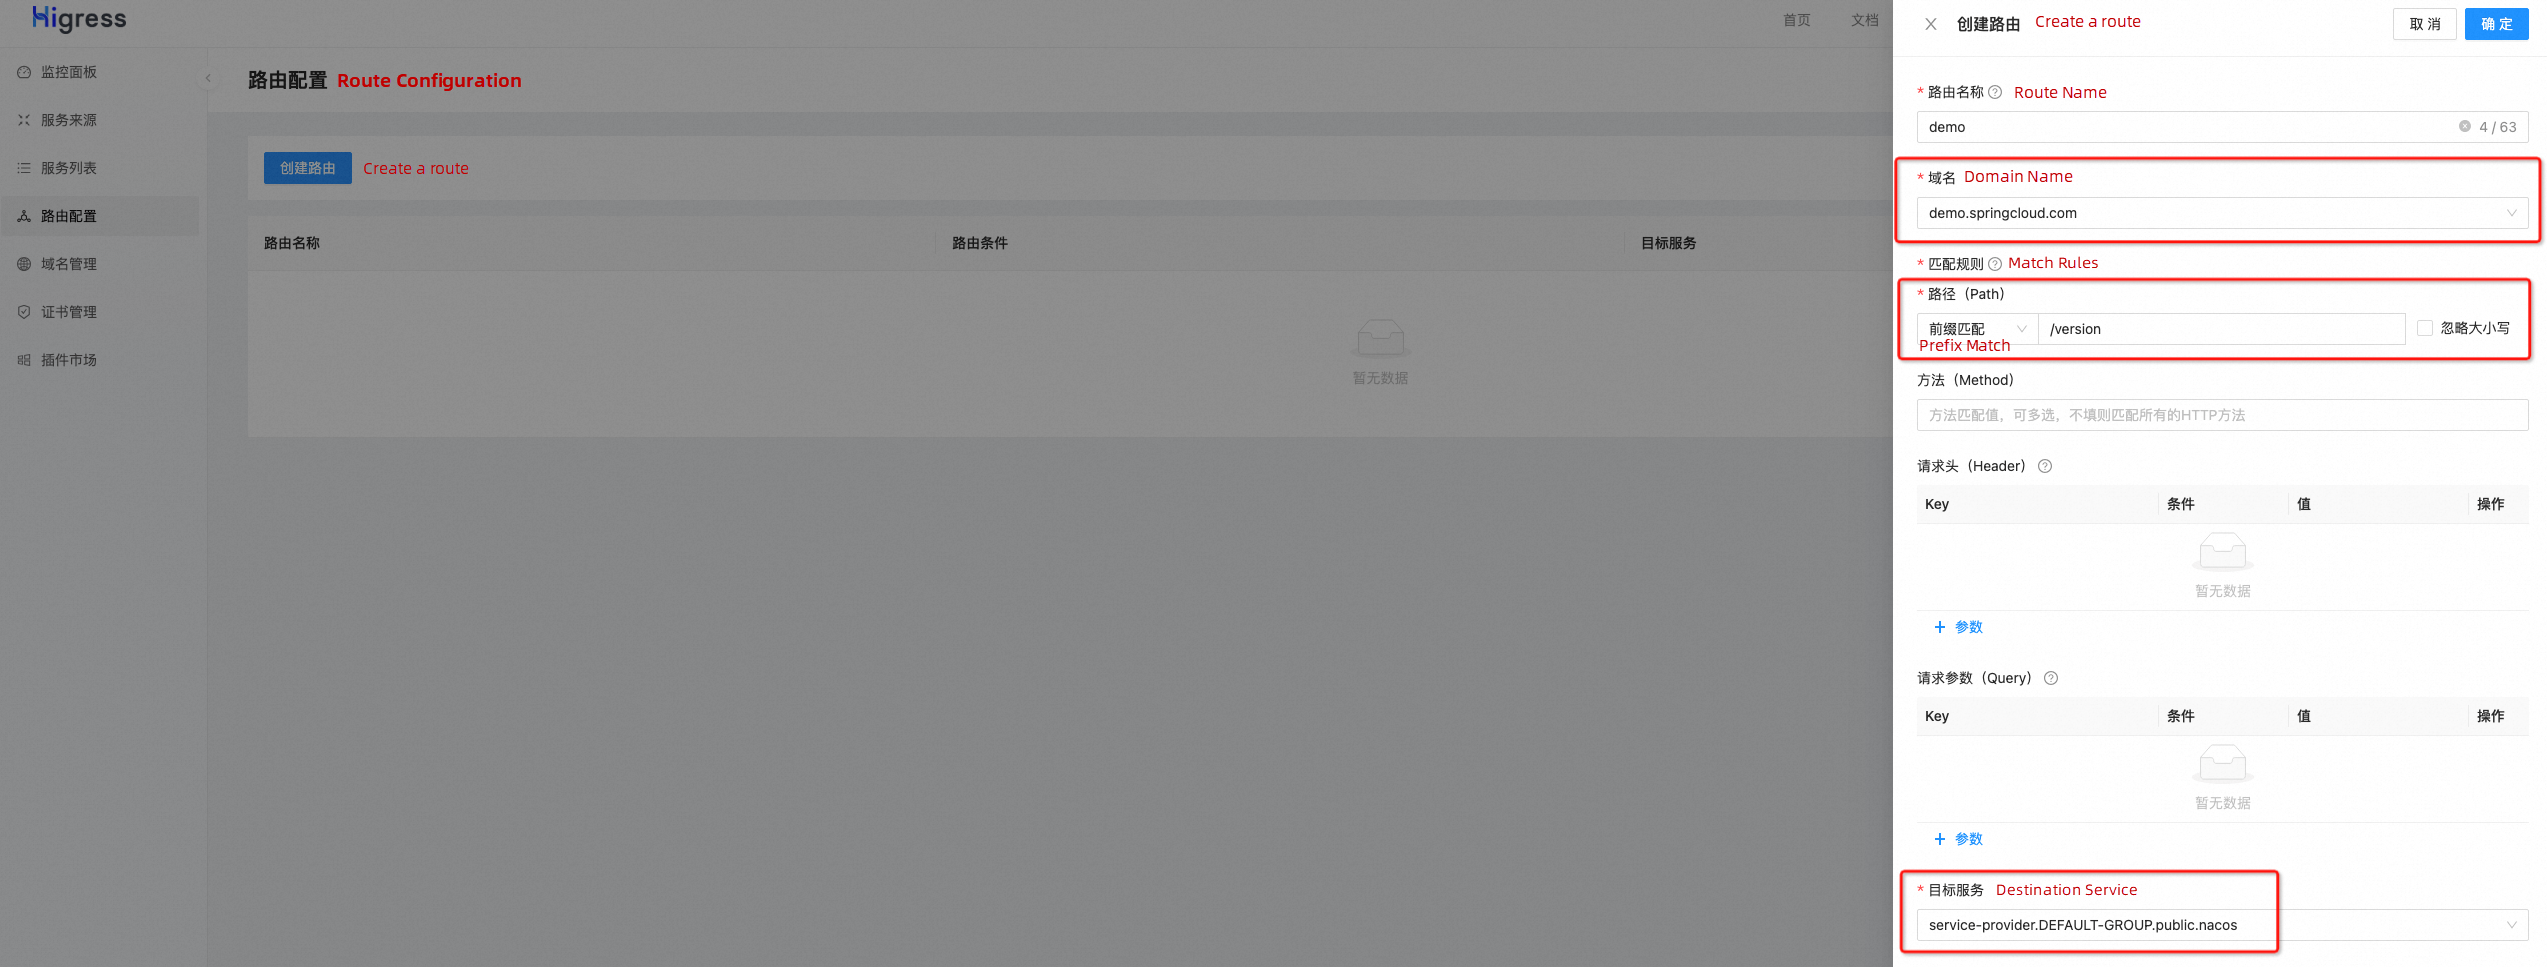
Click Route Configuration - Create Route to create a route named demo. The domain name chosen is the demo.springcloud.com we just created. The target service is the Spring Cloud application in 1.2, and the path is set to /version.
Next, we can use the configured route to access the SpringCloud application. When requesting, we need to resolve the demo.springcloud.com domain name to the local IP, as shown below.

Note: If you want to expose port 80 and port 443 of Higress through a LoadBalancer, you must replace the local IP address with the IP address of the LoadBalancer. For more information, see Quick Start of Higress.
In a blue-green release, there are two identical running environments. One is the current production environment (blue environment), and the other is the test environment for the new version (green environment). The code of the new version runs exclusively in the green environment. Once the code passes the testing phase, the traffic is directly switched to the green environment to launch the new version. At the same time, the blue environment serves as a hot standby environment. If any issues arise in the green environment requiring a rollback, all traffic can be switched back to the blue environment.


Apply the following resources to the on-premises Kubernetes cluster to deploy the Spring Cloud application of v2:
apiVersion: apps/v1
kind: Deployment
metadata:
  name: spring-cloud-demo-v2
spec:
  replicas: 1
  selector:
    matchLabels:
      app: spring-cloud-demo
  template:
    metadata:
      labels:
        app: spring-cloud-demo
    spec:
      containers:
        - name: server
          image: higress-registry.cn-hangzhou.cr.aliyuncs.com/samples/spring-cloud-demo:v2
          imagePullPolicy: IfNotPresent
          env:
            - name: NACOS_REGISTRY_ADDRESS
              value: nacos-server.default.svc.cluster.local
            - name: SPRING_CLOUD_NACOS_DEMO_VERSION
              value: v2
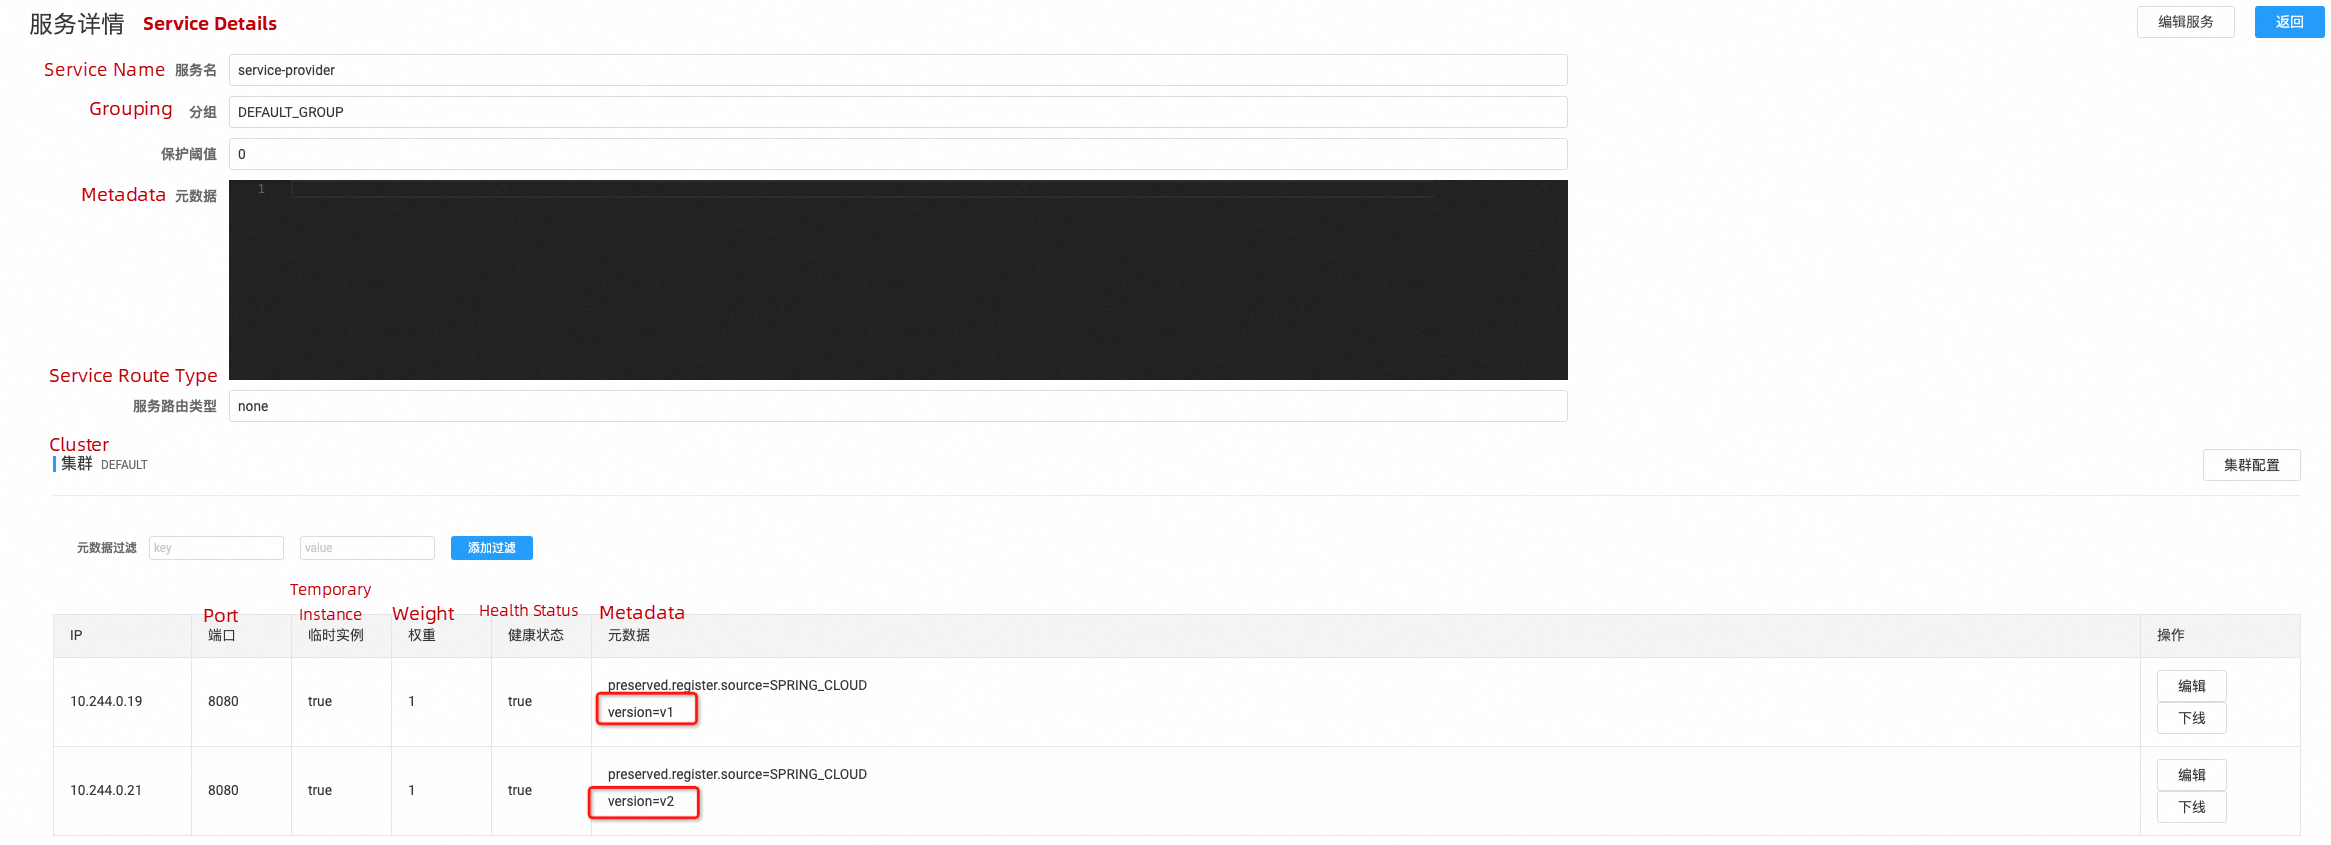
After the deployment is complete, you can see that the application has two endpoints in the service list in the Higress console, as shown in the following figure:

After deploying the v2 version of the application, we can observe in the Nacos console (http://localhost:8848/nacos) that the service-provider service has two IP addresses. The metadata for these IP addresses includes version information, with one being v1 and the other being v2. Higress can utilize this metadata to divide the service into different subsets, allowing it to forward requests to either the new version or the old version of the application.
Apply the following resources to the on-premises Kubernetes cluster to divide the service into v1 and v2 subsets based on the version fields in the application metadata.
apiVersion: networking.istio.io/v1alpha3
kind: DestinationRule
metadata:
  name: demo
  namespace: higress-system
spec:
  host: service-provider.DEFAULT-GROUP.public.nacos
  subsets:
  - name: v1
    labels:
      version: v1
  - name: v2
    labels:
version: v2After the new version of the application is launched, we need to switch all the traffic to it. At this time, we only need to modify the route we created in the 1.3. We can find the following ingress resource in the on-premises Kubernetes cluster, which corresponds to the route we created in 1.3.

Edit the ingress resource and change the value of the higress. io/destination, an annotation, to service-provider.DEFAULT-GROUP.public.nacos v2, and the target service of the route can be changed to the v2 subset.
apiVersion: networking.k8s.io/v1
kind: Ingress
metadata:
  annotations:
    higress.io/destination: service-provider.DEFAULT-GROUP.public.nacos v2
    higress.io/ignore-path-case: "false"
  labels:
    higress.io/domain_demo.springcloud.com: "true"
    higress.io/resource-definer: higress
  name: demo
  namespace: higress-system
spec:
  ingressClassName: higress
  rules:
  - host: demo.springcloud.com
    http:
      paths:
      - backend:
          resource:
            apiGroup: networking.higress.io
            kind: McpBridge
            name: default
        path: /version
pathType: PrefixWe send the request again, and we can see that what we get at this time is the return result of the v2 application, thus realizing the release of the new version.

If you find a problem with the newly launched version and need to roll it back, you only need to modify the higress.io/destination in the ingress route and change the value to service-provider.DEFAULT-GROUP.public.nacos v1.
Canary release routes a small amount of traffic to the new version of your service. As such, few instances are required to deploy the new version. After you confirm that the new version works as expected, you can gradually migrate traffic from the original version to the new version as you change the traffic weights that you assign to the two versions. Throughout this process, you can scale up the new version and scale down the original version, maximizing the utilization of underlying resources based on the configured traffic ratios.
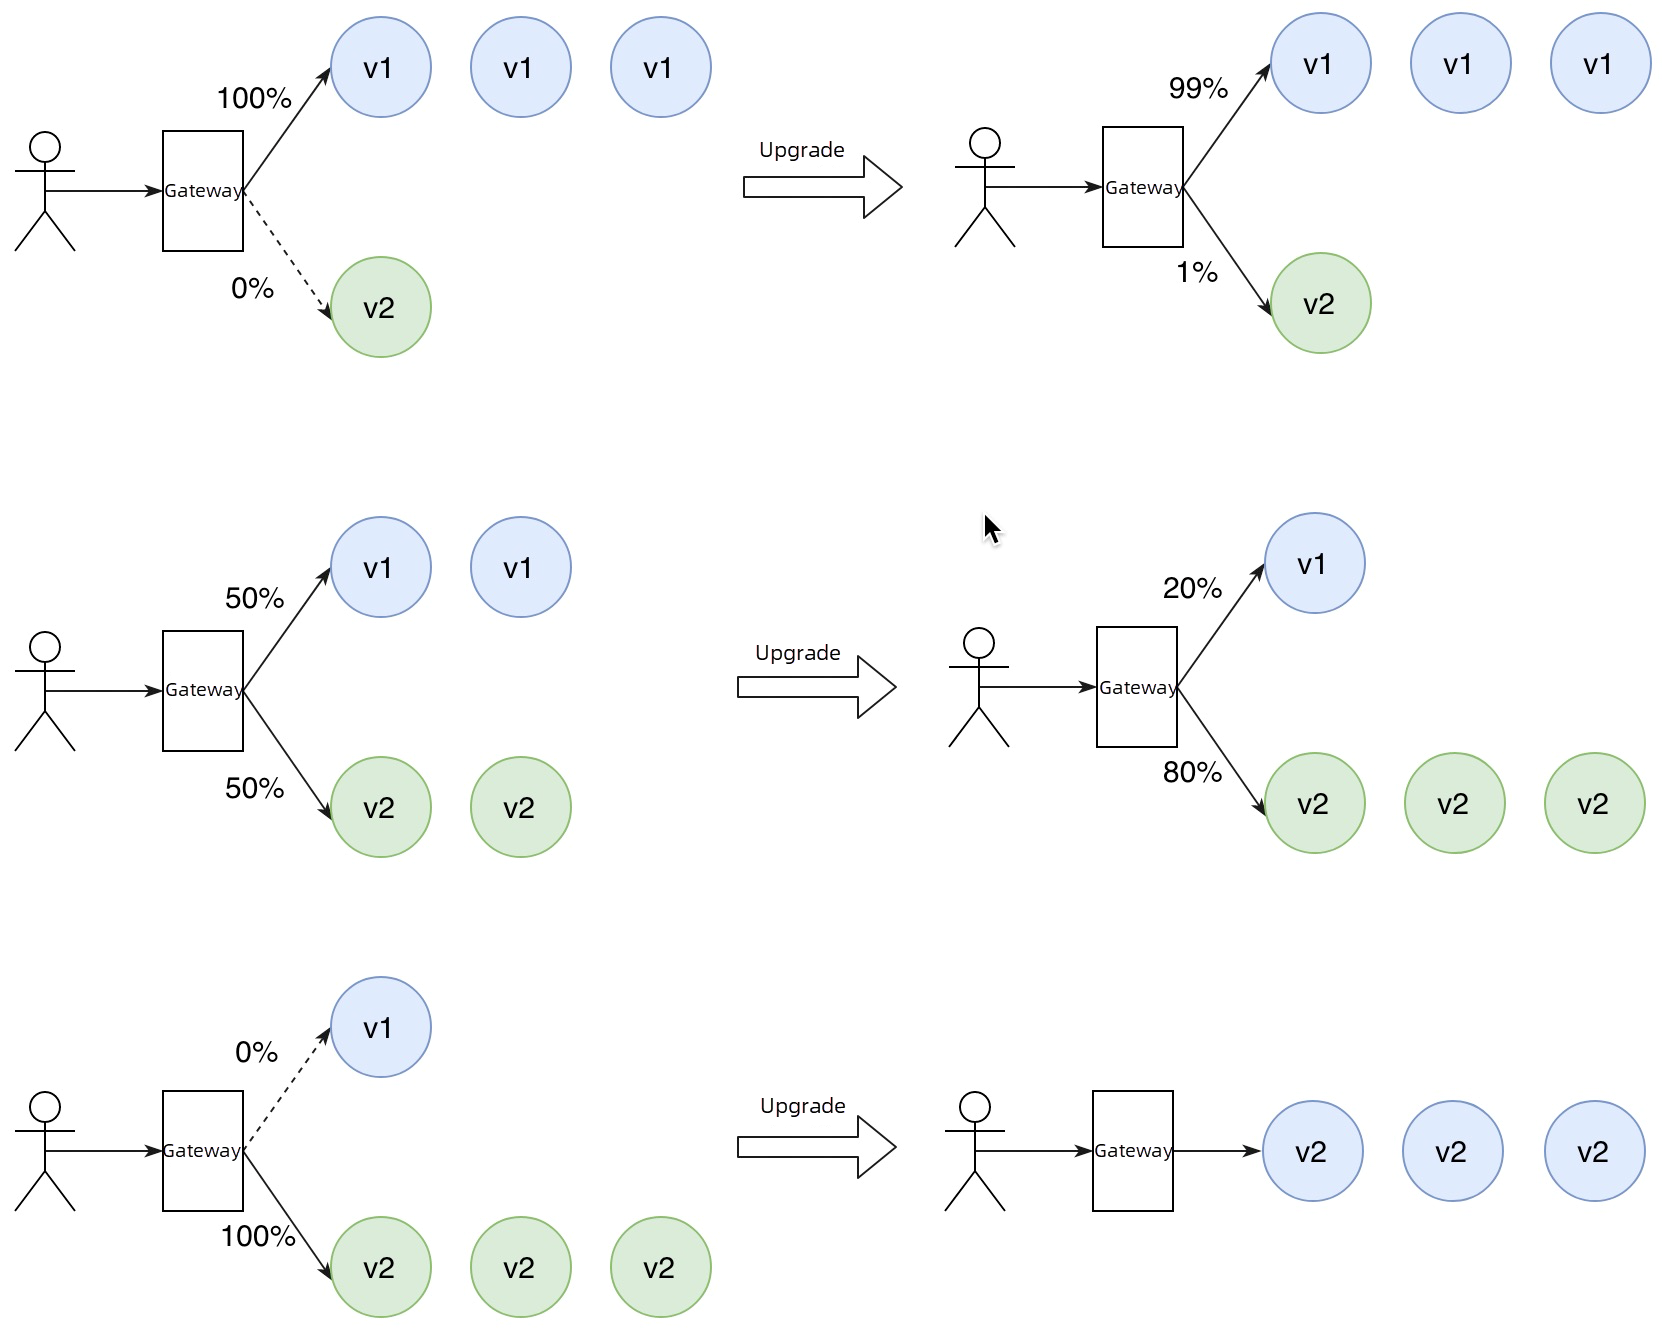
Higress can use an ingress annotation to implement a canary release of an application. Edit the ingress resource in 2.3 and modify the higress.io/destination annotation in the ingress as follows:
metadata:
  annotations:
    higress.io/destination: |
      80% service-provider.DEFAULT-GROUP.public.nacos v1
      20% service-provider.DEFAULT-GROUP.public.nacos v2
In this way, Higress can forward 80% of the traffic to v1 applications and 20% of the traffic to v2 applications.
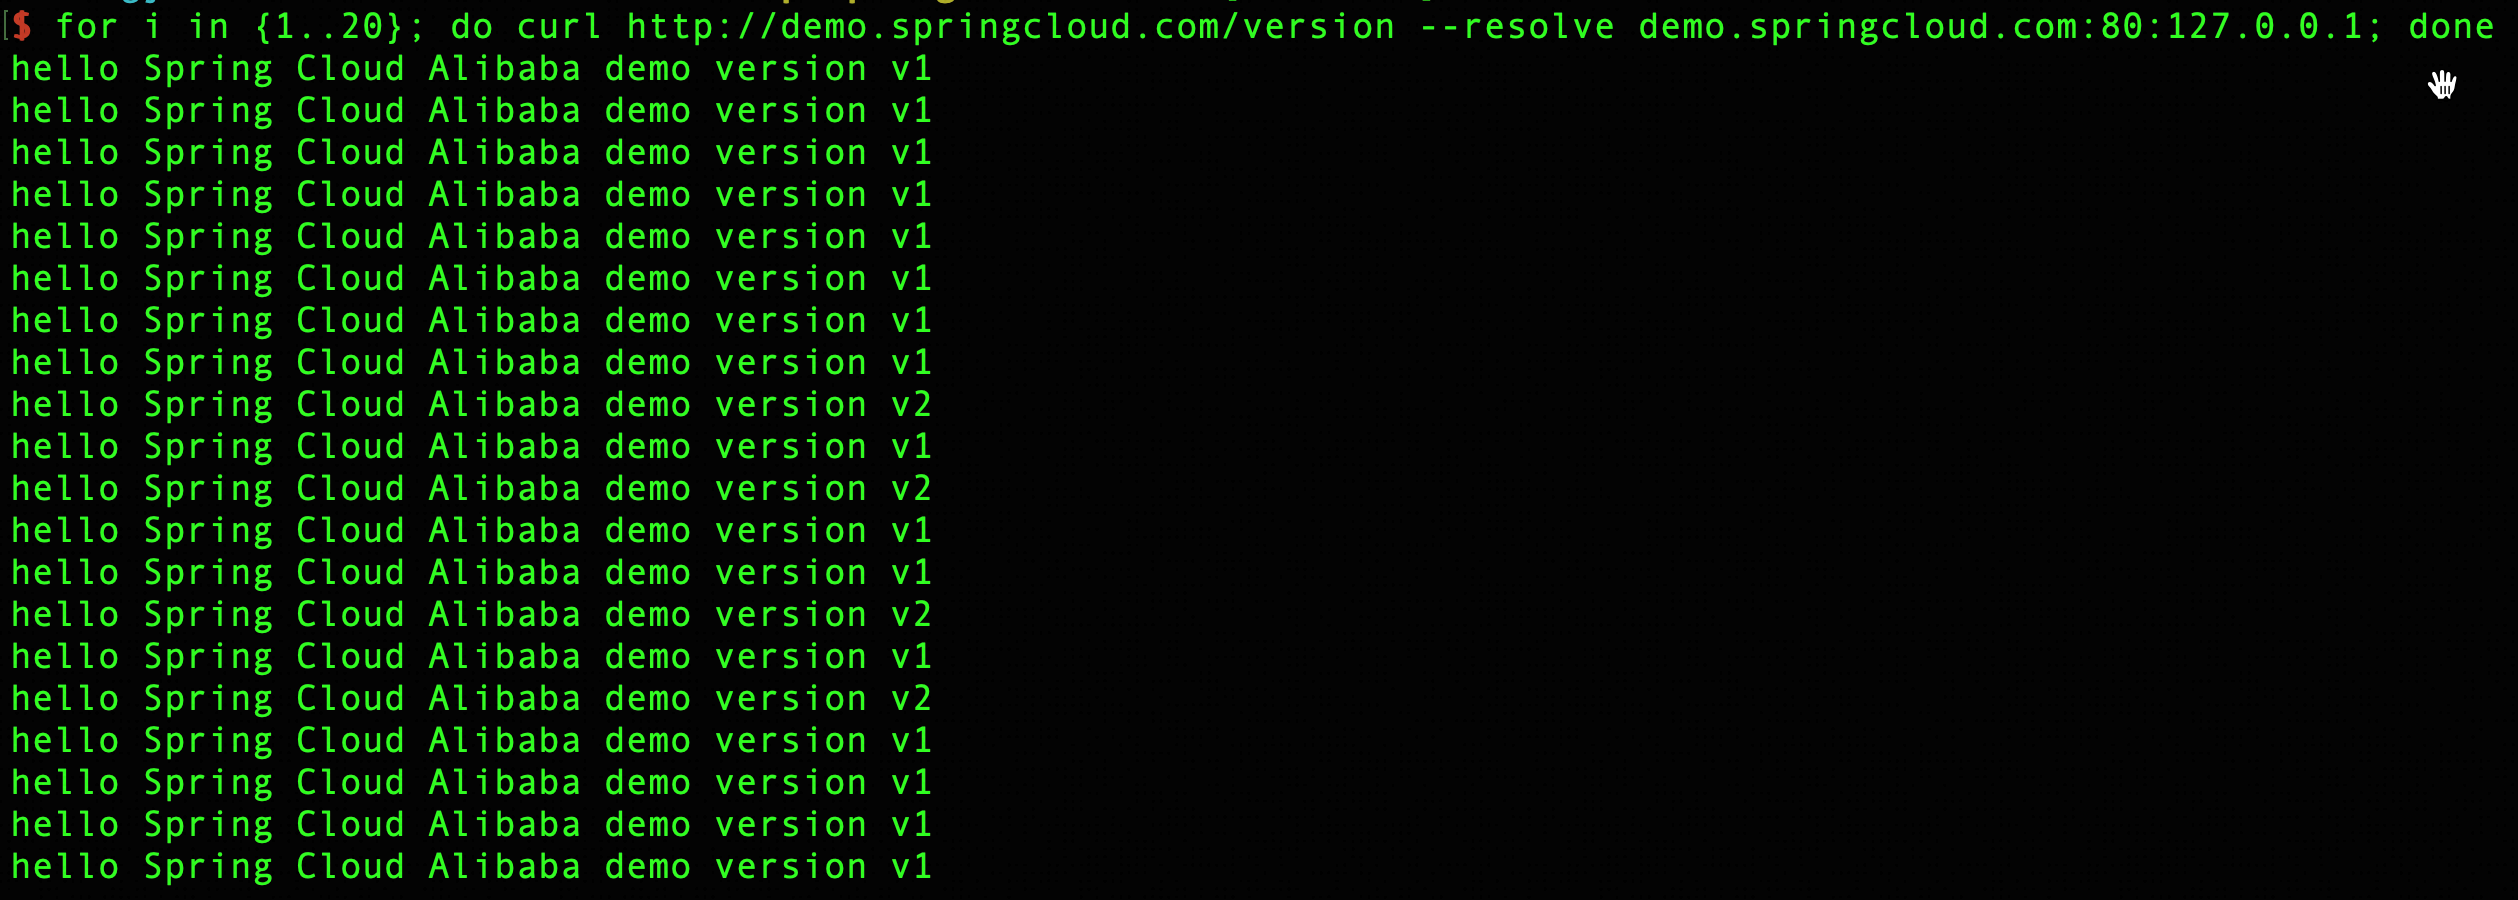
By sending 20 consecutive requests, you can observe that the ratio between v1 and v2 aligns with the configuration set in the ingress. As the canary release progresses, you can gradually increase the traffic ratio of the v2 applications, ultimately achieving a smooth launch of the new version.
A/B testing routes traffic to the new version of your service based on the metadata of user requests. It is a canary release strategy that controls routing based on request content. Only requests that meet specific criteria are directed to the new version. Common methods for routing include using HTTP headers and cookies. For example, you can specify that requests with a User-Agent value of Android can access the new version, while requests from other systems will still access the original version. Additionally, you can configure routing rules based on cookies that contain user data with business semantics. For instance, regular users can access the new version while VIP users continue to access the original version.


In this example, we use User-Agent in the HTTP header to distinguish the traffic and forward the traffic of the Android system to the v2 applications, while the traffic of other systems is still maintained in the v1 applications. First, modify the ingress resource named demo in 2.3, and change the higress. io/destination to v1, which means that all online traffic will be transferred to the original v1:
metadata:
  annotations:
    higress.io/destination: service-provider.DEFAULT-GROUP.public.nacos v1
After the new version is deployed, create an ingress route as shown in the following figure. Here, the regular matching mode is used. When the User-Agent contains Android systems, the request is forwarded to the v2 service.
kind: Ingress
metadata:
  annotations:
    higress.io/destination: service-provider.DEFAULT-GROUP.public.nacos v2
    higress.io/canary: "true"
    higress.io/canary-by-header: "User-Agent"
    higress.io/canary-by-header-pattern: ".*Android.*"
    higress.io/ignore-path-case: "false"
  labels:
    higress.io/domain_demo.springcloud.com: "true"
    higress.io/resource-definer: higress
  name: demo-ab
  namespace: higress-system
spec:
  ingressClassName: higress
  rules:
  - host: demo.springcloud.com
    http:
      paths:
      - backend:
          resource:
            apiGroup: networking.higress.io
            kind: McpBridge
            name: default
        path: /version
pathType: PrefixYou can see that requests from Android systems are forwarded to v2, and the rest of the systems still access v1.

Once the new version has been verified and is ready for full deployment, you simply need to modify the higress.io/destination annotation of the demo route to specify v2, and then delete the demo-ab route. By doing so, all traffic will be directed to v2.
A New Paradigm for Cloud-native Gateway Deployment | Higress 1.1 Supports Non-Kubernetes Deployment
Implementing Security Protection Capability in Cloud-Native Gateway

635 posts | 55 followers
FollowAlibaba Cloud Native Community - March 2, 2023
Alibaba Developer - January 20, 2022
Alibaba Cloud Community - March 9, 2022
Alibaba Clouder - April 8, 2020
Alibaba Cloud Native Community - February 2, 2024
Alibaba Cloud Native Community - September 18, 2023

635 posts | 55 followers
Follow Microservices Engine (MSE)
MSE provides a fully managed registration and configuration center, and gateway and microservices governance capabilities.
Learn More Container Service for Kubernetes
Alibaba Cloud Container Service for Kubernetes is a fully managed cloud container management service that supports native Kubernetes and integrates with other Alibaba Cloud products.
Learn More Managed Service for Prometheus
Multi-source metrics are aggregated to monitor the status of your business and services in real time.
Learn More ACK One
Provides a control plane to allow users to manage Kubernetes clusters that run based on different infrastructure resources
Learn MoreMore Posts by Alibaba Cloud Native Community