By Amit Maity, Alibaba Cloud Tech Share Author. Tech Share is Alibaba Cloud's incentive program to encourage the sharing of technical knowledge and best practices within the cloud community.
In this article, we will learn how to create a Windows-based Elastic Compute Service (ECS) instance to run .NET web apps with SQL Server.
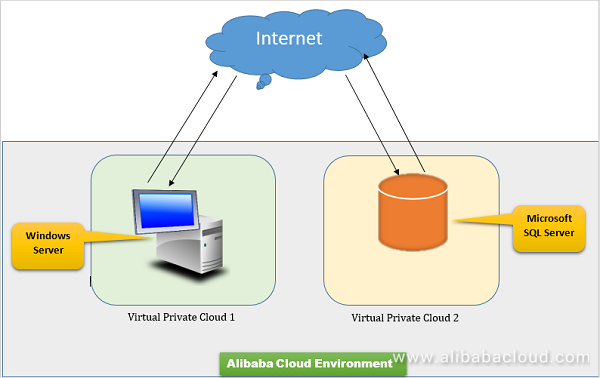
Below is the overall architecture of this sample solution. ASP.NET will be deployed into IIS server running in Windows Server 2008 with its own VPC network. A Microsoft SQL Server instance will be created in separate VPC network using ApsaraDB for RDS product. However, MS SQL Server will be exposed to public internet by applying internet address in Alibaba Cloud. This will allow ASP.NET application to access MS SQL server over public internet. ASP.NET web application will be accessed in Windows server 2008 machine by remotely logging into the server.
To follow this tutorial, you need to have an Alibaba Cloud account. You should also have basic knowledge on the following products or tools:
You'll be using one basic .NET application which was written by me for this tutorial. If you are familiar with .NET, you must be knowing that there can be several ways to connect to a database through C#. In this sample application, simple ADO.NET approach has been used. This is a student registration application that consists of 2 web pages and 2 application control file. 1 page to display registration form for entering the details of the student and next page to display the details of the student submitted in the first page.
Student registration web page is designed as "Web Form with Master Page" Visual Studio component and it is a simple student registration form with 6 text fields with 1 submit button as shown below,
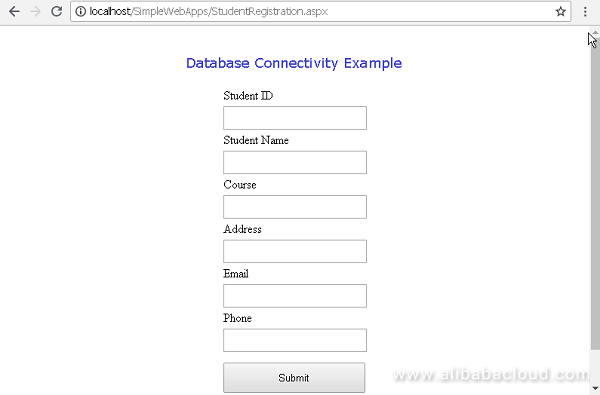
Each text input field is displayed using the asp "TextBox" tag,
<tr><td>Student ID</td></tr>
 <tr><td>
   <asp:TextBox ID="txtId" runat="server" CssClass="txtStyle"></asp:TextBox>
 </td></tr>
The runat="server" attribute is used for information web server that it is a server control (rather than static HTML)
Once you click "Submit" in the student registration web form, btnSubmit_Click function receives the form's contents and send them to SQL server database using INSERT statement. SQL Server connection is established is using below connection string,
SqlConnection con = new SqlConnection(@"Data Source=rm-6gjt0i37hchv8r98ono.mssql.ap-south-1.rds.aliyuncs.com,3433;Initial Catalog=mydb;User ID=testuser;Password=Testuser1234");SQL Server INSERT command is prepared as follows using the values entered into each of the form's text fields. Here each of the text fields is referenced using the TextBox ID attribute values
SqlCommand cmd = new SqlCommand("INSERT into student values('" + txtId.Text.ToString() + "','" + txtName.Text.ToString() + "','" + txtCourse.Text.ToString() + "','" + txtAddress.Text.ToString() + "','" + txtEmail.Text.ToString() + "','" + txtPhone.Text.ToString() + "')", con);Above command is then executed using ExecuteNonQuery function to insert the values into STUDENT table.
int numberRows = cmd.ExecuteNonQuery();Once record is inserted into table, it'll redirect to another web page record.aspx to display the registration details of the student after selecting from STUDENT table and clear the student registration form.
clearRecord();

Response.Redirect("record.aspx");This code is to display the student registration details in grid view. The ASP.NET page framework supports an automatic way to associate page events and methods. AutoEventWireup attribute of the Page directive is set to true to call page events specifically Page_Init and Page_Load methods in record.aspx.cs code file. This code also inherits record class which is defined in record.aspx.cs file.
<%@ Page Language="C#" AutoEventWireup="true" CodeFile="record.aspx.cs" Inherits="record" %>GridView control displays data in tabular form. Data source to the GridView is directly assigned using ID attribute value in record.aspx.cs. Data from datasource is rendered in separate columns, in the order it occurs in the data source. By default, the field names appear in the grid's column headers, and values are rendered in text labels.
<asp:GridView ID="recordgridview" runat="server" HorizontalAlign="Center">
</asp:GridView> When record.aspx page is accessed in browser, Page_Load function is called. This function connects to database, fetch records from STUDENT table and pass the records to record.aspx to display in grid view. This is a two-step process.
First, define new data set and populates with data from student table.
        string s = "select * from student";
  SqlDataAdapter da = new SqlDataAdapter(s, con);
        DataSet ds = new DataSet();
        da.Fill(ds);
Second, associate the data set with grid view data source and bind the columns.
        recordgridview.DataSource = ds;
recordgridview.DataBind();Create MS SQL Server instance using "ApsaraDB for RDS". Choose DB Engine option as Microsoft SQL Server. After creating instance, status of the instance will be in "Creating". Please wait until the status changed to "Running". This may take a few minutes.
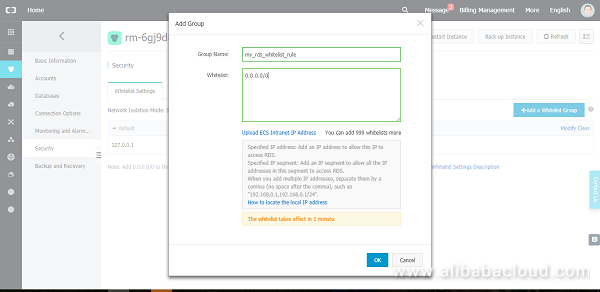
Set Whitelist of the instance to allow any remote machine (For this case, windows server) to access this RDS instance. Use CIDR range 0.0.0.0/0 to grant remote access to any IP.
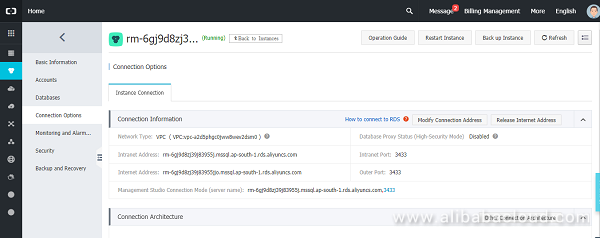
In connection option, apply for internet address. This will assign public/external hostname to RDS instance so that any machine can access this instance over internet. Use internet address and port number as connection string in web application.
Create a new database in MS SQL server instance.
Create superuser account and standard db user account for this database. Standard db user account will be used in the application for connecting to database. If standard db user creation option is not available, then close and reopen the SQL server instance configuration page. Also, authorise standard db user account with "Owner" privilege.
Setup firewall rule in ECS, Security Groups to open 3433 sql server port.
Download and install HeidiSQL tool to connect to MS SQL database using host name, port number, database name, db standard user and password.
For example,
Hostname: rm-6gj9d8zj39j83955jjo.mssql.ap-south-1.rds.aliyuncs.com
Port number: 3433
Database Name: <New database name>
DB User: <Database standard user account name>
DB User Password: <Password>
Run below command in HeidiSQL tool to create the sample table in sql databse.
create table student(student_id varchar(50),student_name varchar(50),course varchar(50),address varchar(50),email varchar(50),phone varchar(50))Create a Windows Server ECS instance. Preferably select minimum 2 GB memory for better performance of windows server. You can set this up yourself, but I have chosen a marketplace image of Windows with ASP.NET stack for easier setup of ASP.NET environment in new window server.
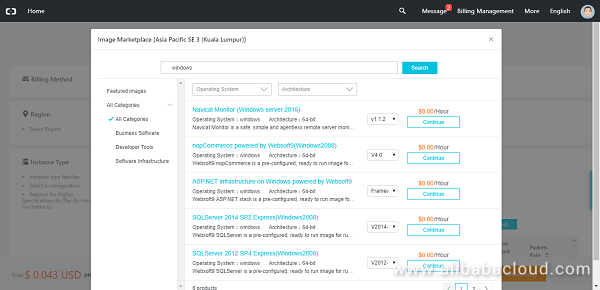
Once instance is started, open instance by clicking on instance name and click "Connect" button to open VNC terminal for remotely connecting to Windows server.
After logging into windows, download and install following software,
Unzip the downloaded folder. Open the below 2 files from SimpleASP.NetWebAppsPackage folder to modify the connection strings and overwrite both the files after updating the connection string.
SqlConnection con = new SqlConnection(@"Data Source=rm-6gjt0i37hchv8r98ono.mssql.ap-south-1.rds.aliyuncs.com,3433;Initial Catalog=mydb;User ID=testuser;Password=Testuser1234");Zip the folder SimpleASP.NetWebAppsPackage. Open IIS Manager and navigate to Default Web Site.
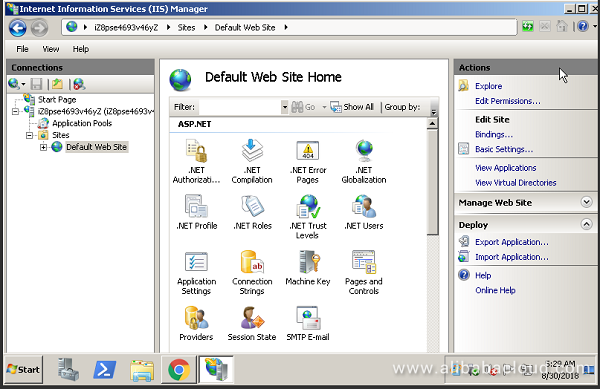
Click Import Application link in Deploy section and import the zipped file prepared in previous step. Finish the application install in IIS manager.
After successful installation, you'll be able to see new application SimpleWebApps under Default Web Site
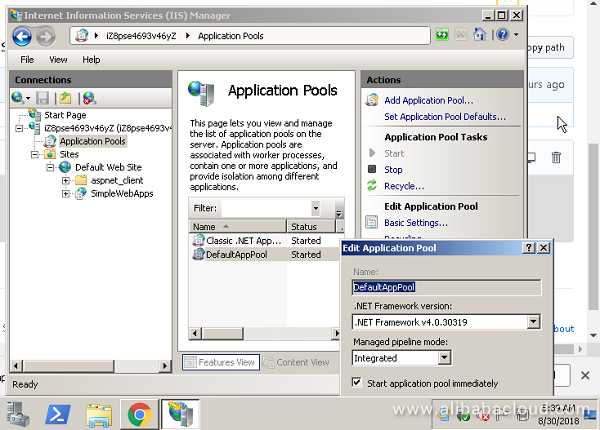
Now open the application in web browser using url as http://localhost/SimpleWebApps/StudentRegistration.aspx

Enter the student details and click on "Submit"
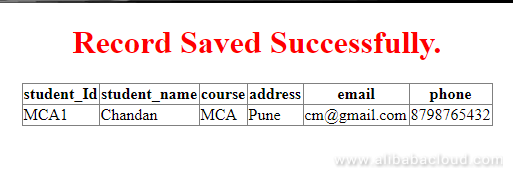
Once submitted, application will open next page displaying the details entered in previous web page.
Here are some of the tips to avoid common issues you may face in completing this tutorial.

Simplifying Marketing with AI: Introducing Alimama's New Ad Tech
How Alibaba Cloud Helped Tmall Expand the Double 11 Shopping Festival for the Past 10 Years

2,593 posts | 791 followers
FollowAlibaba Clouder - September 3, 2018
Alibaba Clouder - March 6, 2019
Alibaba Clouder - September 16, 2019
Alibaba Clouder - August 17, 2020
Alibaba Clouder - September 16, 2019
Alibaba Cloud Project Hub - April 13, 2022

2,593 posts | 791 followers
Follow ECS(Elastic Compute Service)
Elastic and secure virtual cloud servers to cater all your cloud hosting needs.
Learn More Simple Application Server
Cloud-based and lightweight servers that are easy to set up and manage
Learn More ApsaraDB RDS for SQL Server
An on-demand database hosting service for SQL Server with automated monitoring, backup and disaster recovery capabilities
Learn MoreMore Posts by Alibaba Clouder
Dikky Ryan Pratama June 23, 2023 at 8:47 am
awesome!