Once you have registered your Alibaba Cloud account and completed your account and payment information, you are ready to claim free trials of our products (such as ECS, PolarDB, and other services). You can claim all the benefits on Alibaba Cloud Free Trial Center.
If you already have existing instances that reside in the same region and the same VPC, please skip this chapter.
1. On Alibaba Cloud Free Trial Center, find ECS and click Try Now >
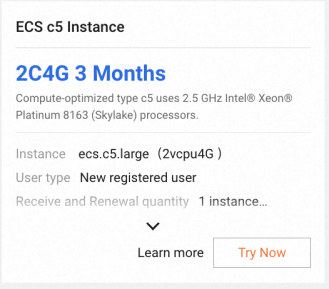
2. Choose a region to deploy the new ECS instance, select the OS type (such as CentOS 7.8 x64), and complete all configurations of the free trial order:
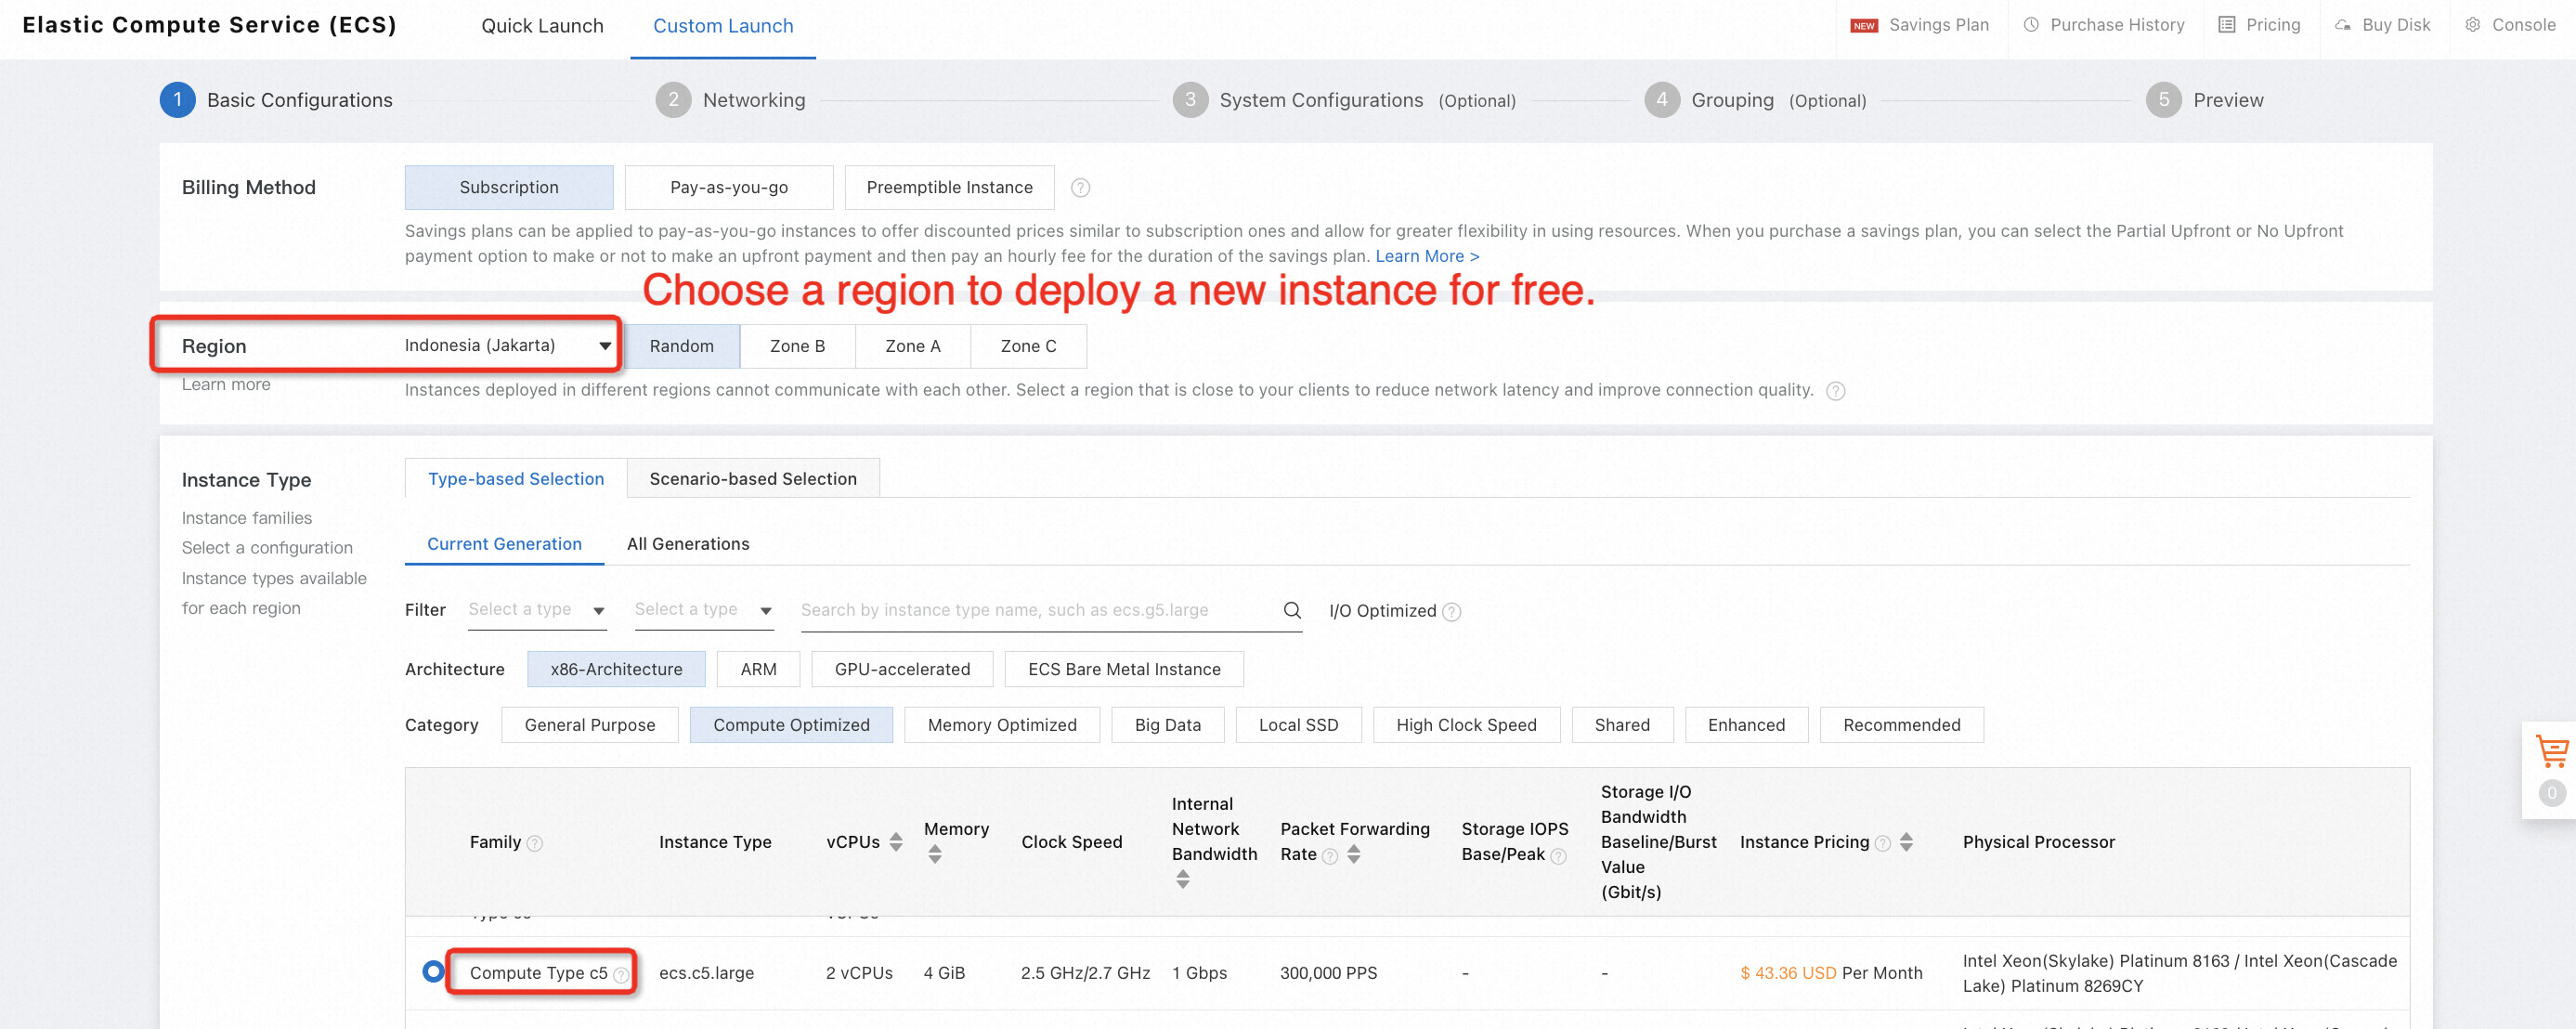
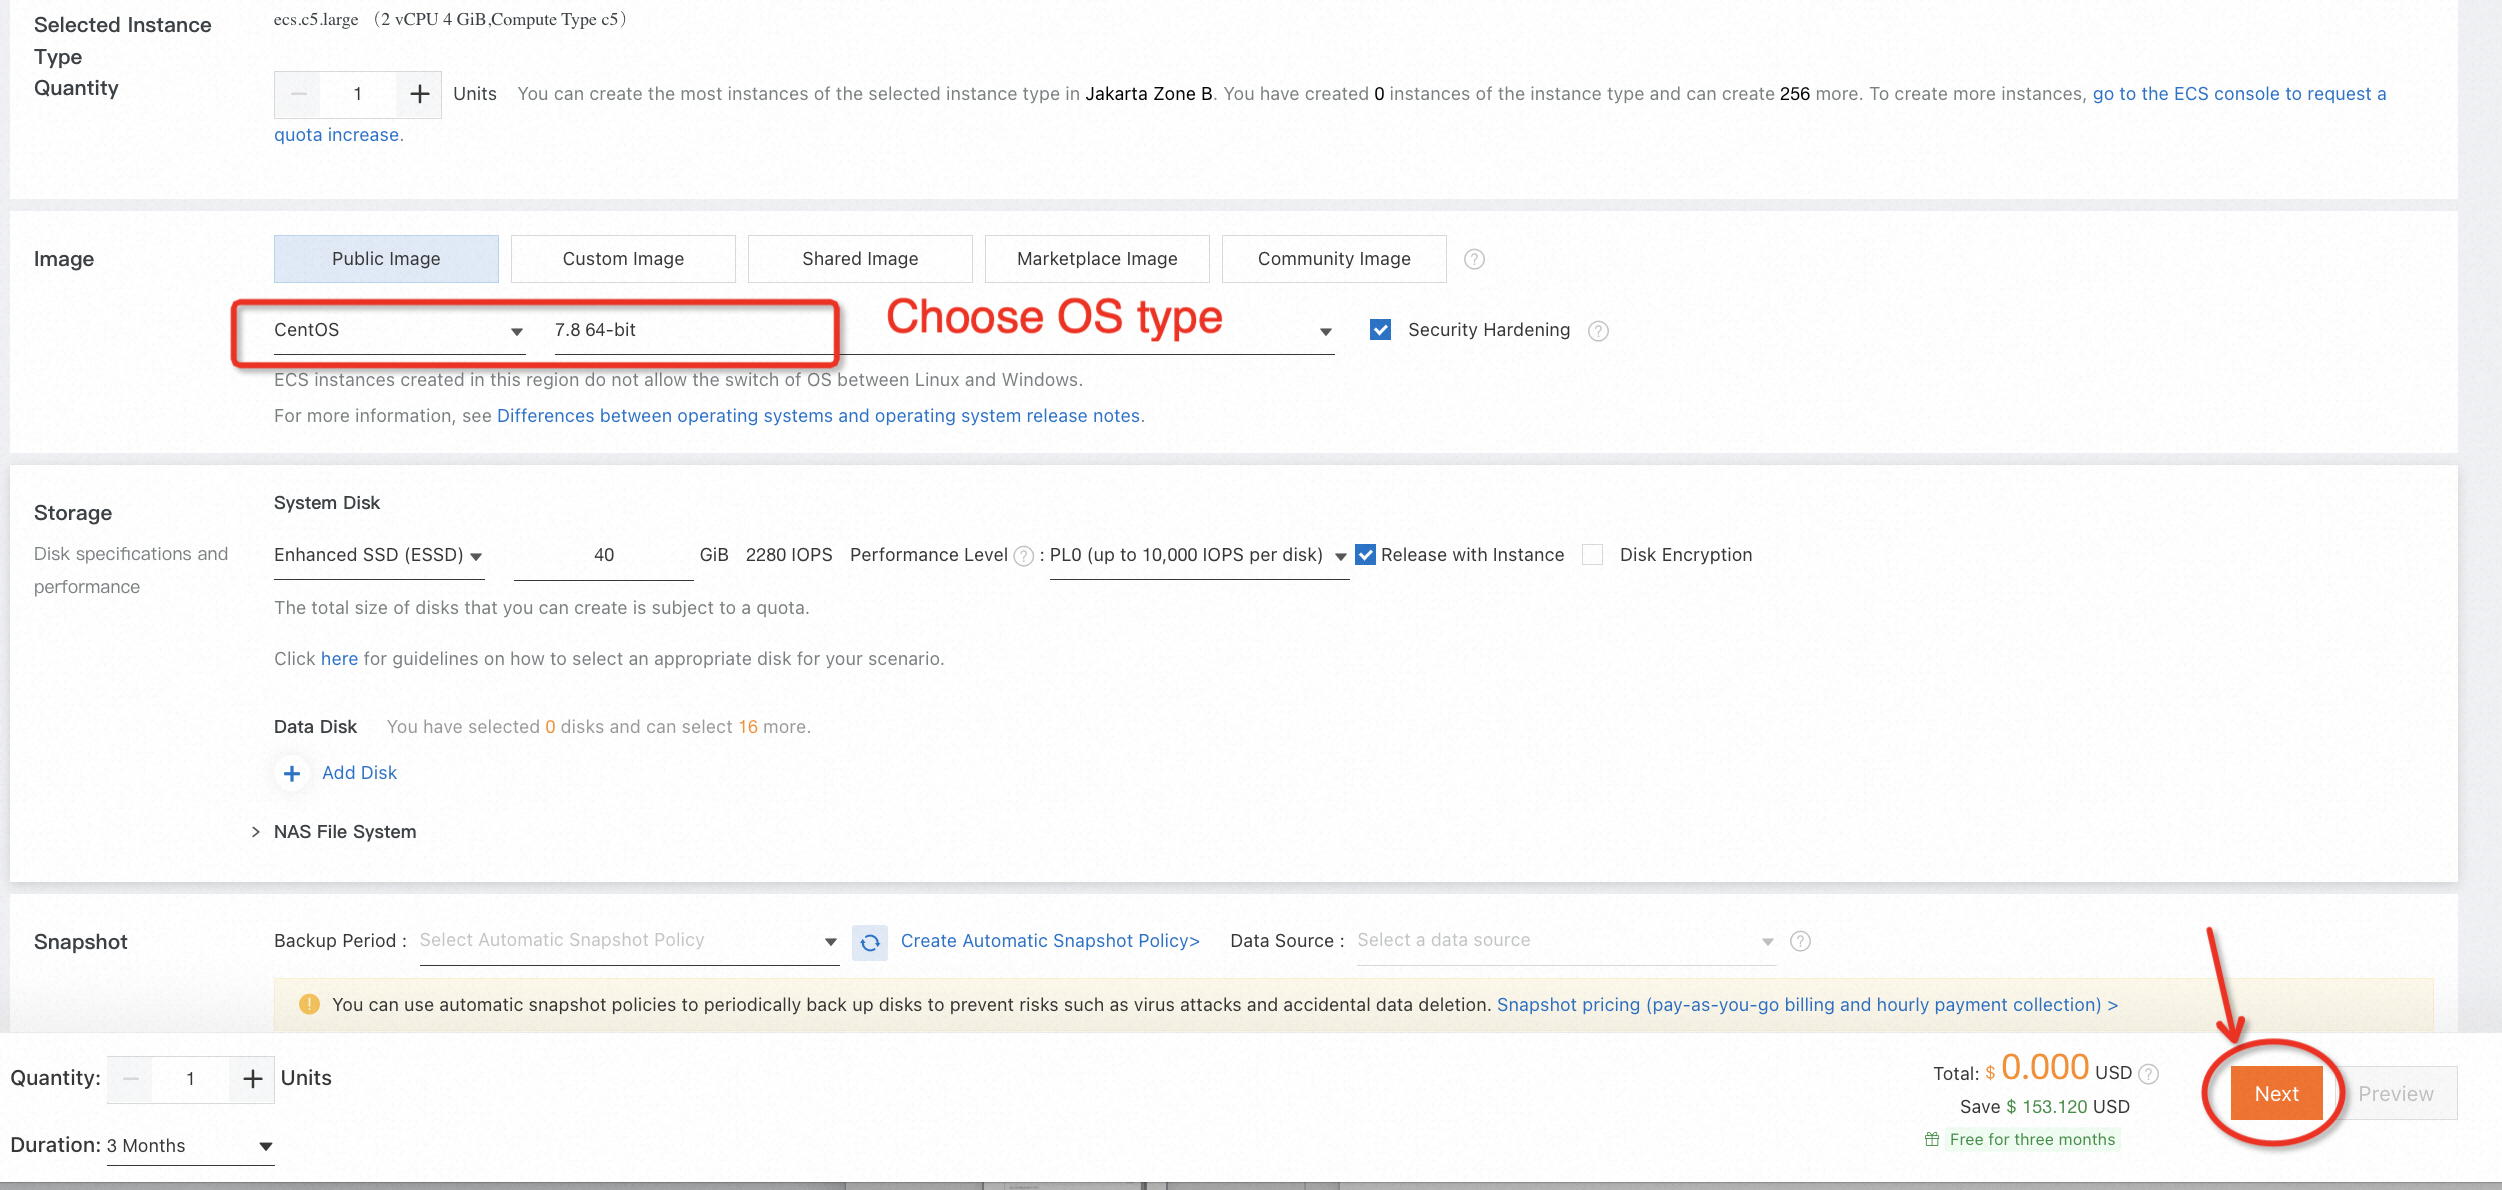
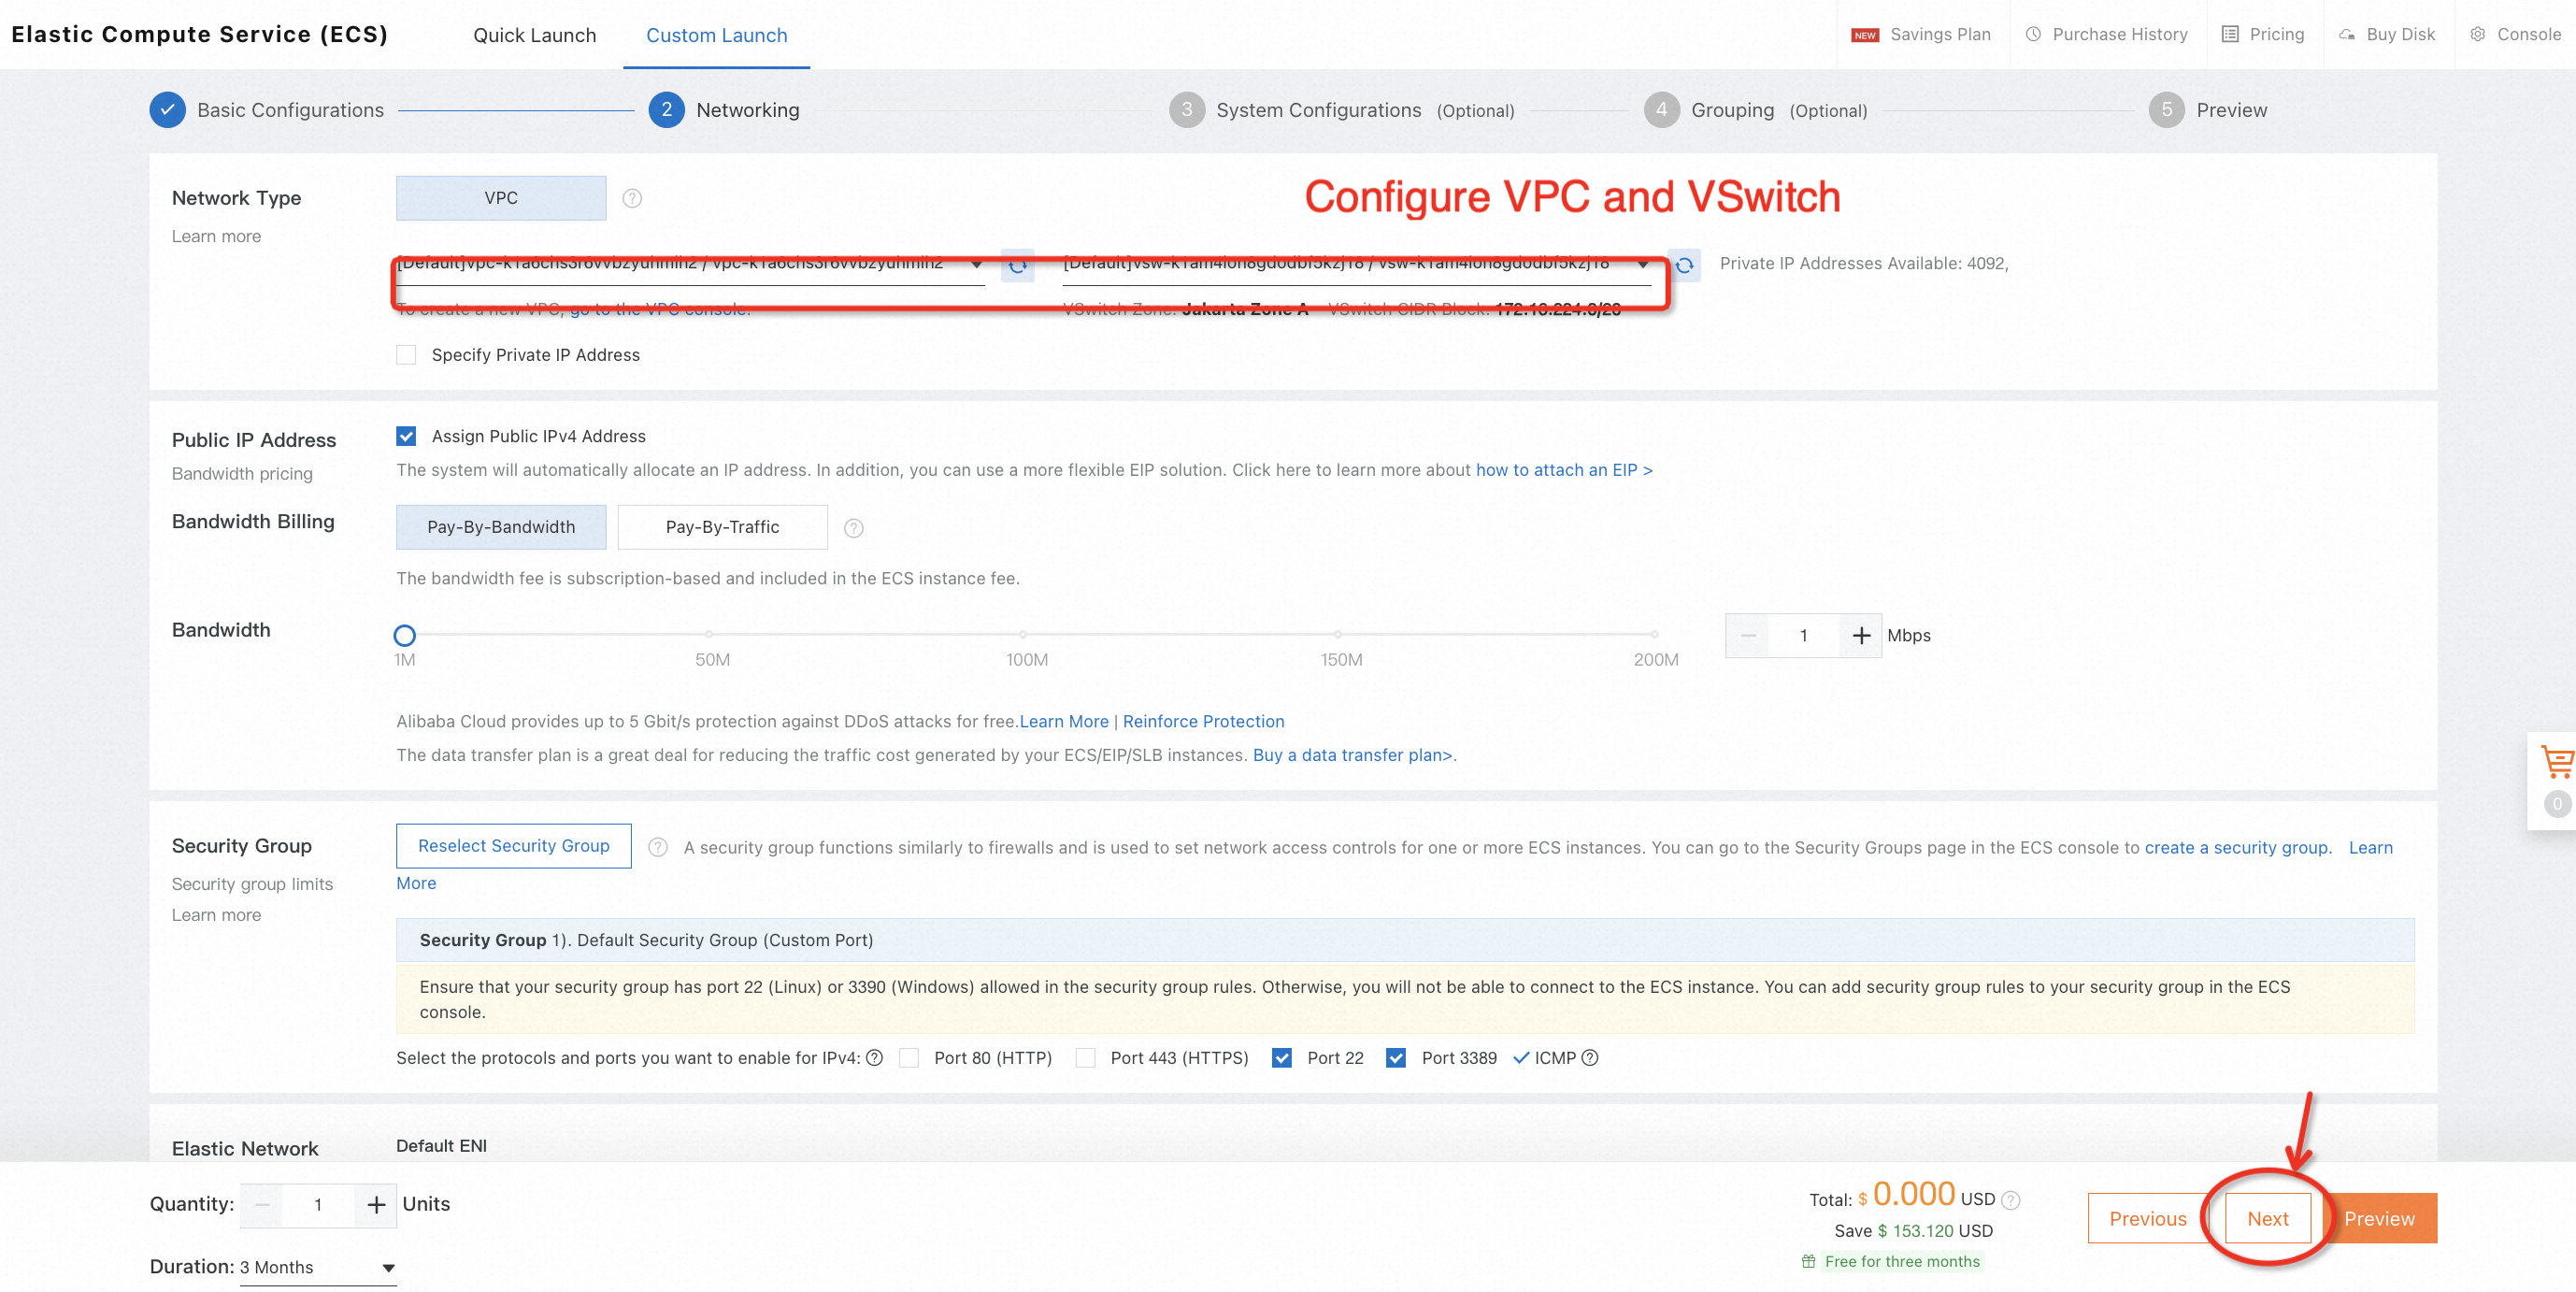
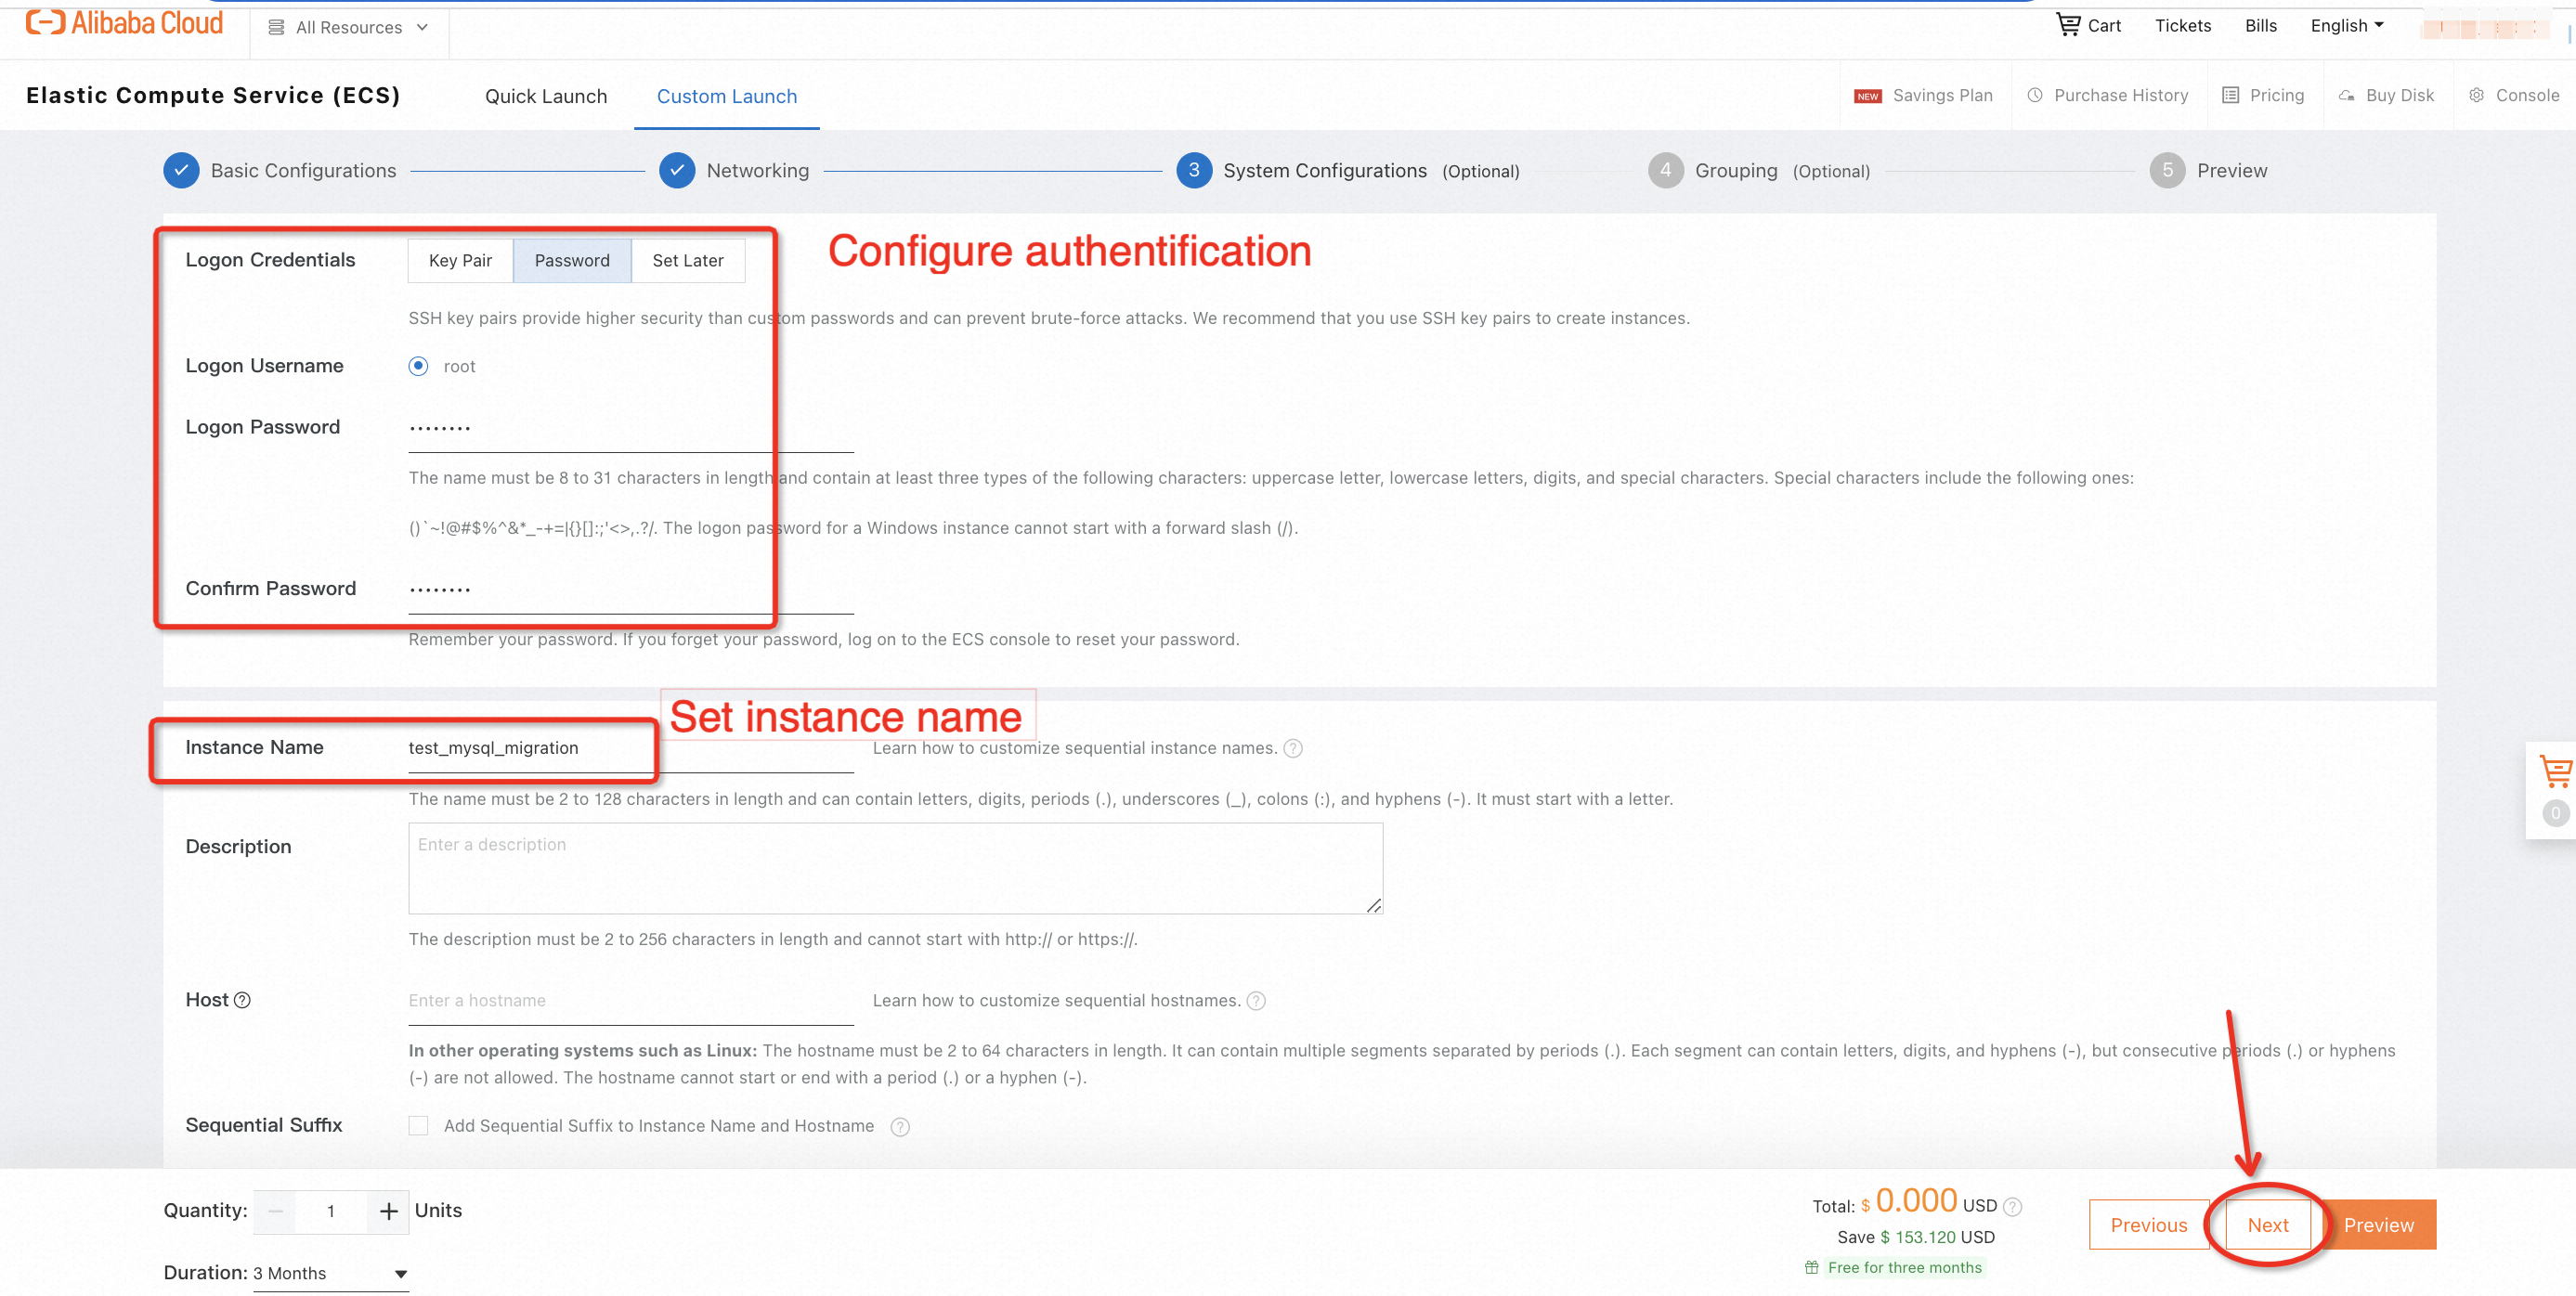
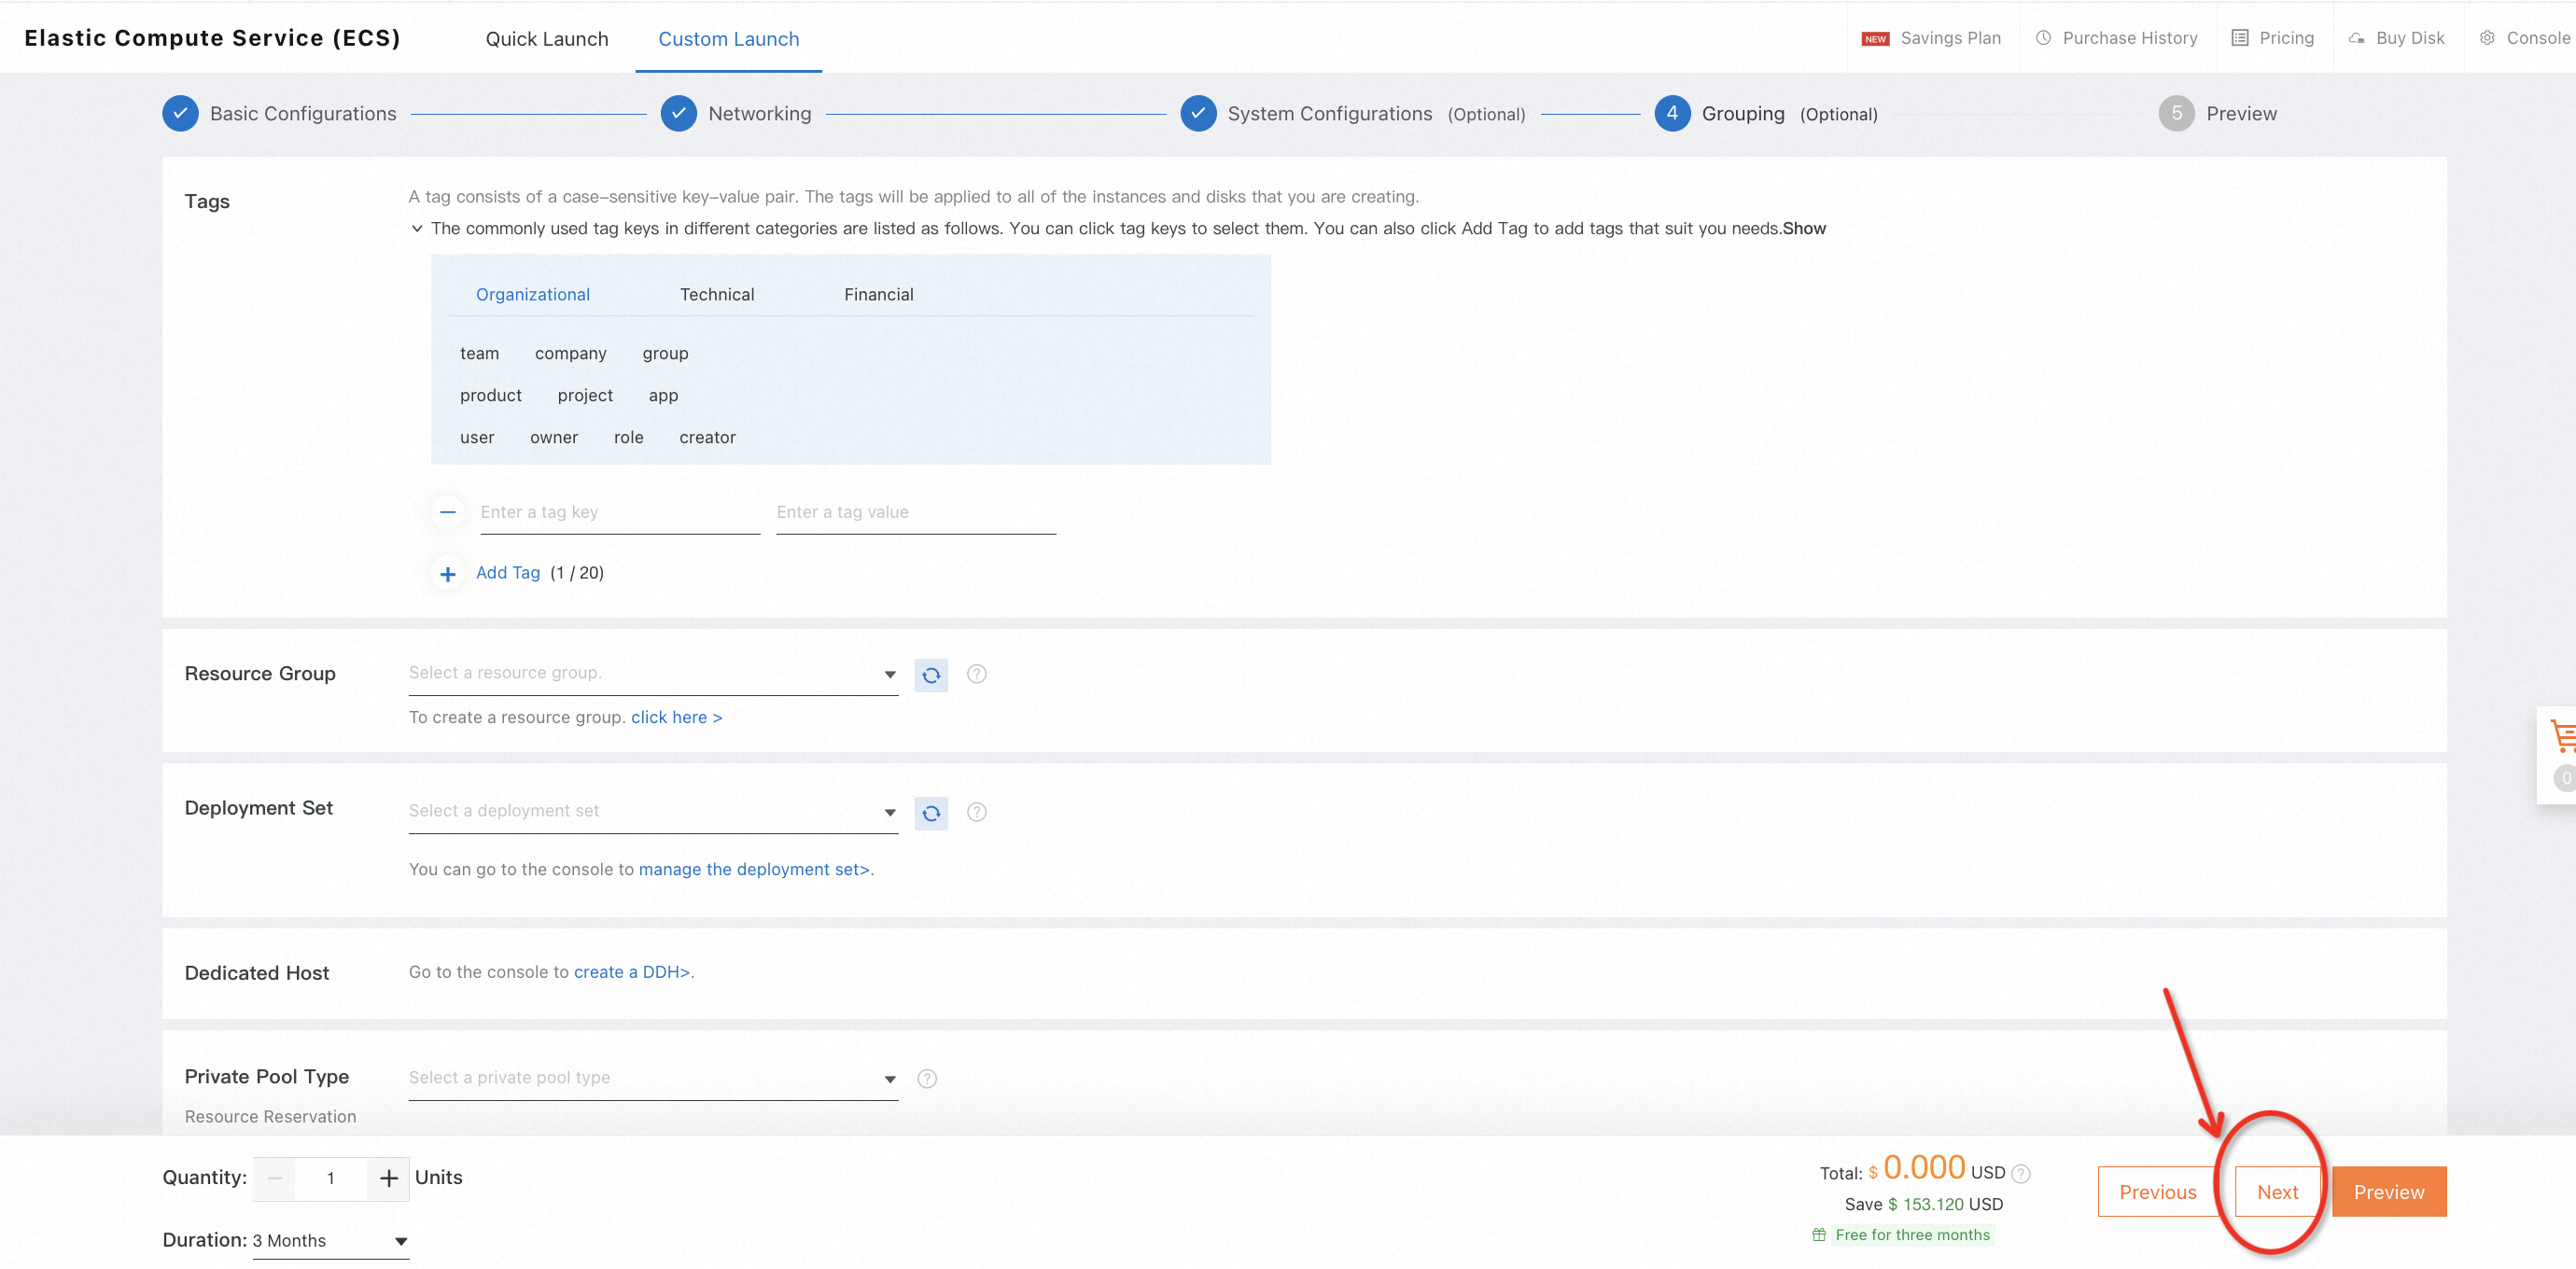
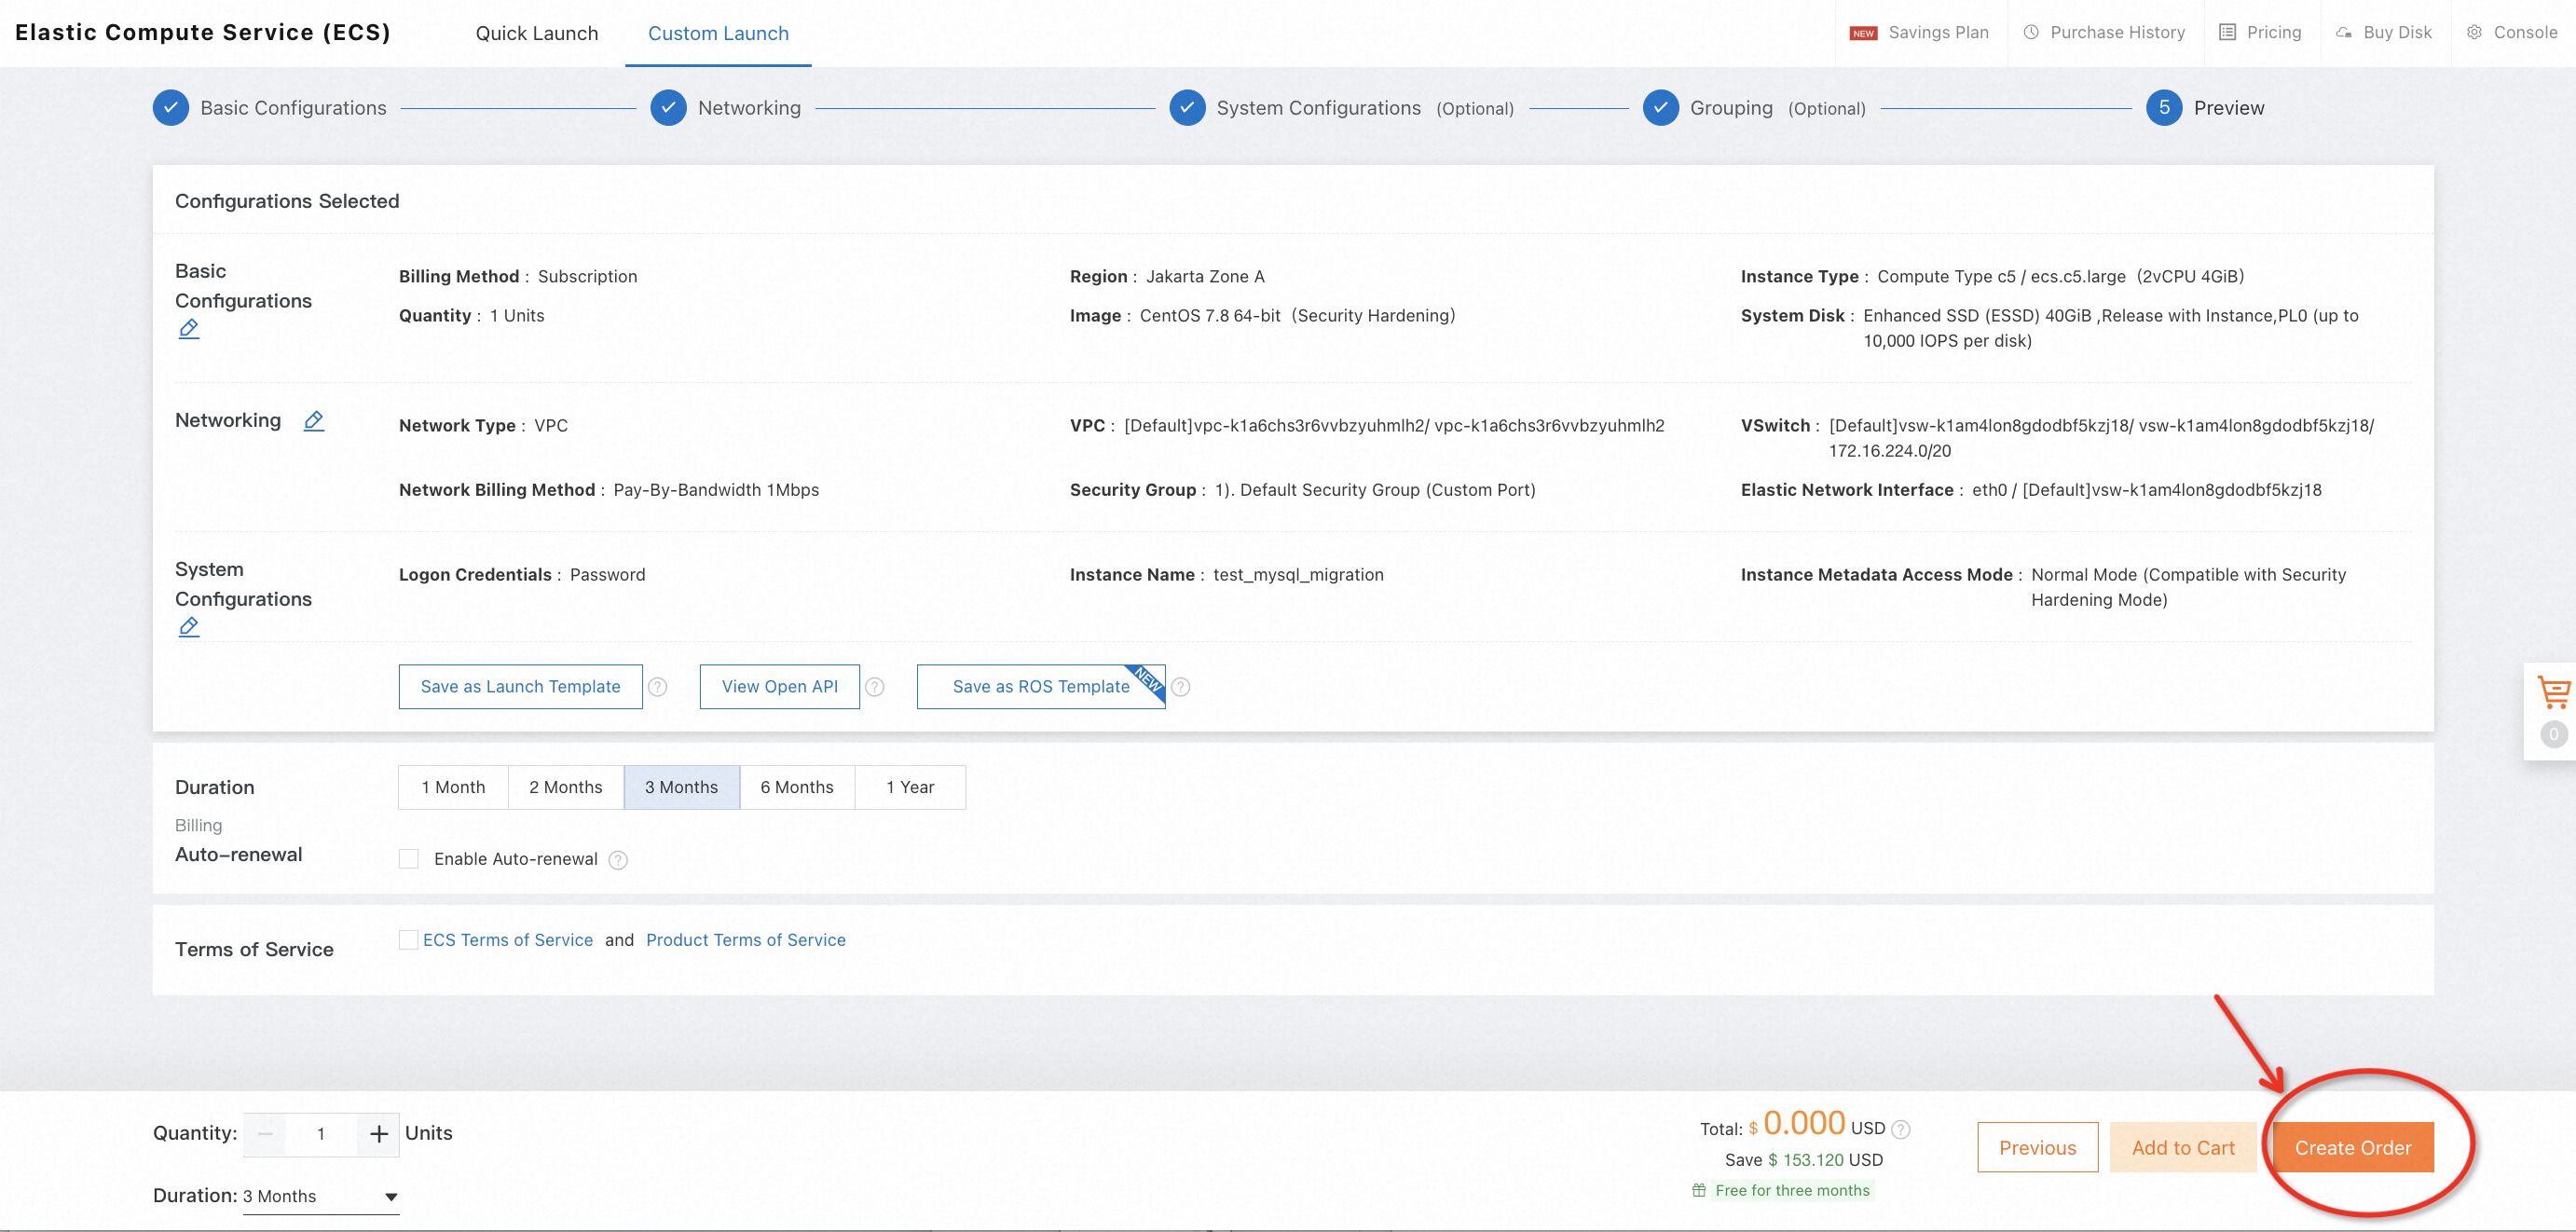
3. Wait for a while and check the status of the instance you just launched. You can also customize the name of the instance when its status becomes Running.

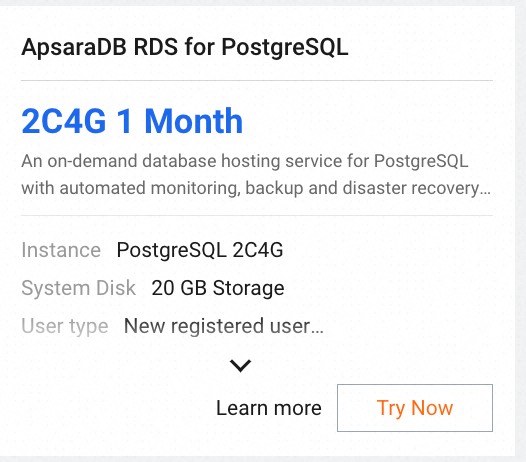
1. On Alibaba Cloud Free Trial Center, find ApsarDB RDS for PostgreSQL and click Try Now >
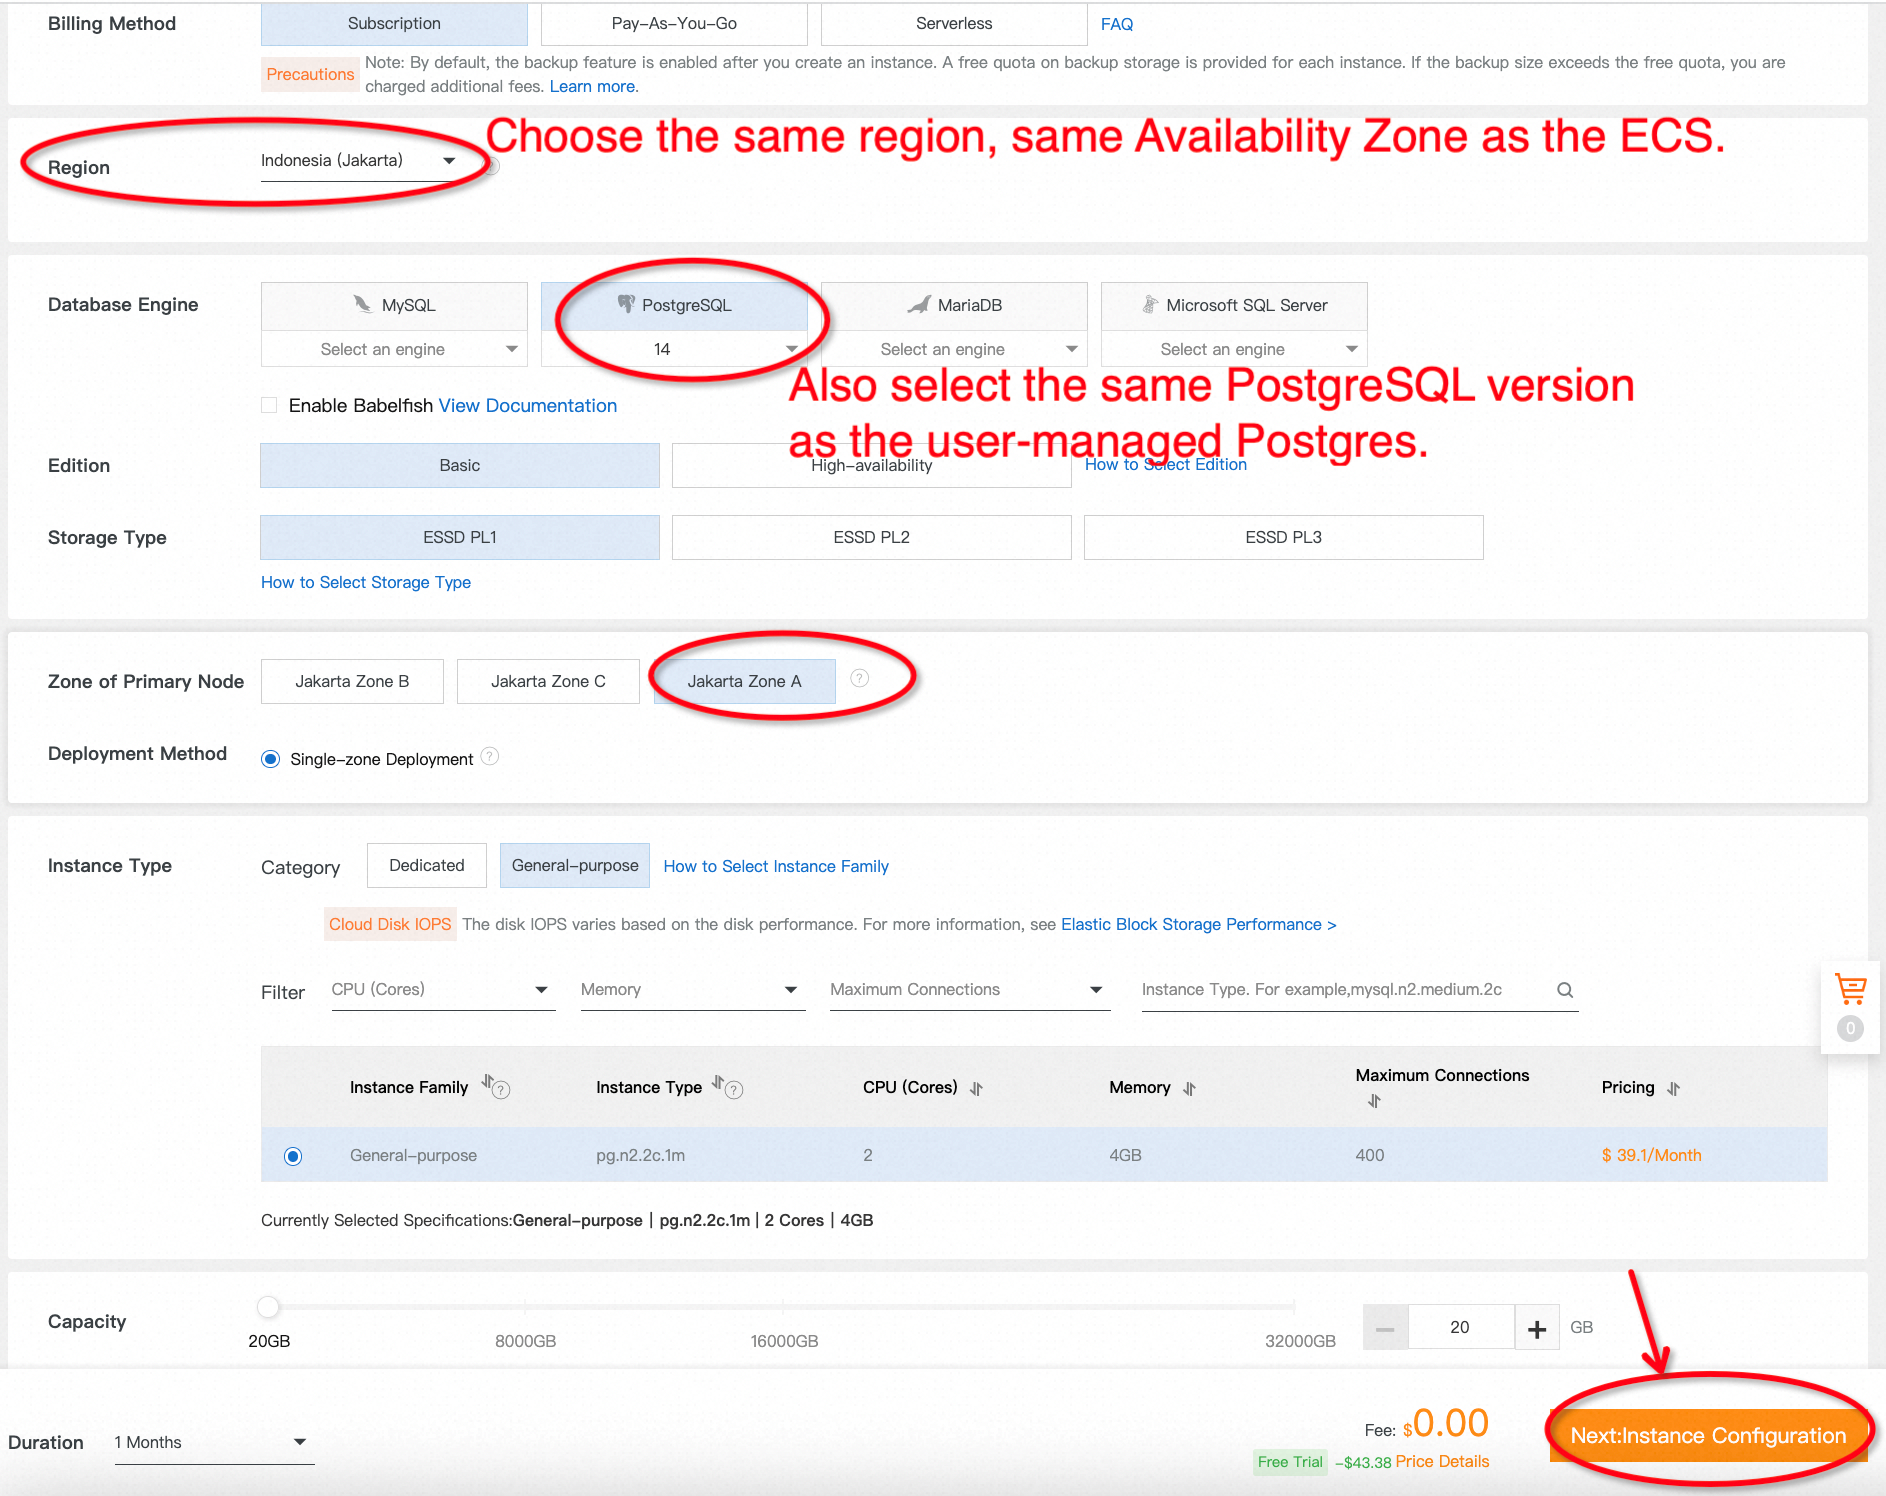
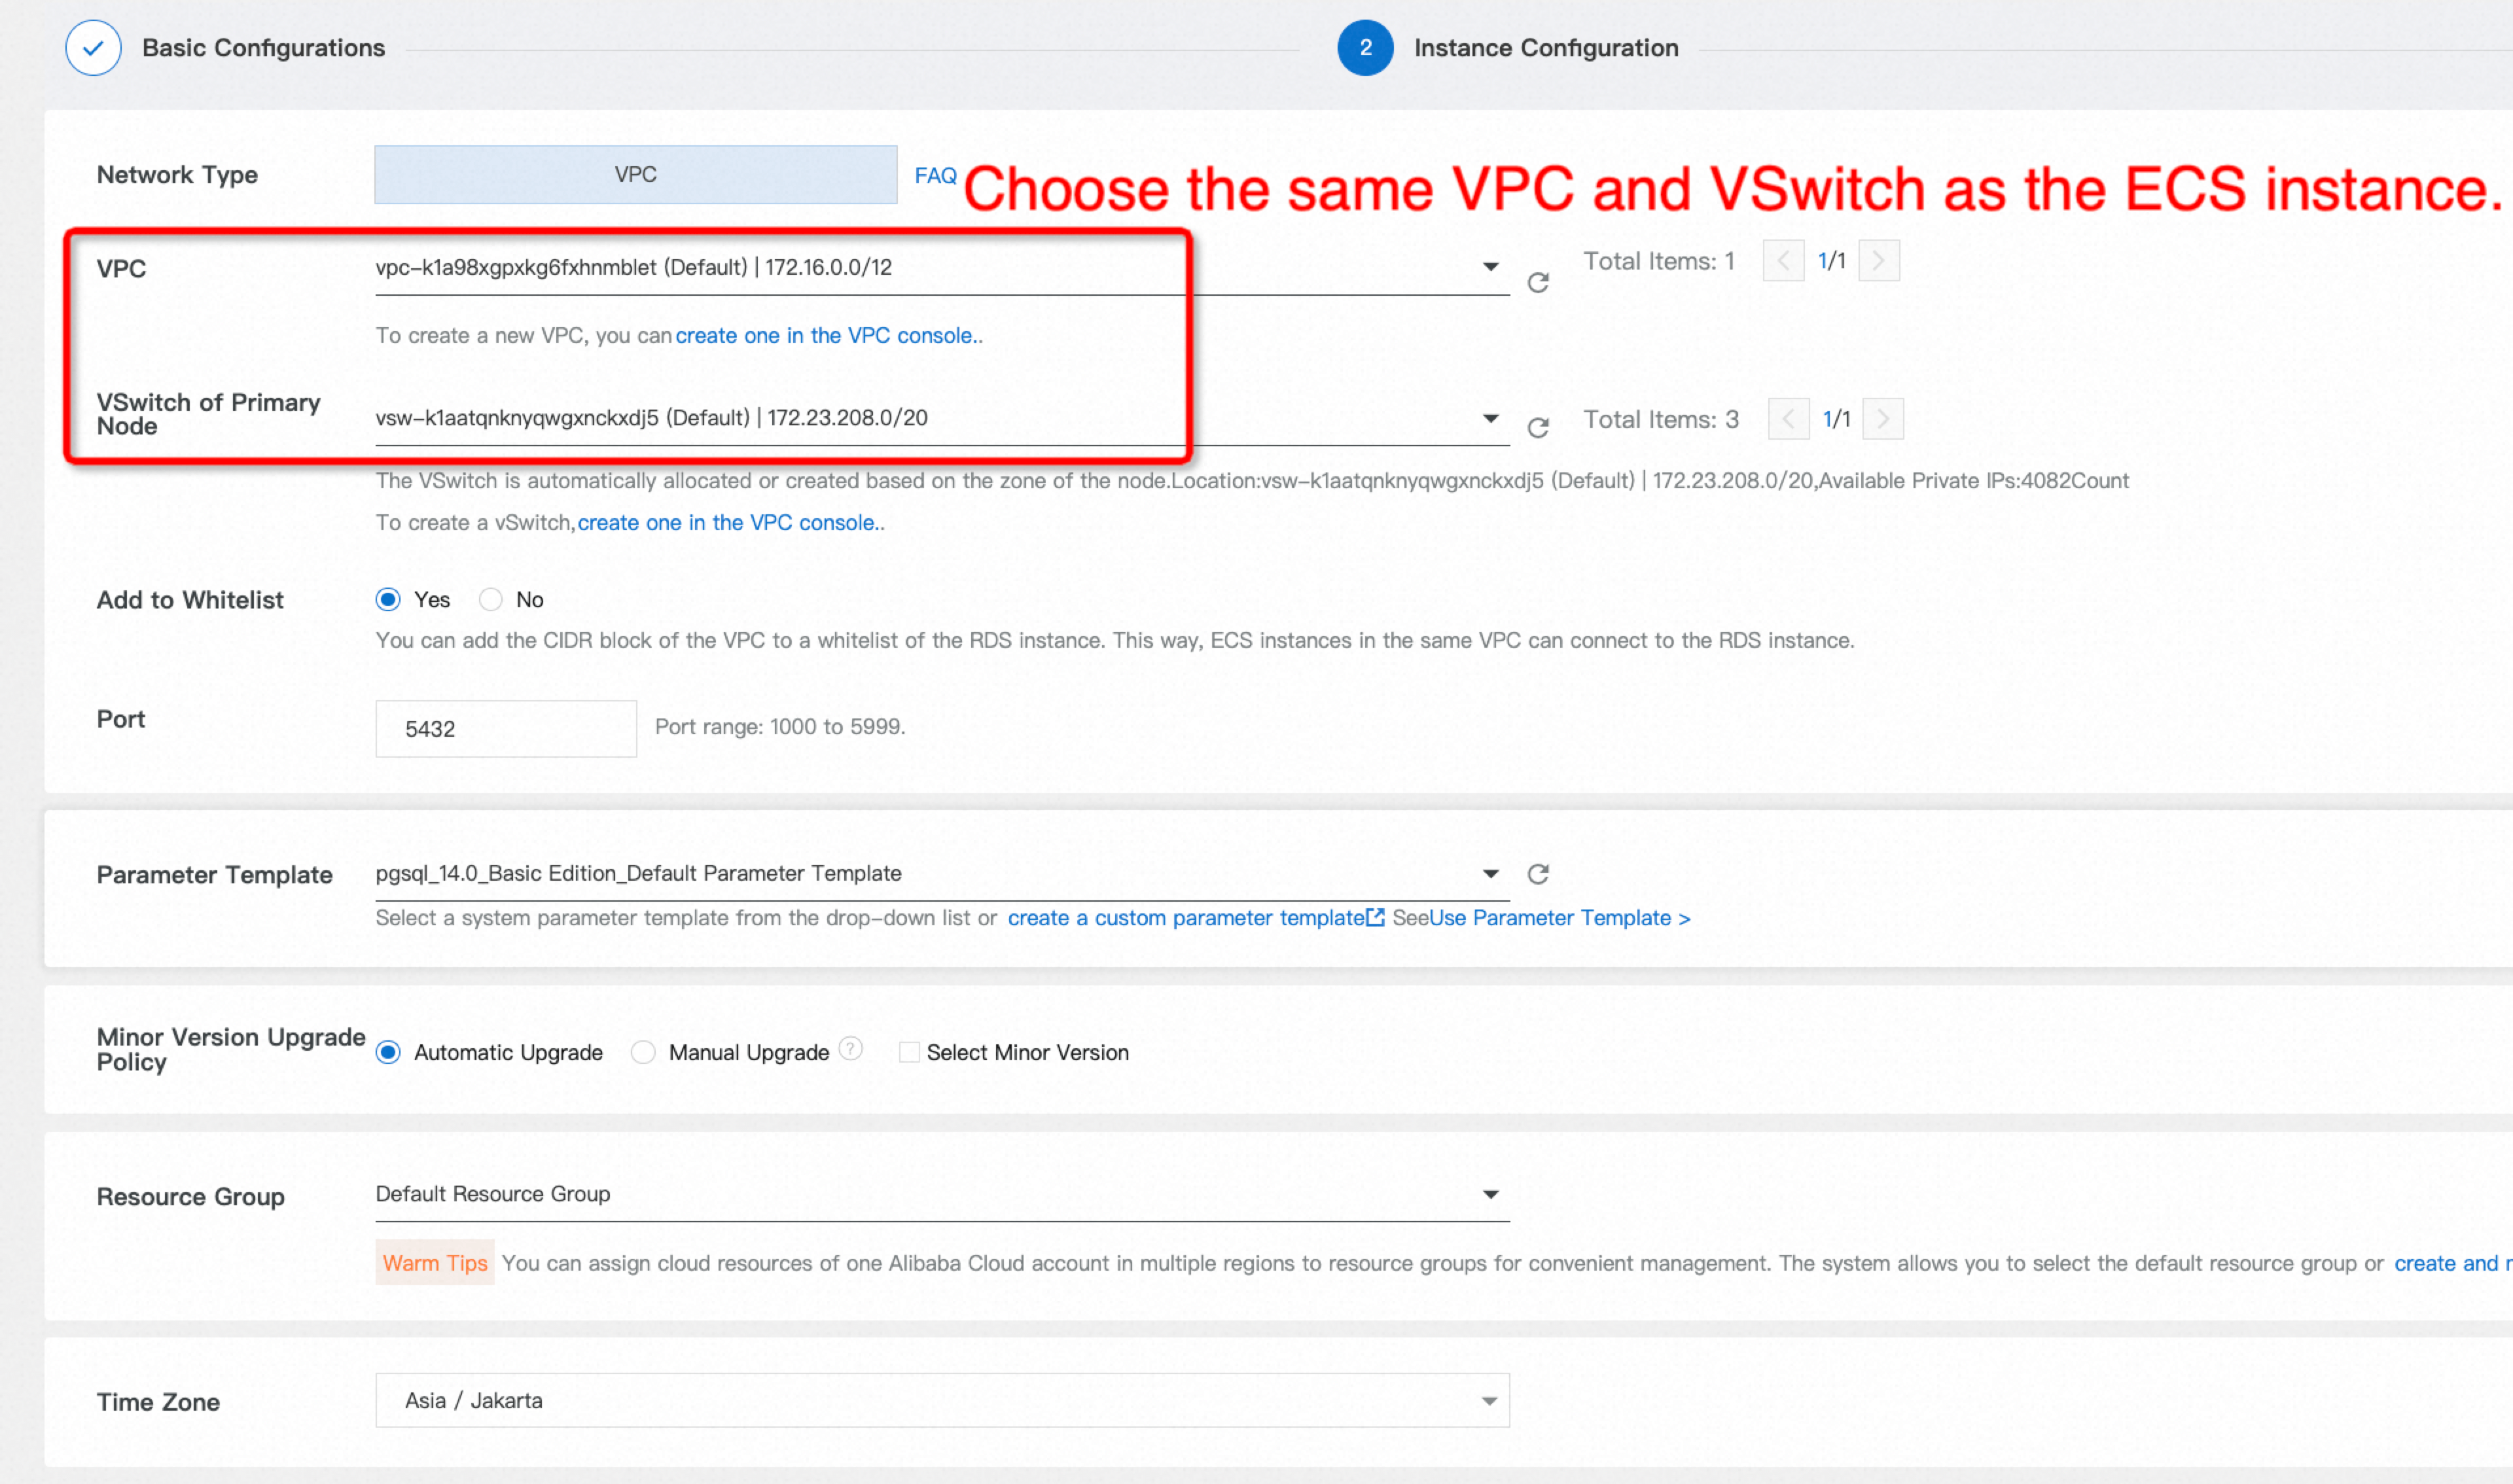
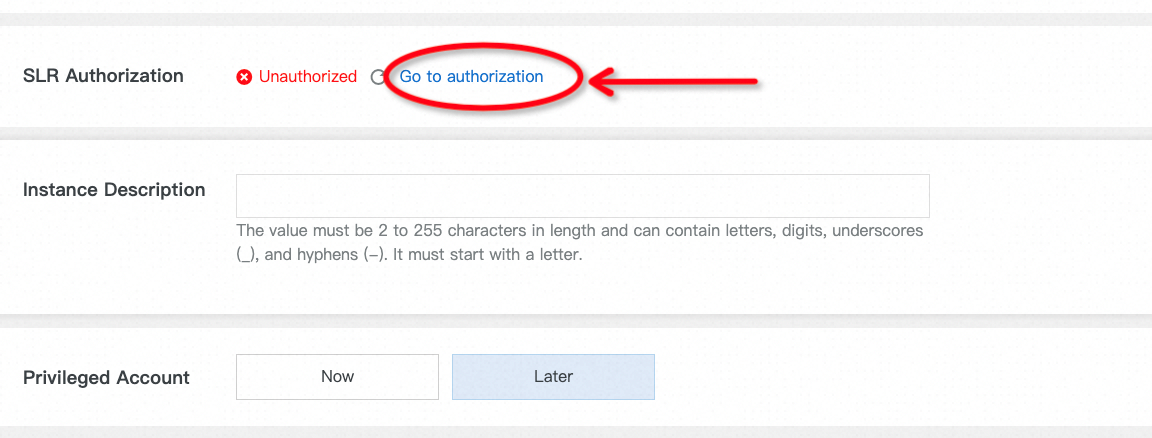
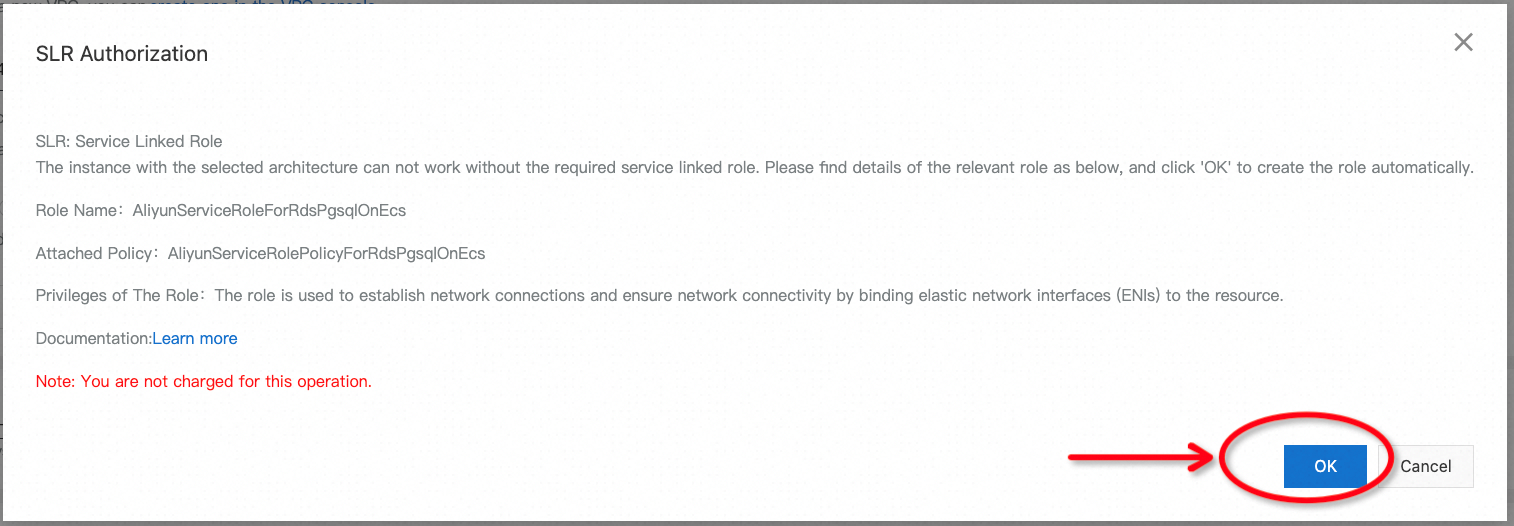
2. Choose a region to deploy your RDS instance and complete all configurations of the free trial order. Please note: It's required to select the same region, the same Availability Zone (AZ), and the same VPC and VSwitch as your ECS instance. You may need to complete the SLR authorization during the process. Please take a look at the screenshots below for reference if you get stuck.
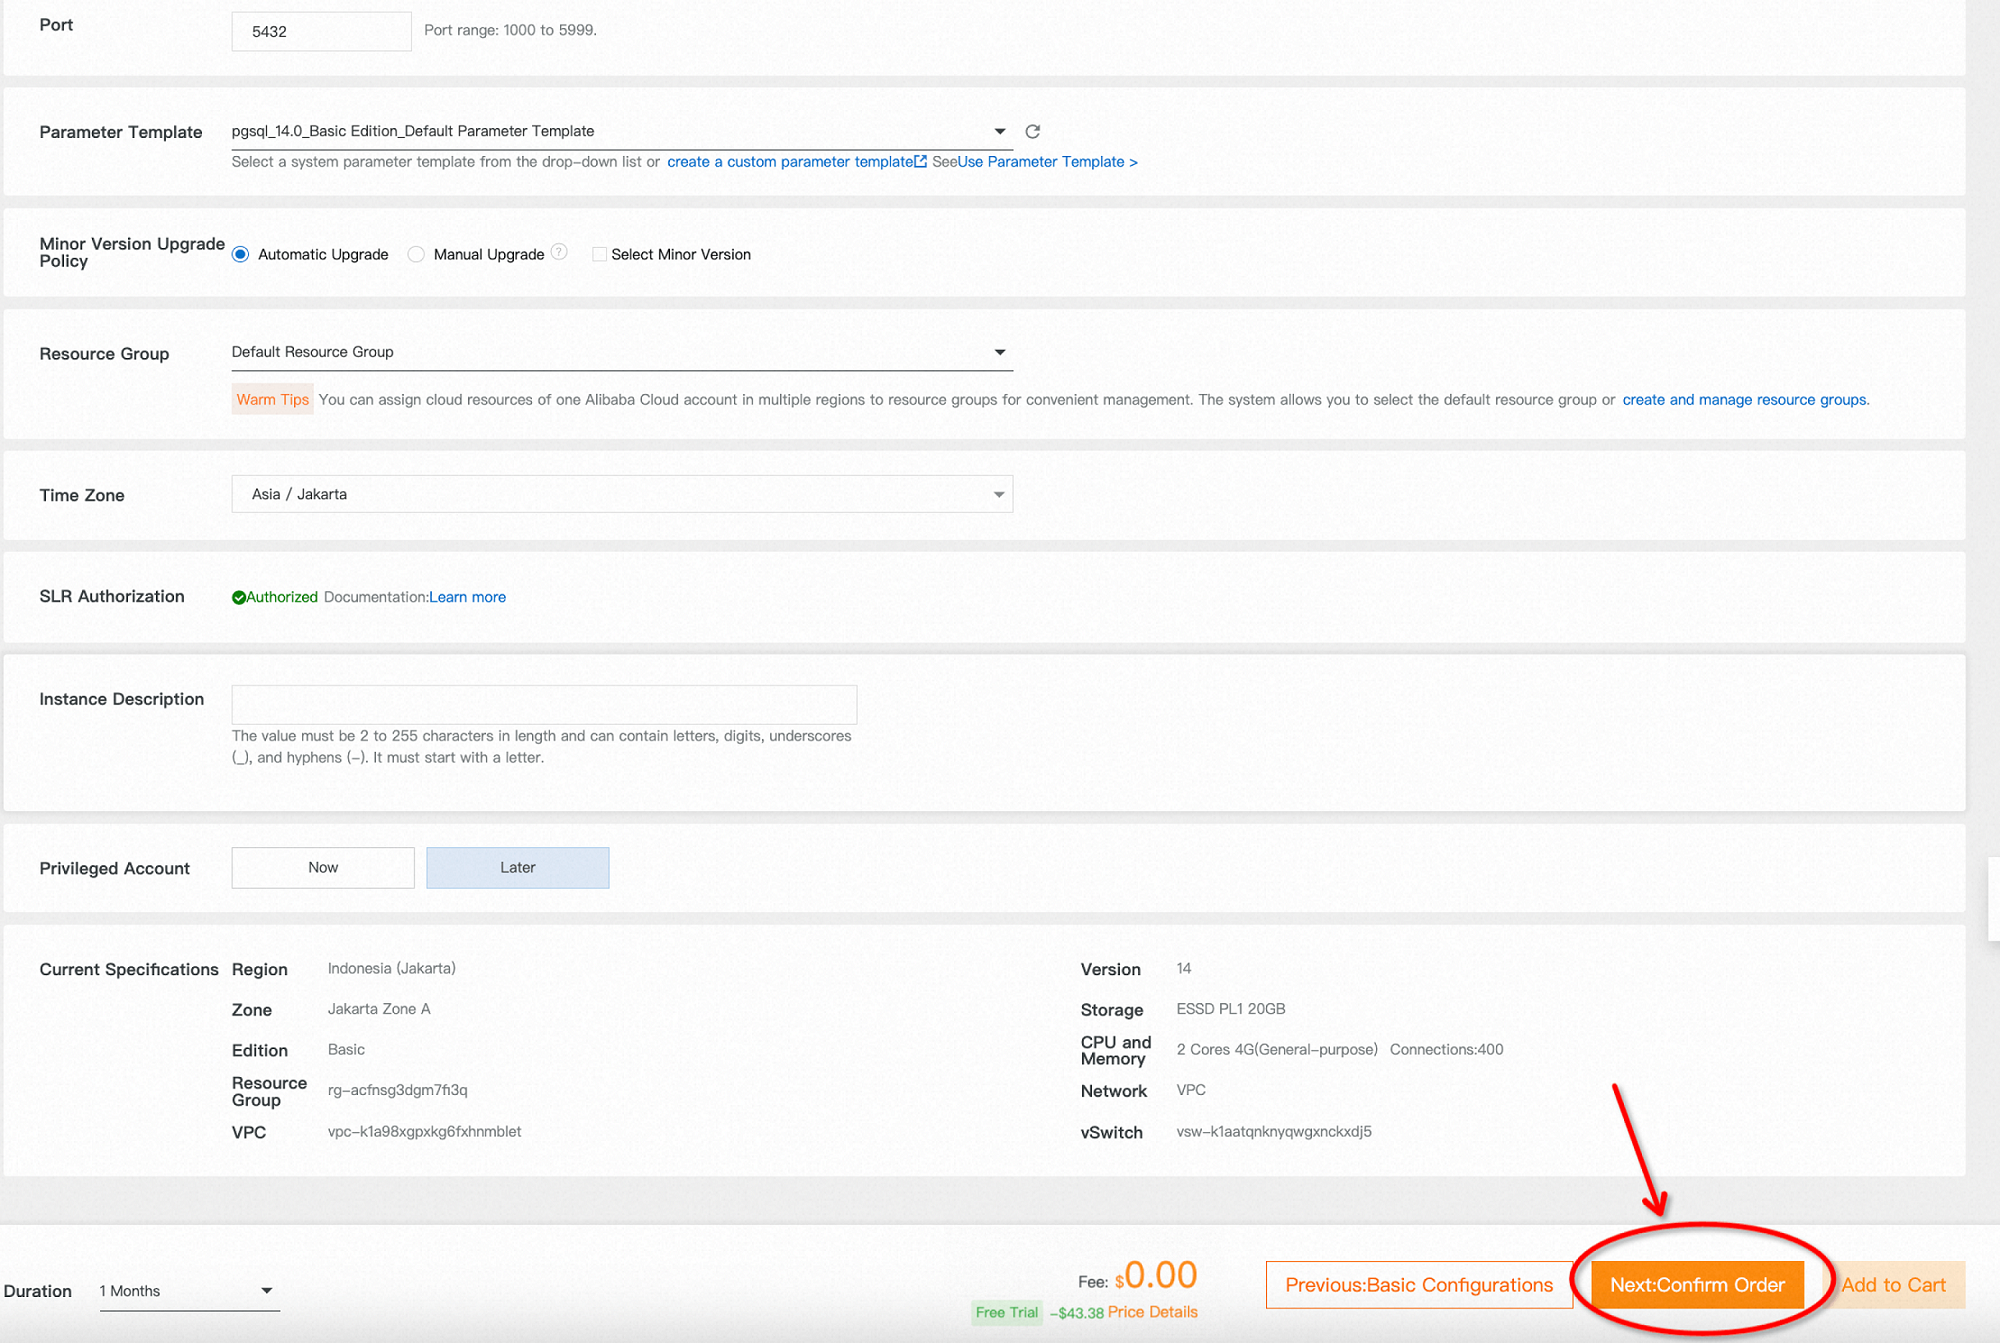
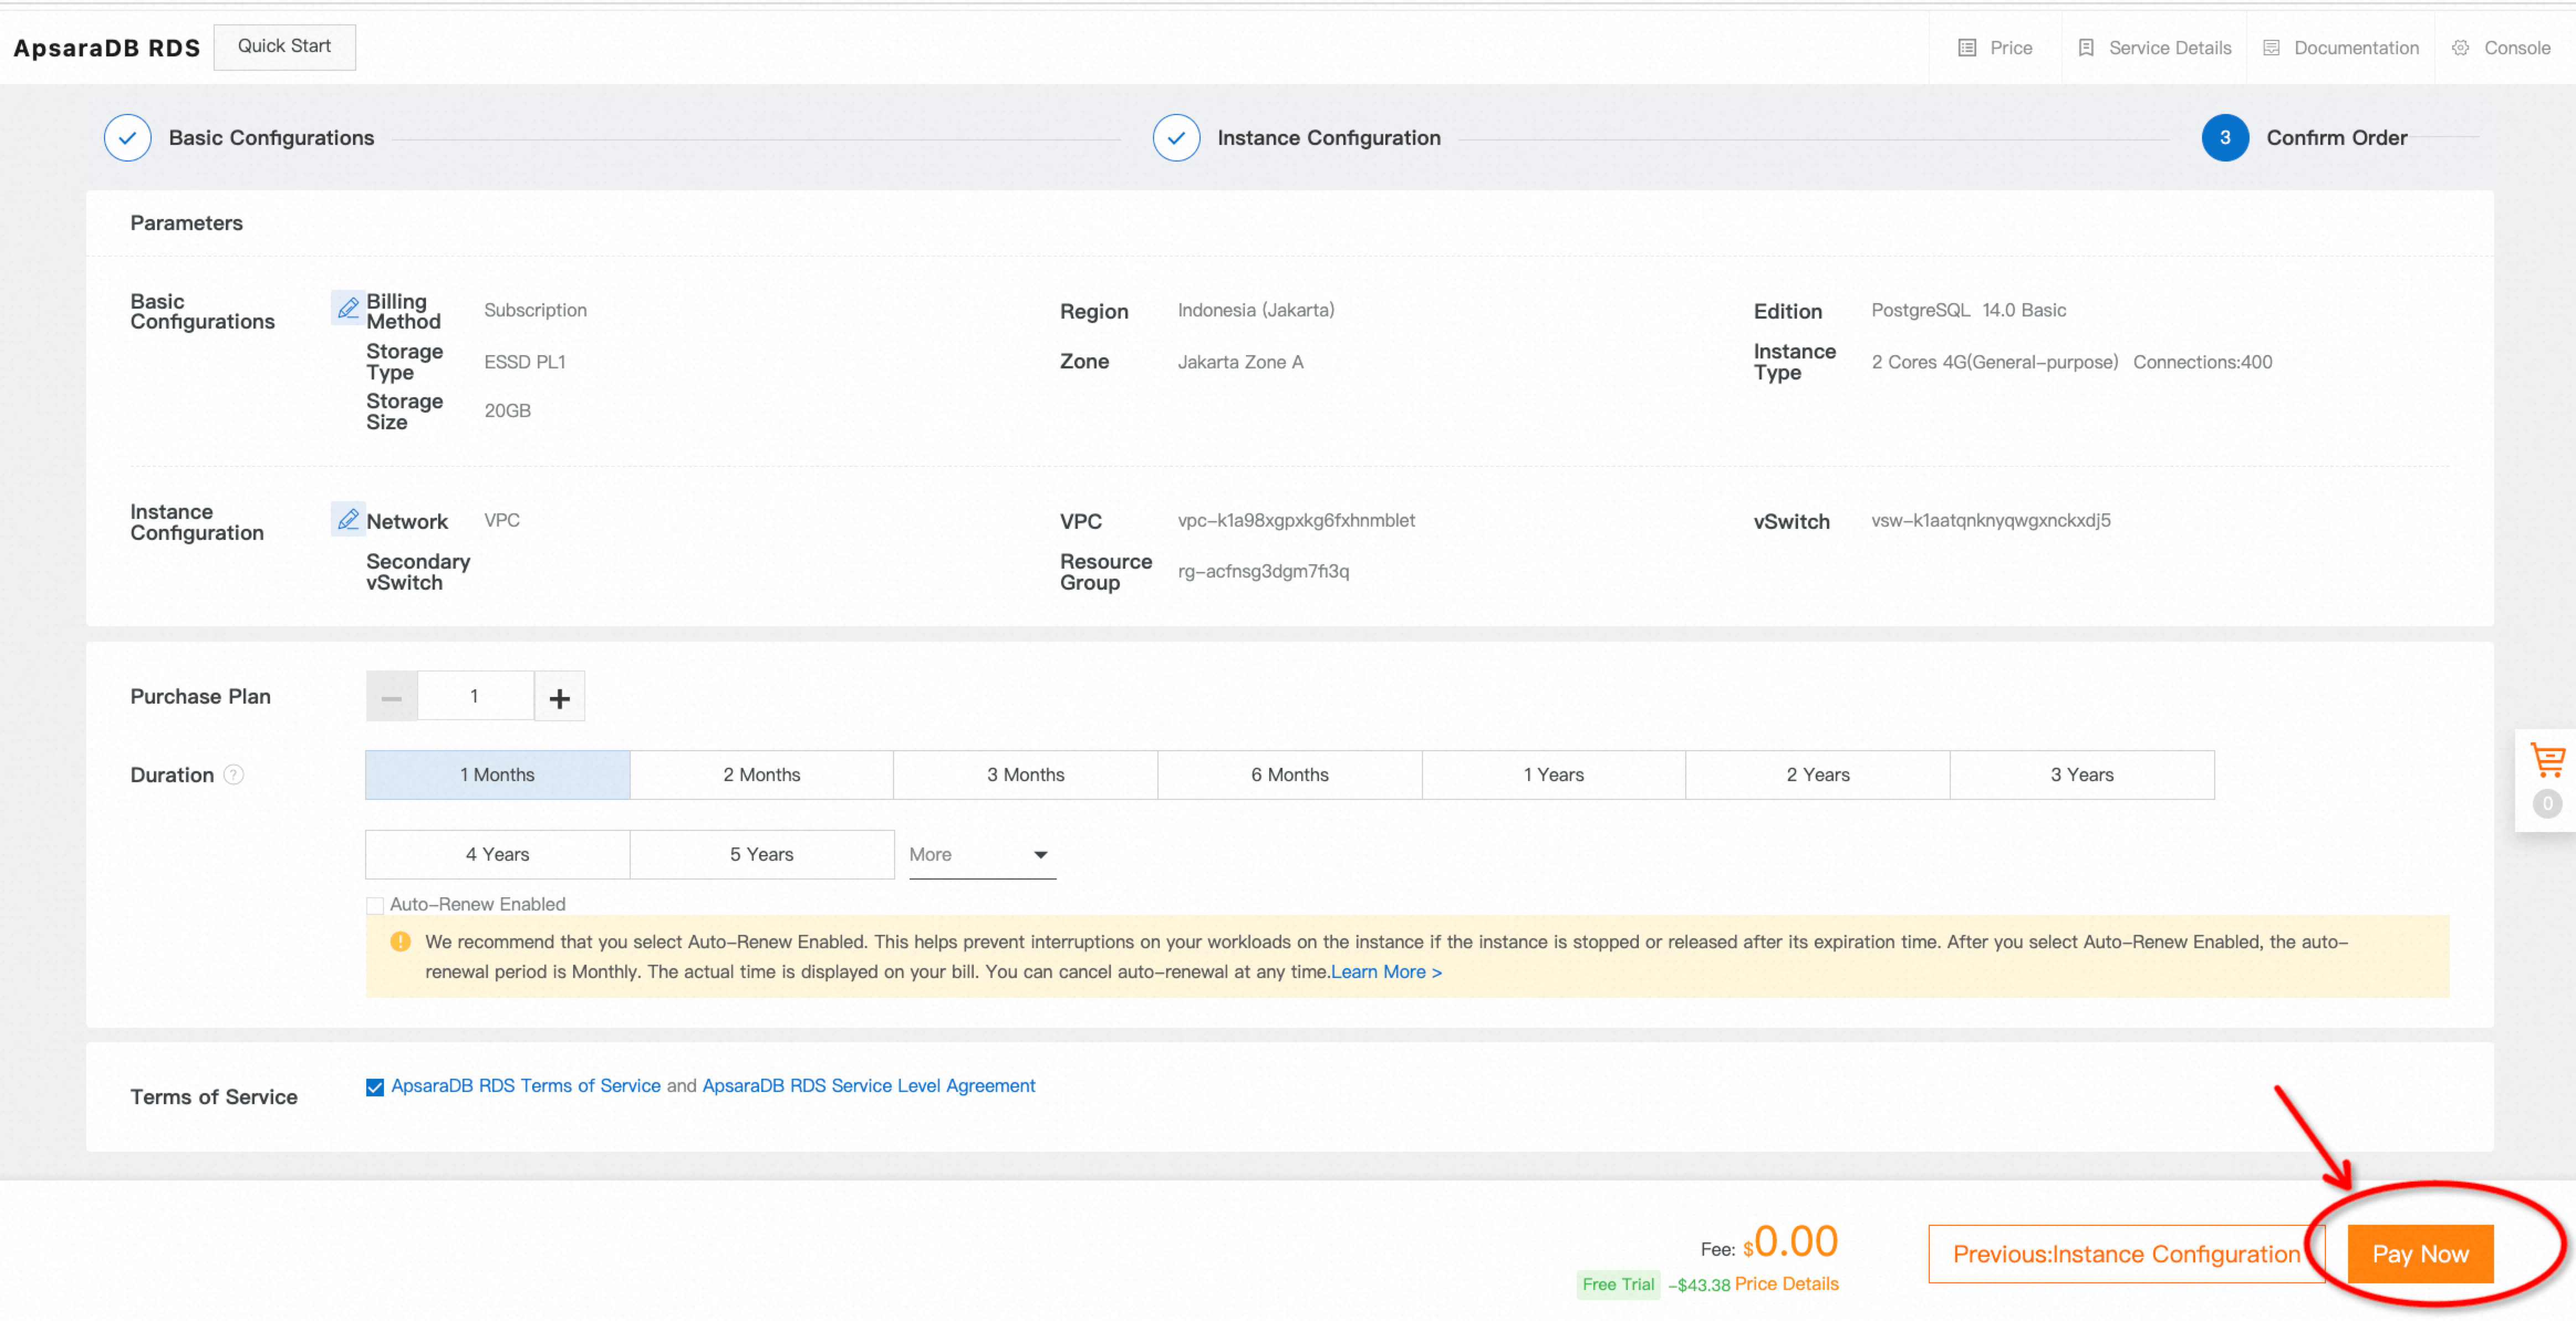

3. The instance will be created after placing a free trial order. It takes several minutes to complete. Come back later to check the status of the instance you just launched. You can also customize the name of the instance when its status becomes Running.


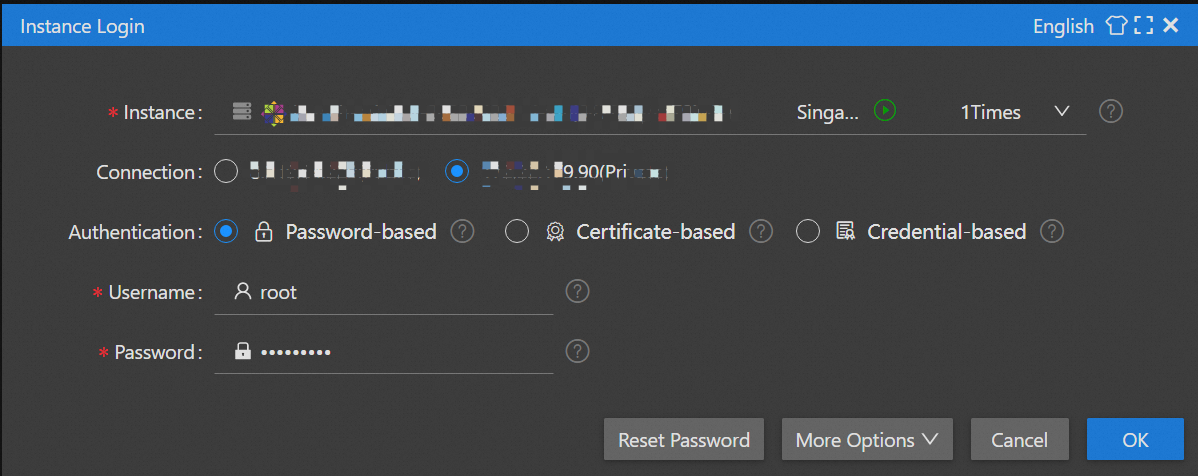
On the right side of the lab page, click the  icon to switch to Web Terminal. Please enter the username and password to log on to the ECS instance.
Run the following command to install PostgreSQL 14 and its extension package on ECS. Then, start the service, check the service status, and enable auto start in case of reboot.
Note: This experiment is based on the CentOS 7.8 x64 Operating System. If you are using another operating system, the installation might be different, which is not discussed in this lab.
sudo yum install -y https://download.postgresql.org/pub/repos/yum/reporpms/EL-7-x86_64/pgdg-redhat-repo-latest.noarch.rpm
sudo yum install -y postgresql14-server postgresql14
sudo /usr/pgsql-14/bin/postgresql-14-setup initdb

sudo systemctl start postgresql-14
sudo systemctl enable postgresql-14
systemctl list-unit-files | grep postgre
ps -ef | grep postgres
systemctl status postgresql-14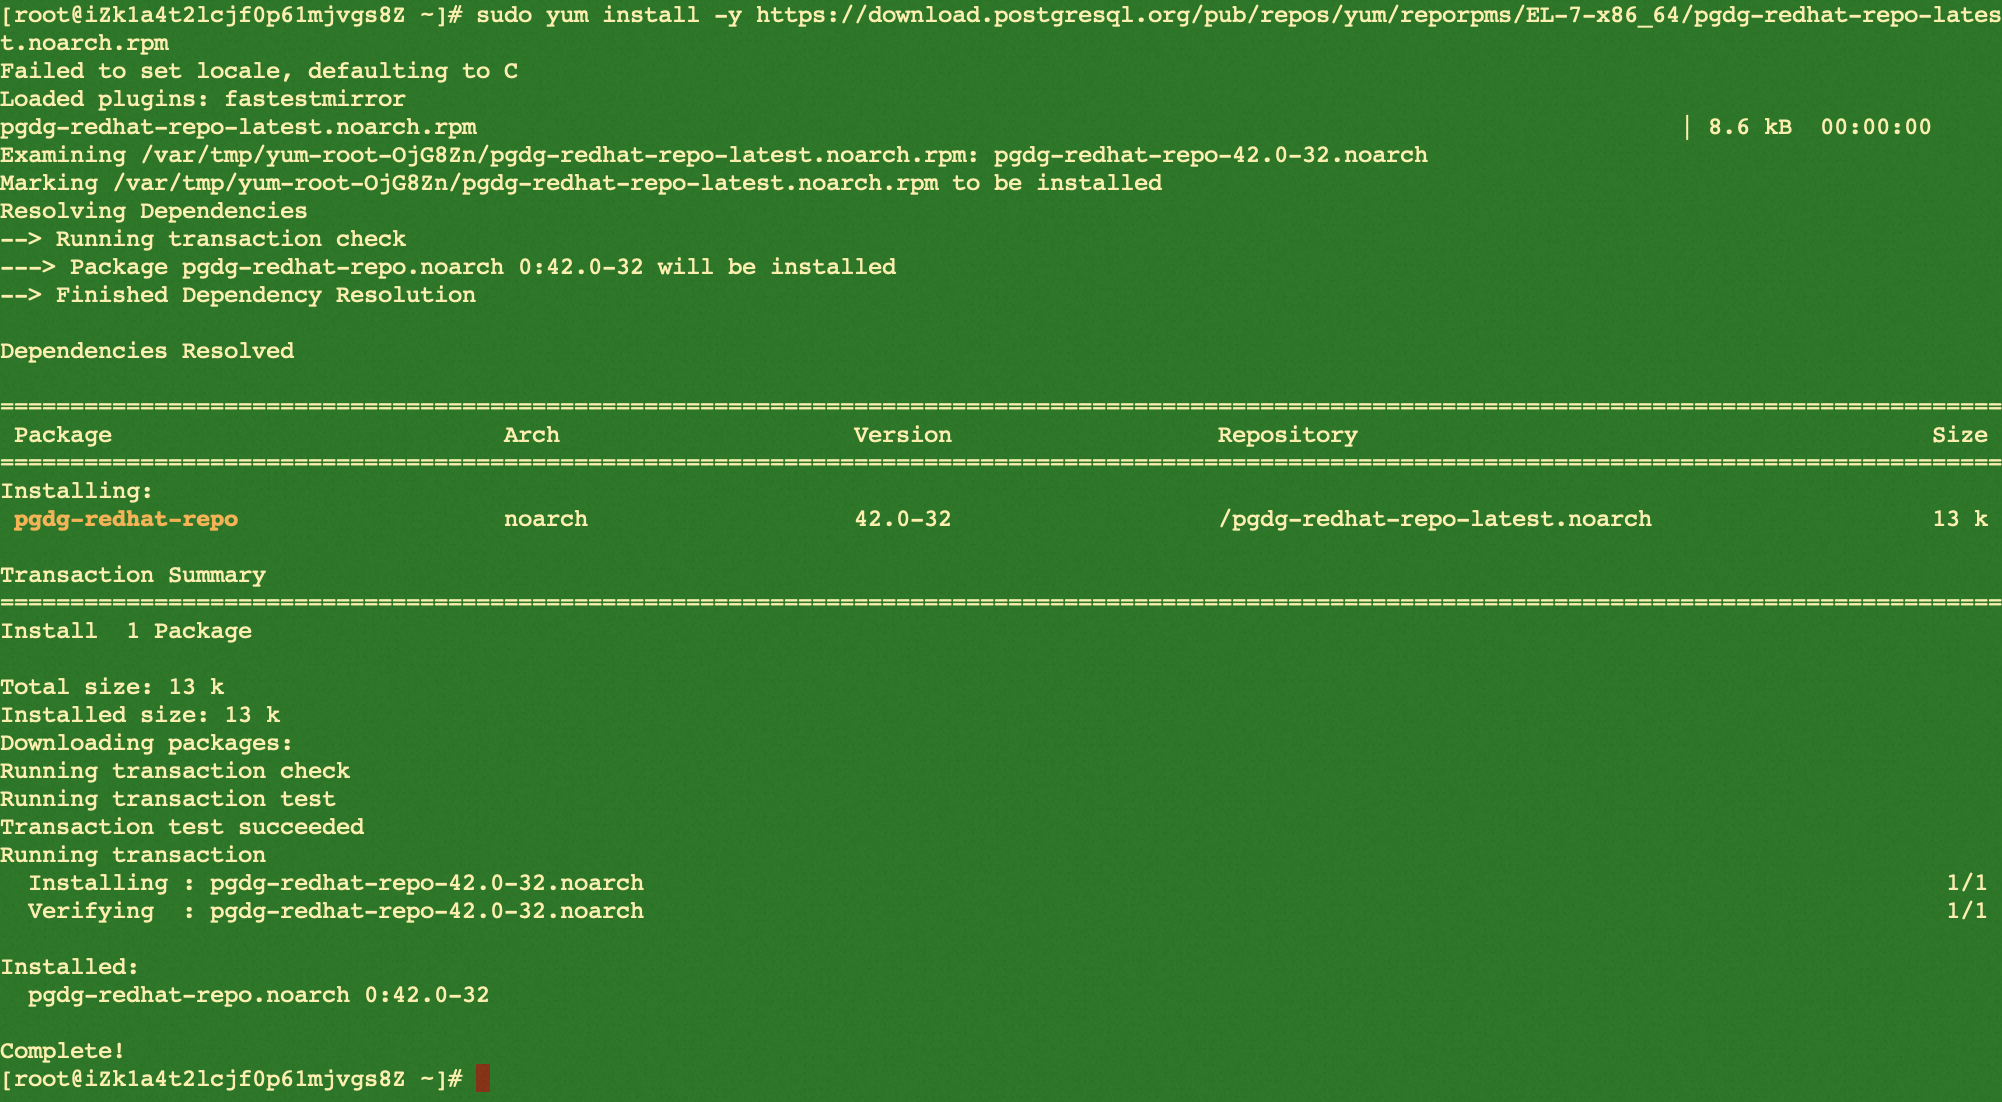


Run the following commands to log in to the Postgres you just installed on ECS, try to create a database and a table, and insert the data.
sudo -u postgres psql
CREATE DATABASE mydb;
\c mydb;

CREATE TABLE table1 (
  id serial PRIMARY KEY,
  name varchar(50) NOT NULL,
  age int NOT NULL,
  gender varchar(10) NOT NULL
);

\dt table1;

INSERT INTO table1 (name, age, gender)
SELECT md5(random()::text), floor(random() * 100)::int,
CASE WHEN random() < 0.5 THEN 'male' ELSE 'female' END
FROM generate_series(1,10000);

select count(*) from table1;
select * from table1 limit 10;
\q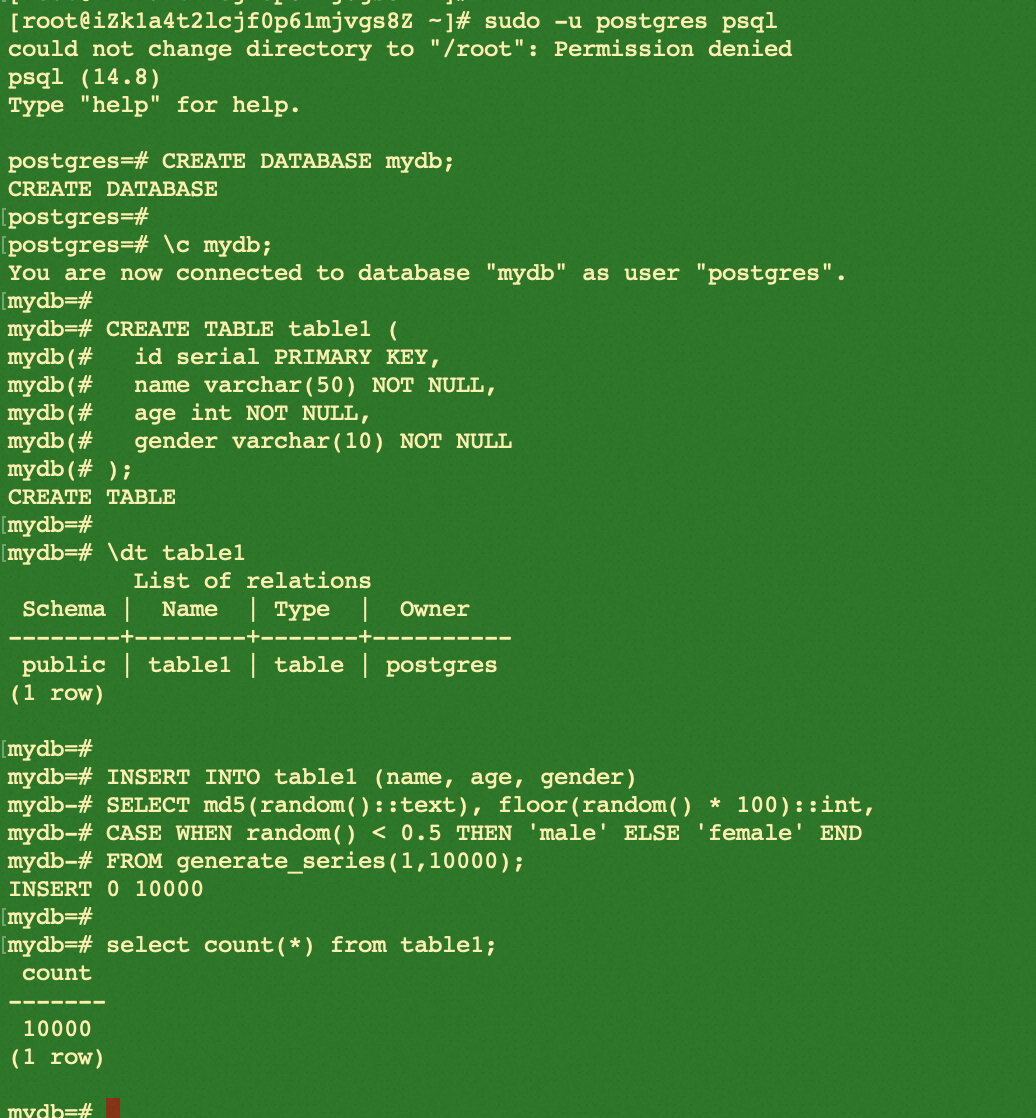
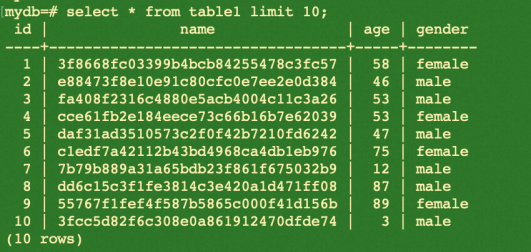
The example code helps create a database named mydb, and a table named table1, and 10,000 records written to the table.
While logged into PostgreSQL, run the following commands to create a new user for migration.
CREATE USER migratetest CREATEROLE REPLICATION LOGIN PASSWORD '123456';
GRANT pg_monitor TO migratetest;
\q
The user migratetest will be created with CREATEROLE and REPLICATION permissions. It's also a member of pg_admin.
After preparing the data of the source database, go to the RDS console and switch to the region where the RDS instance is located to create a user on the target database for migration. Please be aware that a privileged account is required. Follow the guide below to ensure you don't miss any important points.


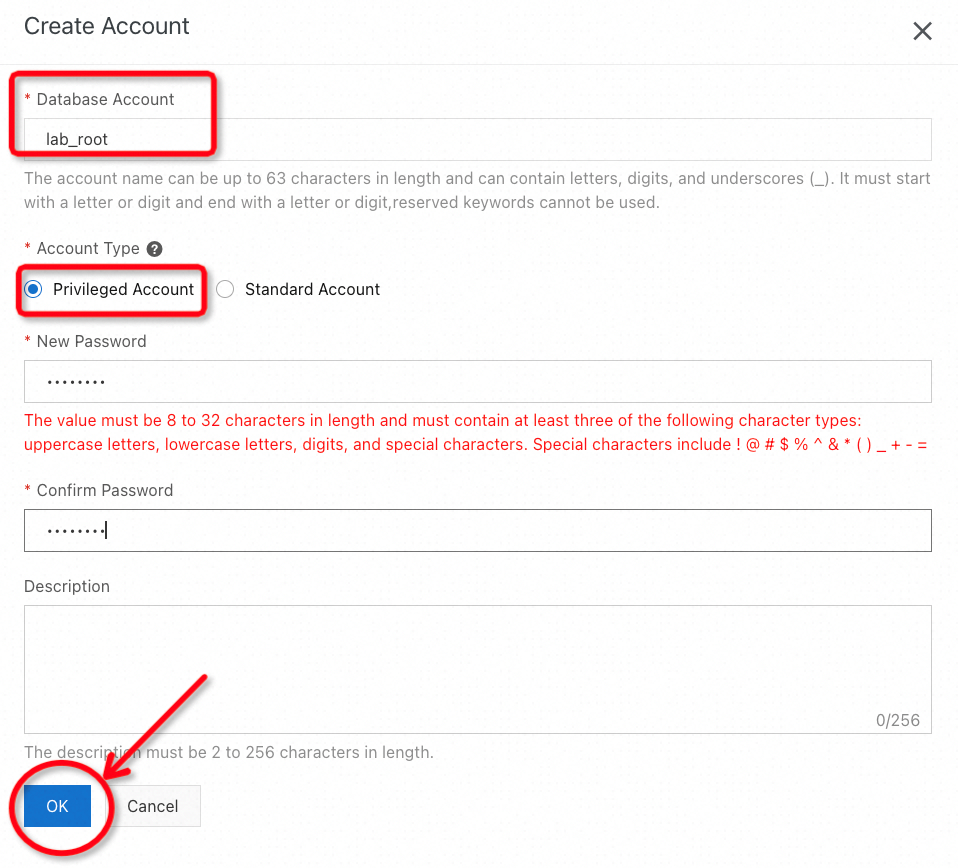

When the status becomes Active, a database user is created successfully.
You are almost there! Let's finish the preparation and move to the next phase. Please do a final environment check to confirm that the network conditions on the source and target side fully meet the requirements.
1. To access the PostgreSQL database you just created, you need to log in to the ECS instance again. On the right side of the lab page, click the  icon and switch to Web Terminal. Enter your username and password to log in to the ECS instance. If you are still logged in from the previous steps, you can use the same session tab on the web terminal.
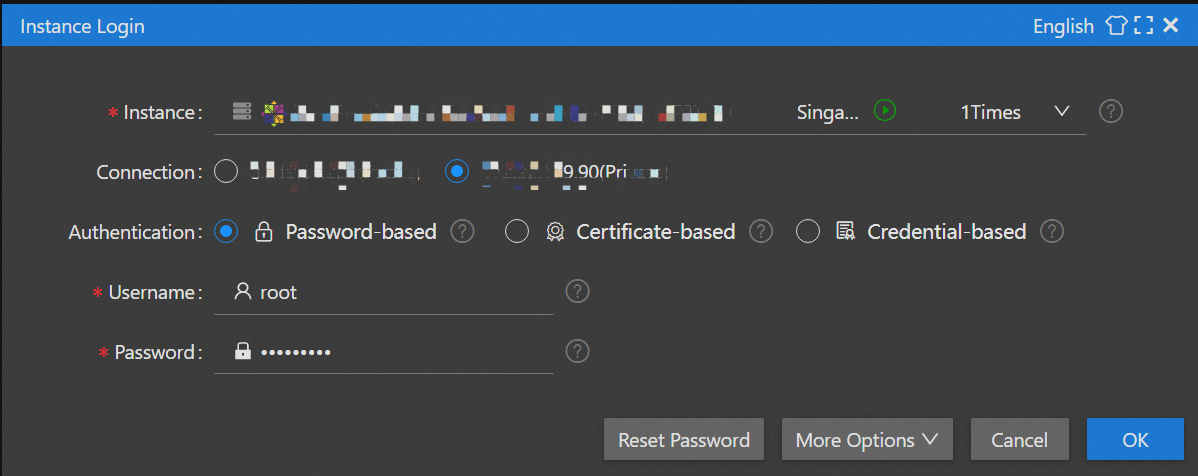
Run the following commands to check current configurations, so you can tell if the user-managed Postgres allows remote access or not.
sudo -u postgres psql
show listen_addresses;
show wal_keep_size;
\q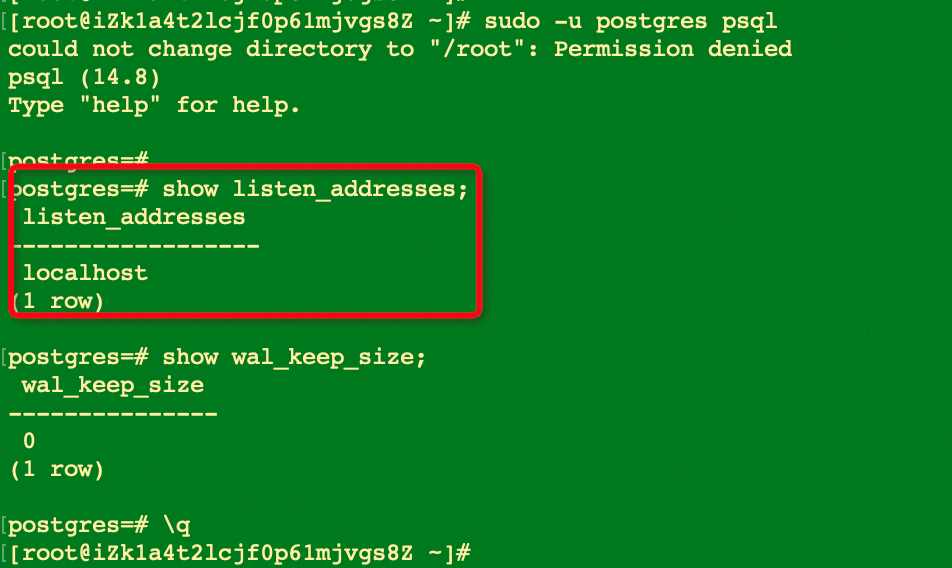
When the value of listen_addresses returns localhost, it means the current database server only accepts access from the local client and doesn't allow remote access. If it's the same for your environment, continue reading. Otherwise, please jump to the next chapter directly.
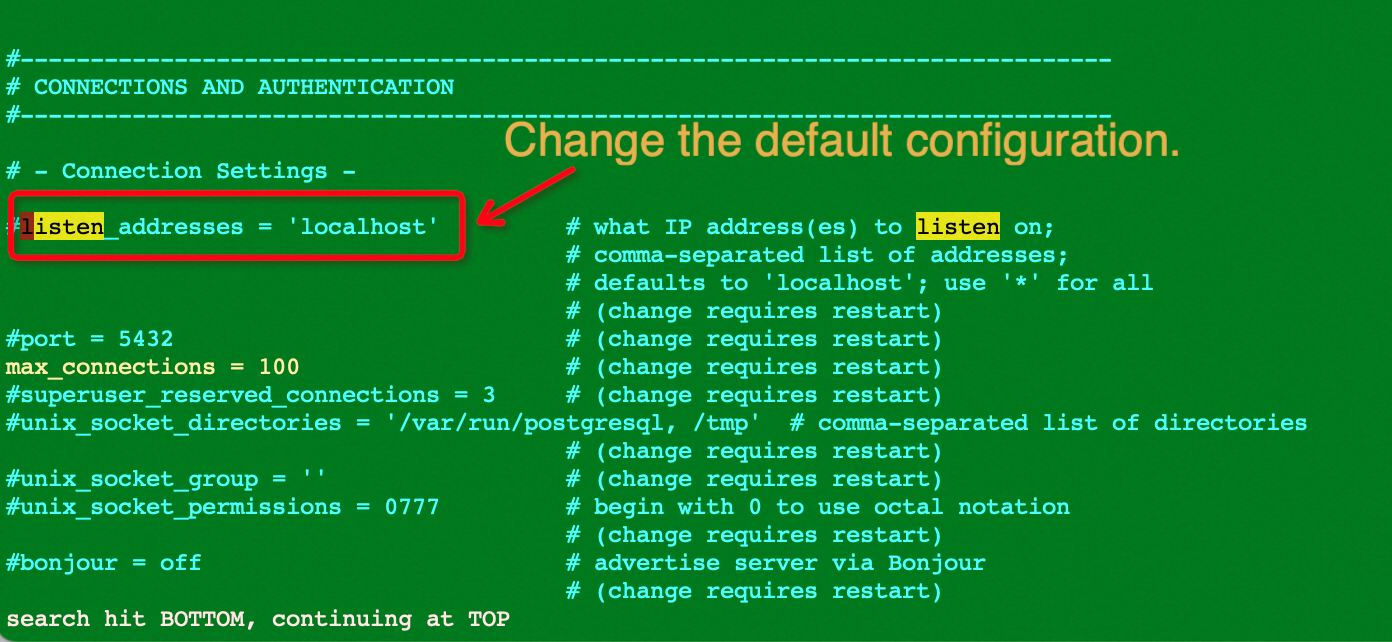
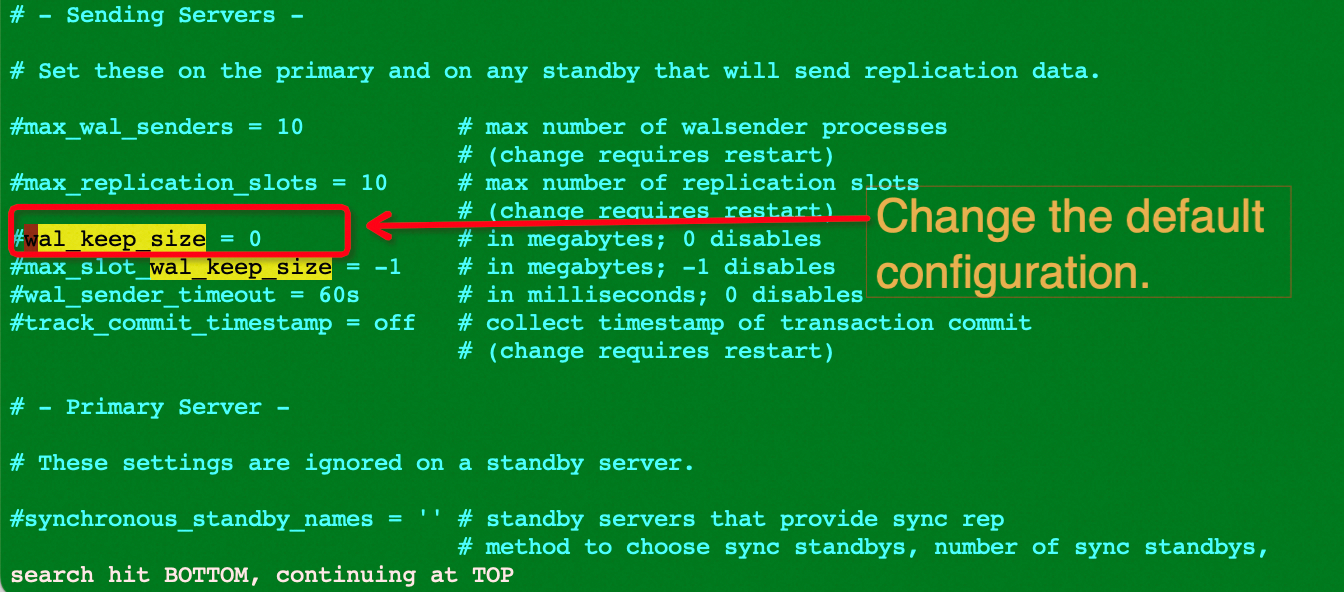
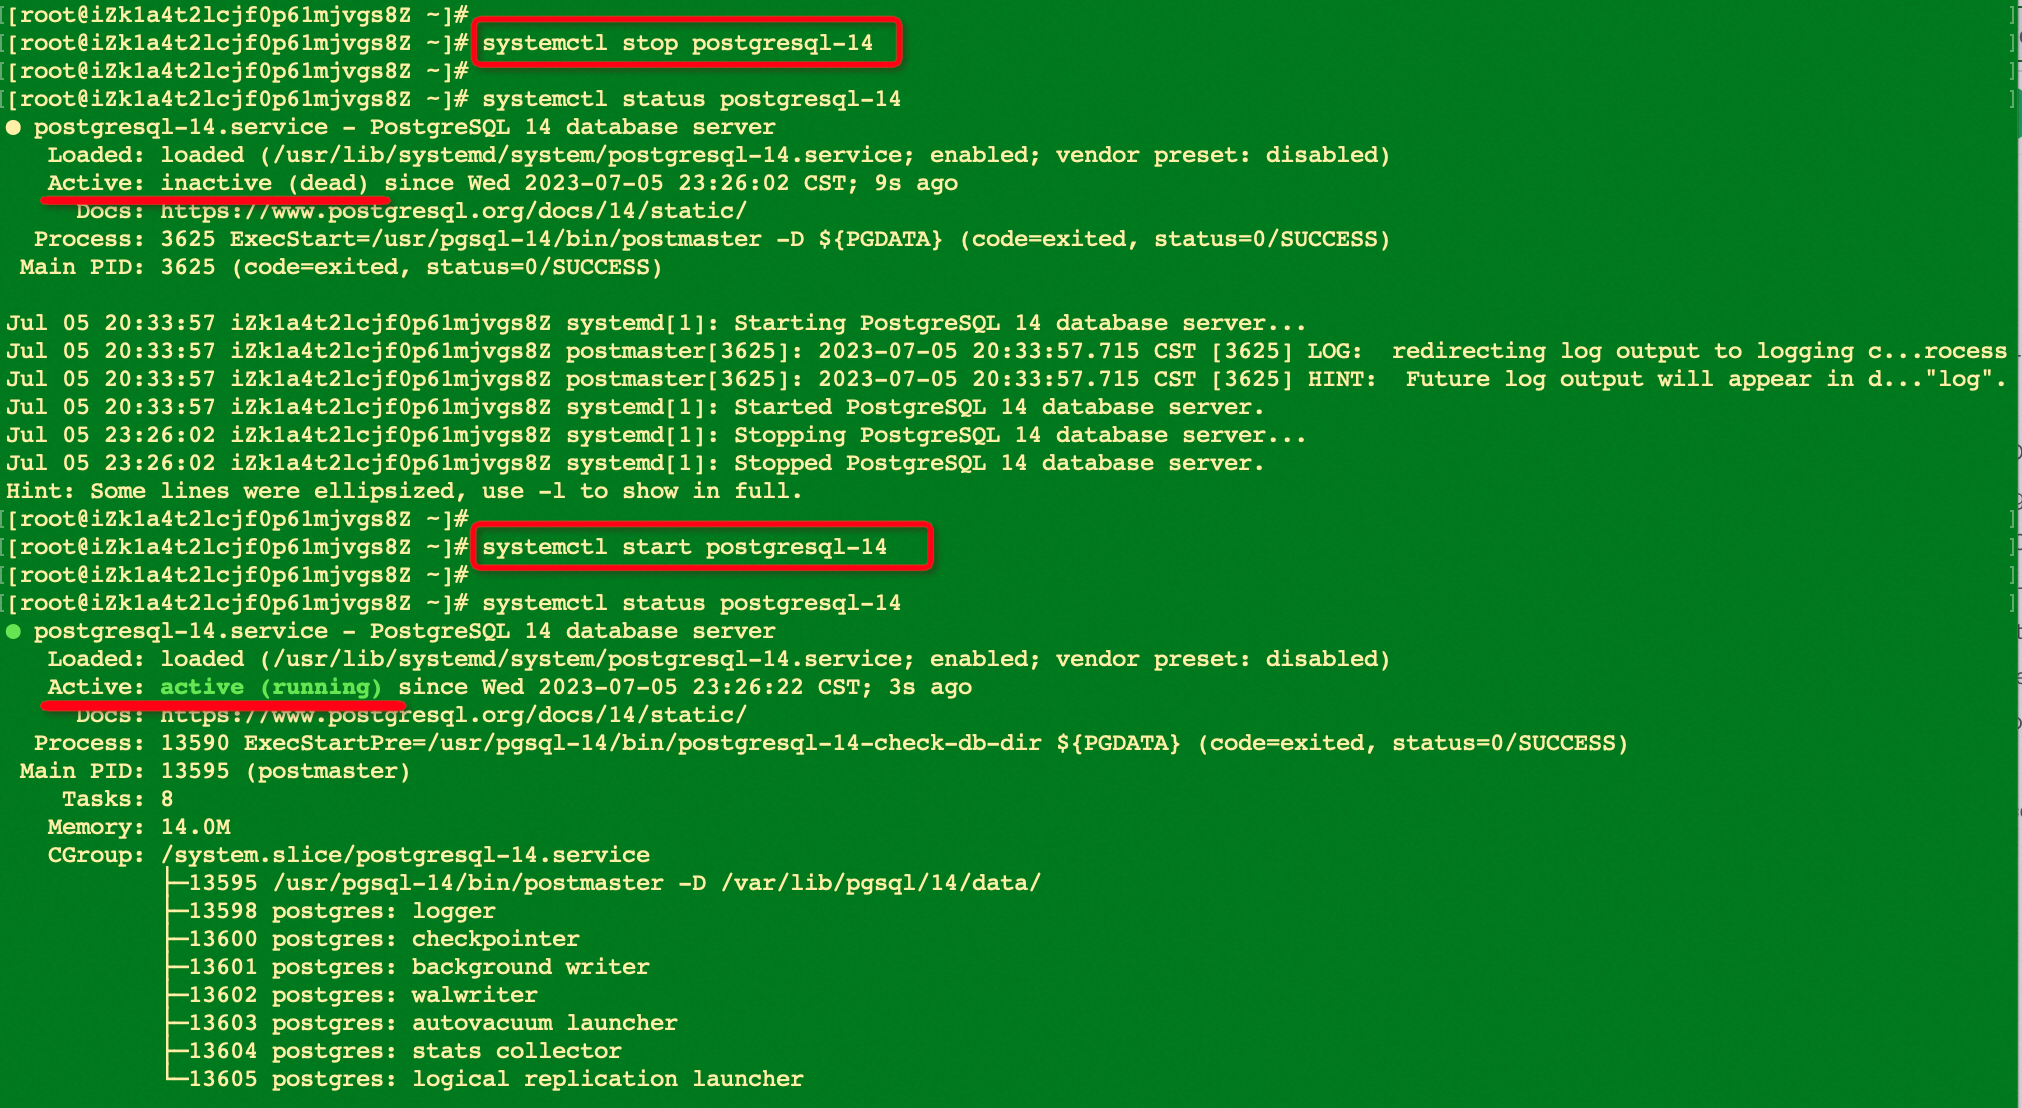
2. Edit the file postgresql.conf and restart the Postgres service to allow remote access.
find / -name postgresql.conf
cat /var/lib/pgsql/14/data/postgresql.conf

echo "listen_addresses = '*'" >> /var/lib/pgsql/14/data/postgresql.conf
echo "wal_keep_size = 65536" >> /var/lib/pgsql/14/data/postgresql.conf

cat /var/lib/pgsql/14/data/postgresql.conf | grep listen_addresses
cat /var/lib/pgsql/14/data/postgresql.conf | grep wal_keep_size

systemctl stop postgresql-14
systemctl status postgresql-14

systemctl start postgresql-14
systemctl status postgresql-14


3. Check the configurations again and ensure the change takes effect and the latest configurations fully meet the requirements
sudo -u postgres psql
show listen_addresses;
show wal_keep_size;
\q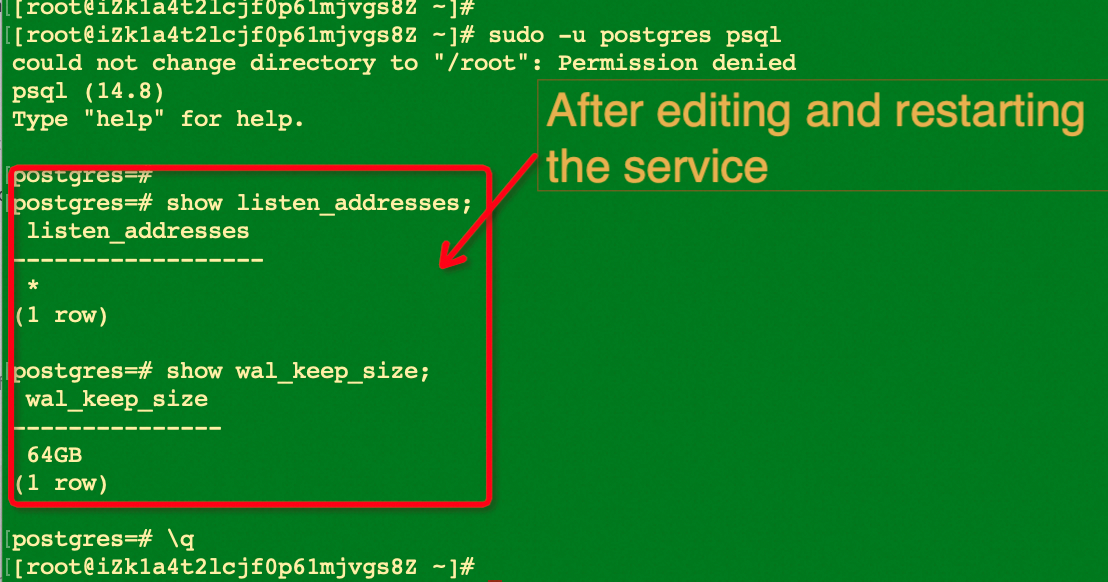
This will make sure the user you created for migration on the user-managed Postgres can access the source database from anywhere in the VPC where the source and target database resides. Go to the RDS console and perform the following configuration checks.
1. Check the CIDR address of the target database on the console.

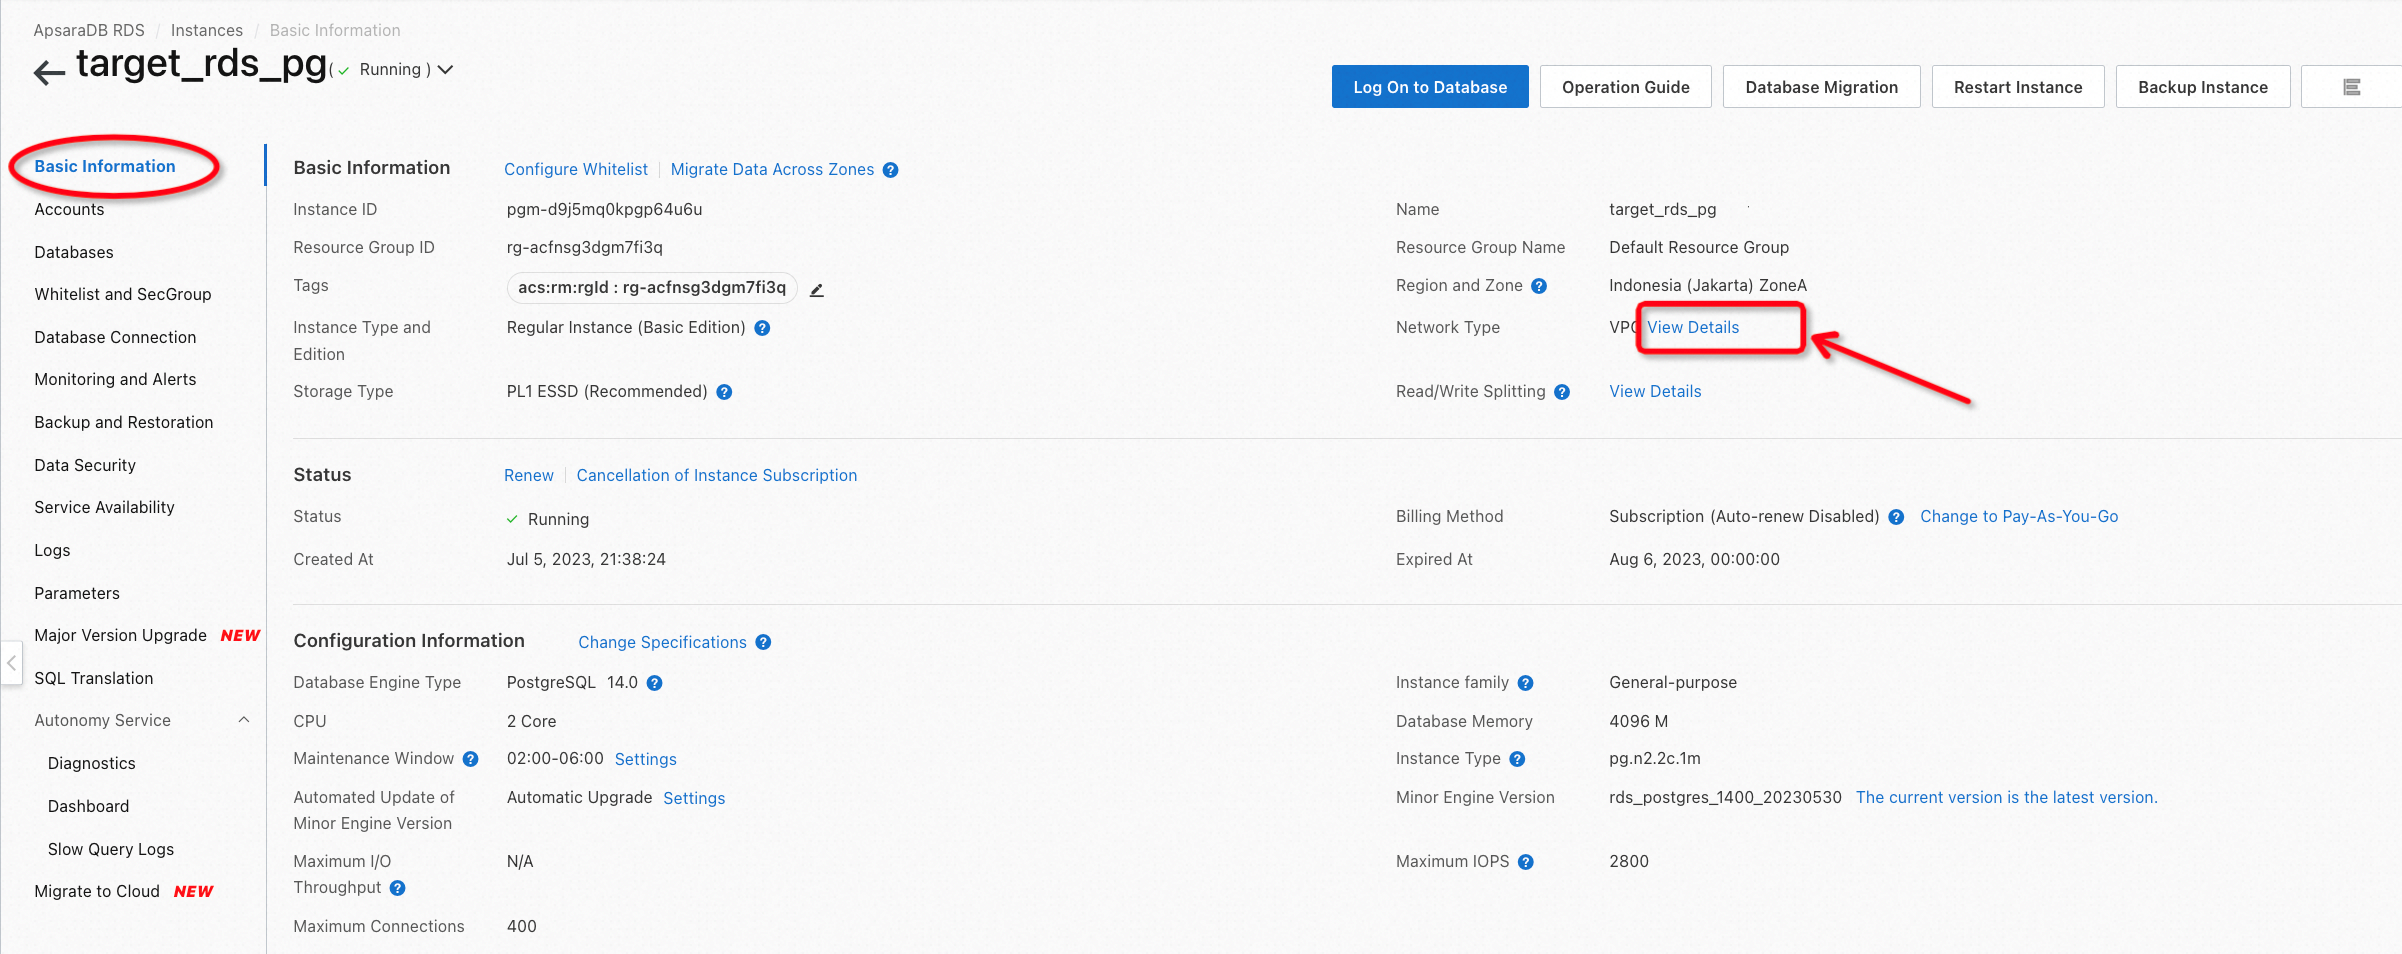
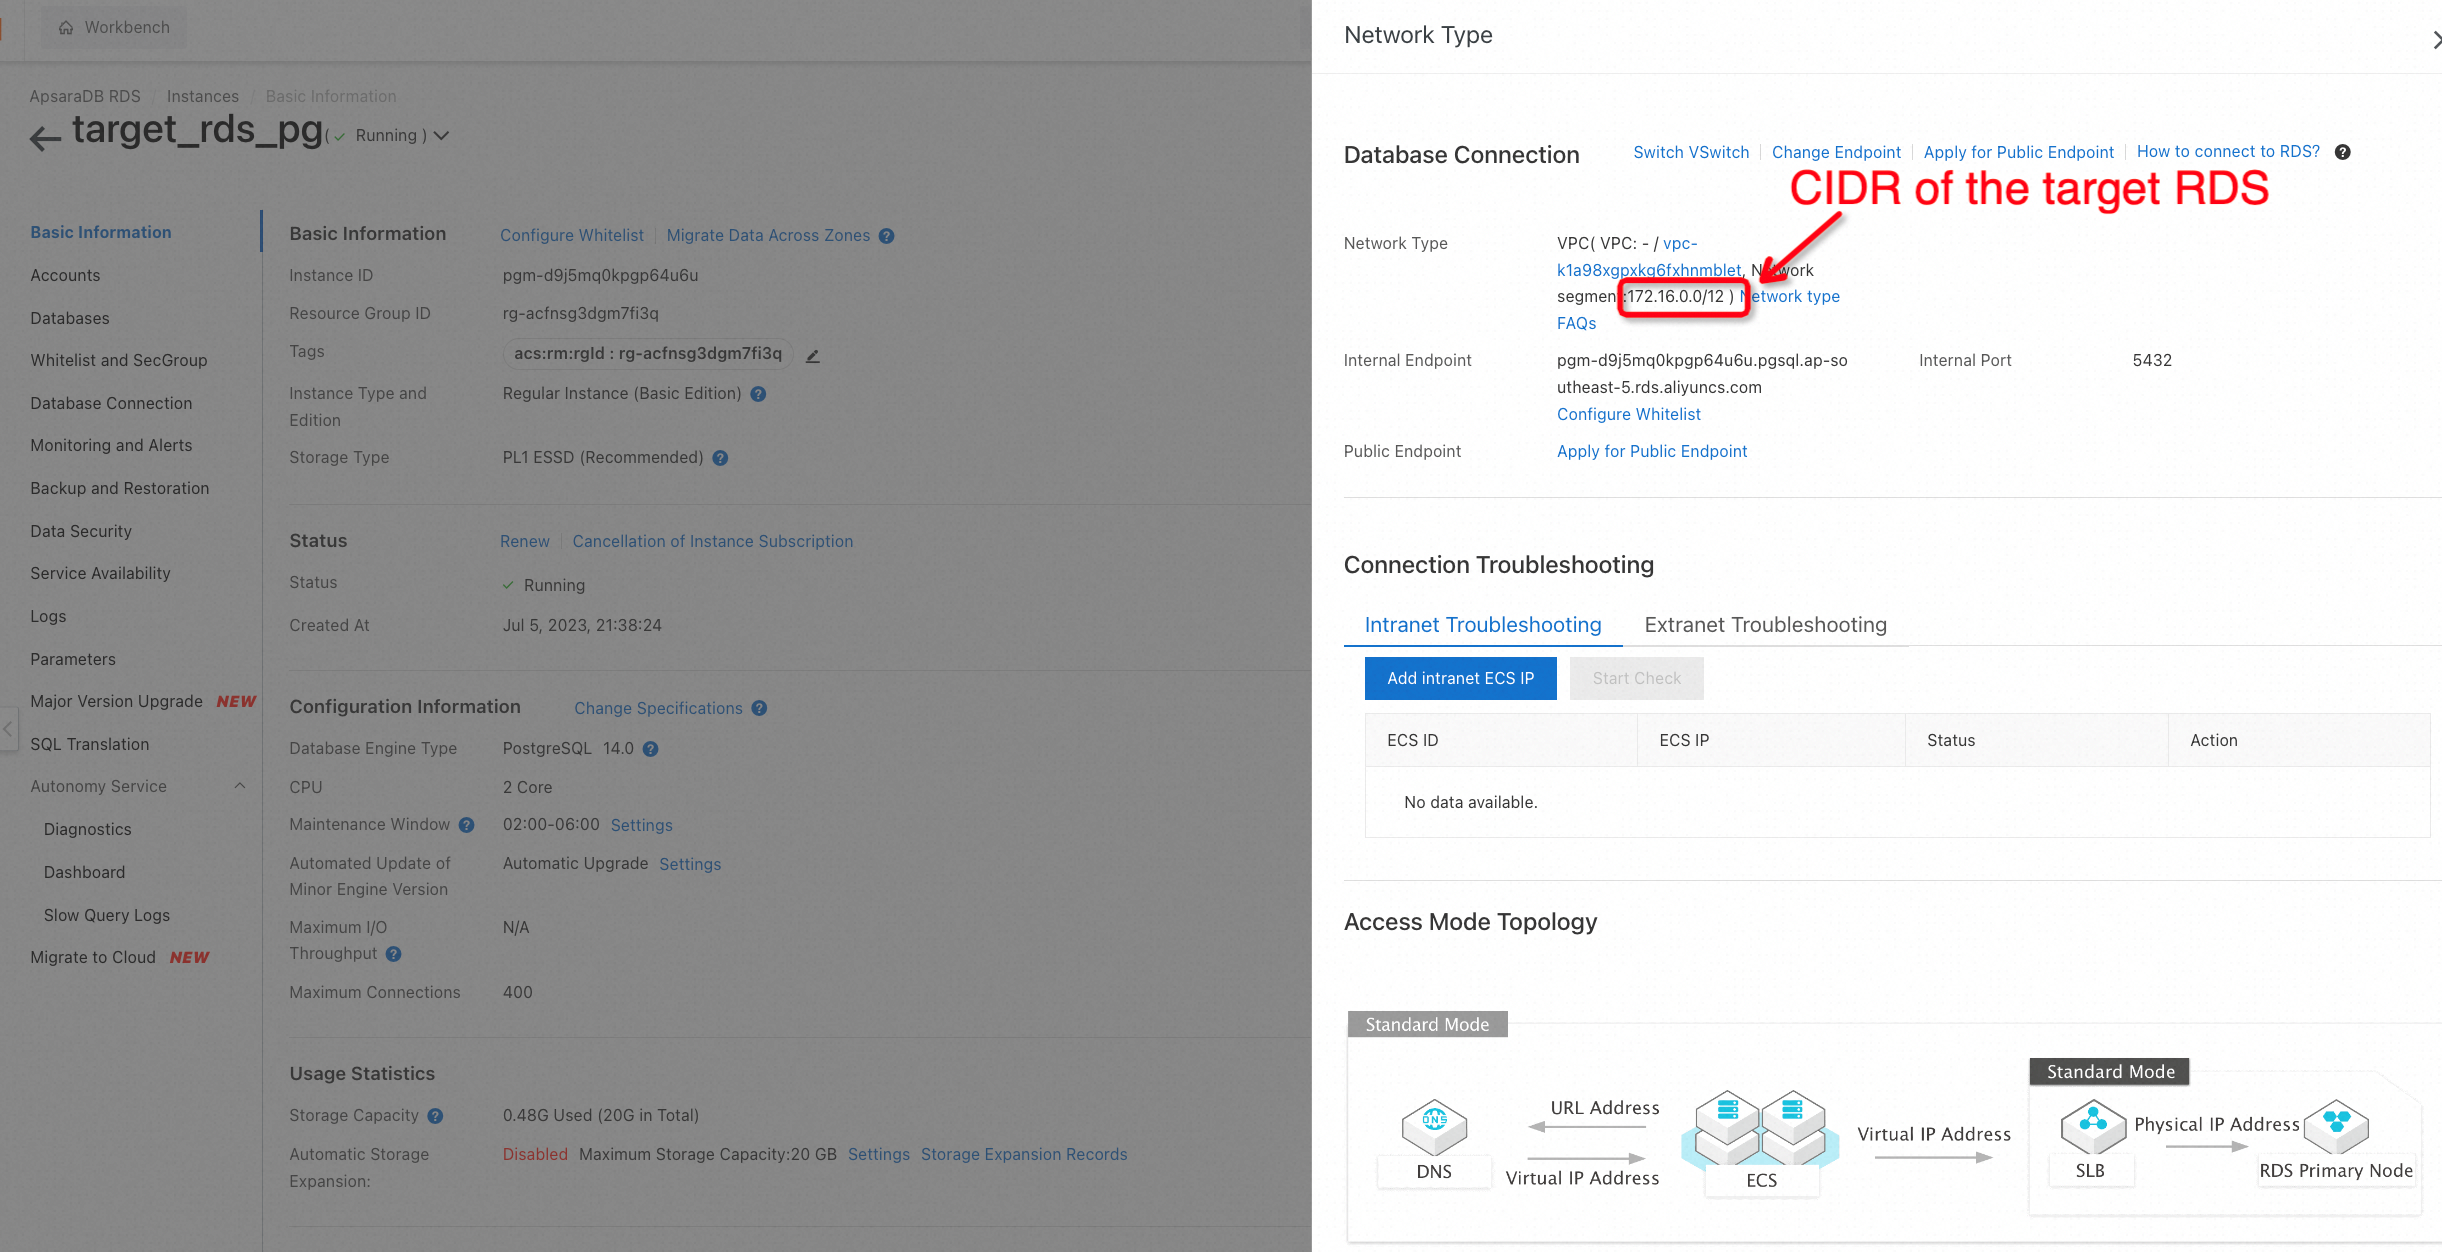
2. Go back to the webshell and edit file pg_hba.conf to allow the user migratetest (used for migration) to access the source database (user-created Postgres) from anywhere in the given network.
Note: Please replace migratetest with the user name you set up for migration if you didn't implement 100% of the example code. You also need to replace the CIDR IP block with the network segement of your target RDS instance.
find / -name pg_hba.conf
cat /var/lib/pgsql/14/data/pg_hba.conf

echo "host  all       migratetest  172.16.0.0/12  md5" >> /var/lib/pgsql/14/data/pg_hba.conf
echo "host  replication  migratetest  172.16.0.0/12  md5" >> /var/lib/pgsql/14/data/pg_hba.conf

cat /var/lib/pgsql/14/data/pg_hba.conf | grep migratetest
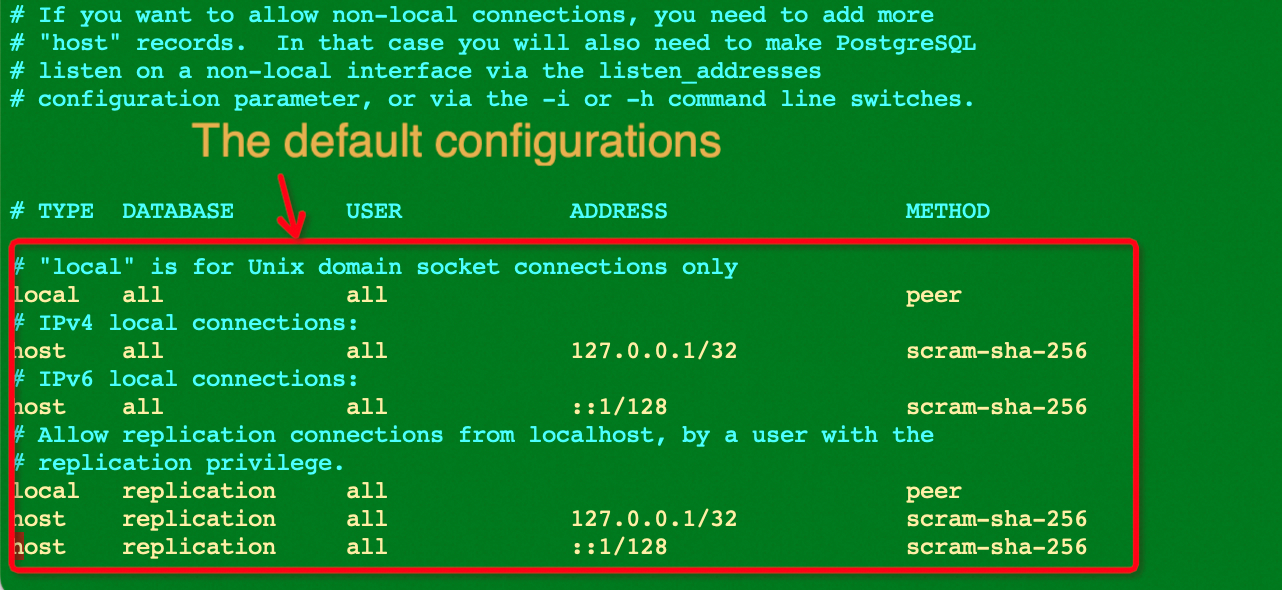

3. Log on to the user-created Postgres and reload the new configurations:
sudo -u postgres psql
SELECT pg_reload_conf();
\q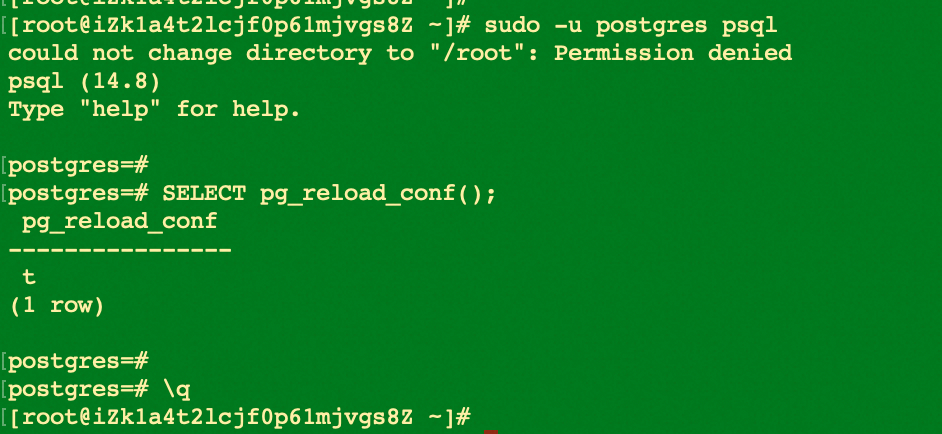
Run the following commands to check the firewall status of ECS. If it's on, you can temporarily turn it off for the lab but do NOT disable firewall service directly if you are using a production environment. In a production environment, we recommend keeping the firewall on and configuring the relevant inbound and outboard policy according to the actual situation.
systemctl status firewalld
In the lab, as shown above, the firewall is off.
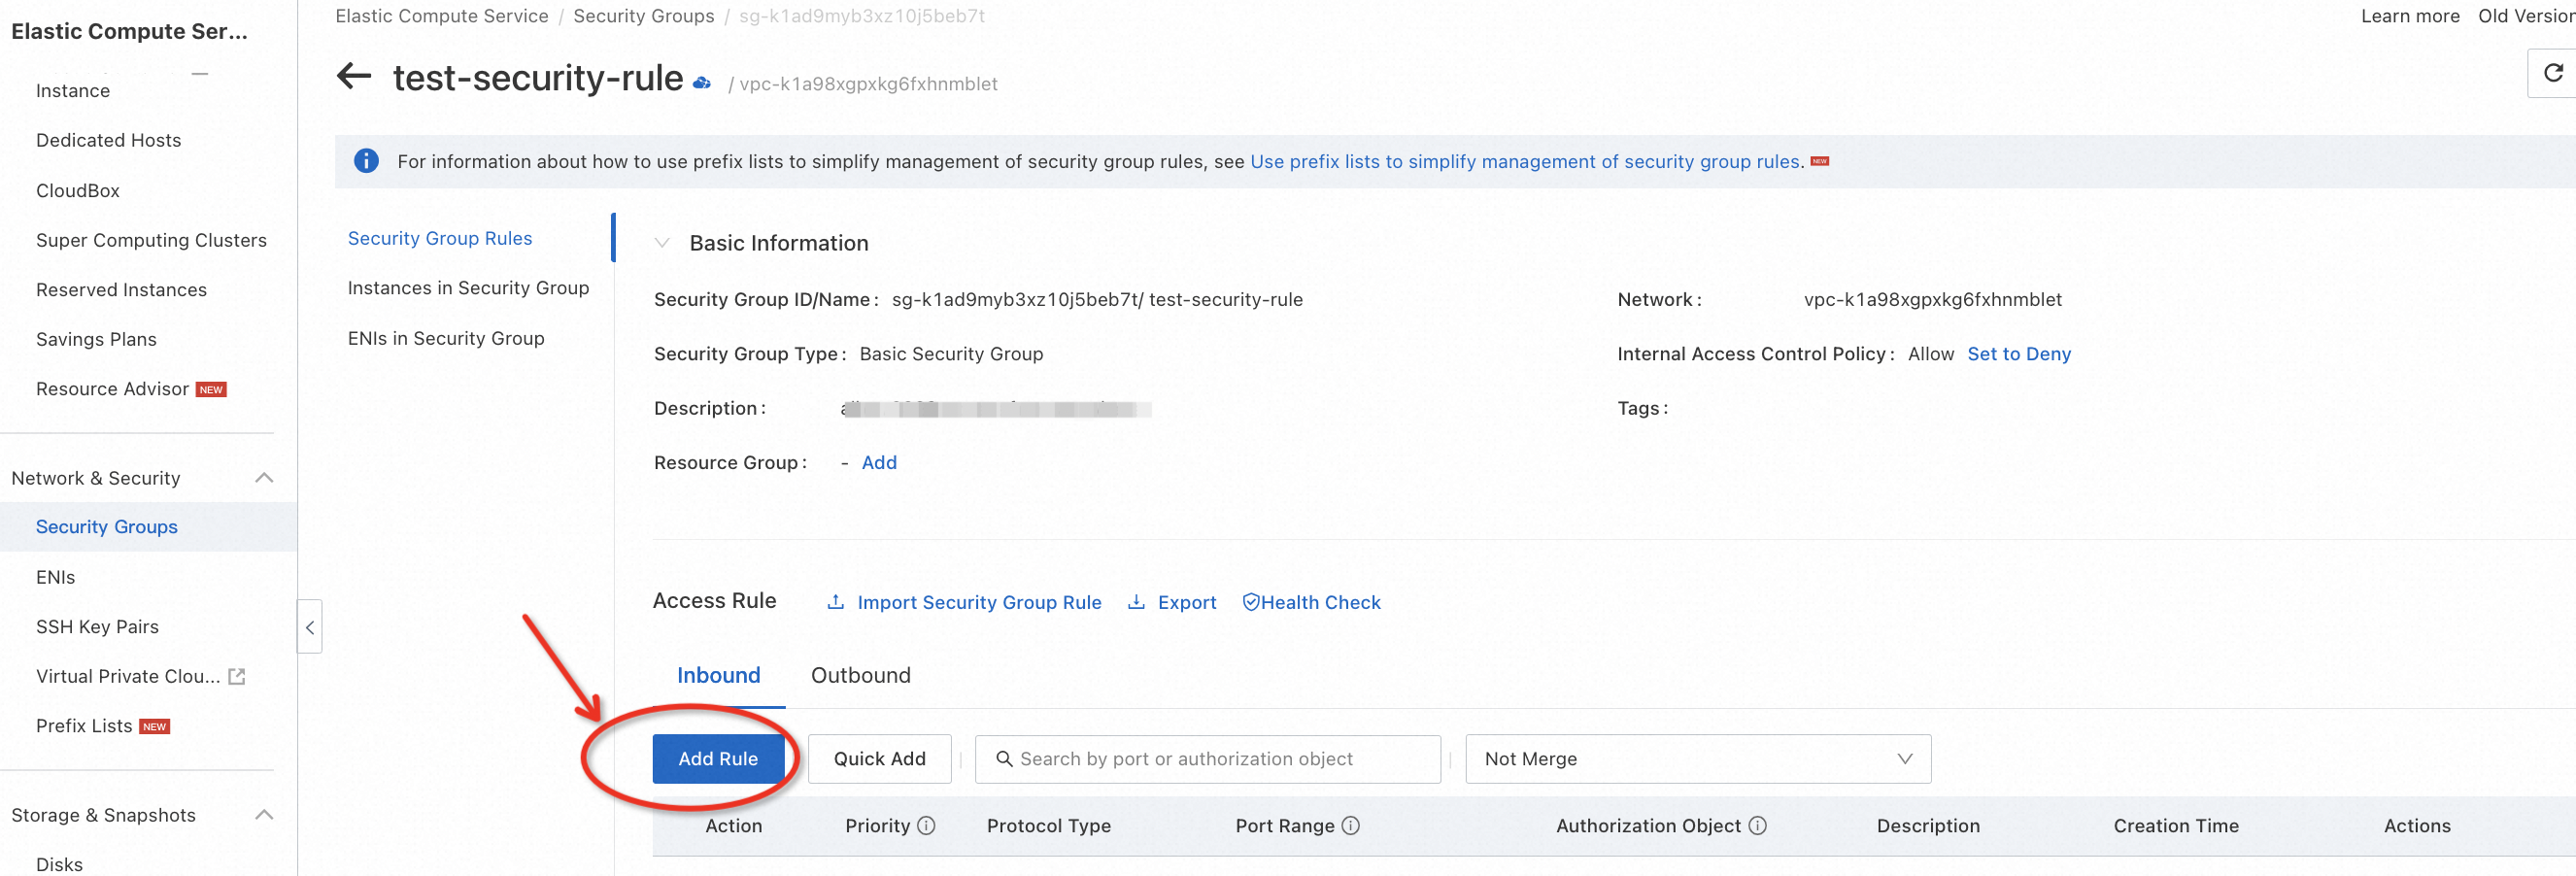
Go to the ECS console, switch to the region where your ECS instance is located, and edit the security rules to allow the target RDS and DTS server to get connected to the MySQL service port. Since this is a test environment, for convenience, you can directly refer to the example below to allow all IPs to access all ports on the ECS.
Similar to firewall configurations, you should NOT allow access from anywhere to any port if it's a production environment.



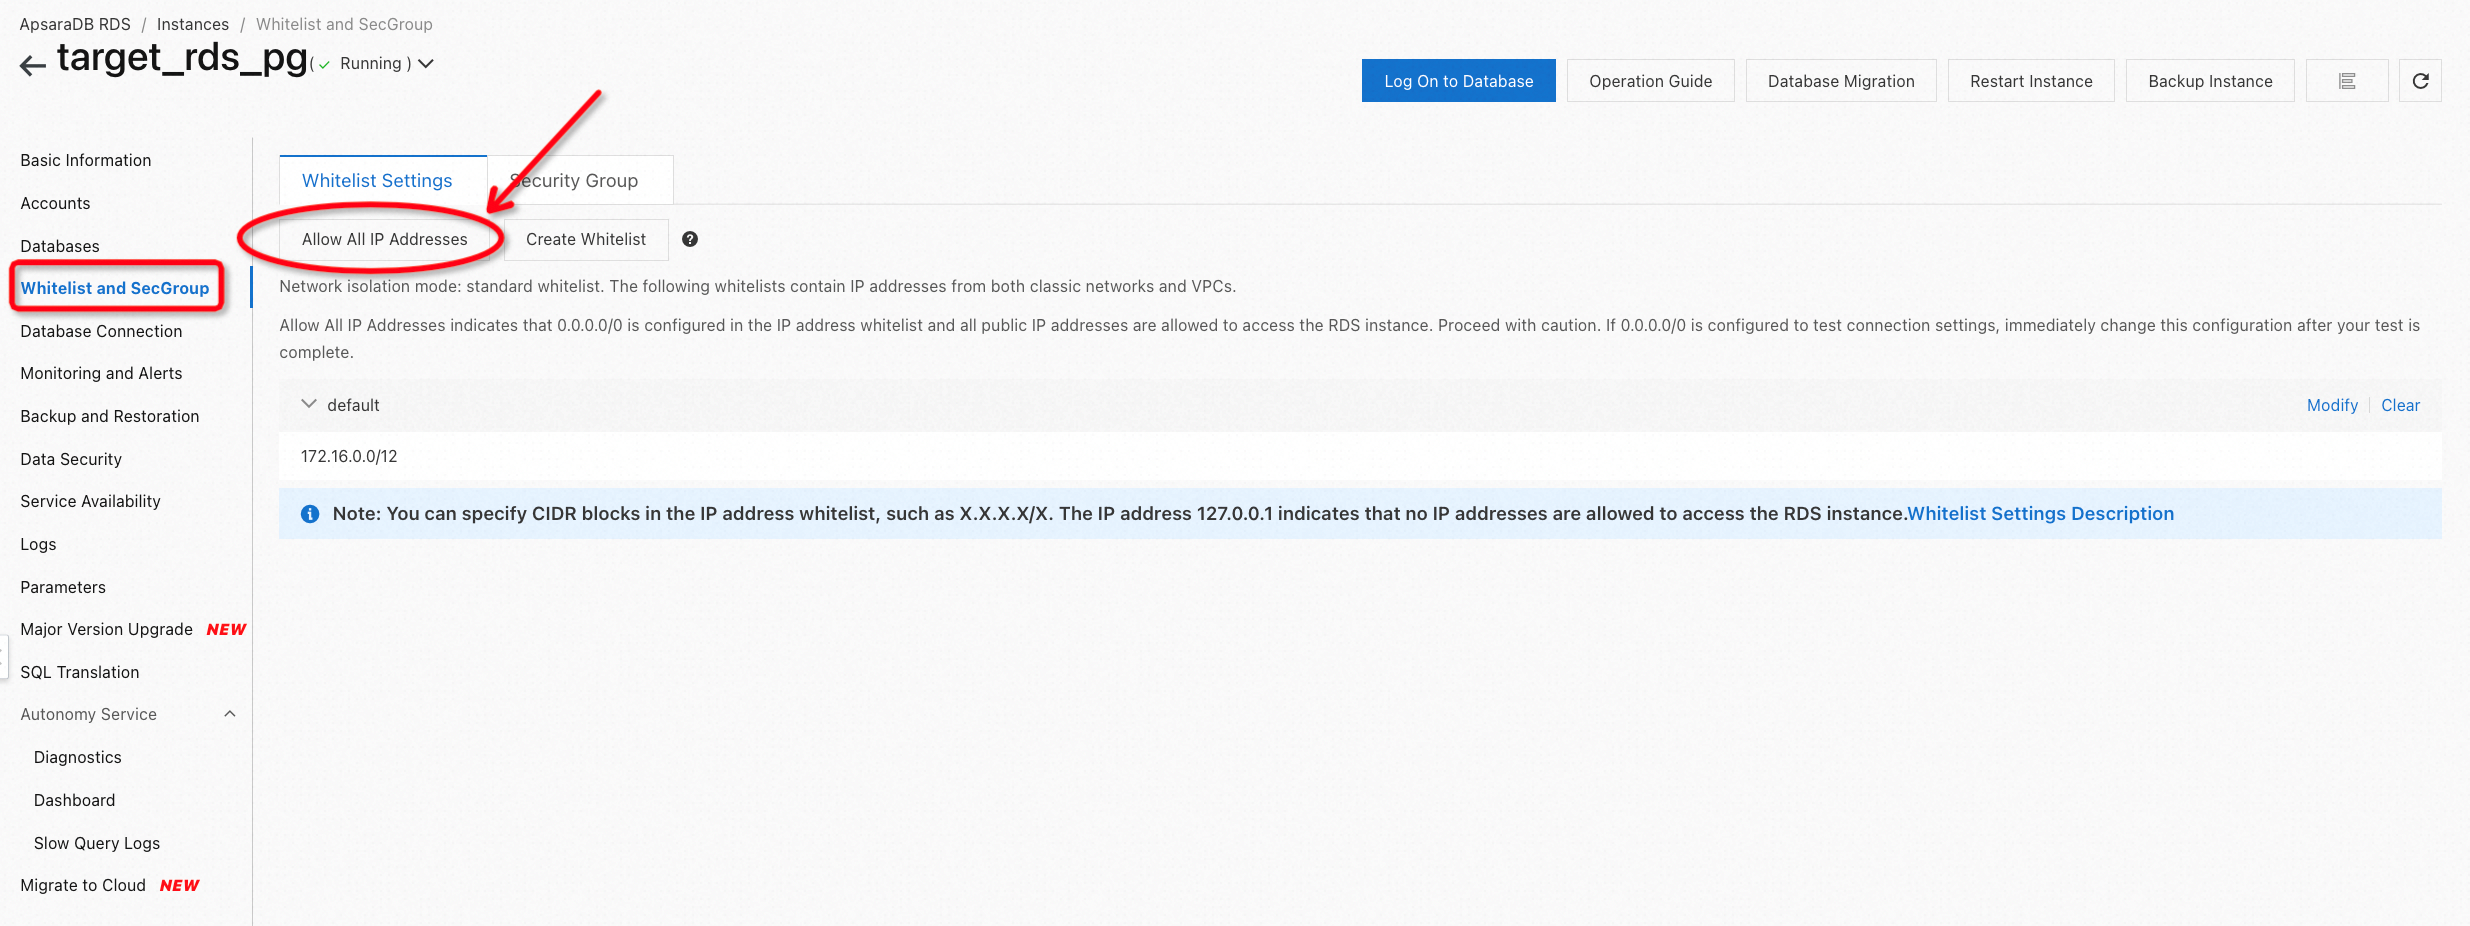
Go to the RDS console and set whitelist of the instance to determine who can create connections with it. In this lab, you can refer to the following example to accept all IPs. However, if you are operating in a production environment, you need to use the configuration 0.0.0.0/0 with caution as it's not secure.

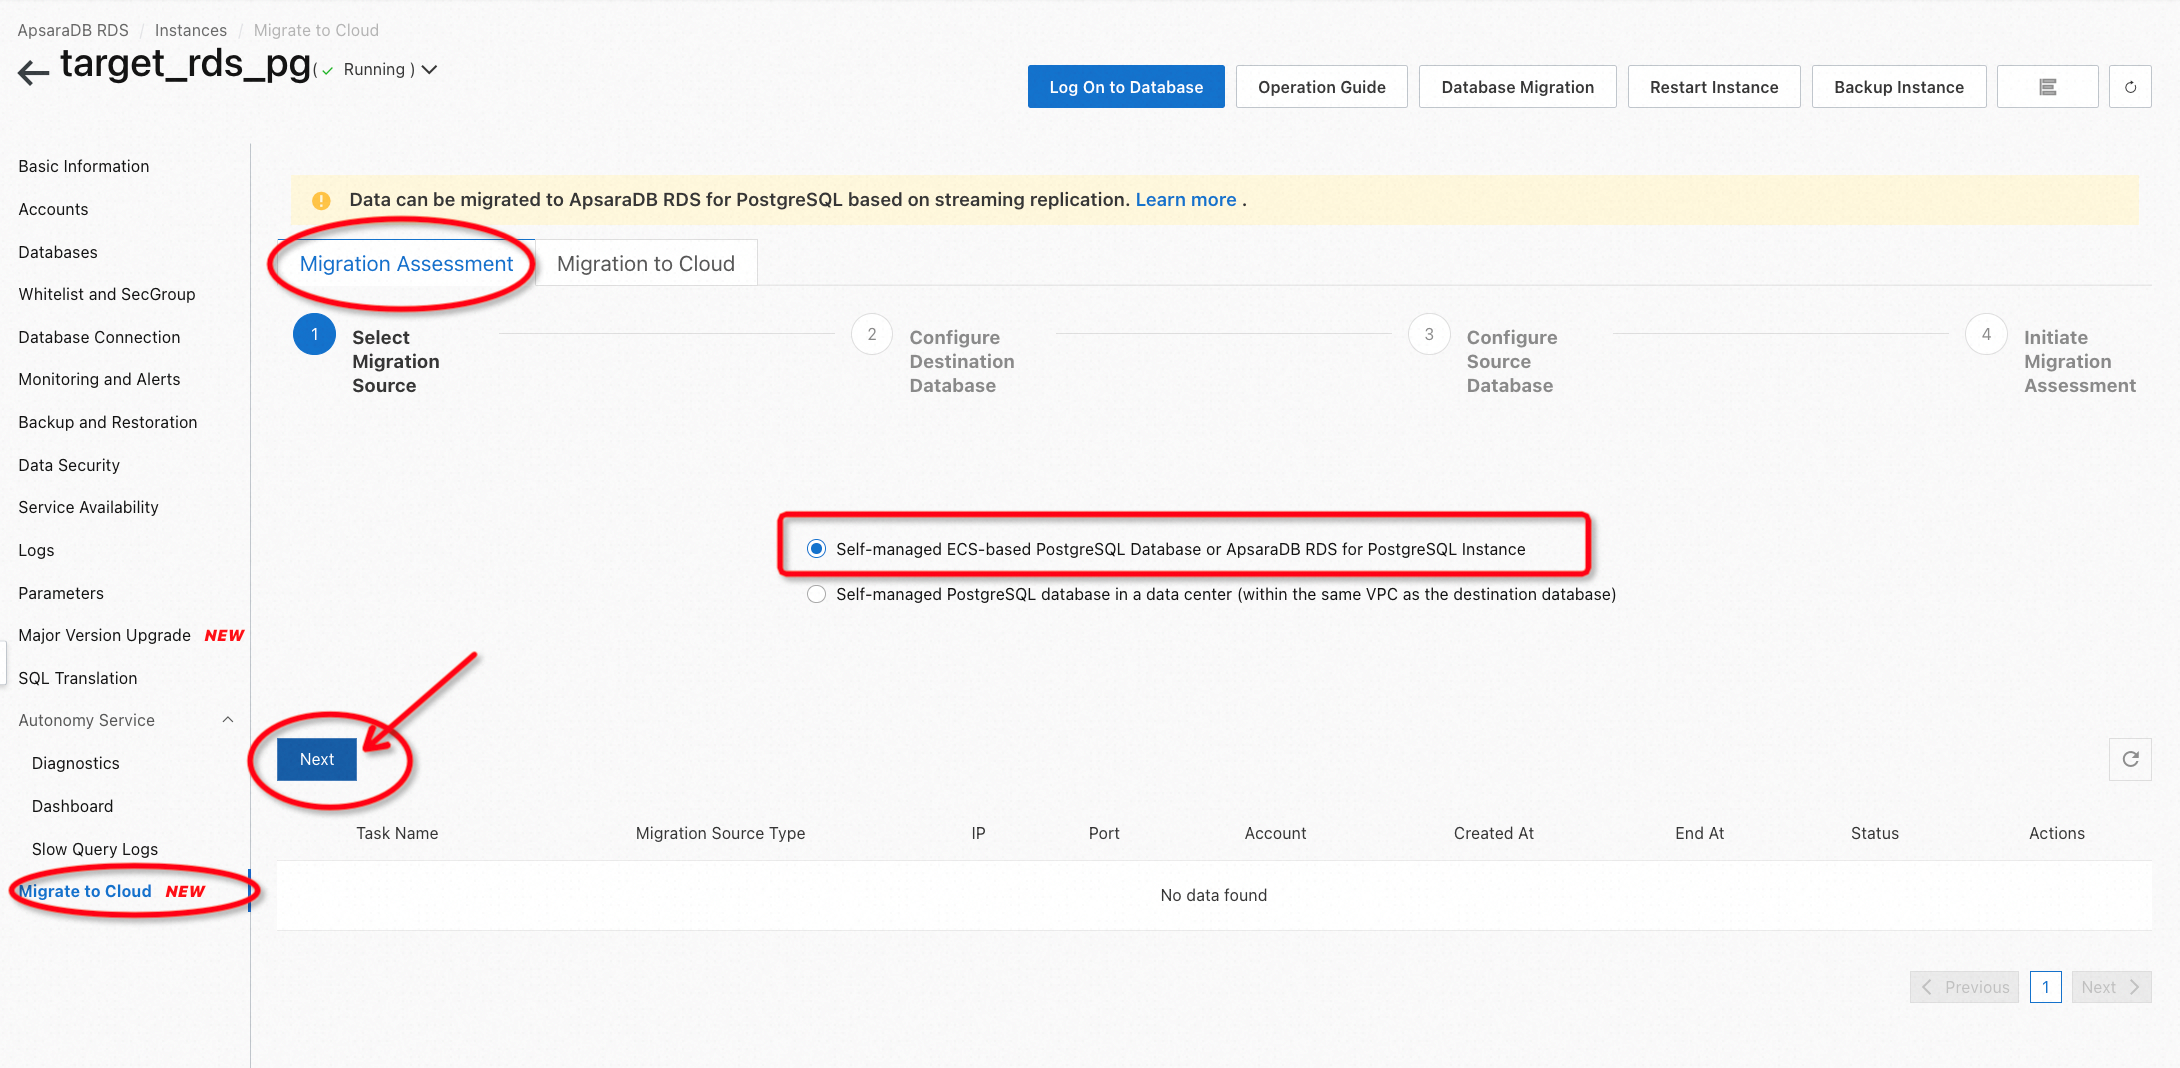
Go to the RDS console, switch to the region where the target database is located and create a migration task. Then click Migrate to Cloud on the left navigation pane to perform migration evaluation, as shown in the following example.
Please note that migrating through the Migrate to Cloud feature is free to use, and it supports incremental data migration for free! It's a good choice when you need to migrate PostgreSQL to ApsaraDB RDS for PostgreSQL.

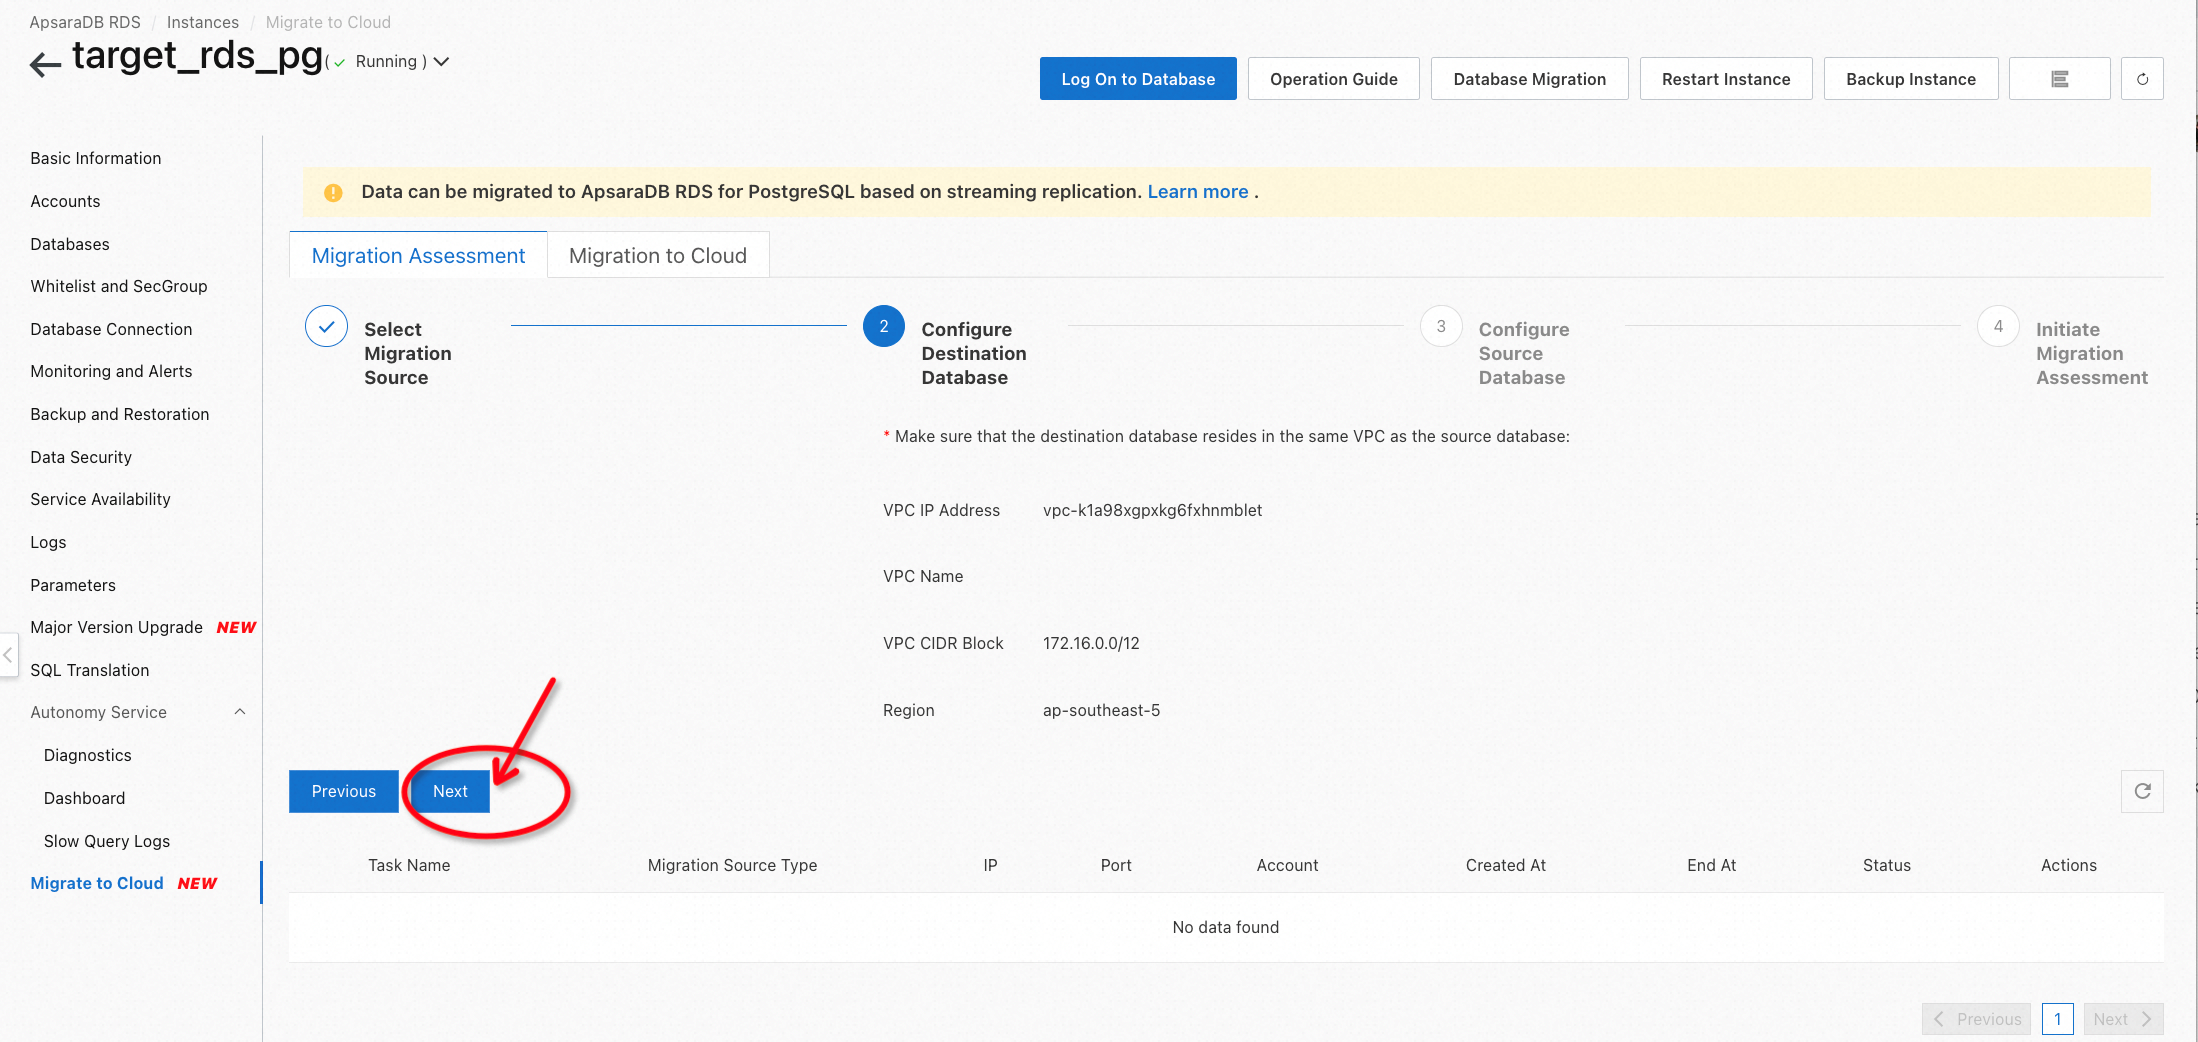
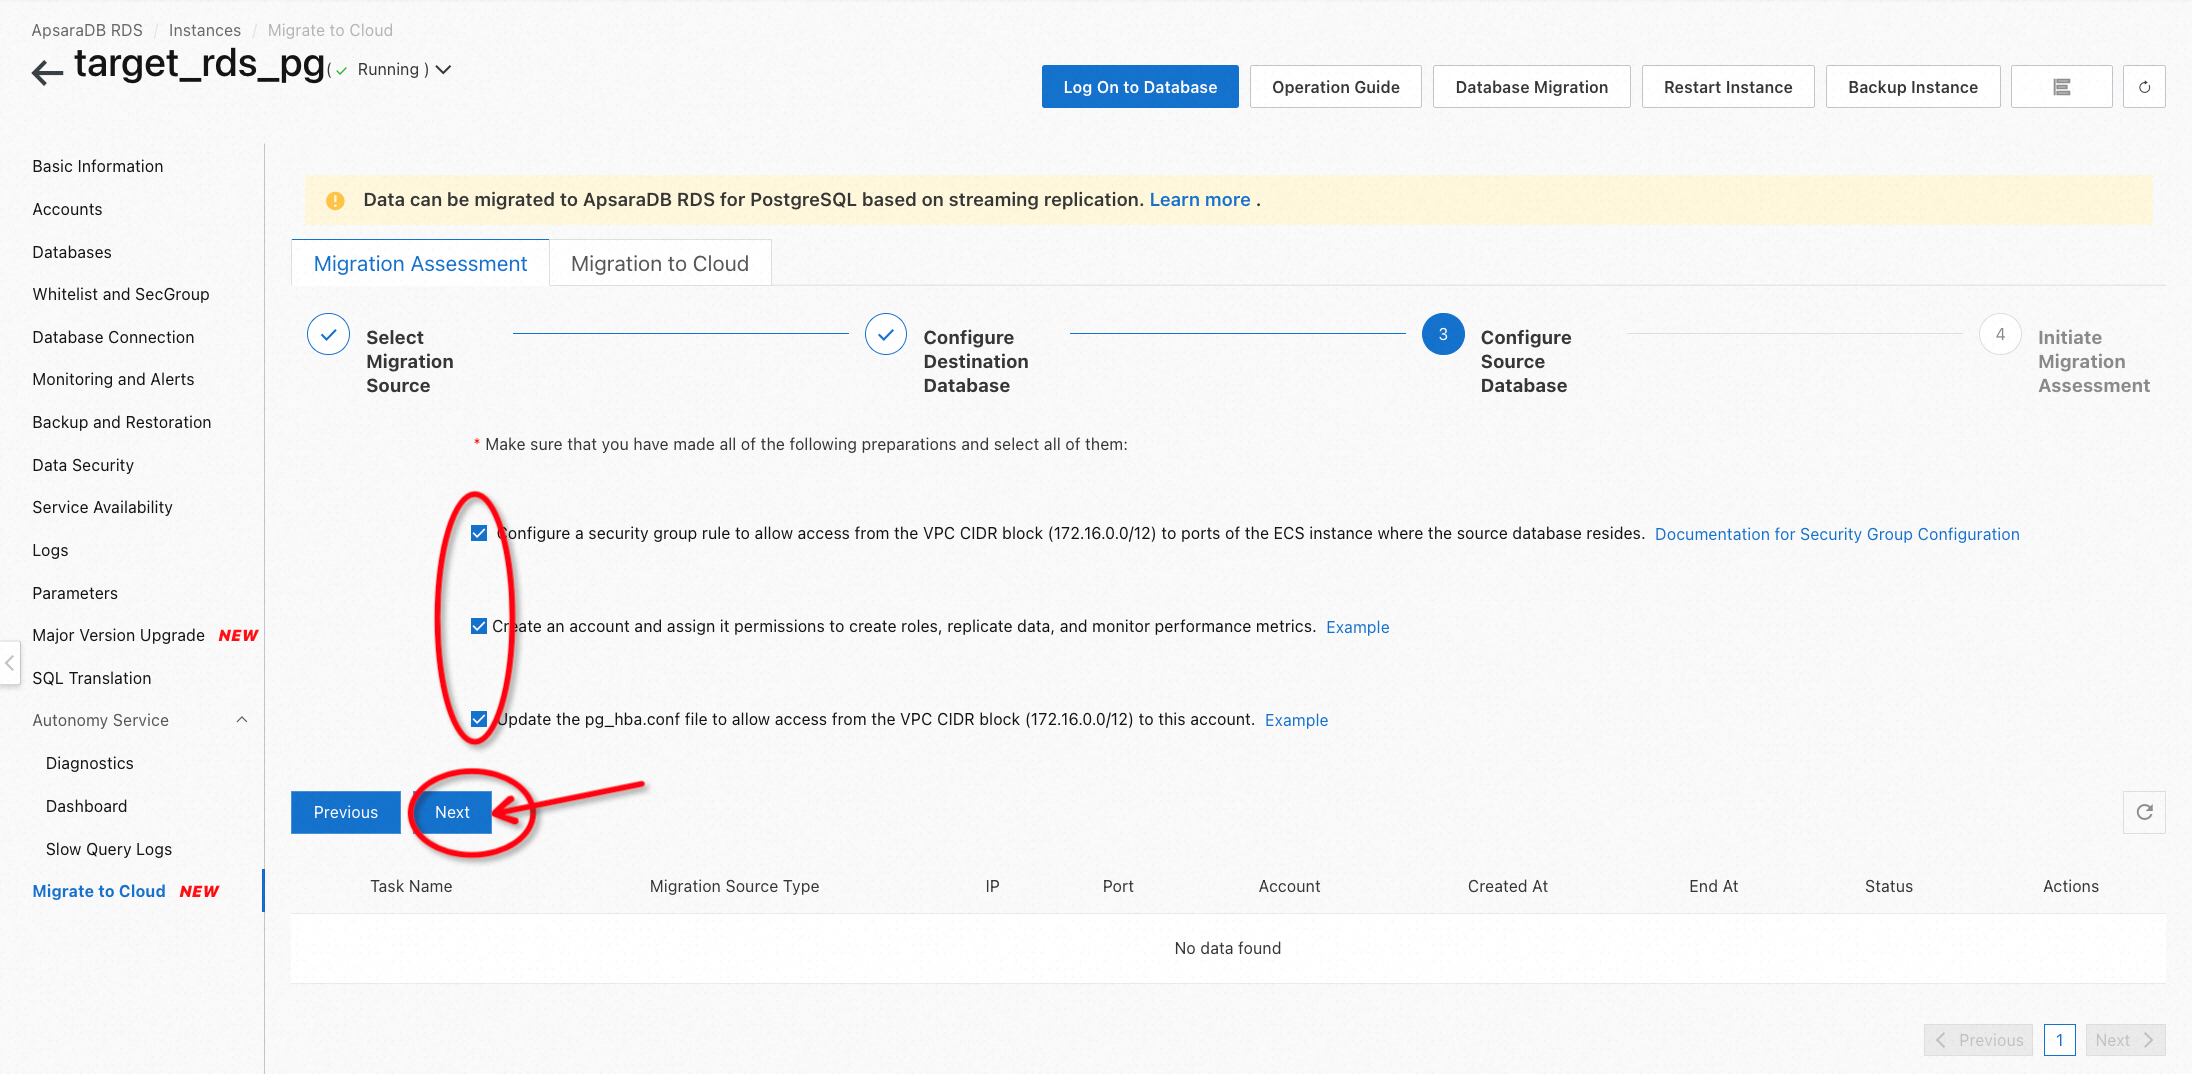

During the configuration, you need to check the IP address and listening port of the user-created Postgres and fill in the blank.
For the IP address, you can check the ECS console or execute the following commands to query.
ip a
netstat -a | grep PGSQL


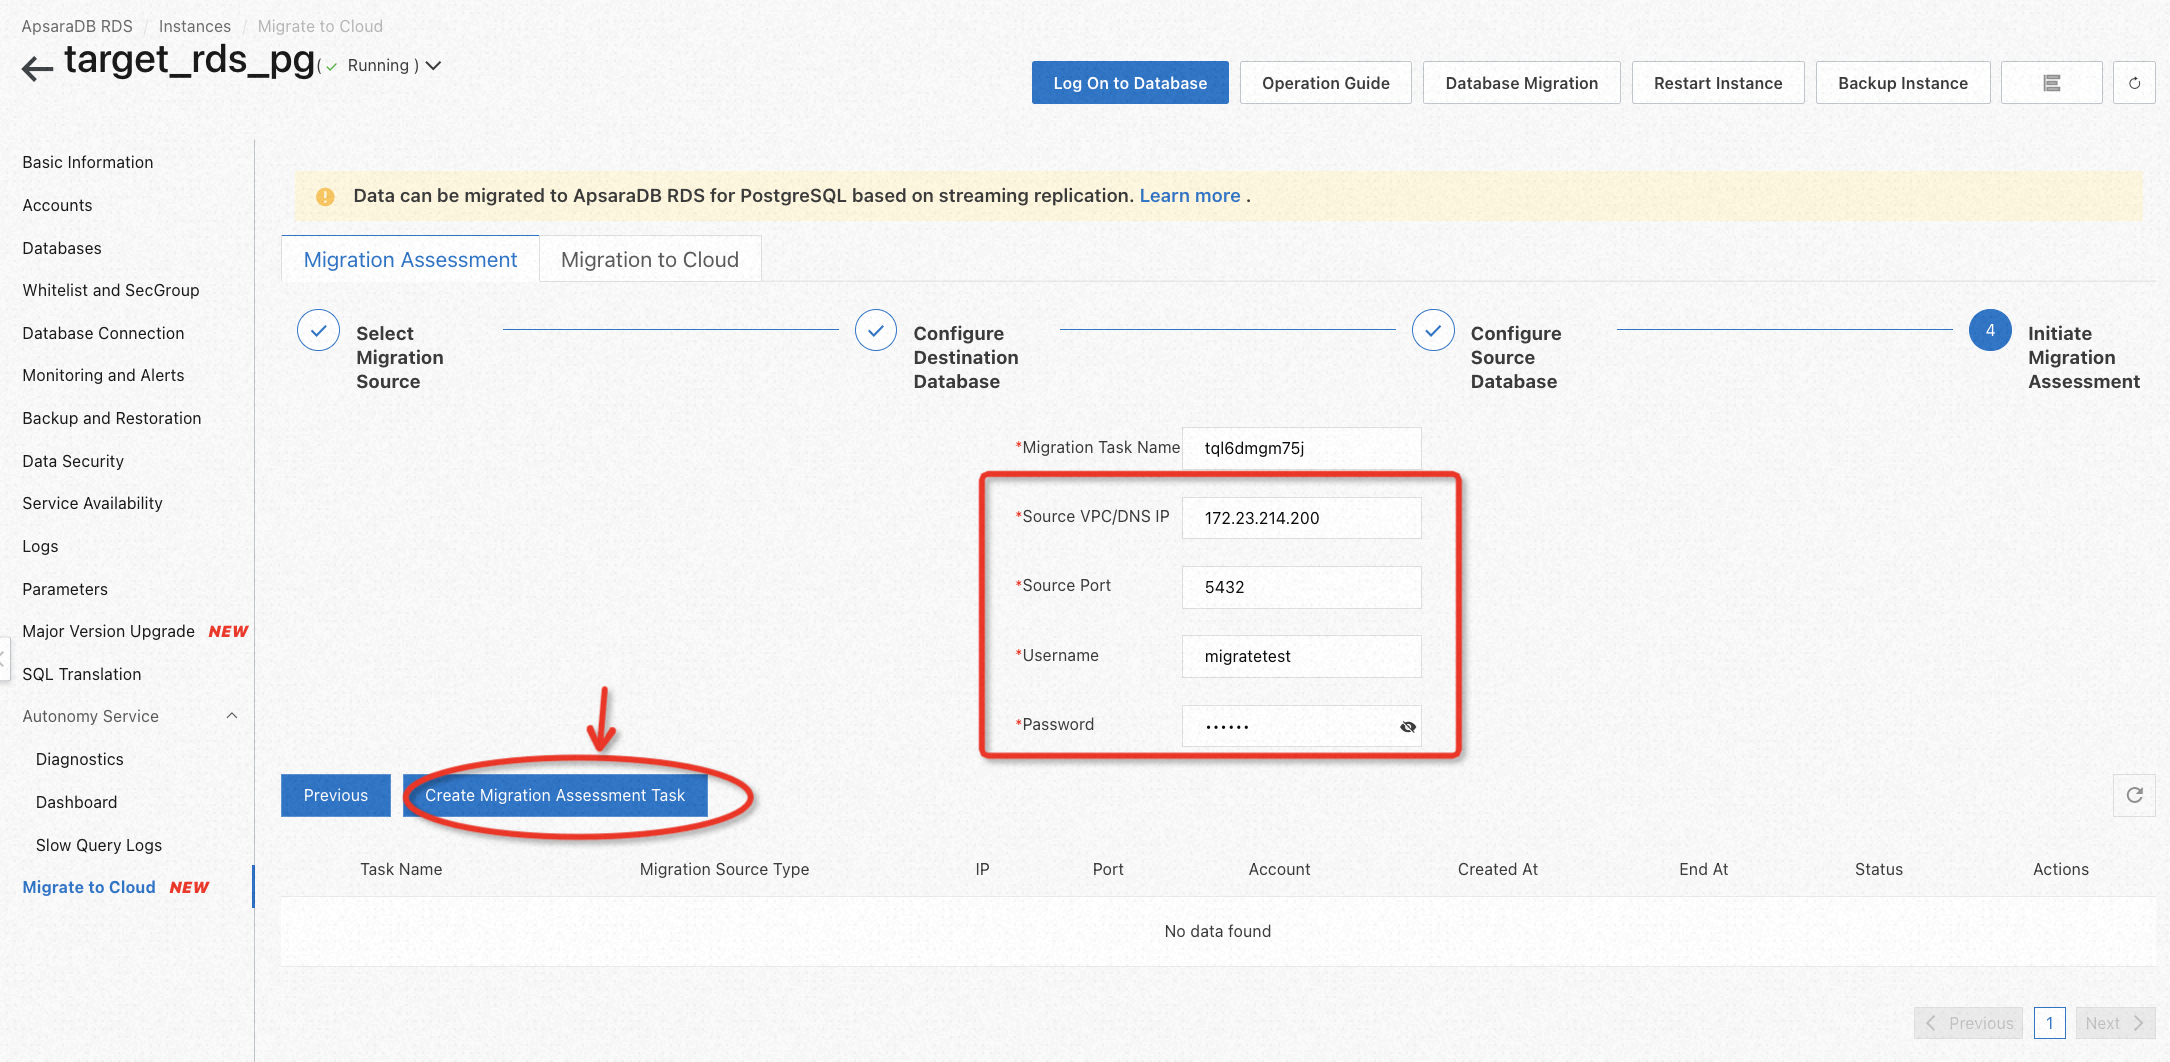
After that, the migration evaluation starts running automatically.
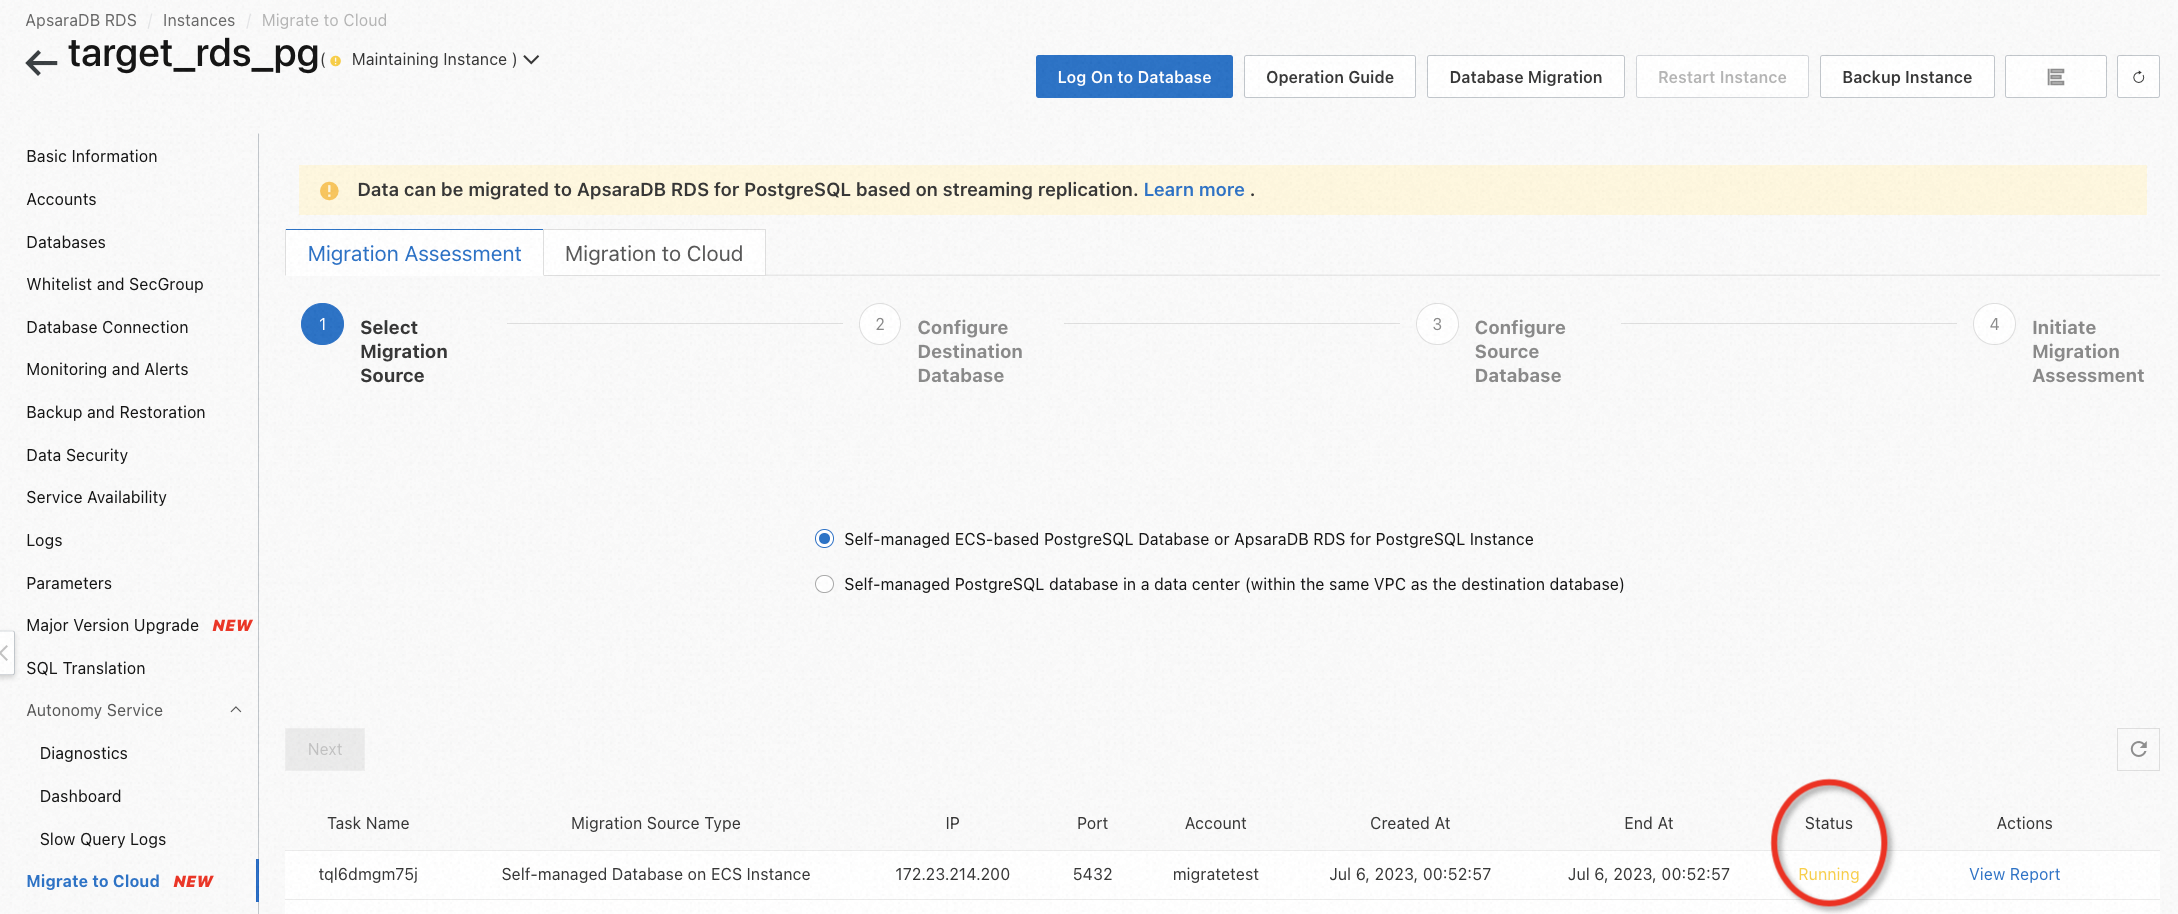
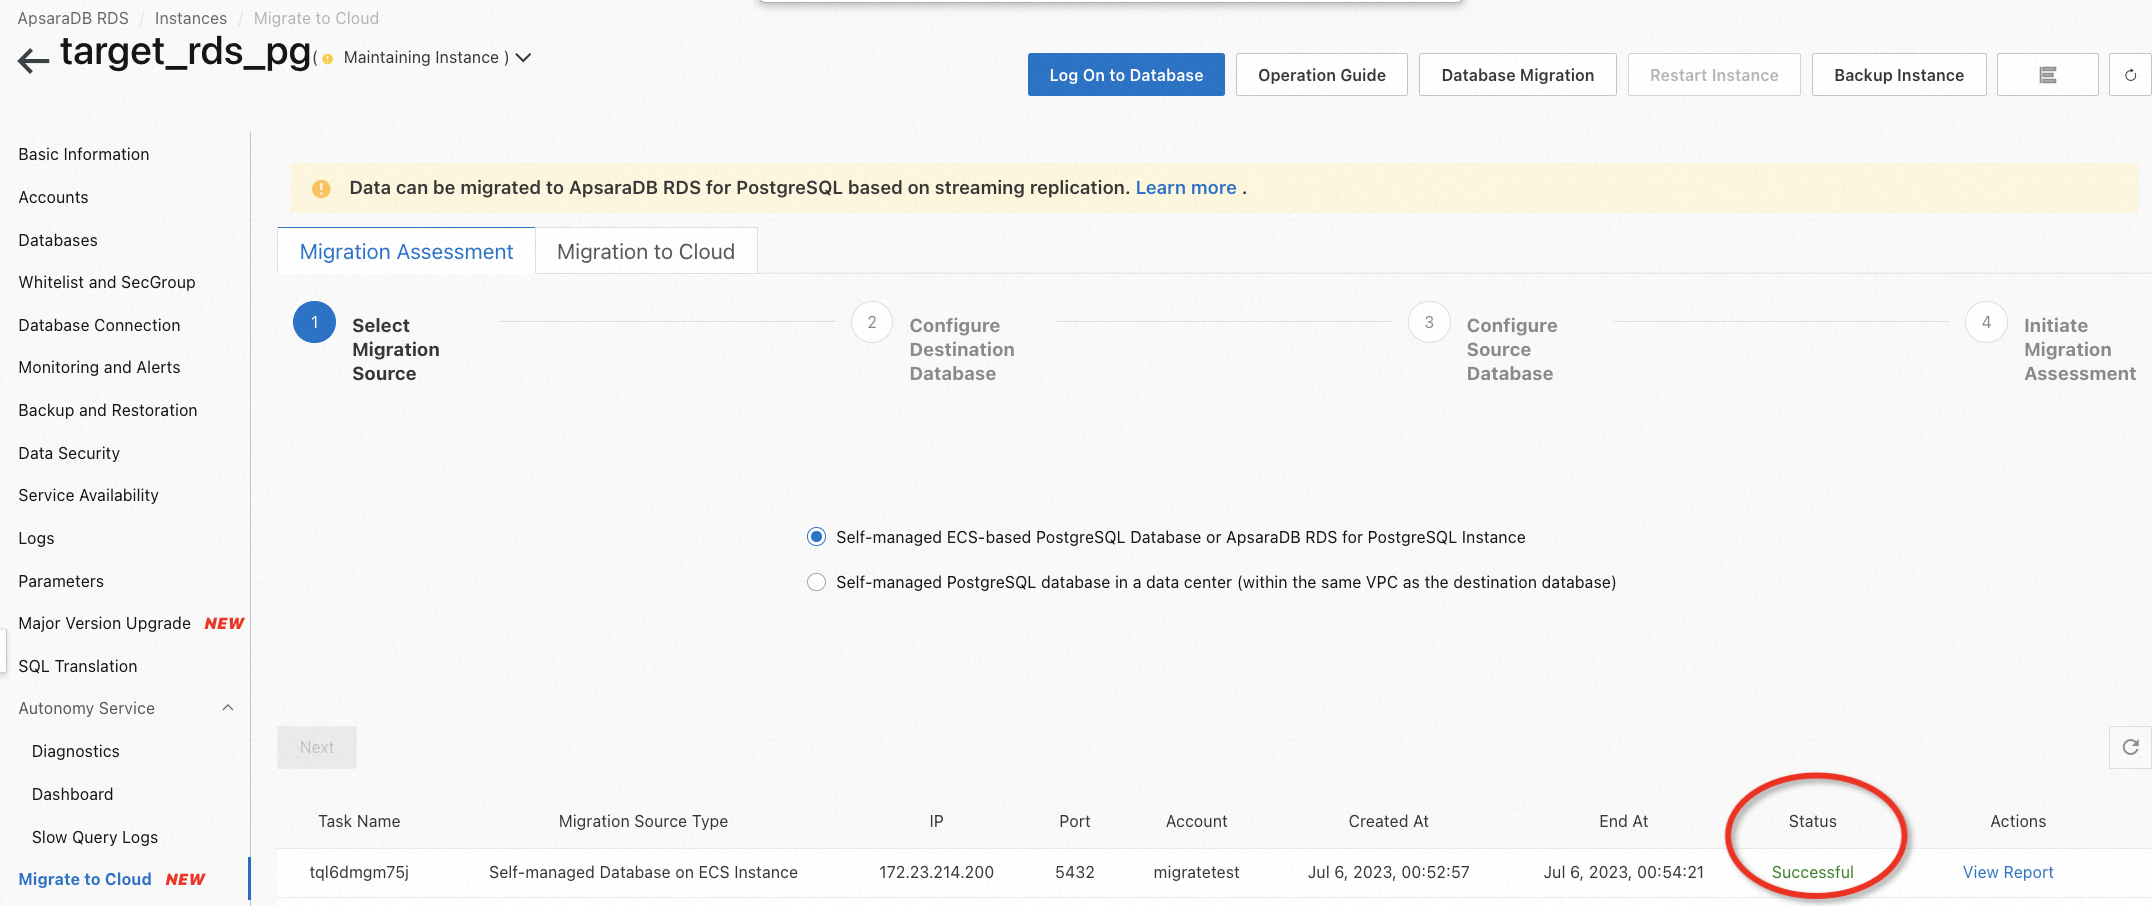
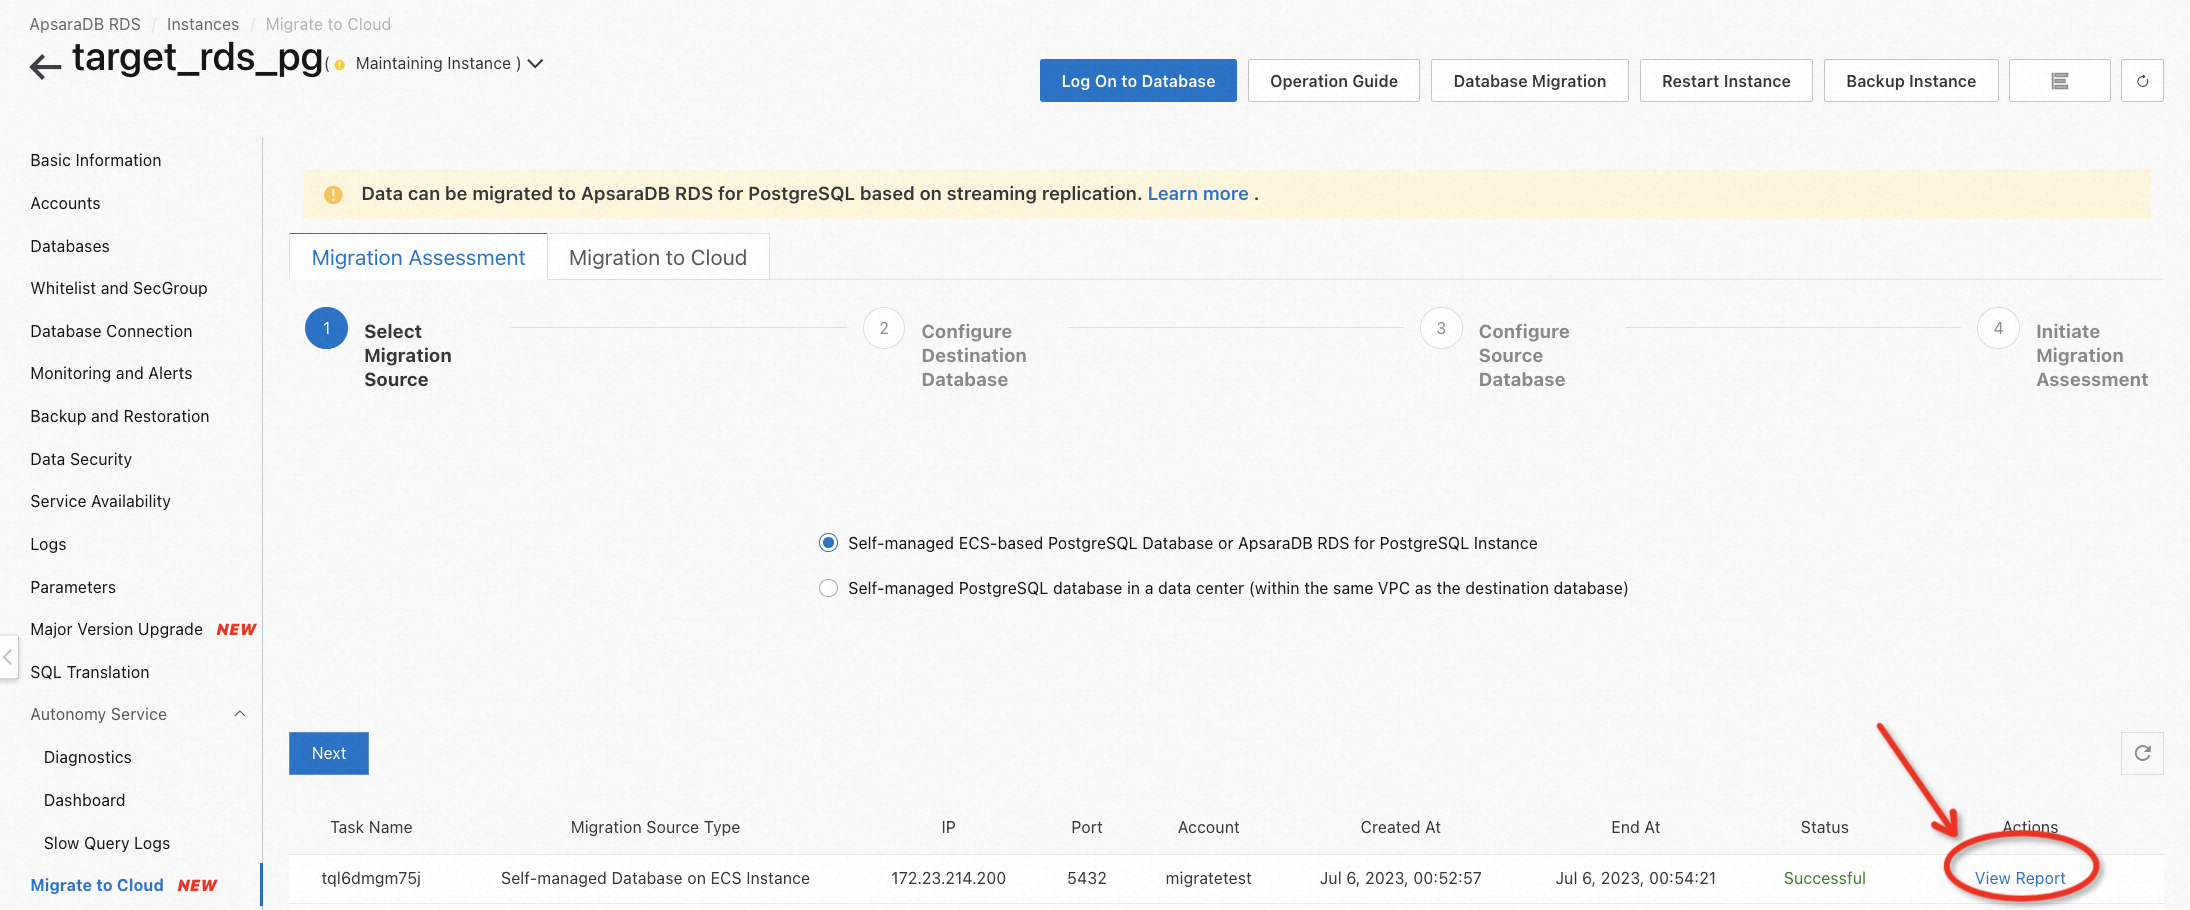
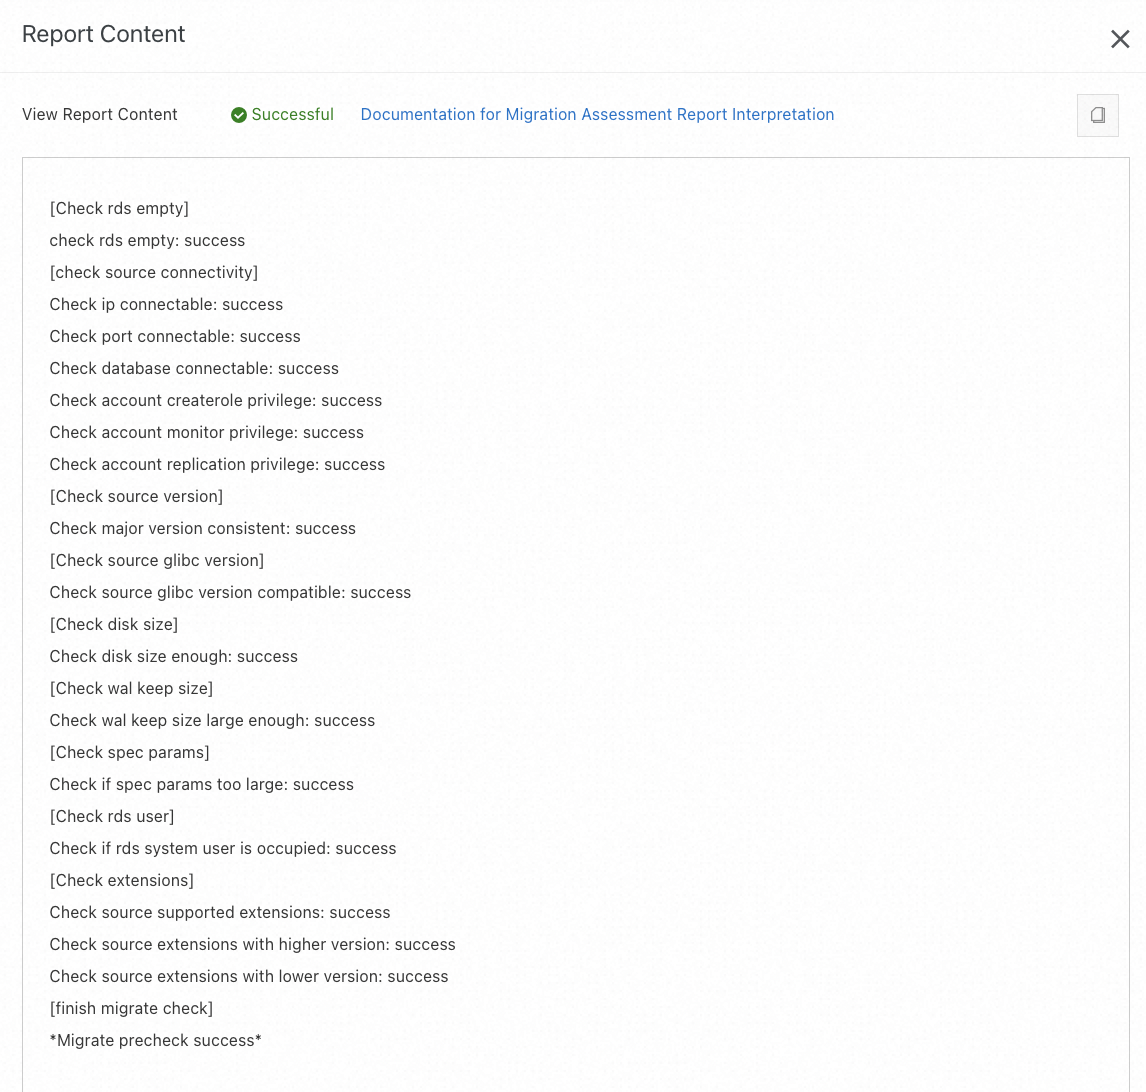
You can check the migration assessment report when the evaluation is finished.
[Troubleshooting]
If you are failed to pass the migration assessment like below, please execute the following code on the webshell to create user on source database. After that, go back to the RDS console and try to access again.
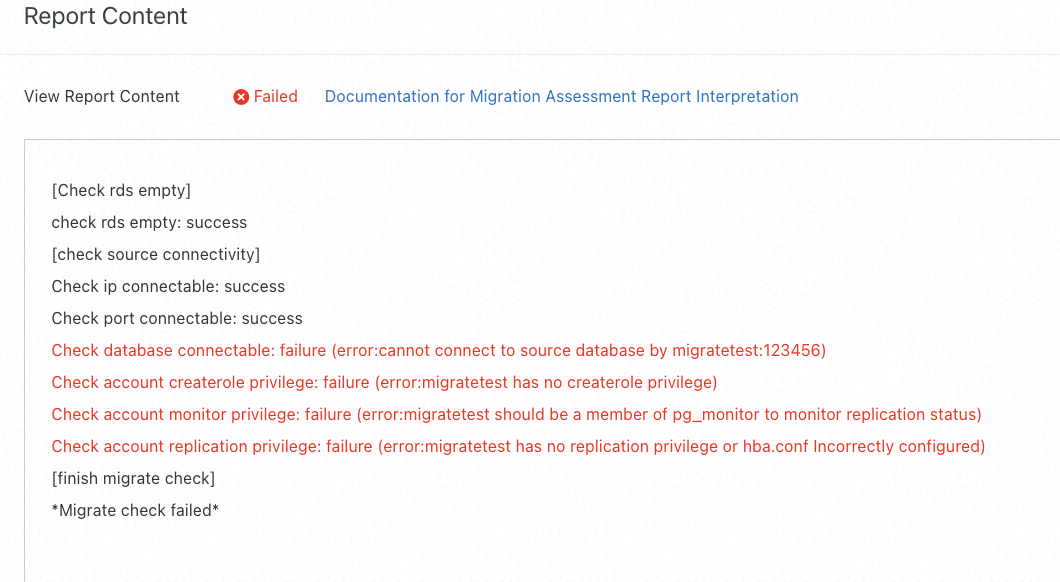
sudo -u postgres psql
CREATE USER migratetest CREATEROLE REPLICATION LOGIN PASSWORD '123456';
GRANT pg_monitor TO migratetest;
\qAfter the migration assessment, click Migrate to Cloud to create a migration task. This kind of cloud migration achieves data migration between Postgres through the Streaming Replication (SR) feature, which is faster and more stable. After setting up a migration task, the task begins with a precheck, full backup, and incremental synchronization.
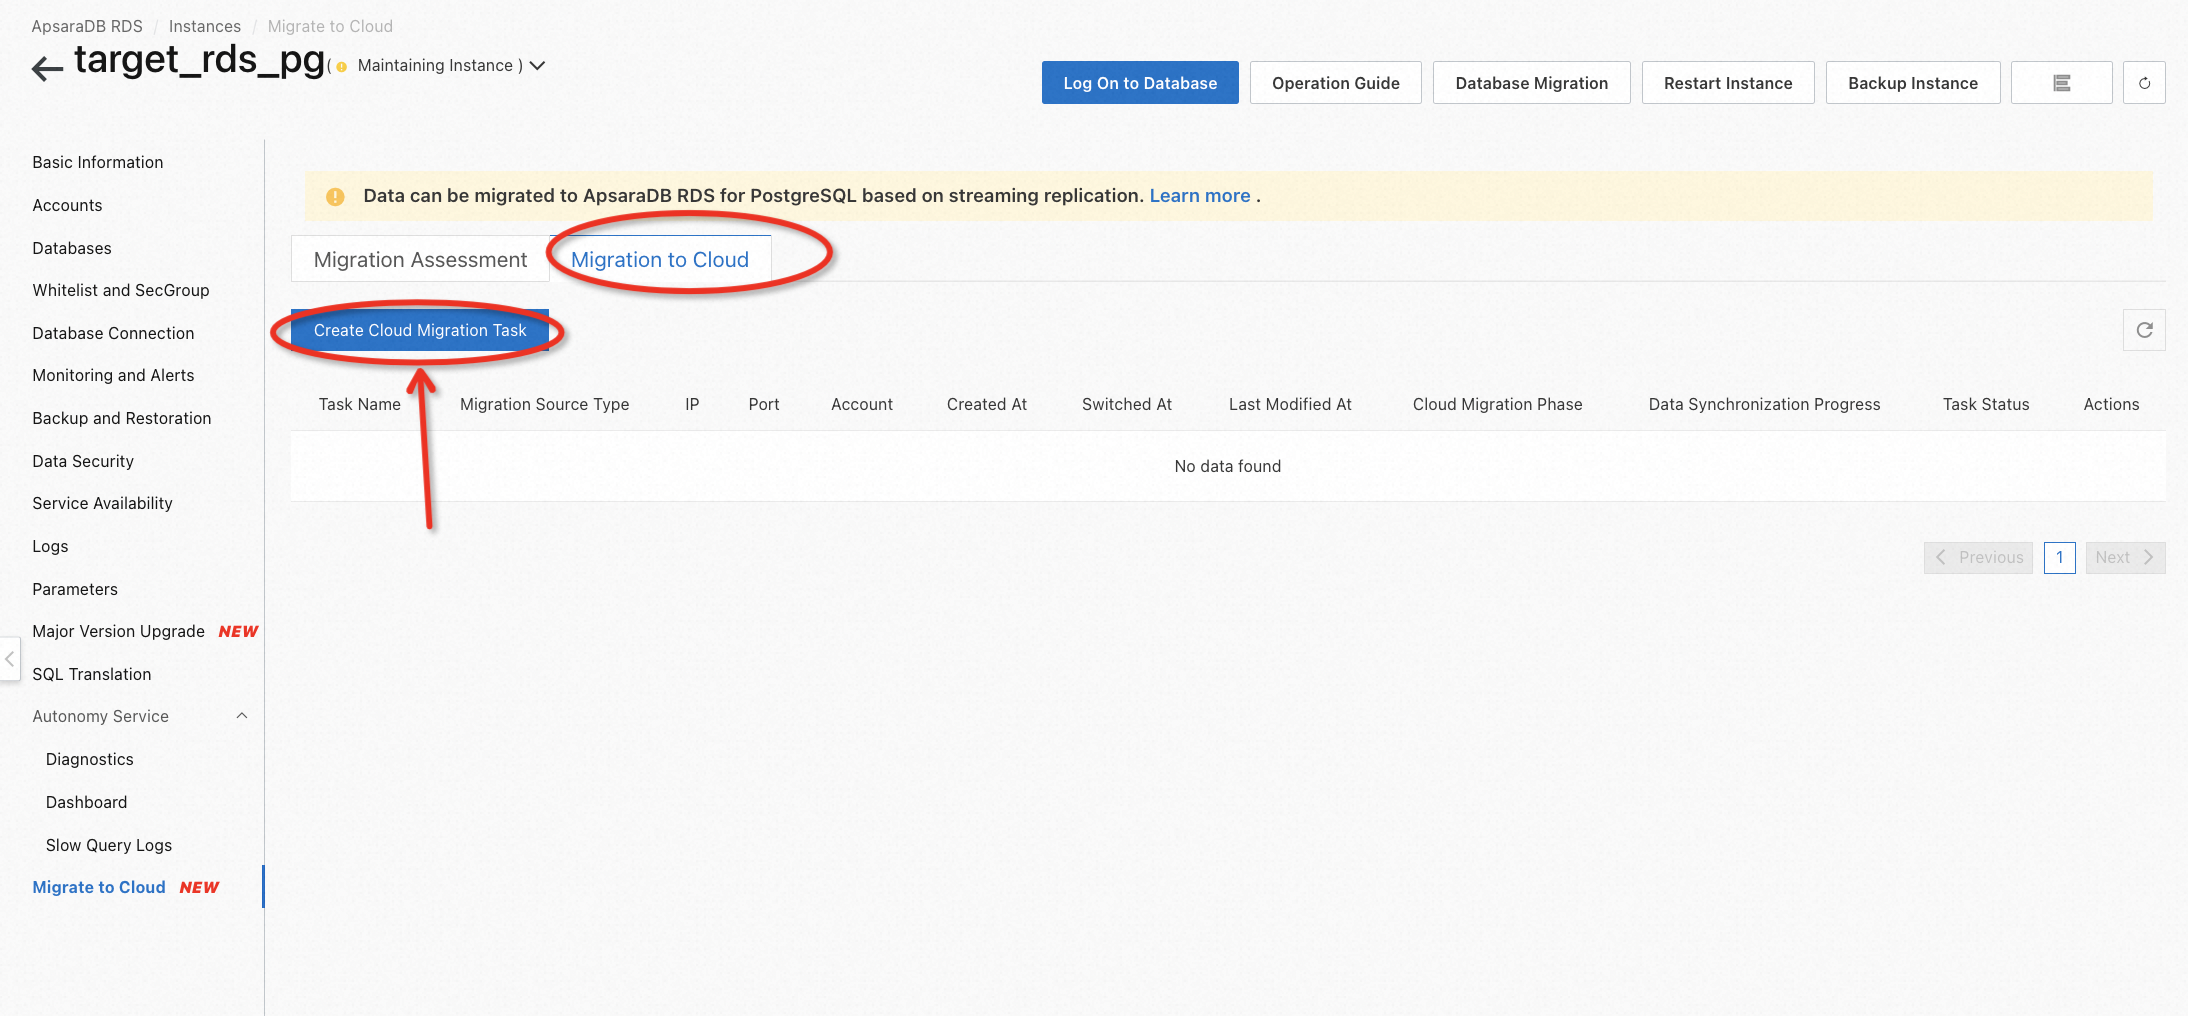
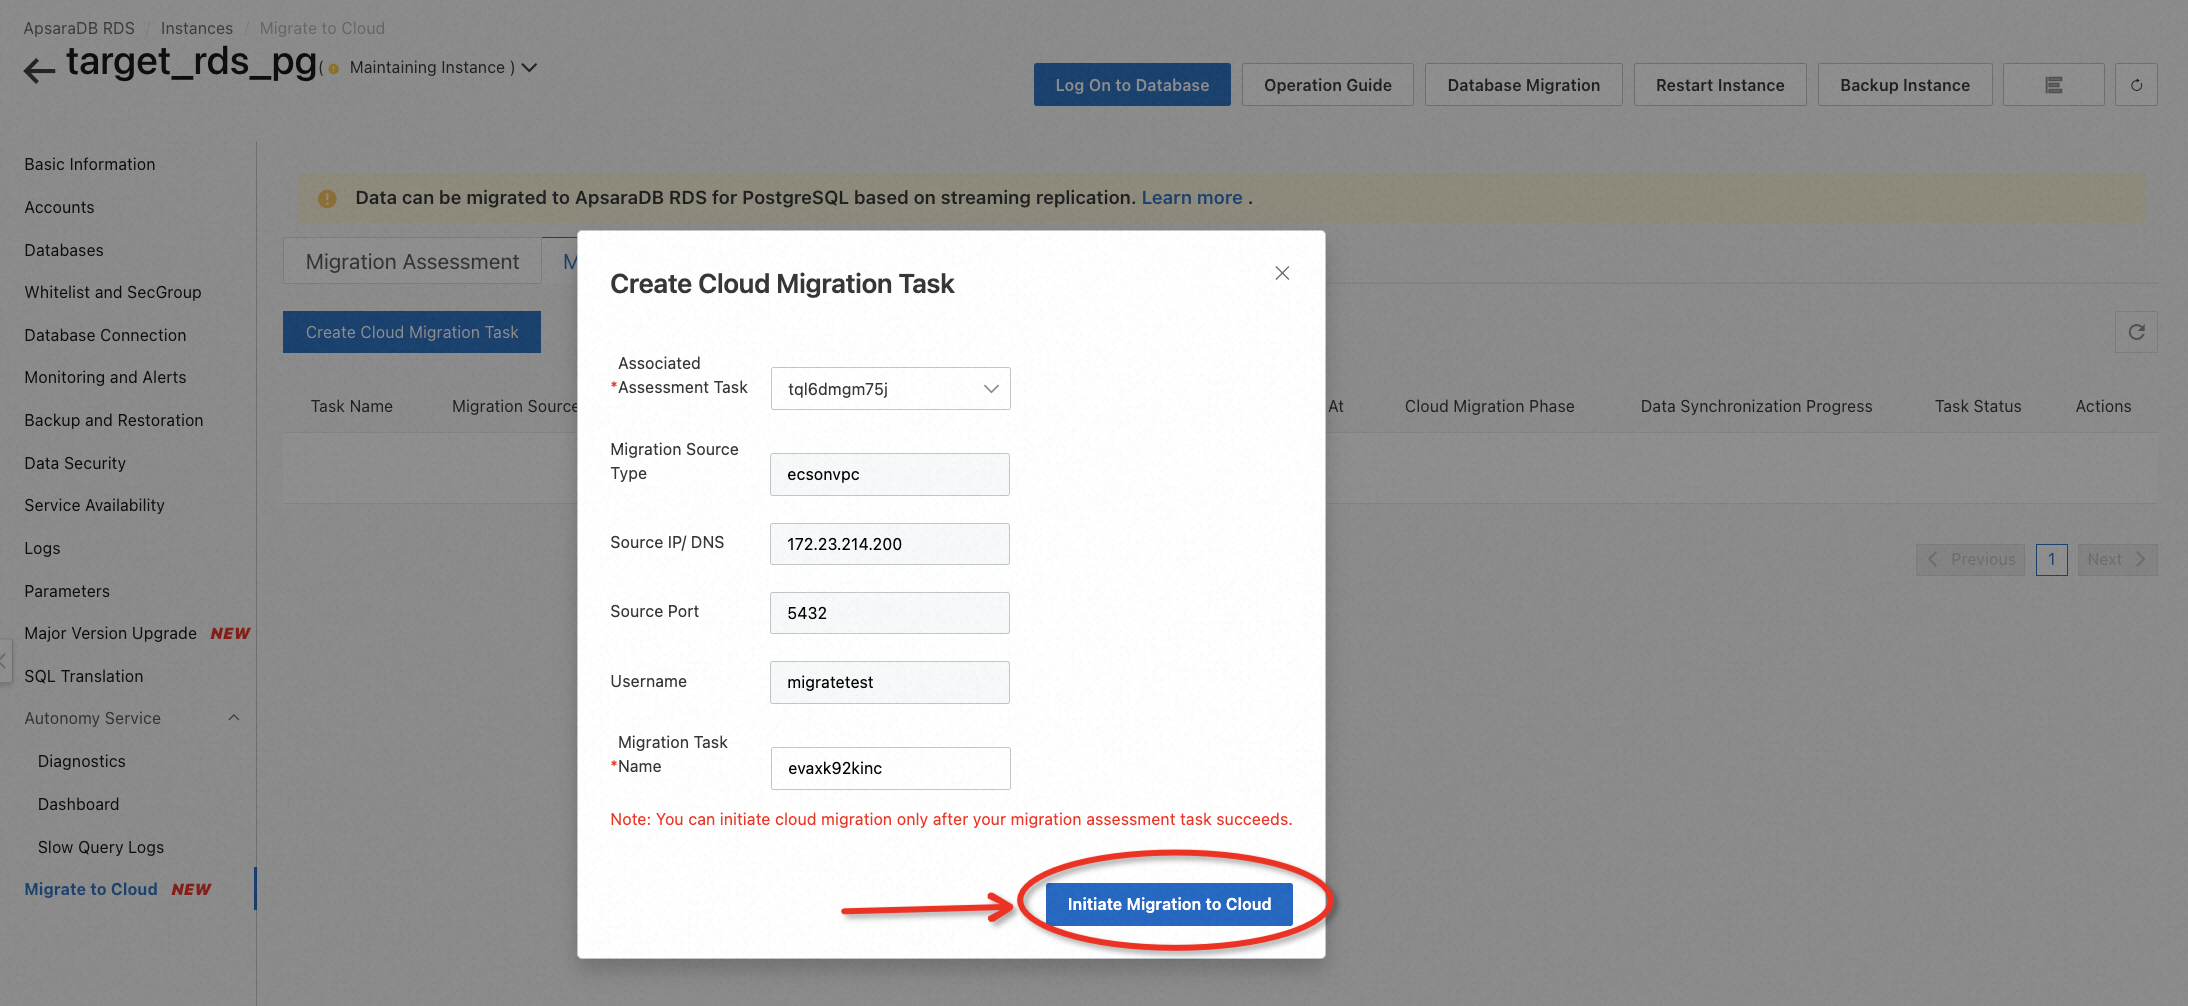
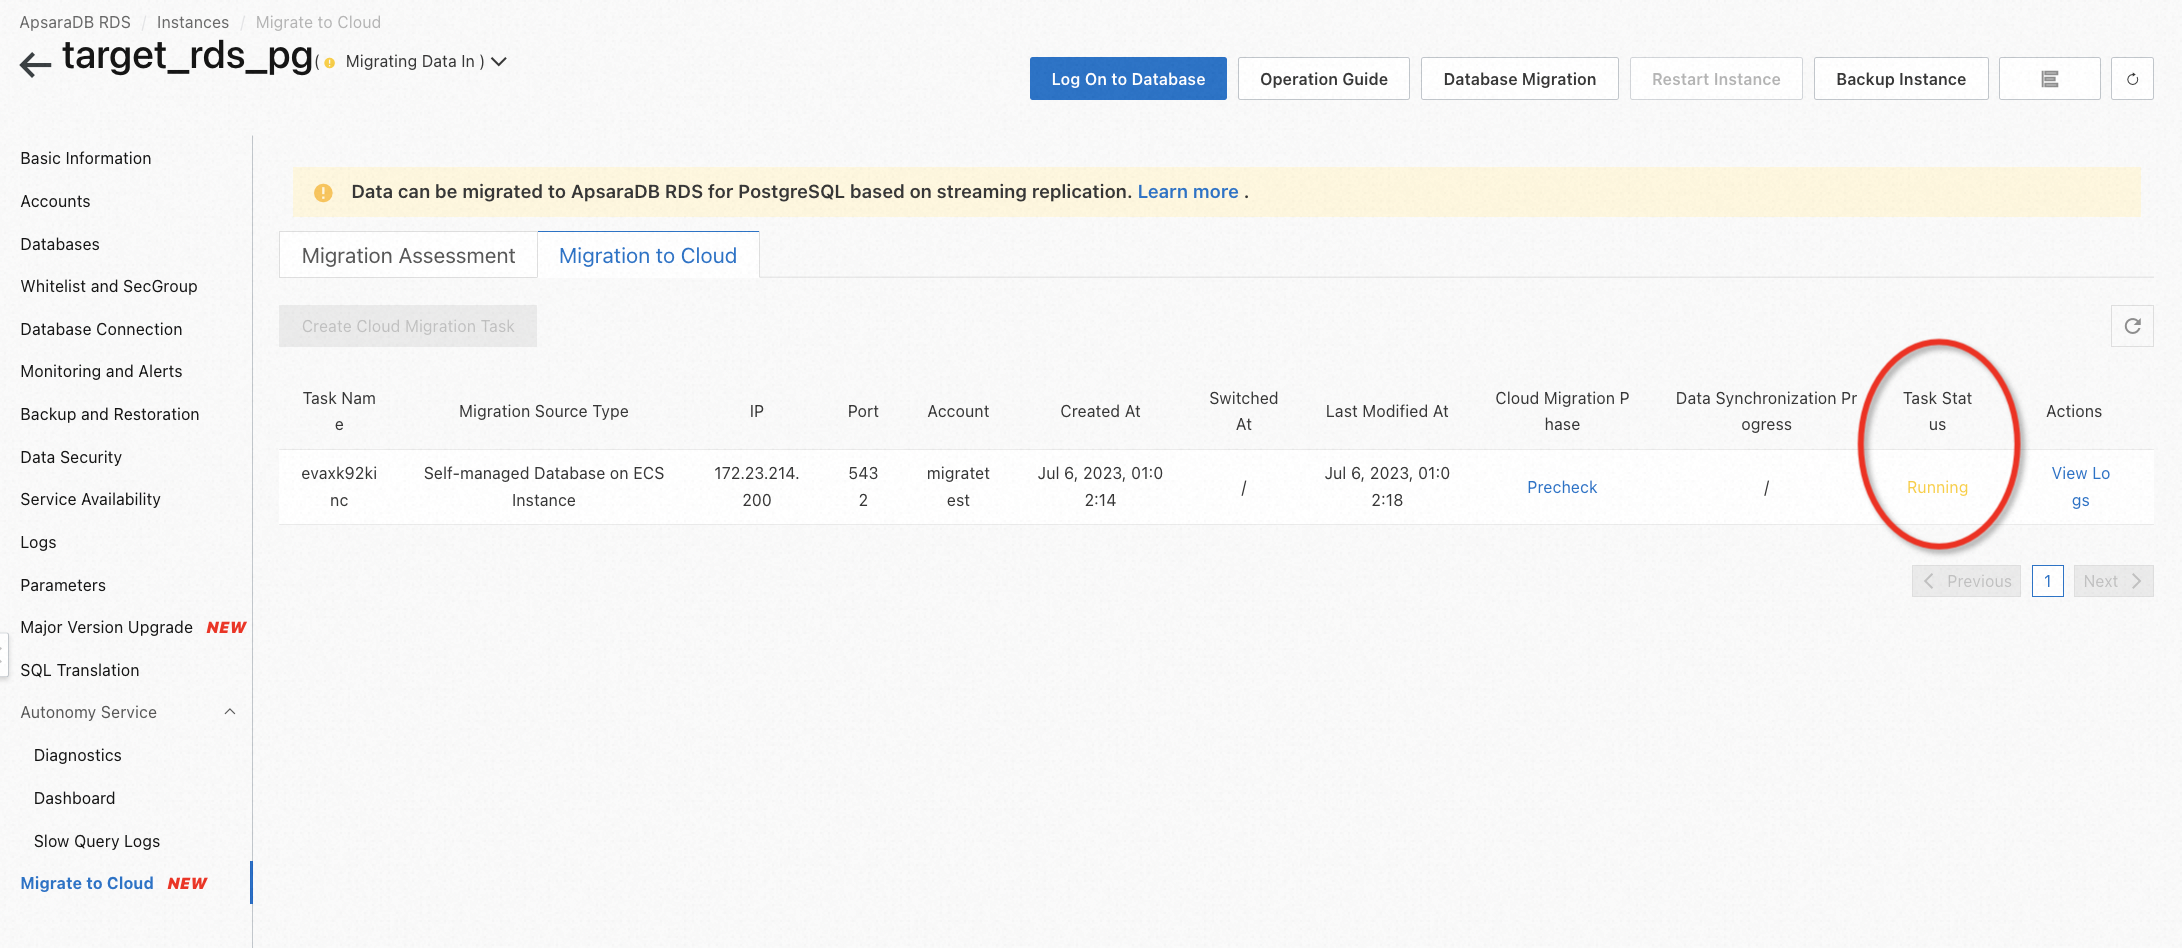


When the task status becomes Incremental Synchronization, the migration is finished, but you can still go ahead for further tests over the on-going data synchronization.
Before the end of migration, there is a need to check the data consistency of the source and target database. It's easy to do this if the data is not too much. For example, in this lab, you can log on to the target database and check schema information to roughly compare the consistency.


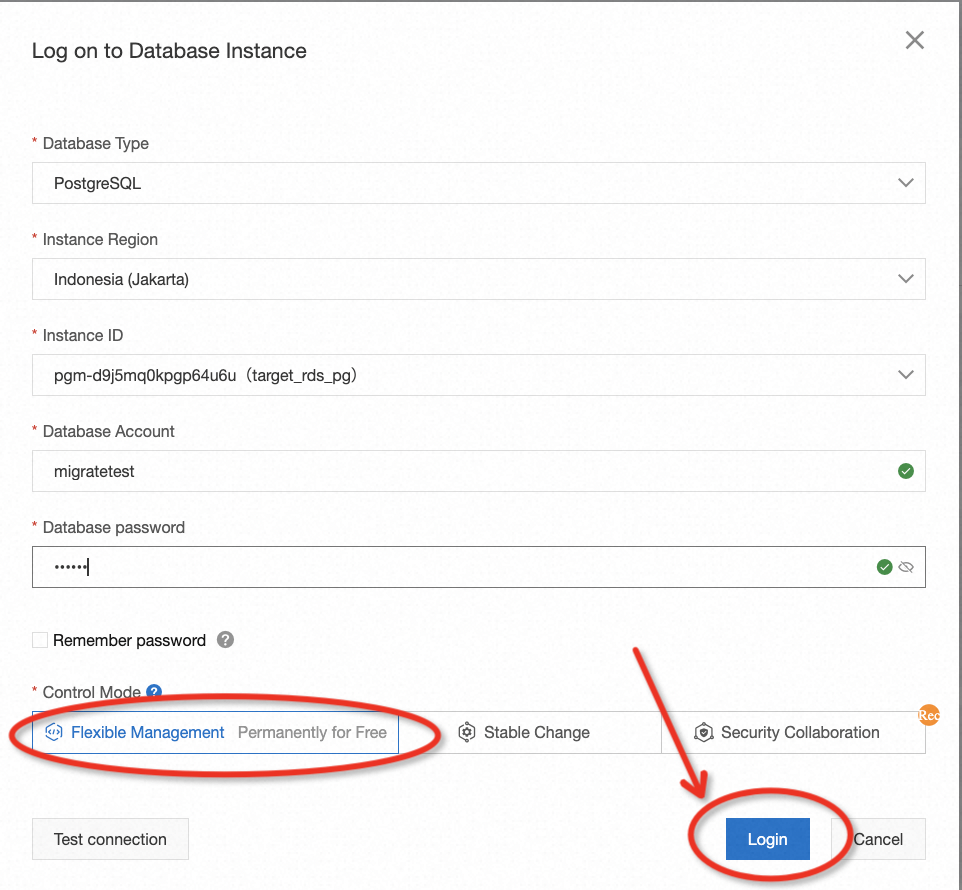
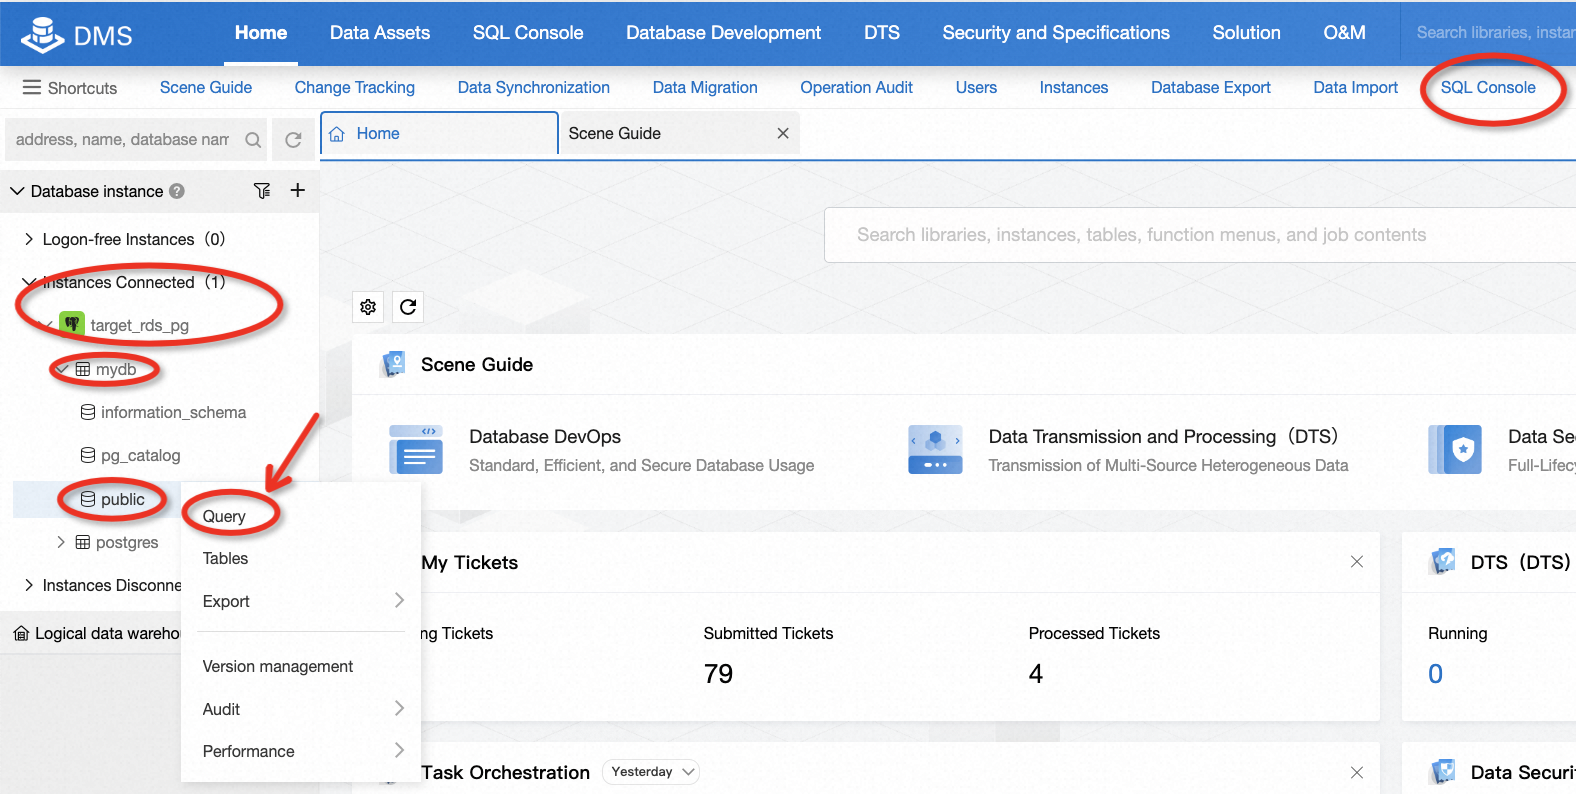
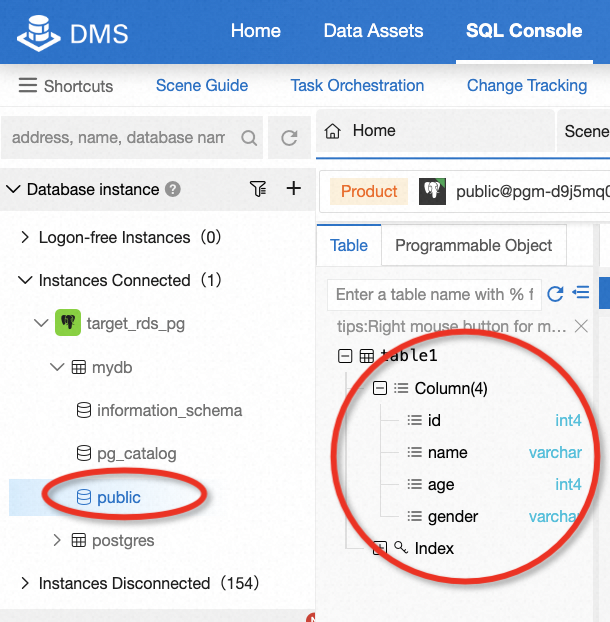
If you want to do further tests over ongoing data synchronization, follow this step. Otherwise, you can skip this part.
Now, create new tables on the source database and then check whether the incremental data can be synced or not.
1. Generate data on the source database (the user-created Postgres)
sudo -u postgres psql
\c mydb
\dn
\dt

CREATE TABLE table2 (
  id serial PRIMARY KEY,
  name varchar(50) NOT NULL,
  age int NOT NULL,
  gender varchar(10) NOT NULL
);

\dt
\q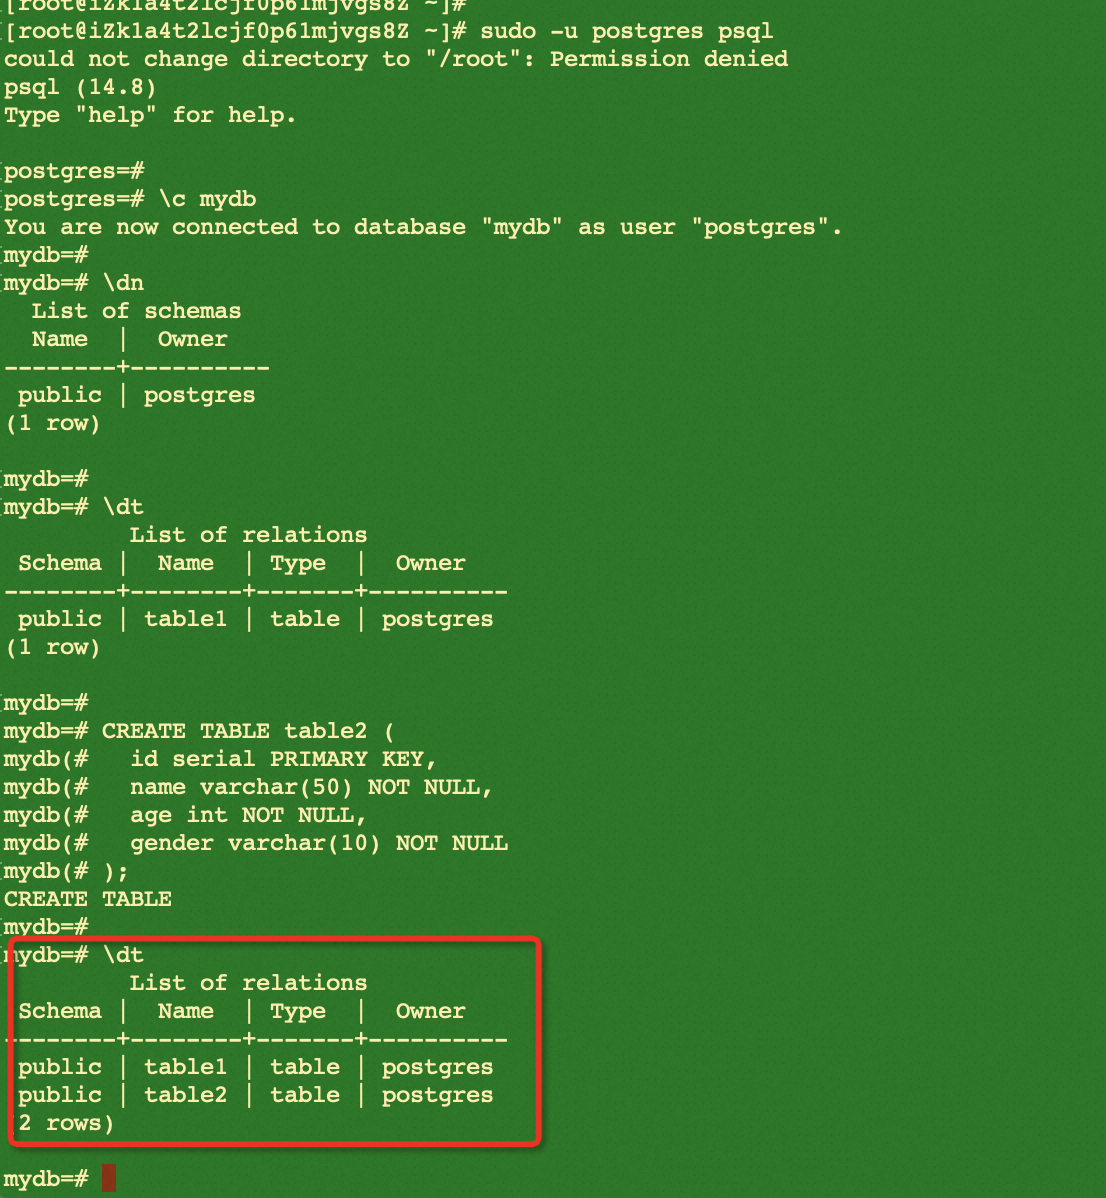
2. Check changes on the target database
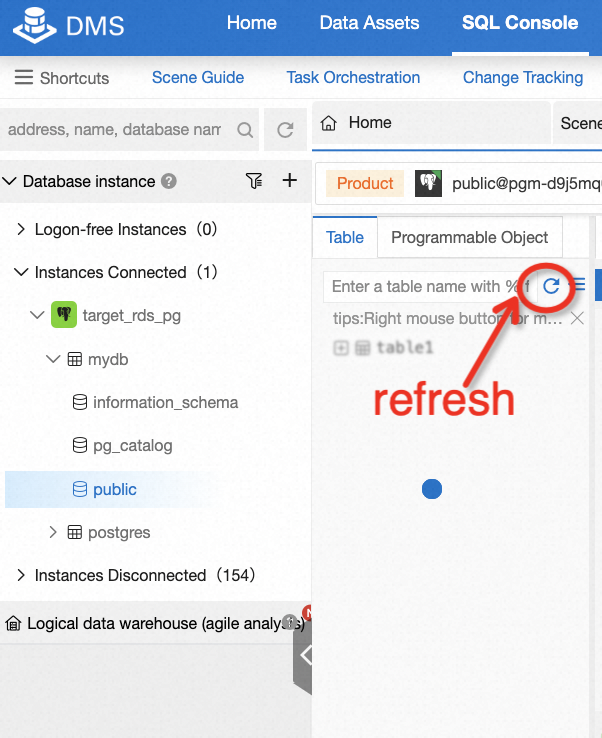
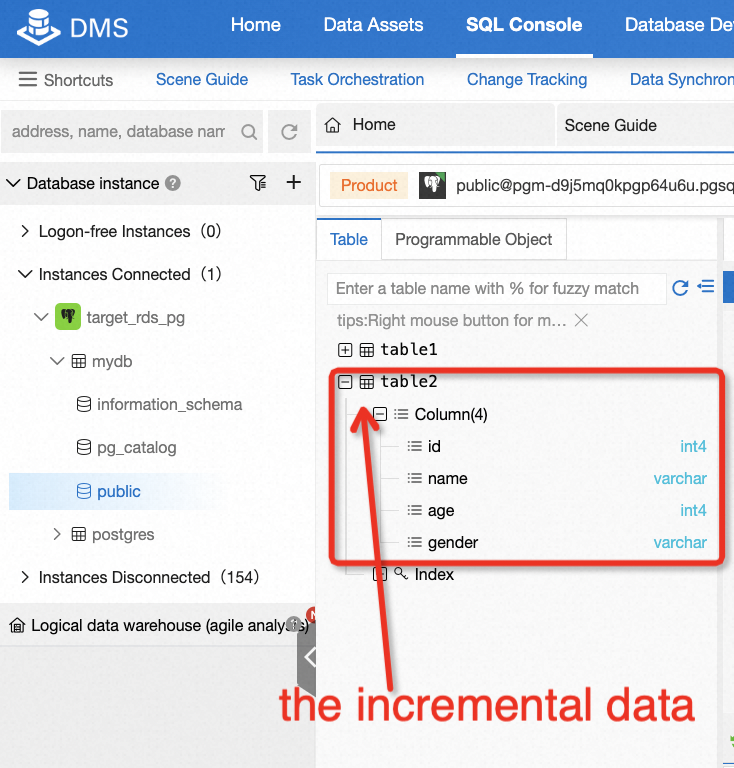
You can see the latest incremental data on the target database as above.
There is one more step to end the lab. In most cases, the target instance will be used to replace the source database to handle the workload, which involves a switchover. If this is also what you want to learn, continue the lab in this chapter and complete it by referring to the given example below.
Run the following commands on the source database (user-created Postgres) to change the working mode of the server and check whether it takes effect or not.
sudo -u postgres psql
ALTER SYSTEM SET default_transaction_read_only=on;
SELECT pg_reload_conf();

SHOW default_transaction_read_only;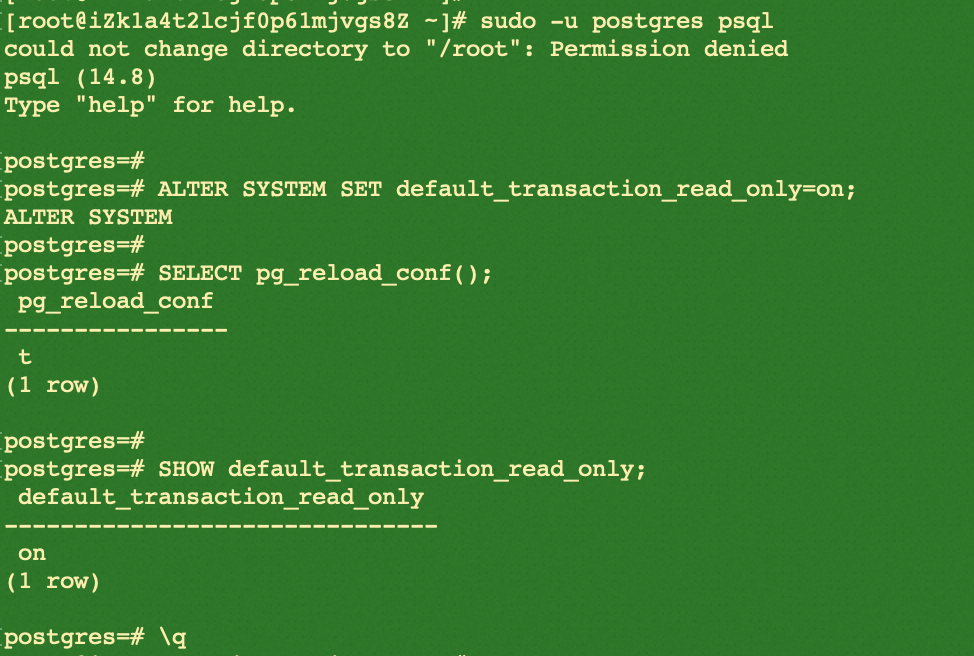
The value of default_transaction_read_only is shown as ON, which indicates the change is successful.
Click Switchover on the RDS console, complete the prompt afterward, and wait until the task becomes Successful.

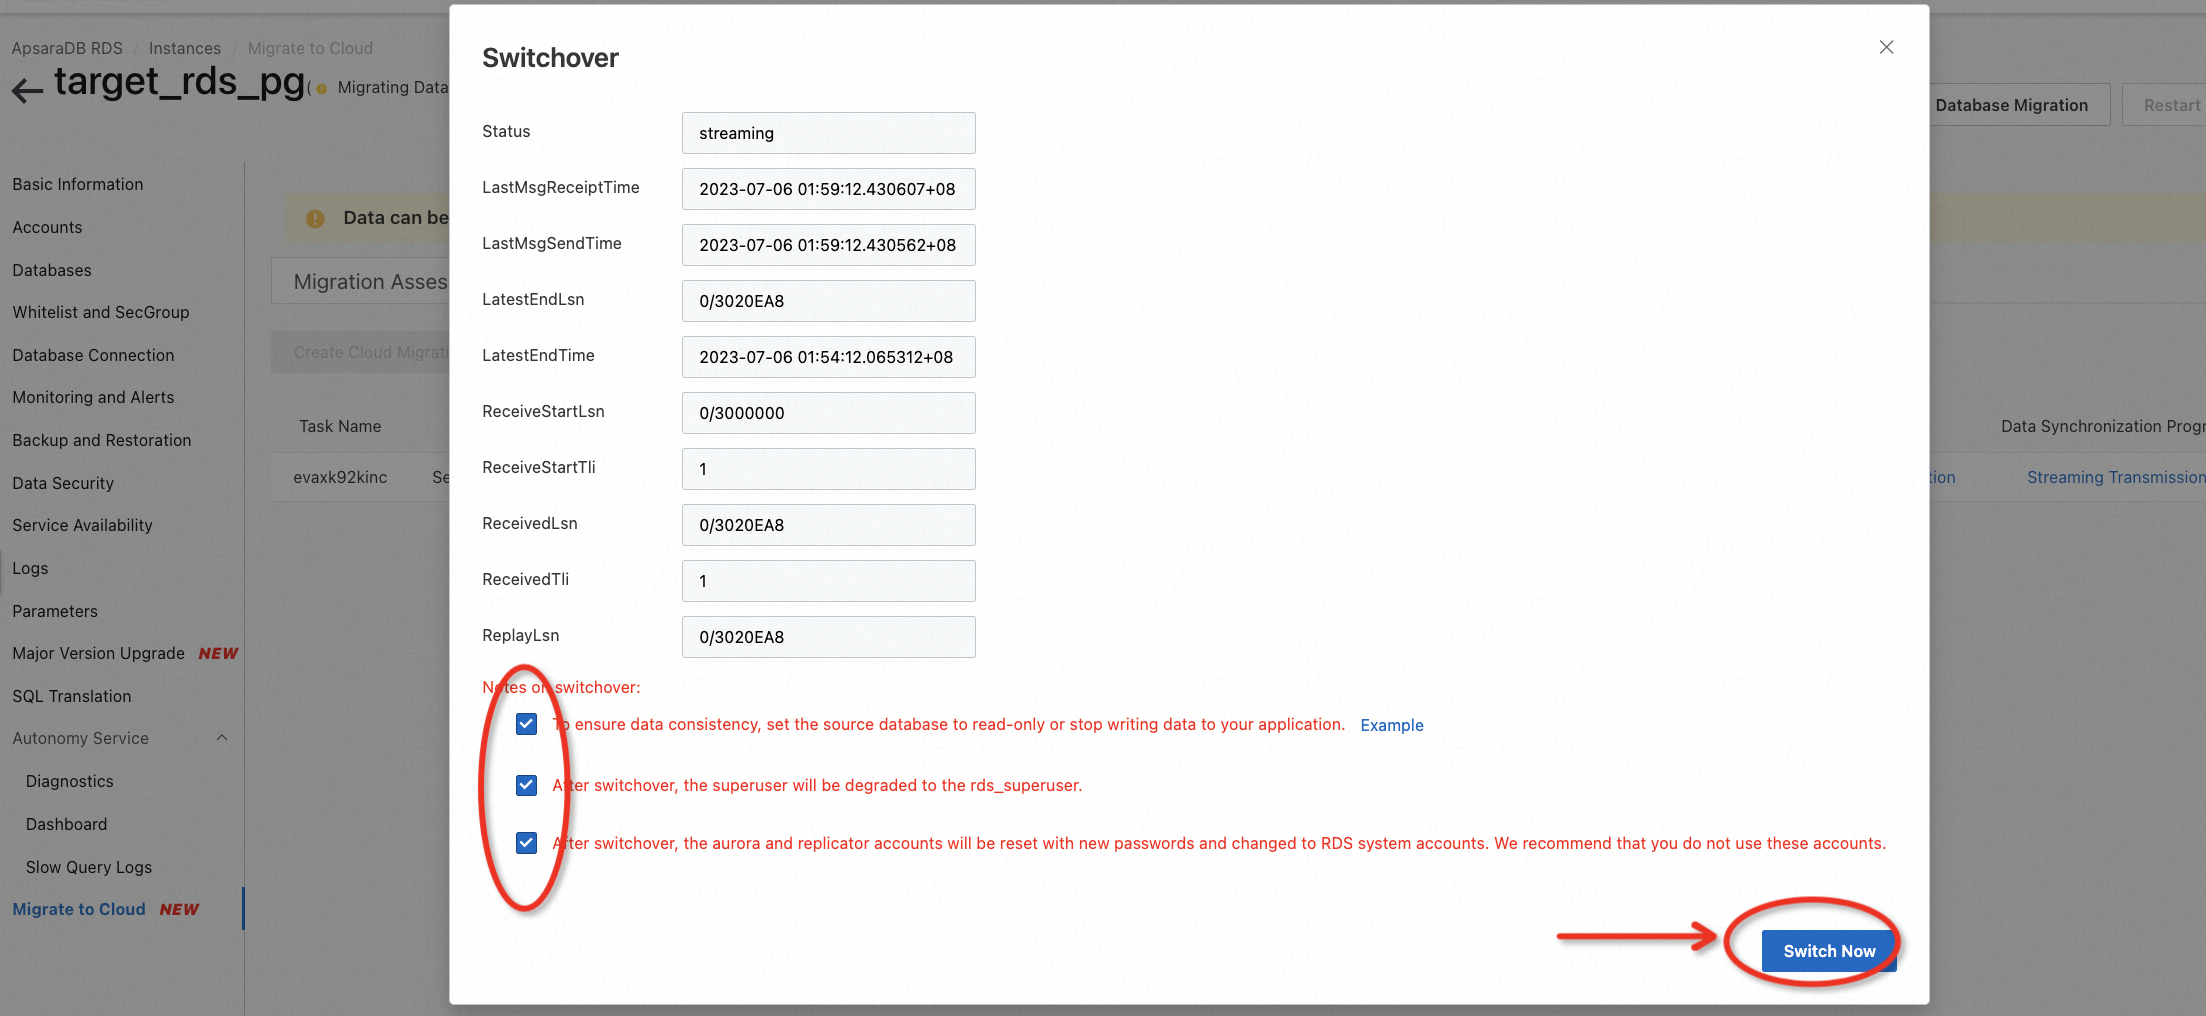


When Migration Completed appears, and the instance status changes to running again, this means the cloud migration was successful.
By now, the lab is complete. You can choose to keep the resource for further use or clean it up immediately. For participants exploring through claiming free trials, if you don't plan to continue using the resources and don't want to clean it up, that's okay, you won't be charged for it. However, we strongly suggest releasing instances if you don't intend to continue using it. You can release all resources in two steps:
Go to the ECS console and release the instance step by step according to the example below:

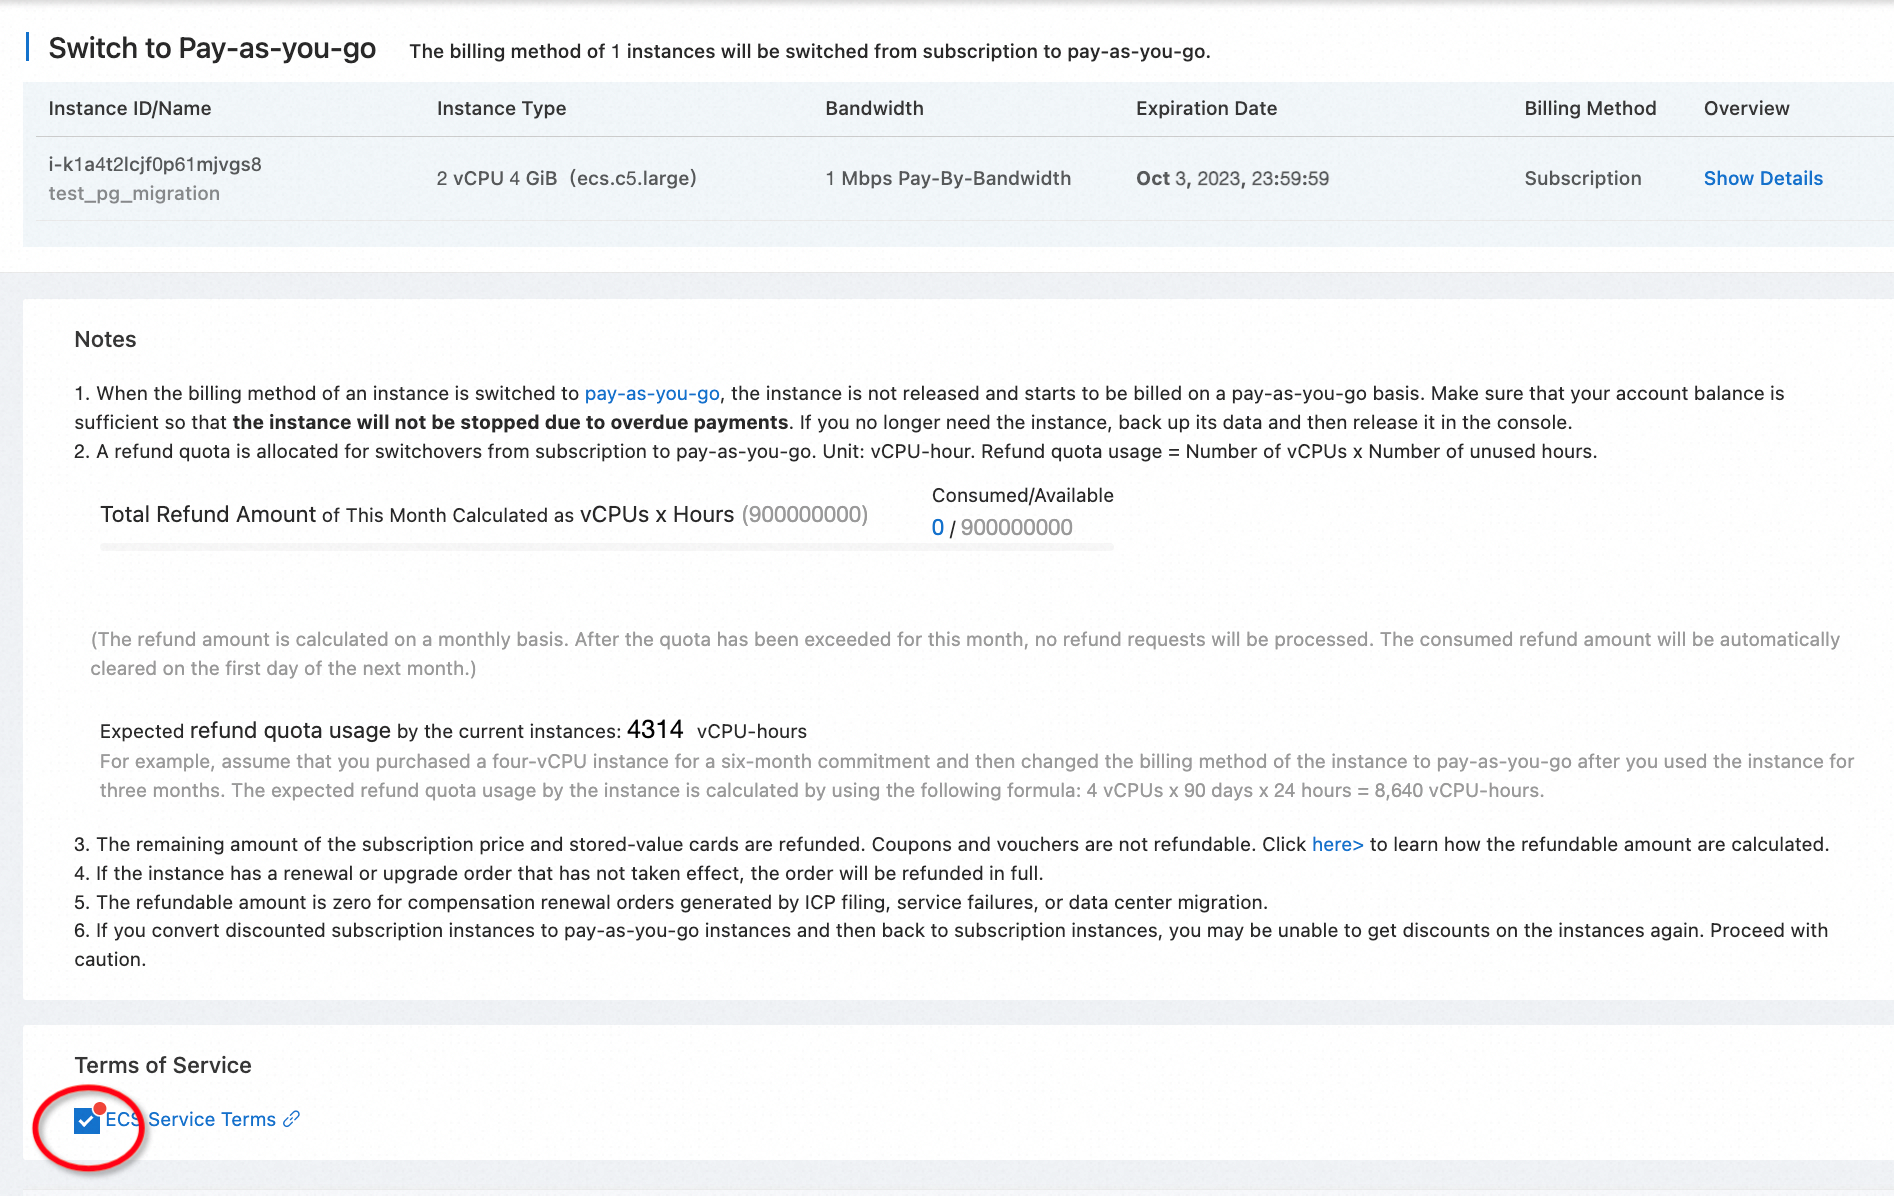
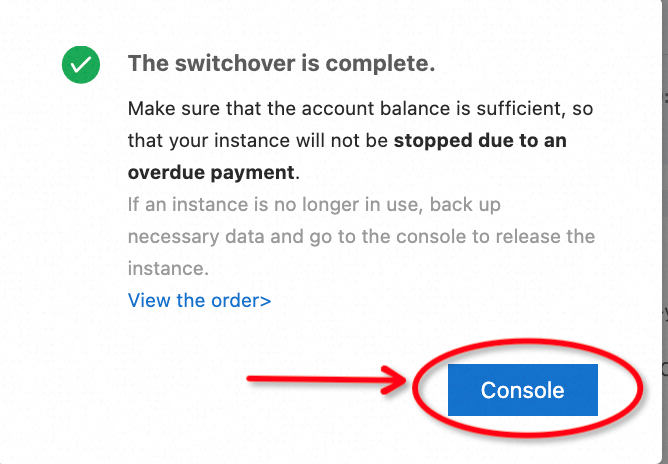

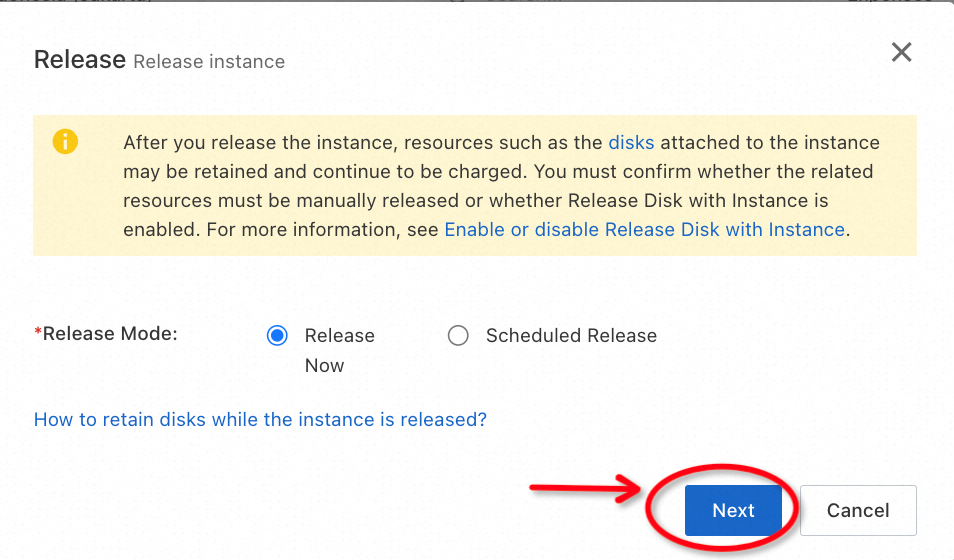
Go to the RDS console and release the instance step by step according to the example below:


Best Practice: Create a Chatbot with LLM and AnalyticDB for PostgreSQL on Alibaba Cloud
Unveil New Possibilities at the Alibaba Cloud Data Management Summit in Indonesia
ApsaraDB - July 12, 2023
ApsaraDB - July 12, 2023
Alibaba Clouder - January 27, 2021
Alibaba Clouder - February 25, 2021
Alibaba Clouder - August 25, 2020
ApsaraDB - January 14, 2025
 ApsaraDB RDS for PostgreSQL
An on-demand database hosting service for PostgreSQL with automated monitoring, backup and disaster recovery capabilities
Learn More ApsaraDB RDS for MySQL
An on-demand database hosting service for MySQL with automated monitoring, backup and disaster recovery capabilities
Learn More Oracle Database Migration Solution
Migrate your legacy Oracle databases to Alibaba Cloud to save on long-term costs and take advantage of improved scalability, reliability, robust security, high performance, and cloud-native features.
Learn More Database Migration Solution
Migrating to fully managed cloud databases brings a host of benefits including scalability, reliability, and cost efficiency.
Learn MoreMore Posts by ApsaraDB
Dikky Ryan Pratama July 14, 2023 at 2:38 am
Awesome!