By Jeremy Pedersen
Welcome back for the 14th installment in our weekly blog series! This week, I show you how to use MaxCompute UDFs to add additional functionality to your MaxCompute SQL queries.
If you've seen my previous blog post about MaxCompute, then you already know that Alibaba Cloud provides a powerful, serverless, petabyte-scale data warehouse.
What you might not know is that beyond running both MaxCompute SQL and Spark jobs natively, the MaxCompute engine also lets you write your own functions, which you can use seamlessly inside your MaxCompute SQL queries.
User Defined Functions (UDFs) allow you to extend MaxCompute SQL with additional functionality, making sure you can tackle any data processing tasks that come your way.
In today's post, I take you through the process of writing your own MaxCompute UDF function and MaxCompute SQL query in DataWorks, using your shiny new UDF.
Let's get started!
Before we start, you should know that there are actually three types of User Defined Functions:
The standard UDF is the simplest type. It takes one input (say an integer or floating point number), and produces one output.
Example: Take an IP address as input, produce a City name as output
UDAFs take multiple inputs but produce just one output, and are used for operations like averaging, finding minimums or maximums, or selecting a single member from a set.
Example: Take a list of numbers as input, produce the average value as output
UDTFs take one input, and produce multiple outputs (in the form of a table).
Example: Take a comma separated string as input say "cheese, ham, bread", and split the string on "," and produce a table with three rows [cheese, ham, bread]
You can learn more about UDFs here, in the MaxCompute documentation.
Let's get started!
First, you'll need to open up the Alibaba Cloud Console by clicking on "Log In" on the upper right hand side of the Alibaba Cloud homepage. Then, you'll need to locate the DataWorks console and create a new Workspace:
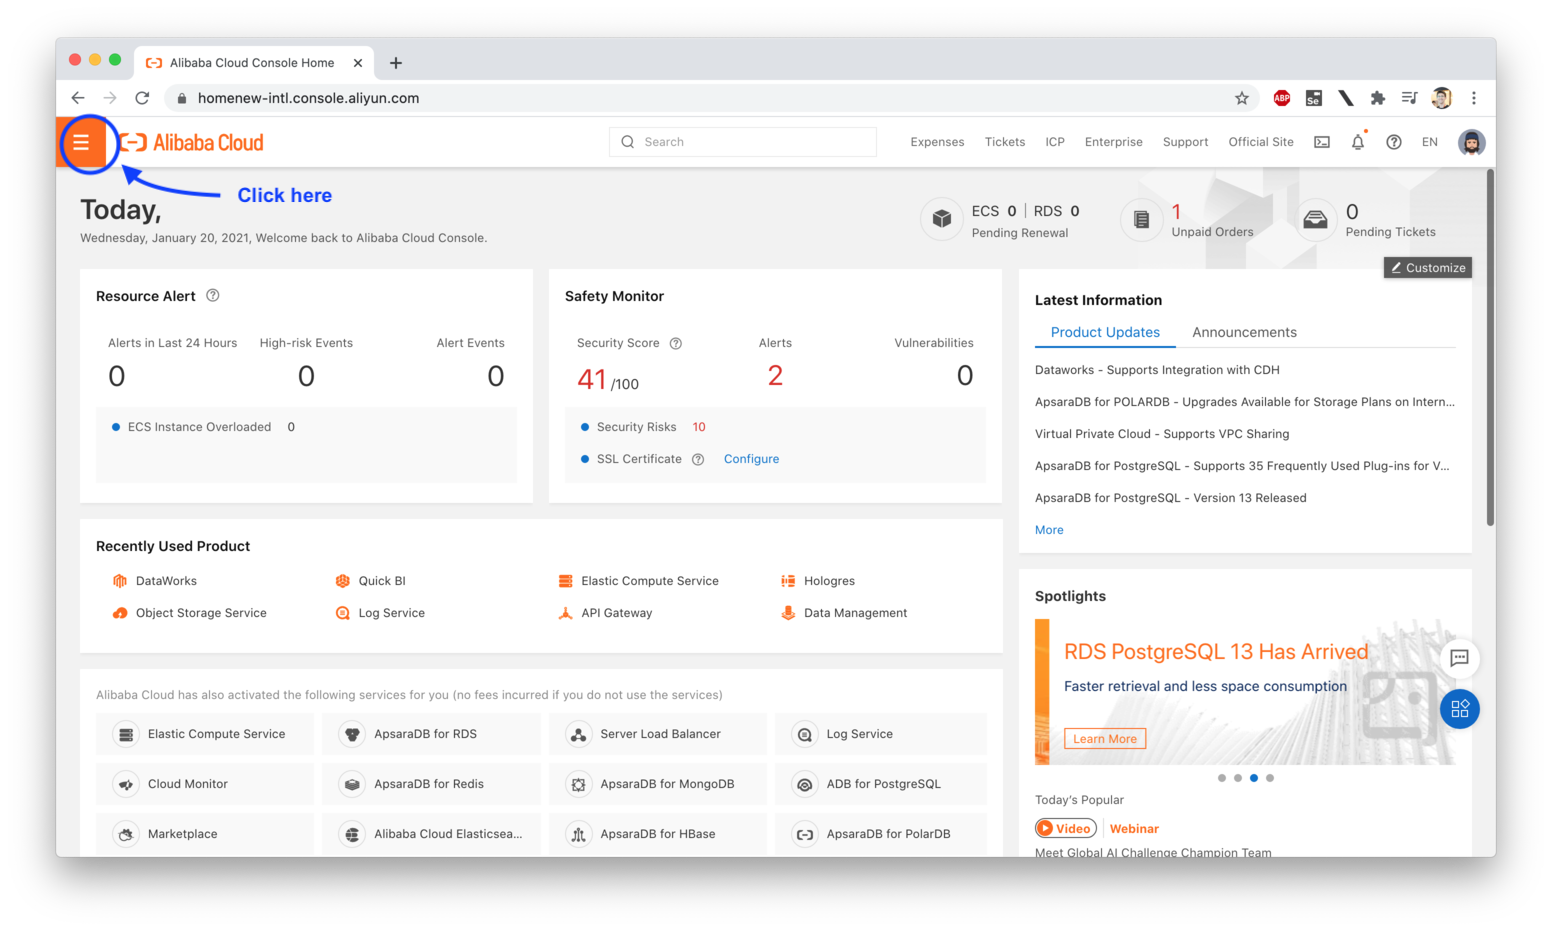
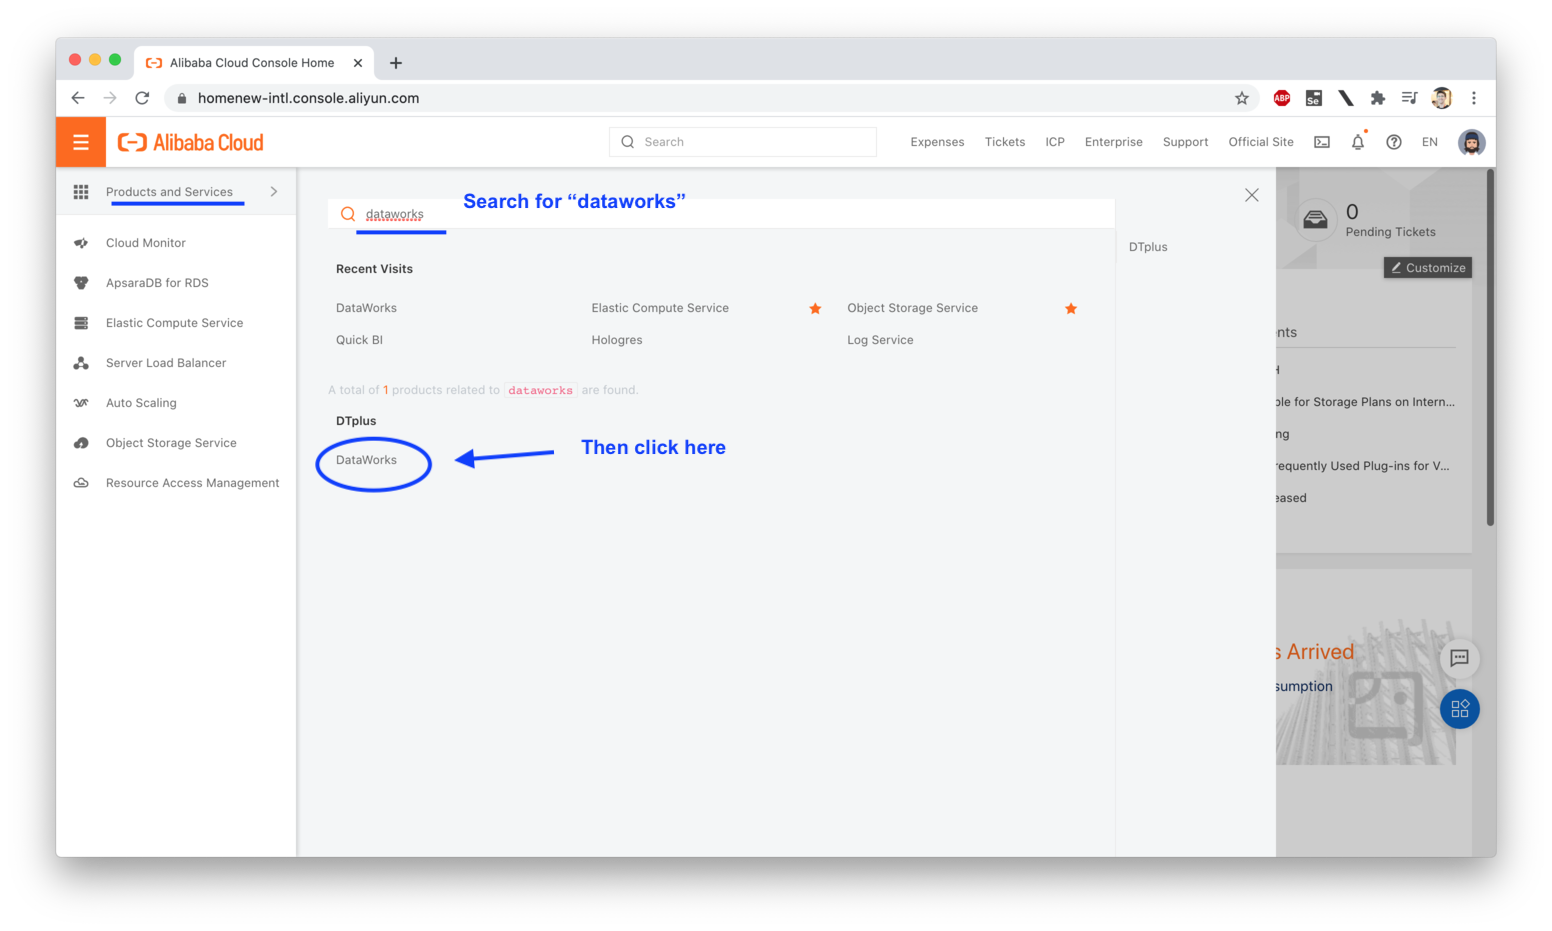
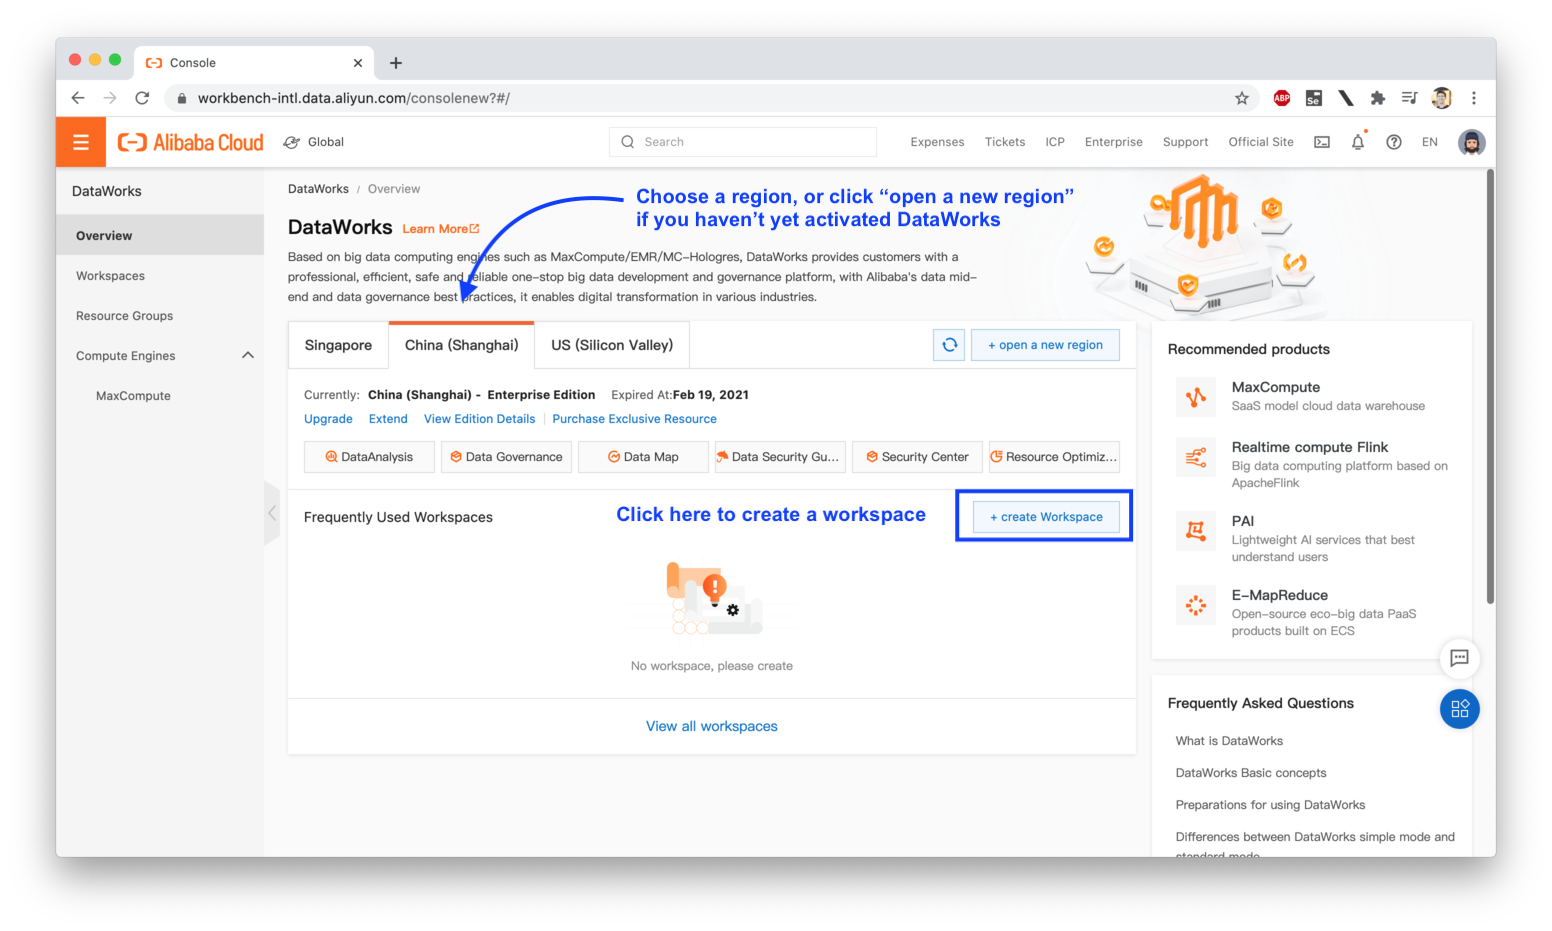
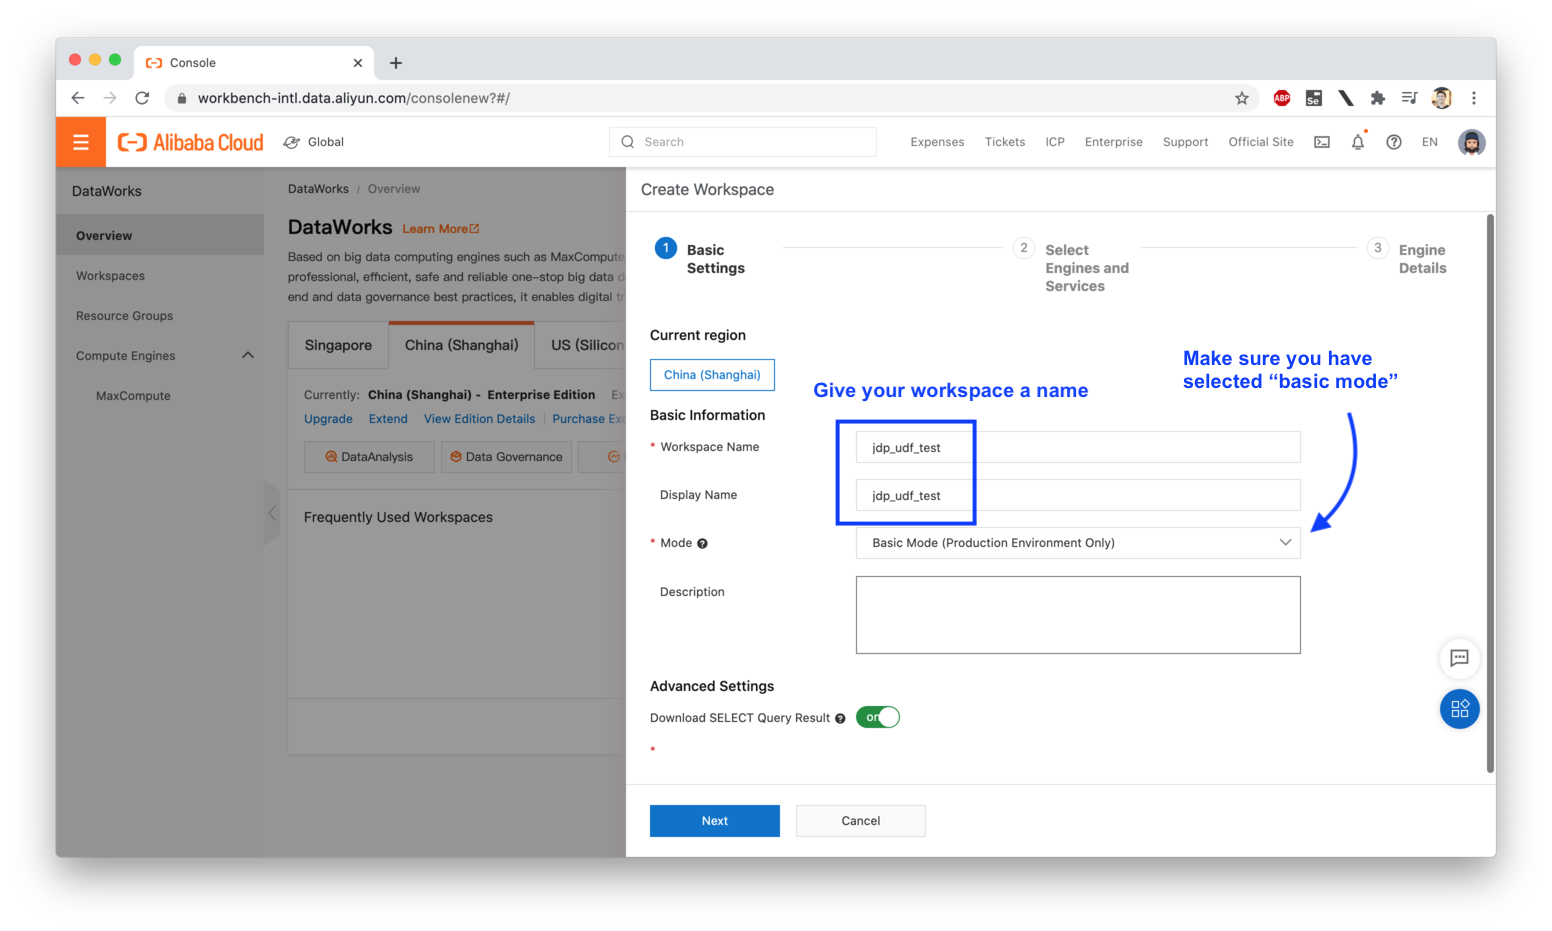
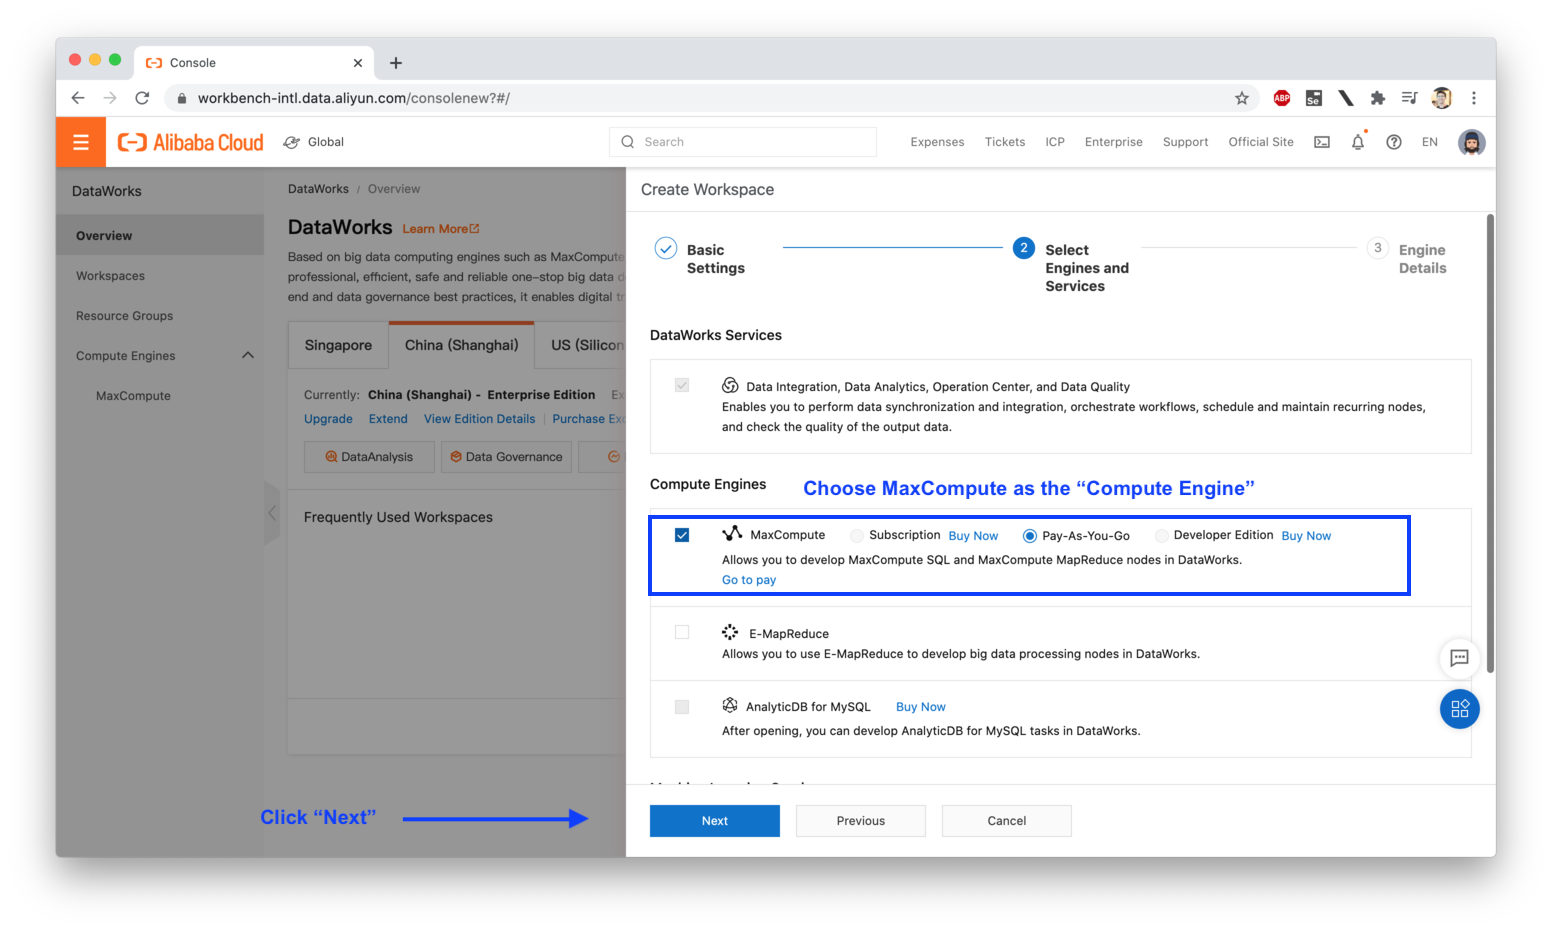
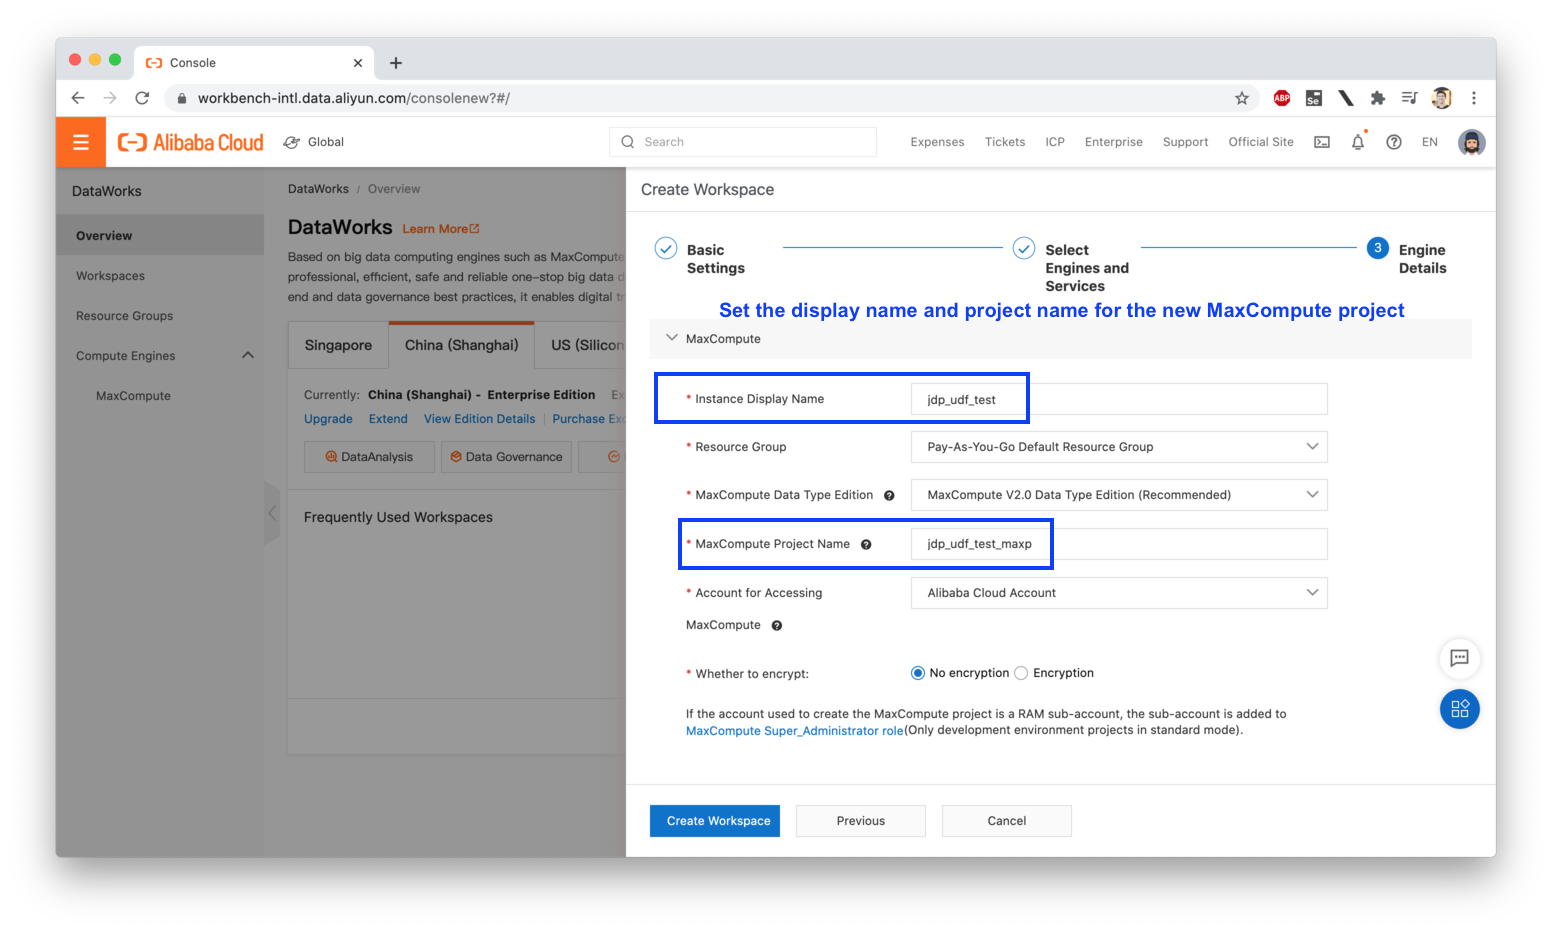
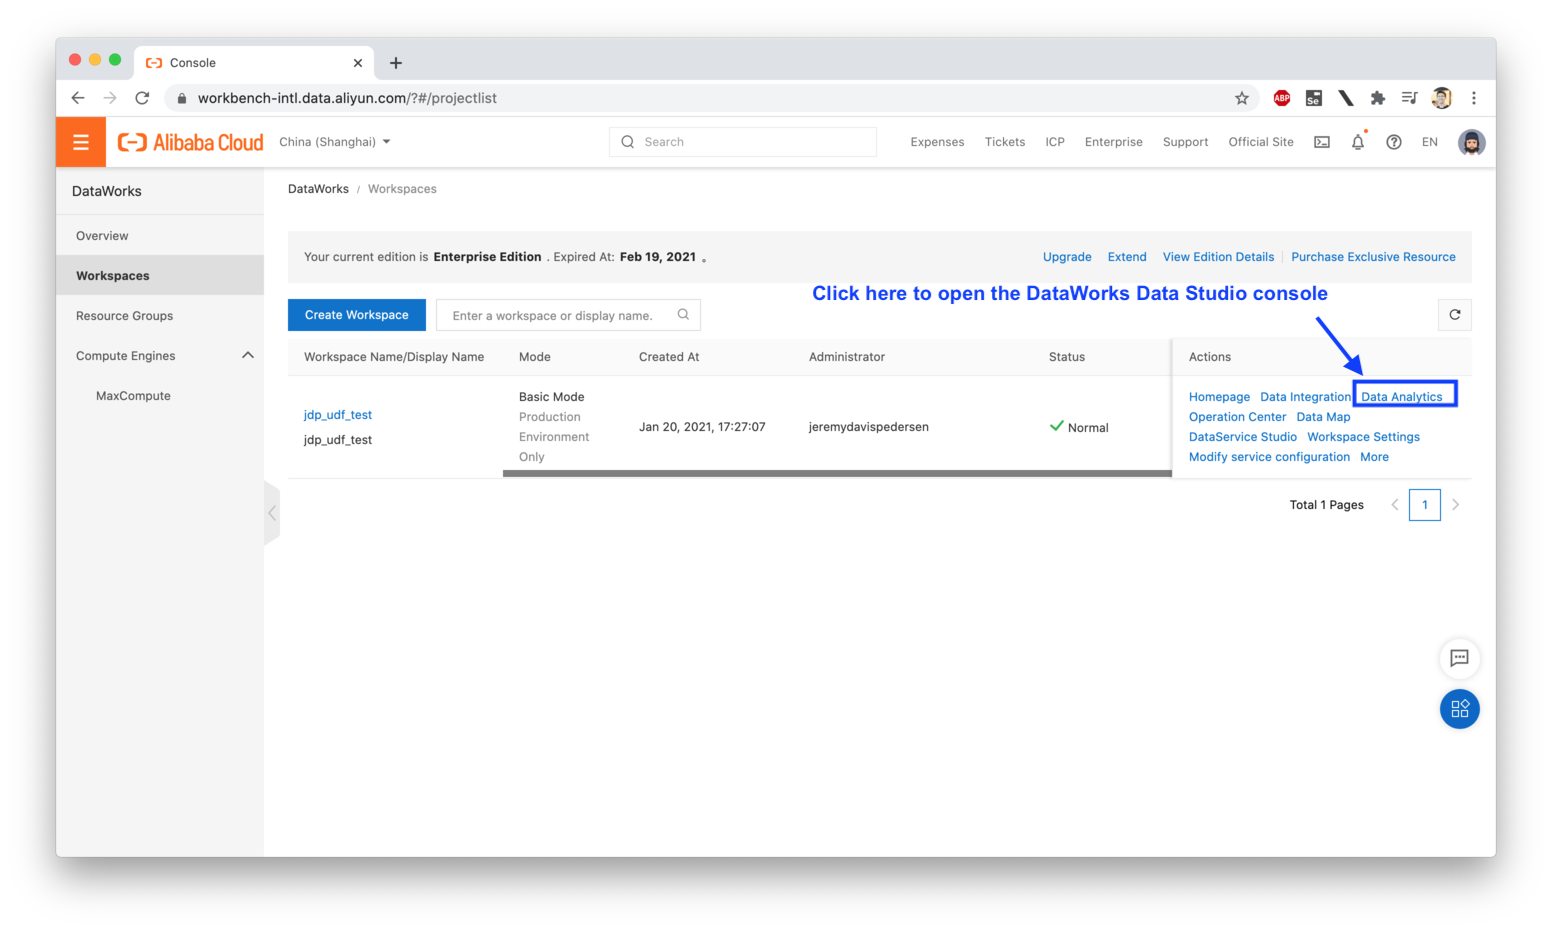
Create two tables, one to hold the radii of circles (input data), and another to hold their areas, which we will calculate using a 3rd party library (NumPy) added to a Python 3 UDF function (more on that later).
First, set up a new Ad-hoc Query:
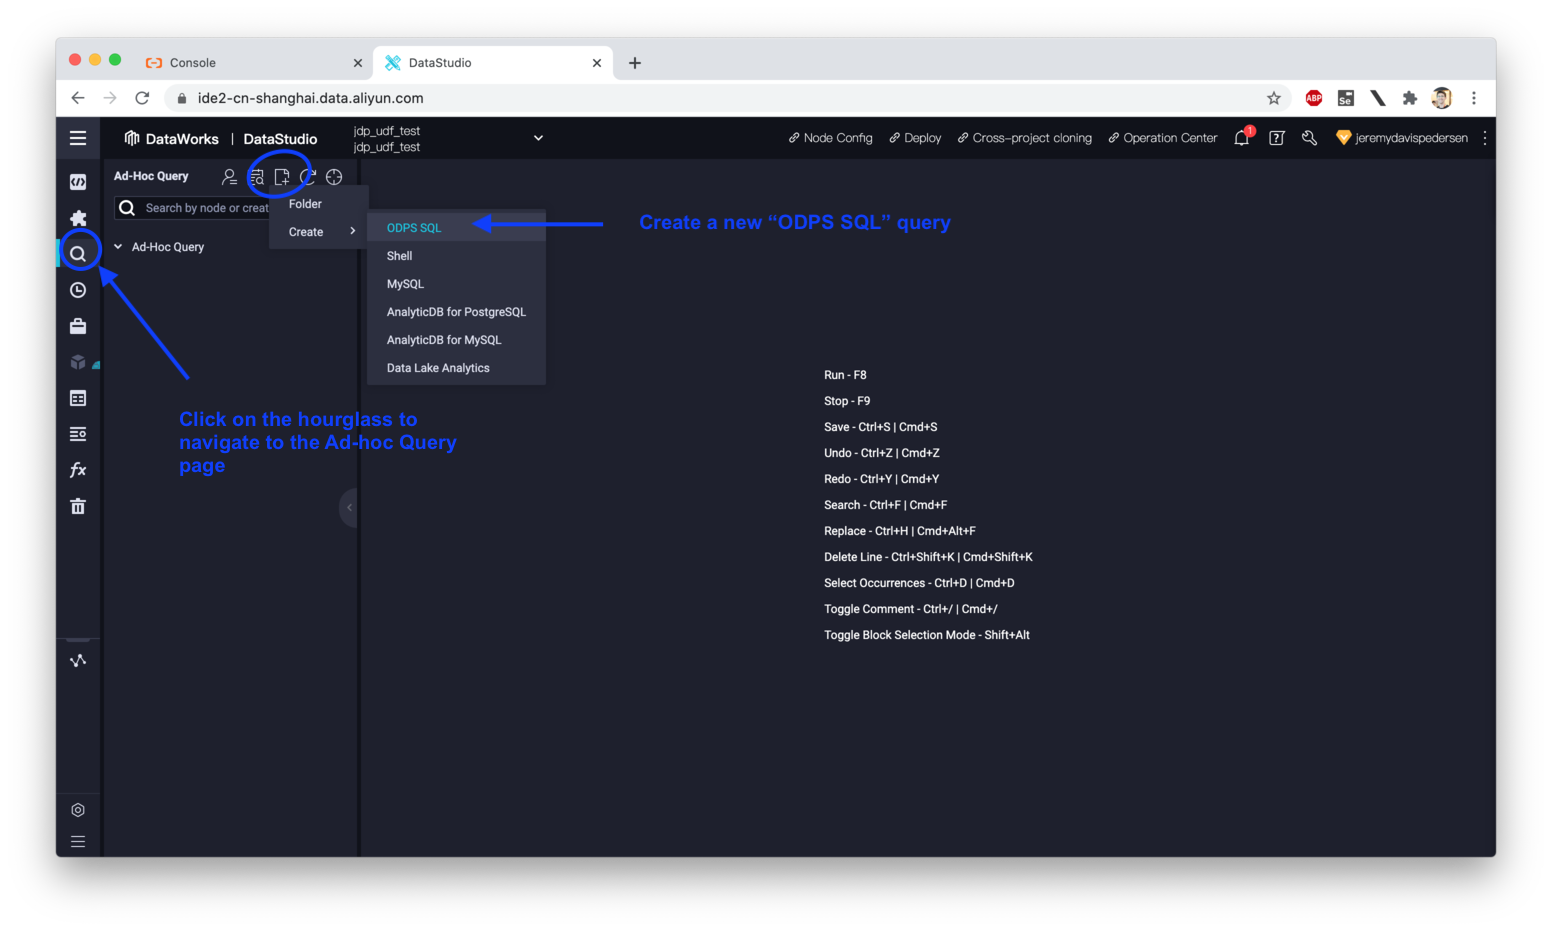
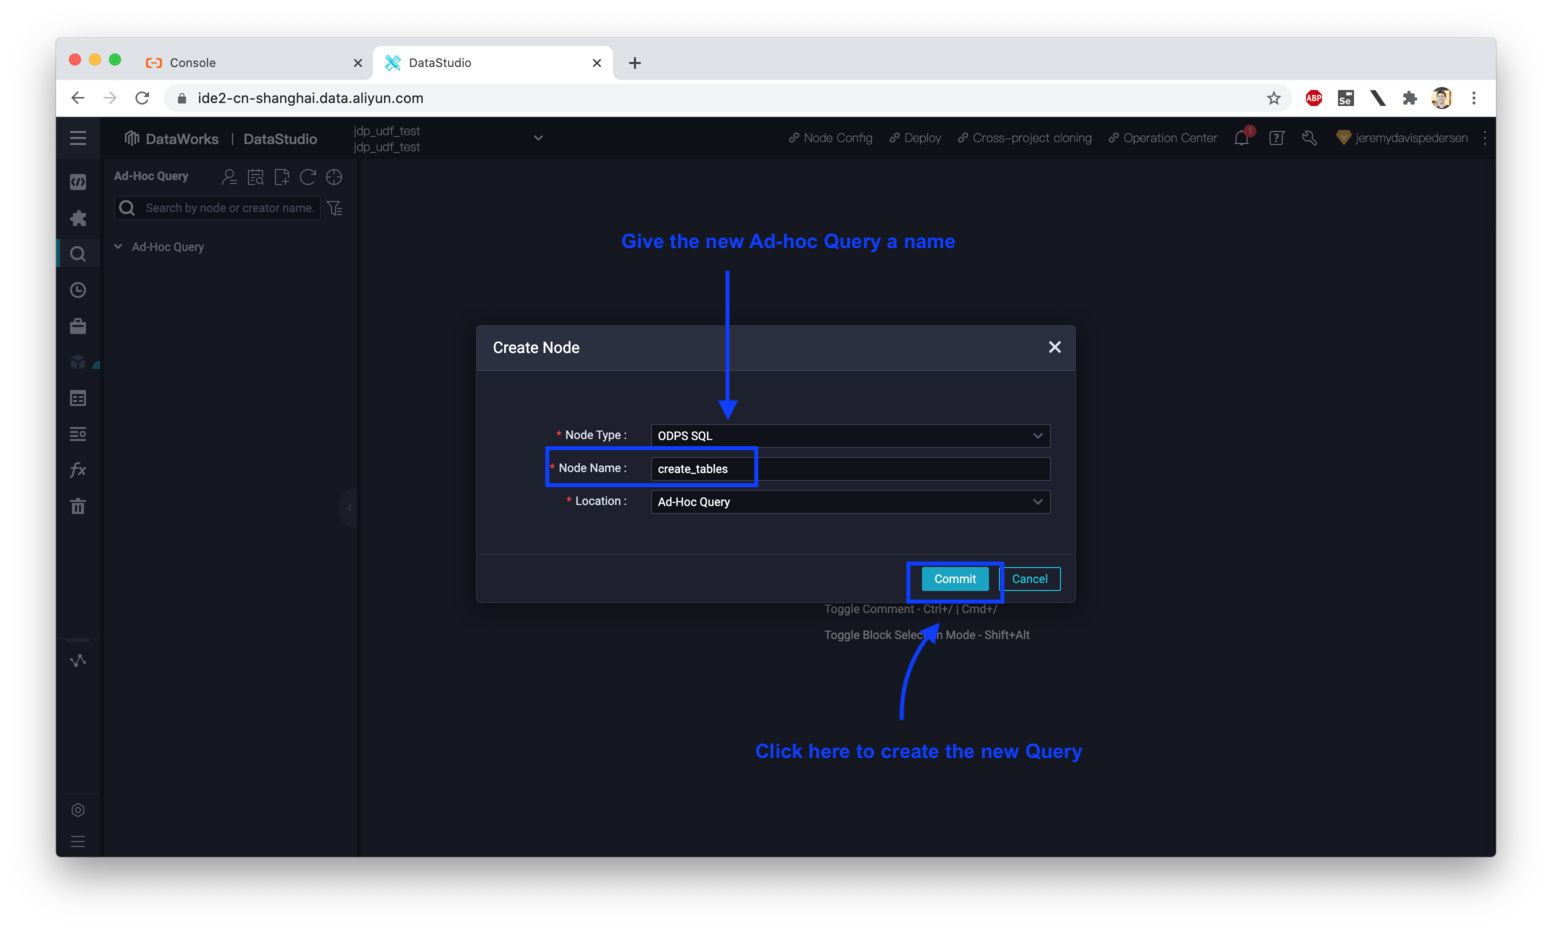
Once the Ad-hoc Query window opens, paste in the following MaxCompute SQL code, then hit the "Run" button near the top of the Ad-hoc Query Window:
CREATE TABLE IF NOT EXISTS circle_data (
    id BIGINT COMMENT 'circle id number',
    radius DOUBLE COMMENT 'circle radius'
);

-- Result table containing the info from circle_data, plus calculated areas
CREATE TABLE IF NOT EXISTS circle_data_out (
    id BIGINT COMMENT 'circle id number',
    radius DOUBLE COMMENT 'circle radius',
    area DOUBLE COMMENT 'circle area'
);
Next, create an additional Ad-hoc Query window, which we'll use to insert some test data into the circle_data table:
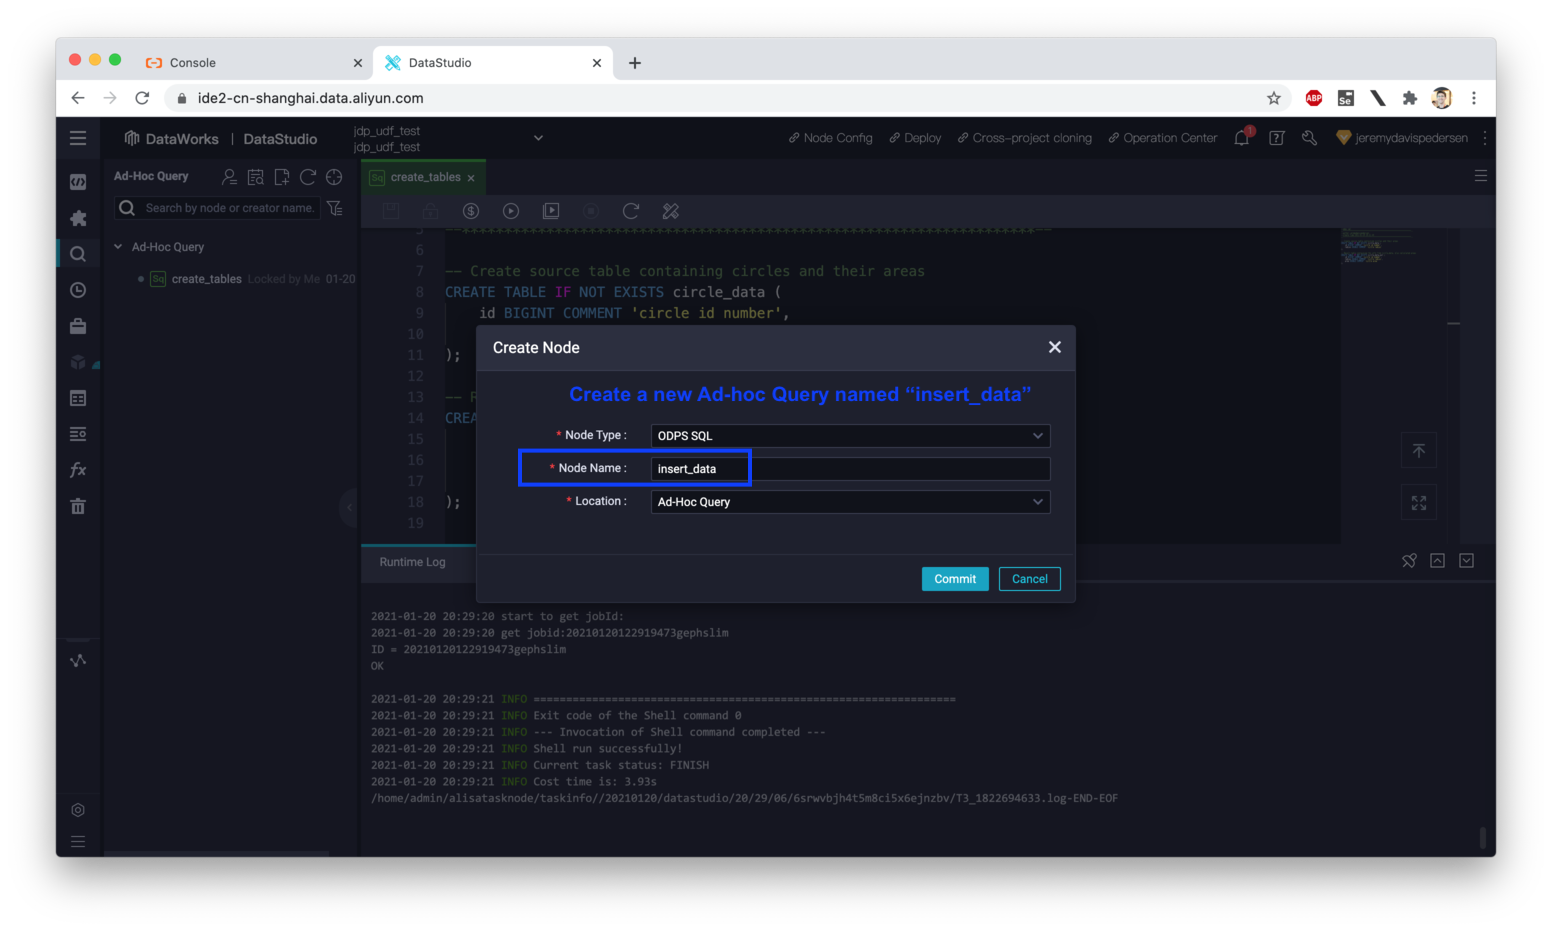
The SQL code you should paste into the query window is:
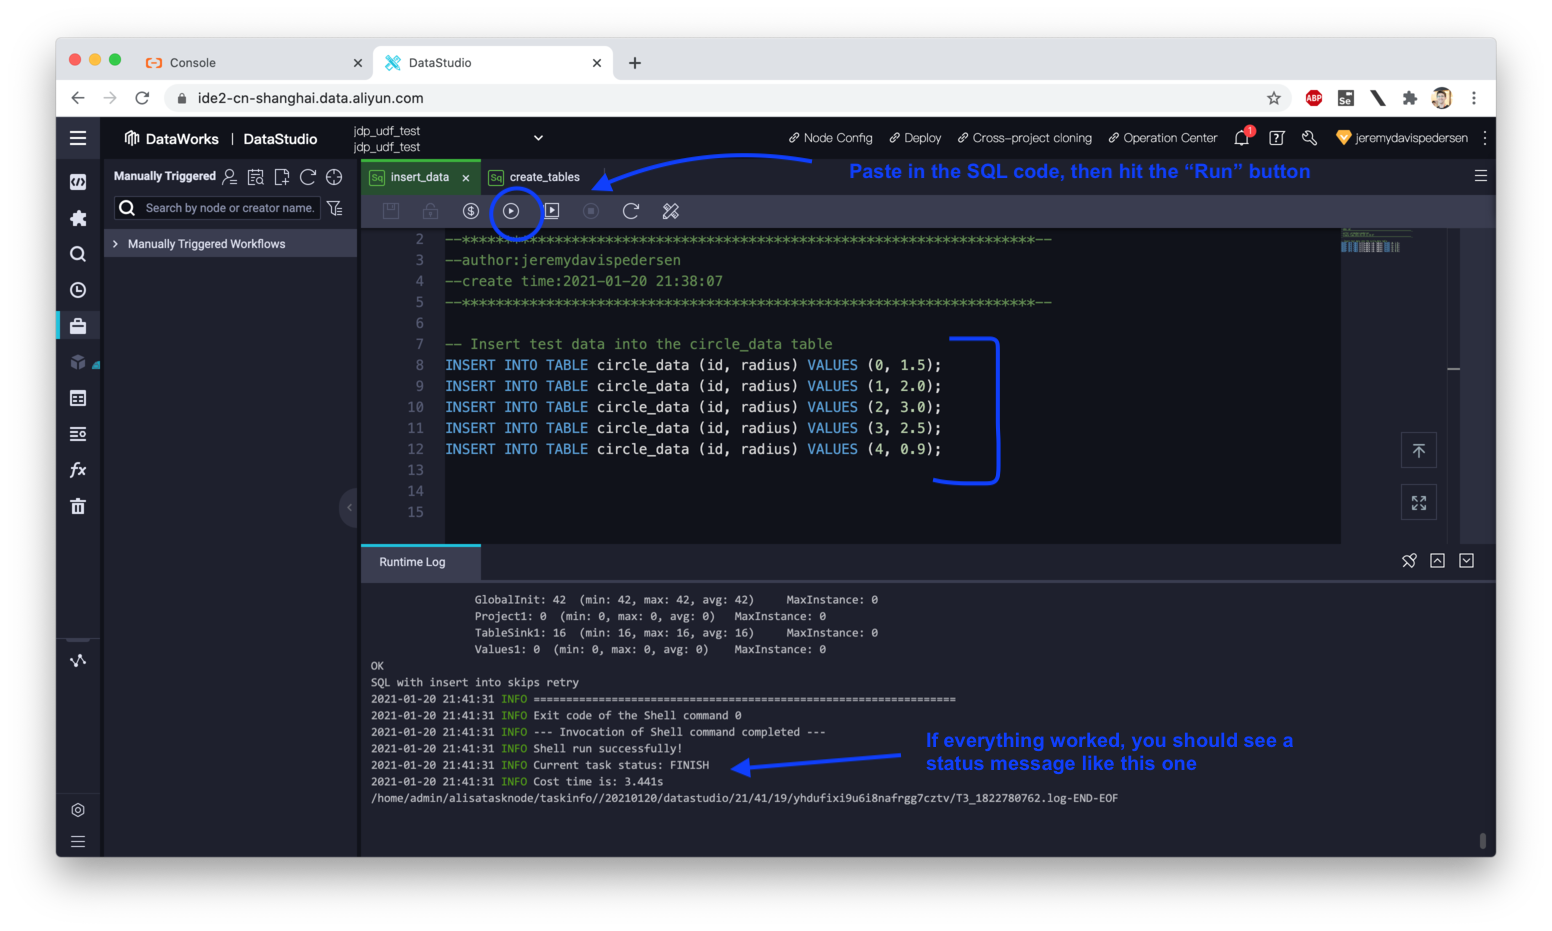
INSERT INTO TABLE circle_data (id, radius) VALUES (0, 1.5);
INSERT INTO TABLE circle_data (id, radius) VALUES (1, 2.0);
INSERT INTO TABLE circle_data (id, radius) VALUES (2, 3.0);
INSERT INTO TABLE circle_data (id, radius) VALUES (3, 2.5);
INSERT INTO TABLE circle_data (id, radius) VALUES (4, 0.9);
Next, run the query:
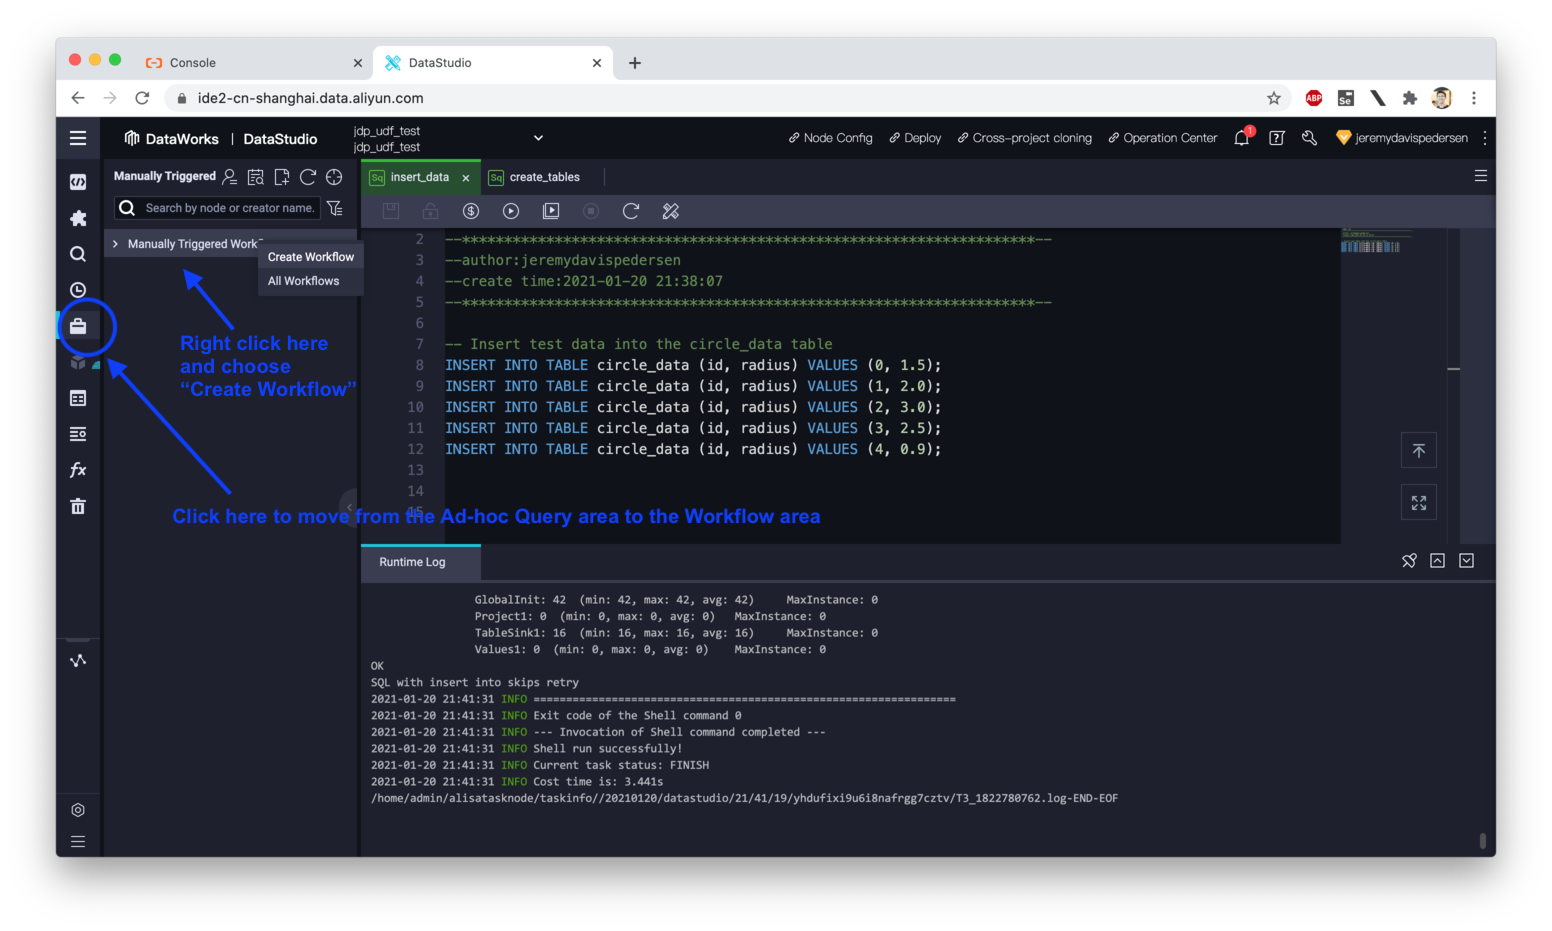
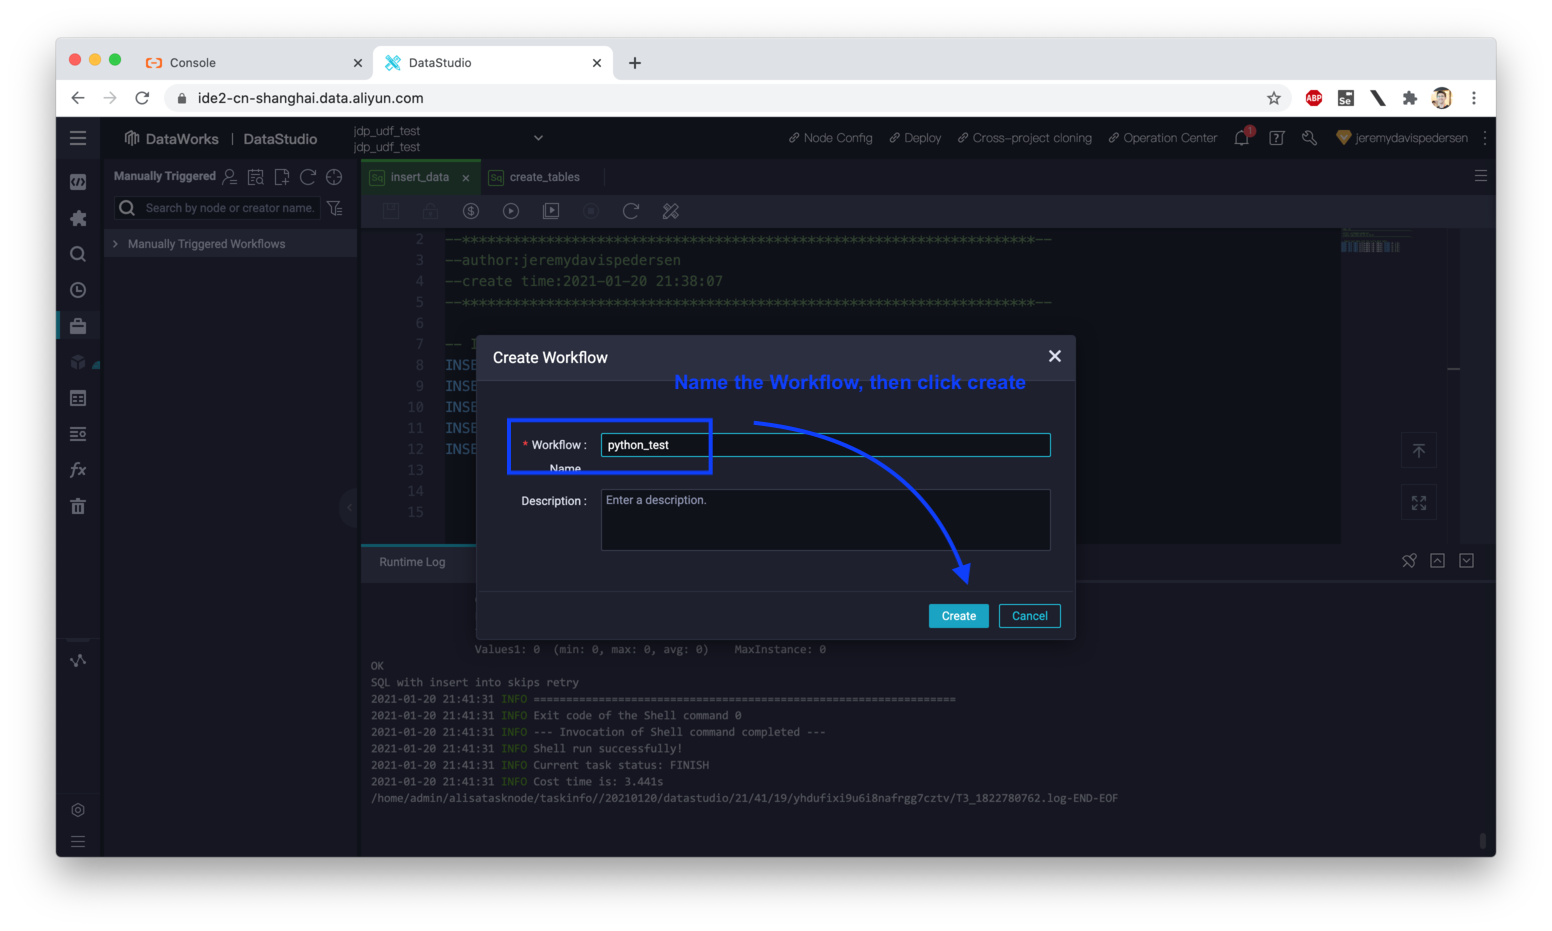
We need to create a new DataWorks Workflow where we can upload our Python code and associated 3rd party library code (NumPy). We can do this from the "Manually Triggered Workflows" area in the DataStudio console:
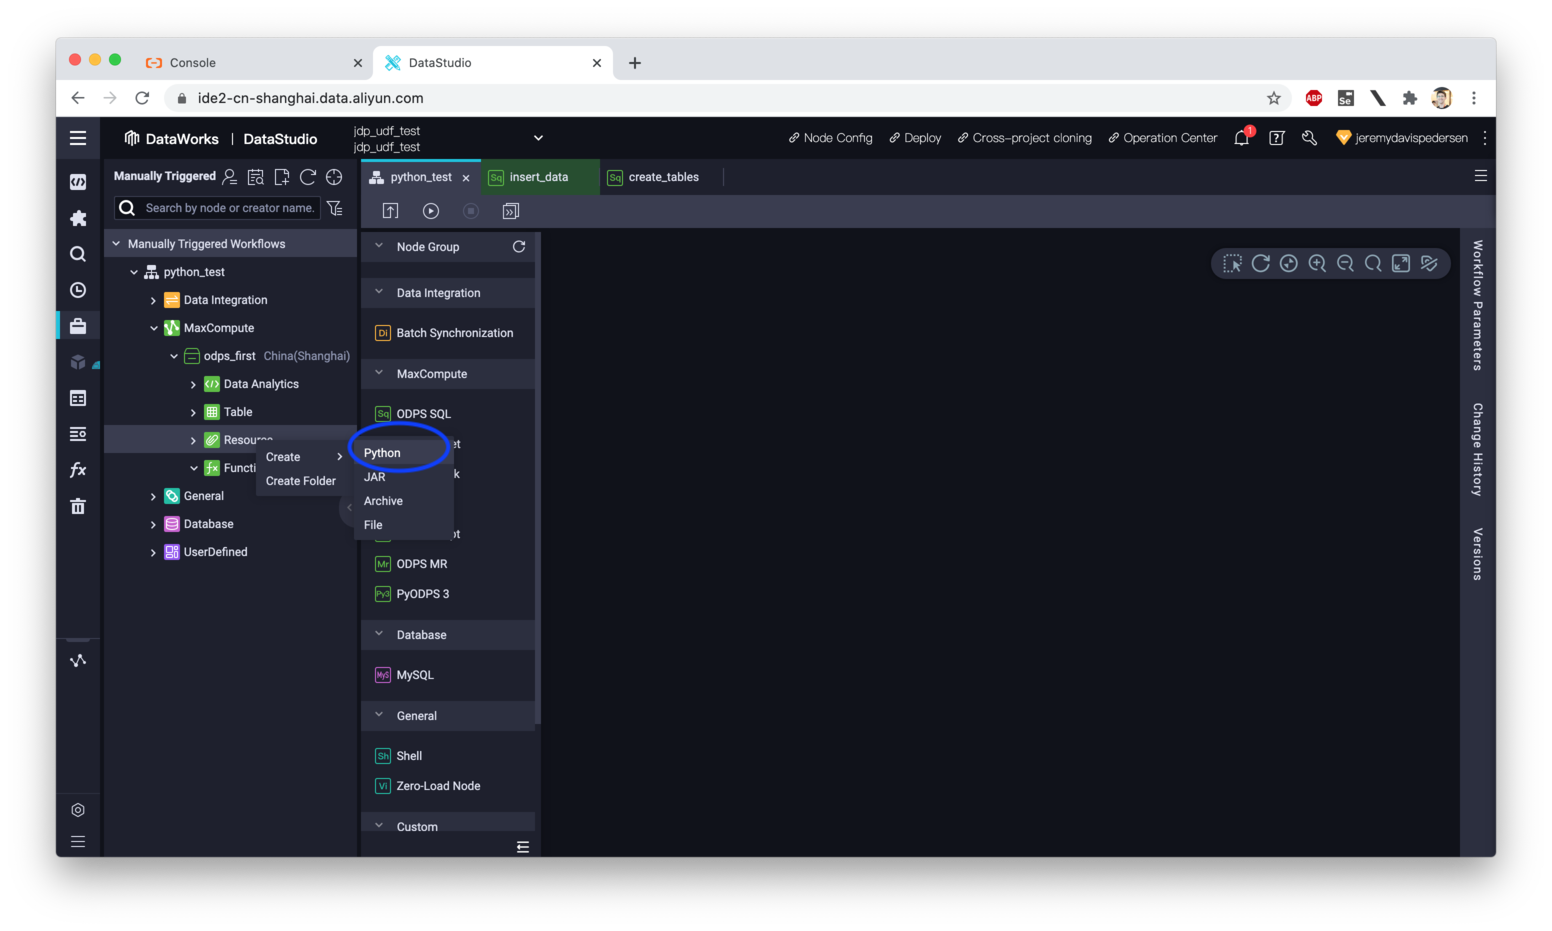
Now we need to upload our Python code. Right click on "Resources", then choose "Create -> Python":
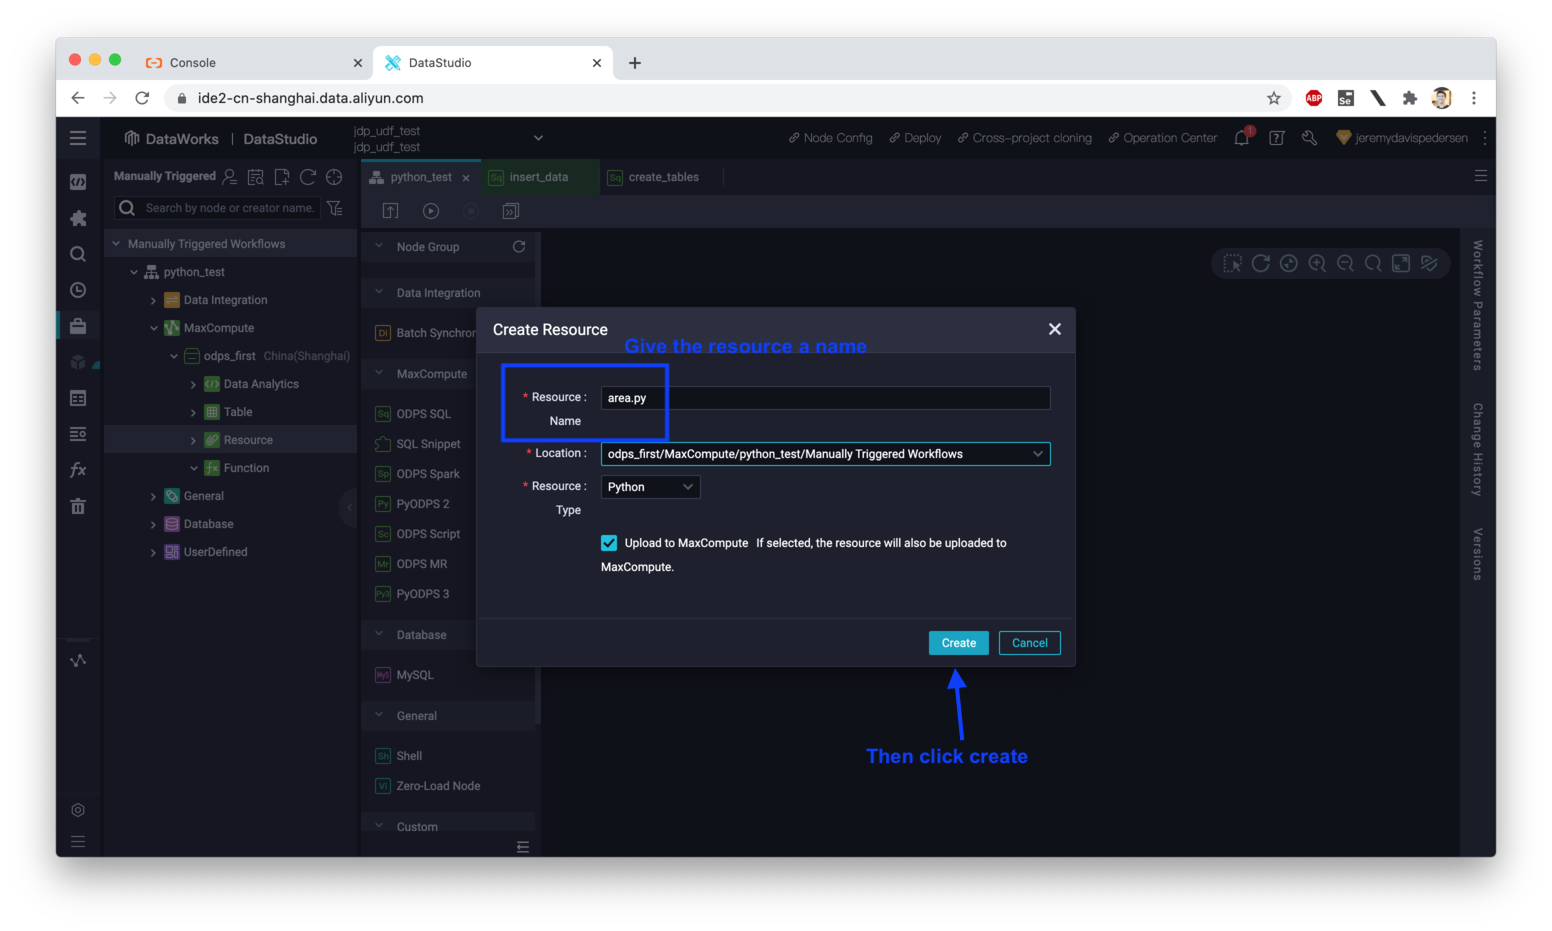
A new dialog should open:
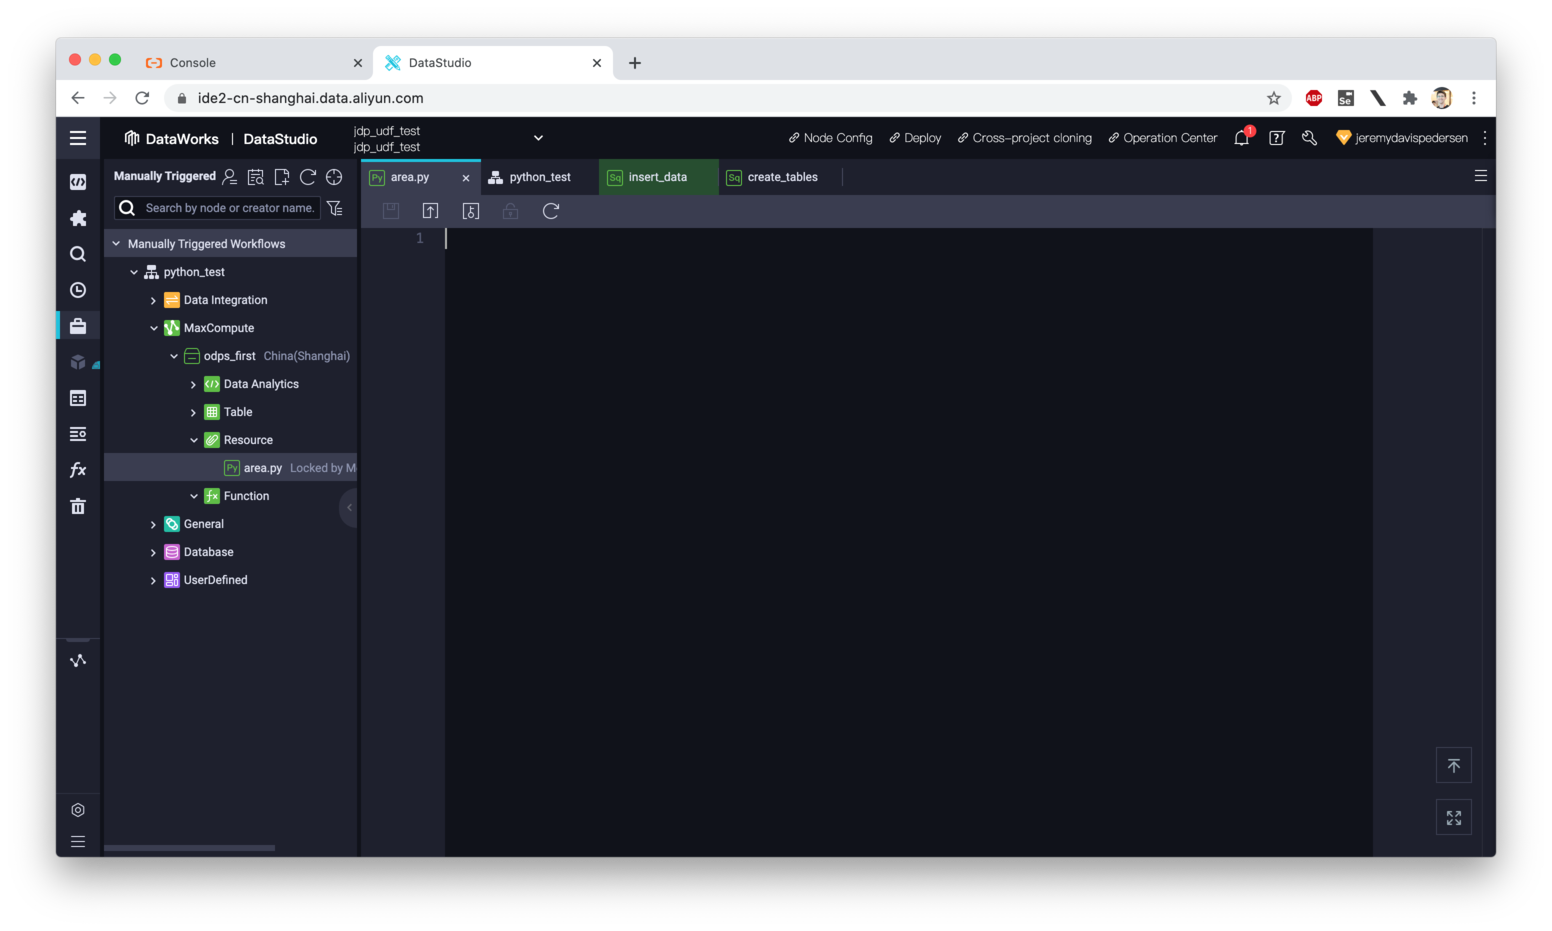
Paste the following code into the dialog:
from odps.udf import annotate
@annotate("double->double")
class area(object):
    def __init__(self):
        import sys
        sys.path.insert(0, 'work/numpy-1.19.5-cp37-cp37m-manylinux1_x86_64.zip') # Our NumPy package

    def evaluate(self, arg0):
       import numpy as np
       if arg0 is None:
           return None
       # Calculate area of the circle
return np.pi * (arg0 * arg0)We want to include a NumPy package in our Python 3 UDF. The package we are using for this example is numpy-1.19.5-cp37-cp37m-manylinux1_x86_64. You can get a copy here.
Note that it is very important to make sure the package name includes "cp37" since the package needs to be built using the same version of CPython used by MaxCompute. When you download this file, the extension will be .whl (it's a wheel file). Change the extension to .zip, then upload the file as a resource:
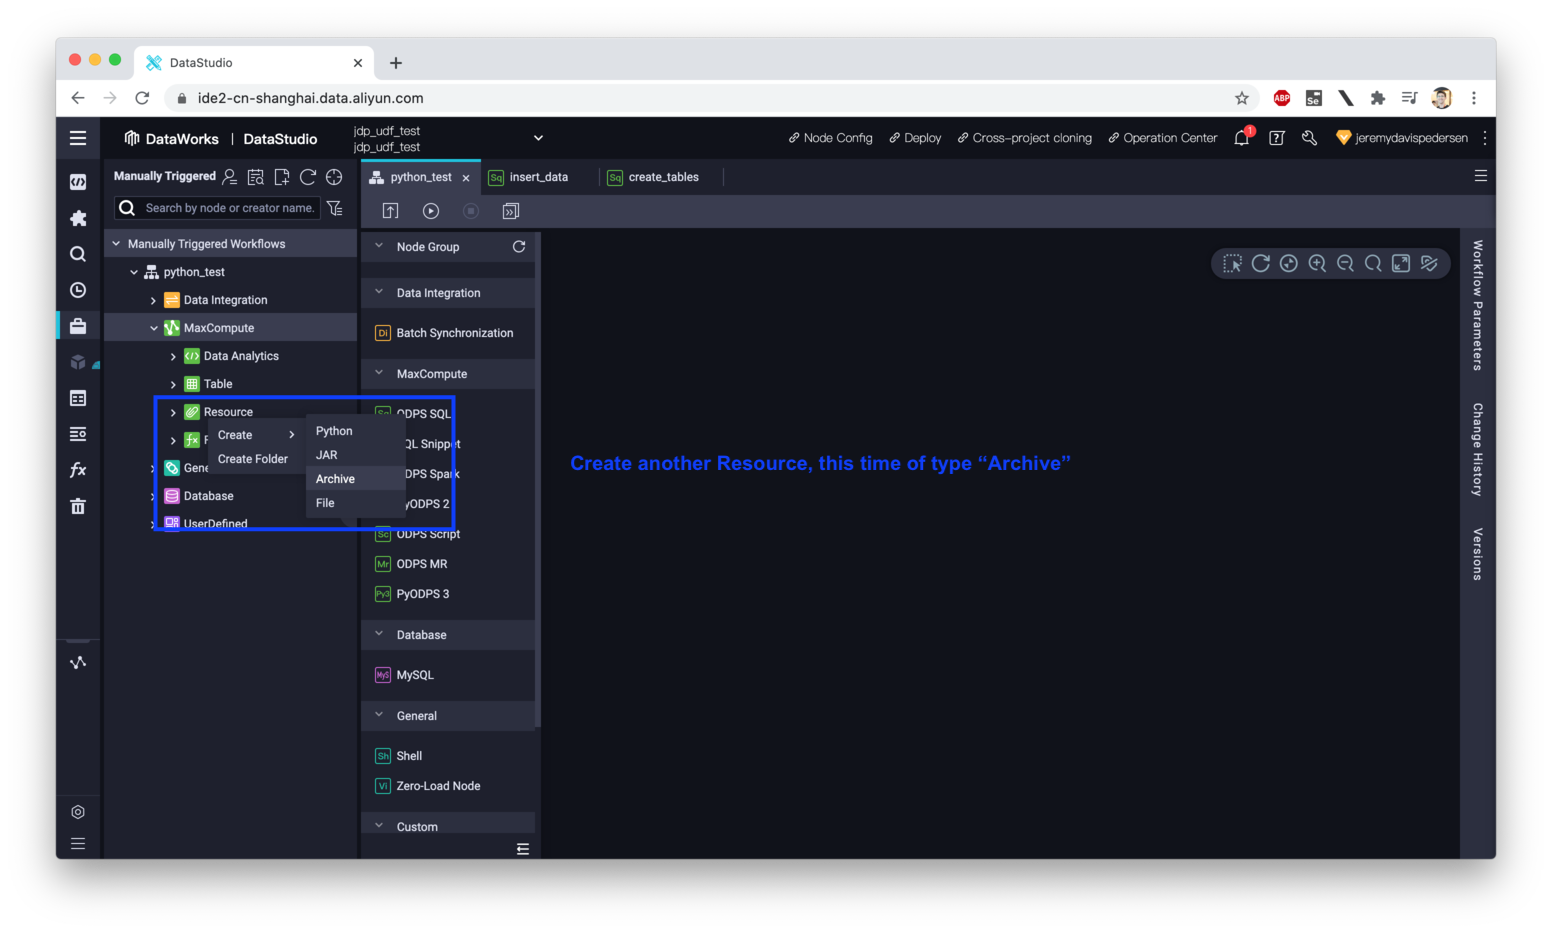
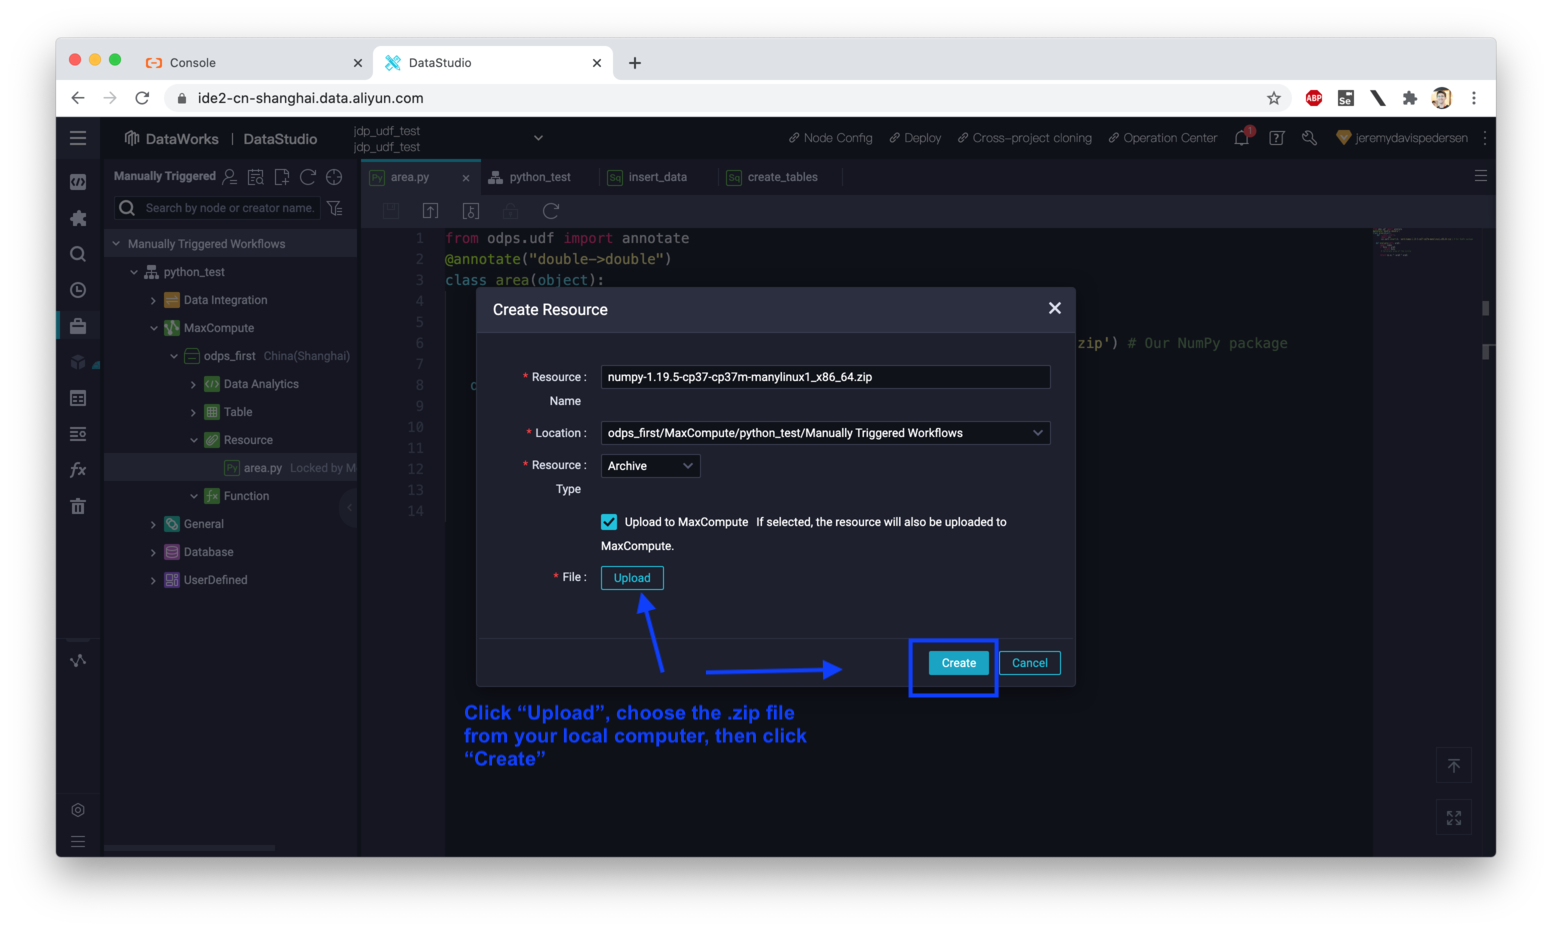
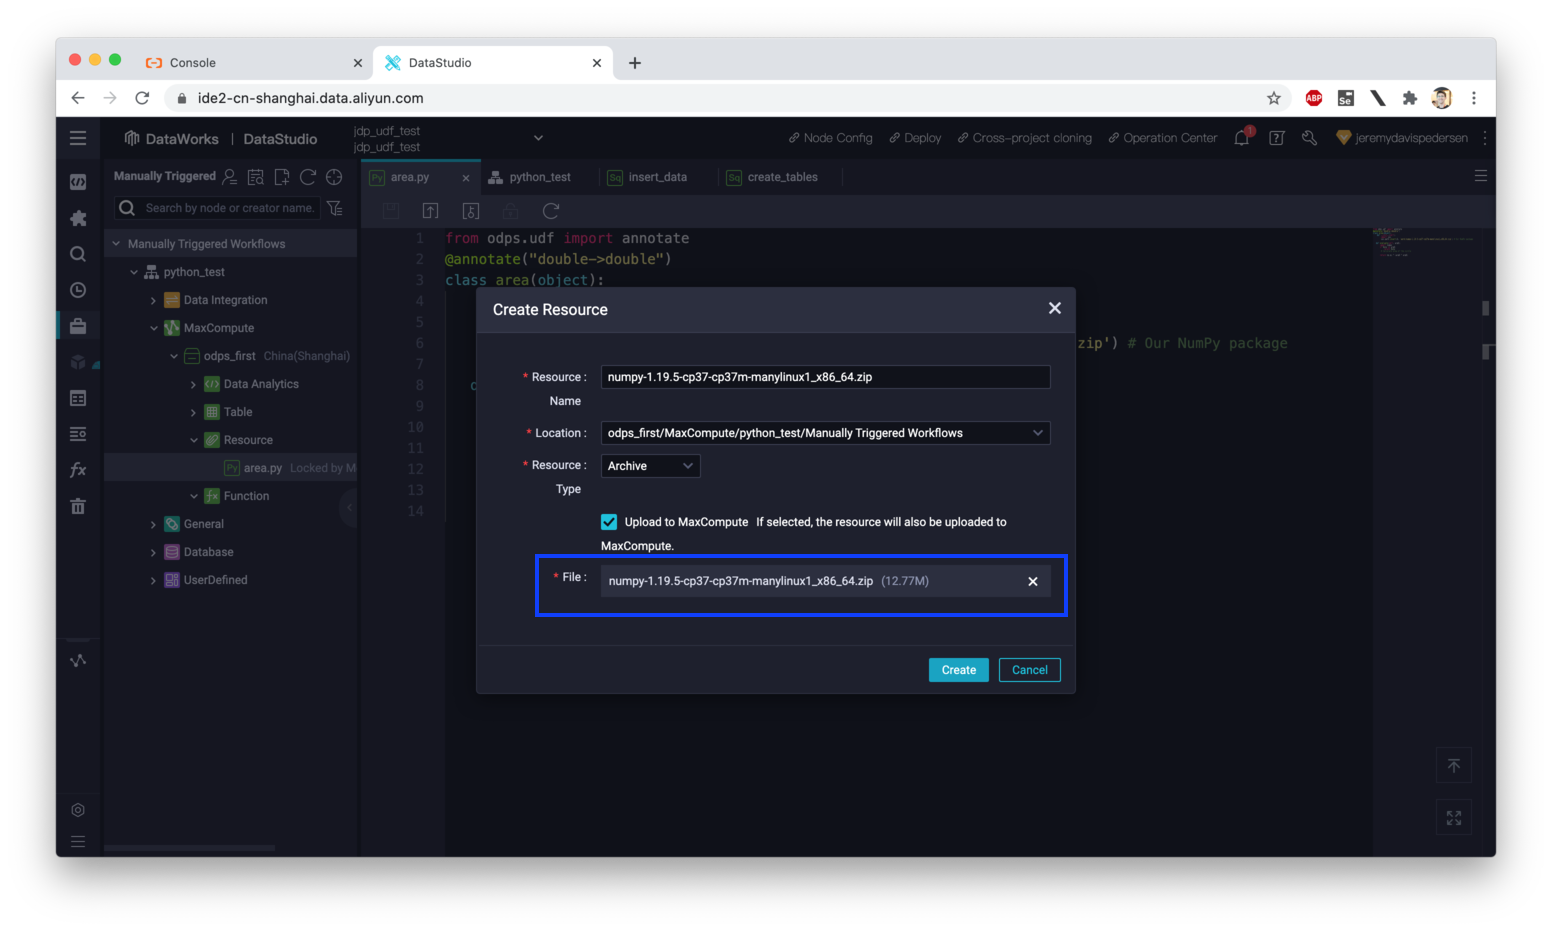
Note that after you upload the NumPy .zip file but before you click "Create", you should see something like this:
Now we have our Python code and our NumPy library .zip file. It's time to register a UDF function! Right click on "Function" as shown in the image below, then click on "Create Solution"
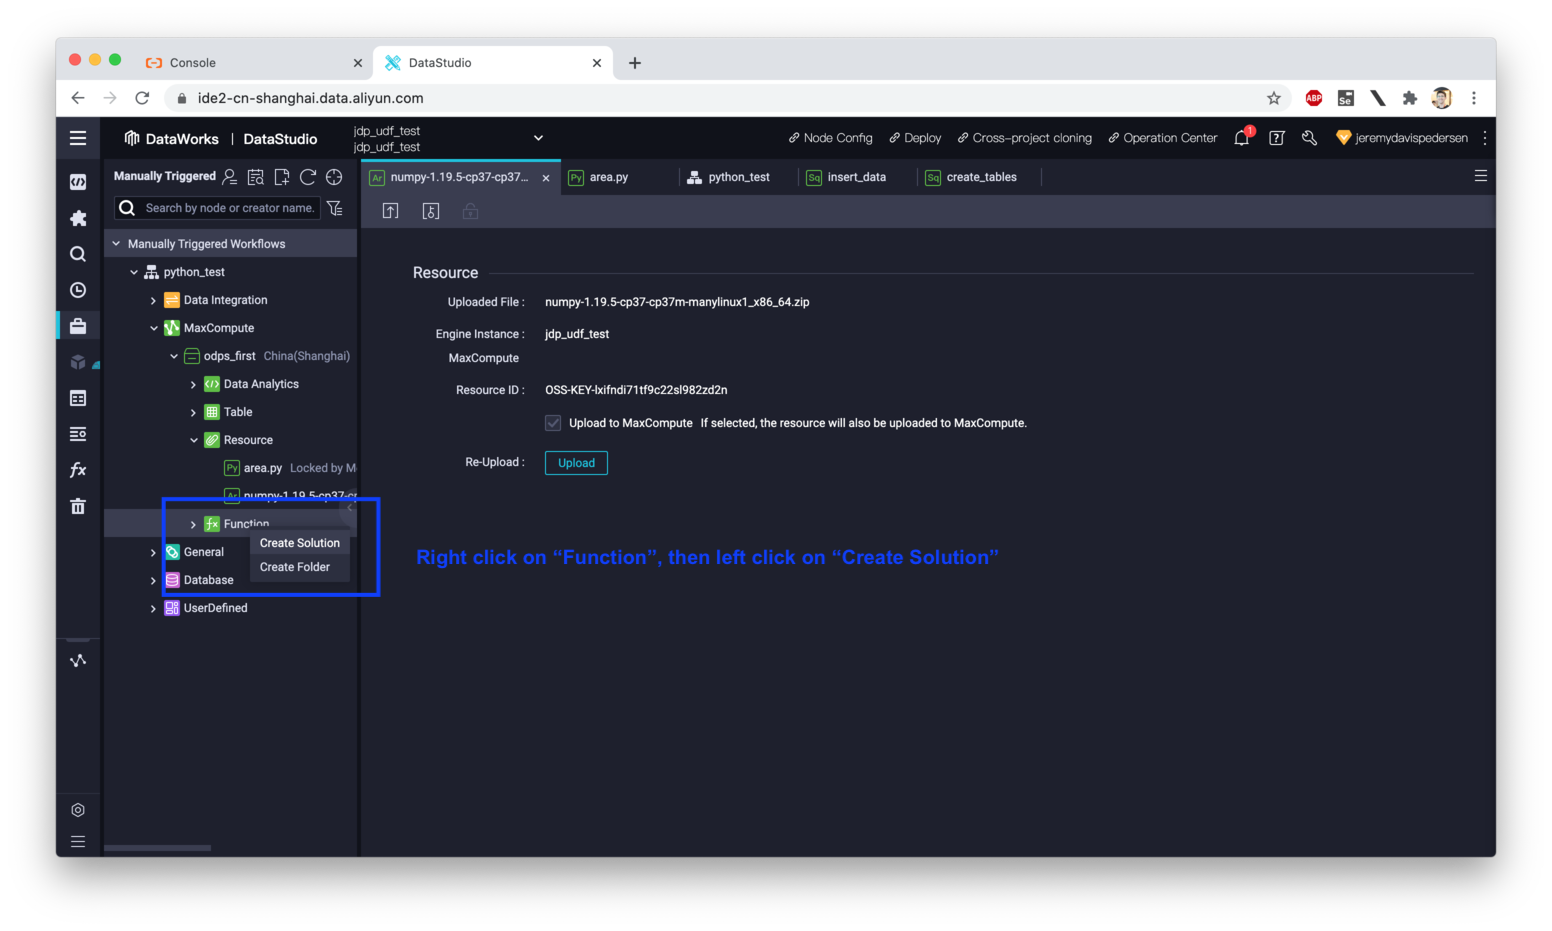
This will open up the function creation dialog:
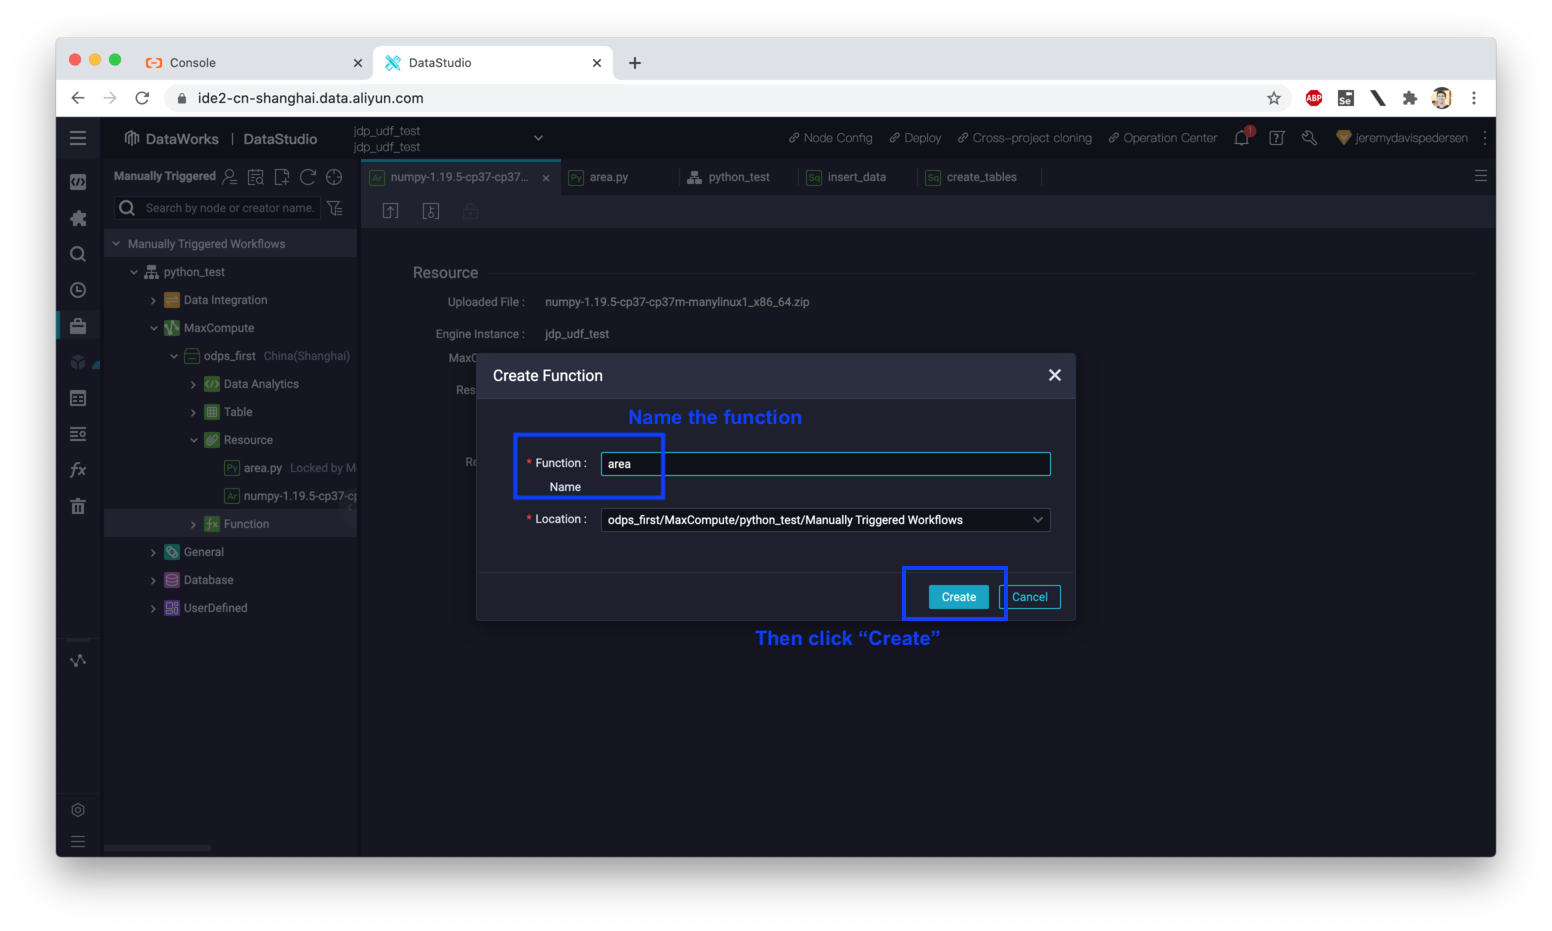
After you've given the function a name, you need to tell MaxCompute which resources it depends on:
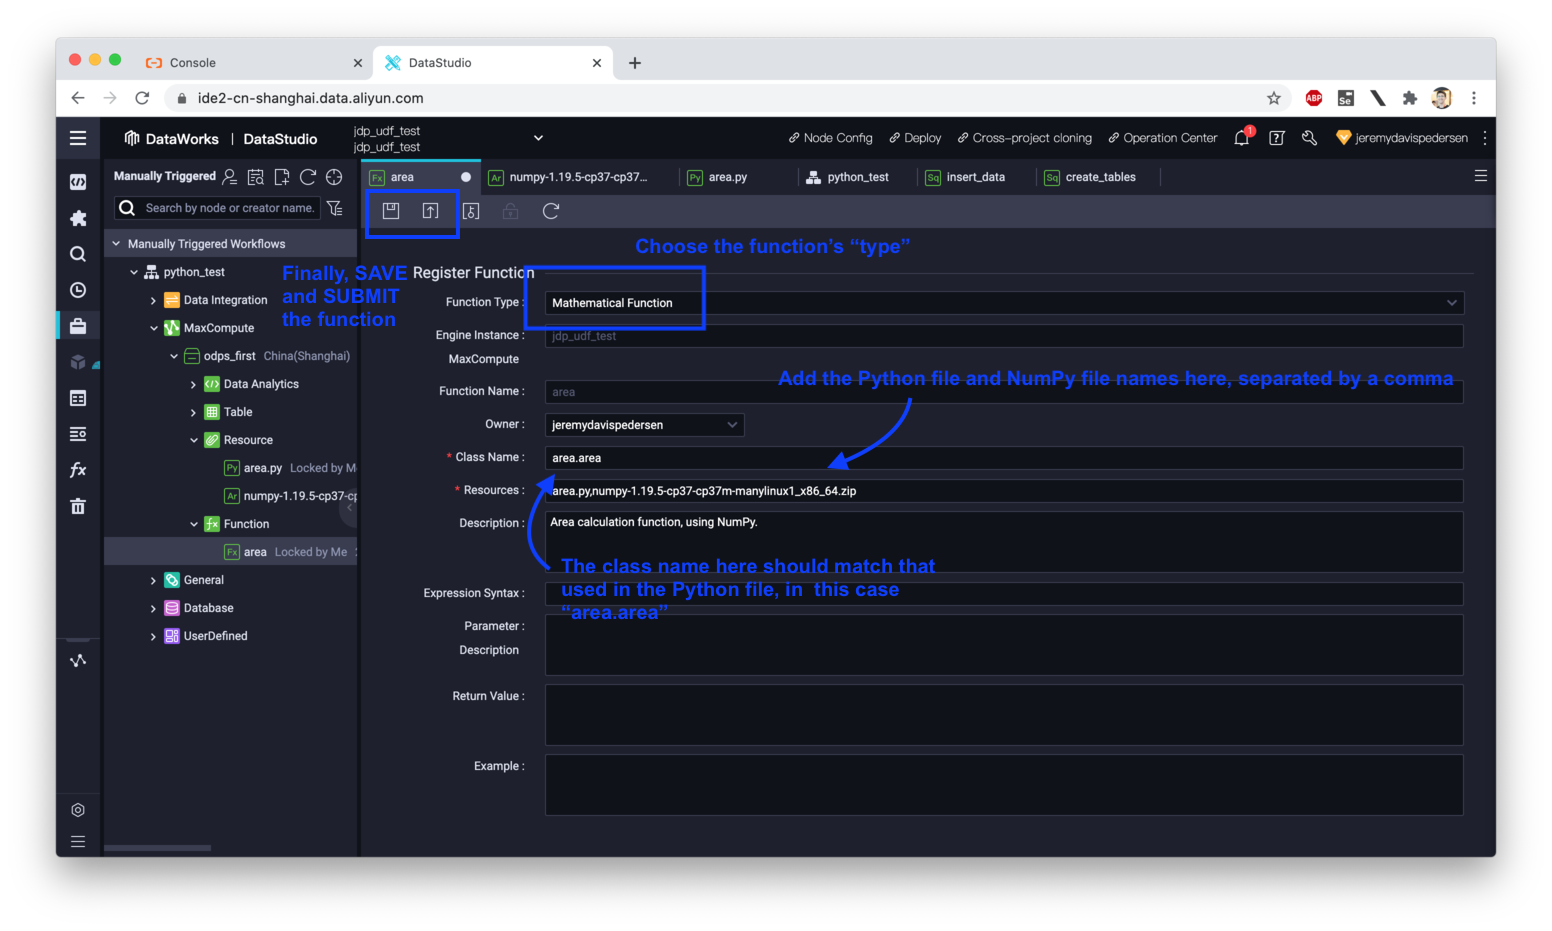
We're almost ready to use the UDF, but before we do that we need to submit the function, the area.py file, and the NumPy .zip archive. Click on the tab corresponding to each of those resources in the DataStudio console, and click on the little up arrow (next to the save button). This is a critically important step, all 3 of these resources must be submitted before you will be able to call your UDF function successfully.
Now that our UDF function is registered, we can create a new ODPS SQL node that uses this function:
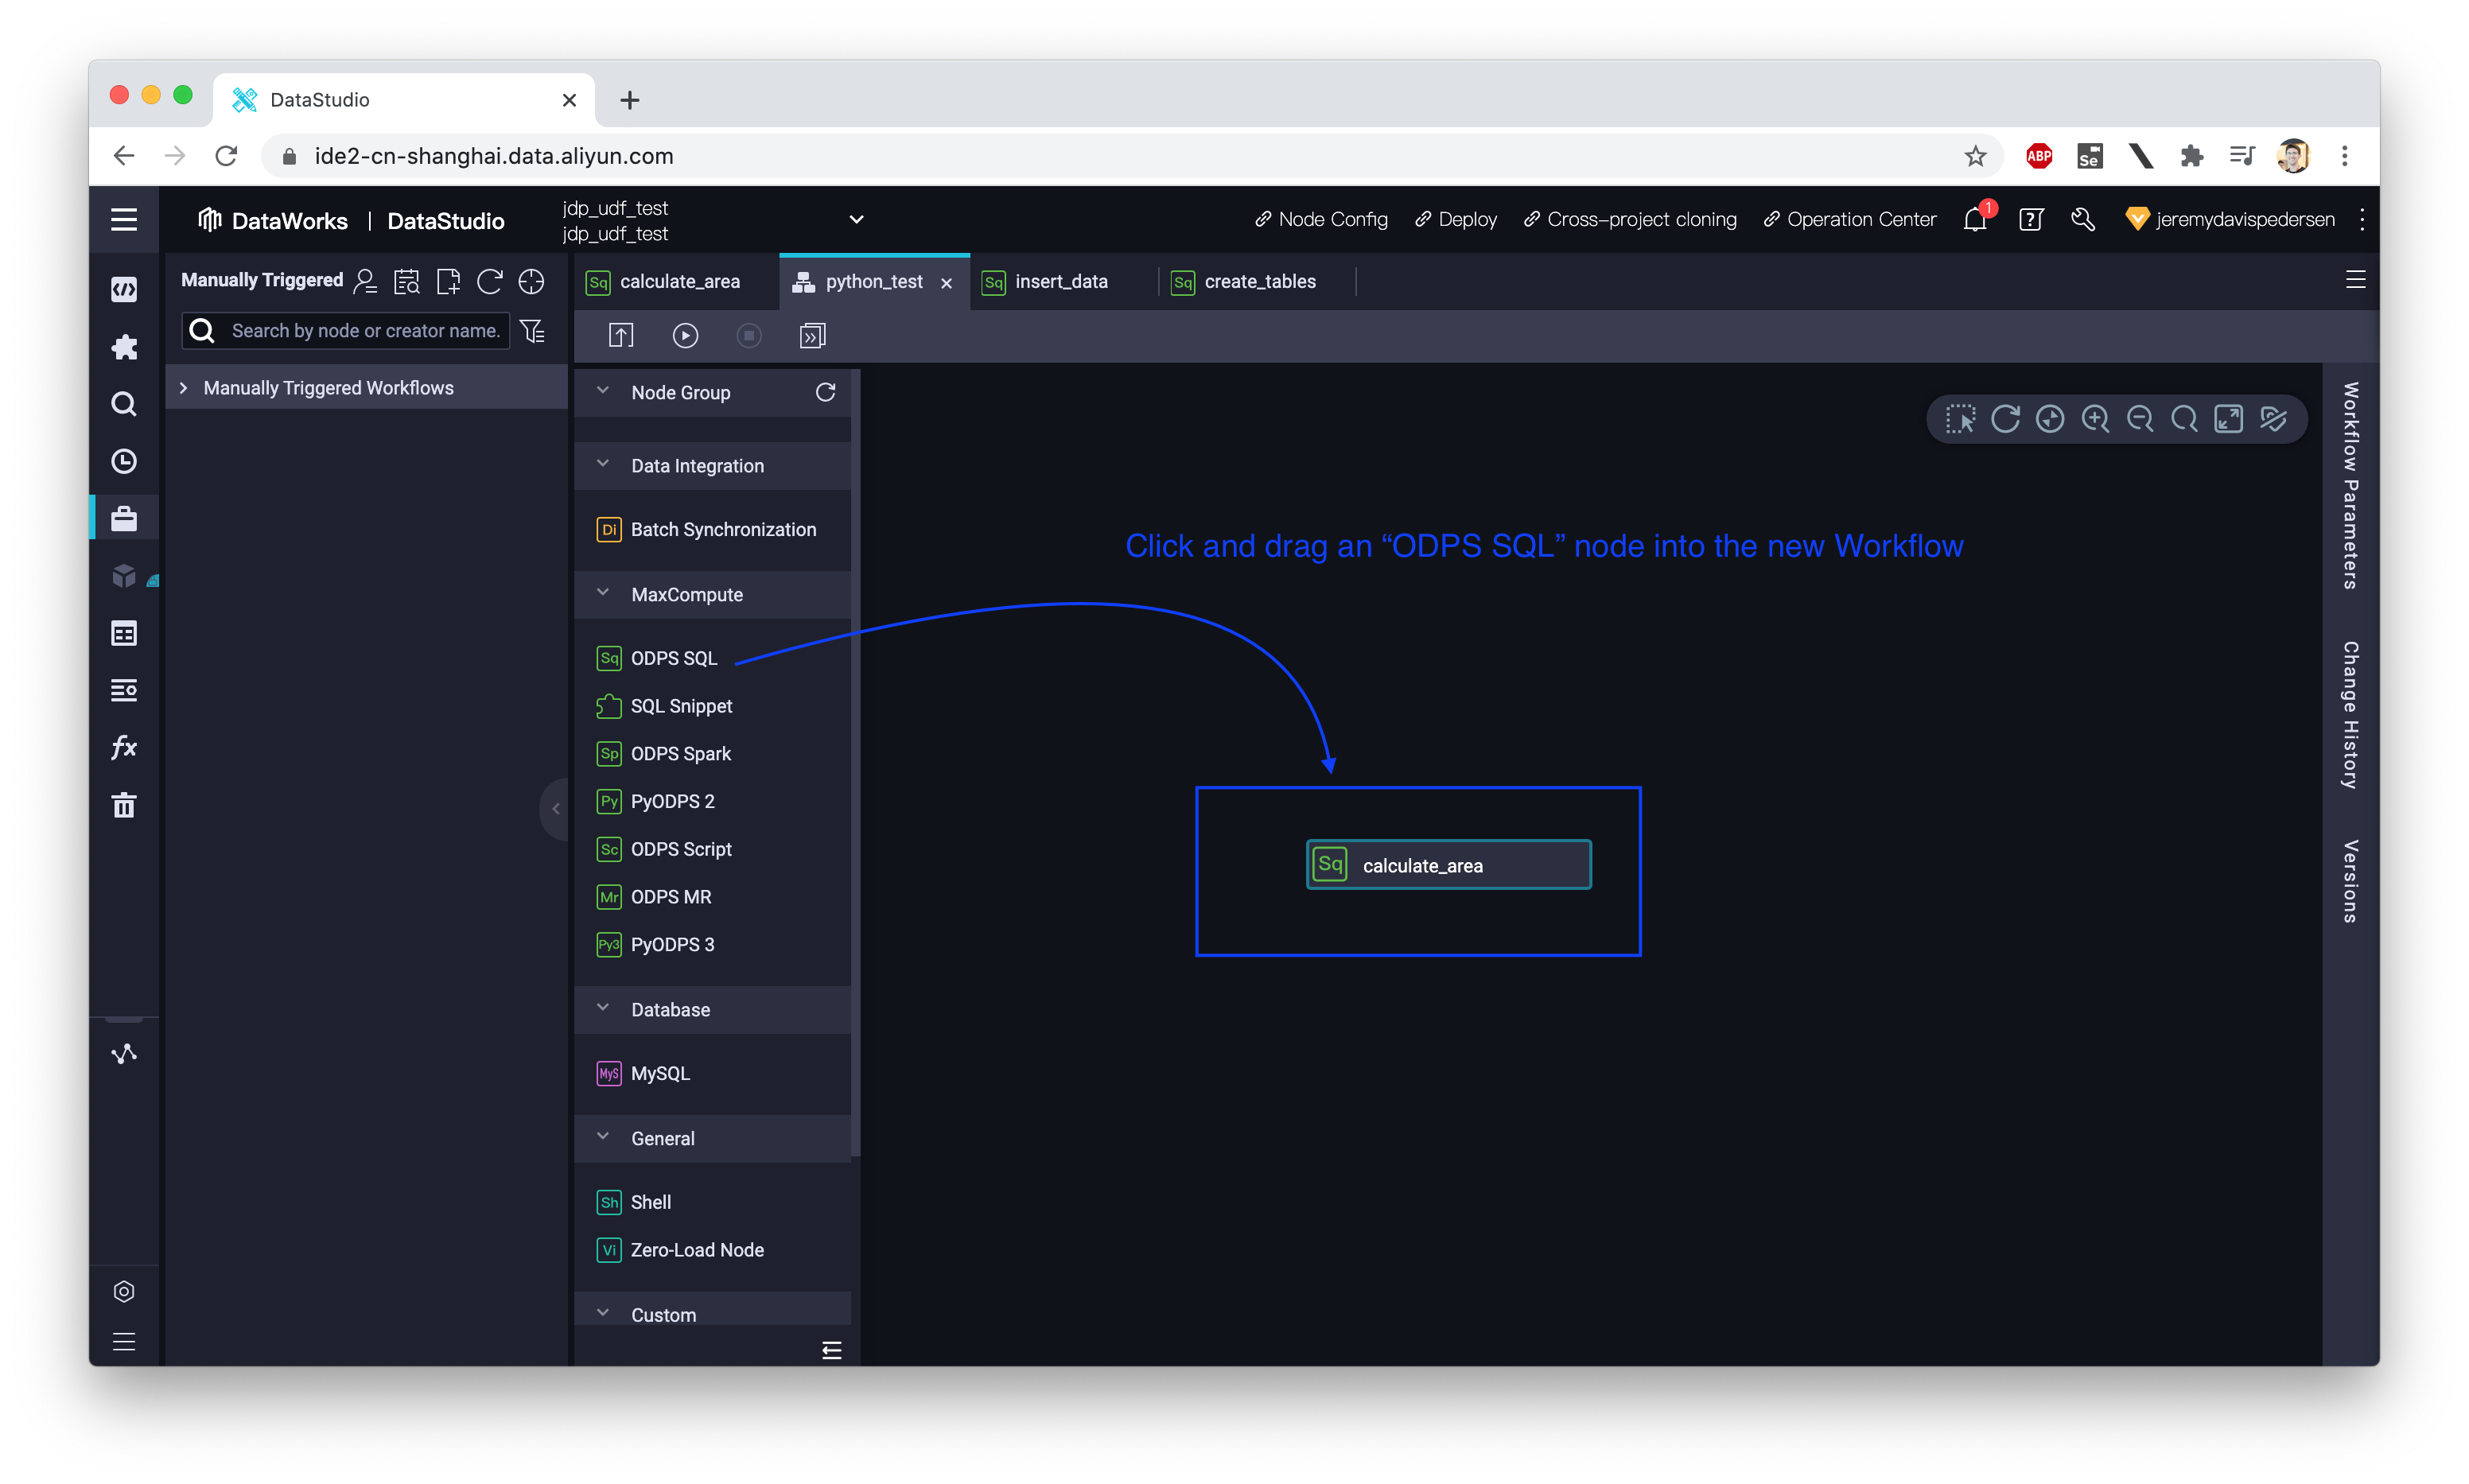
Once the Ad-Hoc query is set up, copy-paste this code into the query window:
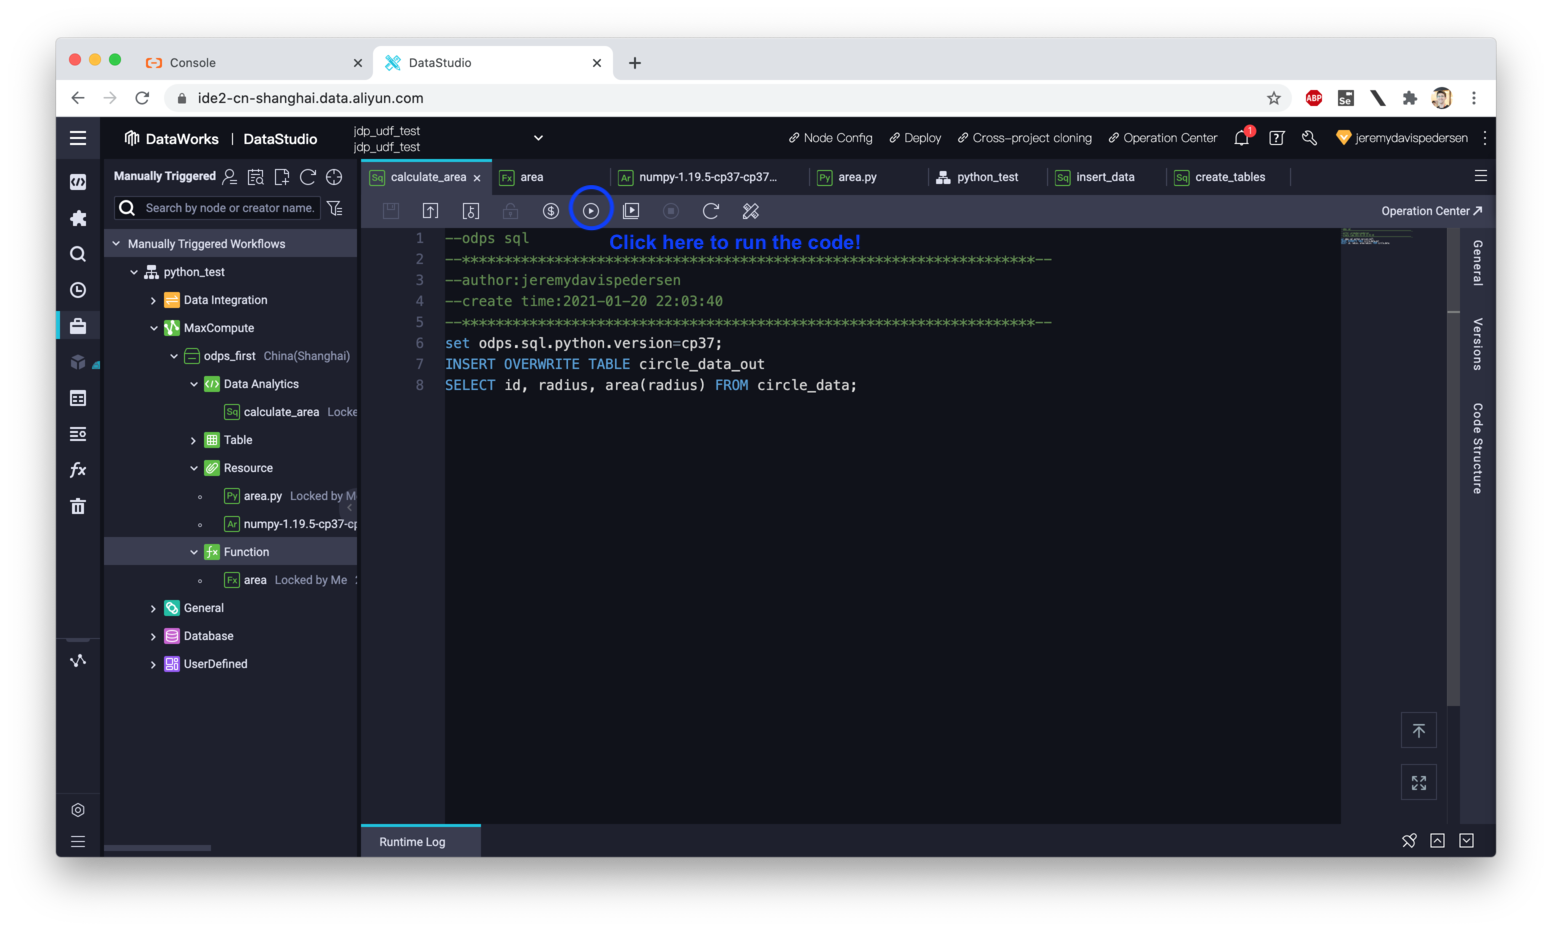
set odps.sql.python.version=cp37;
INSERT OVERWRITE TABLE circle_data_out
SELECT id, radius, area(radius) FROM circle_data;
Note that the line set odps.sql.python.version=cp37; is critical, because MaxCompute runs Python UDFs using Python 2 by default. This line forces MaxCompute to run Python UDFs using the Python 3 runtime. Note that this could change in the future, but this is how things work as of this writing (June 2021).
Once you've saved your code, click on Run to execute the code:
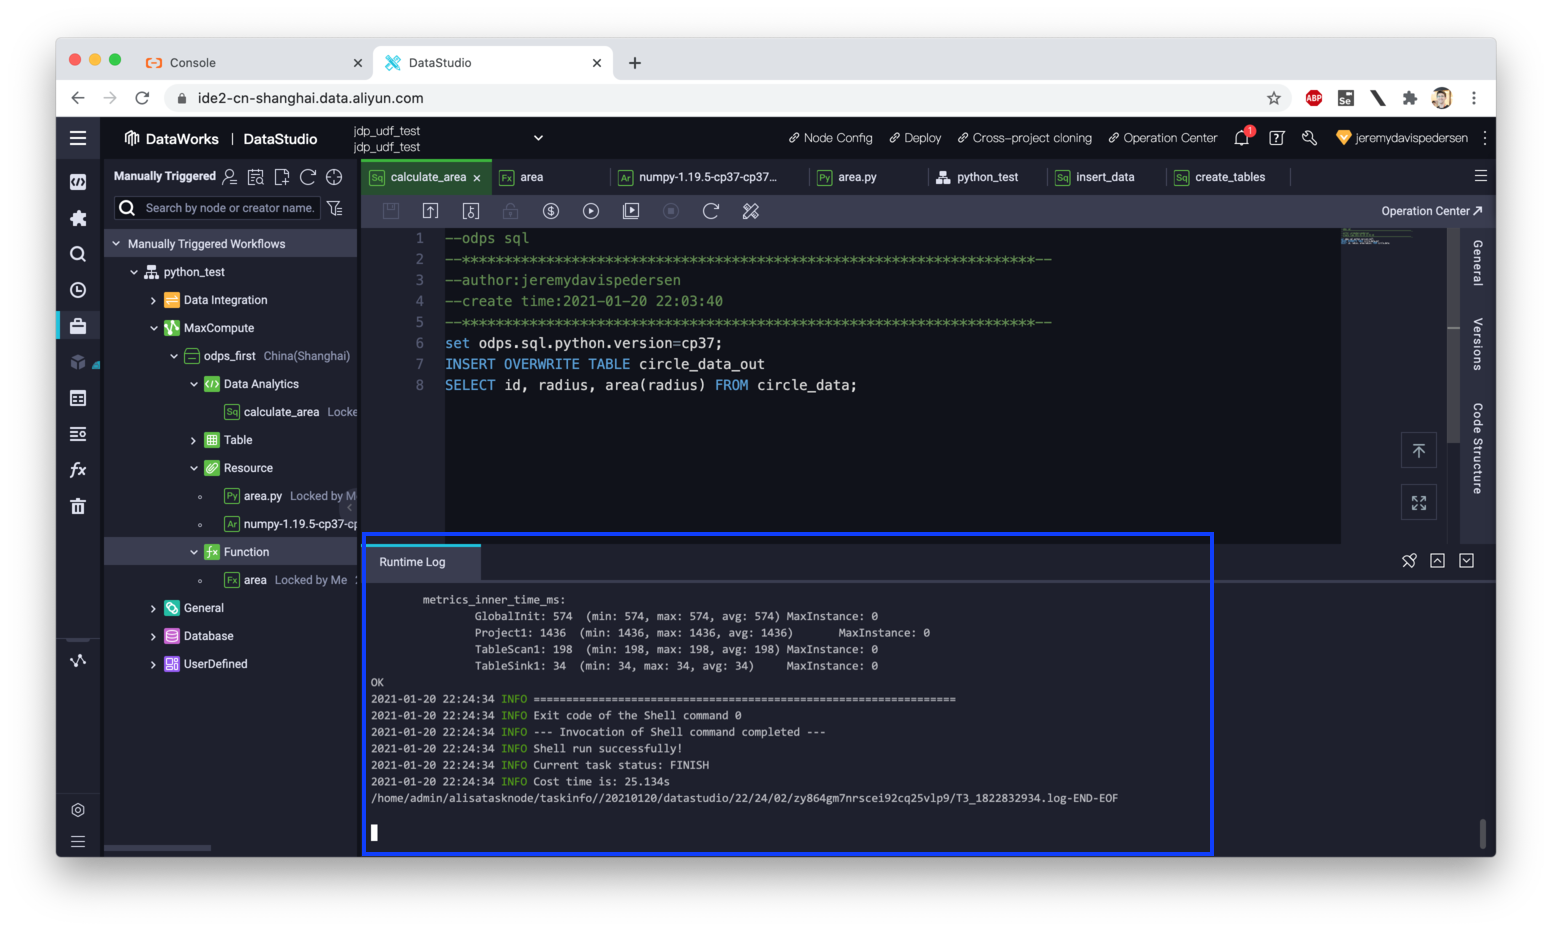
If everything went well, after 10-15 seconds you should see a message like this in the MaxCompute logs:
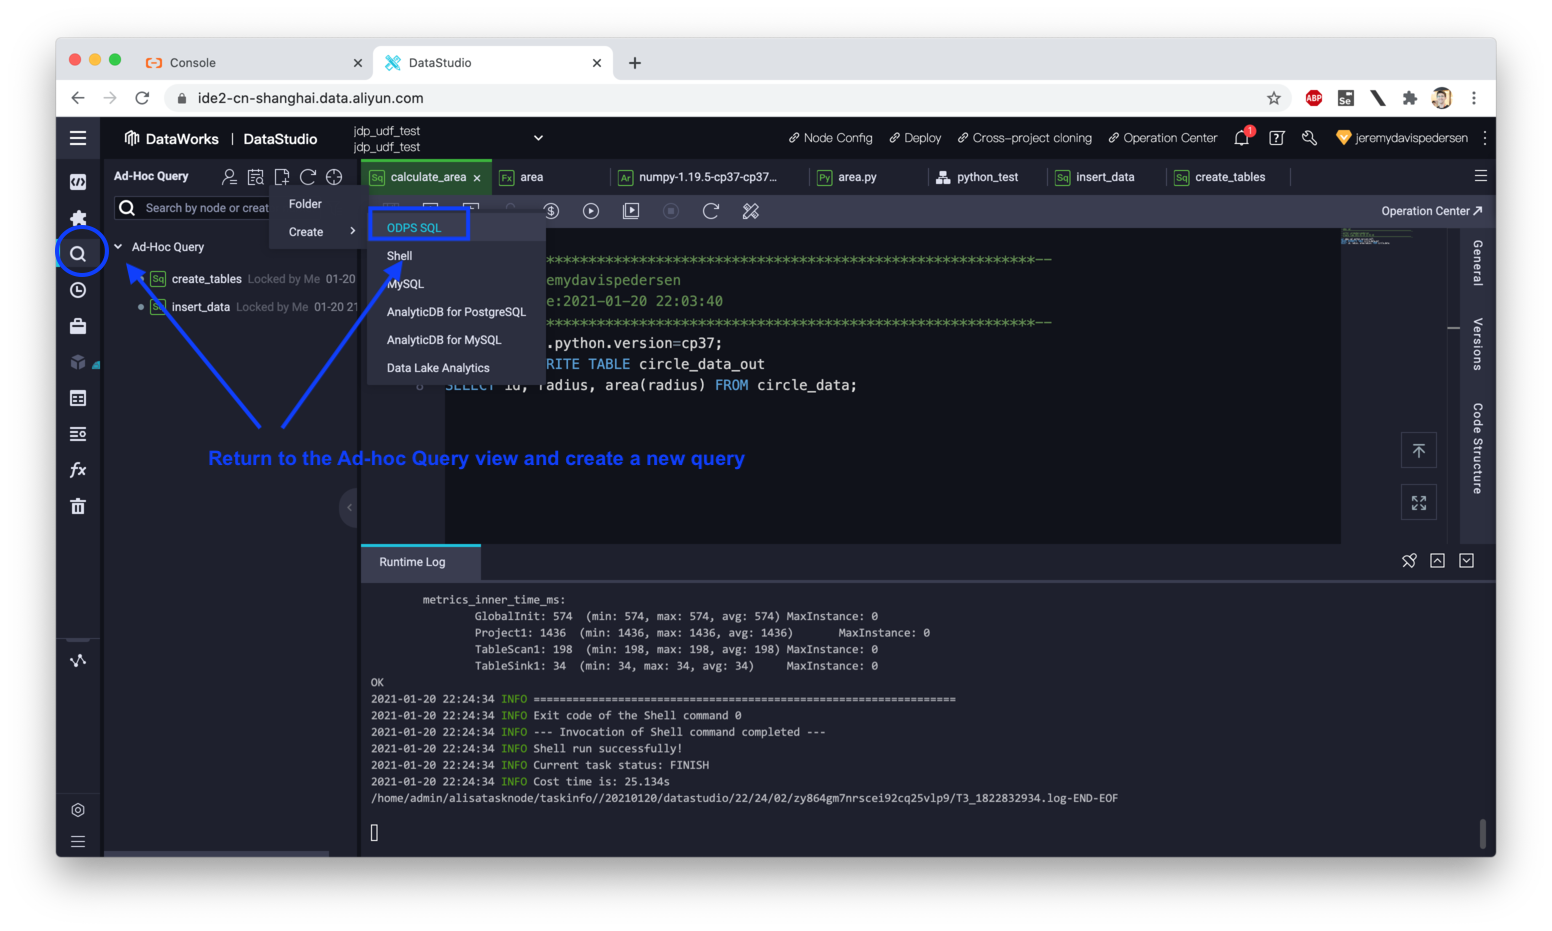
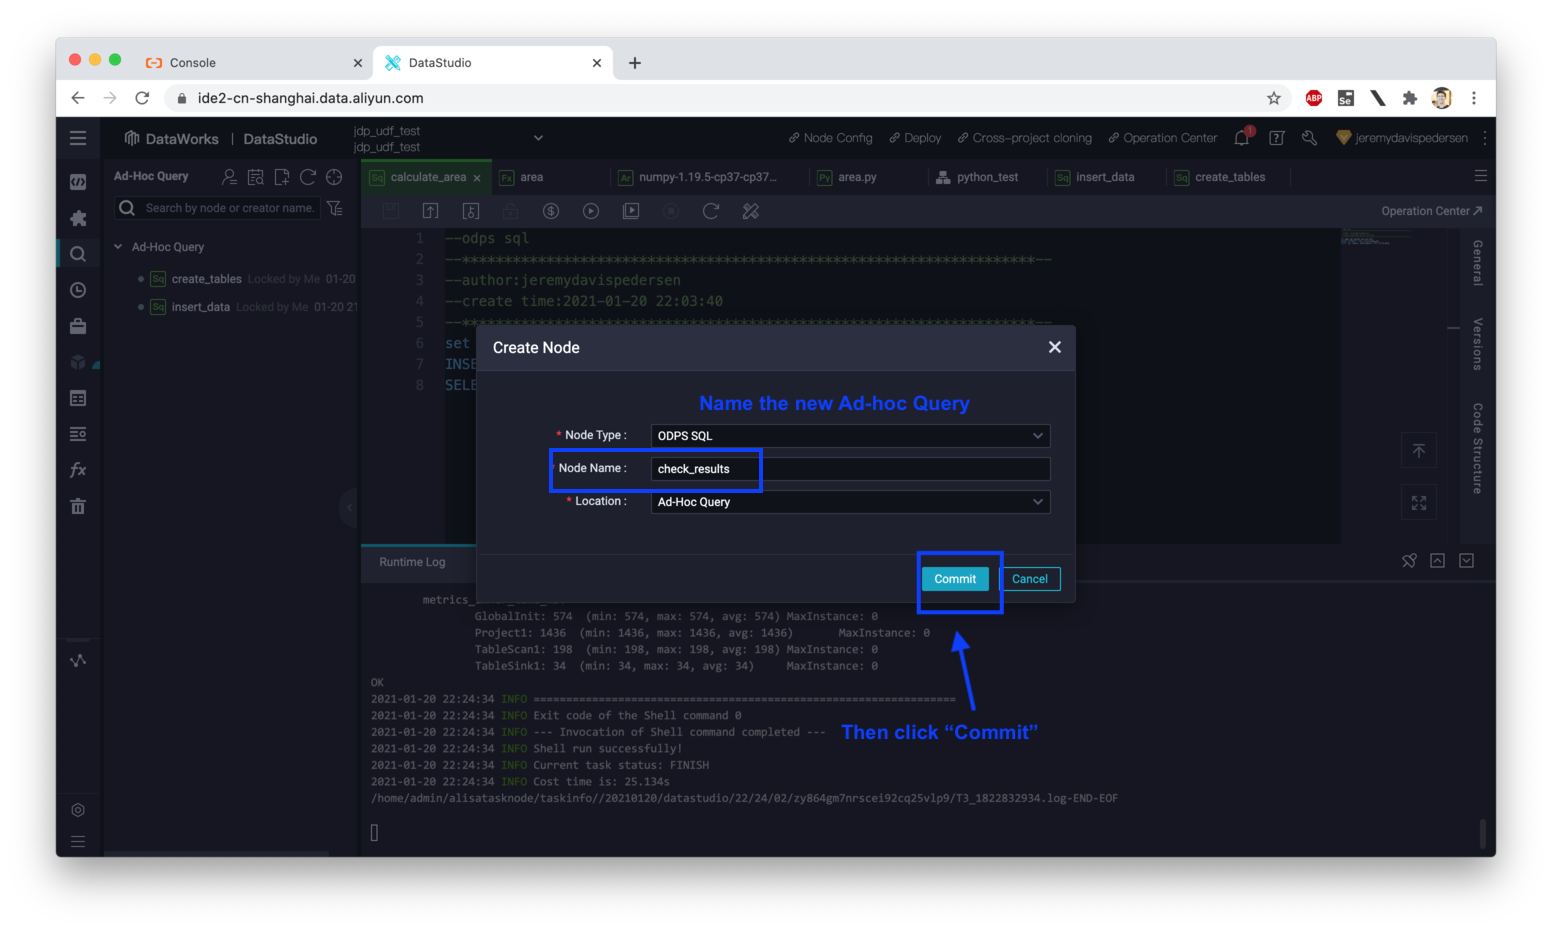
Switch back to the Ad-hoc Query view and create a new query called check_results:
Paste the following code into the query window:
SELECT * FROM circle_data;
SELECT * FROM circle_data_out;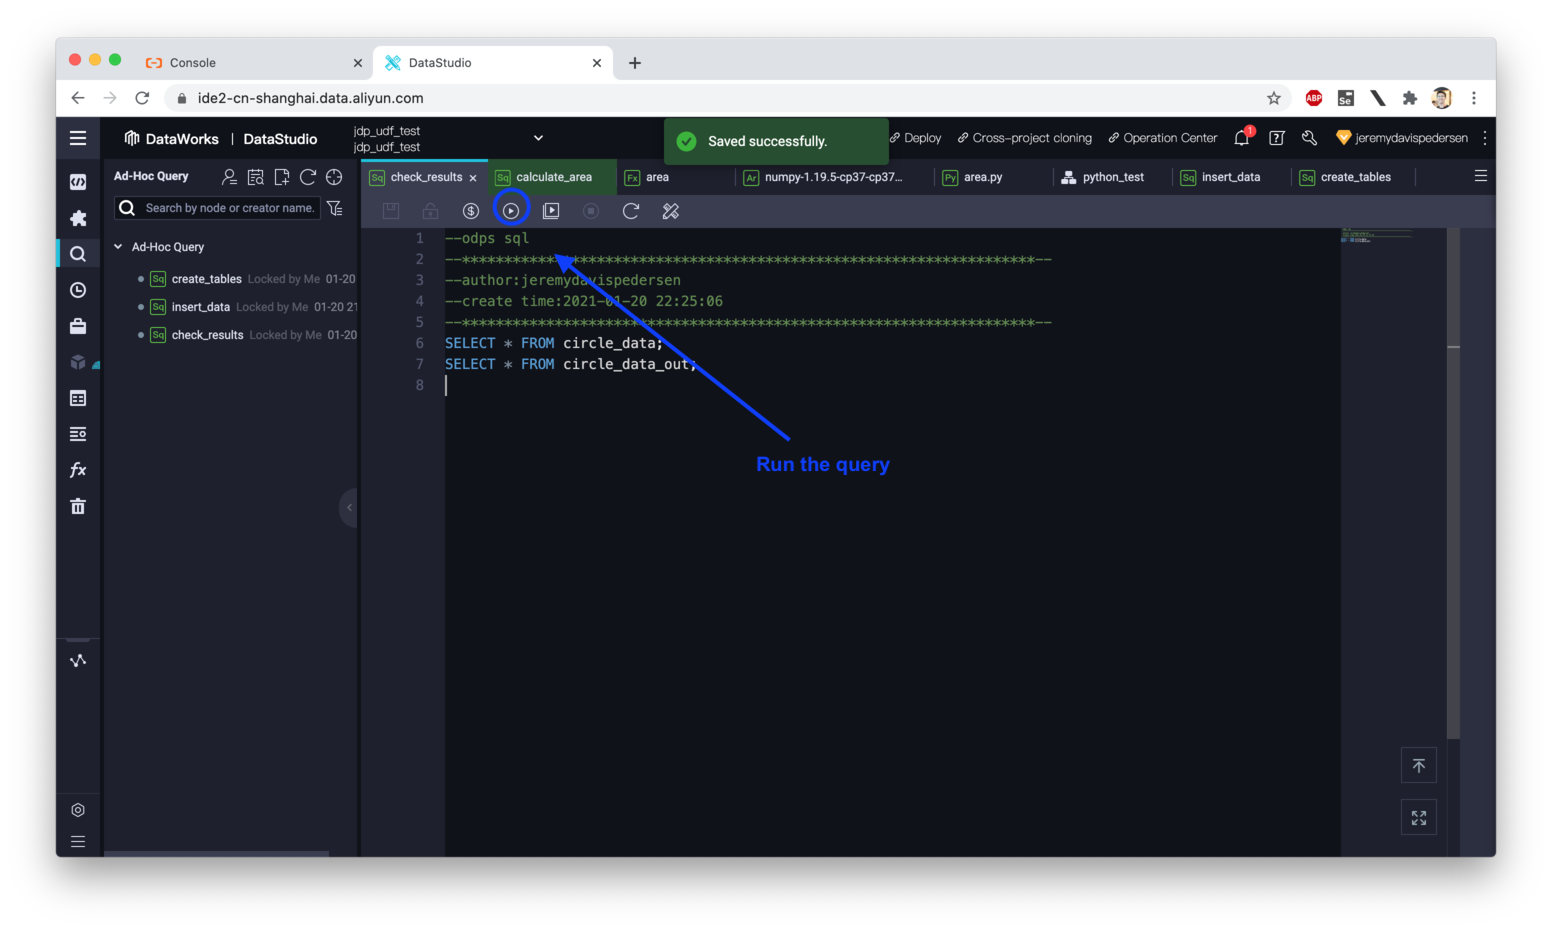
After clicking "Run", you'll be presented with a dialog which will indicate whether there are any errors in your SQL code, alongside a cost estimate:
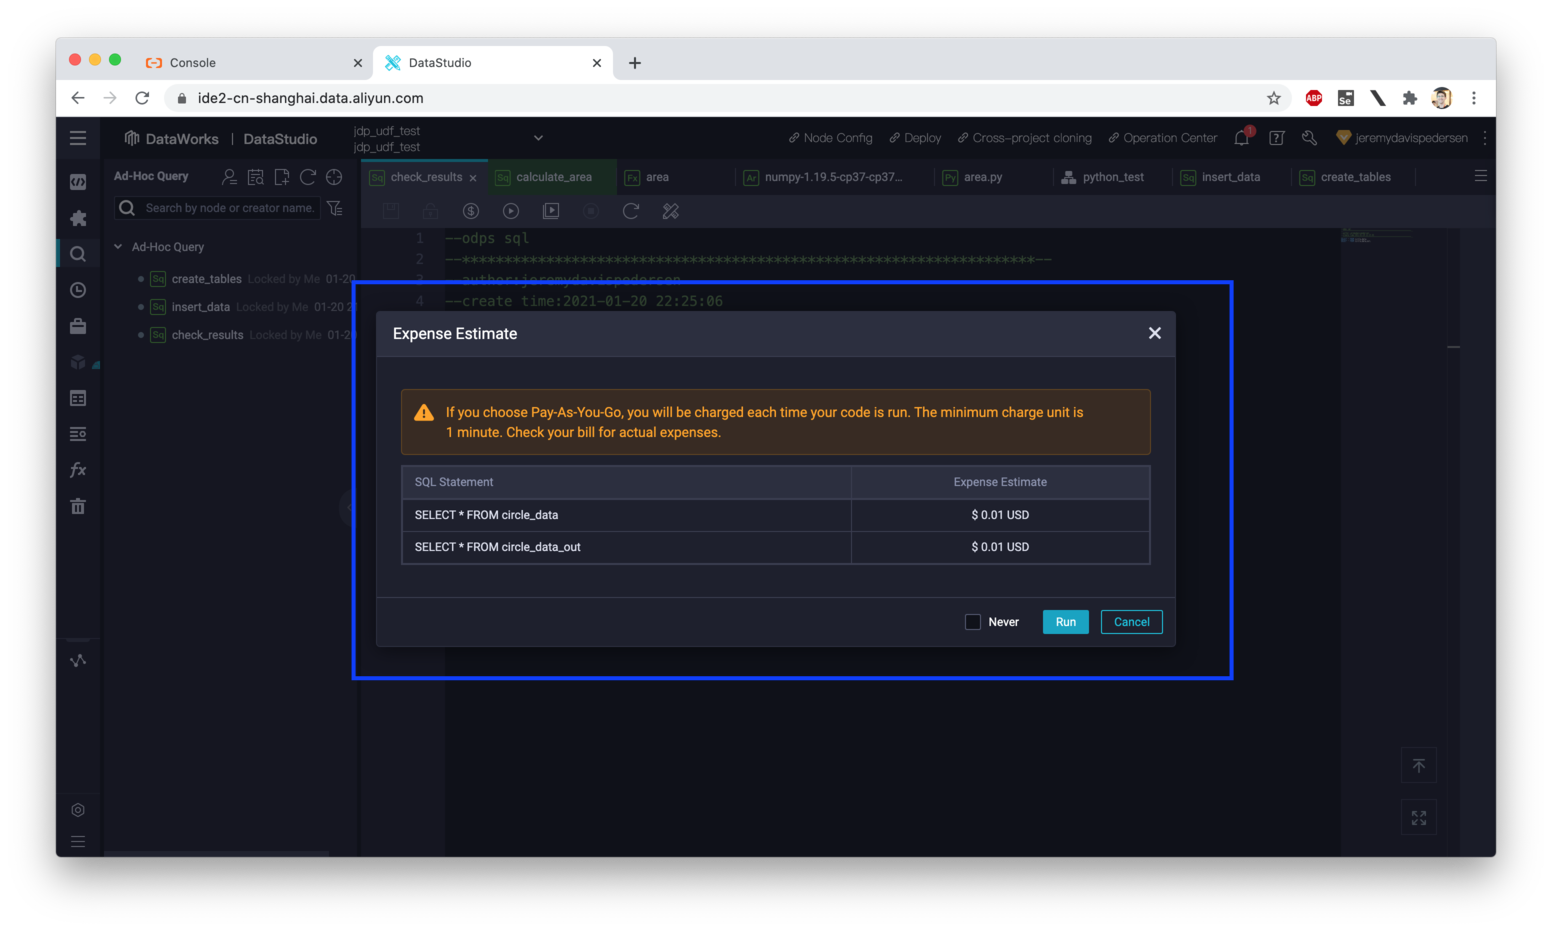
If there are no errors, click "Run" to continue.
After the two SELECT statements execute, you should see the following output:
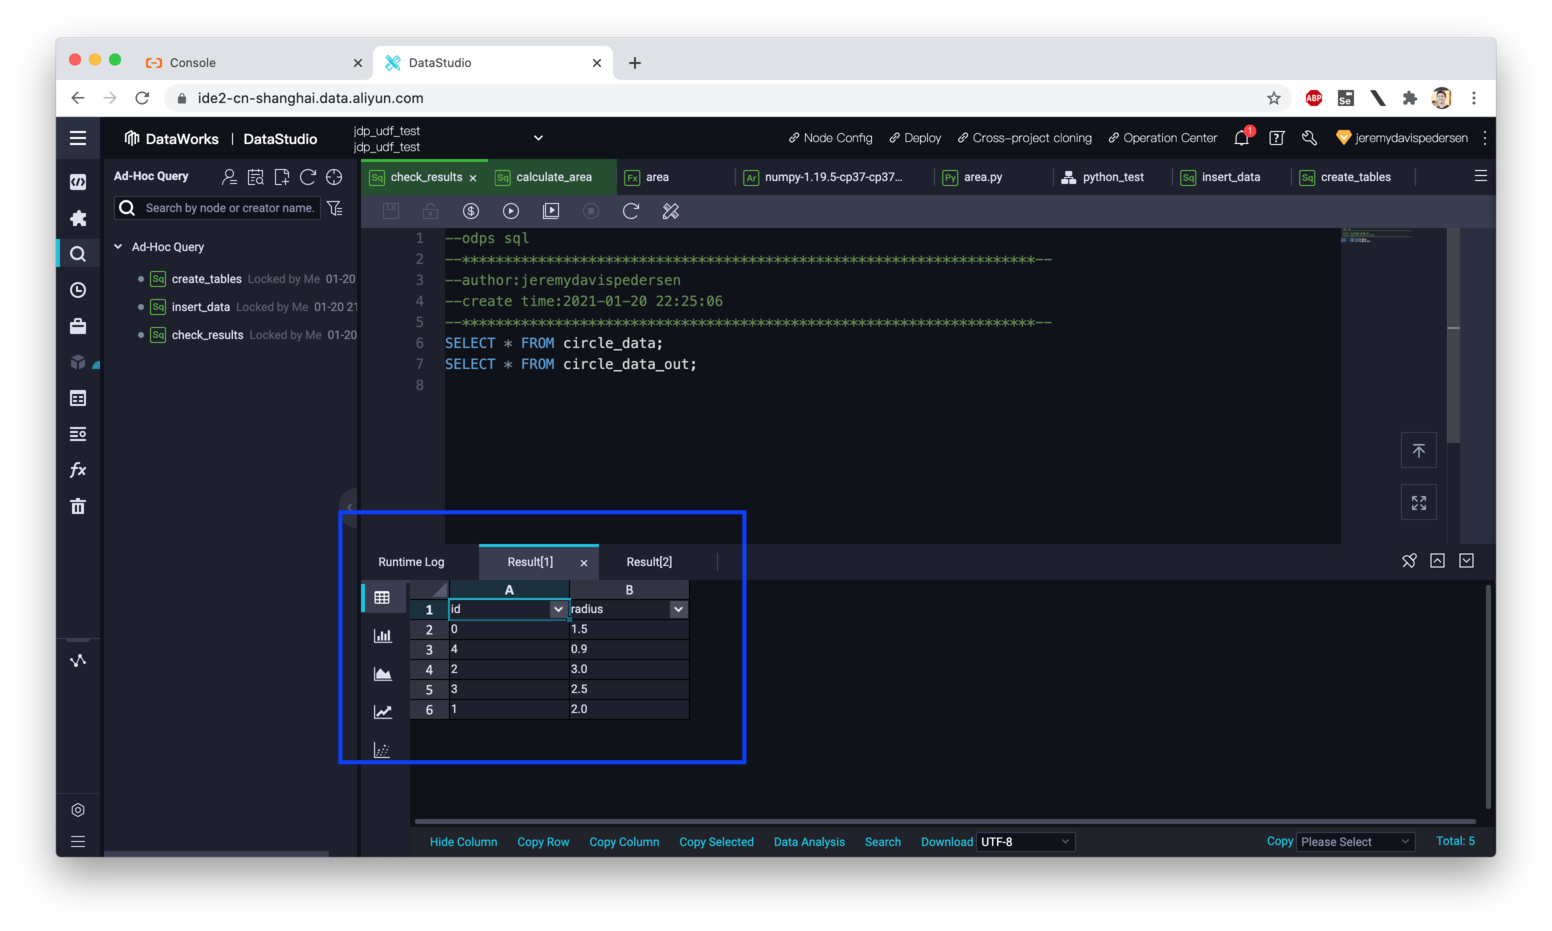
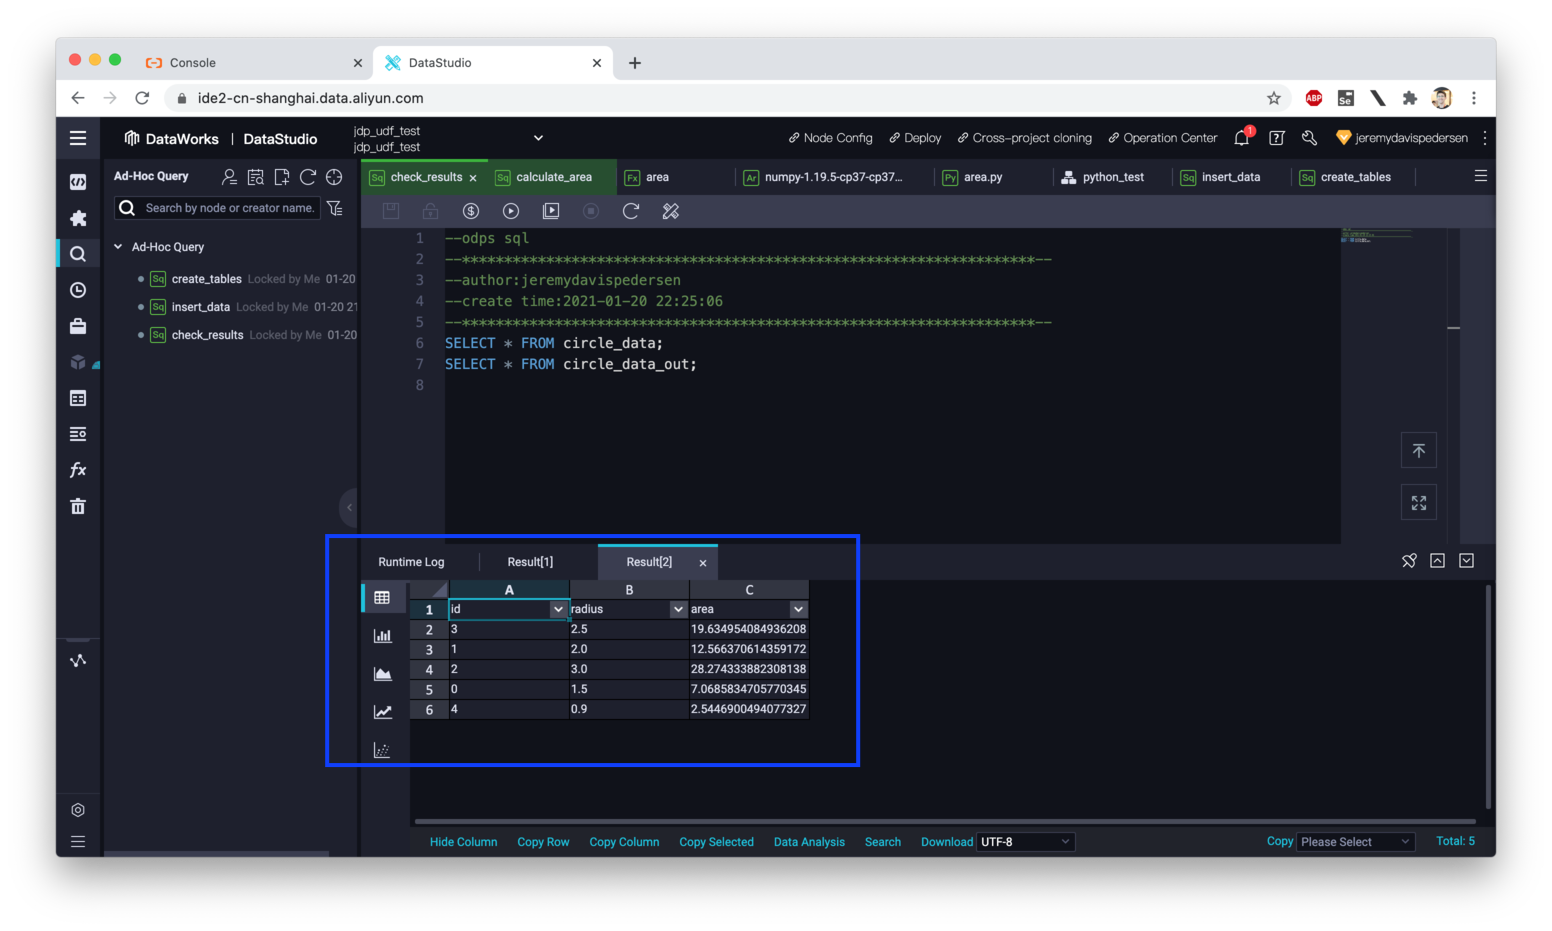
That's it! You've successfully created a Python 3 UDF that uses a 3rd party library, and have used it within your MaxCompute project!
When you're done, just delete the DataWorks Workspace and that's it! All the related resources (MaxCompute project, tables, functions) will be automatically released.
I drew some inspiration from this LabEx lab on creating Python UDF functions, though I chose to use the DataWorks interface rather than IntelliJ.
This document on adding custom libraries to Python 3 UDFs was also referenced heavily as I wrote up this blog post.
Great! Reach out to me at jierui.pjr@alibabacloud.com and I'll do my best to answer in a future Friday Q&A blog.
You can also follow the Alibaba Cloud Academy LinkedIn Page. We'll re-post these blogs there each Friday.
Friday Blog - Week 13 - Bird or Plane? Classifying Images With TensorFlow
Friday Blog - Week 15 - CloudMonitor, Slack chat, and Function Compute: A Perfect Match
JDP - May 20, 2021
JDP - December 30, 2021
JDP - December 10, 2021
JDP - January 6, 2022
JDP - September 15, 2021
JDP - May 27, 2021
 Big Data Consulting for Data Technology Solution
Alibaba Cloud provides big data consulting services to help enterprises leverage advanced data technology.
Learn More MaxCompute
Conduct large-scale data warehousing with MaxCompute
Learn More Big Data Consulting Services for Retail Solution
Alibaba Cloud experts provide retailers with a lightweight and customized big data consulting service to help you assess your big data maturity and plan your big data journey.
Learn More Financial Services Solutions
Alibaba Cloud equips financial services providers with professional solutions with high scalability and high availability features.
Learn MoreMore Posts by JDP