RabbitMQ is an open-source message broker that implements the Advanced Message Queuing Protocol (AMQP) to store and forward messages in a distributed system. RabbitMQ is easy to use, scalable, and highly available. This article describes how to deploy RabbitMQ on an Elastic Compute Service (ECS) instance.
A security group of the virtual private cloud (VPC) type is created. An inbound rule that allows traffic on ports 80, 5672, and 15672 is added to the security group. If you want to connect to a Linux instance in the security group by using Secure Shell (SSH), you must configure the rule to allow traffic on port 22. For more information, see Add security group rules.
The RabbitMQ server is written in the Erlang programming language. RabbitMQ supports multiple types of clients such as Python, Ruby, .NET, Java, Java Message Service (JMS), C, Professional Hypertext Preprocessor (PHP), ActionScript, Extensible Messaging and Presence Protocol (XMPP), Simple Text Oriented Messaging Protocol (STOMP), and Asynchronous JavaScript and XML (AJAX).
Manually deploy RabbitMQ. This method is suitable for users who have a basic knowledge of Linux commands and can perform personalized deployment. Use the following operating system and software versions to manually deploy RabbitMQ:
1. Create and connect to a Linux instance.
a) Create a Linux instance.
For more information, see Create an instance by using the wizard. When you configure parameters to create the instance, take note of the following items:
b) Connect to the instance.
For more information, see Connect to a Linux instance by using password authentication.
2. Install Erlang.
a) Run the following command to install the dependency for Erlang:
yum install -y make gcc gcc-c++ m4 openssl openssl-devel ncurses-devel unixODBC unixODBC-devel java java-develb) Run the following command to download the Erlang installation package:
wget http://erlang.org/download/otp_src_21.1.tar.gzc) Run the following command to decompress the Erlang installation package:
tar -zxvf otp_src_21.1.tar.gzd) Run the following commands to go to the path to which the Erlang installation package is decompressed and create a directory for Erlang:
cd otp_src_21.1
mkdir -p /usr/local/erlang
e) Run the following commands in sequence to compile and install Erlang:
./configure --prefix=/usr/local/erlangmake && make installf) After Erlang is installed, run the following command to configure the environment variable for Erlang:
echo 'export PATH=$PATH:/usr/local/erlang/bin' >> /etc/profileg) Run the following command to apply the configured environment variable:
source /etc/profileh) Run the following commands to go back to the /root directory. View the Erlang version to check whether Erlang is installed.
cd
erl -version
A command output similar to the following one indicates that Erlang is installed.

3. Download and install RabbitMQ.
Different RabbitMQ versions are compatible with different Erlang versions. For more information, see RabbitMQ Erlang Version Requirements. In this example, Erlang 21.1 is used, and you must download RabbitMQ 3.7.8.
a) Run the following command to download the RabbitMQ installation package:
wget https://github.com/rabbitmq/rabbitmq-server/releases/download/v3.7.8/rabbitmq-server-generic-unix-3.7.8.tar.xzb) Run the following command to decompress the RabbitMQ installation package:
tar -xvf rabbitmq-server-generic-unix-3.7.8.tar.xzc) After the package is decompressed, run the following command to configure the environment variable for RabbitMQ:
echo 'export PATH=$PATH:/root/rabbitmq_server-3.7.8/sbin' >> /etc/profiled) Run the following command to apply the configured environment variable:
source /etc/profile4. Configure RabbitMQ.
a) Run the following command to start RabbitMQ and run RabbitMQ in the background:
rabbitmq-server -detachedNote: This command starts RabbitMQ only in the current runtime environment. If the instance restarts, RabbitMQ does not automatically start. We recommend that you use Cloud Assistant to configure RabbitMQ to automatically start on instance startup. For more information, see Use Cloud Assistant to Configure RabbitMQ to automatically start on instance startup.
b) Run the following command to enable the RabbitMQ monitoring plug-in:
rabbitmq-plugins enable rabbitmq_managementTo disable the RabbitMQ monitoring plug-in, you can run the rabbitmq-plugins disable rabbitmq_management command.
c) To ensure data security, we recommend that you run the following command to delete the default user of RabbitMQ.
The default username and password of RabbitMQ are both guest.
rabbitmqctl delete_user guestd) Create a RabbitMQ administrator user.
i) Run the following command to create a user:
rabbitmqctl add_user <Username> <Password>Specify the <Username> and <Password> parameters.
ii) Run the following command to set the new user as an administrator:
rabbitmqctl set_user_tags <Username> administratoriii) Run the following command to grant all permissions to the new user:
rabbitmqctl set_permissions -p / <Username> ".*" ".*" ".*"5. Access <Public IP address of the Linux instance>:15672 in a browser on your computer.
The following page indicates that RabbitMQ is installed.

6. Enter the username and password of the RabbitMQ administrator user that you created and click Login to access the RabbitMQ management interface.
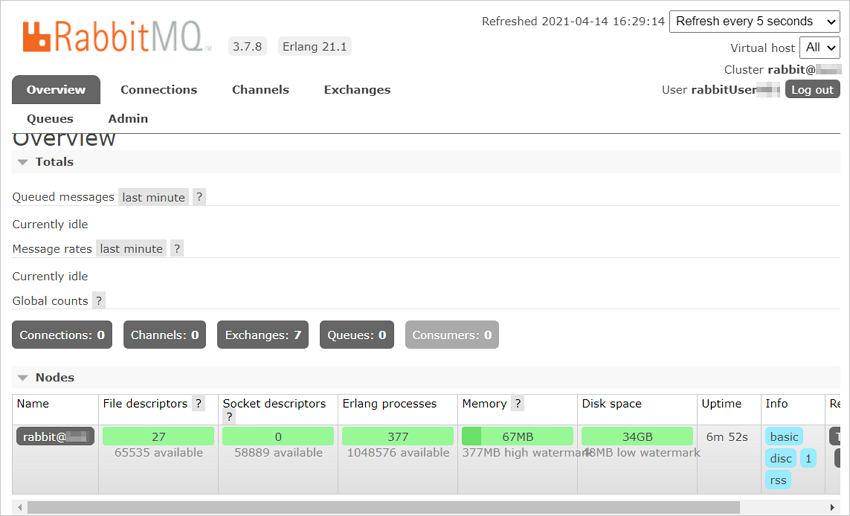
The RabbitMQ management interface appears, as shown in the following figure.

1. Configure the rabbitmq-server file for RabbitMQ.
a) Run the following command to edit the rabbitmq-server file:
vim /root/rabbitmq_server-3.7.8/sbin/rabbitmq-serverb) Press shift+: and enter set nu to view line numbers of the file.
c) Press shift+: and enter 189 to go to Line 189.
d) Press the I key to enter the edit mode.
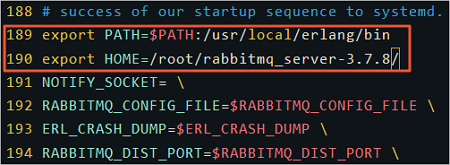
Add the following content to Line 189:
export PATH=$PATH:/usr/local/erlang/bin
export HOME=/root/rabbitmq_server-3.7.8/
The following figure shows the lines after the content is added.

e) Press the Esc key, enter :wq, and then press the Enter key to save and close the file.
2. Call the ECS API RunCommand operation to configure RabbitMQ to automatically start on instance startup.
For more information, see Quick start. To configure RabbitMQ to automatically start on instance startup, you must configure the parameters listed in the following table.
| Parameter | Description | Valid or example value |
| RegionId | The region ID of the instance. | Example: cn-hangzhou. |
| Name | The name of the Cloud Assistant command. | Example: start-rabbitmq. |
| Type | The language type of the command. | Set the value to RunShellScript. |
| CommandContent | The plaintext content of the command. | Set the value to /root/rabbitmq_server-3.7.8/sbin/rabbitmq-server -detached.Note: The command is used to start RabbitMQ. |
| RepeatMode | Specifies how to run the command. | Set the value to EveryReboot. |
| InstanceId.N | The ID of the instance where RabbitMQ is deployed. | Example: i-bp12f1b0i3r7adm3****. |
The following code shows a sample success response in the JSON format. Subsequently, the command used to start RabbitMQ is triggered every time you restart the instance.
{
  "RequestId": "8B4BFE47-F1E3-48D1-B405-CA783B697046",
  "CommandId": "c-hz01gvo1ri9****",
  "InvokeId": "t-hz01gvo1rig****"
}
1,303 posts | 460 followers
FollowAlibaba Clouder - August 5, 2019
Alibaba Clouder - December 29, 2020
Alibaba Clouder - June 13, 2019
Hiteshjethva - March 2, 2020
Alibaba Clouder - August 2, 2018
Alibaba Clouder - September 30, 2018

1,303 posts | 460 followers
Follow ECS(Elastic Compute Service)
Elastic and secure virtual cloud servers to cater all your cloud hosting needs.
Learn More Function Compute
Alibaba Cloud Function Compute is a fully-managed event-driven compute service. It allows you to focus on writing and uploading code without the need to manage infrastructure such as servers.
Learn More Elastic High Performance Computing Solution
High Performance Computing (HPC) and AI technology helps scientific research institutions to perform viral gene sequencing, conduct new drug research and development, and shorten the research and development cycle.
Learn More Elastic High Performance Computing
A HPCaaS cloud platform providing an all-in-one high-performance public computing service
Learn MoreMore Posts by Alibaba Cloud Community