By Ankit Kapoor, Database Senior Solution Architect, Alibaba Cloud
In this Data Management Service (DMS) based article we are going to discuss about:
Before proceeding, please note that I am assuming that the reader is already familiar with the following topics:
Without further ado, let's begin!
DMS stands for Data Management Service, Alibaba's proprietary tool. As name implies DMS has been use for managing user's database and works as a ONE STOP DATA SECURITY solution for all managing needs of a customer. DMS offers a highly efficient, secure, and comprehensive database development environment. DMS provides graphical user interface (GUI) to allow user to perform database research and development (R&D) and performance diagnosis.
Moreover it allows you to manage Linux servers, NoSQL databases, and relational databases, such as MySQL, SQL Server, PostgreSQL, MongoDB, and Redis. It is an all-in-one data management service that supports data management, structure management, access security, BI charts, data trends, data trace, performance trends and optimization, and server management.
To ensure data security, DMS implements a series of functions: R&D specifications, R&D workflow, authorization management, data masking, security auditing and DML rollback etc.
User can use DMS for data analysis, efficient development, real time database optimization and access security
In many of the business scenario we need to protect our customer's data which can be related to his/her personal information. For example, Customer's phone number, Customer's email id, Customer's bank account number. Such information is quite critical that we cannot even reveal this information to some of our internal users even. Internal users can be your developers, application users or other team members. Encryption or masking of the actual production environment's data should not be done because data needs to be display at the application layer or other way is to introduce one more layer of un-masking data between application and database layers.
What most of us do is that, we mask our staging data and unmask same data after moving into the production environment. Believe me this is a chaos or quite a mess up process.
Here is where DMS can be used to encrypt or mask production data without touching the actual data residing on the disk. A user can mask/semi mask confidential or sensitive data and can decide the level of masking according to the user.
Let see how DMS help us in achieving this:
1) Login to your RDS console.
2) Make sure that you do have one existing DB instance. This DB instance can be on on-prem, Ali RDS or on any other cloud vendor.
3) Search for the DMS in search bar or click on below link:
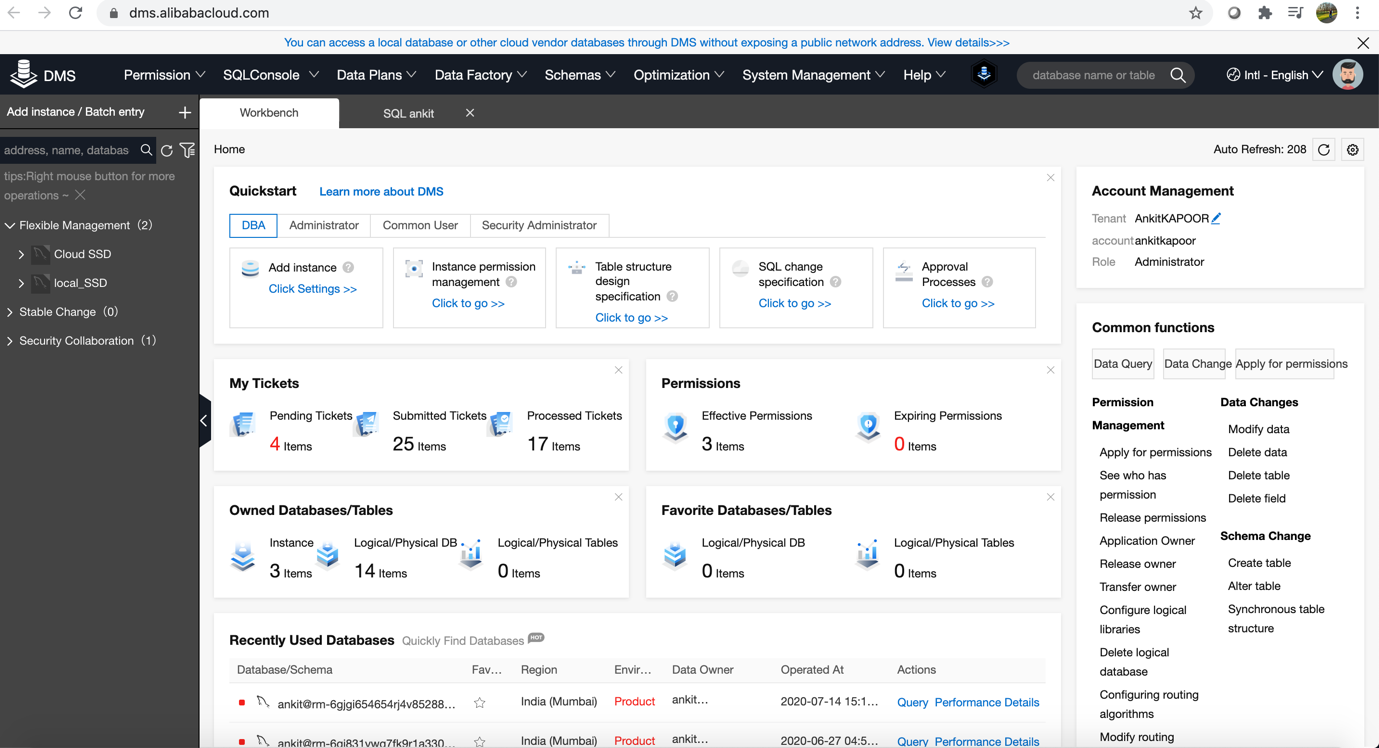
4) Now, if you have already added an instance you can skip to next step else follow below to add an instance. In this example I have used my own testing RDS MySQL hosted on Ali environment.
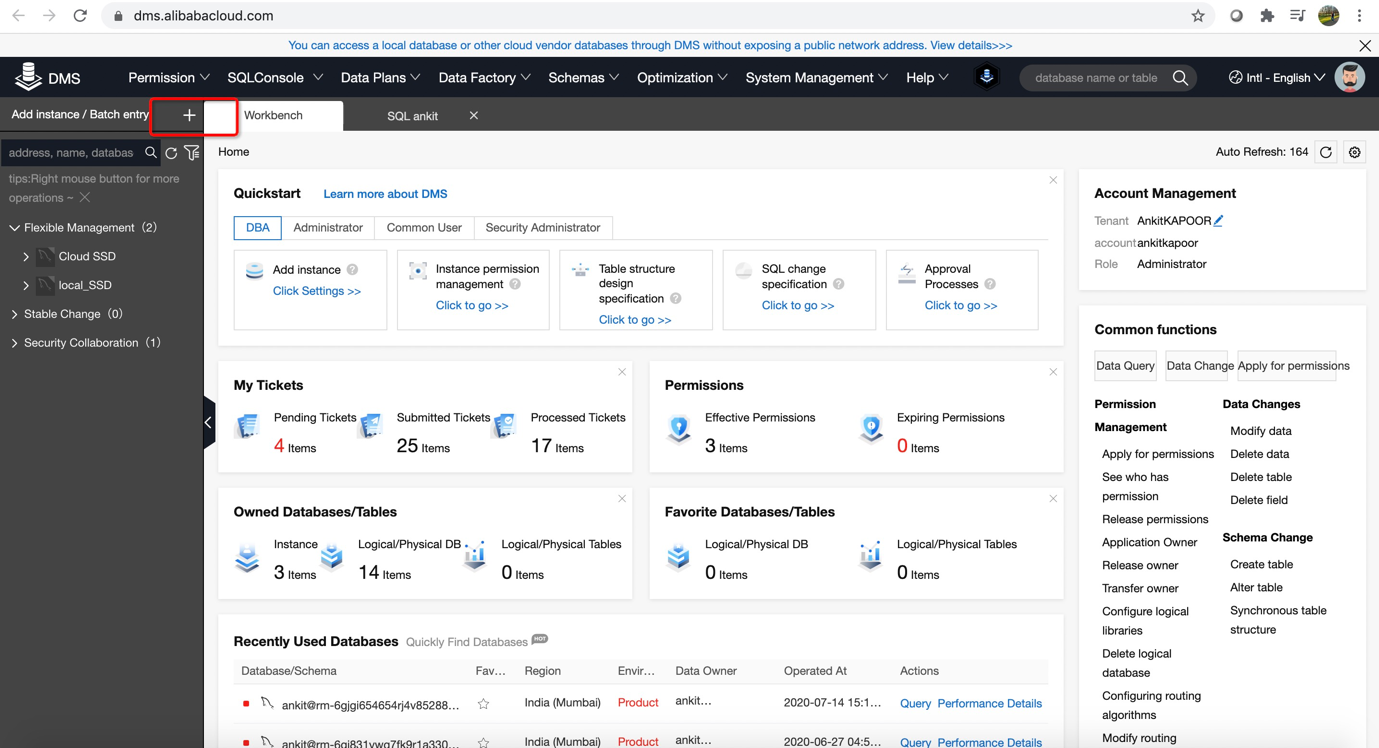
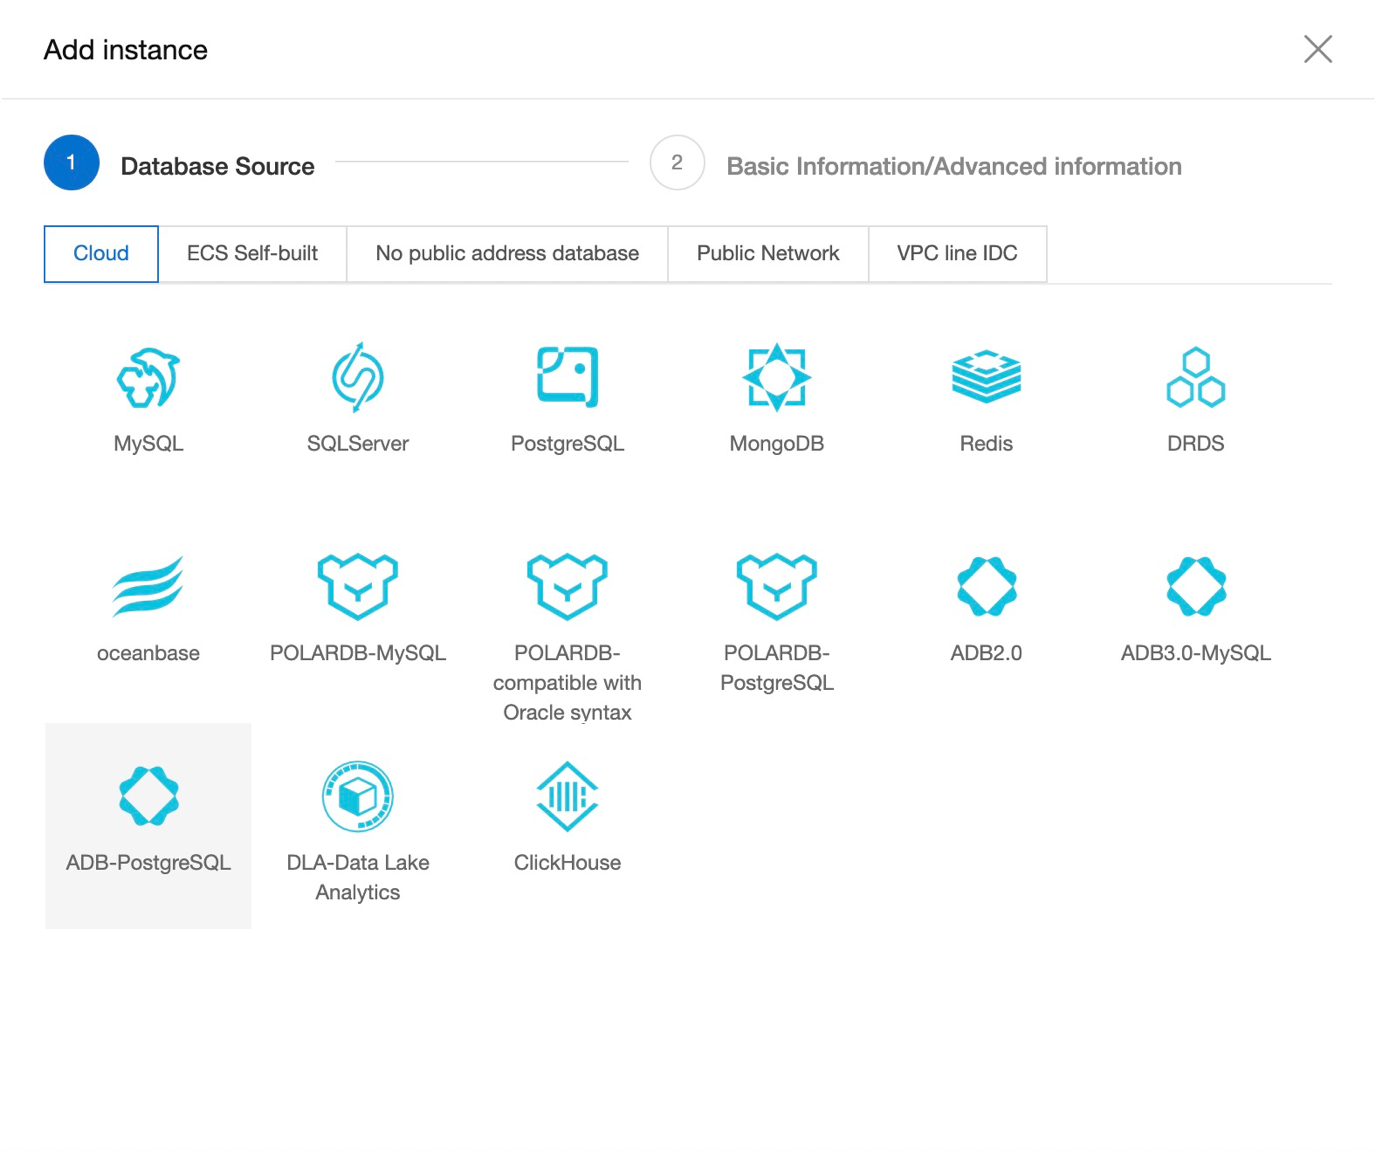
Click on + sign to add an instance and add your desired DB type. Make sure that control mode should be Security Collaboration. Other control type doesn't support Masking data.
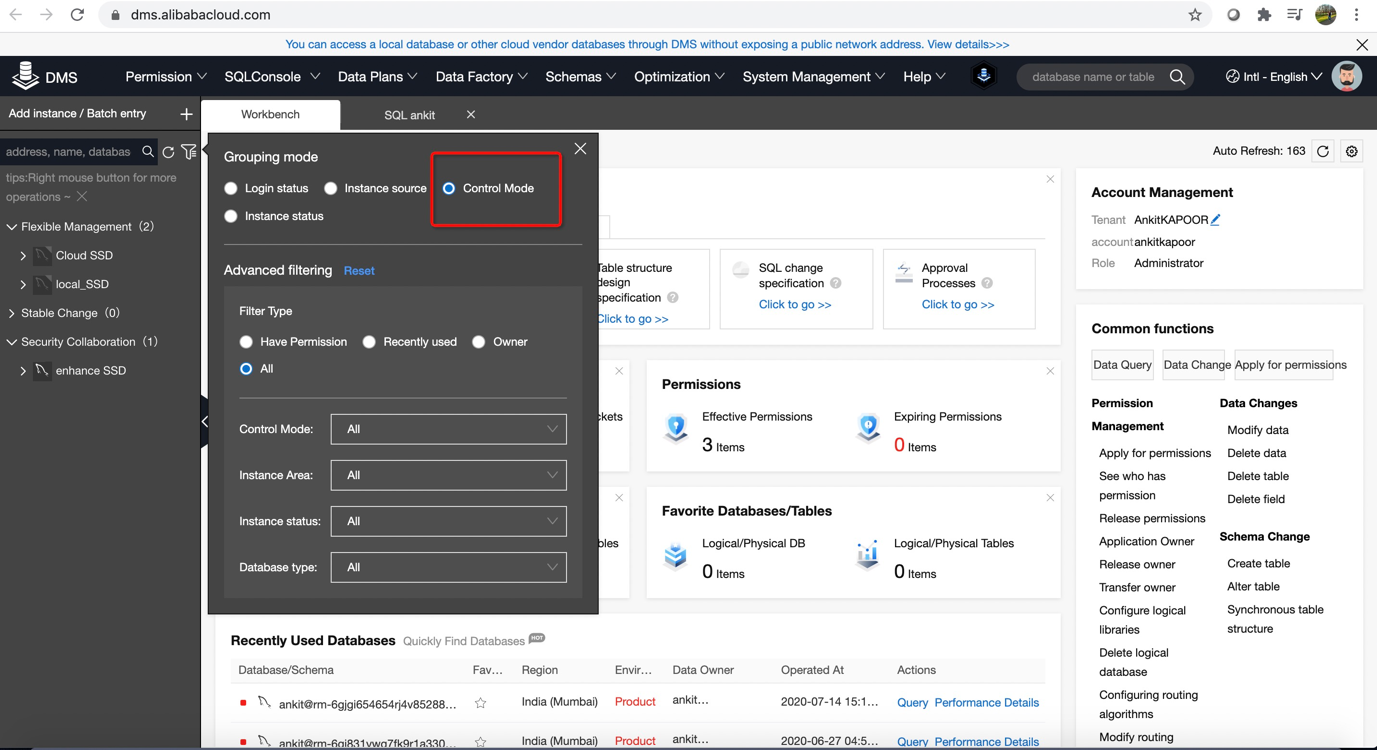
5) Once instance has been added. Make sure that Grouping mode should be Control mode which make easy for you to classify all your instances.
6) Login to your added instance and open the query window:
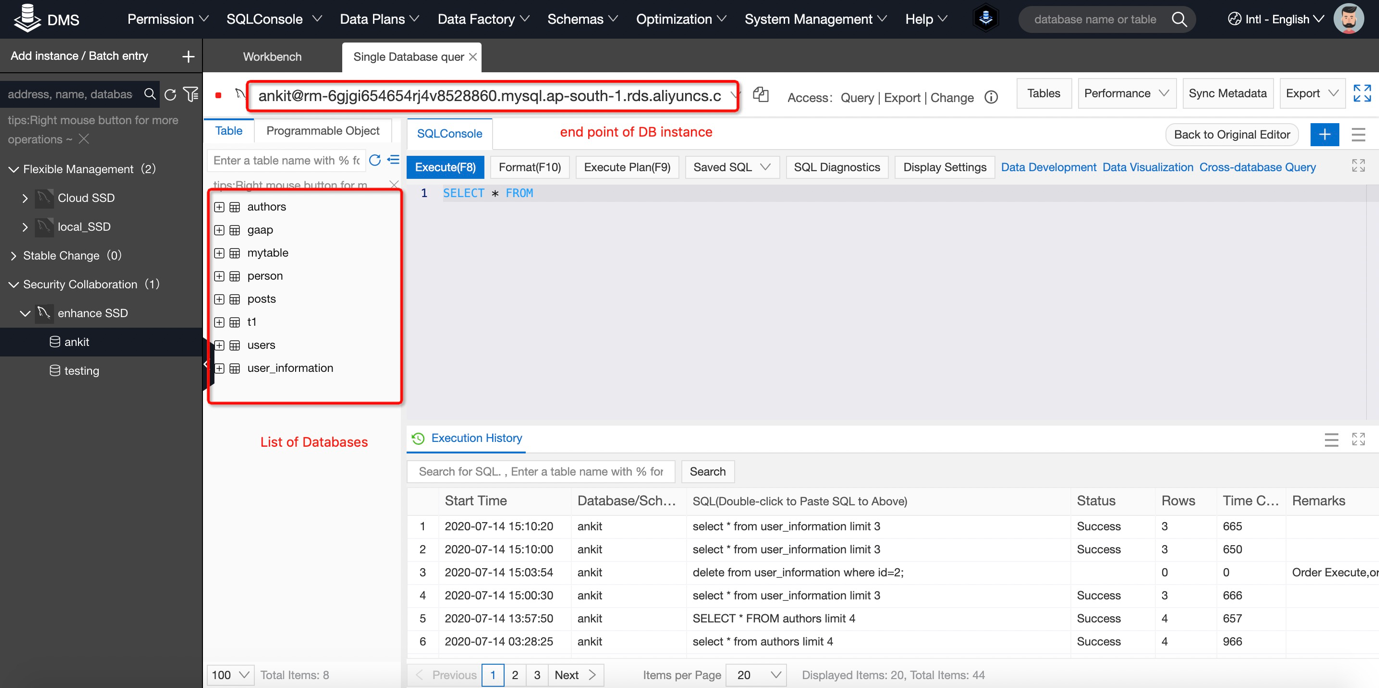
7) Click on Tables:
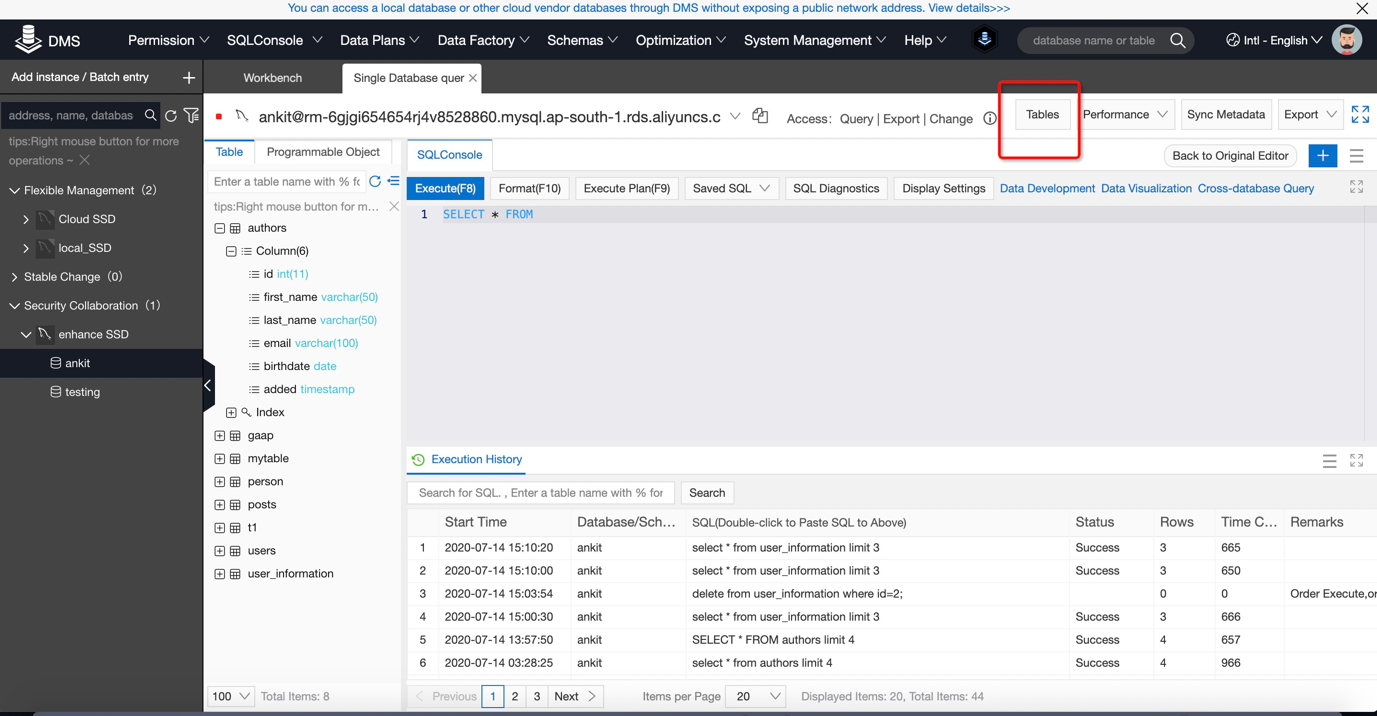
8) Choose your table which you think contains sensitive data. For example I have chosen Author Table containing Authors email id and birth date
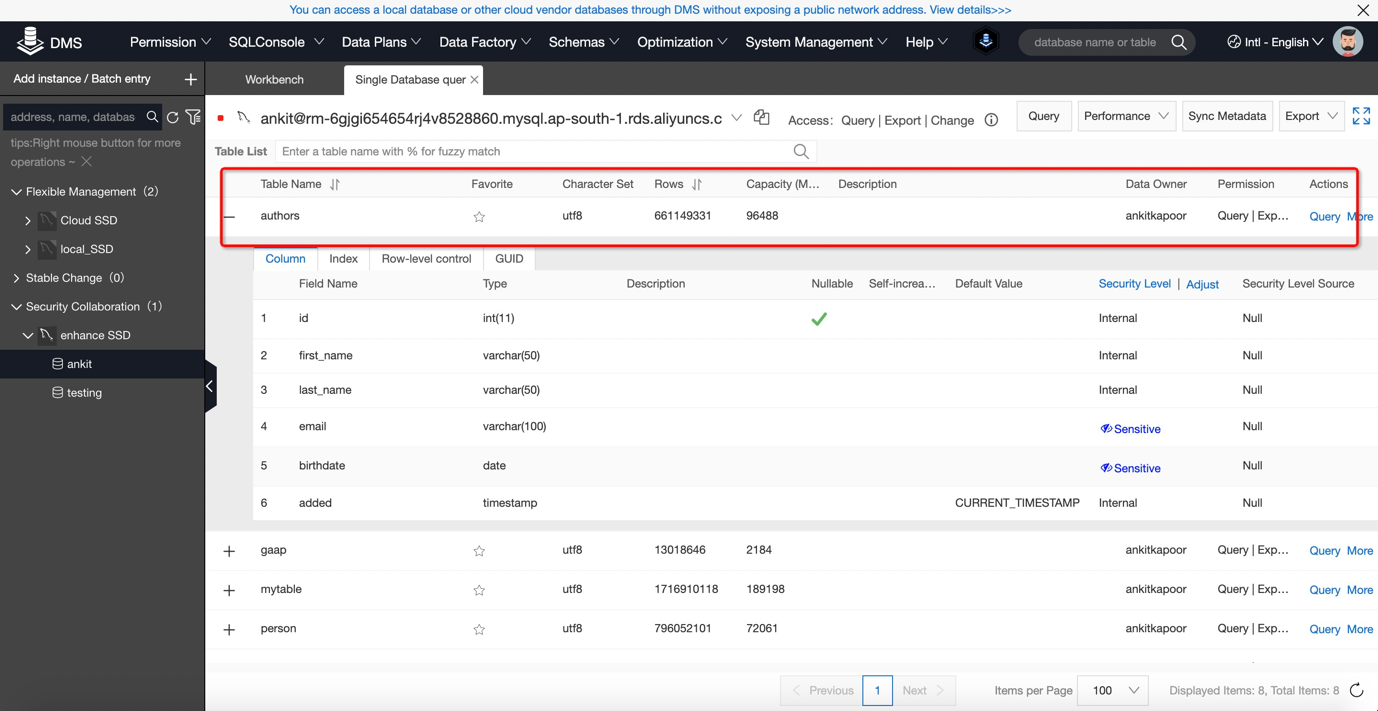
9) Click on the Security level and decide which column you want to mark as sensitive or confidential:
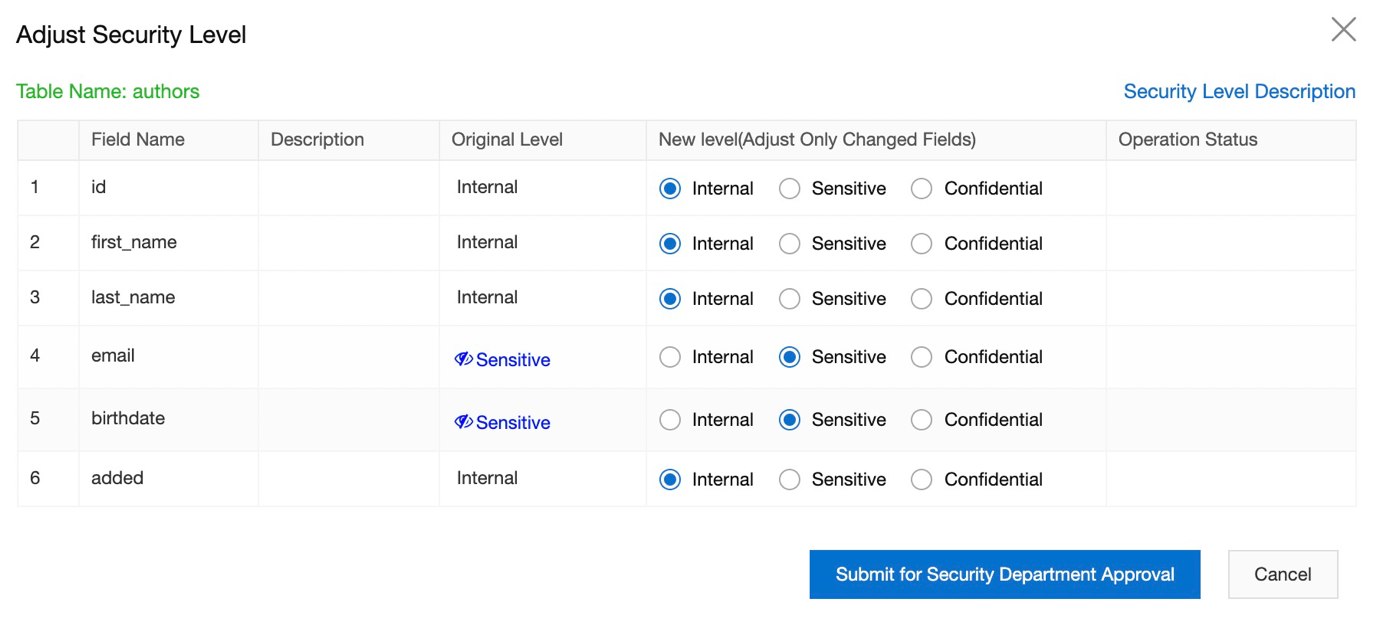
10) Once you decide, submit your application to Security department. In DMS there are few types of role like Security user, Common user, DBA. You can customize your own approval flow as who should approve such kind of request. We can cover this in another blog as how to create approval flow and security rules.
11) Now we need to design the algorithm as how we want to encrypt our data. Whether it should be completely masked or semi masked. For this go to Security management -> Security -> Sensitive data. In this you can either search your required table or columns or all the sensitive column will display here. Refer below figures. You can use any character to mask column's string and decide whether to completely mask the entire string or subset my mentioning the required position. For example (2,5).
There are three type of Algorithm type. Fixed position, fixed character, Full masking, In this example I am using fixed position.
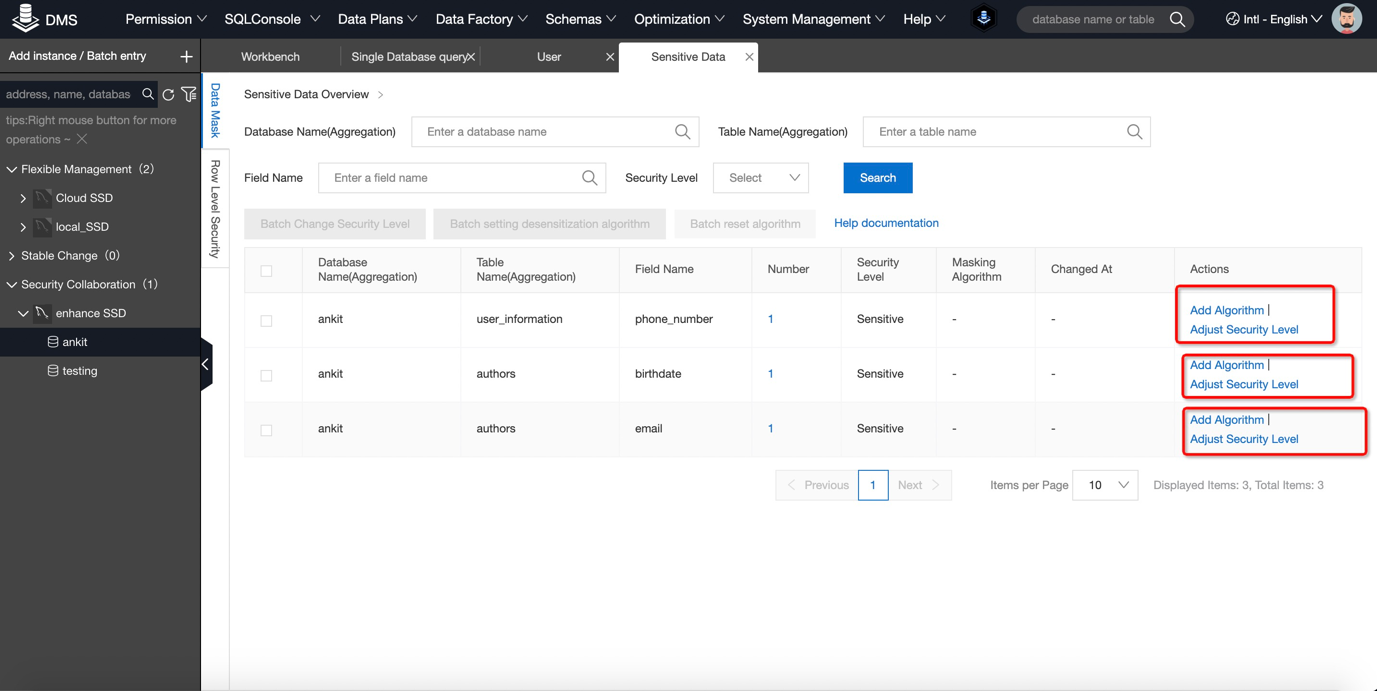
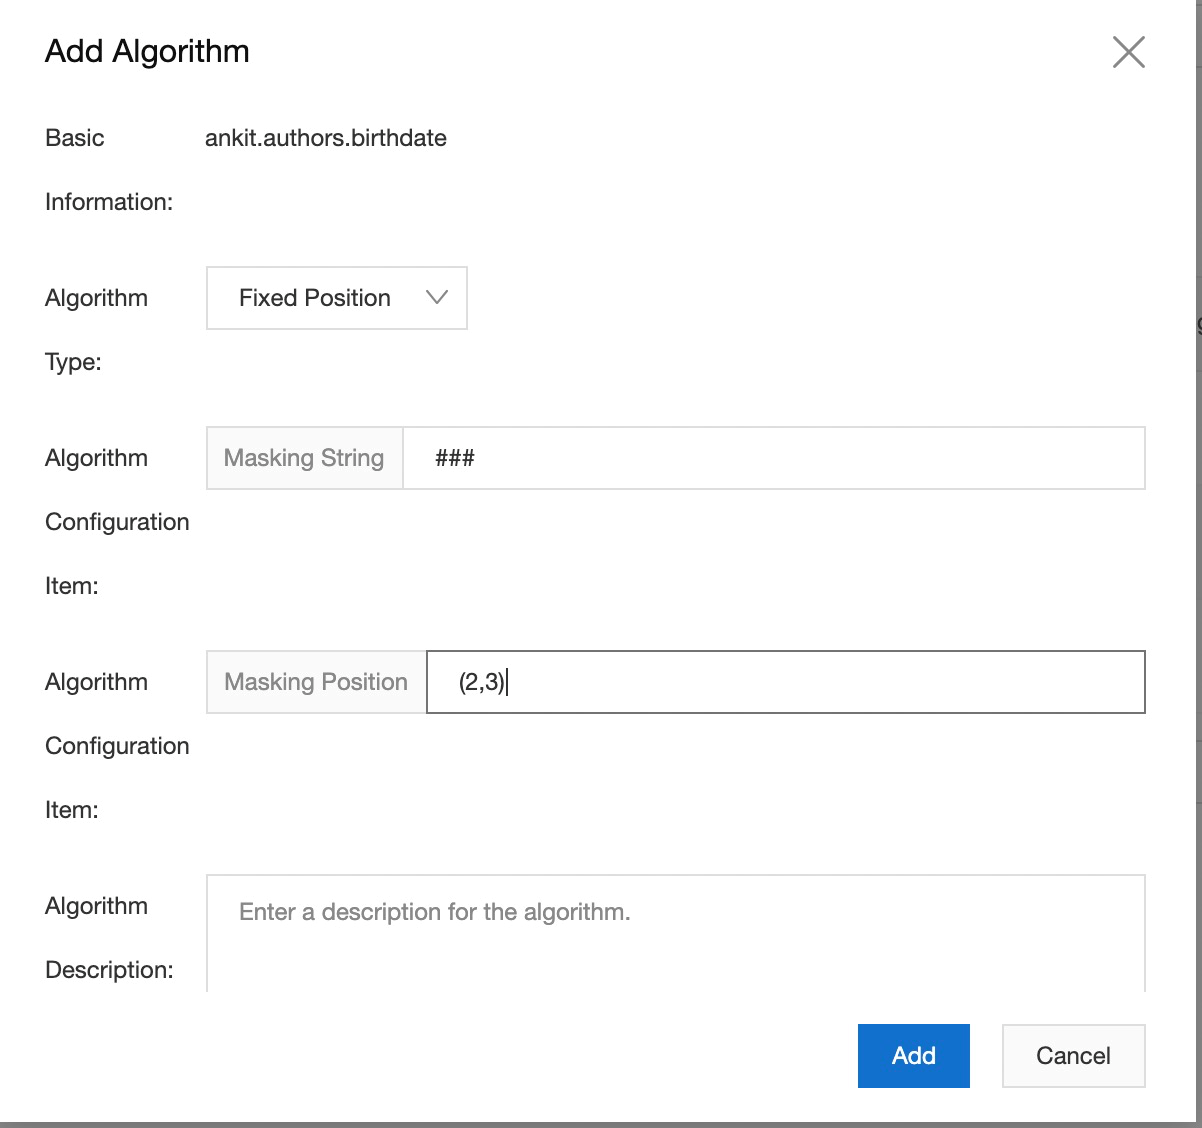
12) Repeat same procedure for rest of the columns.
13) Now we have completely masked our data. Now we need to grant the privileges of such semi masking data to a required user. This user can be a common user. Common user doesn't need to be underlying DB user but it can be an Ali console user. This is quite useful when you don't want to grant privileges to underlying instance. For this click on System management -> User.
14) In this example I already have few users added. But If you want to add a new user you can easily add new user from same screen.
15) Once you successfully add new user, please provide access to sensitive columns.
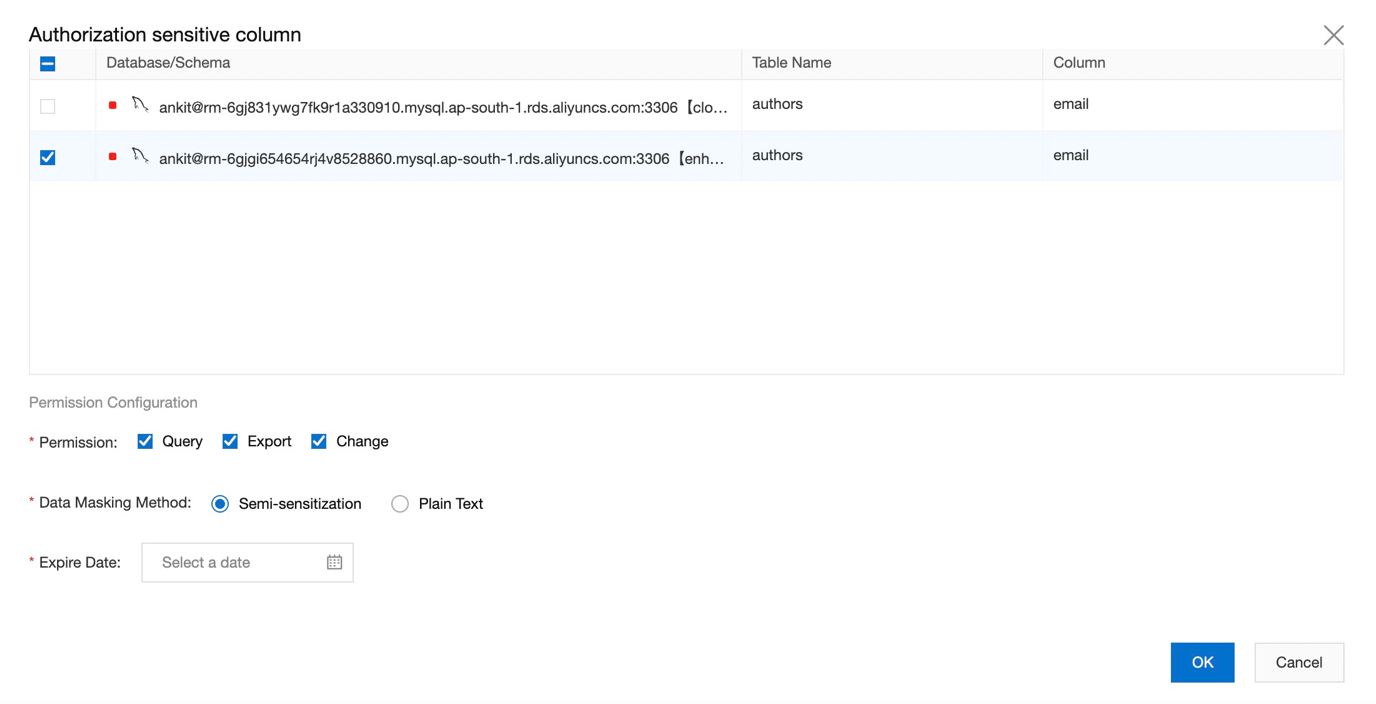
16) Let us verify how data look like for authorized user by reading top 4 records from authors table.
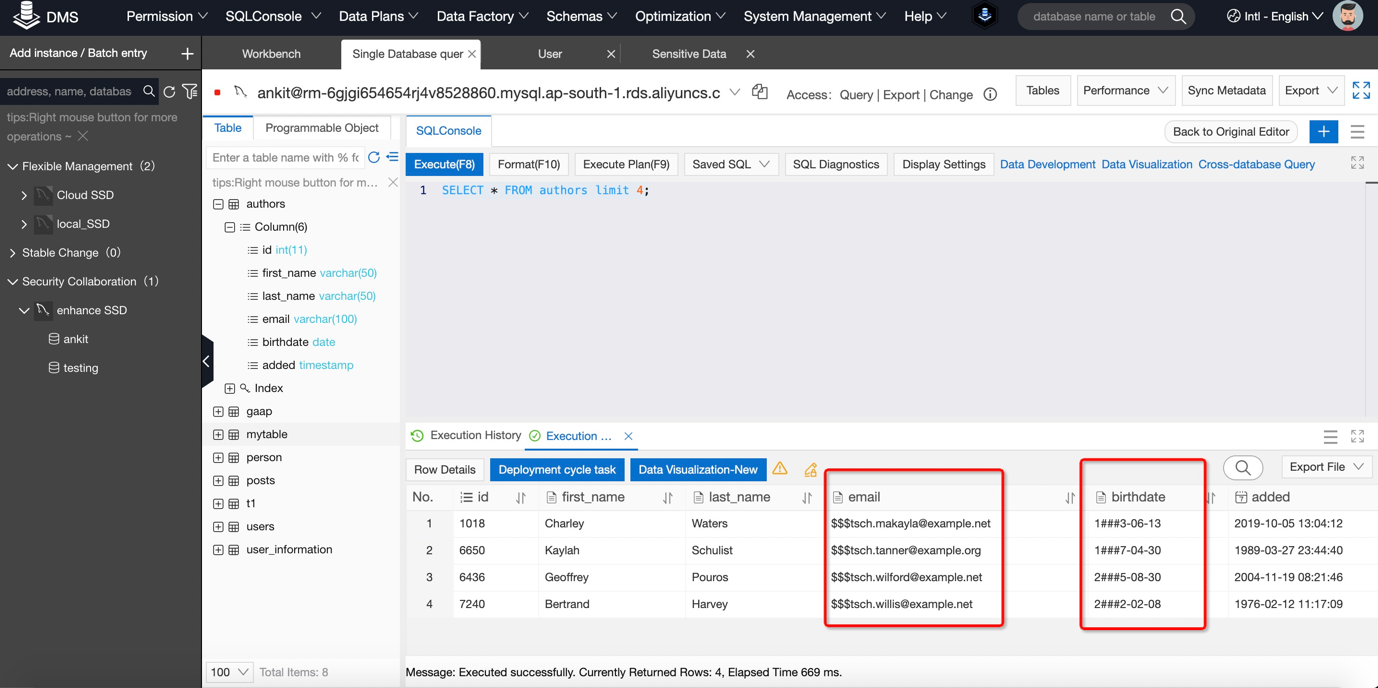
17) As per customized algorithm we set earlier, data has been semi ®C masked because we applied for semi-sensitizations. User can even export this data in excel format and such can be used for Analytics purpose as well.
In many scenarios, we mistakenly delete our data with auto-commit ON or in some cases we mistakenly update wrong data which can leads to data inconsistency with auto-commit ON. In such cases we really want to rollback. Here Binary log are your savior but mining correct transaction from binary logs is quite difficult and you need to use mysqlbinlog utility to achieve same.
DMS provides a data tracking feature via which user can easily rollback row level data.
Let us see How by creating a small table and inserting and deleting some data from it.
mysql> use ankit;
Reading table information for completion of table and column names
You can turn off this feature to get a quicker startup with -A

Database changed
mysql> create table t2 (id int, name char);
Query OK, 0 rows affected (0.08 sec)

mysql> insert into t2 values (1,'A');
Query OK, 1 row affected (0.07 sec)

mysql> insert into t2 values (2,'B');
Query OK, 1 row affected (0.07 sec)

mysql> insert into t2 values (3,'C');
Query OK, 1 row affected (0.12 sec)

mysql> delete from t2 where id =3;
Query OK, 1 row affected (0.12 sec)

mysql> select NOW();
+---------------------+
| NOW()               |
+---------------------+
| 2020-07-16 02:16:57 |
+---------------------+
1 row in set (0.07 sec)
1) Let us go back to DMS and navigate to Data Plans -> Data Tracking.
2) Click on "+ Data Tracking" and fill the required information which includes database name, Table name (data to be recovered for) and time at which you deleted the data. Once you submit, it will go for the approval as per security rules.
3) Once approved, DMS will find out required transactions been performed between mentioned time window.
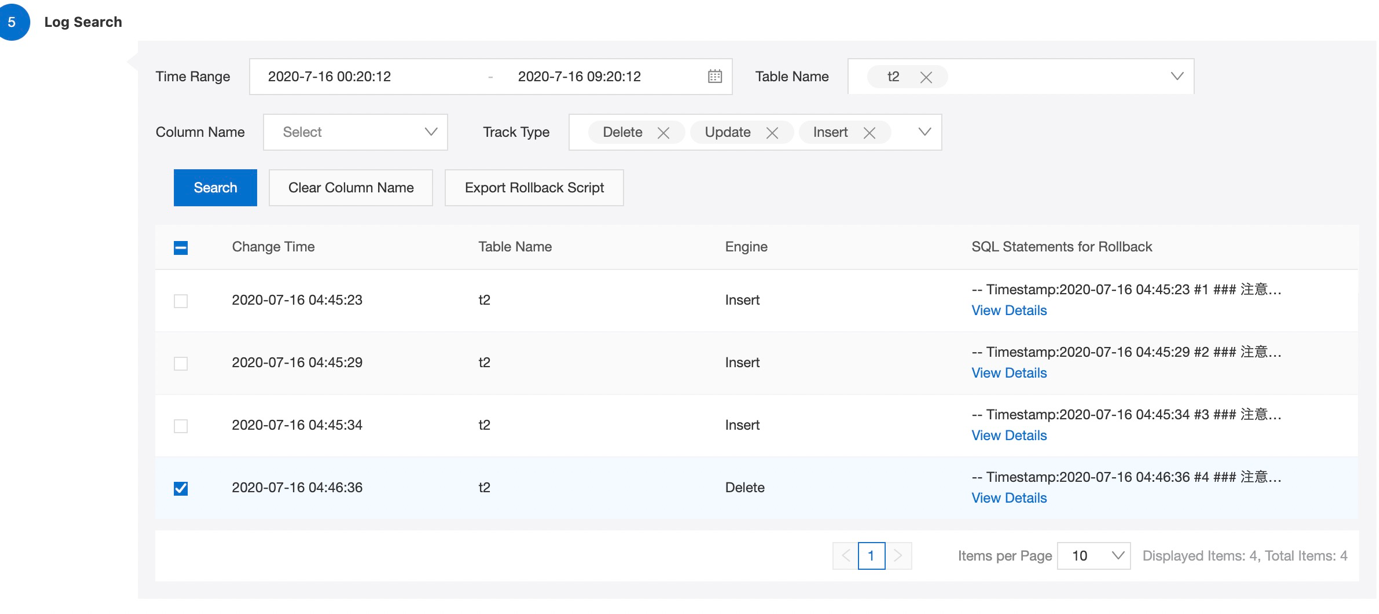
4) Now you can export your rollback script and then you can import same SQL file from DMS console only which will finally recover your data.
The rollback feature works only for MySQL and Polar MySQL. Additionally, binary log depends on your purging policy. If the required binary file has already been purged, then user cannot recover the data.
Visit the Data Management Service page to learn more about this innovative product!
4 posts | 0 followers
FollowAlibaba Cloud Indonesia - March 21, 2025
Alibaba Cloud New Products - August 20, 2020
ApsaraDB - October 29, 2024
ApsaraDB - December 12, 2022
ApsaraDB - May 19, 2025
Your Friend in a need - March 22, 2021
4 posts | 0 followers
Follow ApsaraDB for HBase
ApsaraDB for HBase is a NoSQL database engine that is highly optimized and 100% compatible with the community edition of HBase.
Learn More Data Management Service
Data Management (DMS) provides an integrated solution for data management.
Learn More ApsaraDB RDS for MySQL
An on-demand database hosting service for MySQL with automated monitoring, backup and disaster recovery capabilities
Learn More ApsaraDB RDS for PostgreSQL
An on-demand database hosting service for PostgreSQL with automated monitoring, backup and disaster recovery capabilities
Learn MoreMore Posts by Your Friend in a need