By Ngoi Se Keng, Alibaba Cloud Tech Share Author and Alibaba Cloud MVP
High Availability (HA), Fault Tolerance (FT), and Horizontal Scale Friendly (HSF) are as equally important as to functionality for web applications to run and succeed today. Existing or new web applications shall be designed and provisioned with such architecture underlying. Fortunately, you can easily and promptly deploy mentioned architecture in the Cloud era today (compared to the on-premises bare-metal machine era)! However, this flexibility comes with a caveat – how to choose the right cloud provider? We are spoiled with choice when it comes to choosing cloud providers and it can be really challenging (and hectic!) when evaluating and choosing the right one.
This post is intended to discuss and provide a walkthrough on deploying web applications on Alibaba Cloud from the ground up, including HA, FT, and HSF. There is no intention to discuss on requirement analysis and capacity planning on particular specific domain (I’m a newbie to Alibaba Cloud). Anyway, throughout this post, I will briefly introduce several services & tools provided in Alibaba Cloud. Yes, briefly! If you wish to learn more on particular services or tools, please visit the Documentation Center. In addition, the post would also highlight the concerns and considerations when deploying such services.
WordPress is used as the demo web application that would be deployed on Alibaba Cloud in this post. The same deploying principle shall apply to many other web applications. This post is not intended to discuss on WordPress configuration at all. It shall not (and not able to) serves as reference for WordPress configuration. There are tons and tons of good resources out there regarding best practices on WordPress administrative.
Like many other web applications, the demo web application consists of application layer (WordPress) and DB layer (MySQL).
Goal: Ultimately, we want an always-on
running web application (WordPress)!
In order to achieve such “simple” goal, the demo web application must deployed with the following ‘minimum’ requirements:
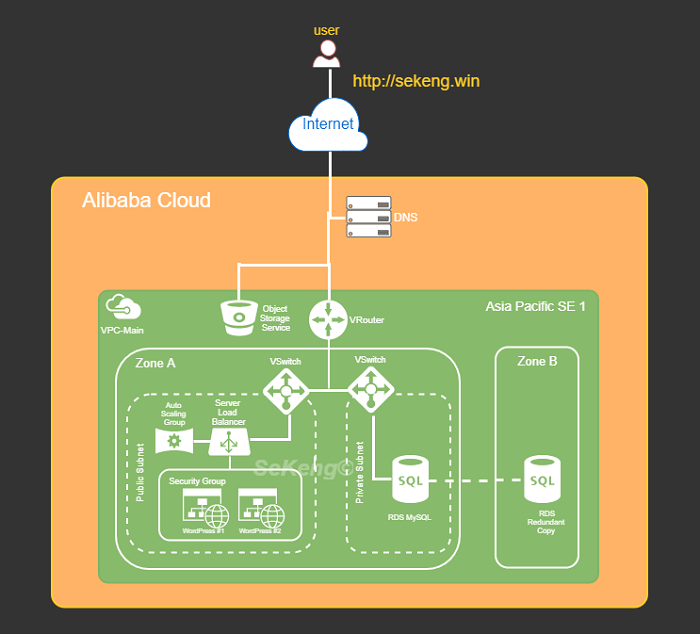
Fortunately, Alibaba Cloud provides a list of services and tool for us to fulfill such ‘minimum’ requirements. In this post specifically, we would utilize Cloud DNS (DNS), Auto Scaling Group (ASG), Server Load Balancer (SLB), Elastic Compute Service (ECS), Relational Database System (RDS), Object Storage Service (OSS), and Object Storage File System (OSSFS) tool to achieve mentioned Goal. The high-level architecture diagram for the deployed WordPress would be as following:

Figure 1: High Level Architecture Diagram of Deployed Web Application (WordPress)
We’ll briefly introduce the components shown in Figure 1.0 before diving into each individual configuration. As stated earlier, you would have to refer to other sources such as Alibaba Cloud online documentation for detail explanation. The following table summarizes the description and usage of such components according to our deployment context:
Table 1: Cloud Components in Demo Deployments
| Site / Region | Geographical area of the data center | 1. Site for deployments |
| Zone | Physically isolated data center within a region | 2. Used for redundancy purpose for Database |
| Cloud DNS | Domain name resolution and management service | 3. Purchase new Domain Name4. Route traffic to WordPress instance |
| VPC (Virtual Private Cloud) | Virtual isolated network built for private usage | 5. To group and separate resources6. To setup security control7. Assign network IP range |
| VRouter | Virtual routing table | 8. To configure network route for provisioned resources |
| VSwitch | Segment virtual networks into subnets | 9. To separate resources into group within specify Zone via subnet |
| Server Load Balancer | Distribute traffic to instances according to configured profile | 10. To load balance (round robin) request among provisioned WordPress instances |
| Auto Scaling Group | Automatically adjust computing resources based on scaling configuration | 11. Serves as watchdog to maintain the defined healthy running WordPress instances |
| Elastics Computing Service (WordPress instance) | Compute and process unit provided by Alibaba Cloud | 12. To install and run WordPress. This is the application layer of demo deployment |
| Relational Database Service (MySQL) | On-demand managed database service | 13. The DB for WordPress application |
| Object Storage Service | High availability and fault tolerance object storage | 14. Centralized storage for files/objects uploaded by user via WordPress application |

Conclusion: After consideration, we’ve decided “Asia Pacific SE 1 (Singapore)” as the main region for our demo deployment.
Conclusion: After consideration, we’d use “192.168.0.0/16” for our demo deployment as there would only be few running nodes within VPC.Conclusion: After consideration, we’d logical grouping ‘WordPress’ in one subnet (192.168.1.0/24) and RDS instance in another subnet (192.168.2.0/24).
Conclusion: Since we are running WordPress on Linux instances, we would at least allow inbound rule for Port 80 (HTTP) and 22 (SSH) in Security Group. Besides that, all outbound traffics would be allowed since no specific requirement on that.
Conclusion: Since this is a demo deployment without any real production usage, we’ll go for the lowest (cheapest) ECS instance configuration. For e.g.: General Type n1: 1-core, 1GB, Ubuntu 16.04 OS, Ultra Cloud Disk 40GB, and 1Mbps network bandwidth.
Conclusion: There is neither manpower to maintain the demo DB nor any specify DB configuration, and hence we’d deploy the demo DB with ApsaraDB RDS – MySQL. In addition, such variant allow us to make redundancy (active standby) DB easily (with just a click!)
Conclusion: A dedicated bucket in Object Storage Service would be created and used to store object created resulted of users’ operation. All running WordPress shall sync with the mentioned bucket for the list of created object.
Conclusion: The demo deployment would utilizing DNS to route traffic to WordPress instances, Auto Scaling to ensure minimum 2 running instances in each region, and Server Load Balancer to provide health check as well as to load balance workload. Last but not least, the Multi-Zone availability feature on RDS MySQL are enabled to provide HA and FT for DB.
 Figure 3: Demo Deployed HA, FT, and LB WordPress
apt-get update
apt-get install apache2 libapache2-mod-php php php-mcrypt php-mysql mysql-client-core-5.7 -y
cd /var/www/html
mv index.html index.html.bk
wget https://wordpress.org/latest.tar.gz
tar -xzf latest.tar.gz
cp -r wordpress/* /var/www/html/
rm -rf wordpress latest.tar.gz
chown -R www-data:www-data /var/www/html
chmod -R 755 /var/www/html/wp-content
service apache2 restart
iv. ApsaraDB RDS Configuration (Configure DB Layer)
9.Create ApsaraDB RDS – MySQL. Go to “Product” and click on “ApsaraDB for RDS”. Once landed at RDS page, click at “Create Instances.
• Billing Method: Pay-As-You-Go
• Region and Zone: Singapore, Multiple Zone (Zone A + Zone B)
• Database Engine: MySQL
• Instance type: 1 Core 1GB (rds.mysql.t1.small)
• Network Type: “VPC”, and select VPC (VPC-Main) and VSwitch (Public-Subnet2) accordingly
• Click “Buy Now” and proceed accordingly
10.Configure RDS instance. Go to “Product” and click on “ApsaraDB for RDS” (It might take a while before the purchased “RDS” appears at the page). Once the purchased RDS is up and running, click on “Manage” on the RDS.
10.1 Create whitelist. Click on “Security” at side tab. At “Whitelist Setting” tab, click on “+Add a Whitelist Group”
• Group Name: rds_ecs_whitelist
• Whitelist: 192.168.1.0/24
• Click “OK”
10.2 Create "wordpress” database. Click on “Databases” at side tab follows by click on “Create Database”
• Database Name: wordpress
• Supported Character: utf8
• Click OK
10.3 Create user account. Click on “Accounts” at side tab follows by click on “Create Account”
• Database Account: wordpress_user
• Authorized Databases: select the created database (wordpress)
• Password & Re-enter Password: Wordpress123
10.4 Click “OK” to create account
v. WordPress Configuration (Configure Application Layer – Part 2):
11.Browse to ECS internet IP (created at Step 7) using internet browser.
11.1 Fill in the MySQL connection detail such as “Database Name”, “Username”, “Password” as defined in Step 10. The “Database Host” is the “Intranet Address” of the created RDS instance at Step 9. You may get the intranet address by go to Alibaba Cloud console at “Product” and click on “ApsaraDB for RDS”. Once landed at RDS page, click on the created RDS instance, and copy the “Intranet Address” value.
12.Click on the “Run on Installation” and continue the WordPress configuration till completion. Hooray, by now, your first WordPress instance should be installed and running at Alibaba Cloud!
vi. Sync Dependent Data Storage (Identify Centralized Storage)
13.The folder used by WordPress to store user uploaded object should be sync to centralized storage.
14.Create an OSS bucket. Go to “Product” and click on “Object Storage Service” under “Storage & CDN”. Once you landed at the Object Storage page, click on “Create Bucket” on the RDS.
• Bucket Name: lab-wp-XXX (using your own bucket name)
• Region: Asia Pacific SE 1 (Singapore)
• Storage Class: Standard
• ACL: Private
• Click OK
15.Grant access to the bucket created at Step 14. Go to “Product” and click on “Resource Access Management” under “Monitor and Management”. Once you landed at the RAM page, click on “User” and follows by click on “Create User”.
• User Name: oss-user
• Click OK
16.Authorize created user with OSS access. Go to “Product” and click on “Resource Access Management” under “Monitor and Management”. Once you landed at the RAM page, click on the “Authorize” of the newly create user.
• Select and add the “AliyunOSSFullAccess”
• Click OK
17.Generate “User Access Key”. Go to “Product” and click on “Resource Access Management” under “Monitor and Management”. Once you landed at the RAM page, click on the “Manage” of the newly create user.
17.1 Go to “User Access Key” section and click “Create Access Key”
17.2 Click on “Save Access Key Information” to save the generated Access Key and Access Key Secret
18.Install “ossfs” tool. This tool would be used to sync WordPress’ dependent folder with OSS bucket created at Step 14.
18.1 SSH into the launched WordPress ECS instance
18.2 Install ‘ossfs’ according to the guideline at this link
cd
wget https://github.com/aliyun/ossfs/releases/download/v1.80.3/ossfs_1.80.3_ubuntu16.04_amd64.deb
sudo apt-get update
sudo apt-get install gdebi-core -y
sudo gdebi ossfs_1.80.3_ubuntu16.04_amd64.deb
18.3 Make WordPress uploading directory
mkdir -p /var/www/html/wp-content/uploads
chown -R www-data:www-data /var/www/html/wp-content/uploads
18.4 Setup credential with the bucket name and key created at Step 14 & 17 accordingly.
chmod 640 /etc/passwd-ossfs18.5 Mount ‘lab-wp-XXX’ OSS bucket to the WordPress’ dependent folder and enable auto mounting during instance startup
18.5.1 Add following command into ‘/etc/fstab’ to mount ‘lab-wp-XXX’ during system startup. Beware of using the correct zone. E.g. “http://oss-ap-southeast-1.aliyuncs.com”
echo "ossfs#lab-wp-XXX /var/www/html/wp-content/uploads fuse _netdev,url=http://oss-ap-southeast-1.aliyuncs.com,allow_other, 0 0" >> /etc/fstab
18.5.2 Execute the mounting operationmount -a
18.6 To avoid mounted OSS bucket to be scanned by Linux (which incurs unnecessary cost), add following detail into “/etc/updatedb.conf”
18.6.1 Add “/var/www/html/wp-content/uploads” to PRUNEPATHS
18.6.2 Add “fuse.ossfs” into PRUNEFS
vii. High Availability, Fault Tolerance, and Load Balance Configuration (Plan for HA, FT, and HSF):
19.Create Load balancer. At ECS overview page, click at “Load Balancer” on side tab. Once Load Balancer page loaded, click on “Create Server Load Balancer”.
• Region: Singapore
• Zone: Multi-zone
• Primary Zone: Zone A
• Backup Zone: Zone B
• Instance Type: Internet
• Quantity: 1
20.Configure load balancer. At ECS overview page, click at “Load Balancer” on side tab. Once Load Balancer page loaded, click “Manage” on the purchased load balancer at Step 19.
20.1 Click “Listener” then click “Add Listener” button.
• Front-end Protocol: HTTP, port 80
• Back-end Protocol: HTTP, port 80
• Scheduling: Weighted Round
• Click “Show Advance” and enable persistence session
• Timeout Duration: 300
20.2 Click “Next” to configure health check.
• Domain Name: Leave Blank
• Health Check Port: 80
• Health Check Path: /index.php
• Normal Status Code: enable http_2xx and http_3xx
• Click “Confirm” to provision Load Balancer
20.3 Update the Load Balancer internet IP address at WordPress. This is important as the running WordPress instance from Step 11 has been auto configured with the running ECS IP. We need to change the IP to point to Load Balancer’s IP as WordPress might be running by any ECS instance behind load balancer. If you have Domain Name, you might want to update to the Domain Name instead.
• Browse to WordPress using browser. Go to the “Setting” url e.g. “http://<ECS Internet IP>/wp-admin/options-general.php” then change the “WordPress Address (URL)” & “Site Address (URL)” to Load Balancer’s internet IP accordingly.
21.Stop ECS instance. Go to “Product” and click on “Elastic Computing Service”. Once landed at ECS overview page, click at “Instances” on side tab and follows by click on “More” then “Stop”.
22.Create Custom Image. Once ECS has stopped, click on “More” then “Click Custom Image”
• Image Name: IMG-WP
• Image Description: Image for WordPress
23.Restart ECS once the ‘custom image’ creation at Step 22 has completed (You may check the creation status at “Snapshot” section). Go to “Product” and click on “Elastic Computing Service”. Once landed at ECS overview page, click at “Instances” on side tab and follows by click on “More” then “Start”.
24.Once ECS is up and running, create Auto Scaling Group. Go to “Product” and click on “Auto Scaling” under “Elastic Computing”. Once landed at “Auto Scaling” page, click on “Create Scaling Group”.
• Scaling Group Name: ASG-WS
• Maximum Number: 2
• Minimum Number: 2
• Default Cool-down Time: 300
• Network Type: VPC and select the VPC(VPC-Main) and VSwitch(Public-Subnet1)
• Server Load Balancer: Select the load balance created at step 19. You may need to click “Load more data” to show the load balancer
• Configure ECS source and ‘User Defined Image' accordingly
• Click “Submit” button
25.Create “Scaling Configuration”. Click on “Create Scaling Configuration”.
• Source ECS: Select the one get restarted at Step 23.
• Configuration Name: ASG_ECS_WP
• Security Group: Select the one created at Step 4
• User Defined Image: Select the one created at Step 22
• Click “Next” then follows by click “OK” and “Enable” the Auto Scaling Group
26.Retrieve Load Balancer Public IP. Go to “Product” and click on “Elastic Computing Service”. Once landed at ECS overview page, click at “Load Balancer” on side tab. The Public IP is under “IP Address” column.
27.The health check carry by Load Balancer might take a while to complete. You may visit the WordPress application by using Load Balancer’s public IP once the Load Balance status shown “normal”.
28.Congratulation, you’re now successfully deployed a high availability, fault tolerance, and load balance WordPress server in single region!
29.If you would like to buy a domain name, go to “Domain” under “Domain & Websites” and proceed for purchasing.
30.If you would like to associate domain name with the deployed WordPress, go to “Alibaba Cloud DNS” under “Domain & Websites” and add at least ‘A’ records for the ‘Server Load Balance’ public IP retrieved at Step <
MaxCompute 2.0 Empowers the Rapid Expansion of ZhongAn Insurance

2,605 posts | 747 followers
FollowAlibaba Clouder - March 26, 2020
Alibaba Clouder - August 26, 2020
Alibaba Clouder - February 24, 2021
Alibaba Clouder - June 15, 2020
Alibaba Clouder - November 3, 2017
Alibaba Clouder - August 12, 2019

2,605 posts | 747 followers
Follow Deploy WordPress on Alibaba Cloud Servers in 5 minutes
WordPress hosting solution is designed to provide an effortless way to start a blog for customers.
Learn More Architecture and Structure Design
Customized infrastructure to ensure high availability, scalability and high-performance
Learn More SOFAStack™
A one-stop, cloud-native platform that allows financial enterprises to develop and maintain highly available applications that use a distributed architecture.
Learn More DevOps Solution
Accelerate software development and delivery by integrating DevOps with the cloud
Learn MoreMore Posts by Alibaba Clouder