Join us at the Alibaba Cloud ACtivate Online Conference on March 5-6 to challenge assumptions, exchange ideas, and explore what is possible through digital transformation.
Istio Gateway supports multiple custom ingress gateways. It opens a series of ports to host incoming connections at the edge of the grid, and can use different load balancers to isolate different ingress traffic flows. cert-manager can be used to obtain certificates by using any signature key pair stored in the Kubernetes Secret resource. This article provides instructions on the steps for manually creating a custom ingress gateway and how to use cert-manager to automatically configure certificates in the gateway.
CA Issuer does not automatically create and manage signature key pairs. The key pairs are either provided by the user or a new signature key pair for a self-signed CA is generated by a tool, such as OpenSSL. For example, you can generate keys and certificates of type x509 by using the following command:
# Generate a CA private key
$ docker run -it -v $(pwd):/export frapsoft/openssl genrsa -out /export/ca.key 2048
# Create a self signed Certificate, valid for 10yrs with the 'signing' option set
$ docker run -it -v $(pwd):/export frapsoft/openssl req -x509 -new -nodes -key /export/ca.key -subj "/CN=${COMMON_NAME}" -days 3650 -reqexts v3_req -extensions v3_ca -out /export/ca.crt
These commands will output two files, which are the key and certificate of the ca.key and ca.crt signature key pair. If you already have your own key pair, you should name the private key and the certificate 'ca.key' and 'ca.crt' respectively.
We are going to create an Issuer that will use this key pair to generate signed certificates. To allow the Issuer to reference our key pair, we will store it in a Kubernetes Secret resource.
Issuers are namespace resources, so they can only reference secrets in their own namespaces. Therefore, we put the key pair into the same namespace as the Issuer. Of course, we could also create a ClusterIssuer, a cluster-scoped version of an Issuer.
The following command will create a Secret that contains a signature key pair in the default namespace:
kubectl create secret tls ca-key-pair \
   --cert=ca.crt \
   --key=ca.key \
--namespace=defaultAlibaba Cloud Container Service for Kubernetes 1.11.5 now supports one-click deployment of Istio 1.0.5. You can quickly and very easily create Kubernetes clusters and deploy Istio using the management console. For more specific information, see Creating a Kubernetes Cluster and Deploy Istio.
Please note that at present, deploying Istio will not create an Ingress Gateway.
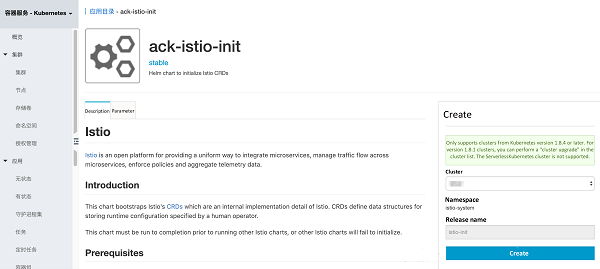
Click Application Directory on the left and select ack-istio-init on the right. Select the corresponding cluster on the right and you can see that the namespace has been set to istio-system and the release name has been set to istio-init. Next, click Deploy. After a few seconds, Istio CRD is created in the cluster.

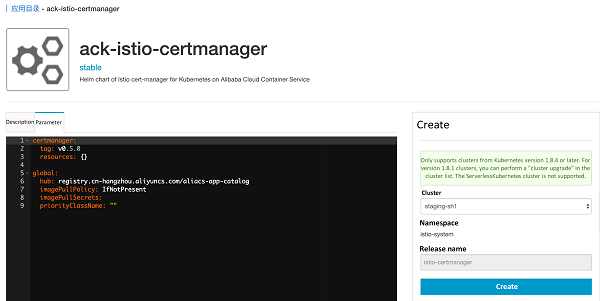
Click Application Directory on the left, select ack-istio-certmanager on the right, and click Parameters in the page opened. You can change the parameter configuration to customize the settings (no additional changes are currently required, so the default values can be kept), as shown below:

Select the corresponding cluster on the right and you can see that the namespace has been set to istio-system and the release name has been set to istio-certmanager. Next, click Deploy. After a few seconds, the Istio cert-manager release can be created, as shown below in the start log for the container group cert-manager:

You can see that cert-manager has started successfully.
We can now create an Issuer referencing the Secret resource we just created:
kubectl apply -f - <<EOF
apiVersion: certmanager.k8s.io/v1alpha1
kind: Issuer
metadata:
  name: ca-issuer
  namespace: default
spec:
  ca:
    secretName: ca-key-pair
EOF
We are now ready to obtain certificates!
We can now create the following Certificate resource which specifies the required certificate. To obtain a certificate using Issuer, we have to create a Certificate resource in the same namespace as Issuer. This is because an Issuer is a namespaced resource, as shown in this example. If we wanted to reuse signature key pairs across multiple namespaces, we could use ClusterIssuer.
First, create a certificate for the domain name myexample.com using the following command:
kubectl apply -f - <<EOF
apiVersion: certmanager.k8s.io/v1alpha1
kind: Certificate
metadata:
  name: myexample-certificate
  namespace: default
spec:
  secretName: istio-myexample-customingressgateway-certs
  issuerRef:
    name: ca-issuer
    # You can reference Issuers of the type ClusterIssuer. By default, this usage only applies to the Issuer of the namespace.
    kind: Issuer
  commonName: myexample.com
  organization:
  - MyExample CA
  dnsNames:
  - myexample.com
  - www.myexample.com
EOF
Please note down the secretName, as it will be required in the next step.
Once the Certificate resource has been created, cert-manager attempts to use the Issuer 'ca-issuer' to obtain a certificate. If successful, the certificate will be stored inside a Secret resource named istio-myexample-customingressgateway-certs, in the same namespace as the Certificate resource (default).
Since we have specified the commonName field, myexample.com will be the common name for the certificate, and both the common name and all the elements in the dnsNames list will be subject alternative names (SANs). If we had not specified the common name, then the first element of the dnsNames list would be used as the common name, and all the elements of the dnsNames list would also be SANs.
After creating the above certificate, we can check whether it has been successfully obtained, as shown below:
kubectl describe certificate myexample-certificate
Name:         myexample-certificate
namespace: default
Labels:       <none>
Annotations:  kubectl.kubernetes.io/last-applied-configuration:
                {"apiVersion":"certmanager.k8s.io/v1alpha1","kind":"Certificate","metadata":{"annotations":{},"name":"myexample-certificate","namespace":"...
API Version:  certmanager.k8s.io/v1alpha1
Kind:         Certificate
Metadata:
  Creation Timestamp:  2019-01-14T08:38:20Z
  Generation:          1
  Resource Version:    19727
  Self Link:           /apis/certmanager.k8s.io/v1alpha1/namespaces/default/certificates/myexample-certificate
  UID:                 bf47b776-17d7-11e9-bafe-00163e069e12
Spec:
  Common Name:  myexample.com
  Dns Names:
    myexample.com
    www.myexample.com
  Issuer Ref:
    Kind:  Issuer
    Name:  ca-issuer
  Organization:
    MyExample CA
  Secret Name:  istio-myexample-customingressgateway-certs
Status:
  Conditions:
    Last Transition Time:  2019-01-14T08:38:22Z
    Message:               Certificate issued successfully
    Reason:                CertIssued
    Status:                True
    Type:                  Ready
Events:
  Type    Reason      Age   From          Message
  ----    ------      ----  ----          -------
  Normal  IssueCert   80s   cert-manager  Issuing certificate...
  Normal  CertIssued  80s   cert-manager  Certificate issued successfully
The last line shows that the certificate has been created successfully.
You can also check whether issuance was successful. You should see a base64 encoded signed TLS key pair.
kubectl get secret istio-myexample-customingressgateway-certs -oyamlOnce the certificate has been obtained, cert-manager will continue checking its validity and attempt to renew it as it gets close to expiry. cert-manager considers certificates to be close to expiry when the Not After field on the certificate is less than the current time plus 30 days. For CA-based Issuers, cert-manager will issue certificates with the Not After field set to the current time plus 365 days.
Gateway describes a load balancer that operates on the edge of the grid and is used to receive incoming or outgoing HTTP/TCP connections.
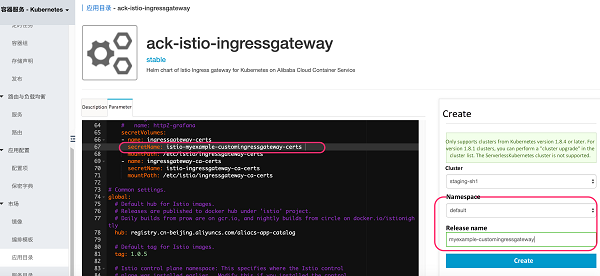
Click Application Directory on the left, select ack-istio-ingressgateway on the right, and click Parameters in the page opened. This will change the secretName known as istio-ingressgateway-certs, which is located near the 67th row, to the one we created above: istio-myexample-customingressgateway-certs. The change is made as follows:

On the right, choose the corresponding cluster and select the namespace that is the same as the secretName istio-myexample-customingressgateway-certs; namely, the default we set earlier in the article. Set the release name to myexample-customingressgateway, then click Deploy. After a few seconds, the custom Istio gateway release can be created. The Gateway configuration settings act as a proxy for the load balancer, opening ports 80 and 443 (https) of the ingress gateway, as shown below:

The internal services in the example shown here were implemented based on Nginx. First, create a configuration file for the Nginx server. Take the internal services of the domain myexample.com as an example. Define the requested root path to directly return the following sentence: "Welcome to myexample.com! This is one custom Istio Ingress Gateway powered by cert-manager!" The status code should be 200.
The specific content of myexample-nginx.conf is as follows:
events {
}

http {
  log_format main '$remote_addr - $remote_user [$time_local] "$request" '
  '$status $body_bytes_sent "$http_referer" '
  '"$http_user_agent" "$http_x_forwarded_for"';
  access_log /var/logs/nginx/access.log main
  error_log /var/log/nginx/error.log warn;

  server {
    listen 80;

    location / {
        return 200 'Welcome to myexample.com! This is one custom Istio Ingress Gateway powered by cert-manager!' ;
        add_header Content-Type text/plain;
    }
  }
}
Create a Kubernetes ConfigMap to store the configuration of the Nginx server:
kubectl create configmap myexample-nginx-configmap --from-file=nginx.conf=./myexample-nginx.confSet the namespace to default and start automatic sidecar injection:
\kubectl label namespace bookinfo istio-injection=enabledNote: Please see that labeling for automatic sidecar injection only occurs once IngressGateway has been created, to ensure that labels are not automatically injected into IngressGateway. You may also decide not to start automatic injection and to complete the process using manual injection. For specific details on how to do this, see Manual injection.
Deploy the Nginx server and create internal services for the domain name myexample.com:
kubectl apply -f - <<EOF
apiVersion: v1
kind: Service
metadata:
  name: myexampleapp
  labels:
    app: myexampleapp
spec:
  ports:
  - port: 80
    protocol: TCP
  selector:
    app: myexampleapp
---
apiVersion: apps/v1
kind: Deployment
metadata:
  name: myexampleapp
spec:
  selector:
    matchLabels:
      app: myexampleapp
  replicas: 1
  template:
    metadata:
      labels:
        app: myexampleapp
    spec:
      containers:
      - name: nginx
        image: nginx
        ports:
        - containerPort: 80
        volumeMounts:
        - name: cloud-config
          mountPath: /etc/config
          readOnly: true
      volumes:
      - name: cloud-config
        configMap:
          name: myexample-nginx-configmap

EOF
Create an Istio custom gateway configuration object using the domain name myexample.com as an example, as shown below:
kubectl apply -f - <<EOF
apiVersion: networking.istio.io/v1alpha3
kind: Gateway
metadata:
  annotations:
  name: istio-myexample-customingressgateway
  namespace: default
spec:
  selector:
    istio: ingressgateway
  servers:
  - hosts:
    - '*.myexample.com'
    port:
      name: http
      number: 80
      protocol: HTTP
    tls:
      httpsRedirect: true
  - hosts:
    - '*.myexample.com'
    port:
      - name: https
      number: 443
      protocol: HTTPS
    tls:
      mode: SIMPLE
      privateKey: /etc/istio/ingressgateway-certs/tls.key
      serverCertificate: /etc/istio/ingressgateway-certs/tls.crt
EOFIn the same way, we can create a VirtualService that connects to istio-myexample-customingressgateway using myexample.com as an example:
kubectl apply -f - <<EOF
apiVersion: networking.istio.io/v1alpha3
kind: VirtualService
metadata:
  name: istio-myexample-customvirtualservice
spec:
  hosts:
  - "www.myexample.com"
  gateways:
  - istio-myexample-customingressgateway
  http:
  - route:
    - destination:
        host: myexampleapp
        port:
          number: 80
EOFTaking the domain name myexample.com as an example, obtain the public IP address of the corresponding custom gateway service and execute the following command:
kubectl get svc -l istio=ingressgateway
NAME               TYPE           CLUSTER-IP    EXTERNAL-IP      PORT(S)                      AGE
istio-ingressgateway   LoadBalancer   172.19.12.75   106.14.48.121   80:31144/TCP,443:30441/TCP   11m
Set the two environment variables INGRESS_HOST and SECURE_INGRESS_PORT, and confirm their values are correct by replacing them with the address values of your actual environment:
INGRESS_HOST=106.14.48.121
SECURE_INGRESS_PORT=443
Check whether the istio-ingressgateway Pod has correctly loaded the certificate and private key:
kubectl exec -it -n default $(kubectl -n default get pods -l istio=ingressgateway -o jsonpath='{.items[0].metadata.name}') -- ls -al /etc/istio/ingressgateway-certsBoth the tls.crt and tls.key should be saved in this directory.
Check whether the subject field in the Ingress gateway certificate is correct.
kubectl exec -i -n default $(kubectl get pod -l istio=ingressgateway -n default -o jsonpath='{.items[0].metadata.name}')  -- cat /etc/istio/ingressgateway-certs/tls.crt | openssl x509 -text -noout | grep 'Subject:'
        Subject: O=MyExample CA, CN=myexample.com
Check the Ingress gateway proxy is able to correctly access the certificate:
kubectl exec -ti $(kubectl get po -l istio=ingressgateway -n default -o jsonpath={.items[0]..metadata.name}) -n default -- curl  127.0.0.1:15000/certs
{
    "ca_cert": "",
    "cert_chain": "Certificate Path: /etc/istio/ingressgateway-certs/tls.crt, Serial Number: c181438895a781c98759fb56b9cc1508, Days until Expiration: 364"
}
We have now completed all the steps for using cert-manager to deploy a custom ingress gateway. Use HTTPS protocol to access the myexample.com service. That is to say, use curl to send a request to istio-myexample-customingressgateway:
curl -k -HHost:www.myexample.com --resolve www.myexample.com:443:106.14.48.121 https://www.myexample.comWelcome to myexample.com! This is one custom Istio Ingress Gateway powered by cert-manager!
To recap, once the certificate has been obtained, cert-manager will keep checking its validity and attempt to renew it if it gets close to expiry. cert-manager considers certificates to be close to expiry when the Not After field on the certificate is less than the current time plus 30 days. For CA-based Issuers, cert-manager will issue certificates with the Not After field set to the current time plus 365 days.
Traffic Management with Istio (4): DNS Resolution with CoreDNS

56 posts | 8 followers
FollowAlibaba Clouder - July 30, 2020
Alibaba Cloud Native - October 9, 2022
Alibaba Container Service - September 14, 2022
Alibaba Cloud Native Community - September 20, 2023
Alibaba Developer - September 22, 2020
Alibaba Cloud Native Community - June 21, 2022

56 posts | 8 followers
Follow Container Service for Kubernetes
Alibaba Cloud Container Service for Kubernetes is a fully managed cloud container management service that supports native Kubernetes and integrates with other Alibaba Cloud products.
Learn More ACK One
Provides a control plane to allow users to manage Kubernetes clusters that run based on different infrastructure resources
Learn More Cloud-Native Applications Management Solution
Accelerate and secure the development, deployment, and management of containerized applications cost-effectively.
Learn More Container Registry
A secure image hosting platform providing containerized image lifecycle management
Learn MoreMore Posts by Xi Ning Wang(王夕宁)