By Jeff Cleverley, Alibaba Cloud Tech Share Author. Tech Share is Alibaba Cloud's incentive program to encourage the sharing of technical knowledge and best practices within the cloud community.
In modern application development, it is essential to be using a version control system, especially given the nature of modern development practices such as agile development and remote teams. There are several different version control systems, but amongst them one stands as a clear leader in the field. Of course I am referring to Git, the version control system originally developed by Linus Torvalds to manage the development of the Linux Kernel. In the years since then, Git has exploded in popularity amongst software development teams and there are several famous online solutions that provide Git repository hosting.
But what if you want to host your own Git service and provide an easy way for your team to manage their own project repositories? The answer to this question is simple – GitLab!
In their own words:
“A single application for the complete DevOps lifecycle”.
In today's tutorial we will be installing the open source GitLab Community Edition on an Alibaba Cloud Elastic Compute Service (ECS) Instance, with the necessary configurations for HTTPS access and email notifications. We will also be using Alibaba Cloud DirectMail as the SMTP provider for the GitLab notification emails.
I will be using a 'root' user to issue commands in the examples. If you are not using the root user, please remember to issue the 'sudo' command before each command where root privileges are necessary.
For the purposes of this demonstration, I will be using a test domain – an-example.com. You should have your own domain available to use.
GitLab recommends a server with 2CPU cores and at least 4GB of Memory available. You should have provisioned an instance with this specification in a location of your choosing before proceeding with this tutorial.
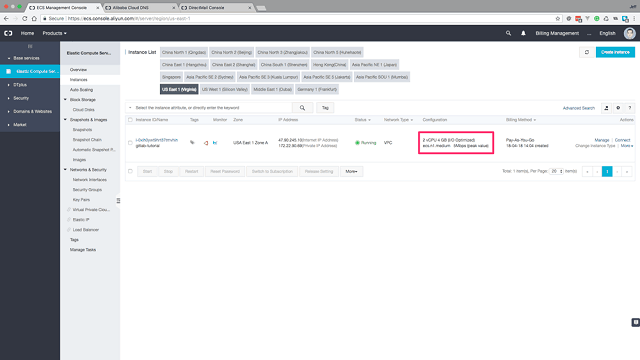
<2CPU Server with 4GB memory>
During provisioning of your server, you should upload your SSH Public Key as you will be accessing your server by ssh.
Add your Domain
Login to your Alibaba Cloud Console, then locate and click the Alibaba Cloud DNS link in the horizontal navigation at the left of the panel.
From the Alibaba Cloud DNS panel, click the big blue Add Domain Name button at the top right of the panel.
Enter your domain name in the pop up modal box and click Confirm:
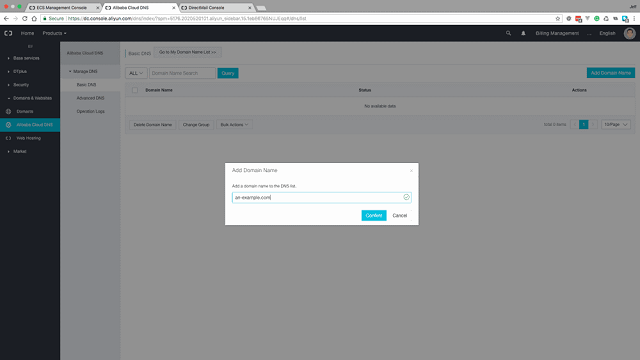
<Enter your domain name in the pop up box>
Your domain name will now appear in the list.
Configure DNS records for your Domain
To configure the DNS settings for your domain name you need to locate and click the Configure link.
In the DNS settings panel for your domain name you will be provided with the Alibaba Cloud DNS (Domain Name Servers) server addresses.
If your domain is registered at a third party domain registrar, you will need to login to that account and change the domain DNS servers to point at the Alibaba DNS servers. It is usually found under the domain settings listed as Custom DNS.
If you are using Alibaba Cloud Domain Names as the registrar, then everything should already be set correctly.
Next you need to click the Add Record button above the top right of the DNS record list:
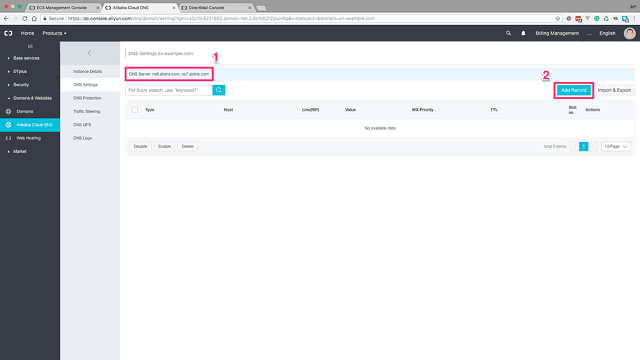
<Configure your Domain DNS servers and Add Record>
You will need to add at least two records.
First your A record pointing to your servers IP address as follows:
Type: A - IPV4 address
Host: @
ISP Line: Default
Value:
TTL: 10 minutes
Click Confirm to add the record.
Next add the CNAME record for the host www pointing to your domain as follows:
Type: CNAME - canonical name
Host: www
ISP Line: Default
Value:
TTL: 10 minutes
Click confirm to add the record. (Alternatively you could add a second 'A' record with the 'www' host pointing to the server IP address.) Once your basic records are set correctly your Domain DNS panel should look similar to this:
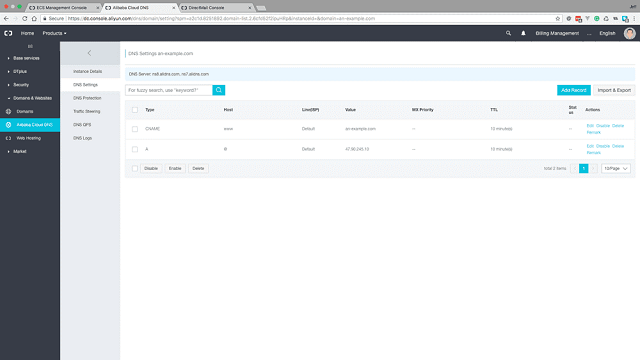
<Basic DNS records for the domain>
GitLab has a free open source community edition, as well as an Enterprise Edition that requires a premium license. For our purposes, GitLab Community Edition should be able to meet all our requirements.
First login to your server by SSH:
# ssh root@<your_server_ip>
Install and configure the necessary dependencies
Now we need to install the dependencies that GitLab requires:
# sudo apt-get update
# sudo apt-get install -y curl openssh-server ca-certificates
If you are not going to use Alibaba Cloud DirectMail, or another SMTP provider then you would also need to install Postfix to allow the server to send emails. You could do that with the following:
# sudo apt-get install -y postfixBut if you are going to use DirectMail, you can skip that.
Add the GitLab package repository
Next we need to add the GitLab Community Edition package repository
# curl https://packages.gitlab.com/install/repositories/gitlab/gitlab-ce/script.deb.sh | bash
(Remember, if you are not using a root user, you will need to precede the bash command with sudo.)
Install the GitLab Community Edition package
Now, install GitLab Community Edition package. Remember to change the URL to match your domain URL. (Make sure that you use the HTTP protocol and not HTTPS.)
# EXTERNAL_URL=“http://an-example.com" apt-get install gitlab-ce
The GitLab omnibus package will take a few minutes to install everything your server needs, an Nginx server, PostgreSQL database, Ruby, Node, Go, Let's Encrypt Certbot, Git.
Once it is completed you will see the following screen and instructions to visit your GitLab installation:
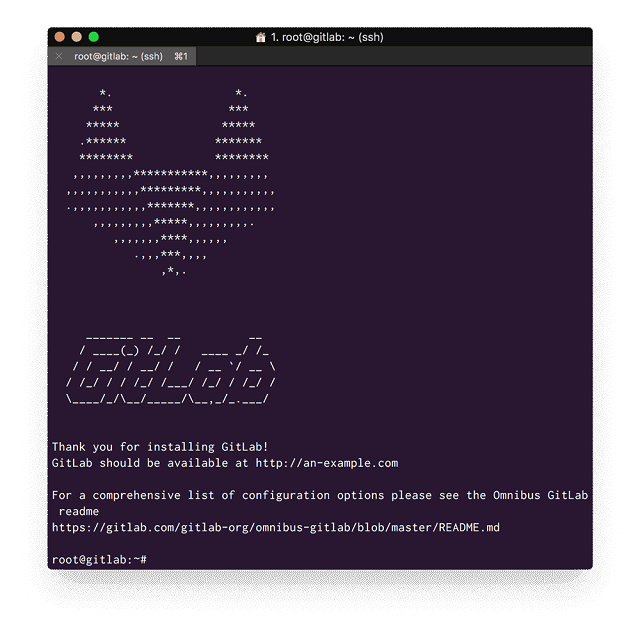
<GitLab initial installation is complete>
If you visit your GitLab installation at your hostname. (Remember to use your domain name.)
http://an-example.com
You will be welcomed with the initial login screen to your Gitlab installation. However the initial configuration is not yet using the HTTPS protocol as it is not secured by SSL.
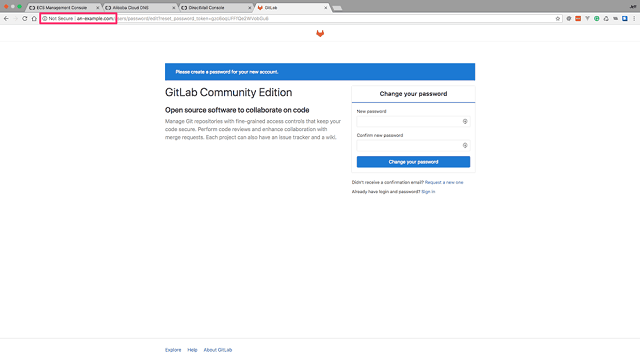
<Your GitLab installation without SSL>
The GitLab package now comes with an automated Let's Encrypt SSL deployment and configuration process. To enable https is now very easy.
Deploy a Let's Encrypt SSL certificate for GitLab
From within your server, open the GitLab configuration file:
# nano /etc/gitlab/gitlab.rb
First thing we need to do is change the external URL. Locate that setting and change the URL HTTP protocol from http to https:
external_url 'https://an-example.com'
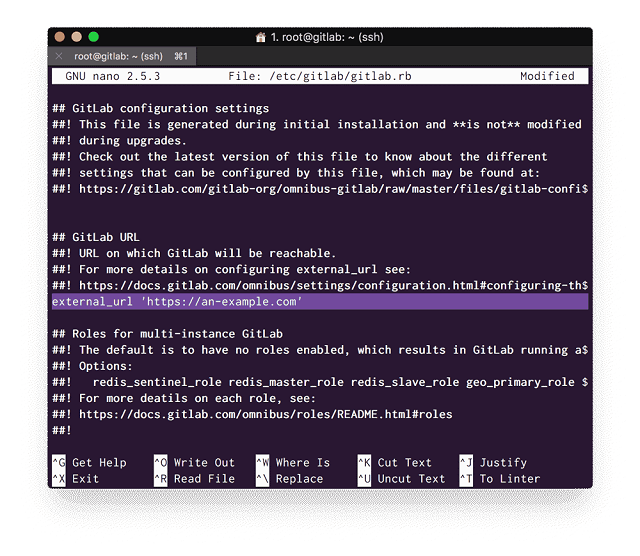
<Change external URL to https>
Now, we can enable Let's Encrypt in the configuration. Locate the Let's Encrypt settings in the configuration file and uncomment them out by removing the '#' hash symbol preceding them.
Then configure them as follows:
letsencrypt['enable'] = true
letsencrypt['contact_emails'] = ['your-email@your-domain.com']
letsencrypt['group'] = 'root'
letsencrypt['key_size'] = '2048'
letsencrypt['owner'] = 'root'
letsencrypt['wwwroot'] = '/var/opt/gitlab/nginx/www'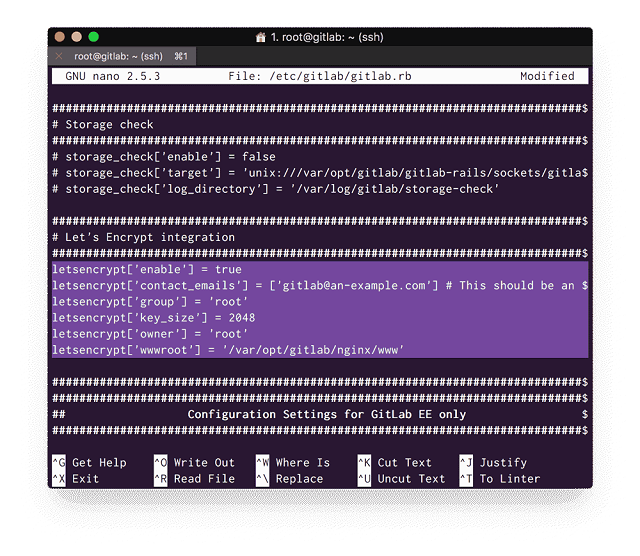
<Configure GitLab Let's Encrypt Settings>
Save and exit the file. Then run the following command to reconfigure GitLab and enable your SSL certificate:
# gitlab-ctl reconfigure
This will run through the GitLab configuration process again, however this time it will take a much shorter while. Once it is complete you will see following message:
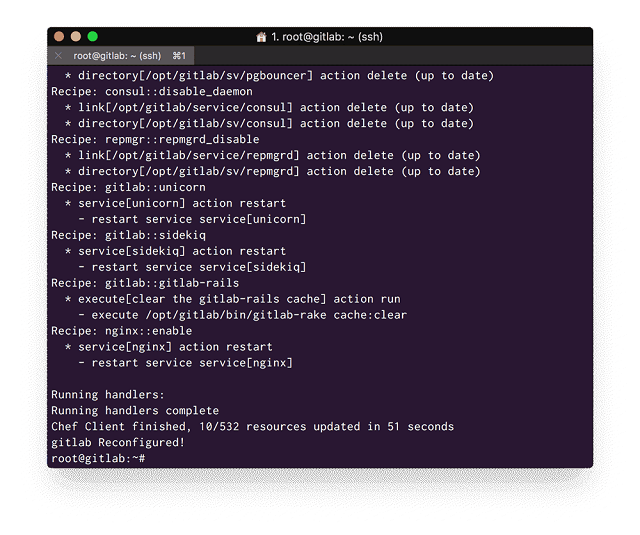
<GitLab Reconfiguration Success Message>
Now you can visit your GitLab installation at your domain using the https protocol:
https://an-example.com
You will be greeted by the same initial login screen, but this time you will see the green padlock confirming a secure connection:
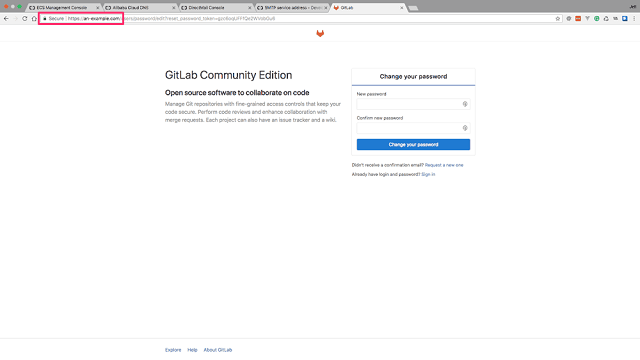
<Visit your GitLab installation by https>
Set up Automated SSL Renewals with a Cronjob
GitLab has a command for renewing a Let's Encrypt SSL certificate as follows:
renew-le-certs
But we don't want to have to renew the certificate manually every month, so we can use the command and set up a cronjob to make sure our SSL certificate is auto renewed.
To do that, open a new 'crontab' for the root user:
# crontab -e
You may be asked to specify which editor to use, I prefer 'nano':
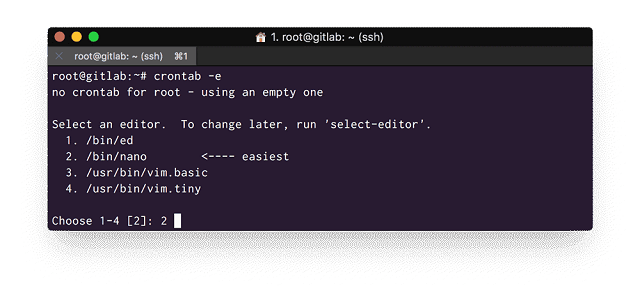
<Choose editor for crontab>
Add the cronjob as follows:
0 0 * * * /opt/gitlab/bin/gitlab-ctl renew-le-certs > /dev/null
Now save and exit the crontab.
Set up Alibaba Cloud DirectMail
Locate and select DirectMail from the Products drop-down menu located in the top horizontal navigation of your Alibaba Cloud Console.
Set up an Email Domain for DirectMail
In the DirectMail Overview Panel, select Email Domains from the left horizontal navigation:
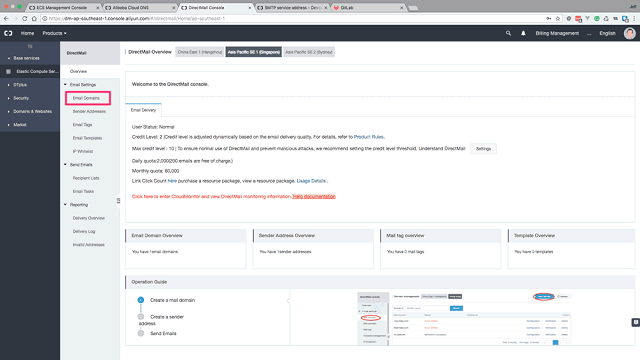
<Select 'Email Domains'>
In the Emails Domain panel, click the big blue 'New Domain' button at the top right of the panel:
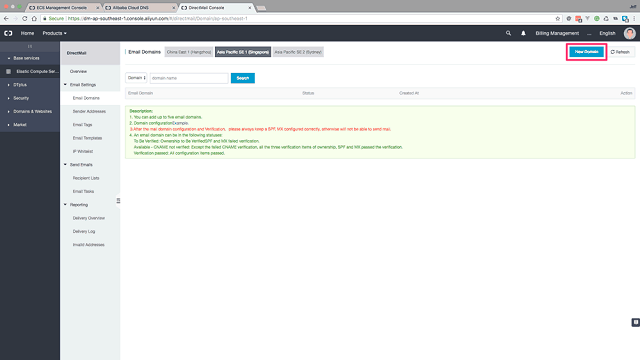
<Click the 'New Domain' button>
Add your email domain as a subdomain of your primary domain. You can choose any subdomain you wish, but it is advisable to choose a domain that is related to the SMTP service to avoid any domain record confusion at a later date.
In my case my demo domain is an-example.com so the subdomain I am using for the email domain is directmail.an-example.com:
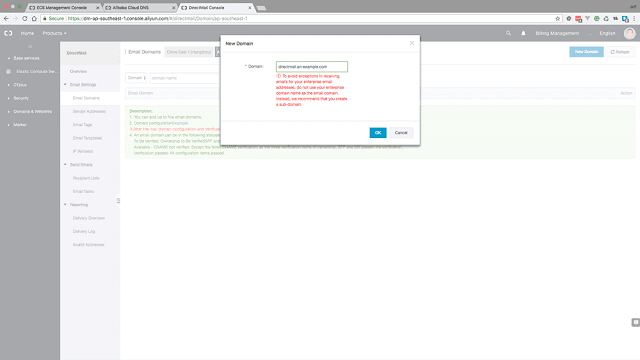
<Add your Email domain as a Subdomain>
Configure Email Domain DNS records
Your Email subdomain will now appear in the Email domains list. Now click Configure to retrieve the DNS records we need to set the domain up for email.
This will open a domain configuration panel, and provide you with 4 DNS records that need configuring on your domain DNS records in the Alibaba Cloud DNS settings page.
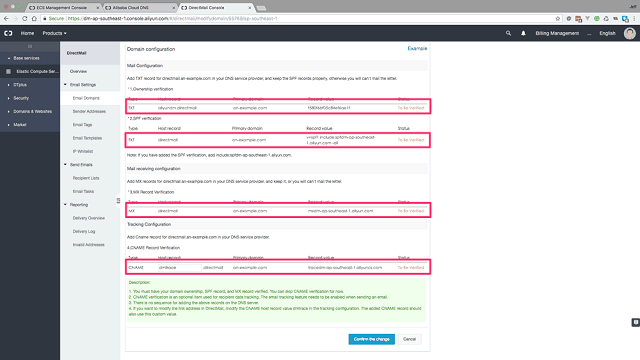
<Make a note of the Email Domain DNS records>
Return to the Alibaba Cloud DNS settings for your domain, and add new DNS records for the domain with each of the provided records:
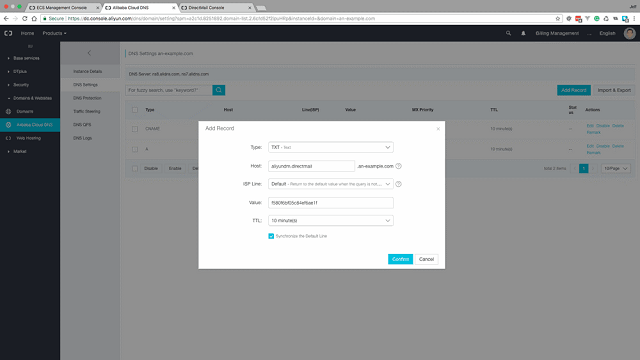
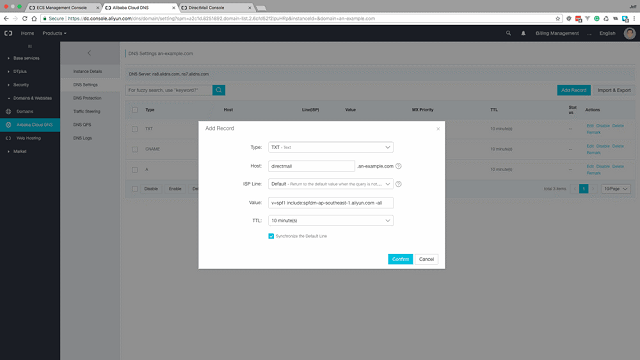
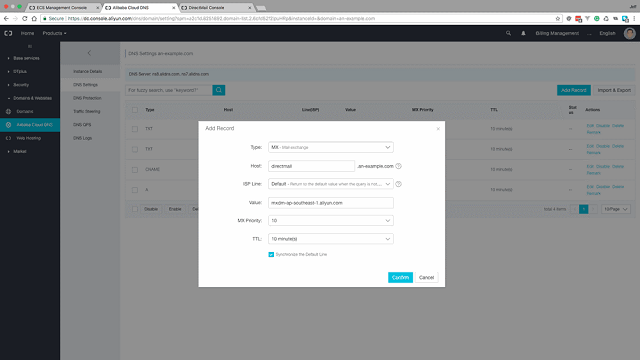
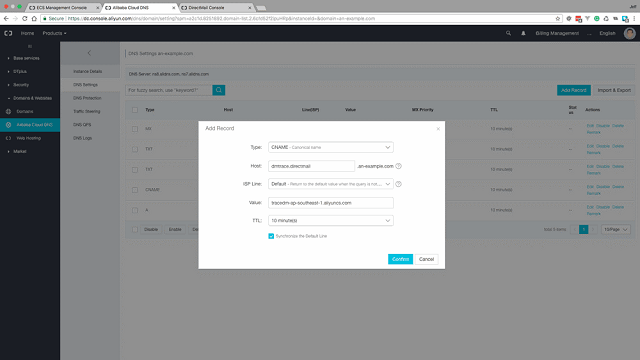
<Add the DirectEmail Email Domain DNS Records>
Your domain DNS records should now look similar to this:
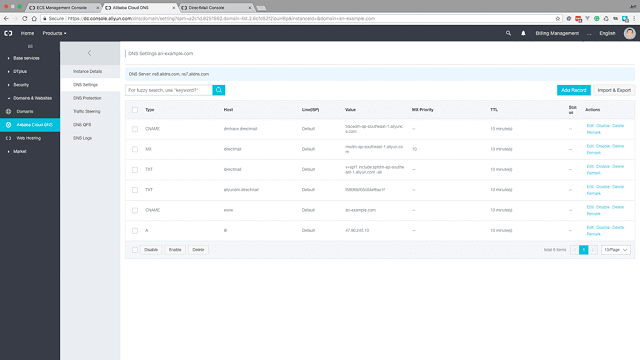
<Domain DNS records with DirectMail records>
Verify Email Domain DNS records
In the DirectMail Email Domains panel, we can now click the Verify link.
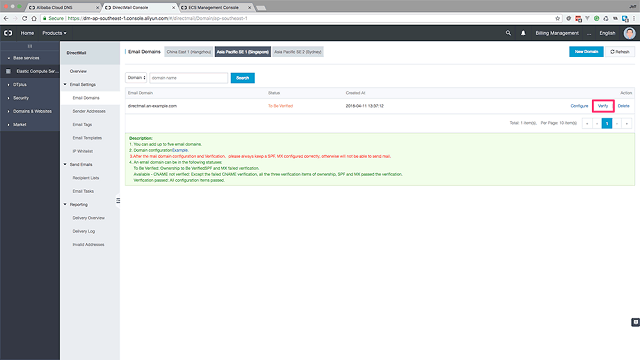
<Click the Verify Email Domain link>
The console will ask us to confirm the verification process. Confirm it.
The status of our Email domain should change from an orange To be verified to a green Verification Successful:
After you have successfully verified your email domain you can now set the Sender Address. Click the Sender Addresses link in the left navigation panel.
Create Sender Address
The Sender Addresses Panel will open, now click the 'Create Sender Address' button at the top right of the panel.
A modal window will pop up, you will need to add some details.
For Email Domain, select the Email Domain you created in the previous step.
For Account, choose an Account Name. This Account Name will be used to create the sender Address in the following format. In my case I chose to use gitlab@an-example.com.
<Account-Name@Email-Domain>
For Reply-To-Address you will need to enter an active email address that you have access to.
This address will not be used in any emails sent from DirectMail, but it is required to verify your sender Address. DirectMail will send a verification email to this address and you will not be able to complete set up of your SMTP password until you have clicked the link in this verification email.
For Mail-Type, select Triggered or Batch. For the purposes of the CRM I am using Triggered.
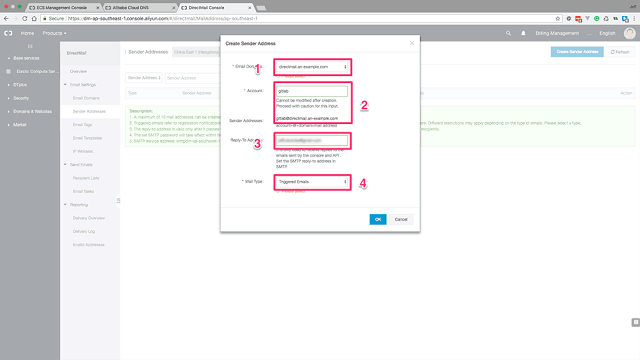
<Create a Sender address>
Verify the Reply-To address
Once the sender address has been created, we need to verify the Reply-To-Address before we are allowed to set the SMTP password that is required. To do that, click the Verify the reply-to address link.
Another modal will pop up, asking for confirmation. Once you confirm, the system will send an email to the reply to address.
Visit the inbox of the email address that you used as a reply to address, locate the email from DirectMail, and click the link within to verify your email address.
The link will open a panel within the Alibaba Cloud Console confirming the verification of your email address.
Set your SMTP password
Now we can set the SMTP password by clicking the Set SMTP Password link on the Sender Address row.
Enter a secure password in the pop up modal.
Take note of DirectMail SMTP server details
From the DirectMail Overview panel, click the documentation link:
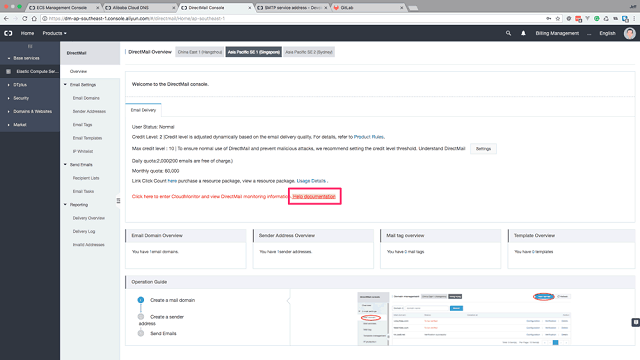
<Click the DirectMail Documentation link>
In the DirectMail documentation you will find the Alibaba DirectMail SMTP server address and port configuration details.
On your server reopen the GitLab configuration file for editing:
# nano /etc/gitlab/gitlab.rb
Locate the email settings section, and remove the '#' hash symbol to uncomment out the following lines, and set the appropriate email addresses from the DirectMail settings:
gitlab_rails['gitlab_email_from'] = '<account-name@your-email-domain>'
gitlab_rails['gitlab_email_reply_to'] = 'noreply@<your-domain.com>'
(Remember - the gitlab_email_from must match up with the email account you created previously in the DirectMail settings. The gitlab_email_reply_to can be a standard no reply email address.)
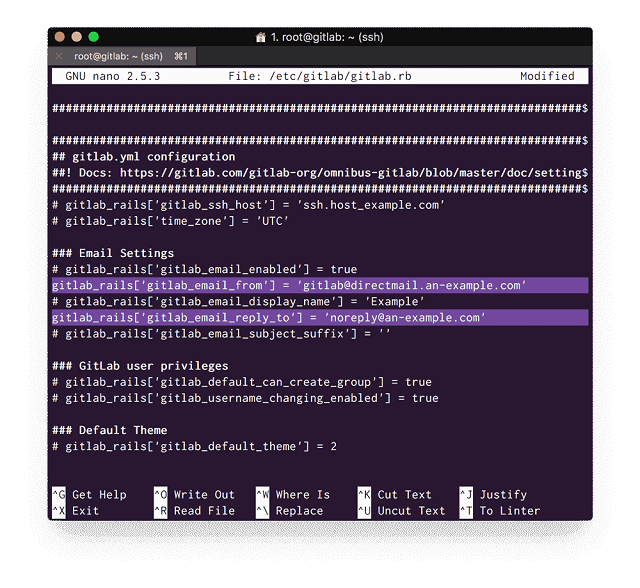
<Configure GitLab Email>
Next we need to set the following SMTP settings, again using the settings from DirectMail:
gitlab_rails['smtp_address'] = “<aliyun-smtp-server-address>”
gitlab_rails['gitlab_email_from'] = '<account-name@email-domain.com>'
gitlab_rails['smtp_enable'] = true
gitlab_rails['smtp_port'] = 465
gitlab_rails['smtp_user_name'] = "<account-name@email-domain.com>"
gitlab_rails['smtp_password'] = “<your-smtp-password>“
gitlab_rails['smtp_domain'] = “<your-email-domain>”
gitlab_rails['smtp_authentication'] = “login"
gitlab_rails['smtp_openssl_verify_mode' = 'peer'
In my case the settings are as follows:
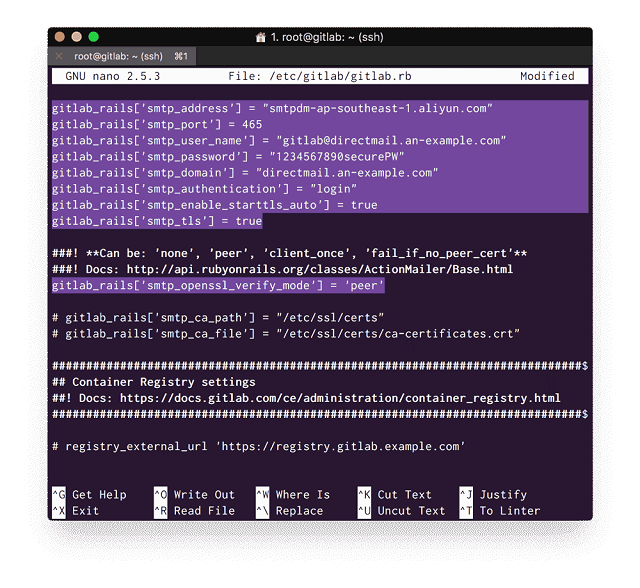
<Configure GitLab for SMTP>
Save and exit the file. Then reconfigure GitLab with your SMTP settings using:
# gitlab-ctl reconfigure
GitLab will once more run through the configuration script, and once it is completed we can finally login to our GitLab installation at its domain:
https://an-example.com
Add Root (Admin) Password and Login
When you first visit your GitLab at its domain, you will be greeted with a password reset screen. This will set your initial root user password. Choose a secure password, and click the Change your Password button.
Next, login to GitLab. Your admin username will be root, and the password is the password you set in the previous step:
Change Root (Admin) Email address
Once you are logged in, the first thing you should do is change your root/admin email and also change the admin name from root.
Open the dropdown on the right of the top navigation menu, and select Settings.
In the main settings panel, you can add your email address for the root user.
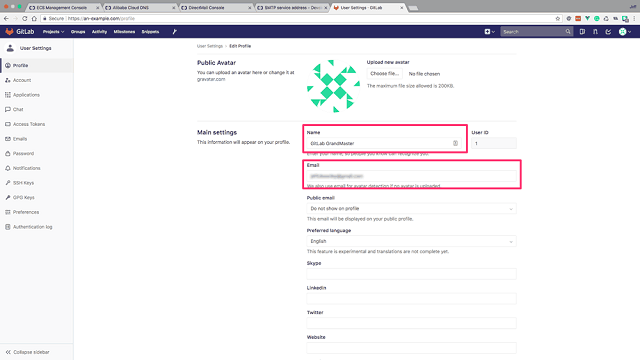
<Add your root user email address>
Click Update profile settings, and the system will send an email to the specified address containing a verification link.
This will also test to make sure you have configured your DirectMail SMTP settings correctly. If you receive the verification email, you know everything is working correctly. If you do not receive the verification email, go back and review the settings.
You will need to click the link in the verification email to confirm ownership of the email address and complete the process of updating your email in the admin user settings.
Once you click the verification link, a new browser window will open showing a confirmation notification in your GitLab settings page.
Change Root (Admin) Email Username
Now we want to change our Admin username from the default root to something more secure and appropriate.
Click Account from the horizontal User Settings navigation at the left of the screen.
In the Change Username section, change your username and click the big orange Change Username button:
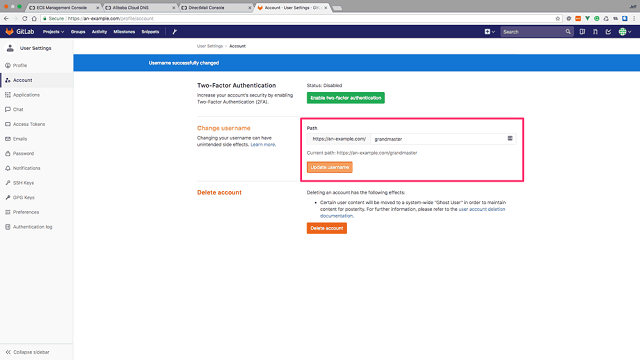
<Change your Username>
With that done, our basic set up is complete. You will want to go in and configure your repository settings, and user permissions on an as per project basis.
There is one more thing you should probably do, subscribe to GitLab emails for security updates. If you don't do this, you will not receive any notifications of security issues and their patches.
Visit their subscription page here.

2,593 posts | 793 followers
FollowAlibaba Clouder - October 3, 2018
Alibaba Cloud Indonesia - August 22, 2022
Alibaba Cloud Indonesia - August 22, 2022
Alibaba Clouder - February 3, 2021
Alibaba Cloud Community - August 3, 2022
digoal - June 28, 2021

2,593 posts | 793 followers
Follow DevOps Solution
Accelerate software development and delivery by integrating DevOps with the cloud
Learn More Alibaba Cloud Flow
An enterprise-level continuous delivery tool.
Learn More Web Hosting Solution
Explore Web Hosting solutions that can power your personal website or empower your online business.
Learn More Web Hosting
Explore how our Web Hosting solutions help small and medium sized companies power their websites and online businesses.
Learn MoreMore Posts by Alibaba Clouder