Colete logs de instâncias do Elastic Compute Service (ECS) em diferentes contas da Alibaba Cloud autorizando o Logtail na conta de destino a acessar as instâncias ECS na conta de source para gerenciar logs centralizadamente.
Informações básicas
O Logtail exige que sua identidade de usuário esteja configurada com o ID da conta da Alibaba Cloud proprietária do projeto SLS de destino. Sem essa configuração, o Logtail não se conecta, causando falhas no heartbeat do grupo de máquinas e interrompendo toda a coleta de logs.
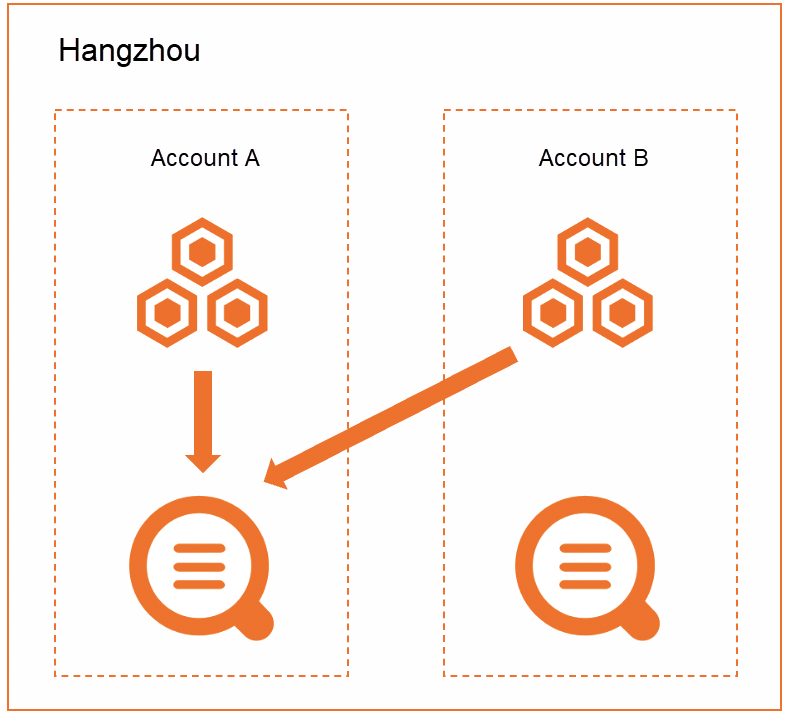
Por exemplo, uma empresa de e-commerce executa dois aplicativos em um cluster ECS na região China (Hangzhou) da Alibaba Cloud e utiliza o SLS na mesma região para gerenciar os logs.
O Aplicativo A está implantado em um cluster ECS Linux sob a conta A da Alibaba Cloud (UID: 12****456) e usa o SLS dessa conta para gerenciamento de logs.
O Aplicativo B está implantado em um cluster ECS Linux sob a conta B da Alibaba Cloud (UID: 17****397) e usa o SLS dessa conta para gerenciamento de logs.
Agora, a empresa precisa centralizar os logs de ambos os aplicativos no projeto do Simple Log Service sob a conta A da Alibaba Cloud (12****456), coletando os logs de cada aplicativo em um logstore separado. Para isso, crie uma nova configuração de coleta do Logtail, um grupo de máquinas e um logstore para o Aplicativo B. A coleta de logs do Aplicativo A permanece inalterada.
Etapa 1: Criar um arquivo de identidade de usuário
-
Faça login no servidor ECS pertencente à conta B da Alibaba Cloud.
ImportanteCrie o arquivo de identidade de usuário em cada servidor ECS do cluster ECS B.
-
Execute o comando a seguir para criar o arquivo de identidade de usuário.
Defina a identidade de usuário como a conta A da Alibaba Cloud. Isso cria um arquivo nomeado com o ID da conta A da Alibaba Cloud. Para mais informações, consulte Configure a user identity.
touch /etc/ilogtail/users/12****456
Etapa 2: Criar um grupo de máquinas baseado em identificador personalizado
-
Crie um arquivo de identificador personalizado para o grupo de máquinas no servidor ECS.
ImportanteCrie o arquivo de identificador personalizado do grupo de máquinas em cada servidor ECS do cluster ECS B.
Faça login no servidor ECS pertencente à conta B da Alibaba Cloud.
-
No diretório especificado, crie o arquivo /etc/ilogtail/user_defined_id e adicione um identificador personalizado.
Por exemplo, para definir o identificador personalizado como
application_b, insiraapplication_bno arquivo e salve-o. Para mais informações sobre o caminho do arquivo, consulte Create a custom identifier-based machine group.
-
Crie um grupo de máquinas no console SLS.
Faça login no console do Simple Log Service com a conta A da Alibaba Cloud.
Na área Project List, clique em no projeto de destino.
No painel de navegação à esquerda, escolha .
À direita de Machine Groups, clique em
 > Create Machine Group.
-
Na caixa de diálogo Create Machine Group, configure os parâmetros e clique em OK.
Defina Custom Identifier com o valor configurado na Etapa 1. Para mais informações sobre outros parâmetros, consulte Create a machine group with a custom identifier. Defina Name como
group-b, selecione Custom Identifier para Machine Group Identifier e insiraapplication_bem Custom Identifier.
-
Verifique se o status de heartbeat dos servidores no grupo de máquinas é OK.
Na lista de grupos de máquinas, clique em no grupo de máquinas de destino.
-
Na página Machine Group Configurations, visualize as instâncias ECS que usam o mesmo identificador personalizado e verifique o status de heartbeat delas.
Um status de Heartbeat igual a OK indica que a instância ECS está conectada ao Simple Log Service. Se o status for FAIL, consulte Troubleshoot Logtail machine group heartbeats. Confirme se todas as quatro máquinas no grupo de máquinas exibem um status de heartbeat OK.
Etapa 3: Coletar logs
Faça login no console do Simple Log Service com a conta A da Alibaba Cloud.
-
Clique em Quick Start.
A seção Integrate Data fica no canto inferior direito da página inicial do console.
Na caixa de diálogo Quick Data Import, selecione Regex - Text Log.
No assistente Import Data, selecione o projeto e o logstore de destino e clique em Next.
-
Configure as Machine Group Configurations.
Defina Scenario como Servers.
Defina Installation Environment como ECS.
Selecione o grupo de máquinas criado na Etapa 2. Mova o grupo de máquinas de Source Machine Group para Applied Machine Group e clique em Next.
-
Crie uma configuração de coleta do Logtail e clique em Next.
Para mais informações sobre os parâmetros, consulte Collect logs in full regex mode.
Importante-
Por padrão, apenas uma configuração de coleta do Logtail pode corresponder a um arquivo. Como a configuração de coleta da conta B ainda está ativa, a nova configuração da conta A não entra em vigor. Use um dos métodos a seguir para ativar a configuração da conta A:
Interrompa a coleta de logs da conta B. Para isso, faça login no console SLS com a conta B e remova a configuração de coleta do Logtail do grupo de máquinas de destino. Para mais informações, consulte Apply a Logtail configuration to a specified machine group.
Adicione uma configuração de coleta forçada para a conta A. Para mais informações, consulte How to collect logs from a file multiple times.
Após criar a configuração de coleta do Logtail, exclua a configuração original da conta B da Alibaba Cloud para evitar duplicidade na coleta de logs. Para mais informações, consulte Delete a Logtail configuration.
No formulário de configuração de coleta do Logtail, defina Config Name como
application_b, defina Log Path como/tmp/**/*.log, selecione Full Regex Mode para Mode e ative Single Line. -
-
Visualize os dados, configure índices e clique em Next.
O SLS habilita a indexação de texto completo por padrão. Você também pode configurar índices de campo manual ou automaticamente com base nos logs coletados. Para mais informações, consulte Create indexes.
Operações relacionadas
Para migrar dados históricos da conta B da Alibaba Cloud, crie um job de transformação de dados no logstore original para copiar os dados para o logstore atual. Para mais informações, consulte Copy logstore data.
Ao processar dados entre contas, use uma função personalizada para autorização. Este exemplo utiliza uma função personalizada.
O primeiro Role ARN permite que o job de transformação de dados assuma essa função e leia dados do logstore de source. Para mais informações sobre como configurar permissões de função, consulte Grant a RAM role read-only access to a source logstore.
O segundo Role ARN permite que o job de transformação de dados assuma essa função e grave os dados transformados no logstore de destino. Para mais informações sobre como configurar permissões de função, consulte Grant a RAM role permissions to write data to a destination logstore (cross-account).